Your Global Automation Partner
excom I/O System
Integrating the
Contents
1 About This Manual ... 5
1.1 Target groups... 5
1.2 Explanation of symbols used ... 5
1.3 Other documents ... 6
1.4 Feedback about these instructions... 6
2 Notes on the System ... 7
2.1 System identification... 7
2.2 Manufacturer and service ... 7
3 For Your Safety ... 8
3.1 General safety notes ... 8
3.2 Notes on Ex protection... 8
4 Integrating the excom System in DeltaV via PROFINET... 9
4.1 Requirements... 9
4.1.1 Requirements – hardware ... 9
4.1.2 Requirements – software ... 10
4.2 excom – assigning the IP address and PROFINET name ... 10
4.2.1 Setting the IP address... 10
4.2.2 Assigning a PROFINET device name ... 11
4.3 Installing an GSDML file ... 12
4.4 Creating an excom station... 15
4.5 Setting up the DeltaV controller ... 16
4.6 Connecting the excom station to a virtual PROFINET card ... 20
4.7 Setting excom PROFINET parameters ... 34
4.8 Parameterizing excom communication... 35
4.9 Parameterizing excom modules... 37
4.9.1 Example: DM80... 37
4.9.2 Example: DO40 ... 39
4.9.3 Example: AIH40... 40
4.9.4 Example: AOH40... 42
4.10 Configuring I/O data ... 43
4.11 PROFINET diagnostics ... 49
5 Redundancy Strategies ... 51
5.1 Topology ... 51
5.2 Redundancy setup ... 51
5.3 System redundancy ... 52
Contents
4 Hans Turck GmbH & Co. KG | T +49 208 4952-0 | F +49 208 4952-264 | [email protected] | www.turck.com
1 About This Manual
This manual describes the integration of the excom system in the DeltaV control system via PROFINET.
Read this manual and the applicable documents carefully before the integration. This will prevent the risk of personal injury and damage to property. Keep this manual safe during the service life of the product. If the product is passed on, hand over this manual as well.
The manual describes the possibilities for the GSDML-based integration, from the installation of the GSDML right through to the handling of the I/O data and the associated diagnostics. Other applications of the excom system are described in addition to the general integration:
n Setting up redundancy
n Changing parameters during operation n Changing configurations during operation
1.1 Target groups
These instructions are written for suitably qualified and trained personnel and must be read carefully by anyone entrusted with the mounting, commissioning, operation, maintenance, dis- assembly or disposal of the device.
When using the device in Ex circuits, the user must also have an additional knowledge of explo- sion protection (EN 60079-14 etc.).
1.2 Explanation of symbols used
The following symbols are used in these instructions:
DANGER
DANGER indicates a dangerous situation with high risk of death or severe injury if not avoided.
WARNING
WARNING indicates a dangerous situation with medium risk of death or severe in- jury if not avoided.
CAUTION
CAUTION indicates a dangerous situation of medium risk which may result in minor or moderate injury if not avoided.
NOTICE
NOTICE indicates a situation which may lead to property damage if not avoided.
NOTE
NOTE indicates tips, recommendations and useful information on specific actions and facts. The notes simplify your work and help you to avoid additional work.
u
CALL TO ACTIONThis symbol denotes actions that the user must carry out.
a
RESULTS OF ACTIONThis symbol denotes relevant results of actions.
Feedback about these instructions
6 Hans Turck GmbH & Co. KG | T +49 208 4952-0 | F +49 208 4952-264 | [email protected] | www.turck.com
1.3 Other documents
Besides this document the following material can be found on the Internet at www.turck.com:
n Data sheets n Quick start guides n excom manuals n GEN… Getting Started n Approvals
1.4 Feedback about these instructions
We make every effort to ensure that these instructions are as informative and as clear as pos- sible. If you have any suggestions for improving the design or if some information is missing in the document, please send your suggestions to [email protected].
2 Notes on the System
2.1 System identification
This manual applies to the Turck excom system.
2.2 Manufacturer and service
Hans Turck GmbH & Co. KG Witzlebenstraße 7
45472 Mülheim an der Ruhr Germany
Turck supports you with your projects, from initial analysis to the commissioning of your applic- ation. The Turck product database contains software tools for programming, configuration or commissioning, data sheets and CAD files in numerous export formats. You can access the product database at the following address: www.turck.de/products
For further inquiries in Germany contact the Sales and Service Team on:
n Sales: +49 208 4952-380 n Technology: +49 208 4952-390
Outside Germany, please contact your local Turck representative.
Notes on Ex protection
8 Hans Turck GmbH & Co. KG | T +49 208 4952-0 | F +49 208 4952-264 | [email protected] | www.turck.com
3 For Your Safety
The product is designed according to state-of-the-art technology. However, residual risks still exist. Observe the following warnings and safety notices to prevent damage to persons and property. Turck accepts no liability for damage caused by failure to observe these warning and safety notices.
3.1 General safety notes
n The device may only be assembled, installed, operated, parameterized and maintained by professionally-trained personnel.
n The device may only be used in accordance with applicable national and international regu- lations, standards and laws.
n The device only meets the EMC requirements for industrial areas and is not suitable for use in residential areas.
3.2 Notes on Ex protection
n Only use the device in Ex areas when installed in the appropriate protective housing.
n Observe national and international regulations for explosion protection.
n When using the device in explosion-protection circuits, the user must have a working know- ledge of explosion protection (EN 60079-14 etc.).
n Use the device only within the permissible operating and ambient conditions (see approval data and Ex approval specifications).
n Fit blank modules (BM1) on unused slots on the module rack.
n Cables and terminals with intrinsically safe circuits must be indicated – use light blue for color-coding. Separate cables and terminals from non-intrinsically safe circuits or isolate ac- cordingly (EN 60079-14).
n Perform "Proof of intrinsic safety".
n Never connect equipment to intrinsically safe circuits if this equipment was previously used once in non-intrinsically safe circuits.
4 Integrating the excom System in DeltaV via PROFINET
The integration of the excom system in the DeltaV control system is GSDML-based. The follow- ing describes all the steps required for the GSDML installation right through to the handling of I/O data and diagnostics.
4.1 Requirements
4.1.1 Requirements – hardware
This example uses the following hardware:
DeltaV hardware
n DeltaV MD controller
n DeltaV virtual I/O module 2 of the M Series (VIM2)
Turck hardware
n MT08-N module rack n Gateway GEN-N
n DM80-N digital input/output module n DO40-N digital output module n AIH401-N analog input module n AOH401-N analog output module n Ethernet cable
PSM24-N GEN-N
DM80-N DO40-N
AIH401-N AOH401-N
MT08-N
excom – assigning the IP address and PROFINET name
10 Hans Turck GmbH & Co. KG | T +49 208 4952-0 | F +49 208 4952-264 | [email protected] | www.turck.com
4.1.2 Requirements – software
This example uses the following software:
DeltaV software
NOTE
VIMNet Explorer V9.4 or higher is required to set up the virtual I/O module with PROFINET.
n DSC DeltaV V11.3.1 (DeltaV Explorer) n VIMNet Explorer V9.6.1.5
Turck software
n GSDML file V2.3
n Gateway firmware V1.3.0 n Turck Service Tool
4.2 excom – assigning the IP address and PROFINET name
4.2.1 Setting the IP address
The device is factory set to IP address 192.168.1.254. A PROFINET device name has not yet been assigned. The IP address can be set via the Turck Service Tool, the DTM or the web server. The following example shows the setting of the IP address via the Turck Service Tool. The Turck Service Tool can be downloaded free of charge at www.turck.com.
NOTE
The PC and the gateway must be located in the same IP network.
Connect the device to a PC via the Ethernet interface.
Launch the Turck Service Tool.
Click Search or press [F5].
a The Turck Service Tool displays the connected devices.
Fig. 2: Turck Service Tool
Click the gateway (example: GEN-N).
Click Change or press [F2].
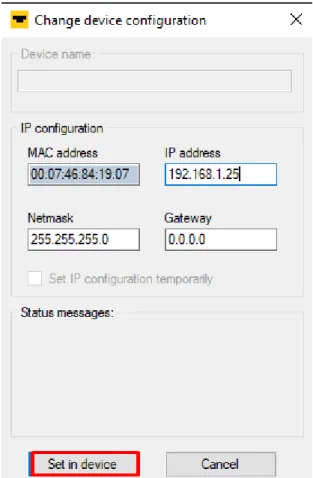
Set the IP address and if necessary the network mask and gateway.
Accept the changes by clicking Set in device.
Fig. 3: Setting the IP address
4.2.2 Assigning a PROFINET device name
A PROFINET device name must be assigned in order to identify the excom system. The PROFINET device name is set in the Turck Service Tool.
Observe the following requirements for assigning the PROFINET name:
n Numbers between 0…9 n Lower case letters from a…z n Dashes “-” and dots “.”
n Max. 63 characters in succession without permissible special characters “-” and “.”
n Max. 127 characters n Spaces not allowed
n “Port (0…999)” not allowed
Installing an GSDML file
12 Hans Turck GmbH & Co. KG | T +49 208 4952-0 | F +49 208 4952-264 | [email protected] | www.turck.com
Alternatively, the PROFINET device name can be set at Gateway Configuration in the web server.
Click the empty field under Name in the Turck Service Tool.
Assign a device name.
Click Set in device.
Fig. 4: PROFINET device name
4.3 Installing an GSDML file
The GSDML file is available as a Zip file free of charge for download from www.turck.com.
Unpack the zip file.
Proceed as follows to install the GSDML file:
Open DeltaV Explorer.
Choose Applications
Ò
VIMNet Explorer. Alternatively: Click the VimNet Explorer icon in the toolbar.
Fig. 5: Open VimNet Explorer
a The New VIO Document window opens.
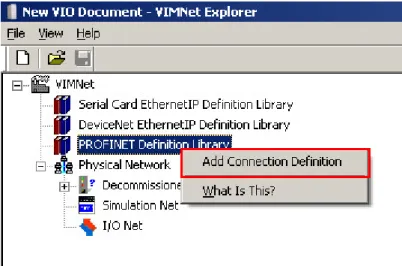
Right-click PROFINET Definition Library.
Click Add Connection Definition.
Fig. 6: PROFINET Definition Library – Add Connection Definition a A window opens, in which the GSDML file can be selected.
Installing an GSDML file
14 Hans Turck GmbH & Co. KG | T +49 208 4952-0 | F +49 208 4952-264 | [email protected] | www.turck.com
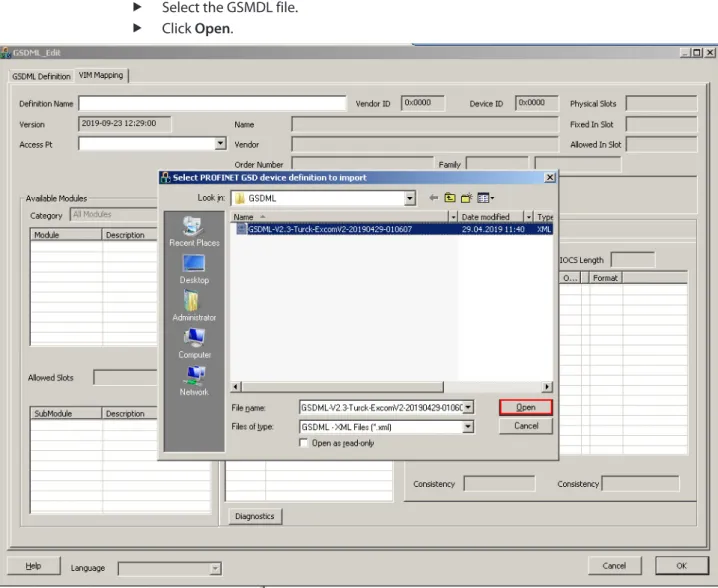
Select the GSMDL file.
Click Open.
Fig. 7: Opening the GSMDL file
a The GSDML file is installed.
a The excom modules and their parameters appear in the GSDML_Edit window
Ò
VIM Mapping.4.4 Creating an excom station
The excom station must be configured. For this map the physical setup of the excom station in DeltaV. The order of the slots must match the order of the modules in the excom station.
NOTE
A template name can be assigned at Definition Name. If no name is assigned, the template contains the name of the GSDML file.
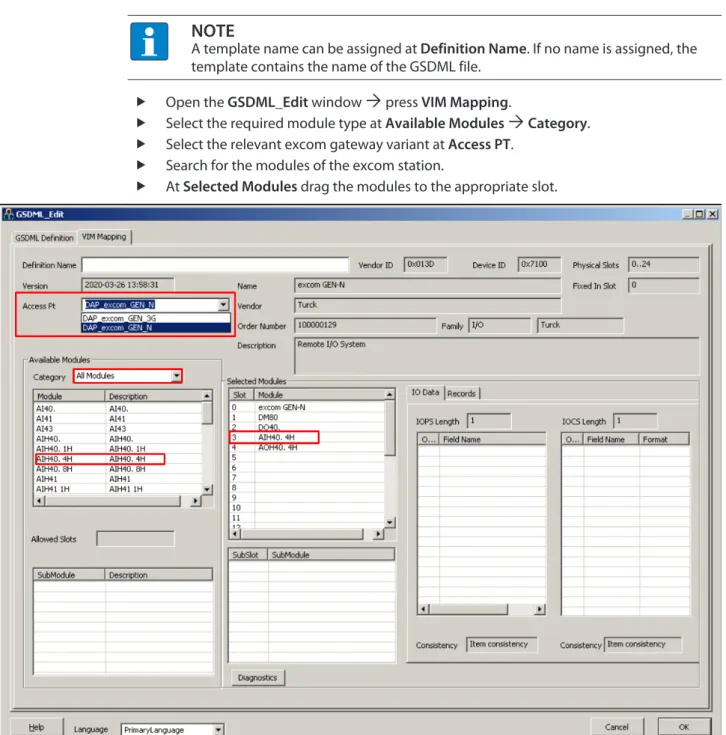
Open the GSDML_Edit window
Ò
press VIM Mapping. Select the required module type at Available Modules
Ò
Category. Select the relevant excom gateway variant at Access PT.
Search for the modules of the excom station.
At Selected Modules drag the modules to the appropriate slot.
Fig. 8: Mapping the virtual excom station in DeltaV
Setting up the DeltaV controller
16 Hans Turck GmbH & Co. KG | T +49 208 4952-0 | F +49 208 4952-264 | [email protected] | www.turck.com
4.5 Setting up the DeltaV controller
The DeltaV controller must be set up in order to configure the excom station as a slave. The DeltaV controller must be integrated in the physical network of the VIMNet Explorer.
NOTE
The devices are identified by the controller name.
Assign the same controller name for the same device (here: CTLR-011290) in both software environments.
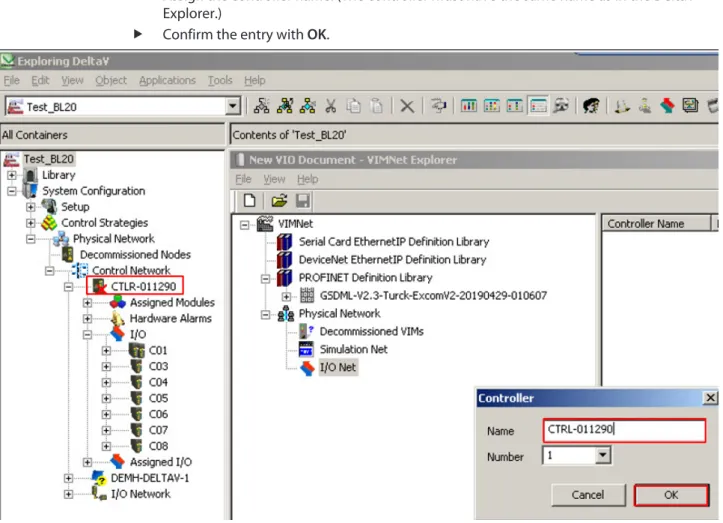
Choose Physical Network
Ò
Right-click I/O Net. Click New Controller.
Fig. 9: Clicking New Controller
a The Controller window is opened.
Assign the controller name. (The controller must have the same name as in the DeltaV Explorer.)
Confirm the entry with OK.
Fig. 10: Assigning the controller name
a The controller appears in the project tree (here: CTRL-011290).
Setting up the DeltaV controller
18 Hans Turck GmbH & Co. KG | T +49 208 4952-0 | F +49 208 4952-264 | [email protected] | www.turck.com
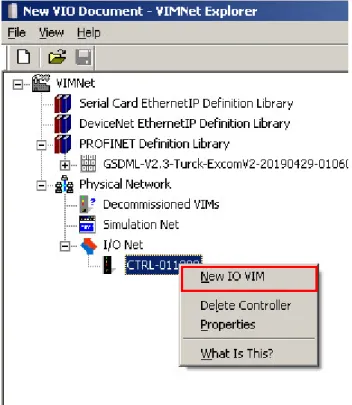
Adding a VIM-PROFINET master
Right-click the controller (here: CTRL-011290).
Click New IO VIM.
Fig. 11: Clicking New IO VIM
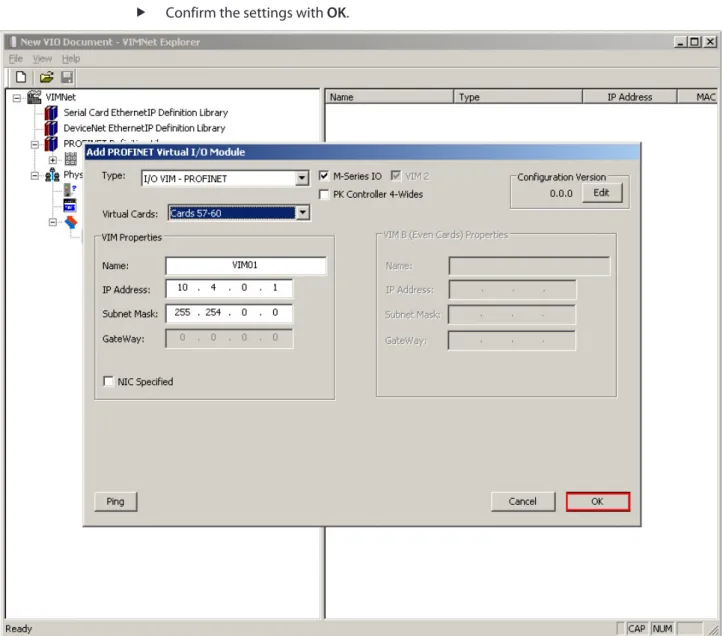
a The ADD PROFINET Virtual I/O Module window opens.
Set up the PROFINET master.
Confirm the settings with OK.
Fig. 12: Setting up the PROFINET master
Connecting the excom station to a virtual PROFINET card
20 Hans Turck GmbH & Co. KG | T +49 208 4952-0 | F +49 208 4952-264 | [email protected] | www.turck.com
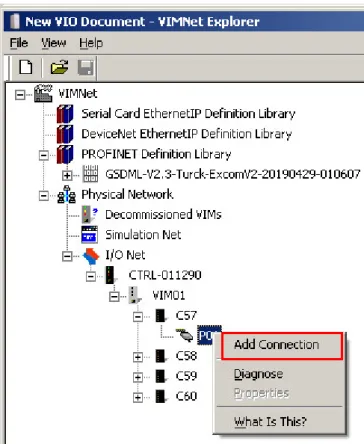
4.6 Connecting the excom station to a virtual PROFINET card
To connect the excom station to the PROFINET master it must be set up using the GSDML file.
Right-click the appropriate virtual PROFINET card (here: C57
Ò
P01). Click Add Connection.
Fig. 13: Clicking Add Connection
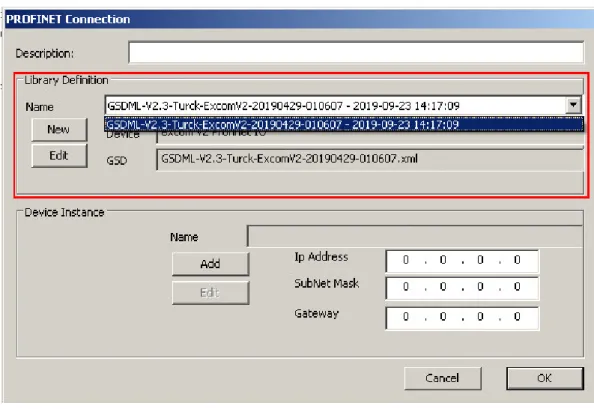
a The PROFINET Connection window is opened.
Select the excom station configured with the GSDML file in the drop-down menu via Library Definition
Ò
Name.Fig. 14: PROFINET Connection window
Click Add in the PROFINET Connection window.
Connecting the excom station to a virtual PROFINET card
22 Hans Turck GmbH & Co. KG | T +49 208 4952-0 | F +49 208 4952-264 | [email protected] | www.turck.com
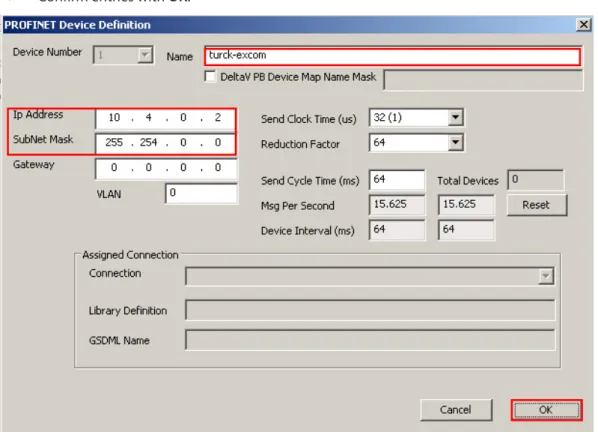
In order for the excom station to communicate with the DeltaV PROFINET master, it must be as- signed a PROFINET name and an IP address [} 11].
Enter the PROFINET name (here: “turck-excom”).
Enter the IP address: (here: 10.4.0.2).
Entering the subnet mask (here: 255.254.0.0).
Confirm entries with OK.
Fig. 16: PROFINET – Assigning an IP address and name
The other parameters do not have to be set and are explained below:
Parameter Meaning
Send Clock Time (ms) The parameter (here:1 ms) is determined by the Send Clock Time (here: 32 µs) multiplied by the basic time unit of 31.25 µs defined in the PROFINET specification.
Reduction Factor Reduction factor (see: Send Cycle Time (ms))
Send Cycle Time (ms) The transfer interval is the product of Send Clock Time × Re- duction Factor. A Send Clock Time of 1 ms and a Reduction Factor of 64 means that IO data is sent every 64 ms.
Msg Per Second Number of messages per second, which the excom station adds to the total message overhead of the VIM. The total message overhead is the right value at Total Devices.
Device Interval (ms) Time between two messages from the excom station, the left value and between two messages for the VIM, the right value.
VLAN VLAN-ID
Only 0 is permissible for devices with the PROFINET IO specification V2.3.
Commissioning VIM
Right-click VIM (here: VIM01).
Click Commission.
Fig. 17: Opening the Commission VIM window a The Commission VIM window opens.
Connecting the excom station to a virtual PROFINET card
24 Hans Turck GmbH & Co. KG | T +49 208 4952-0 | F +49 208 4952-264 | [email protected] | www.turck.com
Confirm with OK.
Fig. 18: Commission VIM window
Adding an excom station as a slave
The configuration must be loaded in the VIM:
Right-click VIM (here: VIM01).
Choose Upload Configuration to VIM.
Fig. 19: Loading the configuration in the VIM
Save the document: Confirm the PPV window with Yes.
Connecting the excom station to a virtual PROFINET card
26 Hans Turck GmbH & Co. KG | T +49 208 4952-0 | F +49 208 4952-264 | [email protected] | www.turck.com
Confirm the VIM Configuration Upload window with OK.
Fig. 21: Upload of the configuration completed
Exporting the FHX file
After the configuration has been successfully uploaded, the FHX file must be exported. This can be done in two ways:
1. Exporting an individual virtual card (here: C57).
2. Export all four virtual cards.
To export the individual virtual card:
Right-click C57.
Choose Export FHX File.
Fig. 22: Right-clicking an individual card
Define the file name and memory location in the Save As window.
Save the setting with Save.
Fig. 23: Defining the file name and memory location
Confirm the prompt in the Configure FHX Export Parameters window without changes with OK.
Fig. 24: Confirming the window
Connecting the excom station to a virtual PROFINET card
28 Hans Turck GmbH & Co. KG | T +49 208 4952-0 | F +49 208 4952-264 | [email protected] | www.turck.com
To export all four virtual cards:
Right-click VIM (here: VIM01).
Choose Export FHX File.
Fig. 25: Right-click VIM01
Define the file name and memory location in the Save As window.
Save the setting with Save.
Fig. 26: Defining the file name and memory location
Confirm the prompt in the Configure FHX Export Parameters window without changes with OK.
Fig. 27: Confirming the prompt
The file must then be loaded in the DeltaV Explorer.
Choose File
Ò
ImportÒ
Standard DeltaV Format… in the DeltaV Explorer.Fig. 28: Import in the DeltaV Explorer
Connecting the excom station to a virtual PROFINET card
30 Hans Turck GmbH & Co. KG | T +49 208 4952-0 | F +49 208 4952-264 | [email protected] | www.turck.com
Select the required file in the Import window.
Click Open.
Fig. 29: Importing a file
The new configuration must be loaded in the controller.
NOTE
Reload the configuration in the controller after each new configuration.
Right-click Physical Network.
Choose Download
Ò
Physical Network in the context menu.Fig. 30: Loading the configuration in the controller
Connecting the excom station to a virtual PROFINET card
32 Hans Turck GmbH & Co. KG | T +49 208 4952-0 | F +49 208 4952-264 | [email protected] | www.turck.com
Exporting an excom station
The excom station can be exported for future applications.
Right-click the excom station (here: EXCOM_02).
Click Export.
Fig. 31: Exporting an excom station
Assign memory location, name and file type.
Click Save.
Fig. 32: Saving an export
a The Export complete window appears.
Setting excom PROFINET parameters
34 Hans Turck GmbH & Co. KG | T +49 208 4952-0 | F +49 208 4952-264 | [email protected] | www.turck.com
4.7 Setting excom PROFINET parameters
The VIM mapping must be opened in order to set the gateway or module parameters:
Open VIMNet Explorer.
Right-click the excom station.
Click Properties.
Click Edit at Library Definition.
Choose excom GEN-N under Module.
Click DAP v3.1 under SubModule.
Fig. 33: General PROFINET parameters
Click the Data window on the right of the relevant parameters under Records.
Select the parameter from the drop-down menu.
The index “gTId_510” consists of the general PROFINET parameters that are still without function:
Parameter Value Meaning
Deactivate all diagnostics
No Diagnostics messages and alarms are generated.
Yes Diagnostics messages and alarms are not generated.
Deactiv. load voltage diagn.
No The monitoring of the field power supply (from the gateway and the supply modules) is activated.
Yes Overshoots or undershoots of the field power supply are not indicated.
Deactivate I/O-ASS.
Force Mode
No –
Yes The DTM cannot access the gateway via Force mode.
4.8 Parameterizing excom communication
The VIM mapping must be opened in order to set the gateway parameters:
Open VIMNet Explorer.
Right-click the excom station.
Click Properties.
Click Edit at Library Definition.
Click Index
Ò
gTId_661. The general settings appear under Field and Data.
Fig. 34: Gateway parameters
Parameterizing excom communication
36 Hans Turck GmbH & Co. KG | T +49 208 4952-0 | F +49 208 4952-264 | [email protected] | www.turck.com
Click the Data window on the right of the relevant parameters under Records.
Select the parameter from the drop-down menu.
The index “gTId_661” consists of the following PROFINET parameters:
Parameter name Value Meaning
Module parameterization Activate The parameter is currently without function.
If the parameter is activated, the module receives the para- meter settings, e.g. from the controller, the IO supervisor or the DTM. Previous parameter settings are overwritten. If the parameter is deactivated, the module uses the saved para- meters.
Deactivate
Line frequency 50 Hz
60 Hz
Select the filter for suppressing superimposed power supply interference with analog input signals.
Analog data format Status MSB Status LSB No status
Select position of the status bit for analog input signals n Status MSB: Status bit at bit position 215
n Status LSB: Status bit at 20
n No status: Measured value without status bit
CAN redundancy Off
On
Activate or deactivate redundancy of internal communica- tion between gateways and I/Os.
Redundancy mode Off
System redundancy
n No redundancy
n Two gateways operate autonomously with the associated master.
Power supply Single
Redundant
Activate or deactivate diagnostic message of the redundant power supply.
4.9 Parameterizing excom modules
Different specific settings can be made via the parameter functions.
The VIM mapping must be opened in order to set the gateway or module parameters:
Open VIMNet Explorer.
Right-click the excom station.
Click Properties.
Click Edit at Library Definition.
Select the appropriate module.
Click the Data window on the right of the relevant parameters under Records.
Select the parameter from the drop-down menu.
4.9.1 Example: DM80
The DM80 digital module is parameterized in the following example. The Module parameterization parameter is still without function.
Fig. 35: DM80 parameters
Parameterizing excom modules
38 Hans Turck GmbH & Co. KG | T +49 208 4952-0 | F +49 208 4952-264 | [email protected] | www.turck.com
Parameter overview – DM80
The parameters are set in pairs for the particular two channels (1/2, 3/4, 5/6, 7/8).
The default parameter values are shown in the following table in bold type.
Parameter name Value Meaning
Short circuit detection
On Off
Activate or deactivate the short circuit monitoring in pairs The output signal can only be monitored if the output is ac- tivated.
Open line detection
On Off
Activate or deactivate the wire-break monitoring in pairs The output signal can only be monitored if the output is activated.
Failsafe mode Min. value
Max. value Last valid value
Set substitute value per channel: minimum (0), maximum (1) or last valid value (0 or 1)
Direction Input
Output
Activate or deactivate input or output
Input: The channels of the module are switched in groups as inputs (1/2, 3/4, 5/6, 7/8). The DM80-N S and DM80-N S8I variants provide one status.
Output: The channels of the module are switched as outputs in groups (1/2, 3/4, 5/6, 7/8). The DM80-N S variant on the other hand also provides a status for the outputs.
Polarity Normal
Inverse
Activate or deactivate signal inversion
Dumping Off
10 ms 20 ms 50 ms
Activate or deactivate additional input signal damping
Channel 1…8 Active
Inactive
Activate or deactivate channel 1…8
If a channel is not used it can be switched off to prevent unwanted error messages.
4.9.2 Example: DO40
The DO40 digital module is parameterized in the following example. The parameters are presented individually for each channel. The Module parameterization parameter is still without function.
Fig. 36: DO40 parameters
Parameter overview – DO40.
The default parameter values are shown in the following table in bold type.
Parameter name Value Meaning
Short circuit detection
On Off
Activating or deactivating the short circuit monitoring The output signal can only be monitored if the output is activated.
Open line detection
On Off
Activating or deactivating the wire-break monitoring by channel
The output signal can only be monitored if the output is activated.
Failsafe mode Min. value
Max. value Last valid value
Set substitute value per channel: minimum (0), maximum (1) or last valid value (0 or 1)
Parameterizing excom modules
40 Hans Turck GmbH & Co. KG | T +49 208 4952-0 | F +49 208 4952-264 | [email protected] | www.turck.com
4.9.3 Example: AIH40
The AIH40 analog module is parameterized in the following example. The Module parameterization parameter is still without function.
Fig. 37: AIH40 parameters
Parameter overview – AIH40
The default parameter values are shown in the following table in bold type. The module can be configured with 1, 4 or 8 HART values. Further information on this is provided in the excom manual for the non-Ex area.
Parameter name Value Meaning
Short circuit detection
On Off
Activate or deactivate short circuit monitoring Open line
detection
On Off
Activate or deactivate wire-break monitoring
Failsafe mode Min. value
Max. value Last valid value
Set substitute value per channel: minimum, maximum or last valid value
HART status/meas. range Off/0…20 mA Off/4…20 mA On/4…20 mA
Off/0…20 mA: Dead zero without HART status query;
diagnostics for wire break and measuring range undershoot not possible
Off/4…20 mA: Live zero without HART status query;
diagnostics for wire break and measuring range undershoot active
On/4…20 mA: Live zero with HART status query; diagnostics for measuring range undershoot and overshoot as well as wire break and short circuit monitoring active
Filter (PT1) Off
0,1 s 2,6 s 29,2 s
Activate or deactivate software filter for generating an average value
Parameterizing excom modules
42 Hans Turck GmbH & Co. KG | T +49 208 4952-0 | F +49 208 4952-264 | [email protected] | www.turck.com
4.9.4 Example: AOH40
The AOH40 analog module is parameterized in the following example. The Module parameterization parameter is still without function.
Fig. 38: AOH40 parameters
Parameter overview – AOH40
The default parameter values are shown in the following table in bold type. The module can be configured with 1, 4 or 8 HART values. Further information on this is provided in the excom manual for the non-Ex area.
Parameter name Value Meaning
Short circuit detection
On Off
Activate or deactivate short circuit monitoring Open line detection On
Off
Activate or deactivate wire-break monitoring
Failsafe mode Min. value
Max. value Last valid value
Set substitute value per channel: minimum, maximum or last valid value
HART status/meas. range Off/0…20 mA Off/4…20 mA On/4…20 mA
Define HART status / measuring range
Off/0…20 mA: Dead zero without HART status query and wire break inactive
Off/4…20 mA: Live zero without HART status query and wire break active
On/4…20 mA: Live zero with HART status query (HART diagnostics active) and wire break active
4.10 Configuring I/O data
The VIMNet Explorer configures the PROFINET mapping independently. The GSDML file defines how the data from the PROFINET device is to be interpreted. During the configuration of the excom system the GSDML file automatically creates signals for each I/O module. The following figure shows the automatic configuration of the I/O signals using the example of a DM80 module:
Open VIMNet Explorer.
Click VIM Mapping.
Select the module at Selected Modules (here: DM80).
Click IO Data.
Fig. 39: Configuring I/O data
Configuring I/O data
44 Hans Turck GmbH & Co. KG | T +49 208 4952-0 | F +49 208 4952-264 | [email protected] | www.turck.com
NOTE
The PROFINET buffer consists of the I/O data and the IOCS and IOPS together. The IO Consumption Status (IOCS) reports to the module that generated the I/O data whether it was used or not. The IO Production Status (IOPS) is used by the producing module to monitor the quality of the associated I/O data.
The VIMNet Explorer uses the GSDML file to map the PROFINET data automatically in the excom system. The PROFINET device is mapped in the signals of the PROFIBUS device. Each PROFIBUS device in DeltaV contains a set of slots that each contain a set of signals. The description for each PROFINET device is part of the associated GSDML file. The GSDML files also describe the arrangement of the data in the I/O buffer.
The VIM virtual I/O module maps the I/O buffer in a series of PROFIBUS devices in DeltaV. The maximum size of a PROFINET buffer is 1440 bytes. One buffer is provided for the input data and one for the output data.
The I/O buffer of a PROFINET device mapped in DeltaV can take a maximum of 512 bytes (256 inputs and 256 output bytes), which are divided up into 128-byte slots with 64 inputs and 64 outputs. The VIM virtual I/O module divides up the PROFINET buffer automatically and assigns all parts of the PROFINET data buffer to a PROFIBUS slot. The buffer is distributed so that a specific signal (defined in the GSDML file) is not split by the slot boundaries.
Adding an I/O signal manually
A signal can also be added manually. This is illustrated here using the DM80 as an example. The DeltaV Explorer must be opened:
In the project tree under System Configuration
Ò
Physical NetworkÒ
Control Net- workÒ
CLTR-011290Ò
open C57. Choose C57PB42
Ò
SLOT001 in the subtree. Right-click SLOT001.
Click New Profibus Signal.
Set the Signal direction to Input in the New Profibus Signal window.
Select the data type under Data type.
Confirm selection with OK.
Configuring I/O data
46 Hans Turck GmbH & Co. KG | T +49 208 4952-0 | F +49 208 4952-264 | [email protected] | www.turck.com
Placing a tick next to Use diagnostic channel makes it possible to link a signal to a channel- specific diagnosis.
Fig. 41: Linking a signal to channel-specific diagnostics
The changes must be loaded in the DeltaV controller. The DeltaV Explorer displays a blue triangle if this is necessary. If changes were made to the setup data, this is indicated at the nodes. Proceed as follows in order to load the configuration in DeltaV:
Right-click Physical Network.
Choose Download
Ò
Physical Network.Fig. 42: Loading changes in the controller
Configuring I/O data
48 Hans Turck GmbH & Co. KG | T +49 208 4952-0 | F +49 208 4952-264 | [email protected] | www.turck.com
Confirm the Confirm Total Download window with Yes.
Fig. 43: Confirming a download
Click Close to close the Download complete window.
4.11 PROFINET diagnostics
Diagnostics options are available for the VIM card, the DeltaV I/O card as well as for the field devices. This example shows diagnostics for the VIM card:
Right-click VIM (here: VIM01).
Click Diagnose.
Fig. 44: Diagnostics
PROFINET diagnostics
50 Hans Turck GmbH & Co. KG | T +49 208 4952-0 | F +49 208 4952-264 | [email protected] | www.turck.com
Right-click the VIM again in the new window that appears (here: VIM01).
Click Enable VIM Communications in the context menu to switch to Online View.
Fig. 45: Enable VIM Communications
a The diagnostics are displayed for the individual slots (here: Slot 3
Ò
SubSlot 1).Fig. 46: Diagnostics window
AR in the diagnostics window displays the status of the PROFINET Application Relation.
CR displays the Connection Relations status.
5 Redundancy Strategies
5.1 Topology
The general topology of the Turck-specific system redundancy with the Ethernet protocols EtherNet/IP, Modbus TCP and PROFINET is structured as follows:
DCS DCSDCS DCSDCS
Fig. 47: System redundancy with one master and two gateways
Fig. 48: System redundancy with two masters and two gateways
The system redundancy with one master and two gateways is a Turck-specific, parameterizable redundancy function of the excom system. The two gateways are provided here with separate IP addresses. The separate IP addresses are used to set up independent communication. The gateways communicate the input data and receive the output data via the IP addresses. One gateway is the primary gateway while the second gateway acts as a backup. If the primary gate- way fails, a bumpless switchover to the backup gateway is carried out automatically. The re- dundancy function makes it possible to implement interruption-free communication. The out- put word of the gateway enables the forcing of a redundancy switchover.
When system redundancy is implemented with two masters and two gateways, two independ- ent Ethernet masters communicate with the associated gateway. Both masters can be con- trolled via one or two process control system controllers. There are two independent Ethernet connections to the excom system, in order to process the process data.
5.2 Redundancy setup
NOTE
Both gateways must have the same configuration, parameterization and firmware.
The Redundancy mode gateway parameter must be set for system redundancy.
System redundancy
52 Hans Turck GmbH & Co. KG | T +49 208 4952-0 | F +49 208 4952-264 | [email protected] | www.turck.com
5.3 System redundancy
NOTE
Both gateways must have the same configuration, parameterization and firmware.
If the Redundancy mode parameter is set to system redundancy in the DTM, web server or control system, the excom station operates in system redundancy mode. Both gateways com- municate with their respective master. The PRIO LED is lit on the active gateway. The active gateway takes over the output data transferred by the master and sends this to the output modules.
The gateway communicating with the secondary master ignores the received output data as the secondary module does not have write access to the output modules.
If the gateway is configured in the controller as “GEN... C”, the gateway is provided with an in- put word as well as an output word for monitoring redundancy. The input word describes the current state of the gateway.
The output word is used for the manual redundancy switchover in the master. It is possible to switch in the process control system from the primary gateway to the secondary gateway. A switchover is carried out in response to the following events:
n The primary gateway was removed.
n Communication to the primary gateway was interrupted.
After a switchover, an automatic switchover to the former primary gateway is no longer carried out.
When the excom system is started, the gateway on the left starts to operate as the primary gateway. If communication with the left gateway fails, the gateway on the right tries to establish primary communication.
Assignment of gateway process data bits
The input word of the gateway process data is used to view the gateway and system redundancy of the excom station:
Bit
Byte 7 6 5 4 3 2 1 0
0 Not used Left power
supply unit Right power supply unit
Gateway
redundancySlot Active/
passive
1 Not used
Meaning of the gateway process data bits
Designation Meaning
Left power supply unit 0: Left power supply unit not present 1: Left power supply unit fitted Right power supply unit 0: Right power supply unit not present
1: Right power supply unit fitted
Gateway redundancy 0: Redundant gateway or redundant communication not available
1: Redundancy available
Slot 0: Gateway is located on the right slot (GW2)
1: Gateway is located on the left slot (GW1)
Active/ passive 0: Gateway is passive
1: Gateway is active
System redundancy
54 Hans Turck GmbH & Co. KG | T +49 208 4952-0 | F +49 208 4952-264 | [email protected] | www.turck.com
Assignment of the command bits
The output word of the gateway enables the forcing of a redundancy switchover in the “Red switching” web server:
Bit
Byte 7 6 5 4 3 2 1 0
0 Not used Control bit Redund-
ancy switchover is initiated
Activation of the right or left gateway Control bits for edge
change
1 Not used
Meaning of the command bits
Designation Meaning
Bit 2 = 0 Redundancy switchover is initiated
11
Ò
01: Receiver is the passive gateway. The passive gateway requests control from the active gateway and becomes active.11
Ò
10: Receiver is the active gateway. The active gateway gives control to the passive gateway and becomes passive.Bit 2 = 1 Activation of the right or left
gateway 11
Ò
01: Receiver is the left gateway. The left gate- way requests control from the right gateway and becomes active.11