Dan Gookin
•
Set up your Droid 2 and start using all
its cool features
•
Keep connected with text and e-mail
and share your photos and videos
•
Download apps, games, music,
movies, and more
Learn to:
IN FULL COLOR!
Droid
™
2
Making Everythi
ng Easier!
™
Dr
o
id
2
Dr
o
id
Start with
FREE
Cheat Sheets
Cheat Sheets include
•
Checklists
•
Charts
• Common Instructions
• And Other Good Stuff!
Get Smart at Dummies.com
Dummies.com makes your life easier with 1,000s
of answers on everything from removing wallpaper
to using the latest version of Windows.
Check out our
•
Videos
• Illustrated Articles
• Step-by-Step Instructions
Plus, each month you can win valuable prizes by entering
our Dummies.com sweepstakes. *
Want a weekly dose of Dummies? Sign up for Newsletters on
• Digital Photography
• Microsoft Windows & Office
• Personal Finance & Investing
• Health & Wellness
• Computing, iPods & Cell Phones
•
eBay
•
Internet
• Food, Home & Garden
Find out “HOW” at Dummies.com
Get More and Do More at Dummies.com
®
Droid
™
2
FOR
by Dan Gookin
Droid
™
2
FOR
Droid™ 2 For Dummies®
Copyright © 2011 by Wiley Publishing, Inc., Indianapolis, Indiana Published by Wiley Publishing, Inc., Indianapolis, Indiana Published simultaneously in Canada
No part of this publication may be reproduced, stored in a retrieval system or transmitted in any form or by any means, electronic, mechanical, photocopying, recording, scanning or otherwise, except as permit-ted under Sections 107 or 108 of the 1976 Unipermit-ted States Copyright Act, without either the prior written permission of the Publisher, or authorization through payment of the appropriate per-copy fee to the Copyright Clearance Center, 222 Rosewood Drive, Danvers, MA 01923, (978) 750-8400, fax (978) 646-8600. Requests to the Publisher for permission should be addressed to the Permission Department, John Wiley
& Sons, Inc., 111 River Street, Hoboken, NJ 07030, (201) 748-6011, fax (201) 748-6008, or online at http://
www.wiley.com/go/permissions.
Trademarks: Wiley, the Wiley Publishing logo, For Dummies, the Dummies Man logo, A Reference for the Rest of Us!, The Dummies Way, Dummies Daily, The Fun and Easy Way, Dummies.com, Making Everything
Easier,and related trade dress are trademarks or registered trademarks of John Wiley & Sons, Inc. and/
or its affi liates in the United States and other countries, and may not be used without written permission. Droid is a trademark of Lucasfi lm Ltd. All other trademarks are the property of their respective owners. Wiley Publishing, Inc., is not associated with any product or vendor mentioned in this book.
LIMIT OF LIABILITY/DISCLAIMER OF WARRANTY: THE PUBLISHER AND THE AUTHOR MAKE NO REPRESENTATIONS OR WARRANTIES WITH RESPECT TO THE ACCURACY OR COMPLETENESS OF THE CONTENTS OF THIS WORK AND SPECIFICALLY DISCLAIM ALL WARRANTIES, INCLUDING WITH-OUT LIMITATION WARRANTIES OF FITNESS FOR A PARTICULAR PURPOSE. NO WARRANTY MAY BE CREATED OR EXTENDED BY SALES OR PROMOTIONAL MATERIALS. THE ADVICE AND STRATEGIES CONTAINED HEREIN MAY NOT BE SUITABLE FOR EVERY SITUATION. THIS WORK IS SOLD WITH THE UNDERSTANDING THAT THE PUBLISHER IS NOT ENGAGED IN RENDERING LEGAL, ACCOUNTING, OR OTHER PROFESSIONAL SERVICES. IF PROFESSIONAL ASSISTANCE IS REQUIRED, THE SERVICES OF A COMPETENT PROFESSIONAL PERSON SHOULD BE SOUGHT. NEITHER THE PUBLISHER NOR THE AUTHOR SHALL BE LIABLE FOR DAMAGES ARISING HEREFROM. THE FACT THAT AN ORGANIZA-TION OR WEBSITE IS REFERRED TO IN THIS WORK AS A CITAORGANIZA-TION AND/OR A POTENTIAL SOURCE OF FURTHER INFORMATION DOES NOT MEAN THAT THE AUTHOR OR THE PUBLISHER ENDORSES THE INFORMATION THE ORGANIZATION OR WEBSITE MAY PROVIDE OR RECOMMENDATIONS IT MAY MAKE. FURTHER, READERS SHOULD BE AWARE THAT INTERNET WEBSITES LISTED IN THIS WORK MAY HAVE CHANGED OR DISAPPEARED BETWEEN WHEN THIS WORK WAS WRITTEN AND WHEN IT IS READ.
For general information on our other products and services, please contact our Customer Care Department within the U.S. at 877-762-2974, outside the U.S. at 317-572-3993, or fax 317-572-4002.
For technical support, please visit www.wiley.com/techsupport.
Wiley also publishes its books in a variety of electronic formats. Some content that appears in print may not be available in electronic books.
Library of Congress Control Number: 2010940232 ISBN: 978-1-118-00286-5
Manufactured in the United States of America
About the Author
Dan Gookin has written more than 115 books about technology, many of
them accurate. He is most famously known as the author of the original For
Dummies book, DOS For Dummies, published in 1991. Additionally, Dan has achieved fame as one of the fi rst computer radio talk show hosts, the editor of a computer magazine, a national technology spokesman, and an occasional actor on the community theater stage.
Dan still considers himself a writer and technology “guru” whose job it is to remind everyone that our electronics are not to be taken too seriously. His approach is light and humorous yet very informative. He knows that modern gizmos can be complex and intimidating but necessary to help people become productive and successful. Dan mixes his vast knowledge of all things high-tech with a unique, dry sense of humor that keeps everyone informed — and awake.
Dan’s most recent books are Word 2010 For Dummies, PCs For Dummies,
Windows 7 Edition, and Laptops For Dummies, 4th Edition. He holds a
Author’s Acknowledgments
Publisher’s Acknowledgments
We’re proud of this book; please send us your comments through our online registration form
located at http://dummies.custhelp.com. For other comments, please contact our Customer
Care Department within the U.S. at 877-762-2974, outside the U.S. at 317-572-3993, or fax 317-572-4002. Some of the people who helped bring this book to market include the following:
Acquisitions and Editorial
Senior Project Editor: Paul Levesque
Acquisitions Editor: Katie Mohr
Copy Editor: Rebecca Whitney
Technical Editor: Paul Eastham
Editorial Manager: Leah Cameron
Editorial Assistant: Amanda Graham
Sr. Editorial Assistant: Cherie Case
Cartoons: Rich Tennant (www.the5thwave.com)
Composition Services
Project Coordinator: Kristie Rees
Layout and Graphics: Carl Byers, Samantha K. Cherolis, Cheryl Grubbs, Joyce Haughey
Proofreader: Leeann Harney
Indexer: Infodex Indexing Services, Inc.
Publishing and Editorial for Technology Dummies
Richard Swadley, Vice President and Executive Group Publisher
Andy Cummings, Vice President and Publisher
Mary Bednarek, Executive Acquisitions Director
Mary C. Corder, Editorial Director
Publishing for Consumer Dummies
Diane Graves Steele, Vice President and Publisher
Composition Services
Contents at a Glance
Introduction ... 1
Part I: Droid 2: The Sequel ... 7
Chapter 1: A Droid 2 of Your Own ... 9
Chapter 2: Initial Confi guration ... 25
Chapter 3: The Droid 2 Tour ... 39
Chapter 4: Human-Droid Interaction ... 53
Part II: Phone 101 ... 75
Chapter 5: Yes, It’s a Telephone ... 77
Chapter 6: Beyond the Basic Phone Stuff ... 91
Chapter 7: At the Sound of the Tone . . . ... 101
Chapter 8: The People in Your Phone ... 107
Part III: Beyond Telephone Communications ... 121
Chapter 9: The 21st Century Telegram (Texting) ... 123
Chapter 10: Mail of the Electronic Kind ... 133
Chapter 11: Fun on the Web ... 149
Chapter 12: The Social Networking Thing ... 161
Chapter 13: Share and Synchronize ... 173
Chapter 14: Network Your Droid 2 ... 183
Part IV: More than a Mere Mortal Cell Phone ... 193
Chapter 15: Never Get Lost Again ... 195
Chapter 16: A Thousand Words ... 209
Chapter 17: Your Digital Photo Album ... 219
Chapter 18: Music, Music, Music ... 233
Chapter 19: A Clutch of Apps ... 247
Chapter 20: Shop at the Android Market ... 261
Part V: Hither and Thither ... 273
Chapter 21: On the Road Again ... 275
Chapter 22: Customize Your Droid 2 ... 283
Part VI: The Part of Tens ... 315
Chapter 24: Ten Tips, Tricks, and Shortcuts ... 317
Chapter 25: Ten Things to Remember ... 327
Chapter 26: Ten Worthy Apps... 333
Table of Contents
Introduction ... 1
About This Book ... 1
How to Use This Book ... 2
Foolish Assumptions ... 2
How This Book Is Organized ... 3
Part I: Droid 2: The Sequel ... 3
Part II: Phone 101 ... 3
Part III: Beyond Telephone Communications ... 4
Part IV: More than a Mere Mortal Cell Phone ... 4
Part V: Hither and Thither ... 4
Part VI: The Part of Tens ... 4
Icons Used in This Book ... 4
Where to Go from Here ... 5
Part I: Droid 2: The Sequel ... 7
Chapter 1: A Droid 2 of Your Own . . . .9
Initial Droid 2 Setup ... 9
Looking in the box ... 10
Installing the phone’s battery ... 11
Charging the battery... 13
Droid 2 Orientation ... 14
Knowing what’s what on your phone ... 14
Listening with earphones ... 16
Exploring your phone’s guts ... 18
Fashionable Droid 2 Accessories ... 20
Using the Multimedia Station ... 20
Watching Your Droid 2 in Your Car ... 21
A Home for Your Phone ... 22
Carrying the Droid 2 ... 22
Storing the Droid 2 ... 23
Chapter 2: Initial Confi guration . . . .25
Greetings, Human ... 25
Turning on the Droid 2 for the fi rst time ... 26
Turning on the phone ... 28
xii
Droid 2 For Dummies
Account Creation and Synchronization Setup ... 32
Getting a Google account ... 32
Setting up a Google account on your phone ... 33
Changing your Google password ... 34
Confi guring the Droid 2 for corporate use ... 35
Goodbye, Phone ... 36
Snoozing the phone ... 37
Controlling snooze options ... 37
Turning off the phone... 38
Chapter 3: The Droid 2 Tour . . . .39
Basic Droid 2 Operations ... 40
Using the soft buttons ... 40
Manipulating the touchscreen ... 41
Setting the volume ... 41
“Silence your phone!” ... 42
Going horizontal... 42
There’s No Screen Like Home ... 44
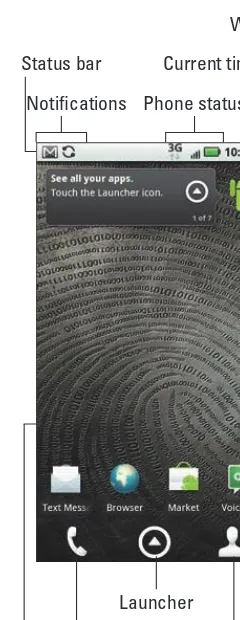
I’ve Been Working on the Home Screen ... 47
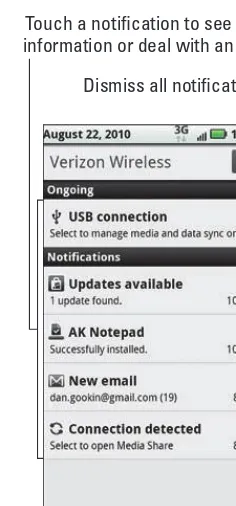
Reviewing notifi cations ... 47
Starting an application ... 49
Accessing a widget ... 49
Using Car Home ... 50
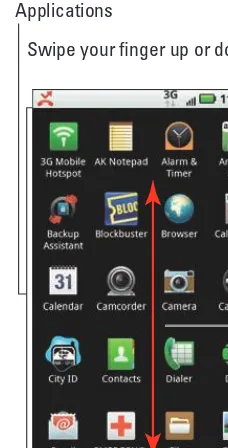
The Applications Tray ... 50
Discovering all the apps on your phone ... 50
Finding lost apps ... 51
Reviewing your most recently used apps ... 52
Chapter 4: Human-Droid Interaction. . . .53
Keyboard Mania ... 54
Using the onscreen keyboard... 54
Sliding out the sliding keyboard ... 57
Droid 2 Hunt-and-Peck ... 58
Typing on your Droid 2 ... 58
Accessing special characters ... 61
Choosing a word as you type ... 62
Take a Swype at the Old Hunt-and-Peck ... 63
Activating Swype ... 63
Using Swype to create text ... 64
Deactivating Swype... 66
Text Editing ... 67
Moving the cursor... 67
Selecting text ... 68
Cutting, copying, and pasting text ... 70
xiii
Table of Contents
Part II: Phone 101 ... 75
Chapter 5: Yes, It’s a Telephone . . . .77
Reach Out and Touch Someone ... 77
Making a phone call ... 78
Dialing a contact ... 81
Phoning someone you call often ... 84
Using the Voice Dialer ... 85
Someone’s Calling! ... 86
Receiving a call ... 86
Setting incoming call signals ... 88
Who’s Calling Who When? ... 89
Dealing with a missed call ... 89
Reviewing recent calls ... 89
Chapter 6: Beyond the Basic Phone Stuff . . . .91
Speed Dial ... 92
Multiple Call Mania ... 93
Receiving a new call when you’re on the phone ... 93
Juggling two calls ... 94
Making a conference call ... 94
Send a Call Elsewhere ... 95
Forwarding phone calls ... 95
Sending a contact directly to voicemail ... 96
Fun with Ringtones ... 97
Choosing the phone’s ringtone ... 97
Setting a contact’s ringtone ... 98
Using music as a ringtone ... 98
Creating your own ringtones ... 99
Chapter 7: At the Sound of the Tone . . . . . . .101
Carrier Voicemail ... 101
Setting up carrier voicemail ... 102
Changing the carrier voicemail number ... 102
Getting your messages ... 103
Visual Voice Mail ... 104
Setting up Visual Voice Mail ... 105
Accessing Visual Voice Mail ... 105
Chapter 8: The People in Your Phone . . . .107
Folks You Know ... 108
Presenting the Contacts list ... 108
Finding your Me account ... 110
Searching contacts ... 111
xiv
Droid 2 For Dummies
A New Contact Is Born ... 113
Making a new contact ... 113
Editing a contact ... 116
Sharing a contact ... 120
Removing a contact ... 120
Part III: Beyond Telephone Communications ... 121
Chapter 9: The 21st Century Telegram (Texting). . . .123
Message for You! ... 123
Composing a new text message to a contact ... 124
Sending a text message when you know only the phone number ... 127
Receiving a text message ... 128
Multimedia Messages ... 128
Composing a multimedia message ... 129
Attaching media to a message ... 129
Receiving a multimedia message ... 131
Message Management ... 131
Chapter 10: Mail of the Electronic Kind . . . .133
Mail Call! ... 134
You’ve Got Email ... 134
Getting a new message ... 135
Checking the inbox ... 135
Visiting your universal inbox ... 136
Reading an email message ... 138
Searching Gmail ... 140
Make Your Own Mail ... 140
Composing a new Gmail message ... 141
Composing a non-Gmail message ... 142
Starting a new message from a contact ... 143
Message Attachments ... 144
Email Confi guration ... 145
Setting up an email account ... 145
Creating a signature... 147
Setting email options ... 148
Chapter 11: Fun on the Web . . . .149
Behold the Web Page ... 150
Viewing the Web ... 150
Visiting a Web page ... 150
Browsing back and forth ... 151
xv
Table of Contents
Managing multiple Web page windows ... 154
Searching the Web ... 154
Sharing a page ... 156
The Perils and Joys of Downloading ... 157
Grabbing an image from a Web page ... 157
Downloading a fi le... 157
Reviewing your downloads... 158
Web Controls and Settings ... 158
Setting a home page ... 159
Changing the way the Web looks ... 159
Setting privacy and security options ... 160
Chapter 12: The Social Networking Thing. . . .161
Your Life on Facebook ... 161
Creating a Facebook account ... 162
Checking your social networking status ... 163
Visiting Facebook ... 163
Setting your Facebook status ... 165
Sending a picture to Facebook ... 166
Changing various Facebook settings ... 168
Become Famous with Twitter ... 168
Setting up Twitter on the Droid 2 ... 169
Getting the Twitter app ... 169
Tweeting to other twits ... 170
Other Social Networking Opportunities ... 171
Chapter 13: Share and Synchronize . . . .173
Make the Connection ... 173
Connecting the phone to the computer ... 174
Disconnecting the phone from the computer ... 176
Your Phone’s Storage ... 177
Accessing information on the MicroSD card ... 177
Unmounting, removing, and replacing the MicroSD card ... 179
That Syncing Feeling ... 180
Synchronizing with doubleTwist ... 180
Using the V CAST Media Manager ... 182
Chapter 14: Network Your Droid 2. . . .183
Wireless Network Access ... 183
Using the digital network ... 184
Creating a 3G mobile hotspot ... 184
Turning on Wi-Fi ... 186
Accessing a Wi-Fi network ... 187
Bluetooth Gizmos ... 190
Activating Bluetooth ... 190
xvi
Droid 2 For Dummies
Part IV: More than a Mere Mortal Cell Phone ... 193
Chapter 15: Never Get Lost Again . . . .195
Basic Map ... 195
Using the Maps app ... 196
Spiffi ng up the map with Labs ... 199
The Droid 2 Is Your Copilot ... 199
Locating your address... 199
Finding locations on the map ... 201
Getting directions ... 204
Navigating to your destination ... 205
Adding a navigation shortcut to the Home screen ... 206
Chapter 16: A Thousand Words . . . .209
The Droid 2 Has a Camera ... 209
Taking a picture ... 210
Adjusting the camera ... 212
Reviewing the picture... 214
You Ought to Be on Video ... 216
Recording video ... 216
Reviewing your movie ... 218
Chapter 17: Your Digital Photo Album . . . .219
Behold the Image Gallery ... 220
Perusing the Gallery ... 220
Finding an image location on a map ... 221
Working with pictures ... 222
Tagging images ... 224
Share Your Pics and Vids with the World ... 226
Sharing your pictures and videos ... 226
Uploading a video to YouTube... 230
Chapter 18: Music, Music, Music . . . .233
The Hits Keep On Coming ... 233
Browsing your music library ... 233
Playing a tune ... 235
Turning your phone into a deejay ... 237
Organize Your Music ... 238
Reviewing your playlists ... 238
Creating a playlist ... 239
Deleting music ... 240
More Music ... 241
Synchronizing music with your computer ... 241
Buying music at the Amazon MP3 store ... 243
xvii
Table of Contents
Chapter 19: A Clutch of Apps . . . .247
An Appointment to Remember ... 247
Understanding the Calendar ... 248
Browsing dates ... 248
Reviewing your schedule ... 250
Making a new event ... 252
Your Phone the Calculator ... 253
No Need to Alarm You ... 254
There’s No Tube Like YouTube ... 256
Movies in the Palm of Your Hand ... 258
The Droid 2 Does Games ... 258
Chapter 20: Shop at the Android Market . . . .261
Welcome to the Market ... 262
Visiting the Market ... 262
Getting a free app ... 264
Buying an app ... 265
Manage Your Applications ... 266
Reviewing your downloads... 266
Updating an app ... 268
Removing installed software ... 269
Controlling your apps ... 270
Part V: Hither and Thither ... 273
Chapter 21: On the Road Again . . . .275
Where the Phone Roams ... 275
Airplane Mode ... 277
International Calling ... 279
Dialing an international number ... 279
Making international calls with Skype mobile ... 280
Taking your Droid 2 abroad ... 282
Chapter 22: Customize Your Droid 2 . . . .283
It’s Your Home Screen ... 283
Changing wallpaper ... 284
Adding apps to the Home screen... 286
Slapping down widgets ... 286
Creating shortcuts ... 287
Rearranging and removing icons and widgets ... 288
Organizing apps into folders ... 288
Droid 2 Security ... 290
Creating an unlock pattern ... 291
Setting a PIN... 293
xviii
Droid 2 For Dummies
Various Phone Adjustments ... 295
Stopping the noise! ... 295
Performing automatic phone tricks... 296
Changing various settings... 296
Setting the double-tap Home soft button function ... 297
Using accessibility settings ... 298
Chapter 23: Maintenance and Troubleshooting . . . .299
Battery Care and Feeding ... 299
Monitoring the battery ... 299
Determining what is sucking up power ... 301
Managing battery performance ... 302
Saving battery life ... 303
Regular Phone Maintenance ... 306
Keeping it clean ... 306
Backing it up ... 306
Updating the system ... 308
Help and Troubleshooting ... 308
Getting help ... 309
Fixing random and annoying problems ... 309
Getting support ... 311
Droid 2 Q&A ... 311
“The touchscreen doesn’t work!” ... 312
“The onscreen keyboard is too small!” ... 312
“The battery doesn’t charge” ... 312
“The phone gets so hot that it turns itself off!” ... 312
“The phone doesn’t do Landscape mode!”... 313
Part VI: The Part of Tens ... 315
Chapter 24: Ten Tips, Tricks, and Shortcuts . . . .317
Summon a Recently Opened App ... 317
Formatted Email ... 318
Stop Unneeded Services ... 320
Set Keyboard Feedback ... 321
Add a Word to the Dictionary ... 322
Quickly Access Settings and Notifi cations ... 323
Create a Direct-Dial Screen Widget ... 323
Use Sliding-Keyboard Menu Shortcuts ... 324
Find Your Lost Cell Phone ... 325
xix
Table of Contents
Chapter 25: Ten Things to Remember . . . .327
Lock the Phone on a Call ... 327
Landscape Orientation ... 328
Use the Arrow Keys ... 328
Use the Keyboard Suggestions ... 328
Things That Consume Lots of Battery Juice ... 329
Check for Roaming ... 329
Use + When Dialing Internationally ... 330
Properly Access the MicroSD Card ... 330
Snap a Pic of That Contact ... 330
The Search Command ... 331
Chapter 26: Ten Worthy Apps. . . .333
AK Notepad ... 334
Barcode Scanner ... 334
Dolphin Browser ... 335
Google Finance ... 335
Movies ... 336
MySettings ... 336
Paper Toss ... 336
Ringdroid ... 336
SportsTap ... 337
Voice Recorder ... 337
Zedge ... 337
Introduction
D
on’t be fooled: Just because the Droid 2 is a smartphone doesn’t meanthat it’s harboring some form of insidious intelligence. There’s no alien brain in the device. It isn’t going to take over the world, though it can
intimi-date you — that is, until you understand and accept that it’s your phone. The
Droid 2 is a gizmo that helps make your life a heck of a lot easier.
The key to understanding an amazing piece of technology such as the Droid 2 is understanding. To help you get there, I offer this book: your friendly, infor-mative, relaxed, and often irreverent reference to the Motorola Droid 2 cell phone. Prepare to get more from your phone.
About This Book
This book is a reference. I don’t intend for you to read it from cover to cover. Instead, you’ll find each chapter to be its own, self-contained unit, covering a specific topic about using the Droid 2 phone. Each chapter is further divided into sections representing a task you perform with the phone or explaining how to get something done. Sample sections in this book include
✓ Typing on your Droid 2
✓ Phoning someone you call often
✓ Setting up Visual Voice Mail
✓ Sending a picture to Facebook
✓ Creating a 3G mobile hotspot
✓ Turning your phone into a deejay
✓ Dialing an international number
✓ Saving battery life
2
Droid 2 For Dummies
How to Use This Book
This book follows a few conventions for using the Droid 2. The main way you
interact with your phone is by using its touchscreen, which is the glassy part
of the phone as it’s facing you. Buttons also adorn the Droid 2, all of which are explained in Part I of this book.
You have various ways to touch the screen, which are explained and named in Chapter 3.
Chapter 4 discusses text input on the Droid 2, which involves using the Multi-Touch keyboard on the screen or the sliding keyboard. The Droid 2 also fea-tures the Swype onscreen keyboard for superfast text entry. And, when you tire of typing, you can always input text on your Droid 2 by dictation.
This book directs you to do things on your phone by following numbered steps. Each step involves a specific activity, such as touching something on the screen. For example:
3. Choose Downloads.
This step directs you to touch the text or item on the screen labeled Downloads. You might also be told to do this:
3. Touch Downloads.
Some phone options can be turned off or on, as indicated by a gray box with a green check mark in it, as shown in the margin. By touching the box on the screen, you add or remove the green check mark. When the green check mark appears, the option is on; otherwise, it’s off.
The barcodes in the margins are there to help you install recommended apps. To install the app, scan the barcode using special software you install on the Droid 2. Chapter 20 discusses how to add software to your phone, and in Chapter 26 I discuss how to use the Barcode Scanner app to read barcodes.
Foolish Assumptions
3
Introduction
My biggest assumption: You have a Droid 2 phone by Motorola. Though you can use this book generically with any Android phone, it’s specific to the things the Droid 2 can do.
In the United States, cellular service for the Droid 2 is provided by Verizon. Many things that the Droid 2 can do are based on the services Verizon offers, such as Visual Voice Mail or Backup Assistant.
I also assume that you have a computer, either a desktop or laptop. The computer can be a PC or Windows computer or a Macintosh. Oh, I suppose it could also be a Linux computer. In any event, I refer to your computer as “your computer” throughout this book. When directions are specific to a PC or Mac, the book says so.
Programs that run on the Droid 2 are apps, which is short for applications. A
single program is an app.
Finally, this book doesn’t assume that you have a Google account, but already having one helps. Information is provided in Chapter 2 about setting up a Google account — an extremely important part of using the Droid 2. Having a Google account opens up a slew of useful features, information, and programs that make using your Droid 2 phone more productive.
How This Book Is Organized
This book has been sliced into six parts, each of which describes a certain aspect of the Droid 2 or how it’s used.
Part I: Droid 2: The Sequel
This part of the book serves as your introduction to the Droid 2. Chapters cover setup and orientation and familiarize you with how the phone works. Part I is a good place to start, plus you discover things in this part that aren’t obvious from just guessing how the phone works.
Part II: Phone 101
4
Droid 2 For Dummies
Part III: Beyond Telephone Communications
The Droid 2 is about more than just telephone communications. Part III of this book explores other ways you can use your phone to stay in touch with people, the Internet, and other gizmos such as your desktop computer or a Bluetooth headset. Chapters in this part explain how to use text messaging, send and receive email, browse the Web, use social networking, and set up your phone for networking, among other things.
Part IV: More than a Mere Mortal Cell Phone
This part of the book explores the nonphone things your phone can do. For example, your phone can find locations on a map, give you verbal driving directions, take pictures, shoot videos, play music, play games, and do all sorts of wonderful things that no one would ever think a phone can do. The chapters in this part of the book get you up to speed on those activities.
Part V: Hither and Thither
The chapters in this part of the book discuss a slate of interesting topics, from taking the phone overseas and making international calls to customizing it to the necessary chores of maintenance and troubleshooting.
Part VI: The Part of Tens
Finally, this book ends with the traditional For Dummies Part of Tens, where
each chapter lists ten items or topics. For the Droid 2, the chapters include tips, tricks, shortcuts, and things to remember, plus a list of some of my favorite Droid 2 phone apps.
Icons Used in This Book
This icon flags useful, helpful tips or shortcuts.
5
Introduction
This icon marks a friendly reminder not to do something.
This icon alerts you to overly nerdy information and technical discussions of the topic at hand. Reading the information is optional, though it may win you
a pie slice in Trivial Pursuit.
Where to Go from Here
Start reading! Observe the table of contents and find something that interests you. Or, look up your puzzle in the index. When those suggestions don’t cut it, just start reading Chapter 1.
My email address is [email protected]. Yes, that’s my real address. I
reply to all the email I get, and you’ll get a quick reply if you keep your ques-tion short and specific to this book. Although I do enjoy saying Hi, I cannot answer technical support questions, resolve billing issues, or help you trou-bleshoot your phone. Thanks for understanding.
You can also visit my Web page for more information or as a diversion:
www.wambooli.com.
Part I
In this part . . .
I
t’s a given that Hollywood sequels rarely live up to the quality of the original movies. That hard-and-fast rule among movie buffs ensures that the rare exceptions are well known: The Godfather II,The Empire Strikes Back, and Toy Story 2. Plus, a handful of others are often touted as being as good as or better than their originals. But normally, sequels suck.1
A Droid 2 of Your Own
In This Chapter
▶ Putting your phone together
▶ Charging the battery
▶ Identifying the phone’s pieces parts
▶ Taking the phone with you
▶ Keeping the phone in one place
N
o one ever asked what happened to R2D1, the lesser-known littlebrother of R2D2 from the Star Wars films. His real name was R2D. That
was before the newer, improved R2D2 came along. Once the newer, improved model showed up, R2D became R2D1. He lost his luster and fame after the newer model showed up. That happens to all sorts of Droids all over the universe.
For your phone, the Droid 2 replaces the original Droid, which, as far as I know, is still named Droid and not Droid 1. Getting started with your Droid 2 begins with a basic familiarity of the hardware. This chapter helps you get to know your way around the Droid 2, by identifying its various parts, buttons, and sliding whatnot.
Initial Droid 2 Setup
Though it hasn’t happened, it would be neat if your phone rang inside the box just as you were opening it. The ringing would certainly accelerate the tedious process of opening the box. Then imagine how much fun it would be to
10
Part I: Droid 2: The Sequel
Looking in the box
Several items come in the Droid 2 box. Even though you’ve probably opened the box already and its contents are doubtless strewn across your desktop, I suggest that you take a moment to locate and identify each of the following goodies:
✓ Droid 2 phone
✓ Papers, instructions, warranty, and perhaps a booklet titled Getting
Started or even Los Primeros Pasos
✓ The phone’s battery, which might already be inside the phone
✓ The phone’s back (battery) cover
✓ Charger/data cable, which is basically a USB cable
✓ Charger head, a wall adapter for the charger/data cable
The phone may ship with a clingy, static plastic cover over its screen. Another plastic cover may be clinging to the battery cover. The plastic thin-gies tell you where various features are located or how to install the battery. You can remove the plastic at this time.
An additional sheet of plastic may be found by sliding out the Droid 2 keyboard; flip the phone over and remove the plastic from the back of the touchscreen.
In addition to the items described in the preceding list, you might have been given a bonus package of goodies from whoever sold you the phone. If the outfit is classy, you have a handy little tote bag with perhaps the Verizon logo on it. Inside the bag, you might find these items:
✓ Smart-looking, leatherette belt-clip phone holster
✓ Micro-USB car charger
✓ Headphones
✓ Even more random pieces of paper
The most important doodad is the phone itself, which might require some assembly before you can use it; refer to the next section for assembly directions.
You can safely set aside all this stuff until you get the phone assembled. I rec-ommend keeping the instructions and other information as long as you own the phone: The phone’s box makes an excellent storage place for that stuff — as well as anything else you don’t plan to use right away.
11
Chapter 1: A Droid 2 of Your Own
Installing the phone’s battery
Your phone might arrive in a disassembled state. If so, your first duty as a new Droid 2 owner is to install its battery. Your second duty is to charge the battery. Installing the battery is easy, and charging it doesn’t require a light-ning storm and a kite.
If the nice people who sold you the phone already installed the battery, the phone is ready for charging; see the next section. Otherwise, you can install the battery yourself by following these steps:
1. Ensure that the phone is turned off.
There’s no need to follow this step unless you got all excited and already turned on your phone. If so, see Chapter 2 for information on turning off the Droid 2.
2. Flip over the phone so that the front (the glassy part) is facing away from you.
Don’t remove the phone’s cover when the phone is turned on. You should also disconnect any cables or the headset, if attached.
3. If the battery isn’t installed, you must remove the cover: Place both thumbs on the center part of the upper back cover.
Refer to Figure 1-1 for proper thumb placement.
4. Gently slide the back cover downward using your thumbs.
A gentle push is all that’s required; feel free to squeeze the phone as you
push downward. The back cover slides down a wee bit, about 1⁄
8-inch.
5. Lift the phone’s back cover and set it aside.
12
Part I: Droid 2: The Sequel
6. If necessary, remove the battery from its plastic cocoon.
You can also remove the back cover from its plastic cocoon. You can also peel the plastic “sticky” from the back cover at this time.
7. Orient the battery so that its metallic contacts are in the upper right corner as you’re looking at the back of the phone.
The battery is shaped like a giant, square mint cookie. The battery doesn’t taste like mint, so please do not eat it.
8. Insert the battery, top edge first, and then lower the bottom edge like you’re closing the lid on a tiny box.
Refer to Figure 1-2 for help in positioning and inserting the battery. The metal contacts on the battery should be on the upper right edge as you insert the battery into the phone, as illustrated in the figure.
When it’s fully inserted, the back of the battery is flush with the back of the phone; it cannot stick up, not one itty bit.
9. Replace the phone’s back cover.
The cover has four prongs that slide into four slots on the back of the phone. Position the cover over the slots and it falls into place. Then slide up the cover with your thumbs until it snaps into place.
Back cover Contacts
Battery Droid 2
Figure 1-2: Inserting the phone’s battery.
13
Chapter 1: A Droid 2 of Your Own
Charging the battery
After inserting the battery into your new phone, the next step is to charge it. It’s cinchy:
1. Connect the charger head (the plug thing) to the charger/data cable.
They connect only one way.
2. Plug the charger head and cable into a wall socket.
3. Plug the phone into the charger/data cable.
The charger cord plugs into the micro-USB connector, found at the phone’s left side. The connector plugs in only one way.
As the phone charges, the notification light on the phone’s front side may light up. When the light is orange-yellow, the phone is charging. When the light is green, the phone is fully charged.
The phone may turn on when you plug it in for a charge. That’s okay; but you need to read Chapter 2 to find out what to do the first time the Droid 2 turns on. You also may need to phone your cell provider for additional setup instructions before you turn on the phone.
✓ Wait until the notification light turns green before unplugging the phone
from its power cable, especially the first time you charge the phone.
✓ The notification light uses three colors: amber for charging, green for
fully charged, and red for warning that the battery is low.
✓ The notification light flashes whenever the phone requires your
atten-tion, such as when new email or a text message has been received. See Chapter 3 for information on reviewing notifications.
✓ You can use the phone while it’s charging.
✓ The Droid 2 can use any standard cell phone charger, though I recommend
using the equipment that came with the phone or is designed for a Droid 2.
✓ You can charge the Droid 2 in your car, using what was once called a
“cig-arette lighter.” Simply ensure that your car cell phone charger features a micro-USB connector and that it’s designed for use with the Droid 2.
✓ The phone also charges itself when plugged into a computer using
either the USB cable that came with the phone or any micro-USB cable attached to a computer. The computer must be on for charging to work.
✓ The Droid 2 charges more quickly when it’s plugged into the wall as
opposed to a computer’s USB port or a car adapter.
✓ A micro-USB connector is a standard USB connector, but one that
14
Part I: Droid 2: The Sequel
Droid 2 Orientation
Back in the old days, a telephone came with a rotary dial. When you dialed a
phone, you were literally turning a dial on the phone. When you hung up the
phone, you placed the headset on a hook. Not so with cell phones. For
exam-ple, on the Droid 2 you use something called a touchscreen to dial the phone.
In case you don’t know what a touchscreen is, or what many of the other goo-bers are that festoon your phone, this section explains everything.
Knowing what’s what on your phone
Like all other confusing things, the Droid 2 attempts to intimidate you with some new terms for its features, not to mention that you may not be aware of all the hardware features available. Fret not, gentle reader.
Figure 1-3 illustrates the names of all the useful knobs and doodads on the front of your Droid 2 phone. Figure 1-4 illustrates the same things, but for your phone’s backside.
M O T O R O L A
Volume up
Volume down
Microphone Camera shutter button
Sliding keyboard Touchscreendisplay
Soft buttons Power / USB connector
Speaker Notification light
Power / Lock button Headphone
jack
15
Figure 1-4: Your phone’s rump.
The terms referenced in Figures 1-3 and 1-4 are the same ones used else-where in this book as well as in whatever scant Droid 2 documentation exists.
In addition to a front and back, your phone has a middle part, which slides out. This teensy keyboard was added to the Droid 2 because of a shipping error from Lilliput. You slide the keyboard out to the left when facing the phone, as illustrated in Figure 1-5.
When you’re done using the keyboard, you can slide it back into the phone, as shown in Figure 1-5.
✓ The phone’s Power button, which turns the phone off or on, is found on
top the phone, as shown in Figures 1-3 and 1-4.
✓ The main part of the phone is the touchscreen display. You use the
touchscreen with one or more of your fingers to control the phone,
which is where it gets the name touchscreen.
✓ The soft buttons appear below the touchscreen, as shown in Figure 1-3.
They have no function unless the phone is turned on.
✓ Yes, the main microphone is on the bottom of the phone. Even so, it
16
Part I: Droid 2: The Sequel
✓ The phone’s volume is adjusted by using the volume buttons on the
phone’s left side, as shown earlier in Figure 1-3.
✓ Sliding out the keyboard wakes up the phone when it has been sleeping.
Refer to Chapter 2 for more information on why the phone gets tired and falls asleep.
✓ Officially, the keyboard is the sliding keyboard. Notice that it’s not a true
QWERTY keyboard, like the one found on your computer. Chapter 4 covers using the sliding keyboard.
✓ When the keyboard is out, the phone’s touchscreen display switches to
landscape orientation. You can read more about the phone’s ability to orient the display into landscape and portrait modes in Chapter 3.
M
Figure 1-5: The Droid 2 secret keyboard.
Listening with earphones
17
Chapter 1: A Droid 2 of Your Own
You’re probably familiar with the earbud type of earphone: The buds are set into your ears. The sharp, pointy end of the earphones, what you don’t want to stick into your ear, plugs into the top of the phone.
Between the earbuds and the sharp, pointy thing is often found a doodle on which a button sits. The button can be used to mute the phone or to start or stop the playback of music when the Droid 2 is in its music-playing mode.
You can also use the doodle button to answer the phone when it rings.
There’s usually a teensy hole on the back side of the doodle that serves as the phone’s microphone. You can use the earphones as a hands-free headset with the Droid 2. Because I’m half Italian, I love this option.
✓ You can purchase any standard cell phone headset for use with the
Droid 2.
✓ Some headsets feature extra doodle buttons. Those headsets work fine
with the Droid 2, though the extra buttons may not do anything specifi-cally with the Droid 2.
✓ The earbuds are labeled R for right and L for left. If not, the end with the
shorter wire is placed in your right ear.
✓ You don’t use the earphone’s doodle to set the phone’s volume, either
in a call or while you’re listening to music. Instead, the volume is set by using the volume control buttons, found on the side of the phone, as illustrated in Figures 1-3 and 1-4.
✓ See Chapter 18 for more information on using your Droid 2 as a portable
music player.
✓ Be sure to fully insert the earphone connector into the phone. The
person you’re talking with can’t hear you well when the earphones are plugged in only part of the way.
✓ You can also use a Bluetooth headset with your phone, to listen to a
call or some music. See Chapter 14 for more information on Bluetooth attachments for the Droid 2.
✓ Fold the earphones when you don’t need them, as opposed to
18
Part I: Droid 2: The Sequel
Exploring your phone’s guts
Rarely do you need to examine the intricacies of your phone’s innards. Still, unlike other cell phones, the Droid 2 is designed to let you easily access replaceable items inside the unit without having to sneak around behind the manufacturer’s back and alerting the warranty police.
Specifically, you need to open your phone for only two reasons:
✓ To replace the battery
✓ To access the MicroSD memory card
When you need to access those items, you can obey these steps:
1. Turn off your phone.
See the section “Turning off the phone,” in Chapter 2, for more information.
2. Flip the phone over.
3. Press down on the upper part of the back cover, using your thumbs as illustrated earlier, in Figure 1-1.
The back cover slides down.
4. Set aside the back cover.
Use Figure 1-6 to identify the phone’s battery and the MicroSD memory card.
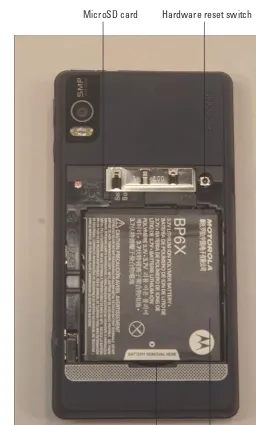
The battery is removed by lifting its bottom edge: Use your fingernail to lift beneath the label Battery Removal Here, as illustrated in Figure 1-6.
To remove the MicroSD card, pull it downward using the tiny lip at the bottom of the card. It fits in there kind of tightly, so don’t be shy about dragging it out. Pull out the card all the way until it’s free.
See Chapter 23 for more information on the Droid 2 battery.
When you’re done rummaging around inside your phone, you close things up:
5. Set the back cover onto the phone; the little prongs on the back cover fit into four holes on either side of the phone.
The cover fits only one way.
6. Slide the cover up until it snaps into position.
19
Chapter 1: A Droid 2 of Your Own
MicroSD card Hardware reset switch
Battery Lift the battery here
20
Part I: Droid 2: The Sequel
You can turn on the phone again, after the cover is locked into place. See Chapter 2 for information on turning on your phone.
The Droid 2 does not have or use a SIM card. Other cell phones use the SIM card to access the cellular network. The SIM, which stands for Subscriber Identity Module, identifies the phone and does other things you need not care about.
Fashionable Droid 2 Accessories
The Droid 2 has available two accessories you can buy to enhance your mobile communications experience. They are the Multimedia Station and the Car Mount phone holder.
Using the Multimedia Station
In a nutshell, the Multimedia Station is a heavy base into which you can
set your phone. The station features a USB connection so that the phone can recharge inside the Multimedia Station as well as communicate with a computer.
When the Droid 2 is set inside the Multimedia Station, it runs a special Clock home screen, which displays the current time and provides access to common phone features, as shown in Figure 1-7.
Figure 1-7: The Droid 2 in the Multimedia Station.
21
Chapter 1: A Droid 2 of Your Own
✓ The Multimedia Station can be purchased at the same place where
you obtained your Droid 2 or at any location where cell phone goodies are sold.
✓ With the Multimedia Station, you get the handsome, high-tech-looking
base and a USB cable, plus a power adapter.
✓ See Chapter 19 for more information about using your state-of-the-art
cell phone as a digital clock.
✓ Chapter 18 covers playing music on the Droid 2.
✓ Playing slide shows and managing pictures with the Droid 2 are covered
in Chapter 17.
Watching Your Droid 2 in Your Car
There’s no point in fumbling with your phone while you’re on the road. That’s because the Droid 2 comes with a handy car mount. When the car mount is properly assembled, a suction cup on one end of it lets you stick
your Droid 2 to any flat surface. Because it’s a car mount, I assume that you’ll
suck it to the windshield or dashboard of your favorite auto and not your refrigerator or an elevator door.
When you stick the Droid 2 into the car mount, the phone automatically switches to the Car Home screen, shown in Figure 1-8. You can read more about the Car Home screen in Chapter 3, which is your basic Droid 2 orienta-tion chapter.
Car Home notification icon Map and navigation
Exit to Home screen
22
Part I: Droid 2: The Sequel
The Droid 2 also has a rapid car charger, which may come with the car mount or may be an extra purchase. The rapid car charger is one of those gizmos that plugs into the car’s power adapter (née cigarette lighter). The other end of the rapid car charger plugs into the Droid 2, which can be nestled in the car mount or just rattling loose inside your vehicle.
✓ Yes, you can use the rapid car charger without having to use the
car mount.
✓ To make the suction cup on the car mount work properly, you use a
hard, smooth surface. An adhesive plastic disk comes with the car mount. Use the disk to ensure that the suction cup has something solid to suck on.
A Home for Your Phone
There was no point in finding a home for your phone back when the Telephone Company bolted the thing to the wall. I remember hunting all over the house for our family’s first cordless phone. That was a pain when the batteries were dead and the phone’s locator-ring trick didn’t work. It
was even more of a pain when you just knew that the phone was lost in the
sofa cushions and Aunt Martha was pulling some zzz’s on the couch.
Your Droid 2 lives an untethered existence, so find it a permanent spot — even when you’re carrying it around.
Carrying the Droid 2
The compact design of the Droid 2 is perfect for a pocket or even the teensi-est of party purses. It’s well designed so that you can carry your phone in your pocket or handbag without the fear that something will accidentally turn it on, dial Sri Lanka, and run up a heck of a cell phone bill.
Because the Droid 2 features a proximity sensor, you can even keep the phone in your pocket while you’re on a call. The proximity sensor disables the touchscreen, which ensures that nothing accidentally gets touched when you don’t want it to be touched.
✓ Though it’s okay to place the phone somewhere when you’re making a
23
Chapter 1: A Droid 2 of Your Own
✓ You can always store the Droid 2 in one of a variety of handsome
carrying case accessories, some of which come in fine Naugahyde or leatherette.
✓ Don’t forget that the phone is in your pocket, especially in your coat or
jacket. You might accidentally sit on the phone, or it could fly out when you take off your coat. The worst fate for the Droid 2, or any cell phone, is to take a trip through the wash. I’m sure the phone has nightmares about that happening.
Storing the Droid 2
I recommend that you find a place for your phone when you’re not taking it with you. Make the spot consistent: on top of your desk or workstation, in the kitchen, on the nightstand — you get the idea. Phones are as prone to being misplaced as are your car keys and glasses. Consistency is the key to finding your phone.
Then again, your phone does ring, so when you lose it, you can always have someone else call your cell phone to help you locate it.
✓ The Multimedia Station makes a handsome, permanent location for your
Droid 2.
✓ I keep my Droid 2 on my desk, next to my computer. Conveniently, I
have the charger plugged into the computer so that I keep the phone plugged in, connected, and charging when I’m not using it.
✓ Phones on coffee tables get buried under magazines and often squished
when rude people put their feet on the furniture.
✓ Avoid putting the Droid 2 in direct sunlight; heat is a bad thing for any
electronic gizmo.
✓ Do not put your phone in the laundry (see the preceding section). See
2
Initial Configuration
In This Chapter
▶ Setting up the Droid 2
▶ Turning on the phone
▶ Working with a Google account
▶ Snoozing the Droid 2
▶ Turning off your phone
T
he 20th century ushered in many amazing new inventions, just aboutnone of which required any initial setup or configuration. When you bought a car, it was ready to run. When you bought a TV, you plugged it in and turned it on. When you bought a microwave oven, you searched for a tepid cup of coffee and then marveled at how the brew heated up — in its own mug, no less. Those were simple times.
Like most things in this 21st century world, your Droid 2 requires some initial configuration. It’s unavoidable. Even if the Nice People In The Store set up your phone and did all the stuff they do (whatever it is), your phone needs input from you to complete the setup process. It’s all part of the 21st century, and getting the most from your Droid 2.
Oh, this chapter also covers the official ways of turning your phone on and off, as well as putting the phone to sleep and waking it again.
Greetings, Human
One of the most basic operations for any gizmo is knowing how to turn it on. Don’t bother looking: The Droid 2 doesn’t have an on-off switch. Instead,
it has a Power button. It can be used in several ways, which is why I had to
26
Part I: Droid 2: The Sequel
The Droid 2 doesn’t turn on unless its battery is installed and fully charged. Sure, you can try turning on the phone without a battery, but it takes forever. See Chapter 1.
Turning on the Droid 2 for the first time
Before turning on your Droid 2 for the first time, ensure that it has been con-figured. The folks at the store may have completed the configuration for you. If not, you may need to call your cell phone provider before you turn on the phone. A notice inside the box alerts you to the process.
To turn on the Droid 2 for the first time, press the Power button. You see the
Motorola logo, the word Droid, and some fancy graphics and animation. After
a moment, you hear the phone say, robotically, “Droid!” Don’t be alarmed. Well, at least its response is better than the one you hear when you turn on one of those inexpensive phones, which greets you with the phrase “You cheap bastard.”
When you turn on your phone for the first time, you have to do some setup. This step is required, and it may have been done by the folks who sold you the Droid 2. If not, you can follow along here when you first start the phone and see the Android character prompting you to get started:
1. Obey the instructions on the touchscreen display and touch the Android icon.
2. If you’re prompted, touch the Activate button to activate your phone.
The Activation notice doesn’t appear when the nice people who sold you your phone configured it for you. So, when you buy your phone directly from Verizon or someone else on the Internet, you have to suffer through the activation process.
If you don’t need to activate your phone, skip to Step 5.
3. Heed the directions of the robot.
Touch the Speaker button so that you can hear what the robot is saying and punch numbers into the dialpad on the touchscreen when necessary.
4. Touch the Next button after activating your phone.
You’re presented with a tutorial, which tells you about your Droid 2 and how it works.
5. Touch the Begin button to view the tutorial.
Or, you can touch the Skip button to proceed with basic configuration.
27
Chapter 2: Initial Configuration
6. Touch the Next button.
You should have a Google account with your phone, especially because it says “with Google™” on the back. If you don’t already have a Google account, set one up right now.
Setting up a Google account using your computer is easier than using the phone. See the section “Account Creation and Synchronization Setup” for more information on using a Google account with the Droid 2.
If you have multiple Google accounts, sign in to the phone using the pri-mary account or the one that has the calendar you use most often.
7. Choose the Sign In button to sign in to your existing Google account.
8. Touch the first text field, where you enter your Google account name.
A keyboard appears at the bottom of the touchscreen.
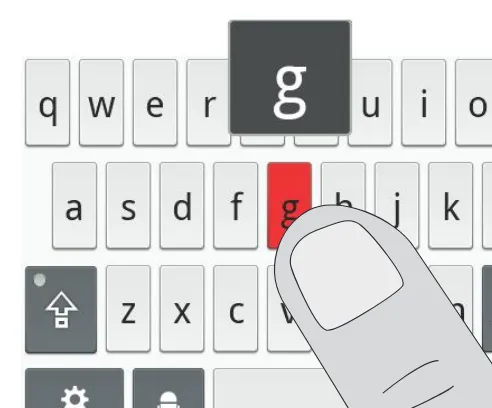
9. Use the onscreen keyboard to type your Google account name.
Feel free to use the phone’s slider keyboard, if you prefer it, though I recommend first reviewing Chapter 4 to get comfortable with that keyboard. Otherwise, these steps assume that you’re using the onscreen keyboard.
The Google account name is also the first part of your Gmail email
account. For example, my Gmail account name is dan.gookin.
Touch the onscreen keyboard’s Delete button to back up if you make a mistake.
10. Touch the Password text box.
11. Type your Google account password.
Each character in the password appears briefly as you type it, and then the character turns into a black dot. So pay attention to what you type!
Touch the onscreen keyboard’s Shift key to display capital letters.
Touch the onscreen keyboard’s Symbols key to see numbers and a smattering of other symbols that might dwell in your Google account password.
12. Touch the Sign In button.
If you can’t see the Sign In button, touch the Done button on the key-board or, if that’s not available, touch the Back soft button, found at the bottom of the touchscreen (and shown in the margin).
13. Ensure that a check mark appears by the option Back Up Data with My Google Account.
28
Part I: Droid 2: The Sequel
14. Touch the Next button.
15. Touch the Finish Setup button.
You may be asked additional setup and configuration questions. Plow through them, if you will, or you generally have an option to skip things by touching the Skip button on the touchscreen.
If you find any option that perplexes you, use this book’s Index to look up the item and glean more information.
After the initial setup, you’re taken to the Home screen. Chapter 3 offers more Home screen information, which you should probably read right away before the temptation to play with the Droid 2 becomes unbearable.
✓ If you have more than one Google account, you have to manually add
that account after you initially configure your Droid 2. See the later sec-tion “Setting up a Google account on your phone.”
✓ The Droid 2 works closely with your Google account, sharing
informa-tion you have on the Internet for your email and contacts on Gmail, appointments on the Google Calendar, plus other Google applications.
✓ A Google account is free. Google makes bazillions of dollars by
sell-ing advertissell-ing on the web, so they don’t charge you for your Google account or any of the fine services they offer.
✓ You will find that your phone has automatically synched with your
Google account after initial setup. Your contacts, calendar appoint-ments, and Google Talk pals will already be configured for you on your Droid 2.
✓ When your various Google accounts (email messages and calendar
appointments, for example) are holding a massive amount of informa-tion, the Droid 2 may take a while to fully synchronize everything. An appropriate message appears on the phone during these long waiting periods.
✓ You can also configure your phone to work with other
information-sharing services, such as those offered by your company or organization. See the section “Configuring the Droid 2 for corporate use” later in this chapter.
Turning on the phone
29
Chapter 2: Initial Configuration
After pressing the Power button, the phone turns itself on. You’ll see the Droid 2 logo and animation, and the phone may scream “Droid!” at you. Eventually you’ll be plopped into an unlocking screen.
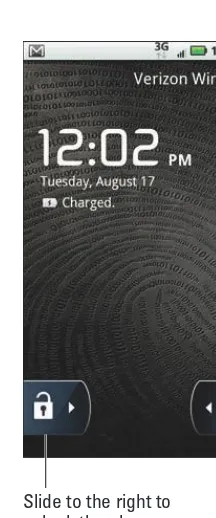
The primary unlocking screen is shown in Figure 2-1. To access your phone, use your finger to slide the padlock icon to the right.
Slide to the right to unlock the phone
Slide to the left to silence the phone
Figure 2-1: Unlocking the phone.
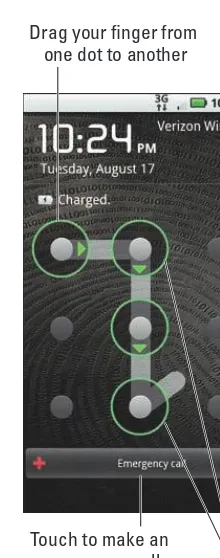
A second unlocking screen, shown in Figure 2-2, uses an unlock pattern to help prevent unauthorized access to your phone. Drag your finger over the dots on the screen, duplicating the pattern you’ve preset. Only after you drag over the dots in the proper sequence is the phone unlocked.
30
Part I: Droid 2: The Sequel
Drag your finger from one dot to another
Touch to make an emergency call
Follow the pattern you’ve already set
Figure 2-2: Tracing the phone’s security pattern.
Eventually, you see the Home screen, which is where you control the phone, run applications, and do all sorts of interesting things. The Home screen is covered in Chapter 3.
✓ The locking pattern, PIN, and password screens appear only when
you’ve configured those items on your Droid 2. They add a level of security that the normal locking screen (shown in Figure 2-1) doesn’t provide. See Chapter 22.
✓ PIN stands for personal identification number.
✓ After unlocking the phone, you may hear some alerts or see
notifica-tions. These messages inform you of various activities taking place in the phone, such as new email, scheduled appointments, updated apps, and more. See Chapter 3 for information on notifications.
✓ Even if the phone has a security pattern, PIN, or password, you can still
make emergency calls: Touch the Emergency Call button, as illustrated in Figure 2-2.
31
Chapter 2: Initial Configuration
Waking up the phone
Most of the time, you don’t turn off your phone. Instead, the phone does the electronic equivalent of falling asleep. Either the phone falls asleep on its own (after you’ve ignored it for a while), or you can put it to sleep by singing it a lullaby or following the information in the section “Snoozing the phone,” later in this chapter.
In Sleep mode, the phone is still on and it can still receive calls (as well as email and other notifications), but the touchscreen is turned off.
The phone wakes itself up whenever it receives a call; you see the unlock screen, similar to the one shown earlier, in Figure 2-1, though information about the person calling appears on the touchscreen: Slide the unlock tab to the right to unlock and answer the phone.
When the phone isn’t ringing, you can wake it at any time by pressing the Power button. A simple, short press is all that’s needed. The phone awakens, yawns, and turns on the touchscreen display, and you can then unlock the phone as described in the preceding section.
✓ Touching the touchscreen when the screen is off doesn’t wake up
the phone.
✓ Pressing the camera shutter button while the phone is sleeping doesn’t
wake up the phone.
✓ Loud noises will not wake up the phone.
✓ The phone doesn’t snore while it’s sleeping.
There’s an Android in your phone
You might see or hear the term Android used in association with your phone. That’s because your phone, like your computer, has an operat-ing system — the main program in charge of a computer’s hardware. The operating system controls everything. For the Droid 2, that operat-ing system is Android.
The Android operating system was developed by Google. Well, actually, it was started by another company that Google gobbled. Anyway: Android is based on the popular Linux operating
system, used to power desktop computers and larger, more expensive, computers all over the world. Android offers a version of Linux cus-tomized for mobile devices, such as the Droid 2, but also for other cell phone brands that I can’t recall right now.
32
Part I: Droid 2: The Sequel
✓ See the section “Snoozing the phone,” later in this chapter, for
informa-tion on manually putting the phone to sleep.
✓ The pattern lock, PIN, and password prompts don’t appear when you’re
answering the phone; only the sliding lock (see Figure 2-1) is used.
Account Creation and Synchronization Setup
After initially turning on your phone and getting things configured, you’re ready to go. Well, that is, unless you opted to skip the account synchroniza-tion step or you just didn’t get a chance to synchronize the proper accounts. Don’t fret! The Droid 2 welcomes your ability to procrastinate by providing more account synchronization options, as described in this section.
Getting a Google account
It helps immensely to have a Google account to get the most from your
Droid 2 phone. If you don’t already have a Google account, run — don’t walk or stroll — to a computer and follow these steps to create your own Google account:
1. Open the computer’s Web browser program.
2. Visit the main Google page at www.google.com.
Type www.google.com into the Web browser’s Address box.
3. Click the Sign In link.
Another page opens where you can log in to your Google account, but you don’t have a Google account, so:
4. Click the link to create a new account.
The link is typically found beneath the text boxes where you would log in to your Google account. As I write this chapter, the link is titled Create an Account Now.
5. Continue heeding the directions until you’ve created your own Google account.
33
Chapter 2: Initial Configuration
Continue reading in the next section for information on synchronizing your new Google account with the Droid 2 phone.
✓ The Google account gives you access to a wide array of free services
and online programs. These include Gmail for electronic messaging, Calendar for scheduling and appointments, the online picture sharing program Picasa, and an account on YouTube, along with Google Finance, blogs, Google Buzz, and other features that are also instantly shared with your phone.
✓ Information on using the various Google programs on your phone is
cov-ered throughout this book; specifically, in Part IV.
Setting up a Google account on your phone
The only time you need to set up a Google account for your Droid 2 is when you neglected to initially set up the account when you first bought the phone, you postponed setup, or you’re adding a second Google account you already have. If you have the Google account already set up, great: Just concentrate on working through the steps in this section.
If you haven’t yet configured a Google account, though, follow the steps in the preceding section and then continue with these steps:
1. Go to the Home screen.
The Home screen is the Droid 2’s main screen. You can always get there by pressing the Home soft button, found at the bottom of the touchscreen.
2. Touch the Launcher button.
The Launcher button is found at the lower center of the Home screen. Touching this button displays the Applications Tray, which lists icons representing every application installed on your phone.
3. Scroll the list of program icons to locate the My Accounts icon.
Scroll the list by using your finger; touch the screen and slide your finger up, toward the top of the phone.
The application icons are arranged in alphabetical order, so the My Accounts icon might be partway down the list.
4. Touch the Add Account button.
5. Choose Google.