by Neal Goldstein
and Dave Wilson
Development
FOR
Copyright © 2013 by John Wiley & Sons, Inc., Hoboken, New Jersey
Published by John Wiley & Sons, Inc., Hoboken, New Jersey Published simultaneously in Canada
No part of this publication may be reproduced, stored in a retrieval system or transmitted in any form or by any means, electronic, mechanical, photocopying, recording, scanning or otherwise, except as permit-ted under Sections 107 or 108 of the 1976 Unipermit-ted States Copyright Act, without either the prior written permission of the Publisher, or authorization through payment of the appropriate per-copy fee to the Copyright Clearance Center, 222 Rosewood Drive, Danvers, MA 01923, (978) 750-8400, fax (978) 646-8600. Requests to the Publisher for permission should be addressed to the Permissions Department, John Wiley & Sons, Inc., 111 River Street, Hoboken, NJ 07030, (201) 748-6011, fax (201) 748-6008, or online at http:// www.wiley.com/go/permissions.
Trademarks: Wiley, the Wiley logo, For Dummies, the Dummies Man logo, A Reference for the Rest of Us!, The Dummies Way, Dummies Daily, The Fun and Easy Way, Dummies.com, Making Everything Easier, and related trade dress are trademarks or registered trademarks of John Wiley & Sons, Inc. and/or its affiliates in the United States and other countries, and may not be used without written permission. All other trade-marks are the property of their respective owners. John Wiley & Sons, Inc., is not associated with any product or vendor mentioned in this book.
LIMIT OF LIABILITY/DISCLAIMER OF WARRANTY: THE PUBLISHER AND THE AUTHOR MAKE NO REPRESENTATIONS OR WARRANTIES WITH RESPECT TO THE ACCURACY OR COMPLETENESS OF THE CONTENTS OF THIS WORK AND SPECIFICALLY DISCLAIM ALL WARRANTIES, INCLUDING WITH-OUT LIMITATION WARRANTIES OF FITNESS FOR A PARTICULAR PURPOSE. NO WARRANTY MAY BE CREATED OR EXTENDED BY SALES OR PROMOTIONAL MATERIALS. THE ADVICE AND STRATEGIES CONTAINED HEREIN MAY NOT BE SUITABLE FOR EVERY SITUATION. THIS WORK IS SOLD WITH THE UNDERSTANDING THAT THE PUBLISHER IS NOT ENGAGED IN RENDERING LEGAL, ACCOUNTING, OR OTHER PROFESSIONAL SERVICES. IF PROFESSIONAL ASSISTANCE IS REQUIRED, THE SERVICES OF A COMPETENT PROFESSIONAL PERSON SHOULD BE SOUGHT. NEITHER THE PUBLISHER NOR THE AUTHOR SHALL BE LIABLE FOR DAMAGES ARISING HEREFROM. THE FACT THAT AN ORGANIZA-TION OR WEBSITE IS REFERRED TO IN THIS WORK AS A CITAORGANIZA-TION AND/OR A POTENTIAL SOURCE OF FURTHER INFORMATION DOES NOT MEAN THAT THE AUTHOR OR THE PUBLISHER ENDORSES THE INFORMATION THE ORGANIZATION OR WEBSITE MAY PROVIDE OR RECOMMENDATIONS IT MAY MAKE. FURTHER, READERS SHOULD BE AWARE THAT INTERNET WEBSITES LISTED IN THIS WORK MAY HAVE CHANGED OR DISAPPEARED BETWEEN WHEN THIS WORK WAS WRITTEN AND WHEN IT IS READ.
For general information on our other products and services, please contact our Customer Care Department within the U.S. at 877-762-2974, outside the U.S. at 317-572-3993, or fax 317-572-4002. For technical support, please visit www.wiley.com/techsupport.
Wiley also publishes its books in a variety of electronic formats and by print-on-demand. Not all content that is available in standard print versions of this book may appear or be packaged in all book formats. If you have purchased a version of this book that did not include media that is referenced by or accom-panies a standard print version, you may request this media by visiting http://booksupport.wiley. com. For more information about Wiley products, visit us www.wiley.com.
Library of Congress Control Number: 2012955762
ISBN 978-1-118-50880-0 (pbk); ISBN 978-1-118-55006-9 (ebk); ISBN 978-1-118-55013-7 (ebk); ISBN 978-1-118-55095-3 (ebk)
Neal Goldstein is a recognized leader in making state-of-the-art and cutting-edge technologies practical for commercial and enterprise development. He was one of the first technologists to work with commercial developers at firms such as Apple Computer, Lucasfilm, and Mircrosoft to develop commercial applications using object-based programming technologies. He was a pioneer in moving that approach into the corporate world for developers at Liberty Mutual Insurance, USWest (now Verizon), National Car Rental, EDS, and Continental Airlines, showing them how object-oriented programming could solve enterprise-wide problems. His book (with Jeff Alger) on object-oriented development, Developing Object-Oriented Software for the Macintosh (Addison Wesley, 1992), introduced the idea of scenarios and patterns to developers. He was an early advocate of the Microsoft .NET framework, and he successfully introduced it into many enterprises, including Charles Schwab. He was one of the earliest developers of Service Oriented Architecture (SOA), and as Senior Vice President of Advanced Technology and the Chief Architect at Charles Schwab, he built an integrated SOA solution that spanned the enterprise, from desktop PCs to servers to complex network mainframes. (He holds six patents as a result.) As one of IBM’s largest customers, he introduced the folks at IBM to SOA at the enterprise level and encouraged them to head in that direction.
Since the release of the iPhone SDK in March 2008, he has been focusing on mobile applications and has had eight applications in the App Store, including a series of Travel Photo Guides (developed with his partners at mobile fortytwo), and a Digital Field Guides series (http://lp.wileypub.com/ DestinationDFGiPhoneApp), developed in partnership with Wiley. He also has a free app called Expense Diary that allows you to keep track of things like expenses, mileage, and time by adding them to your calendar.
Application Development For Dummies (multiple editions all published by Wiley), Objective-C For Dummies (multiple editions all published by Wiley), and he co-authored (with Tony Bove) iPad Application Development For Dummies (multiple editions published by Wiley) and iPhone Application Development All-in-One For Dummies (Wiley). He is also the primary author (with Jon Manning and Paris Buttfield-Addison) of iPhone & iPad Game Development For Dummies.
Dave Wilson is the sole proprietor of Personal Concepts and an independent software consultant and software developer living in San Jose, California. Although Dave has a Bachelor’s degree in Engineering Physics from Cornell University, and a Masters and Ph.D. in Applied Physics from Stanford University, he doesn’t do physics research anymore — other than occasionally looking under the bed for Dark Energy, and collecting Higgs bosons for fun and profit.
Dave’s areas of software expertise include graphical user interfaces, object-oriented programming, frameworks, and developing iOS apps.
Dave developed and taught the first regularly scheduled classes on Macintosh programming for Apple starting in 1984 and taught Apple’s first regularly scheduled classes on object-oriented programming starting in 1987. He also taught Smalltalk-80 programming classes for Xerox PARC (and then ParcPlace) — the inventors of Smalltalk. Dave also taught advanced Java programming classes for Sun Microsystems — the inventors of Java and still teaches iOS programming classes when he has time.
Dave has presented programming seminars for IBM, Boeing, Visa
International, and many other clients in lots of interesting places, such as London; Tokyo; Hamburg, Germany; Melbourne, Australia; and even Infinite Loop in Cupertino, California.
Dave was the lead author on a number of quick-reference guides and programming books, including the IBM PC Diskguide, Programming with MacApp, and C++ Programming with MacApp.
Dave’s iPhone and iPad apps include Deadlines, Rick Sammon’s 24/7 Photo Buffet, Rick Sammon’s 24/7 Photo Buffet for iPad, and Rick Sammon’s iHDR.
To my friends and family, and especially my children Sarah and Evan and my wife, Linda. She deserves special recognition for her support and patience and for maintaining her (and my) sense of humor. Without her support, I never would have been able to write 12 books in 3.5 years. Thank you so much.
This is for you As day follows night The tunnel ends in the light Finally time to play
— Neal Goldstein
To my wife, Cheryl, for being tolerant of all the time I spend in front of a Macintosh.
— Dave Wilson
Authors’ Acknowledgments
Acquisitions and Editorial
Sr. Project Editor: Mark Enochs
Sr. Acquisitions Editor: Kyle Looper
Copy Editor: John Edwards
Technical Editor: Jesse Feiler
Editorial Manager: Leah Michael
Editorial Assistant: Anne Sullivan
Sr. Editorial Assistant: Cherie Case
Cover Photo: Cardboard box © 123render/ iStockphoto.com; toolbox, wrench, hammer, gears, and calendar icons © PhotoHamster/iStockphoto.com; apple icon © Paul Pantazescu/iStockphoto.com Cartoons: Rich Tennant (www.the5thwave.com)
Composition Services
Project Coordinator: Patrick Redmond
Layout and Graphics: Christin Swinford
Proofreaders: John Greenough, Evelyn Wellborn
Indexer: Broccoli Information Mgt.
Publishing and Editorial for Technology Dummies
Richard Swadley, Vice President and Executive Group Publisher
Andy Cummings, Vice President and Publisher
Mary Bednarek, Executive Acquisitions Director
Mary C. Corder, Editorial Director
Publishing for Consumer Dummies
Kathy Nebenhaus, Vice President and Executive Publisher
Composition Services
Introduction ... 1
A Bit of History ... 1
The iPhone Stands Alone ... 2
The iPad Joins the Party ... 2
A Universal App ... 2
Serial or Parallel Development? ... 3
Our Plan for This Book ... 3
iOS and Xcode Game Changers ... 5
About This Book ... 6
Conventions Used in This Book ... 7
Foolish Assumptions ... 8
How This Book Is Organized ... 8
Part I: Getting Started ... 8
Part II: Building RoadTrip ... 9
Part III: Getting Your Feet Wet — Basic Functionality ... 9
Part IV: The Model and Application Structure ... 10
Part V: Adding the Application Content... 10
Part VI: The Part of Tens ... 10
Icons Used in This Book ... 11
Where to Go from Here ... 11
Part I: Getting Started ... 13
Chapter 1: What Makes a Killer iOS App. . . .15
Figuring Out What Makes a Great iOS Application ... 16
Providing an immersive experience ... 17
Making content relevant ... 18
Designing for the larger iPad screen ... 18
Exploiting the iOS Platform ... 19
Exploiting advantages of the system ... 19
Accessing the Internet... 21
Knowing the location of the user ... 21
Tracking orientation and motion ... 21
Tracking users’ fingers on the screen ... 22
Playing content ... 22
Accessing information from Apple’s apps ... 22
Copying, cutting, and pasting between apps ... 23
Multitasking, background processing, and notifications ... 23
Designing for fingers ... 25
Balancing memory and battery life ... 26
Why Develop iOS Applications? ... 27
Developing with Apple’s Expectations in Mind ... 28
An Application Ecosystem ... 29
Enter the Cloud ... 31
Developing an App the Right Way Using the Example App in This Book ... 31
What’s Next ... 32
Chapter 2: Getting to Know the SDK . . . .33
Developing Using the SDK ... 33
Using Xcode to Develop an App ... 34
Creating an Xcode project ... 35
Developing the application ... 35
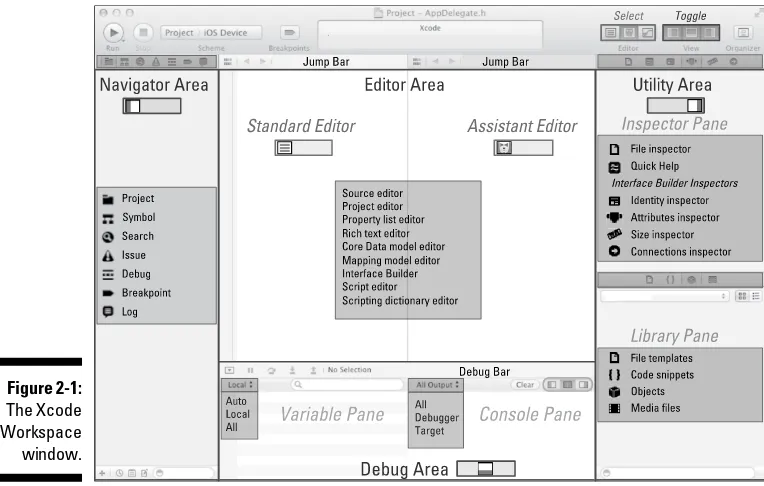
The Workspace Window ... 37
Workspace areas ... 38
Displaying an area’s content ... 40
The toolbar and Tab bar ... 44
The Organizer window ... 45
Chapter 3: The Nuts and Bolts of an Xcode Project. . . .47
Creating Your Project ... 47
Exploring Your Project ... 52
The project ... 52
The Project editor ... 53
The Project navigator ... 55
Setting Your Xcode Preferences ... 58
Building and Running Your Application ... 61
Building an app ... 62
The iPad’s Split views ... 64
The Log navigator ... 65
Running in the Simulator ... 67
Interacting with your simulated hardware ... 67
Making gestures ... 68
Uninstalling apps and resetting your device ... 69
Living with the Simulator’s limitations ... 70
Adding the Image and Sound Resources and an Application Icon ... 71
Standard and Retina display images ... 72
Adding the application icons ... 73
Part II: Building RoadTrip ... 75
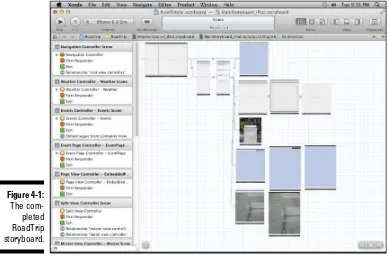
Chapter 4: Storyboards and the User Experience . . . .77
Introducing the Storyboard ... 78
Telling your story ... 78
Working with object graphs ... 80
Defining What You Want an Application to Do: The RoadTrip Application ... 81
Creating the Application Architecture ... 86
What You Add Where ... 86
Using Frameworks ... 87
Using Design Patterns ... 88
The iOS design patterns ... 89
The Model-View-Controller (MVC) design pattern ... 89
Working with Windows and Views ... 92
Looking out the window... 92
Admiring the view ... 92
The kinds of views you use... 94
View Controllers — the Main Storyboard Players ... 98
What About the Model? ... 101
It’s Not That Neat ... 102
Taking a Look at Other Frameworks ... 102
The Foundation framework ... 103
The CoreGraphics framework ... 103
Even more frameworks ... 103
Understanding the MVC in the Project ... 104
Chapter 5: Creating the RoadTrip User Interface . . . .107
Creating Your User Interface in the iPad Storyboard ... 107
It’s about the view controller ... 108
Using Interface Builder to add the user elements ... 109
Working within the Utility Area ... 111
Inspector and Quick Help pane ... 111
Library pane ... 112
Understanding iPad Navigation ... 113
Adding a New View Controller ... 117
Danger Will Robinson ... 124
Adding an identifier to the view controller ... 125
Adding the User Interface Objects ... 126
View Layout ... 127
Autosizing ... 132
Adding the Test Drive button ... 136
Massaging the Template Code ... 140
Autosizing the Button ... 143
Creating the iPhone User Interface ... 146
A Quick Auto Layout Example. ... 146
Final thoughts ... 150
Chapter 6: The Runtime, Managing Memory,
and Using Properties . . . .151
Stepping through the App Life Cycle ... 152
UIApplicationMain ... 153
Handling events while your application is executing ... 157
Knowing what to do when the normal processing of your application is interrupted ... 159
An overview of the view controller life cycle ... 163
Working within the Managed Memory Model Design Pattern ... 164
Understanding memory management ... 164
Using reference counting ... 165
Automatic Reference Counting (ARC) ... 166
Working with variable types according to ARC ... 168
Understanding the deadly retain cycle ... 169
Observing Low-Memory Warnings ... 171
The viewDidUnload method ... 171
The didReceiveMemoryWarning method ... 172
The applicationDidReceiveMemoryWarning: method ... 172
The UIApplicationDidReceiveMemory WarningNotification: notification ... 173
Picking the right memory-management strategy for your application ... 173
Customizing the Behavior of Framework Classes ... 174
Subclassing ... 174
The Delegation pattern ... 174
Understanding Declared Properties ... 175
What comprises a declared property ... 176
Using dot syntax ... 177
Setting attributes for a declared property... 178
Writing your own accessors ... 180
Accessing instance variables with accessors ... 180
Hiding Instance Variables ... 181
Chapter 7: Working with the Source Editor. . . .183
Navigating in the Xcode Source Editors ... 183
Using the Jump bar ... 186
Using the Xcode Source Editor ... 189
Using Live Issues and Fix-it ... 191
Compiler warnings ... 192
The Issue navigator ... 192
Accessing Documentation ... 193
Getting Xcode help ... 194
The Organizer window ... 196
The Help menu ... 197
Finding and Searching in Your Project ... 198
Using the Find command to locate an item in a file ... 198
Using the Search navigator to search your project or framework ... 199
Using the Symbol navigator ... 200
You’re Finally Ready to Code! ... 201
Part III: Getting Your Feet Wet —
Basic Functionality ... 203
Chapter 8: It’s (Finally) Time to Code . . . .205
Checking for Network Availability ... 205
Downloading the Reachability sample ... 205
Adding the code to check for reachability ... 210
Sprucing Up the Main View ... 212
Understanding Autorotation ... 220
Writing Bug-Free Code ... 221
Working in the Debug area and Debug navigator ... 222
Managing breakpoints ... 224
What you’ll find in the Debug area ... 228
What you’ll find in the Debug navigator ... 230
Displaying variables in the Source editor ... 231
Tiptoeing through your program ... 232
Chapter 9: Adding Outlets and Actions to Your RoadTrip Code. . . . .235
Using Custom View Controllers ... 236
Adding the custom view controller ... 236
Setting up the TestDriveController in the MainStoryboard for iPad ... 237
Understanding Outlets ... 239
Adding Outlets ... 240
Opening the Assistant editor... 240
Creating the outlet ... 242
The Connections inspector ... 246
Working with the Target-Action Design Pattern ... 247
Using the Target-Action pattern: It’s about controls ... 248
Adding an action ... 249
How Outlets and Actions Work ... 253
Understanding iOS Animation ... 255
View geometry and coordinate systems ... 256
Points versus pixels ... 257
A view’s size and position... 257
Working with data structures ... 258
Animating a View ... 258
Finally, More Code ... 259
Implementing the testDrive Method ... 259
Understanding Block Objects ... 263
Rotating the Object ... 266
Working with Audio ... 268
Tracking Touches ... 275
Animating a Series of Images “In Place” ... 278
iPhone versus iPad ... 280
Part IV: The Model and Application Structure ... 281
Chapter 11: The Trip Model . . . .283
What’s in the Model ... 283
Adding the Model Data ... 284
Using property lists ... 284
Adding a property list to your project ... 287
Adding the First Two Model Classes ... 295
Understanding the Trip Interface ... 297
Implementing the Trip Class ... 299
Initializing objects ... 300
Invoking the superclass’s init method ... 301
Initializing instance variables ... 302
Returning self ... 303
Initializing the Destination Class ... 304
Creating the Trip Object ... 307
More Debugger Stuff ... 310
Chapter 12: Implementing the Master View Controller. . . .313
Setting Up a Custom View Controller for the iPad ... 313
Adding a Background Image and Title ... 324
Updating the iPhone Storyboard File ... 327
Chapter 13: Working with Split View Controllers
and the Master View . . . .329
The Problem with Using a Navigation Controller in Detail View ... 329
Using a Navigation Controller in the Master View ... 333
The Split View Controller ... 340
The UISplitViewController delegate ... 342
Localization ... 347
Back to the main feature ... 347
Adding the Toolbar ... 353
Adding the button when the view controller is replaced ... 358
A Few More Tweaks to the RTMasterViewController ... 362
And (a Little Extra) One More Thing ... 362
Don’t Forget the iPhone ... 363
Chapter 14: Finishing the Basic Application Structure. . . .365
Extending the iPad Storyboard to Add More Functionality to Your App ... 366
Adding the Weather view controller ... 366
Adding the Events controller ... 371
Adding the remaining controllers ... 375
Changing the Split View Controller to a Detail View Controller Relationship ... 376
Repeat for iPhone ... 380
Part V: Adding the Application Content ... 381
Chapter 15: How’s the Weather? Working with Web Views . . . .383
The Plan ... 383
The iPad storyboard ... 384
The iPhone storyboard ... 385
Setting Up the Weather Controller ... 386
Adding the custom view controller ... 386
Setting Up WeatherController in the MainStoryboard_iPad file .... 387
The Weather Controller ... 393
Managing links in a Web view ... 395
More Opportunities to Use the Debugger ... 400
Unrecognized selector sent to instance... 401
Repeat for the iPhone Storyboard ... 402
Adding the WeatherController to the iPhone storyboard file ... 402
Test in the iPhone Simulator ... 402
Chapter 16: Displaying Events Using a Page View Controller. . . .405
The Plan ... 406
Setting Up the EventsController ... 407
Adding the custom view controller ... 407
Setting up the EventsController in the MainStoryboard ... 408
Adding the Events Class ... 413
The EventsController and Its PageViewController ... 416
Data sources and delegates ... 416
Data source ... 417
Delegate ... 417
The EventsController ... 417
The EventPageController ... 422
And Then There’s the Bar Button Item ... 424
Adding Events Support to the iPhone Storyboard ... 425
Chapter 17: Finding Your Way . . . .427
The Plan ... 427
Setting Up the Map Controller ... 429
Adding the custom view controller ... 429
Setting up the MapController in the MainStoryboard_iPad ... 430
Adding the MapKit framework ... 435
Test ... 436
Putting MapKit through Its Paces ... 437
MKMapView ... 437
Enhancing the map ... 438
Changing the Map Type ... 445
Adding Annotations ... 447
Creating the annotation ... 447
Displaying the map title and annotations ... 451
Going to the Current Location ... 456
Update the iPhone Storyboard ... 461
Chapter 18: Geocoding . . . .463
Understanding Geocoding on the iPad ... 463
Reverse Geocoding ... 466
Chapter 19: Finding a Location. . . .473
Setting Up the Find Controller ... 473
Adding the custom view controller ... 473
Setting up FindController in the MainStoryboard_iPad... 474
Implementing the Find Controller ... 477
Getting the text... 477
Disabling cell highlighting ... 484
Finding the Location ... 485
Making the Map Title the Found Location ... 491
Chapter 20: Selecting a Destination . . . .495
The Plan ... 495
Setting Up the DestinationController for the iPad Storyboard ... 496
Adding the custom view controller ... 496
Setting up the DestinationController in the MainStoryboard_iPad ... 497
Adding a Modal View ... 501
Implementing a Table View ... 503
Creating the Table View ... 504
Adding sections ... 506
Displaying the cell... 508
Working with user selections ... 510
Saving the Destination Choice and Selecting a Destination ... 518
Displaying the Destination Table ... 523
Testing ... 524
Adding Destination Support to the iPhone Storyboard ... 525
A Word about Adding Settings ... 525
What’s Next? ... 526
Part VI: The Part of Tens ... 527
Chapter 21: Ten Ways to Extend the RoadTrip App . . . .529
Add Preferences ... 529
Cache Data ... 530
Monitor the Current Location’s Distance from the Destination ... 530
Post to Facebook and Twitter ... 530
Send Postcards from the Road ... 530
Add Hotels and Reservations ... 531
Create an Itinerary ... 531
Make the App Part of an Application Ecosystem ... 531
It’s Never Early Enough to Start Speaking a Foreign Language ... 531
Provide Some Implementation Enhancements ... 532
Chapter 22: Ten Ways to Be a Happy Developer . . . .533
Keep Things Loosely Coupled ... 533
Remember Memory ... 534
Don’t Reinvent the Wheel ... 535
Understand State Transitions ... 535
Do the Right Thing at the Right Time ... 536
Remember the User ... 537 Keep in Mind That the Software Isn’t Finished
Until the Last User Is Dead ... 537 Keep It Fun ... 538
i
OS 6 Application Development For Dummies is a beginner’s guide to devel-oping iOS applications. And not only do you not need any iOS development experience to get started, but you also don’t need any Macintosh develop-ment experience, either. We’ve written this book as though you are coming to iPhone and iPad application development as a blank slate, ready to be filled with useful information and new ways to do things. Well, almost a blank slate, anyway; see the upcoming “Foolish Assumptions” section for details on what you need to know before using this book.Because of the nature of the iPhone and iPad, you can create small, bite-sized applications that can be quite powerful. Also, because you can start small and create real applications that do something important for a user, it’s relatively easy to transform yourself from an “I know nothing” person into a developer who, though not (yet) a superstar, can still crank out quite a respectable application.
But the iPhone and iPad can be home to some pretty fancy software as well — so we’ll take you on a journey through building an industrial-strength application and show you the ropes for developing one on your own.
A Bit of History
It’s 6:00 a.m. PST on January 9, 2007. One of us (Dave) is walking through a cold mist to join the end of a distressingly long line of nerds wrapped all the way around San Francisco’s Moscone Center. Why? To hear Steve Jobs give his MacWorld Expo keynote address. It was nuts to get up so early on a cold morning, but Steve Jobs was rumored to be introducing an Apple phone.
No one knew whether an Apple phone would be any good, but perhaps Steve would show us magic — something that would revolutionize an industry. Perhaps it would be as cool and important as the iPod! Probably not, but I wanted to be there, just in case.
The iPhone Stands Alone
The first iPhone shipped in late June 2007. It came with a bunch of Apple’s native apps such as Contacts, Maps, Stocks, Safari, and so on. The problem was that only Apple could develop these native apps. The Apple developer “evangelists” told us developers that we should be happy writing web apps. This did not make us happy — we wanted to write native Objective-C apps.
Steve Jobs and Apple eventually saw the light. Apple released a beta ver-sion of the iPhone Software Development Kit (SDK) in the spring of 2008, and it opened the App Store for business in July 2008. At this point, you could develop apps — but only for the iPhone, because the iPad did not yet exist.
The iPad Joins the Party
Apple released the first iPad in April 2010, so now you could write apps for either the iPhone or the iPad.
Many developers then developed two different versions of each applica-tion — one for the iPhone and a different one (often called the “HD” version back in 2010) optimized for the larger iPad screen. The problem was that you would then have two separate Xcode projects to maintain. Some of the proj-ect code would be shared between the iPhone and iPad versions, but many of the files would be slightly different. Code maintenance became a nightmare.
It gradually became clear that it would be better to have a single Xcode proj-ect that could be used to build a universal app — a single app that runs with the iPhone user interface on the iPhone, but uses a different iPad user inter-face on the iPad.
A Universal App
“So,” you say, “What are the benefits of merging the iPhone and iPad apps into a single universal app?” The benefits include the following:
✓ You can add a new feature in the one Xcode project that can appear in both the iPhone and iPad versions.
✓ You can fix a bug in one project rather than two.
✓ You only have to make changes for a new version of iOS in one project.
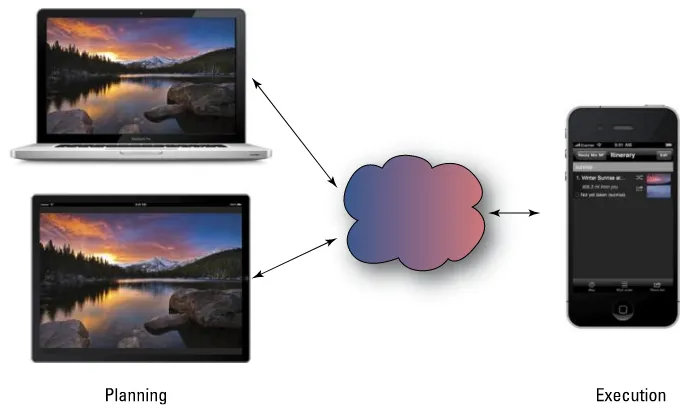
Serial or Parallel Development?
This book shows you how to build a universal version of our RoadTrip proj-ect. The compiled native app will run on the iPhone with a user interface designed for the iPhone. The same app will run on the iPad with a different user interface, optimized for the iPad’s larger screen. The obvious ques-tion involves the order in which the different versions are developed. Your choices are diagrammed in the following figure, where time flows to the right. (Einstein’s special theory of relativity proved that time always flows to the right, unless you are in the southern hemisphere.)
Strategies you can use include the following:
A. (Serial) Develop and test the iPhone version first, and later add the iPad version to the universal Xcode project.
B. (Serial) Develop and test the iPad version first, and later add the iPhone version to the universal Xcode project.
C. (Parallel) Incrementally develop both versions, more or less in parallel. Get the basic iPhone and iPad versions each working. Then add features to each version until time runs out. This is the approach we recommend, and the approach we use in this book.
Our Plan for This Book
You will build this book’s RoadTrip app using the following steps:
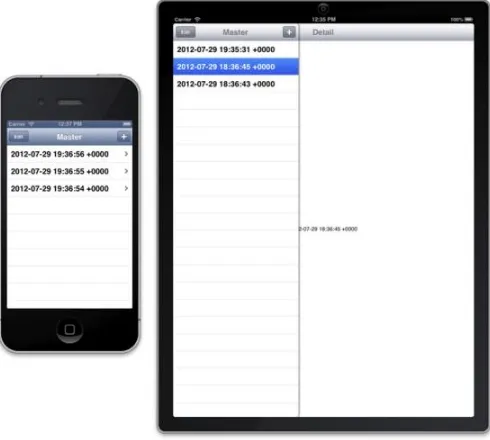
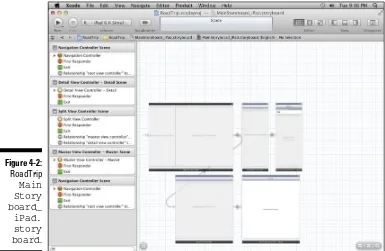
1. Create the initial storyboards for both the iPad and iPhone versions, starting with Xcode’s Master-Detail project template.
The Master View controller will appear on the left when the iPad is held in landscape orientation, while the Detail View controller appears on the right.
2. Build and test the iPad version in the iPad simulator. You should see a Table view embedded in a Navigation controller in the Master view. The template’s initial iPhone storyboard design begins with a custom
MasterViewController (a Table view) embedded in a Navigation view. Selecting an item in the Table view displays data managed by a custom DetailViewController.
3. Build and test the iPhone version in the iPhone simulator. It should also work perfectly, because you haven’t had a chance to make any mistakes yet.
The opening screens of the iPhone and iPad versions are compared in the following figure, as created by the Master-Detail template.
4. Add a TestDriveController to the iPhone storyboard. Build and test. Add it to the iPad storyboard. Build and test.
5. Add animation and sound to the Test Drive controller. Build and test both (BATB) the iPhone and iPad versions.
6. Add additional features to each version until done.
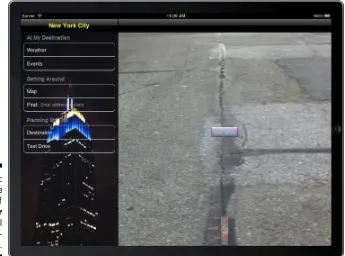
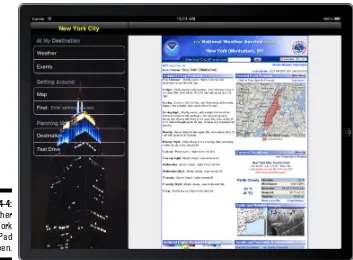
The final screens of the iPhone and iPad versions of RoadTrip are compared in the following figure.
iOS and Xcode Game Changers
With iOS 6 and — more importantly — with Xcode 4.5 (and later versions), the nuts and bolts of iOS application development have changed dra-matically. Xcode 4.5 has added much more functionality to the Integrated Development Environment (IDE) with which you develop iOS applications, especially when it comes to writing syntactically correct (and bug-free) code that’s better able to manage memory. Storyboards, one of our all-time favorite new features, allow you to develop applications in a new way, with much less code and a better idea of what the flow of the application (and subsequent user experience) will be. Of course, for all this new functionality, you pay a price: more complexity. But after you get the hang of working with Xcode 4.5, writing applications becomes much easier than it has ever been.
readers and students of earlier books have been asking for — including more animation and sound — as well as an infrastructure that people can use to develop more robust applications. The resulting example is an app we call RoadTrip, which can send you on your way to developing apps that you can be proud of and that other people will want to have.
This new edition is based on iOS 6 and Xcode 4.5. If you want to find out how to develop applications, the tools discussed in this book are the tools you absolutely need to use to do it the right way.
But what’s more, storyboards all of a sudden make it easier to develop uni-versal applications — applications that run with equal aplomb on the iPad or iPhone — using the same code base!
This is great stuff!
About This Book
iOS 6 Application Development For Dummies distills the hundreds (or even thousands) of pages of Apple documentation (not to mention our own devel-opment experience) into only what’s necessary to start you developing real applications. But this is no recipe book that leaves it up to you to put it all together. Rather, it takes you through the frameworks (the code supplied in the SDK) and iOS architecture in a way that gives you a solid foundation in how applications really work, and also acts as a road map to expand your knowledge as you need to.
We assume that you’re in this for the long haul and that you want to master the whole application-development ball of wax. We use real-world applica-tions to show the concepts and give you the background on how things actu-ally work on iOS — the in-depth knowledge you need to go beyond the simple “Hello World” apps and create those killer iOS applications. So be prepared! You may find some places where you might want to say, “Get on with it,” but — based on our experience (including more than ten apps in the App Store, 12 books (and counting), and untold hours expended on in-person classes and technical talks — you’ll find what you need to move from follow-ing recipes in a cookbook by rote to modifyfollow-ing and even creatfollow-ing your own recipes.
Conventions Used in This Book
This book guides you through the process of building iOS applications. Throughout the book, you use the classes provided by Apple’s iOS frame-works (and create new classes of your own, of course). You code them using the Objective-C programming language.
Code examples in this book appear in a monospaced font so that they stand out a bit better. That means that the code you see will look like this:
#import <UIKit/ UIKit.h>
Objective-C is based on C, which is case sensitive, so please enter the code that appears in this book exactly as it appears in the text. We also use the standard Objective-C naming conventions — for example, class names always start with a capital letter, and the names of methods and instance variables always start with a lowercase letter.
Note that all URLs in this book appear in a monospaced font as well, like this:
www.nealgoldstein.com
When we ask you to add code to a program, it will be in bold like this:
#import <UIKit/ UIKit.h>
You’ll notice — starting around Chapter 8 — that you will sometimes be asked to delete some of the code you have in place for your project to make room for some new stuff. When that happens, we’ll comment out the code (to make things really clear). We refer to code we want you to delete as com-mented out, bold, underline, and italic code, because said code will show up as commented out, bold, underlined, and italic. Simple enough, as shown in the following example:
// Delete this
Foolish Assumptions
To begin programming your iOS applications, you need an Intel-based Macintosh computer with the latest version of OS X on it. (No, you can’t develop iOS applications directly on the iPhone or iPad.) You also need to download the iOS Software Development Kit (SDK) — which is free. And, oh yeah, you need an iPhone and/or iPad. You won’t start running your applica-tion on it right away — you’ll use the iOS Simulator that Apple provides with the iOS SDK during the initial stages of development — but at some point, you’ll want to test your application on a real, live iOS device.
This book assumes that you have some programming knowledge and that you have at least a passing acquaintance with object-oriented program-ming, using some variant of the C language (such as C++, C#, or maybe even Objective-C). In case you don’t, we point out some resources that can help you get up to speed. The application example in this book is based on the frameworks that come with the SDK; the code is pretty simple (usually) and straightforward. (We don’t use this book as a platform to dazzle you with fancy coding techniques.)
We also assume that you’re familiar with the iPhone and iPad themselves and that you’ve at least explored Apple’s included applications to get a good working sense of an iOS app’s look and feel. It might also help to browse the App Store to see the kinds of applications available there and maybe even download a few free ones (as if we could stop you).
How This Book Is Organized
iOS 6 Application Development For Dummies has six main parts, which are described in the following sections.
Part I: Getting Started
Part II: Building RoadTrip
In this part of the book, you find out how to create the kind of user interface that will capture someone’s imagination. We explain the Interface Builder editor, which is much more than your run-of-the-mill program for building graphical user interfaces. You also discover storyboards, which are the icing on the Interface Builder cake that let you lay out the entire user experience and application flow — saving you a lot of coding, to boot.
We also take you on a brief tour of the RoadTrip app, the app that you build along with us in this book. We show you not only what the app can do but also how it uses the frameworks and SDK to do that.
We also explain how the main components of an iOS application go together. We describe how the iOS applications work from a viewpoint of classes and design patterns, as well as show how the app works at runtime. We spend some time on three very important ideas: how to extend the framework classes to do what you want them to, how to manage memory, and how to take advantage of declared properties. We also explain how everything works together at runtime, which should give you a real feel for how an iOS applica-tion works.
Parts I and II give you the fundamental background that you need to develop iOS applications.
Part III: Getting Your Feet Wet —
Basic Functionality
Part IV: The Model and
Application Structure
Now you begin to get down to the real work. You find out about the iPad’s popovers and Split View controllers, and you also add navigation to the application. Along the way, we really get into showing you how to account for the differences between an iPad and an iPhone, and make sure that the app can run flawlessly on whatever device the user has handy. You also add the application model, which provides both the data and the logic you need to create an application that delivers real value to the user. Finally, you finish the storyboard so that you can see your basic application flow.
Part V: Adding the Application Content
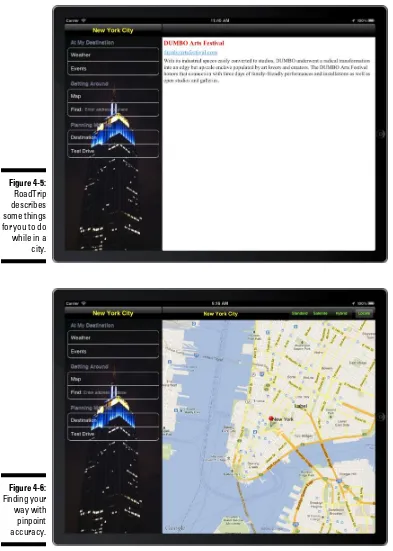
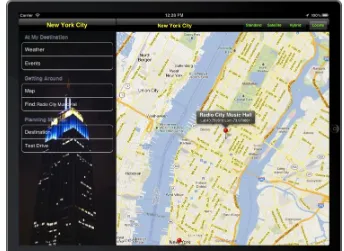
Now that you have the application foundation and the user experience archi-tecture in place, Part V takes you into the world of applications that contain major functionality. We show you how to display the weather using a web page right off the Internet, how to allow the user to page through local events as if he were reading a book, how to display a map of where the user is going and where he is right now, how to find a location that he has always wanted to visit and display it on a map, and even how to change where he is going (limited in the RoadTrip app to New York and San Francisco, but it’s incred-ibly easy to add other destinations). We don’t go slogging through every detail of every detail, but we demonstrate almost all the technology you need to master if you intend to create a compelling application like this on your own.Part VI: The Part of Tens
Icons Used in This Book
This icon indicates a useful pointer that you shouldn’t skip.
This icon represents a friendly reminder. It describes a vital point that you should keep in mind while proceeding through a particular section of the chapter.
This icon signifies that the accompanying explanation may be informative (dare we say interesting?), but it isn’t essential to understanding iPad applica-tion development. Feel free to skip past these tidbits if you like (though skip-ping while learning may be tricky).
This icon alerts you to potential problems that you may encounter along the way. Read and obey these blurbs to avoid trouble.
This icon indicates how to use an important part of Xcode functionality. This helps you wade through Xcode’s complexity and focus on how to get specific things done.
Where to Go from Here
It’s time to explore iOS application development! If you’re nervous, take heart: We’ve received lots of e-mails (and an occasional card or letter) from readers ranging in age from 12 to 67 who tell us how they’re doing (and yes, we do respond to them all).
Also, be sure to visit the companion website for this book at www.dummies. com/go/ios6applicationdevelopmentfd for source code, all the figures from the book, and other information. For updates to this edition, check out http://www.dummies.com/go/ios6applicationdevelopmentfd updates. For helpful tables and tips, check out the book’s cheat sheet at
www.dummies.com/cheatsheet/ios6applicationdevelopment.
good idea for an app — one that displays information about interesting places, with maps showing how to get there. Now what?
This part of the book lays out what you need to know to get started on the development journey. First, what makes a great iOS application? Knowing that, you can evaluate your idea, see how it ranks, and maybe figure out what you have to do to transform it into something that knocks your users’ socks off.
This part shows you how to use the iOS Software Development Kit (SDK), which includes Xcode — your home away from home when you are developing your app. You also find out how to create an Xcode project, within which you code and then build and run your app.
What Makes a Killer iOS App
In This Chapter
▶ Figuring out what makes an insanely great iOS application
▶ Discovering the iOS features that can inspire you
▶ Understanding Apple’s expectations for iOS applications
▶ Making a plan for developing iOS software
D
ouglas Adams, in the bestseller The Hitchhiker’s Guide to the Galaxy (conceived in 1971 and published in 1979), introduced the idea of a handy travel guide that looked “rather like a largish electronic calculator,” with a hundred tiny flat-press buttons and a screen “on which any one of a million ‘pages’ could be summoned at a moment’s notice.” It looked insanely complicated, and this is one of the reasons why the snug plastic cover it fitted into had the words DON’T PANIC printed on it in large friendly letters. According to Adams, this guide was published in this form because “if it were printed in normal book form, an interstellar hitchhiker would require several inconveniently large buildings to carry it around in.”The iPhone and iPad are different sizes of a hitchhiker’s dream come true, and their users don’t even have any reason to panic. The only “insanely com-plicated” part of the iOS experience may be trying to develop a killer app that best exemplifies iPhone and iPad features, but that’s why I think this book should have DON’T PANIC printed on its cover — it takes you through the entire process of imagining, creating, developing, testing, and distributing your iOS app. And in this chapter, I talk about what would make that app a killer app.
Figuring Out What Makes
a Great iOS Application
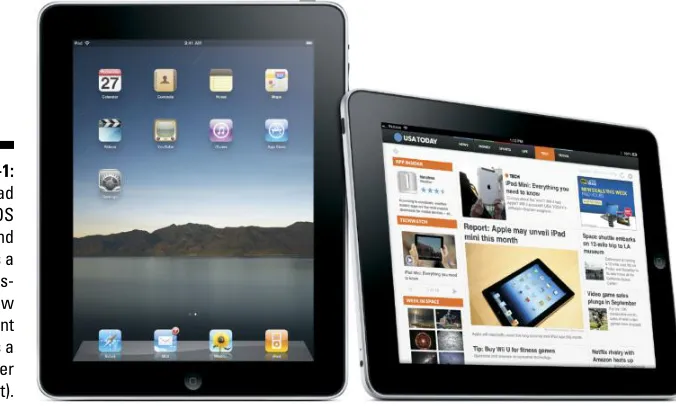
You use the same Software Development Kit and much of the same code to develop iPad, iPhone, and iPod touch applications. The iPad runs the same operating system as the iPhone and iPod touch. However, the iPad is a bigger device with more horsepower and a larger display, as shown in Figure 1-1.
For many iPhone/iPod touch app developers, the iPad’s larger display alone changes everything. Apple demonstrated exactly how much things have changed when the company demonstrated the iWork suite of productivity tools (Keynote for presentations, Numbers for spreadsheets, and Pages for word processing and page formatting) on both the iPhone and iPad.
The biggest challenge in making a killer app for iOS is to design for the iOS experience. For example, according to Douglas Adams, the Encyclopedia Galactica describes alcohol as “a colorless volatile liquid formed by the fer-mentation of sugars” and also notes “its intoxicating effect on certain carbon-based life forms.” On the other hand, The Hitchhiker’s Guide to the Galaxy not only tells you what alcohol is, but it also says “the best drink in existence is the Pan Galactic Gargle Blaster,” describes its effect as “like having your brains smashed out by a slice of lemon wrapped round a large gold brick,” tells you which planets have bars that offer it and at what prices, and then shows you how to mix one yourself. As Adams points out, “The Hitchhiker’s Guide to the Galaxy sells rather better than the Encyclopedia Galactica.”
Figure 1-1:
If the explosion of new iOS apps since its introduction is any indication, you’ll want to leverage its fabulous touch-sensitive interface and other fea-tures. Because the iPad evolved from the iPhone design, the iPad has design advantages that make netbooks and laptops feel like the dull Encyclopedia Galactica. Most iOS apps are designed to take advantage of the iPhone’s Multi-Touch display; accelerometer (which detects acceleration, rotation, motion gestures, and tilt); and location services for detecting its physical location — or all three.
However, you can create iOS apps that aren’t just a little bit better than their desktop counterparts, but a lot better, with an interface that’s simpler to use than a Mac or a PC.
Providing an immersive experience
An iPad app can offer a more immersive experience compared with an iPhone app by adding more content — full pages from the Internet or in memory, maps you can zoom in to, full-screen videos and slide shows with music, and so on. People can enjoy this content while away from their desks — on living room couches, in coffee shops, on the train, in outer space — and more easily share it with others than they can by using an iPhone or iPod touch. On the other hand, people always have their smartphone with them, so you find many benefits to an iPhone version of your app.
Whenever possible, add a realistic, physical dimension to your application. When I demonstrate the iPad to someone, my favorite game to play is Touch Hockey, because it fully immerses you in an experience that resembles the physical game so well. But it’s also a good idea to extend some physical met-aphors, like the newspaper or book page, to provide a more immersive expe-rience. The New York Times, for example, designed an iPad app that looks like a newspaper and also includes embedded, fully functional videos (not just videos that appear in a separate window). In the iBooks app, you swipe the page to go to the next one, just like a real book, but you can also search the entire text, add bookmarks, and change the font size.
the Contacts app is a streamlined list, but on the iPad, Contacts is an address book with a beautifully tangible look and feel. The more true to life your application looks and behaves, the easier it is for people to understand how it works and enjoy using it. But again, the iPhone Contacts app is always with you, while your poor iPad often gets left home all alone.
The best approach for many apps is to have a portable iPhone version and an immersive iPad version. This book shows you how to develop both versions in a single universal app — built from a single universal Xcode project.
Making content relevant
The iPad’s large display may tempt you to consider a design for your app that would look good on a laptop. But you shouldn’t forget the first rule of iPhone design: Make its content and functions relevant to the moment. The iPad, like the iPhone, adds mobility to the party. This ability to run apps wherever you are and whenever you want makes it possible to have the information you need (as well as the tools you’d like to use) constantly avail-able. But it’s not just about the fact that the app you need is ready to run right there on your iPhone or iPad; it’s (as importantly) about how the app is designed and implemented. It needs to require as little as possible from the user in terms of effort when it comes to delivering results.
An iOS app can present information relevant to where you are, what time it is, what your next activity might be, and how you’re holding the device (in Portrait or Landscape orientation, tilting and shaking it, and so on).
The iOS platform offers a strong foundation for pinpointing the device’s cur-rent location on a map, controlling views, managing data, playing multimedia content, switching display orientations, and processing gestures. Because the iOS platform can do all that, an app can know your current location, the hotels or campgrounds you’re going to stay at, and the planets you’re plan-ning to visit. It can even show videos and play the music of the stars all at the same time. While searching maps and brochures, you can know at a glance where you are, how to get to your destination, and what the weather’s like so that you know what to wear.
Designing for the larger iPad screen
An iPad app can offer the primary content on the Main view and provide additional information or tools in an auxiliary view (such as a popover that appears above the Main view) to give users access to functions without requiring them to leave the context of the Main view.
The large iPad screen also gives you a lot more room for multifinger gestures, including gestures made by more than one person. An iPad app can react to gestures and offer touch controls and pop-up settings that are relevant to what you’re actually doing in the app and where you place your fingers. With a display the size of a netbook, you have a lot more screen real estate to allow dragging and two-finger gestures with graphics and images, and depending on what you’re doing, a tap or gesture on a particular part of the screen can have a particular function. For example, in the Gameloft version of the first-person shooter called Nova (as adapted to the iPad), the display size gives you more flexibility than the iPhone version, with more controls and objects such as mini-maps, and you can slide two fingers across the screen to throw grenades.
With all this in mind, you need to consider at least two things — besides func-tionality, of course — when it comes to creating a great iPad or iPhone app:
✓ Creating a compelling user experience
✓ Exploiting the platform and ecosystem
I’ve already talked about the compelling user experience; now it’s time to dive into exploiting the platform.
Exploiting the iOS Platform
Okay, enough talk about the iPad’s unique experience. Just what exactly is the iOS platform, and what are its features?
Note: The best thing is that the iOS 6 platform runs on both the iPhone and iPad, and uses many of the same views, controls, and code, as you will see in this book.
Exploiting advantages of the system
mouse clicks. If you design an app that simply uses a single finger tap as if it were a mouse click, you may be missing an opportunity to design a better user experience.
✓ Movement and orientation: The iPhone and iPad have an accelerom-eter, so you can design apps that detect accelerated movement, as well as change the display for different orientations.
✓ Split views and unique keyboards: You can use a Split view on an iPad to display more than one view onscreen at a time. Either device pro-vides a special keyboard unique to the task, such as the numbers-and-formulas keyboard that appears in the Numbers app.
✓ Internet access: Users can send and receive e-mail and browse the web; sync contacts, calendars, and notes over the Internet; and down-load content from Apple stores. With quick and easy access, your app doesn’t need to store lots of data — all it really needs to do is jump on the Internet and grab what it needs from there.
✓ Television or projection system connection: Users can connect the iPhone or iPad to an HDTV or projection system to show content to larger audiences. With iOS’s AirPlay feature and an Apple TV, users don’t even need a physical connection.
✓ Consistent system environment: The Home button quits your app, and the volume controls take care of audio, just like you’d expect them to. User preference settings can be made available in the Settings applica-tion to avoid cluttering your app’s user interface. And your native iOS apps can coexist with web services and apps created in HTML5.
✓ Breathtaking imagery: Photos and video already look fantastic on this display, but the artwork you create yourself for your app should be set to 24 bits (8 bits each for red, green, and blue), plus an 8-bit alpha chan-nel to specify how a pixel’s color should be merged with another pixel when the two are overlaid one on top of the other. In general, the PNG format is recommended for graphics and artwork that are included as part of your iOS app.
In the following sections, you get to dive into some of the major features, grouped into the following major areas:
✓ Accessing the Internet
✓ Tracking location
✓ Tracking motion
✓ Supporting multifinger gestures and touches
✓ Playing content
✓ Accessing the content of Apple’s supplied apps (such as Contacts and Photos)
Accessing the Internet
An iOS device can access websites and servers on the Internet through Wi-Fi or optional 3G or 4G services. This Internet access gives you the capability to create apps that can provide real-time information. An app can tell a user, for example, that the next tour at the Tate Modern in London is at 3 p.m.
This kind of access also allows you, as the developer, to go beyond the lim-ited memory and processing power of the device and access large amounts of data stored on servers, or even offload the processing. You don’t need all the information for every city in the world stored on the device, nor do you have to strain the device processor to compute the best way to get some-place on the Tube. You can send the request to a server for all that informa-tion, especially information that changes often.
This technique is called client-server computing — a well-established software architecture where the client provides a way to make requests to a server on a network that’s just waiting for the opportunity to do something. A web browser is an example of a client accessing information from other websites that act as servers.
Knowing the location of the user
You can create an app that can determine the device’s current location or even be notified when that location changes, using iOS location services. As people move, it may make sense for your app to tailor itself to where the user is, moment by moment.
Many iPad and iPhone apps use location information to tell you where the nearest coffeehouse is or even where your friends are.
When you know the user’s location, you can even put it on a map, along with other places he or she may be interested in. You find out how easy it is to add a map to your app in Chapter 17.
Tracking orientation and motion
in movement (think of a car accident or a fall) or the user shaking the device back and forth. It makes some way-cool features easy to implement — for example, the Etch A Sketch metaphor of shaking the device to undo an operation. You can even control a game by moving the iPhone or iPad like a controller — such as the aforementioned Need for Speed Shift game for the iPad (Electronic Arts), in which you drive the car by using the device like a steering wheel.
Tracking users’ fingers on the screen
People use their fingers to select and manipulate objects on the device screen. The moves that do the work, called gestures, give the user a height-ened sense of control and intimacy with the device. Several standard gestures — tap, double-tap, pinch-close, pinch-open, flick, and drag — are used in the applications supplied with iOS.You may want to stick with the standard gestures in your app, just because folks are already aware of (and comfortable with) the current pool, but iOS Multi-Touch gesture support lets you go beyond standard gestures when appropriate. Because you can monitor the movement of each finger to detect gestures, you can create your own.
Playing content
Your iOS app can easily play audio and video. You can play sound effects or take advantage of the multichannel audio and mixing capabilities available. You can even create your own music player that has access to all the audio synced to the device from the user’s iTunes Library, or from Apple’s iCloud service. You can also play back many standard movie file formats, configure the aspect ratio, and specify whether controls are displayed. You can put up pages that look like web pages or book pages if you want, and you can easily mix content for an immersive experience.
What you can do with Contacts, you can do in a similar fashion with the Calendar app. Your app can remind a user when to leave for the airport or create calendar events based on what’s happening this week in New York. These events show up in the Calendar app and in other apps that support that framework.
Your app can also access the Photo library in the Photos app, not only to display photos but also to use or even modify them. For example, Apple’s Photos app lets you add a photo to a contact, and many applications enable you to edit your photos on the device itself. You can develop your own photo-editing app for the iPhone or iPad using, for example, Apple’s Core Image framework.
Copying, cutting, and
pasting between apps
iOS (the iPad and iPhone operating system) provides support for Copy, Cut, and Paste operations within and between applications. It also provides a con-text-sensitive Edit menu that can display the Copy, Cut, Paste, Select, Select All, and Delete system commands. That means that while each iOS applica-tion is generally expected to play only in its own sandbox, you actually do have ways to send small amounts of data between applications.
Multitasking, background processing,
and notifications
Although iOS doesn’t have true multitasking, it has instant-on task switching that reduces application startup and makes it easier to continue right where you left off. For certain kinds of applications, you can also process events in the background. Such applications include the following:
✓ Audio: Many apps play audio in the background.
✓ Location: Many apps process location events (information the iOS sends to your app about changes in location) in the background.
✓ VoIP: Many apps provide the ability for the user to make Voice over Internet Protocol calls — turning a standard Internet connection into a way to place phone calls.
✓ Newsstand-Content: The Newsstand apps download and process con-tent in the background.
ers even when your app isn’t running, and local notifications that you can use in your app to alert users of scheduled events and alarms in the background (no servers required). You can use local notifications to get a user’s atten-tion; for example, a driver navigation application running in the background can use local notifications to alert the user when it’s time to make a turn. Applications can also schedule the delivery of local notifications for a future date and time and have those notifications delivered even if the application isn’t running.
Living large on the big screen
The iPad display offers enough space to show a laptop-style application (which is one reason why web pages look so great). You can organize your app with a master list and detailed list of menu choices, or in a layout for Landscape orientation with a source column on the left and a view on the right — similar to the OS X versions of iTunes and iPhoto and exemplified by the Contacts app on the iPad.
Note:Although the iPhone screen is smaller than the iPad screen, don’t think of the iPhone screen as being “tiny.” The iPhone 5 screen, for example, at 1136 x 640 pixels, displays more pixels (on a smaller physical screen) than the original Macintosh screen (512 x 342 pixels). The first Mac had a 0.18-megapixel monochrome display. The iPhone 5 clocks in at a 0.73-mega-pixel (four times larger) dazzling full-color display. Progress is a wonderful thing, eh?
If you’re familiar with iPhone apps and OS X applications, the iPad is some-where in between. With the iPad touch-sensitive display, you no longer have to create different screens of menus (as you might for an iPhone app) or deploy drop-down menus and toolbars (as you might for an OS X app) to offer many functions.
For example, to crop and mask out parts of an image in Apple’s Keynote app for the iPad (the app that lets you create slide shows), you don’t have to select a photo and then hunt for the cropping tool or select a menu item — just double-tap the image, and a mask slider appears. In Apple’s Numbers app for the iPad, if you double-tap a numeric formula, the app displays a spe-cial numeric-and-function keyboard rather than a full-text keyboard — and the app can recognize what you’re doing and finish the function (such as a Sum function) for you.
Lists are a common way to efficiently display large amounts of information in iPhone apps. Lists are very useful in iPad apps, too, but you should take this opportunity to investigate whether you can present the same information in a richer way on the larger display.
Embracing Device Limitations
Along with all those features, however, the iPhone, and even the iPad, have some limitations. The key to successful app development — and to not making yourself too crazy — is to understand those limitations, live and program within them, and even learn to love them. (It can be done. Honest.) These constraints help you understand the kinds of applications that are right for this device.
Often, it’s likely that if you can’t do something (easily, anyway) because of device limitations, maybe you shouldn’t.
The iPad evolved from the iPhone and iPod touch, and you need to consider related limitations, as well as a few things left out. So learn to live with and embrace some facts of iPad life:
✓ Users have fat fingers. You may think that the iPad’s larger display makes that relatively easy to deal with, but keep in mind that you may want to design a multiuser app for the iPad that takes into account mul-tiple fingers. (Anyone for a nice game of Touch Hockey?)
✓ Memory and battery power are limited. This limitation may or may not be a decisive factor, depending on what kind of app you want to create, but smaller apps generally perform better.
✓ You can use only one app at a time. Although users can switch from one app to another instantly, and apps can continue where a user left off, only one application actually runs at a given time, with some apps capable of running in the background to serve notifications or play music.
The next sections help get you closer to a state of iOS enlightenment.
Designing for fingers
operations even more difficult on an iPhone or iPod touch than on an iPad (text selection, for example). Still, due to fat fingers, user-interface elements need to be large enough and spaced far enough apart so that users’ fingers can find their way around the interface comfortably. Apple recommends that anything a user has to select or manipulate with a finger be a minimum of 44 x 44 points in size.
Because it’s so much easier to make a mistake using fingers, you also need to ensure that you implement a robust — yet unobtrusive — Undo mechanism. You don’t want to have your users confirm every action (it makes using the app tedious), but on the other hand, you don’t want your app to let anybody mistakenly delete a page without asking, “Are you sure this is what you really want to do?” Lost work is worse than tedious. Fortunately, the iPad supports the same shake-to-undo feature as the iPhone.
Balancing memory and battery life
As an app designer, you have several balancing acts to keep in mind:✓ Limited memory: When compared to the original Macintosh’s stan-dards, the computer power and amount of memory on the iPad may seem significant . . . but that is so yesterday. No ifs, ands, or buts; the computer power and amount of memory on the iPhone and iPad are limited. But this is an issue much more with older devices. The newer iPhones and iPads do have fairly large amounts of memory.
✓ Limited battery power: Access to the Internet can mitigate the device’s power and memory limitations by storing data and (sometimes) offload-ing processoffload-ing to a server, but those Internet operations eat up the bat-tery faster.
While it’s true that the iOS power-management system conserves power by shutting down any hardware features that aren’t currently being used, a developer must manage the trade-off between all those busy features and a shorter battery life. Any app that takes advantage of Internet access, core location, and the accelerometer is going to eat up the batteries.
iOS devices are particularly unforgiving when it comes to memory usage. If you run out of memory, in order to prevent corruption of other apps and memory, the system will simply shut down your app (unfortunately not to the tune of “Shut Down” by the Beach Boys).
Why Develop iOS Applications?
Because you can. Because it’s fun. And because the time has come (today!). iOS apps are busting out all over, and developers have been very successful. Even high-profile magazines such as Wired and The New Yorker now offer app versions.
Developing iOS apps can be the most fun you’ve had in years, with very little investment of time and money (compared with developing for platforms like Windows). Here’s why:
✓ iOSapps are usually bite-sized, which means that they’re small enough to get your head around. A single developer — or one with a partner and maybe some graphics support — can do them. You don’t need a 20-person project team with endless procedures and processes and meetings to create something valuable.
✓ The applications tend to be crisp and clean, focusing on what the user wants to do at a particular time and/or place. They’re simple but not simplistic. This makes application design (and subsequent implementa-tion) much easier and faster.
✓ The apps use the most innovative platform available for mobile comput-ing. The iPhone was a game changer in 2007. The iPad is a still a game changer. It’s completely changing the Internet as a publishing medium, the software industry with regard to applications, and the mobile device industry with regard to the overall digital media experience.
✓ The free iOS Software Development Kit (SDK) makes development as easy as possible. This book reveals the SDK in all its splendor and glory in Chapter 2. If you can’t stand waiting, you could register as an iOS developer, and download the SDK . . . but (fair warning) jumping the gun leads to extra hassle. It’s worth getting a handle on the ins and outs of iPad app development beforehand.
iOS has these three other advantages that are important to you as a developer:
✓ You can distribute your app through the App Store. Apple will list your app in the App Store in the category you specify, and the store takes care of credit-card processing (if you charge for your app), hosting, downloading, notifying users of updates, and all those things that most developers hate doing. Developers name their own prices for their cre-ations or distribute them free; Apple gets 30 percent of the sales price of commercial apps, with the developer getting the rest. However, keep in mind that Apple must approve your app before it appears in the App Store.