The Not So Short
Introduction to L
A
TEX 2
ε
Or L
ATEX 2
ε
in
95
minutes
by Tobias Oetiker Hubert Partl, Irene Hyna and Elisabeth Schlegl
ii
Copyright c2000 Tobias Oetiker and all the Contributers to LShort. All rights reserved.
This document is free; you can redistribute it and/or modify it under the terms of the GNU General Public License as published by the Free Software Foundation; either version 2 of the License, or (at your option) any later version.
This document is distributed in the hope that it will be useful, but WITHOUT ANY WARRANTY; without even the implied warranty of MERCHANTABILITY or FITNESS FOR A PARTICULAR PURPOSE. See the GNU General Public License for more details.
Thank you!
Much of the material used in this introduction comes from an Austrian introduction to LATEX 2.09 written in German by:
Hubert Partl <[email protected]>
Zentraler Informatikdienst der Universit¨at f¨ur Bodenkultur Wien
Irene Hyna <[email protected]>
Bundesministerium f¨ur Wissenschaft und Forschung Wien Elisabeth Schlegl <no email>
in Graz
If you are interested in the German document, you can find a version updated for LATEX 2ε by J¨org Knappen at
CTAN:/tex-archive/info/lshort/german
iv Thank you!
Rosemary Bailey, Friedemann Brauer, Jan Busa, Markus Br¨uhwiler, David Carlisle, Jos´e Carlos Santos, Mike Chapman,
Christopher Chin, Carl Cerecke, Chris McCormack, Wim van Dam, Jan Dittberner, Michael John Downes, David Dureisseix, Elliot, David Frey, Robin Fairbairns, J¨org— Fischer, Erik Frisk, Frank, Kasper B. Graversen, Alexandre Guimond, Cyril Goutte, Greg Gamble, Neil Hammond, Rasmus Borup Hansen,
Joseph Hilferty, Bj¨orn Hvittfeldt, Martien Hulsen, Werner Icking, Jakob, Eric Jacoboni, Alan Jeffrey, Byron Jones, David Jones, Johannes-Maria Kaltenbach, Michael Koundouros, Andrzej Kawalec, Alain Kessi, Christian Kern, J¨org Knappen, Kjetil Kjernsmo, Maik Lehradt, Alexander Mai, Martin Maechler,
Aleksandar S Milosevic, Claus Malten, Kevin Van Maren, Lenimar Nunes de Andrade, Hubert Partl, John Refling, Mike Ressler, Brian Ripley, Young U. Ryu, Bernd Rosenlecher, Chris Rowley, Hanspeter Schmid, Craig Schlenter,
Preface
LATEX [1] is a typesetting system which is very suitable for producing scien-tific and mathematical documents of high typographical quality. The system is also suitable for producing all sorts of other documents, from simple letters to complete books. LATEX uses TEX [2] as its formatting engine.
This short introduction describes LATEX 2ε and should be sufficient for most applications of LATEX. Refer to [1,3] for a complete description of the LATEX system.
LATEX is available for most computers, from the PC and Mac to large UNIX and VMS systems. On many university computer clusters, you will find that a LATEX installation is available, ready to use. Information on how to access the local LATEX installation should be provided in the Local
Guide [4]. If you have problems getting started, ask the person who gave you this booklet. The scope of this document isnot to tell you how to install and set up a LATEX system, but to teach you how to write your documents so that they can be processed by LATEX.
This Introduction is split into 5 chapters:
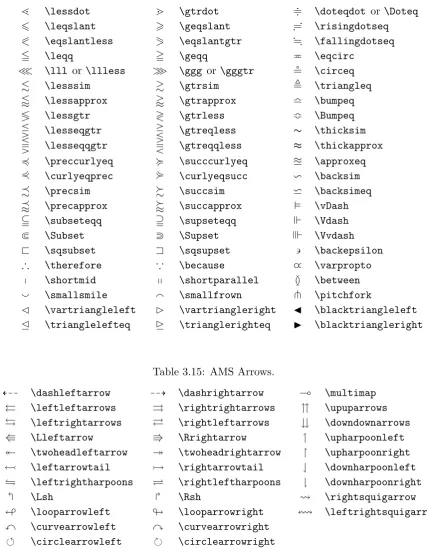
Chapter 1 tells you about the basic structure of LATEX 2εdocuments. You will also learn a bit about the history of LATEX. After reading this chapter, you should have a rough picture of LATEX. The picture will only be a framework, but it will enable you to integrate the information provided in the other chapters into the big picture.
Chapter 2 goes into the details of typesetting your documents. It explains most of the essential LATEX commands and environments. After read-ing this chapter, you will be able to write your first documents.
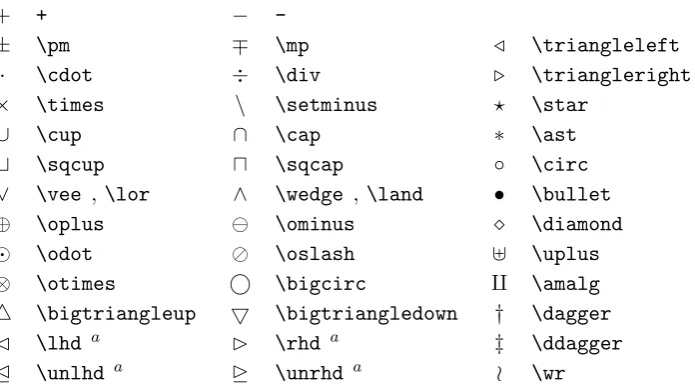
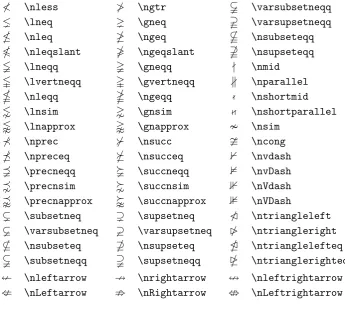
Chapter 3 explains how to typeset formulae with LATEX. Again, a lot of examples help you to understand how to use one of LATEX’s main strengths. At the end of this chapter, you will find tables, listing all the mathematical symbols available in LATEX.
vi Preface
Chapter 5 contains some potentially dangerous information about how to make alterations to the standard document layout produced by LATEX. It will tell you how to change things such that the beautiful output of LATEX begins looking quite bad.
It is important to read the chapters in sequential order. The book is not that big after all. Make sure to carefully read the examples, because a great part of the information is contained in the various examples you will find all throughout the book.
If you need to get hold of any LATEX related material, have a look at one of the Comprehensive TEX Archive Network (CTAN) sites. The homesite is athttp://www.ctan.org. All packages can also be retrieved from the ftp archiveftp://www.ctan.organd it’s various mirror sites all over the world. They can be found e.g. atftp://ctan.tug.org(US),ftp://ftp.dante.de
(Germany), ftp://ftp.tex.ac.uk (UK). If you are not in one of these countries, choose the archive closest to you.
You will find other references to CTAN throughout the book. Especially pointers to software and documents you might want to download. Instead of writing down complete urls, I just wrote CTAN: followed by whatever location within the CTAN tree you should go to.
If you want to run LATEX on your own computer, take a look at what is available fromCTAN:/tex-archive/systems.
If you have ideas for something to be added, removed or altered in this document, please let me know. I am especially interested in feedback from LATEX novices about which bits of this intro are easy to understand and which could be explained better.
Tobias Oetiker <[email protected]>
Department of Electrical Engineering, Swiss Federal Institute of Technology
The current version of this document is available on
Contents
Thank you! iii
Preface v
1 Things You Need to Know 1
1.1 The Name of the Game . . . 1
1.1.1 TEX . . . 1
1.1.2 LATEX . . . . 1
1.2 Basics . . . 2
1.2.1 Author, Book Designer, and Typesetter . . . 2
1.2.2 Layout Design . . . 3
1.2.3 Advantages and Disadvantages . . . 3
1.3 LATEX Input Files . . . . 5
1.3.1 Spaces . . . 5
1.3.2 Special Characters . . . 5
1.3.3 LATEX Commands . . . . 6
1.3.4 Comments. . . 6
1.4 Input File Structure . . . 7
1.5 A Typical Commandline Session . . . 9
1.6 The Layout of the Document . . . 9
1.6.1 Document Classes . . . 9
1.6.2 Packages. . . 10
1.7 Files you might encounter . . . 12
1.7.1 Page Styles . . . 14
1.8 Big Projects . . . 14
2 Typesetting Text 17 2.1 The Structure of Text and Language . . . 17
2.2 Linebreaking and Pagebreaking . . . 19
2.2.1 Justified Paragraphs . . . 19
2.2.2 Hyphenation . . . 20
2.3 Ready made Strings . . . 21
viii CONTENTS
2.4.1 Quotation Marks . . . 21
2.4.2 Dashes and Hyphens . . . 22
2.4.3 Tilde (∼) . . . 22
2.4.4 Degree Symbol (◦) . . . 22
2.4.5 Ellipsis ( . . . ) . . . 22
2.4.6 Ligatures . . . 23
2.4.7 Accents and Special Characters . . . 23
2.5 International Language Support. . . 23
2.5.1 Support for German . . . 26
2.6 The Space between Words . . . 26
2.7 Titles, Chapters, and Sections . . . 27
2.8 Cross References . . . 29
2.9 Footnotes . . . 29
2.10 Emphasized Words . . . 30
2.11 Environments . . . 30
2.11.1 Itemize, Enumerate, and Description . . . 31
2.11.2 Flushleft, Flushright, and Center . . . 31
2.11.3 Quote, Quotation, and Verse . . . 32
2.11.4 Printing Verbatim . . . 32
2.11.5 Tabular . . . 33
2.12 Floating Bodies . . . 35
2.13 Protecting fragile commands . . . 38
3 Typesetting Mathematical Formulae 39 3.1 General . . . 39
3.2 Grouping in Math Mode . . . 41
3.3 Building Blocks of a Mathematical Formula . . . 41
3.4 Math Spacing . . . 45
3.5 Vertically Aligned Material . . . 46
3.6 Phantom . . . 48
3.7 Math Font Size . . . 48
3.8 Theorems, Laws, . . . 49
3.9 Bold symbols . . . 50
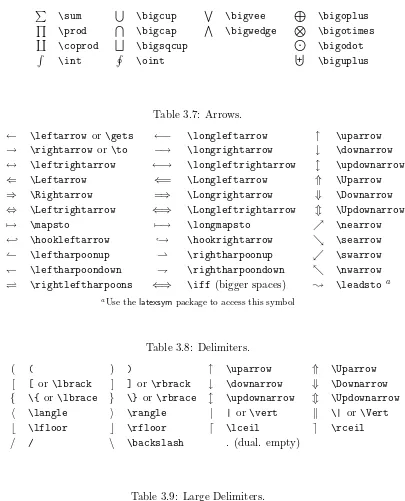
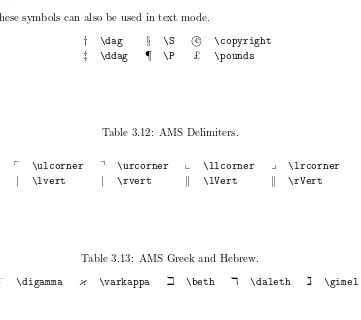
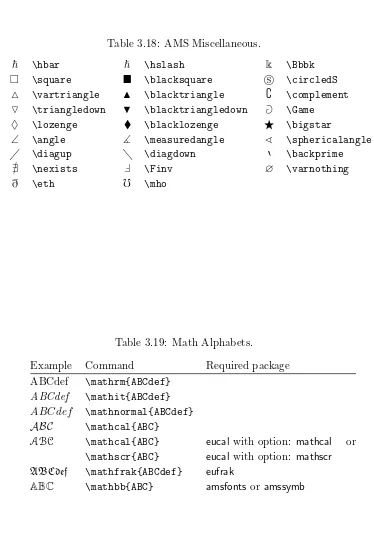
3.10 List of Mathematical Symbols . . . 52
4 Specialities 59 4.1 Including EPS Graphics . . . 59
4.2 Bibliography . . . 61
4.3 Indexing . . . 62
4.4 Fancy Headers . . . 63
4.5 The Verbatim Package . . . 64
CONTENTS ix
5 Customising LATEX 67
5.1 New Commands, Environments and Packages . . . 67
5.1.1 New Commands . . . 68
5.1.2 New Environments . . . 69
5.1.3 Your own Package . . . 69
5.2 Fonts and Sizes . . . 70
5.2.1 Font changing Commands . . . 70
5.2.2 Danger, Will Robinson, Danger . . . 73
5.2.3 Advice . . . 73
5.3 Spacing . . . 74
5.3.1 Line Spacing . . . 74
5.3.2 Paragraph Formatting . . . 74
5.3.3 Horizontal Space . . . 75
5.3.4 Vertical Space . . . 76
5.4 Page Layout. . . 76
5.5 More fun with lengths . . . 78
5.6 Boxes . . . 79
5.7 Rules and Struts . . . 81
Bibliography 83
List of Figures
1.1 Components of a TEX System. . . . 2
1.2 A Minimal LATEX File. . . . . 8
1.3 Example of a Realistic Journal Article. . . 8
4.1 ExamplefancyhdrSetup. . . 64
5.1 Example Package. . . 70
List of Tables
1.1 Document Classes. . . 10
1.2 Document Class Options. . . 11
1.3 Some of the Packages Distributed with LATEX. . . . . 12
1.4 The Predefined Page Styles of LATEX. . . . . 14
2.1 Accents and Special Characters. . . 24
2.2 German Special Characters. . . 26
2.3 Float Placing Permissions. . . 36
3.1 Math Mode Accents. . . 52
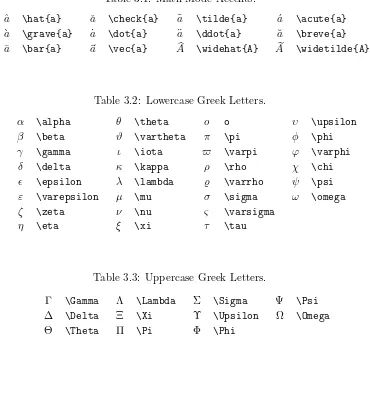
3.2 Lowercase Greek Letters. . . 52
3.3 Uppercase Greek Letters. . . 52
3.4 Binary Relations. . . 53
3.5 Binary Operators. . . 53
3.6 BIG Operators. . . 54
3.7 Arrows. . . 54
3.8 Delimiters. . . 54
3.9 Large Delimiters. . . 54
3.10 Miscellaneous Symbols. . . 55
3.11 Non-Mathematical Symbols. . . 55
3.12 AMS Delimiters. . . 55
3.13 AMS Greek and Hebrew. . . 55
3.14 AMS Binary Relations. . . 56
3.15 AMS Arrows. . . 56
3.16 AMS Negated Binary Relations and Arrows.. . . 57
3.17 AMS Binary Operators. . . 57
3.18 AMS Miscellaneous. . . 58
3.19 Math Alphabets. . . 58
4.1 Key Names forgraphicx Package. . . 60
4.2 Index Key Syntax Examples. . . 63
5.1 Fonts. . . 71
5.2 Font Sizes.. . . 71
xiv LIST OF TABLES
5.4 Math Fonts. . . 72
Chapter 1
Things You Need to Know
In the first part of this chapter, you will get a short overview about the philosophy and history of LATEX 2ε. The second part of the chapter focuses on the basic
structures of a LATEX document. After reading this chapter, you should have a
rough knowledge of how LATEX works. When reading on, this will help you to
integrate all the new information into the big picture.
1.1
The Name of the Game
1.1.1 TEX
TEX is a computer program created by Donald E. Knuth [2]. It is aimed at typesetting text and mathematical formulae. Knuth started writing the TEX typesetting engine in 1977 to explore the potential of the digital printing equipment that was beginning to infiltrate the publishing industry at that time, especially in the hope that he could reverse the trend of deteriorating typographical quality that he saw affecting his own books and articles. TEX as we use it today was released in 1982, with some slight enhancements added in 1989 to better support 8-bit characters and multiple languages. TEX is renowned for being extremely stable, for running on many different kinds of computers, and for being virtually bug free. The version number of TEX is converging to π and is now at 3.14159.
TEX is pronounced “Tech,” with a “ch” as in the German word “Ach” or in the Scottish “Loch.” In an ASCII environment, TEX becomes TeX.
1.1.2 LATEX
2 Things You Need to Know ✎ ✍ ☞ ✌ .pk ❄ METAfont ❄ ✎ ✍ ☞ ✌ .mf driver dvips xdvi ... ❄ ✎ ✍ ☞ ✌ .dvi ❄ TEX Plain
LATEX 2ε
AMS-Package ... ❄ ✎ ✍ ☞ ✌ .tex ✻ ❄ editor emacs ispell ... ❄ ✎ ✍ ☞ ✌ copy
✲ ✲ printer screen PostScript ✻ ✲✎ ✍ ☞ ✌
.tfm ✲ ✲✎
✍
☞ ✌
.log
✛ Fonts ✲ ✛ Typesetting ✲
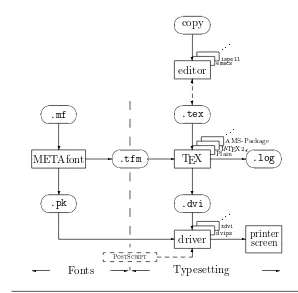
Figure 1.1: Components of a TEX System.
In 1994 the LATEX package was updated by the LATEX3 team, led by Frank Mittelbach, to include some long-requested improvements, and to reunify all the patched versions which had cropped up since the release of LATEX 2.09 some years earlier. To distinguish the new version from the old, it is called LATEX 2ε. This documentation deals with LATEX 2ε.
LATEX is pronounced “Lay-tech” or “Lah-tech.” If you refer to LATEX in an ASCII environment, you type LaTeX. LATEX 2ε is pronounced “Lay-tech two e” and typedLaTeX2e.
Figure1.1above shows how TEX and LATEX 2εwork together. This figure is taken fromwots.texby Kees van der Laan.
1.2
Basics
1.2.1 Author, Book Designer, and Typesetter
1.2 Basics 3
designer writes his instructions into the manuscript and then gives it to a typesetter, who typesets the book according to these instructions.
A human book designer tries to find out what the author had in mind while writing the manuscript. He decides on chapter headings, citations, examples, formulae, etc. based on his professional knowledge and from the contents of the manuscript.
In a LATEX environment, LATEX takes the role of the book designer and uses TEX as its typesetter. But LATEX is “only” a program and therefore needs more guidance. The author has to provide additional information which describes the logical structure of his work. This information is written into the text as “LATEX commands.”
This is quite different from the WYSIWYG1 approach which most mod-ern word processors such as MS Word or Corel WordPerfect take. With these applications, authors specify the document layout interactively while typing text into the computer. All along the way, they can see on the screen how the final work will look when it is printed.
When using LATEX it is normally not possible to see the final output while typing the text. But the final output can be previewed on the screen after processing the file with LATEX. Then corrections can be made before actually sending the document to the printer.
1.2.2 Layout Design
Typographical design is a craft. Unskilled authors often commit serious formatting errors by assuming that book design is mostly a question of aesthetics—“If a document looks good artistically, it is well designed.” But as a document has to be read and not hung up in a picture gallery, the readability and understandability is of much greater importance than the beautiful look of it. Examples:
• The font size and the numbering of headings have to be chosen to make the structure of chapters and sections clear to the reader.
• The line length has to be short enough to not strain the eyes of the reader, while long enough to fill the page beautifully.
With WYSIWYG systems, authors often generate aesthetically pleasing documents with very little or inconsistent structure. LATEX prevents such formatting errors by forcing the author to declare the logical structure of his document. LATEX then chooses the most suitable layout.
1.2.3 Advantages and Disadvantages
When People from the WYSIWYG world meet people who use LATEX, they often discuss “the advantages of LATEX over a normal word processor” or the
4 Things You Need to Know
opposite. The best thing you can do when such a discussion starts is to keep a low profile, since such discussions often get out of hand. But sometimes you cannot escape . . .
So here is some ammunition. The main advantages of LATEX over normal word processors are the following:
• Professionally crafted layouts are available, which make a document really look as if “printed.”
• The typesetting of mathematical formulae is supported in a convenient way.
• The user only needs to learn a few easy-to-understand commands which specify the logical structure of a document. They almost never need to tinker with the actual layout of the document.
• Even complex structures such as footnotes, references, table of con-tents, and bibliographies can be generated easily.
• Free add-on packages exist for many typographical tasks not directly supported by basic LATEX. For example, packages are available to includePostScriptgraphics or to typeset bibliographies conforming
to exact standards. Many of these add-on packages are described in The LATEX Companion [3].
• LATEX encourages authors to write well-structured texts, because this is how LATEX works—by specifying structure.
• TEX, the formatting engine of LATEX 2ε, is highly portable and free. Therefore the system runs on almost any hardware platform available.
LATEX also has some disadvantages, and I guess it’s a bit difficult for me to find any sensible ones, though I am sure other people can tell you hundreds
;-)
• LATEX does not work well for people who have sold their souls . . .
• Although some parameters can be adjusted within a predefined docu-ment layout, the design of a whole new layout is difficult and takes a lot of time.2
• It is very hard to write unstructured and disorganized documents.
• Your hamster might, despite some encouraging first steps, never be able to fully grasp the concept of Logical Markup.
2Rumour says that this is one of the key elements which will be addressed in the
1.3 LATEX Input Files 5
1.3
L
ATEX Input Files
The input for LATEX is a plain ASCII text file. You can create it with any text editor. It contains the text of the document as well as the commands which tell LATEX how to typeset the text.
1.3.1 Spaces
“Whitespace” characters such as blank or tab are treated uniformly as “space” by LATEX. Several consecutive whitespace characters are treated asone “space”. Whitespace at the start of a line is generally ignored, and a single linebreak is treated as “whitespace”.
An empty line between two lines of text defines the end of a paragraph. Several empty lines are treated the same asone empty line. The text below is an example. On the left hand side is the text from the input file, and on the right hand side is the formatted output.
It does not matter whether you enter one or several spaces after a word.
An empty line starts a new paragraph.
It does not matter whether you enter one or several spaces after a word.
An empty line starts a new paragraph.
1.3.2 Special Characters
The following symbols are reserved characters that either have a special meaning under LATEX or are not available in all the fonts. If you enter them directly in your text, they will normally not print, but rather coerce LATEX to do things you did not intend.
# $ % ^ & _ { } ~ \
As you will see, these characters can be used in your documents all the same by adding a prefix backslash:
\# \$ \% \^{} \& \_ \{ \} \~{} # $ % ˆ & { }˜
The other symbols and many more can be printed with special commands in mathematical formulae or as accents. The backslash character\ cannot be entered by adding another backslash in front of it (\\), this sequence is used for linebreaking.3
3Try the
6 Things You Need to Know
1.3.3 LATEX Commands
LATEX commands are case sensitive and take one of the following two formats:
• They start with a backslash \ and then have a name consisting of letters only. Command names are terminated by a space, a number or any other ‘non-letter’.
• They consist of a backslash and exactly one special character.
LATEX ignores whitespace after commands. If you want to get a space after a command, you have to put either{}and a blank or a special spacing command after the command name. The{} stops LATEX from eating up all the space after the command name.
I read that Knuth divides the people working with \TeX{} into \TeX{}nicians and \TeX perts.\\ Today is \today.
I read that Knuth divides the people working with TEX into TEXnicians and TEXperts. Today is 9th August 2001.
Some commands need a parameter which has to be given between curly braces { } after the command name. Some commands support optional parameters which are added after the command name in square brackets[ ]. The next examples use some LATEX commands. Don’t worry about them, they will be explained later.
You can \textsl{lean} on me! You canleanon me!
Please, start a new line right here!\newline Thank you!
Please, start a new line right here! Thank you!
1.3.4 Comments
When LATEX encounters a %character while processing an input file, it ig-nores the rest of the present line, the linebreak, and all whitespace at the beginning of the next line.
This can be used to write notes into the input file, which will not show up in the printed version.
This is an % stupid
% Better: instructive <----example: Supercal%
ifragilist% icexpialidocious
1.4 Input File Structure 7
The % character can also be used to split long input lines where no whitespace or linebreaks are allowed.
For longer comments you should use thecommentenvironment provided by theverbatimpackage. This means, to use the commentenvironment you have to add the commend\usepackage{verbatim}to the preamble of your document.
This is another \begin{comment} rather stupid, but helpful \end{comment}
example for embedding comments in your document.
This is another example for embedding com-ments in your document.
Note that this won’t work inside complex environments like math for example.
1.4
Input File Structure
When LATEX 2εprocesses an input file, it expects it to follow a certain struc-ture. Thus every input file must start with the command
\documentclass{...}
This specifies what sort of document you intend to write. After that, you can include commands which influence the style of the whole document, or you can load packages which add new features to the LATEX system. To load such a package you use the command
\usepackage{...}
When all the setup work is done,4 you start the body of the text with the command
\begin{document}
Now you enter the text mixed with some useful LATEX commands. At the end of the document you add the
\end{document}
command, which tells LATEX to call it a day. Anything which follows this command will be ignored by LATEX.
Figure1.2shows the contents of a minimal LATEX 2εfile. A slightly more complicated input file is given in Figure 1.3.
4The area between
8 Things You Need to Know
\documentclass{article} \begin{document}
Small is beautiful. \end{document}
Figure 1.2: A Minimal LATEX File.
\documentclass[a4paper,11pt]{article} % define the title
\author{H.~Partl} \title{Minimalism} \begin{document} % generates the title \maketitle
% insert the table of contents \tableofcontents
\section{Start}
Well, and here begins my lovely article. \section{End}
\ldots{} and here it ends. \end{document}
1.5 A Typical Commandline Session 9
1.5
A Typical Commandline Session
I bet you must be dying to try out the neat small LATEX input file shown on page8. Here is some help: LATEX itself comes without a GUI or fancy buttons to press. It is just a program which crunches away on your input file. Some LATEX installations feature a graphical front end where you can click LATEX into compiling your input file. But Real Men don’t Click, so here is how to coax LATEX into compiling your input file on a text based system. Please note, this description assumes that a working LATEX installation already sitts on your computer.
1. Edit/Create your LATEX input file. This file must be plain ASCII text. On Unix all the editors will create just that. On windows you might want to make sure that you save the file in ASCII orPlain Text format. When picking a name for your file, make sure it bears the extention
.tex.
2. Run LATEX on your input file. If successful you will end up with a.dvi file.
latex foo.tex
3. Now you may view the DVI file.
xdvi foo.dvi
or convert it to PS
dvips -Pcmz foo.dvi -o foo.ps
xdvi and dvips are open-source tools for handling .dvi files. The first displays them on screen within the X11 environment and the other creates a PostScript file for printing. If you are not working on a Unix system, other means for handling the.dvifiles may be provided.
1.6
The Layout of the Document
1.6.1 Document Classes
The first information LATEX needs to know when processing an input file is the type of document the author wants to create. This is specified with the
\documentclass command.
\documentclass[options]{class}
10 Things You Need to Know
provides additional classes for other documents, including letters and slides. Theoptions parameter customises the behaviour of the document class. The options have to be separated by commas. The most common options for the standard document classes are listed in Table1.2.
Example: An input file for a LATEX document could start with the line
\documentclass[11pt,twoside,a4paper]{article}
which instructs LATEX to typeset the document as an article with a base font size of eleven points, and to produce a layout suitable for double sided printing onA4 paper.
1.6.2 Packages
While writing your document, you will probably find that there are some areas where basic LATEX cannot solve your problem. If you want to include graphics, coloured text or source code from a file into your document, you need to enhance the capabilities of LATEX. Such enhancements are called packages. Packages are activated with the
\usepackage[options]{package}
command wherepackage is the name of the package andoptions is a list of keywords which trigger special features in the package. Some packages come with the LATEX 2ε base distribution (See Table 1.3). Others are provided separately. You may find more information on the packages installed at your site in yourLocal Guide [4]. The prime source for information about LATEX packages is The LATEX Companion [3]. It contains descriptions of hundreds
Table 1.1: Document Classes.
article for articles in scientific journals, presentations, short reports, program documentation, invitations, . . .
report for longer reports containing several chapters, small books, PhD theses, . . .
book for real books
slides for slides. The class uses big sans serif letters. You might want to consider using FoilTEXa instead.
a
1.6 The Layout of the Document 11
Table 1.2: Document Class Options.
10pt,11pt,12pt Sets the size of the main font in the document. If no option is specified,10pt is assumed.
a4paper,letterpaper, . . . Defines the paper size. The default size isletterpaper. Besides that, a5paper,b5paper,
executivepaper, and legalpapercan be specified.
fleqn Typesets displayed formulae left-aligned instead of centred.
leqno Places the numbering of formulae on the left hand side instead of the right.
titlepage,notitlepage Specifies whether a new page should be started after the document title or not. Thearticle class does not start a new page by default, whilereportand book do.
onecolumn,twocolumn Instructs LATEX to typeset the document in one columntwo columns.
twoside, oneside Specifies whether double or single sided output should be generated. The classes articleand reportare single sided and the bookclass is double sided by default. Note that this option concerns the style of the document only. The option
twosidedoes not tell the printer you use that it should actually make a two-sided printout.
openright, openany Makes chapters begin either only on right hand pages or on the next page available. This does not work with thearticle class, as it does not know about chapters. The
12 Things You Need to Know
of packages along with information of how to write your own extensions to LATEX 2ε.
Table 1.3: Some of the Packages Distributed with LATEX.
doc Allows the documentation of LATEX programs.
Described in doc.dtxaand in The LATEX Companion [3].
exscale Provides scaled versions of the math extension font. Described in ltexscale.dtx.
fontenc Specifies which font encoding LATEX should use. Described in ltoutenc.dtx.
ifthen Provides commands of the form ‘if. . . then do. . . otherwise do. . . .’
Described in ifthen.dtxand The LATEX Companion [3].
latexsym To access the LATEX symbol font, you should use the
latexsympackage. Described in latexsym.dtx and in The LATEX Companion [3].
makeidx Provides commands for producing indexes. Described in section4.3 and in The LATEX Companion [3].
syntonly Processes a document without typesetting it.
inputenc Allows the specification of an input encoding such as ASCII, ISO Latin-1, ISO Latin-2, 437/850 IBM code pages, Apple Macintosh, Next, ANSI-Windows or user-defined one. Described in inputenc.dtx.
a
This file should be installed on your system, and you should be able to get advifile by typinglatex doc.dtxin any directory where you have write permission. The same is true for all the other files mentioned in this table.
1.7
Files you might encounter
1.7 Files you might encounter 13
.tex LATEX or TEX input file. Can be compiled withlatex.
.sty LATEX Macro package. This is a file you can load into your LATEX document using the\usepackage command.
.dtx Documented TEX. This is the main distribution format for LATEX style files. If you process a .dtx file you get documented macro code of the LATEX package contained in the .dtx file.
.ins Is the installer for the files contained in the matching .dtx file. If you download a LATEX package from the net, you will normally get a .dtx and a .ins file. Run LATEX on the .ins file to unpack the .dtx file.
.cls Class files define what your document looks like. They are selected with the\documentclass command.
The following files are generated when you run LATEX on your input file:
.dvi Device Independent file. This is the main result of a LATEX compile run. You can look at its content with a DVI previewer program or you can send it to a printer with dvipsor a similar application.
.log Gives a detailed account of what happened during the last compiler run.
.toc Stores all your section headers. It gets read in for the next compiler run and is used to produce the table of content.
.lof This is like .toc but for the list of figures.
.lot And again the same for the list of tables.
.aux Another file which transports information from one compiler run to the next. Among other things, the .aux file is used to store information associated with crossreferences.
.idx If your document contains an index. LATEX stores all the words which go into the index in this file. Process this file with makeindex. Refer to section4.3 on page 62 for more information on indexing.
.ind Is the processed .idx file, ready for inclusion into your document on the next compile cycle.
14 Things You Need to Know
1.7.1 Page Styles
LATEX supports three predefined header/footer combinations—so-called page styles. Thestyle parameter of the
\pagestyle{style}
command defines which one to use. Table1.4lists the predefined page styles.
Table 1.4: The Predefined Page Styles of LATEX.
plain prints the page numbers on the bottom of the page, in the middle of the footer. This is the default page style.
headings prints the current chapter heading and the page number in the header on each page, while the footer remains empty. (This is the style used in this document)
empty sets both the header and the footer to be empty.
It is possible to change the page style of the current page with the com-mand
\thispagestyle{style}
A description how to create your own headers and footers can be found inThe LATEX Companion [3] and in section4.4 on page 63.
1.8
Big Projects
When working on big documents, you might want to split the input file into several parts. LATEX has two commands which help you to do that.
\include{filename}
you can use this command in the document body to insert the contents of another file named filename.tex. Note that LATEX will start a new page before processing the material input fromfilename.tex.
1.8 Big Projects 15
instruct LATEX to only input some of the \included files.
\includeonly{filename,filename,. . .}
After this command is executed in the preamble of the document, only
\include commands for the filenames which are listed in the argument of the\includeonly command will be executed. Note that there must be no spaces between the filenames and the commas.
The \include command starts typesetting the included text on a new page. This is helpful when you use\includeonly, because the pagebreaks will not move, even when some included files are omitted. Sometimes this might not be desirable. In this case, you can use the
\input{filename}
command. It simply includes the file specified. No flashy suits, no strings attached.
To make LATEX quickly check your document you can use the syntonly package. This makes LATEX skim through your document only checking for proper syntax and usage of the commands, but doesn’t produce any (DVI) output. As LATEX runs faster in this mode you may save yourself valuable time. Usage is very simple:
\usepackage{syntonly} \syntaxonly
Chapter 2
Typesetting Text
After reading the previous chapter, you should know about the basic stuff of which a LATEX 2ε document is made. In this chapter I will fill in the remaining
structure you will need to know in order to produce real world material.
2.1
The Structure of Text and Language
The main point of writing a text (some modern DAAC1literature excluded), is to convey ideas, information, or knowledge to the reader. The reader will understand the text better if these ideas are well-structured, and will see and feel this structure much better if the typographical form reflects the logical and semantical structure of the content.
LATEX is different from other typesetting systems in that you just have to tell it the logical and semantical structure of a text. It then derives the typographical form of the text according to the “rules” given in the document class file and in various style files.
The most important text unit in LATEX (and in typography) is the para-graph. We call it “text unit” because a paragraph is the typographical form which should reflect one coherent thought, or one idea. You will learn in the following sections, how you can force linebreaks with e.g. \\and paragraph breaks with e.g. leaving an empty line in the source code. Therefore, if a new thought begins, a new paragraph should begin, and if not, only linebreaks should be used. If in doubt about paragraph breaks, think about your text as a conveyor of ideas and thoughts. If you have a paragraph break, but the old thought continues, it should be removed. If some totally new line of thought occurs in the same paragraph, then it should be broken.
Most people completely underestimate the importance of well-placed paragraph breaks. Many people do not even know what the meaning of
1Different At All Cost, a translation of the Swiss German UVA (Um’s Verrecken
18 Typesetting Text
a paragraph break is, or, especially in LATEX, introduce paragraph breaks without knowing it. The latter mistake is especially easy to make if equa-tions are used in the text. Look at the following examples, and figure out why sometimes empty lines (paragraph breaks) are used before and after the equation, and sometimes not. (If you don’t yet understand all commands well enough to understand these examples, please read this and the following chapter, and then read this section again.)
% Example 1
\ldots when Einstein introduced his formula \begin{equation}
e = m \cdot c^2 \; , \end{equation}
which is at the same time the most widely known and the least well understood physical formula.
% Example 2
\ldots from which follows Kirchoff’s current law: \begin{equation}
\sum_{k=1}^{n} I_k = 0 \; . \end{equation}
Kirchhoff’s voltage law can be derived \ldots
% Example 3
\ldots which has several advantages.
\begin{equation} I_D = I_F - I_R \end{equation}
is the core of a very different transistor model. \ldots
The next smaller text unit is a sentence. In English texts, there is a larger space after a period which ends a sentence than after one which ends an abbreviation. LATEX tries to figure out which one you wanted to have. If LATEX gets it wrong, you must tell it what you want. This is explained later in this chapter.
2.2 Linebreaking and Pagebreaking 19
take a short breath at every comma. If this feels awkward at some place, delete that comma, if you feel the urge to breathe (or make a short stop) at some other place, insert a comma.
Finally, the paragraphs of a text should also be structured logically at a higher level, by putting them into chapters, sections, subsections, and so on. However, the typographical effect of writing e.g. \section{The Structure of Text and Language} is so obvious that it is almost self-evident how these high-level structures should be used.
2.2
Linebreaking and Pagebreaking
2.2.1 Justified Paragraphs
Often books are typeset with each line having the same length. LATEX inserts the necessary linebreaks and spaces between words by optimizing the con-tents of a whole paragraph. If necessary, it also hyphenates words that would not fit comfortably on a line. How the paragraphs are typeset depends on the document class. Normally the first line of a paragraph is indented, and there is no additional space between two paragraphs. Refer to section5.3.2
for more information.
In special cases it might be necessary to order LATEX to break a line:
\\or\newline
starts a new line without starting a new paragraph.
\\*
additionally prohibits a pagebreak after the forced linebreak.
\newpage
starts a new page.
\linebreak[n],\nolinebreak[n],\pagebreak[n]and\nopagebreak[n]
20 Typesetting Text
you really want to start a “new line”, then use the corresponding command. Guess its name!
LATEX always tries to produce the best linebreaks possible. If it cannot find a way to break the lines in a manner which meets its high standards, it lets one line stick out on the right of the paragraph. LATEX then complains (“overfull hbox”) while processing the input file. This happens most often when LATEX cannot find a suitable place to hyphenate a word.2 You can in-struct LATEX to lower its standards a little by giving the\sloppycommand. It prevents such over-long lines by increasing the inter-word spacing — even if the final output is not optimal. In this case a warning (“underfull hbox”) is given to the user. In most such cases the result doesn’t look very good. The command\fussybrings LATEX back to its default behaviour.
2.2.2 Hyphenation
LATEX hyphenates words whenever necessary. If the hyphenation algorithm does not find the correct hyphenation points, you can remedy the situation by using the following commands to tell TEX about the exception.
The command
\hyphenation{word list}
causes the words listed in the argument to be hyphenated only at the points marked by “-”. The argument of the command should only contain words built from normal letters or rather signes which are regarded as normal let-ters in the active context. The hyphenation hints are stored for the language which is active when the hyphenation command occurs. This means that if you place a hyphenation command into the preamble of your document it will influence the english language hyphenation. If you place the command after the \begin{document} and you are using some package for national language support likebabel, then the hyphenation hints will be active in the language activated throughbabel.
The example below will allow “hyphenation” to be hyphenated as well as “Hyphenation”, and it prevents “FORTRAN”, “Fortran” and “fortran” from being hyphenated at all. No special characters or symbols are allowed in the argument.
Example:
\hyphenation{FORTRAN Hy-phen-a-tion}
2Although LATEX gives you a warning when that happens (Overfull hbox) and displays
2.3 Ready made Strings 21
The command \- inserts a discretionary hyphen into a word. This also becomes the only point hyphenation is allowed in this word. This command is especially useful for words containing special characters (e.g. accented characters), because LATEX does not automatically hyphenate words con-taining special characters.
I think this is: su\-per\-cal\-% i\-frag\-i\-lis\-tic\-ex\-pi\-% al\-i\-do\-cious
I think this is: supercalifragilisticexpialido-cious
Several words can be kept together on one line with the command
\mbox{text}
It causes its argument to be kept together under all circumstances.
My phone number will change soon. It will be \mbox{0116 291 2319}.
The parameter
\mbox{\emph{filename}} should contain the name of the file.
My phone number will change soon. It will be 0116 291 2319.
The parameter filename should contain the name of the file.
\fbox is similar to mbox, but in addition there will be a visible box drawn around the content.
2.3
Ready made Strings
In some of the examples on the previous pages you have seen some very simple LATEX commands for typesetting special text strings:
Command Example Description
\today 9th August 2001 Current date in the current language
\TeX TEX The name of your favorite typesetter
\LaTeX LATEX The name of the Game
\LaTeXe LATEX 2ε The current incarnation of LATEX
2.4
Special Characters and Symbols
2.4.1 Quotation Marks
22 Typesetting Text
‘‘Please press the ‘x’ key.’’ “Please press the ‘x’ key.”
2.4.2 Dashes and Hyphens
LATEX knows four kinds of dashes. You can access three of them with differ-ent numbers of consecutive dashes. The fourth sign is actually not a dash at all: It is the mathematical minus sign:
daughter-in-law, X-rated\\ pages 13--67\\
yes---or no? \\ $0$, $1$ and $-1$
daughter-in-law, X-rated pages 13–67
yes—or no? 0, 1 and−1
The names for these dashes are: ‘-’ hyphen, ‘–’ en-dash, ‘—’ em-dash and ‘−’ minus sign.
2.4.3 Tilde (∼)
A character, often seen with web addresses is the tilde. To generate this in LATEX you can use\~but the result: ˜ is not really what you want. Try this instead:
http://www.rich.edu/\~{}bush \\ http://www.clever.edu/$\sim$demo
http://www.rich.edu/˜bush http://www.clever.edu/∼demo
2.4.4 Degree Symbol (◦)
How to print a degree symbol in LATEX?
Its $-30\,^{\circ}\mathrm{C}$, I will soon start to
super-conduct.
Its−30◦
C, I will soon start to super-conduct.
2.4.5 Ellipsis ( . . . )
2.5 International Language Support 23
‘ellipsis’ by just typing three dots, as the spacing would be wrong. Besides that there is a special command for these dots. It is called
\ldots
Not like this ... but like this:\\ New York, Tokyo, Budapest, \ldots
Not like this ... but like this: New York, Tokyo, Budapest, . . .
2.4.6 Ligatures
Some letter combinations are typeset not just by setting the different letters one after the other, but by actually using special symbols.
ff fi fl ffi. . . instead of ff fi fl ffi . . .
These so-called ligatures can be prohibited by inserting an\mbox{}between the two letters in question. This might be necessary with words built from two words.
Not shelfful\\ but shelf\mbox{}ful
Not shelfful but shelfful
2.4.7 Accents and Special Characters
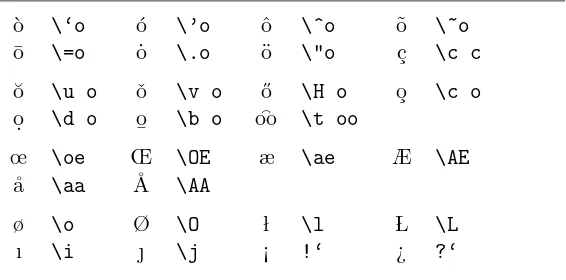
LATEX supports the use of accents and special characters from many lan-guages. Table 2.1 shows all sorts of accents being applied to the letter o. Naturally other letters work too.
To place an accent on top of an i or a j, its dots have to be removed. This is accomplished by typing\i and \j.
H\^otel, na\"\i ve, \’el\‘eve,\\ sm\o rrebr\o d, !‘Se\~norita!,\\ Sch\"onbrunner Schlo\ss{}
Stra\ss e
Hˆotel, na¨ıve, ´el`eve, smørrebrød, ¡Se˜norita!, Sch¨onbrunner Schloß Straße
2.5
International Language Support
24 Typesetting Text
1. All automatically generated text strings3 have to be adapted to the new language. For many languages, these changes can be accomplished by using thebabel package by Johannes Braams.
2. LATEX needs to know the hyphenation rules for the new language. Getting hyphenation rules into LATEX is a bit more tricky. It means rebuilding the format file with different hyphenation patterns enabled. YourLocal Guide [4] should give more information on this.
If your system is already configured appropriately, you can activate the
babelpackage by adding the command
\usepackage[language]{babel}
after the\documentclass command. The languages your system supports should also be listed in the Local Guide. Babel will automatically activate the apropriate hyphenation rules for the language you choose. If your LATEX format does not support hyphenation in the language of your choice, babel will still work but it will disable hyphenation which has quite a negative effect on the visual appearance of the typeset document.
For some languages, babel also specifies new commands which simplify the input of special characters. The German language, for example, contains a lot of umlauts (¨a¨o¨u). Withbabel, you can enter an ¨o by typing"o instead of\"o.
Some computer systems allow you to input special characters directly from the keyboard. LATEX can handle such characters. Since the December
3Table of Contents, List of Figures, . . .
Table 2.1: Accents and Special Characters.
`
o \‘o ´o \’o ˆo \^o ˜o \~o
¯
o \=o ˙o \.o ¨o \"o ¸c \c c
˘
o \u o ˇo \v o ˝o \H o ¸o \c o
o. \d o o
¯ \b o ⁀oo \t oo
œ \oe Œ \OE æ \ae Æ \AE
˚a \aa ˚A \AA
ø \o Ø \O l \l L \L
2.5 International Language Support 25
1994 release of LATEX 2ε, support for several input encodings is included in the basic distribution of LATEX 2ε. Check theinputenc package:
\usepackage[encoding]{inputenc}
When using this package, you should consider that other people might not be able to display your input files on their computer, because they use a different encoding. For example, the German umlaut ¨a on a PC is encoded as 132, but on some Unix systems using ISO-LATIN 1 it is encoded as 228. Therefore you should use this feature with care. The following encodings may come handy, depending on the type of system you are working on:
Operating system encoding
Mac applemac
Unix latin1
Windows ansinew
OS/2 cp850
Font encoding is a different matter. It defines at which position inside a TEX-font each letter is stored. The original Computer Modern TEX font does only contain the 128 characters of the old 7-bit ASCII character set. When accented characters are required, TEX creates them by combining a normal character with an accent. While the resulting output looks perfect, this approach stops the automatic hyphenation from working inside words containing accented characters.
Fortunately, most modern TEX distributions contain a copy of the EC fonts. These fonts look like the Computer Modern fonts, but contain special characters for most of the accented characters used in European languages. By using these fonts you can improve hyphenation in non-English docu-ments. The EC fonts are activated by including thefontenc package in the preamble of your document.
26 Typesetting Text
2.5.1 Support for German
Some hints for those creating German documents with LATEX. You can load German language support with the command:
\usepackage[german]{babel}
This enables German hyphenation, if you have configured your LaTeX system accordingly. It also changes all automatic text into German. Eg. “Chapter” becomes “Kapitel”. Further a set of new commands becomes available which allows you to write German input files more quickly. Check out table2.2for inspiration.
Table 2.2: German Special Characters.
"a ¨a "s ß
"‘
” "’ “
"< ≪ "> ≫
\dq ”
2.6
The Space between Words
To get a straight right margin in the output, LATEX inserts varying amounts of space between the words. It inserts slightly more space at the end of a sentence, as this makes the text more readable. LATEX assumes that sen-tences end with periods, question marks or exclamation marks. If a period follows an uppercase letter, this is not taken as a sentence ending, since periods after uppercase letters normally occur in abbreviations.
Any exception from these assumptions has to be specified by the author. A backslash in front of a space generates a space which will not be enlarged. A tilde ‘~’ character generates a space which cannot be enlarged and which additionally prohibits a linebreak. The command \@ in front of a period specifies that this period terminates a sentence even when it follows an uppercase letter.
Mr.~Smith was happy to see her\\ cf.~Fig.~5\\
I like BASIC\@. What about you?
Mr. Smith was happy to see her cf. Fig. 5
2.7 Titles, Chapters, and Sections 27
The additional space after periods can be disabled with the command
\frenchspacing
which tells LATEXnot to insert more space after a period than after ordinary character. This is very common in non-English languages, except bibliogra-phies. If you use \frenchspacing, the command \@is not necessary.
2.7
Titles, Chapters, and Sections
To help the reader find his or her way through your work, you should divide it into chapters, sections, and subsections. LATEX supports this with special commands which take the section title as their argument. It is up to you to use them in the correct order.
The following sectioning commands are available for thearticleclass:
\section{...} \paragraph{...}
\subsection{...} \subparagraph{...} \subsubsection{...}
You can use two additional sectioning commands for thereportand the
book class:
\part{...} \chapter{...}
As the article class does not know about chapters, it is quite easy to add articles as chapters to a book. The spacing between sections, the numbering and the font size of the titles will be set automatically by LATEX.
Two of the sectioning commands are a bit special:
• The \part command does not influence the numbering sequence of chapters.
• The\appendix command does not take an argument. It just changes the chapter numbering to letters.4
LATEX creates a table of contents by taking the section headings and page numbers from the last compile cycle of the document. The command
\tableofcontents
expands to a table of contents at the place where it is issued. A new doc-ument has to be compiled (“LATEXed”) twice to get a correct table of con-tents. Sometimes it might be necessary to compile the document a third time. LATEX will tell you when this is necessary.
28 Typesetting Text
All sectioning commands listed above also exist as “starred” versions. A “starred” version of a command is built by adding a star*after the command name. They generate section headings which do not show up in the table of contents and which are not numbered. The command\section{Help}, for example, would become\section*{Help}.
Normally the section headings show up in the table of contents exactly as they are entered in the text. Sometimes this is not possible, because the heading is too long to fit into the table of contents. The entry for the table of contents can then be specified as an optional argument in front of the actual heading.
\chapter[Title for the table of contents]{A long and especially boring title, shown in the text}
The title of the whole document is generated by issuing a
\maketitle
command. The contents of the title have to be defined by the commands
\title{...},\author{...}and optionally\date{...}
before calling \maketitle. In the argument of \author, you can supply several names separated by\and commands.
An example of some of the commands mentioned above can be found in Figure1.3 on page 8.
Apart from the sectioning commands explained above, LATEX 2ε intro-duced three additional commands for use with the book class. They are useful for dividing your publication. The commands alter chapter headings and page numbering to work as you would expect it in a book:
\frontmatter should be the very first command after \begin{document}. It will switch page numbering to Roman numerals. It is common to use the starred sectioning commands (eg \chapter*{Preface}) for frontmatter as this stopps LATEX from enumerating them.
\mainmatter comes after right befor the first chapter of the book. It turns on Arabic page numbering and restarts the page counter.
\appendix marks the start of additional material in your book. After this command chapters will be numbered with letters.
2.8 Cross References 29
2.8
Cross References
In books, reports and articles, there are often cross-references to figures, tables and special segments of text. LATEX provides the following commands for cross referencing
\label{marker}, \ref{marker}and\pageref{marker}
where marker is an identifier chosen by the user. LATEX replaces \ref by the number of the section, subsection, figure, table, or theorem after which the corresponding \label command was issued. \pageref prints the page number of the page where the \label command occurred.5 Just as the section titles, the numbers from the previous run are used.
A reference to this subsection \label{sec:this} looks like: ‘‘see section~\ref{sec:this} on page~\pageref{sec:this}.’’
A reference to this subsection looks like: “see section11on page29.”
2.9
Footnotes
With the command
\footnote{footnote text}
a footnote is printed at the foot of the current page. Footnotes should always be put6 after the word or sentence they refer to. Footnotes referring to a sentence or part of it should therefore be put after the comma or period.7
Footnotes\footnote{This is a footnote.} are often used by people using \LaTeX.
Footnotesa
are often used by people using LATEX.
a
This is a footnote.
5Note that these commands are not aware of what they refer to.\labeljust saves the
last automatically generated number.
6“put” is one of the most common English words.
7Note, that footnotes are distracting the reader from the main body of your document.
After all everybody reads the footnotes, we are a curious species. So why not just integrate everything you want to say into the body of the document.8
30 Typesetting Text
2.10
Emphasized Words
If a text is typed using a typewriter, important words are emphasized by underlining them.
\underline{text}
In printed books, however, words are emphasized by typesetting them in anitalic font. LATEX provides the command
\emph{text}
to emphasize text. What the command actually does with its argument depends on the context:
\emph{If you use
emphasizing inside a piece of emphasized text, then \LaTeX{} uses the
\emph{normal} font for emphasizing.}
If you use emphasizing inside a piece of em-phasized text, then LATEX uses the normal font for emphasizing.
Please note the difference between telling LATEX toemphasize something and telling it to use a differentfont:
\textit{You can also \emph{emphasize} text if it is set in italics,} \textsf{in a
\emph{sans-serif} font,} \texttt{or in
\emph{typewriter} style.}
You can alsoemphasizetext if it is set in ital-ics, in a sans-serif font, or in typewriter
style.
2.11
Environments
\begin{environment} text \end{environment}
Where environment is the name of the environment. Environments can be called several times within each other as long as the calling order is maintained.
\begin{aaa}...\begin{bbb}...\end{bbb}...\end{aaa}
2.11 Environments 31
2.11.1 Itemize, Enumerate, and Description
The itemize environment is suitable for simple lists, the enumerate en-vironment for enumerated lists, and the description environment for de-scriptions.
\flushleft
\begin{enumerate}
\item You can mix the list environments to your taste: \begin{itemize}
\item But it might start to look silly.
\item[-] With a dash. \end{itemize}
\item Therefore remember: \begin{description}
\item[Stupid] things will not become smart because they are in a list.
\item[Smart] things, though, can be presented beautifully in a list. \end{description}
\end{enumerate}
1. You can mix the list environments to your taste:
• But it might start to look silly. - With a dash.
2. Therefore remember:
Stupid things will not become smart because they are in a list.
Smart things, though, can be presented beautifully in a list.
2.11.2 Flushleft, Flushright, and Center
The environments flushleft and flushright generate paragraphs which are either left- or right-aligned. Thecenterenvironment generates centred text. If you do not issue\\ to specify linebreaks, LATEX will automatically determine linebreaks.
\begin{flushleft}
This text is\\ left-aligned. \LaTeX{} is not trying to make each line the same length. \end{flushleft}
This text is
left-aligned. LATEX is not trying to make
each line the same length.
\begin{flushright}
This text is right-\\aligned. \LaTeX{} is not trying to make each line the same length. \end{flushright}
This text is right-aligned. LATEX is not trying to make each
line the same length.
\begin{center}
At the centre\\of the earth \end{center}
32 Typesetting Text
2.11.3 Quote, Quotation, and Verse
The quote environment is useful for quotes, important phrases and exam-ples.
A typographical rule of thumb for the line length is: \begin{quote}
On average, no line should be longer than 66 characters. \end{quote}
This is why \LaTeX{} pages have such large borders by default and also why multicolumn print is used in newspapers.
A typographical rule of thumb for the line length is:
On average, no line should be longer than 66 characters.
This is why LATEX pages have such large
bor-ders by default and also why multicolumn print is used in newspapers.
There are two similar environments: the quotation and the verse en-vironments. The quotation environment is useful for longer quotes going over several paragraphs, because it does indent paragraphs. Theverse en-vironment is useful for poems where the line breaks are important. The lines are separated by issuing a\\at the end of a line and a empty line after each verse.
I know only one English poem by heart. It is about Humpty Dumpty. \begin{flushleft}
\begin{verse}
Humpty Dumpty sat on a wall:\\ Humpty Dumpty had a great fall.\\ All the King’s horses and all the King’s men\\
Couldn’t put Humpty together again.
\end{verse} \end{flushleft}
I know only one English poem by heart. It is about Humpty Dumpty.
Humpty Dumpty sat on a wall: Humpty Dumpty had a great
fall.
All the King’s horses and all the King’s men
Couldn’t put Humpty together again.
2.11.4 Printing Verbatim
Text which is enclosed between \begin{verbatim} and \end{verbatim}
will be directly printed, as if it was typed on a typewriter, with all linebreaks and spaces, without any LATEX command being executed.
Within a paragraph, similar behavior can be accessed with
\verb+text+
2.11 Environments 33
The \verb|\ldots| command \ldots
\begin{verbatim}
10 PRINT "HELLO WORLD "; 20 GOTO 10
\end{verbatim}
The\ldotscommand . . .
10 PRINT "HELLO WORLD "; 20 GOTO 10
\begin{verbatim*} the starred version of the verbatim environment emphasizes the spaces in the text \end{verbatim*}
the starred version of the verbatim environment emphasizes the spaces in the text
The \verbcommand can be used in a similar fashion with a star:
\verb*|like this :-) | like this :-)
The verbatim environment and the \verb command may not be used within parameters of other commands.
2.11.5 Tabular
The tabular environment can be used to typeset beautiful tables with optional horizontal and vertical lines. LATEX determines the width of the columns automatically.
The table spec argument of the
\begin{tabular}{table spec}
command defines the format of the table. Use an l for a column of left-aligned text, rfor right-aligned text, andcfor centred text;p{width}for a column containing justified text with linebreaks, and|for a vertical line.
Within a tabular environment, & jumps to the next column, \\ starts a new line and\hline inserts a horizontal line. You can add partial Lines by using the\cline{j-i} whereby j and i are the column numbers the line should extend over.
\begin{tabular}{|r|l|} \hline
7C0 & hexadecimal \\
3700 & octal \\ \cline{2-2} 11111000000 & binary \\ \hline \hline
1984 & decimal \\ \hline
\end{tabular}
7C0 hexadecimal 3700 octal 11111000000 binary
34 Typesetting Text
\begin{tabular}{|p{4.7cm}|} \hline
Welcome to Boxy’s paragraph. We sincerely hope you’ll all enjoy the show.\\ \hline
\end{tabular}
Welcome to Boxy’s paragraph. We sincerely hope you’ll all en-joy the show.
The column separator can be specified with the @{...}construct. This command kills the inter-column space and replaces it with whatever is be-tween the curly braces. One common use for this command is explained below in the decimal alignment problem. Another possible application is to suppress leading space in a table with@{}.
\begin{tabular}{@{} l @{}} \hline
no leading space\\ \hline
\end{tabular}
no leading space
\begin{tabular}{l} \hline
leading space left and right\\ \hline
\end{tabular}
leading space left and right
Since there is no built-in way to align numeric columns to a decimal point,9 we can “cheat” and do it by using two columns: a right-aligned inte-ger and a left-aligned fraction. The@{.}command in the\begin{tabular}
line replaces the normal inter-column spacing with just a “.”, giving the ap-pearance of a single, decimal-point-justified column. Don’t forget to replace the decimal point in your numbers with a column separator (&)! A column label can be placed above our numeric “column” by using the\multicolumn
command.
\begin{tabular}{c r @{.} l} Pi expression &
\multicolumn{2}{c}{Value} \\ \hline
$\pi$ & 3&1416 \\ $\pi^{\pi}$ & 36&46 \\ $(\pi^{\pi})^{\pi}$ & 80662&7 \\ \end{tabular}
Pi expression Value
π 3.1416
ππ 36.46
(ππ)π 80662.7
9If the ‘tools’ bundle is installed on your system, have a look at the
2.12 Floating Bodies 35
\begin{tabular}{|c|c|} \hline
\multicolumn{2}{|c|}{Ene} \\ \hline
Mene & Muh! \\ \hline
\end{tabular}
Ene Mene Muh!
Material typeset with the tabular environment always stays together on one page. If you want to typeset long tables you might want to have a look at thesupertabular and thelongtabular environments.
2.12
Floating Bodies
Today most publications contain a lot of figures and tables. These elements need special treatment, because they cannot be broken across pages. One method would be to start a new page every time a figure or a table is too large to fit on the present page. This approach would leave pages partially empty, which looks very bad.
The solution to this problem is to ‘float’ any figure or table which does not fit on the current page to a later page, while filling the current page with body text. LATEX offers two environments for floating bodies; one for tables and one for figures. To take full advantage of these two environments it is important to understand approximately how LATEX handles floats internally. Otherwise floats may become a major source of frustration, because LATEX never puts them where you want them to be.
Let’s first have a look at the commands LATEX supplies for floats: Any material enclosed in afigureortableenvironment will be treated as floating matter. Both float environments support an optional parameter
\begin{figure}[placement specifier]or\begin{table}[placement specifier]
called theplacement specifier. This parameter is used to tell LATEX about the locations to which the float is allowed to be moved. Aplacement specifier is constructed by building a string offloat-placing permissions. See Table2.3. Note: The 0pt and 1.05em are TEX units. Read more on this in table
5.5on page 76.
A table could be started with the following line e.g.
\begin{table}[!hbp]
36 Typesetting Text
LATEX will place every float it encounters, according to the placement specifier supplied by the author. If a float cannot be placed on the current page it is deferred either to thefigures or the tables queue10. When a new page is started, LATEX first checks if it is possible to fill a special ‘float’ page with floats from the queues. If this is not possible, the first float on each queue is treated as if it had just occurred in the text: LATEX tries again to place it according to its respective placement specifiers (except ‘h’ which is no longer possible). Any new floats occurring in the text get placed into the appropriate queues. LATEX strictly maintains the original order of appearance for each type of float. That’s why a figure which cannot be placed pushes all further figures to the end of the document. Therefore:
If LATEX is not placing the floats as you expected, it is often only one float jamming one of the two float queues.
While it is possible to give LaTeX single-location placement specifiers, this causes problems. If the float does not fit in the location specified, then it becomes stuck, blocking subsequent floats. In particular, you should never ever use the [h] option, it is so bad that in more recent versions of LaTeX, it is automatically replaced by [ht].
Having explained the difficult bit, there are some more things to mention about thetableand figureenvironments. With the
\caption{caption text}
command, you can define a caption for the float. A running number and the string “Figure” or “Table” will be added by LATEX.
10These are fifo - ‘first in first out’ queues!
Table 2.3: Float Placing Permissions.
Spec Permission to place the float . . .
h here at the very place in the text where it occurred. This is useful mainly for small floats.