Early Praise for
iCloud for Developers
Cesare does an excellent job demonstrating how iCloud works and how you can work best within its expectations. His style is easy to follow, and he breaks it down into simple steps, but he doesn’t hold back and pretend that the complexity isn’t there. You’ll be building useful apps on iCloud in no time. Don’t hesitate to buy this book.
➤ Jonathan Penn, http://cocoamanifest.net/
iCloud for Developers guides you through the three core features of iCloud: key-value store, documents, and CoreData. Each section has great examples to help you learn how to use the feature to its full potential. Buy this book if you want to learn about iCloud!
➤ Matt Galloway
The cloud can be a confusing topic, but Cesare makes it easy. He shows you how to add iCloud into a real app step-by-step, covering all the juicy bits you’ll want to know along the way. If you want to use iCloud in your apps, this is the book for you!
iCloud for Developers
Automatically Sync Your iOS Data,
Everywhere, All the Time
Cesare Rocchi
Many of the designations used by manufacturers and sellers to distinguish their products are claimed as trademarks. Where those designations appear in this book, and The Pragmatic Programmers, LLC was aware of a trademark claim, the designations have been printed in initial capital letters or in all capitals. The Pragmatic Starter Kit, The Pragmatic Programmer, Pragmatic Programming, Pragmatic Bookshelf, PragProg and the linking g device are trade-marks of The Pragmatic Programmers, LLC.
Every precaution was taken in the preparation of this book. However, the publisher assumes no responsibility for errors or omissions, or for damages that may result from the use of information (including program listings) contained herein.
Our Pragmatic courses, workshops, and other products can help you and your team create better software and have more fun. For more information, as well as the latest Pragmatic titles, please visit us at http://pragprog.com.
The team that produced this book includes: John Osborn (editor)
Kim Wimpsett (copyeditor) David J Kelly (typesetter) Janet Furlow (producer) Juliet Benda (rights) Ellie Callahan (support)
Copyright © 2013 The Pragmatic Programmers, LLC. All rights reserved.
No part of this publication may be reproduced, stored in a retrieval system, or transmitted, in any form, or by any means, electronic, mechanical, photocopying, recording, or otherwise, without the prior consent of the publisher.
Printed in the United States of America. ISBN-13: 978-1-937785-60-4
Contents
Acknowledgments . . . vii
Preface . . . ix
1. Preparing Your Application for iCloud . . . 1
What Is iCloud? 2
1.1
1.2 What’s Behind iCloud 3 1.3 Introducing the Grocery Application 5 1.4 Enabling Your Application for iCloud 6 1.5 Checking for iCloud Availability 12
1.6 Moving On 13
2. Working with Key-Value Data . . . 15
iCloud Storage Types 15 2.1
2.2 Using Key-Value Pairs with iCloud 16 2.3 Using Key-Value Pairs in Grocery 17 2.4 Reacting to Changes in iCloud 21 2.5 Key-Value Storage Limitations 22
2.6 Moving On 23
3. Working with Documents . . . 25
Interacting with iCloud 25 3.1
3.2 Extending the UIDocument Class 26 3.3 Modeling a Grocery Item as a UIDocument 30 3.4 Displaying a Grocery Item 32
3.5 Moving On 38
4. Managing Multiple Files and iCloud Notifications. . . . 39
Creating and Managing Multiple Files 39 4.1
4.4 Editing Grocery Item Content 48
4.5 Moving On 53
5. Wrapping Items in a Single File . . . 55
Working with File Packages 56 5.1
5.2 Packaging Grocery Items 56 5.3 Updating the User Interface 64
5.4 Moving On 72
6. Handling Nontextual Information in a Data Model . . . 73
Working with Data in Packages 73 6.1
6.2 Associating Images with Names 74 6.3 Updating the User Interface 80
6.4 Moving On 87
7. Handling Conflicts . . . 89
Working with Document States and Notifications 89 7.1
7.2 Preventing Conflicts Between Grocery Items 91 7.3 Resolving Conflicts Between Grocery Items 96
7.4 Moving On 102
8. Working with Core Data and iCloud . . . 103
The Relational Model of the Grocery List 104 8.1
8.2 Initializing a Core Data Stack for iCloud 106 8.3 Handling Conflicts 114
8.4 Moving On 117
8.5 Conclusion 117
A1. Bibliography . . . 119
Acknowledgments
When a book shows just one author name on the cover, we tend to think it’s the result of a single-person effort. That’s far from the truth. Without the help of the many people who surrounded me (though just virtually) during the writing, this book would not have seen the light. I am happy to thank Andy and Dave for the opportunity to publish this book. John Osborn, the editor, deserves a special mention because he helped me throughout all the phases of the writing, from organizing the content to tweaking obscure sentences. Finally, I’d like to thank all the awesome technical reviewers who provided feedback on all the chapters and the code attached to this book.
• Jeff Holland
• Matt Galloway (http://www.galloway.me.uk) • Felipe Laso Marsetti (http://ife.li/)
• Marcio Valenzuela (http://www.santiapps.com) • Bear Cahill (http://www.brainwashinc.com)
Preface
You are an iOS developer with a successful application to your credit, but your customers want more and pepper you with questions: How do I back up my data? How can I replicate on my iPad the data that I’ve created on my iPhone? If I buy a new iPhone, will I lose the data in my apps when I switch devices?
You’d like to support your users, but you don’t have the skills or time to build a back-end system that could provide the safe and reliable backups your customers say they want. Moreover, the thought of synchronizing data across multiple devices gives you a headache.
If any of this applies to you, iCloud is a good candidate for solving your problems and giving your users the features they’ve requested. This book will teach you how to work with iCloud, hook up with its APIs, work with its dif-ferent storage solutions, and make your application shine.
Who Should Read This Book?
If you are an iOS developer looking to integrate your application with iCloud and to enhance it with data synchronization and backup, this book is for you. This book is also for those who simply want to know more about iCloud and the features it provides to client applications.
Before digging in, you should already know the basics of programming iOS, including proficiency in coding with Objective-C 2.0, working with view con-trollers, and using common data structures such as arrays and dictionaries. If you don’t normally use them, I also suggest you refresh your knowledge of Notification Center1 and Grand Central Dispatch,2 both of which are used
extensively throughout the book.
1. https://developer.apple.com/library/mac/#documentation/Cocoa/Conceptual/Notifications/Introduction/introNo-tifications.html#//apple_ref/doc/uid/10000043-SW1
What
’
s in This Book?
This book is an introduction to iCloud and how to use its APIs to add synchro-nization and data backup in your applications. We’ll cover the three main technologies that iCloud supports: key-value storage, document-based storage, and Core Data storage. I will illustrate the use of these APIs by showing how to build a Universal iOS app, Grocery, that keeps track of a shopping list.
How to Read This Book
The book starts with the simplest approach to synchronizing data with iCloud, key-value storage, and ends with the most advanced, Core Data. Unless you have previous experience with iCloud APIs, I suggest you read the book from start to finish and take the time to understand the concepts and techniques of iCloud development as they are introduced. Throughout the book, you will be invited to build and run the Grocery application as it is being developed. You should consider these as “conceptual check points”—opportunities to ask yourself whether you have a clear understanding of what’s been described in the previous sections.
Notes on Formatting
Objective-C is a verbose language. You will find snippets in this book that do not appear to be conventionally formatted, in the way you would expect them to appear in Xcode. That’s because of the lengths of many of the names used in iCloud programming, such as those for the various notifications the service provides. Some of these are lengthy and cannot be broken on two different lines. I have tried as much as possible to preserve Cocoa conventions, but sometimes the size of the page rules.
Online Resources
This book has a companion website at http://www.icloudfordevelopers.com and a mailing list in which news will be announced.
Requirements
In this book we are going to build a real application. You will learn how to set it up and configure it correctly. But it’s not possible to test an iCloud-enabled application on the Device Simulator. This means that to get the most out of the book, you’ll need a pair of real devices, such as an iPhone and an iPad, both with iOS 6 installed and with iCloud correctly configured and enabled.
happens correctly between the devices. Also access http://www.icloud.comto see whether your entry has been propagated to the central iCloud servers.
To develop the application used throughout the book, you will need a Mac with Xcode 4.6.2 installed and updated to develop applications that target iOS 6. We assume that you already have an active developer account and are acquainted with iOS development, Objective-C, Xcode, and Core Data. In case you need some introduction to iOS development, check out iOS SDK Development [AD12] or find plenty of material at the iOS Dev Center:
https://developer.apple.com/devcenter/ios/index.action.
Moving On
Now that you have all the pieces, let’s get started. We are going to start slowly, by first introducing the basics of iCloud and showing you how to take advantage of its features in your application. To prepare for work on the Grocery app, you’ll also learn how to prepare the Xcode project for iCloud. Ready, set, go!
CHAPTER 1
Preparing Your Application for iCloud
You have created an attractive application that friends and families can use to jointly manage their shopping lists, to-do lists, and other types of lists. Your customers say they like it, but it lacks two features they’d like to see: backup and synchronization.
If you haven’t yet received such feedback, chances are you will. Apple users expect more from their applications these days because Calendar, Contacts, and many other Apple applications that ship with the latest iPhones, iPads, and Macs can both store their data in the cloud and sync it across multiple devices.
Take Calendar, Apple’s appointment application, for example. If you own two or more Apple devices—an iPhone or iPad or two—and they all run iOS 6 or greater, open Calendar on one of them and enter a new appointment for today. Now, switch to another device, open Calendar, and go to your entries for today. Provided that you have activated iCloud on both devices, you’ll find the very same appointment on the second device that you just entered on the first.
Here’s what happened. When you entered it, your iPhone or iPad pushed the appointment to servers operated by Apple. The Calendar application on the second device was listening for changes to the calendar, found yours, and updated itself. You’ll have the same experience whenever you enter a new contact, save a photo, buy music, and more.1
Naturally, you’d like to provide features like this to your own users. Fortunate-ly, Apple has not kept iCloud to itself but opened it to app developers like you and me. Now when you write an iOS application, you’ll be able to use the information in this book to add iCloud support that works on all of Apple’s devices running iOS 5 or greater.2 Users who install the application on each
of their iOS devices will be able to store their data and keep it in sync. And we are talking about any kind of data: properties, configurations, documents, binary files, and even information in a relational database.
In this chapter, you will get acquainted with iCloud, learn how it works, and go over the steps to take to prepare an app to use the service. You’ll learn about the following:
• What iCloud provides and how you can take advantage of it • How iCloud handles data and synchronizes updates
• How to prepare an iOS project for iCloud
We will also introduce and start work on Grocery, the application that we’re going to build together in this book to flex and show off iCloud’s features (Section 1.3, Introducing the Grocery Application, on page 5).
By the end of this chapter you will have a clearer idea of the scenarios iCloud supports and the steps needed to start building an iCloud-enabled application. Let’s begin by describing what iCloud does and how it works.
1.1
What Is iCloud?
iCloud is a cloud-based tool that can store data for an application at a central server and synchronize updates served up by the iPhones, iPads, or Macs that use it. For both developers and users, iCloud solves two problems: backup and data synchronization.
For backup, data for an application need only be made to adhere to certain formats and specifications and stored in one or more special folders that iCloud provides. For data synchronization, the application has to listen for iCloud notifications indicating changes have occurred and then, when one is received, resolve any conflicts that exist and update the local data store. You will learn to handle both cases in this book, but in order to understand how iCloud handles its data, you first need to understand how it works under the hood.
2. While it’s possible to add iCloud support to versions of your application that run on a Mac, we will not cover that topic in this book.
1.2
What
’
s Behind iCloud
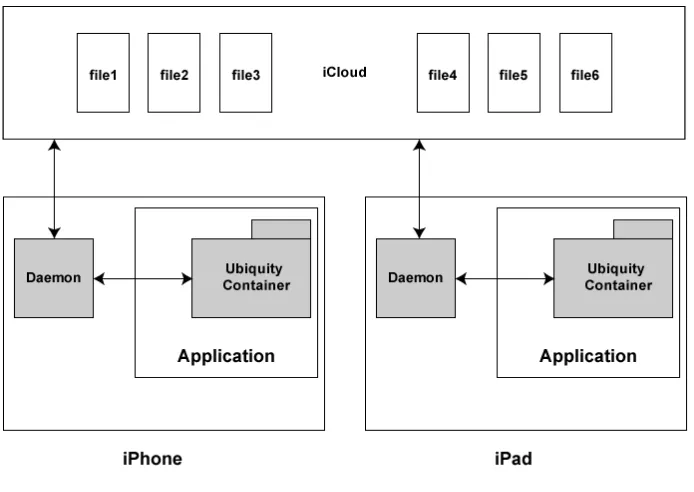
From an application’s perspective, iCloud consists of one or more “special folders” whose contents iCloud synchronizes with files stored at a central location. This special folder is called a ubiquity container. An application can have one or more ubiquity containers, each of which is assigned its own unique container ID when you enable an application to use the service. As a user adds or modifies application data, iCloud pushes the changes to a central server, which in turn pushes them to other devices that have signed up to share it. An application doesn’t need to query iCloud for updates to its ubiq-uity containers but instead simply queues itself as an observer. When notified of new content, the application takes steps to integrate it into its local data stores.
To make this mechanism perform efficiently, the contents of files in a container are broken into chunks. Whenever you change a file in a ubiquity container, the synchronization mechanism pushes the bits that have changed, not the entire file. The same thing happens when an application is notified of changes made on other devices: the application running on your device receives only the bits that have changed and integrates them into the files in its ubiquity container.
The synchronization of data across devices is managed by a background process on each device known as the daemon. The daemon is not under the control of the developer, who is responsible for managing the main thread of a program. The daemon is an independent process, whose job is to detect changes to a resource (for example, a document or database) and send these changes to a central iCloud server. The daemon acts as a sort of middle man to the file system on a device. This is summarized in Figure 1, Architecture of iCloud, on page 4, which diagrams the flow of data between an application, its containers, and iCloud.
It will be up to you to write the code that opens and closes a file used by an iCloud-enabled application. Those operations will in turn trigger the read or write procedure that is managed by the daemon. Although this might seem inflexible, such an architecture relieves you of having to manage concurrency. Without the daemon, you would need to implement thread-safe procedures to read, write, and push changes to the cloud, not to mention managing file updates. iCloud takes care of these tasks as well as two others: bandwidth management and conflict resolution.
Figure 1—Architecture of iCloud.Each device has a daemon in charge of pushing and receiving changes to and from iCloud. Each application has one or more ubiquity containers.
a change occurs on a device, the first thing pushed to iCloud is metadata that describes it. This information includes, for example, the size of the file and the date and time it was modified. Metadata is also sent to iCloud when you work with media such as pictures, videos, or audio recordings. As soon as a save operation completes on such a resource file, a 1KB element pops up on the cloud to serve as a placeholder while the actual file is uploaded.
iCloud also breaks down files into chunks to simplify their push to the cloud when they are updated. Only the modified chunks are sent to iCloud, which saves bandwidth and also makes it easier to resolve conflicts. To detect con-flicts between updates, only the modified chunks of a file need to be compared. Changes that don’t conflict are merged with the existing iCloud file, while those that do will trigger notifications so the developer can implement policies to resolve them, which could include asking the user to pick the “right” version.
and the status of its battery. In general, changes are pulled when they are “appropriate” and won’t degrade performance. On devices, such as phones with limited battery life, iOS pulls changes only when it needs to, such as when you open or close a document. The use of metadata, however, guarantees that the devices that share the application are synchronized and that an iPad or iPhone are “on the same page,” even if one of them has yet to integrate the most recent changes made to an application file.
To sum up, when you create or change an application file on a device, its metadata (name, creation date, and so on) is pushed immediately to iCloud. When you run the application on another mobile device, that device will be “aware” that new content is available, but the changes will be replicated there only when
• you open the file or
• the daemon decides that downloading the file will not impact the performance of the OS.
Although it’s important to be aware of such policies, you will not need to write “special” code to address them, since the daemon does all the work. If a file is unchanged (for example, it was created on the current device or it was pulled recently from iCloud), its contents will be displayed without delay when you open it. If changes have occurred, the daemon will start downloading the file and notify you when it’s done. We will look more closely at this behavior as we develop our Grocery application.
1.3
Introducing the Grocery Application
To show what’s possible with iCloud, we’re going to build a real application that uses it. I’ll name the app Grocery. Grocery will allow users to share a common grocery list between their devices. Each item in the list will have a name, will include an image (so we can show how to store binary files), and will be assigned to one or more categories (to show how we can work with relational data). When a user creates or modifies an item on one device, it will be replicated on any others that are connected to the same iCloud account.
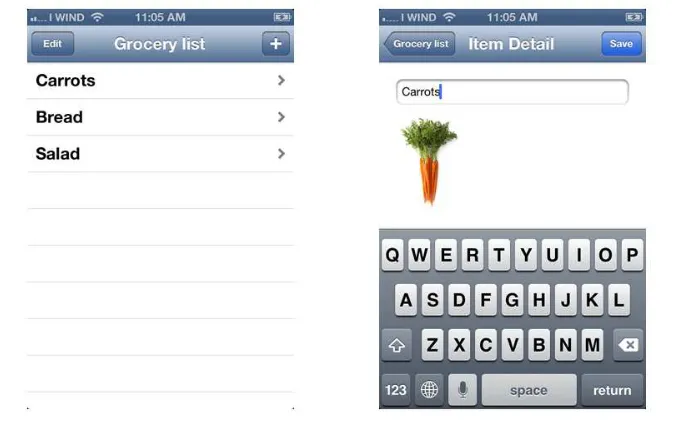
The application will have two views, as shown in Figure 2, Two views of the Grocery application, on page 6. The first is a table view that displays the list of grocery items to be bought. This view also lets users add and delete items. The second view will appear whenever the user taps an item in the first view and will display some pertinent details about it, such as its name and an image of the item.
Figure 2—Two views of the Grocery application.The first view shows a list of items, and the second shows a detailed view of a single item.
As we move through the book, we’re going to encounter slightly different ver-sions of this application, but its core will remain the same: two views, one to display the list and one to show the details of each item.
While the Grocery application is a simple one, it’s complex enough for us to learn some important iCloud skills, such as building a data model, reacting to update notifications, detecting and resolving conflicts, and working with relational data.
In the next section, we will focus on the very first steps you’ll need to get started with iCloud.
1.4
Enabling Your Application for iCloud
For any iOS applications, the steps you take to set it up are always pretty much the same: create an application ID, create a provisioning profile, and create an Xcode project. Prior to that, of course, you must have joined Apple’s developer program, paid your fee, and received a developer certificate. To set up a project for iCloud, the steps are the same but with a twist: the application ID must be enabled for iCloud, and the Xcode project must be “entitled” to use iCloud and configured to use one or more ubiquity containers.
Let’s walk through each of these steps using the Grocery app.
Create an iCloud-Enabled Application ID
Every application must have an application ID, whether you want to publish it or simply debug it on a real device, so this is always a mandatory step.
Log in to the iOS provisioning portal as you would for any other application.3 In the iOS Apps section you’ll find a handy menu you can use to navigate its different parts. To create a new application identifier, click Identifiers and then click the + sign at the top right.
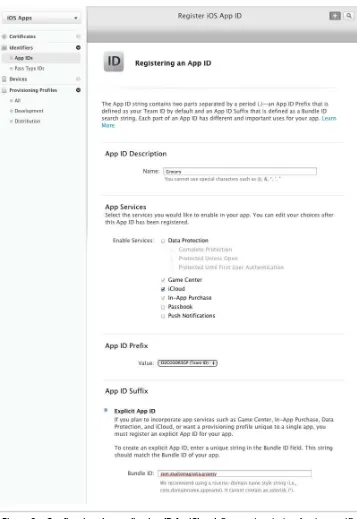
I have entered Grocery as the App ID description, checked the iCloud option, left Team ID selected, and entered com.studiomagnolia.grocery as a bundle ID. I’ve used my own reverse domain identifier, which is mine and personal, so if you try to use it, it will tell you it’s already in use. You will have to create your own ID to run and debug the application on your devices. Once you have entered all the data and checked the iCloud option (as in Figure 3, Configuring the application ID for iCloud, on page 8), click the Continue button at the bottom.
Now that you have an application ID that’s enabled for iCloud, you can use it to create a provisioning profile in order to enable the application to run on your devices.
Create a Provisioning Profile
While you are still in the provisioning portal, create a provisioning profile for our application. You need this in order to couple the application ID with the list of devices entitled to run the application as you develop and test it.
Click Provisioning Profiles in the left sidebar, click Development, then click the + sign at the top left. From the list of options, choose iOS App Development and click the Continue button at the bottom. On the next screen (Figure 4,
Creating a provisioning profile, on page 9), select the application ID that you created in the previous step and click Continue. For the next step, select the certificate to be included in the provisioning profile and click Continue.4 Finally, select the list of devices on which you want to test the application. Remember that you’ll need at least two to explore iCloud. I’ve added some devices owned by colleagues; be sure to add your own.
3. https://developer.apple.com/account/overview.action
4. If you have developed application in the past, you’ll have one certificate for development and one for distribution. Select the one for development. If you don’t have a certificate, you can create one in the Certificates section. If you need more details about certificates, you can check out this page at Apple’s support: https://developer.apple.com/support/technical/ certificates/.
Figure 3—Configuring the application ID for iCloud.Enter a description for the app ID, check iCloud in the services, keep the team ID as it is, and enter the app ID.
Figure 4—Creating a provisioning profile.Here you specify the list of devices on which the application can run.
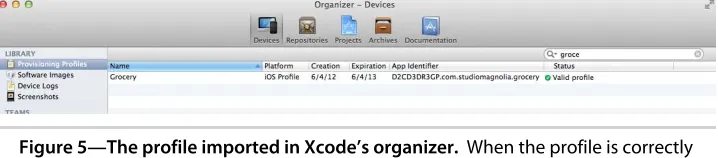
As a last step, enter a name for the profile and click Generate. This will show you a recap of the provisioning profile. Click the Download button to obtain the profile generated, and double-click it to import it into Xcode. Xcode will fire up, and the profile should appear as one of the provisioning profiles now listed in the Xcode Organizer, as shown in Figure 5, The profile imported in Xcode's organizer, on page 9.
Figure 5—The profile imported in Xcode’s organizer. When the profile is correctly imported, there is a green icon in the Status column.
Configure a Project for iCloud
Now you are ready to create a project for the Grocery application and get to work. If you haven’t done so already, open Xcode and create a new project using the Master-Detail project template. Name it Grocery, set Device Family to Universal so it will run on all iOS devices, enable automatic reference counting (ARC),5 and disable all the other options, as in Figure 6, Creating an iCloud-enabled Xcode project, on page 10.
Figure 6—Creating an iCloud-enabled Xcode project. The configuration of our first project.
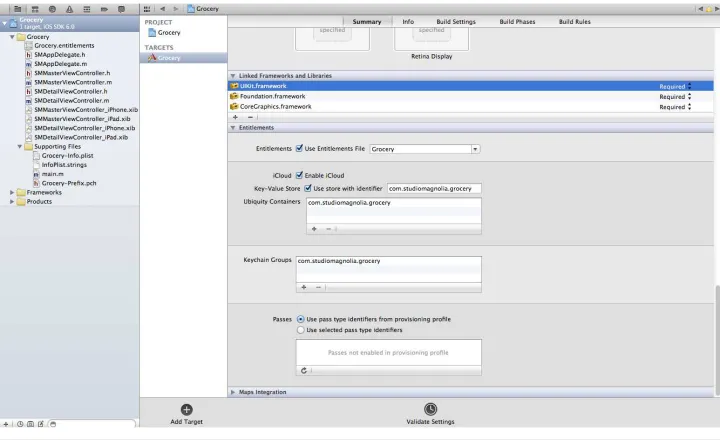
To work with iCloud, an application needs to be entitled. Select the project root on the left and then the target, and scroll to the bottom of the summary tab, where you will need to set the iCloud details. Once you enable Entitle-ments, the fields will be autofilled with your application ID.
Entitlements include information about what the application is entitled to do. As shown in Figure 7, Configuring a project for iCloud, on page 11, entitle-ments for an iCloud-enabled application include entries for the following:
5. ARC enables automated memory management at compile time. To know more, see
http://developer.apple.com/library/mac/#releasenotes/Objective-C/RN-TransitioningToARC/Introduction/Introduc-tion.html%23//apple_ref/doc/uid/TP40011226.
Key-value store
Represents the identifier of the key-value store in iCloud. Note that the identifier is the same as the one we’re using for the Grocery ubiquity container. You will learn about key-value data in Chapter 2, Working with Key-Value Data, on page 15.
Ubiquity containers
Specifies the identifiers of the ubiquity containers whose files can be read from or written to by the application. The container can be shared by more than one application, provided the applications are created by the same team.
Keychain groups
Specifies the keys needed to access keychain data, in case an application manages them. We will not cover this topic in the book.
You can edit any of these entries also by opening the file for the project, which is named grocery.entitlements and is listed in the project root.
Figure 7—Configuring a project for iCloud. Here we define the application’s entitlement to use iCloud.
such as Grocery starts up, it’s always best to have it check whether iCloud is available. You will see how that’s done in the next section.
If you have already published an application in the App Store and you want to enhance it by adding iCloud support, I recom-mend you regenerate the provisioning profile instead of activating iCloud in the existing one. In my experience, synchronization does not work when you just switch iCloud on in an existing profile.
Tip 1
1.5
Checking for iCloud Availability
The first step that an iCloud-enabled application must take on startup is to check whether iCloud is turned on for the host device. The user might not have enabled iCloud, in which case it is important to detect this condition and act to prevent unexpected behaviors or crashes. The code to do this is pretty simple and is usually added to the application:didFinishLaunchingWithOptions: method of the application delegate, as shown in the following snippet:
- (BOOL)application:(UIApplication *)application didFinishLaunchingWithOptions:(NSDictionary *)launchOptions
{
[self.window makeKeyAndVisible];
id currentToken = [[NSFileManager defaultManager] ubiquityIdentityToken];
if (currentToken) {
NSLog(@"iCloud access on %@", currentToken);
} else {
NSLog(@"No iCloud access"); }
return YES; }
Here the key element is the ubiquityIdentityToken method, which returns the token associated with the container ID that we previously set up in the project’s entitlements. A returned value that is not nil means the user has activated iCloud on the device. If iCloud is enabled, when you run the project, the console will print the following:
iCloud access on <e3660e9f 2f283084 c4f5af91 29f707df 6bfb5c7e>
Remember, to test iCloud, you must run the project on a device, not in the simulator.
Tip 2
Once we have verified that iCloud is correctly configured and up and running, we are all set for the next step in developing our application: building a model for the data that the application will use and then storing and retrieving it from iCloud.
1.6
Moving On
In this first chapter, you saw what iCloud can do and how it works under the hood. iCloud uses special ubiquity folders to store data for each application on a device. Developers can read and write to these folders, but it is the responsibility of a background process on the device, known as a daemon, to make sure the contents are in sync.
You were also introduced to the Grocery application that you will develop in the remaining chapters of this book and learned the steps you must take to equip an application for iCloud, which include creating an iCloud-enabled application ID and provisioning profile and then entitling the application to use it. You also learned how to check whether users have enabled iCloud for their devices, a necessary prerequisite to running your app.
As a reference, I have put the Xcode project related to this chapter in the repository attached to this book. It’s in the folder named Grocery-chp1.
In the next chapter, you will learn about the different types of storage iCloud supports and then learn how to store and retrieve data of the simplest kind: key-value pairs.
Storage Guidelines
As of iOS 5, data stored in the Documents folder is automatically backed up on iCloud as part of your application even if the app is not iCloud enabled. Apple suggests to store in Documents only data that is really needed, like the data created by the app that cannot be reproduced.
There is an edge case: you need some files to be permanent on the device, even when storage is low, and you don’t need them to be backed up on iCloud. In this case, you should mark those files with the no-backup flag. Further details are available at
https://developer.apple.com/library/ios/#qa/qa1719/.
CHAPTER 2
Working with Key-Value Data
In the previous chapter, you learned how to configure an application and its entitlements to work with iCloud and to confirm that a given iOS device is ready for iCloud.
In this chapter, you will learn about the three types of storage that iCloud supports and then learn to use the simplest: key-value storage. To show how key-value pairs can be synced via iCloud, we will build a working prototype of the Grocery application introduced in the previous chapter and use it to store, retrieve, and update its grocery list.
Let’s begin with a quick look at the types of storage supported by iCloud.
2.1
iCloud Storage Types
iCloud provides developers with three ways to store data: key-value storage, document-based storage, and Core Data storage. Document-based storage is the most intuitive. User-generated content—documents, pictures, or other media—is stored in files located in the ubiquity container. The only limit to this kind of storage is the one set by a user’s iCloud account.1 Day One,2 a
journaling application, uses this approach to replicate a user’s entries on multiple devices. We will explore this approach in Chapter 3, Working with Documents, on page 25.
Key-value storage is even simpler. You can think of it as a sort of hash table in the cloud, where you can store data, such as preferences, meant to be shared across devices. Interacting with such data is easy: given a key, it’s a matter of getting or setting its corresponding value. An application can store up to 1MB f data in its key-value store. For example, the weather application
bundled in iOS exploits this approach to ensure the list of locations on all of a user’s devices is the same.
Core Data is a framework used to model and manage relational data and has been iCloud enabled since the release of iOS 5. With Core Data you can replicate a relational database in the cloud and on other devices. Changes to the database are stored in transaction logs and are propagated to the cloud. As with a document-based scheme, there is no explicit limit to the storage except the one specified in the user’s account. Using iCloud with Core Data is the subject of Chapter 8, Working with Core Data and iCloud, on page 103. Given its limit in size, key-value storage is ideal for the synchronization of small data (for example, values in the settings of an application) that would propagate quickly across devices. Whenever you work with files, such as documents or pictures, document-based storage is the best option. If you are dealing with relational data, you can give iCloud-enabled Core Data a shot.
In this chapter, you will explore the use of key-value storage. You will learn how to store items created by users of the Grocery application in a hash table–like structure that is stored locally and then pushed to iCloud. You will see how to store and retrieve such items and how to make the application react to changes in that data as it is broadcast by iCloud.
2.2
Using Key-Value Pairs with iCloud
Dealing with the main class used to interact with iCloud’s key-value storage is similar to working with the NSMutableDictionary class. Both even share some of the same methods, such as setObject:forKey:, which says, in effect, “insert this object and use this key as a reference for future retrieval.” An even more closely related component is the NSUserDefaults class, which you might have used in other applications to persist data on disk. You can think of key-value storage as NSUserDefaults on steroids, where data is both persisted on disk and pushed to iCloud, where it is available for use on your other devices.
The class to use for storing and retrieving key-value pairs for iCloud is the NSUbiquitousKeyValueStore class. Whenever we want to store a key-value pair, we first create a reference to it and then call the setObject:ForKey: method to pass it a key and its value, like so:
NSUbiquitousKeyValueStore* store =
[NSUbiquitousKeyValueStore defaultStore]; [store setObject:someObject forKey:somekey];
To retrieve a key-value pair, we pass the same key to the objectForKey: method. [store objectForKey:someKey];
Finally, to explicitly save in-memory data to disk and propagate it to iCloud, we call the synchronize method.
[store synchronize];
That’s it. These are the three operations you need to know to use key-value data with iCloud. You don’t need to call synchronize every time you add or change an item. Instead, you can wait until application launch. A call to the method synchronize does not guarantee that changes are pushed to iCloud; it is rather a hint to iCloud that new keys or updated values are available to be synchro-nized. This means you should not expect new keys or values to be immediately available on other devices right after you call synchronize.
Let’s put this knowledge to work in our Grocery project.
2.3
Using Key-Value Pairs in Grocery
In Chapter 1, Preparing Your Application for iCloud, on page 1, we designed the Grocery project and wrote code to check whether iCloud is turned on for its host device. Now we are going to use iCloud’s key-value storage to store and retrieve information about the application.3 As you read through the fol-lowing example code, notice the repeated use of the NSUbiquitousKeyValueStore class. It’s key to the use of key-value storage but embedded in code that’s needed to manipulate and display the contents of its objects.
But first things first. Although the documentation says to call synchronize when an app launches, I think it’s a good idea to place a call also when the applica-tion goes to background. As I said, the method is just a clue, and providing more clues to iCloud does not harm our applications. So, I am going to call this method in applicationDidEnterBackground:. This is triggered whenever a user taps the home button on a device. Since the user closes the application, we can safely assume that the user is not about to enter more information at that moment. It’s a good time to tap on iCloud’s shoulder. Here’s the code to add to the application delegate:
Grocery-chp2/Grocery/SMAppDelegate.m
- (void)applicationDidEnterBackground:(UIApplication *)application {
NSUbiquitousKeyValueStore* store =
[NSUbiquitousKeyValueStore defaultStore];
[store synchronize]; }
3. You’ll find the code for the version used in this chapter in the Grocery-00 folder for the book.
Now let’s work on the code needed to retrieve a grocery list and display it to a user.
As specified in Chapter 1, Preparing Your Application for iCloud, on page 1, the application will provide users with two views of its data: the first displays a list of grocery items, and the second displays a single item from that list, with the ability to edit the entry.4
The quickest way to get started is to use the Xcode Master-Detail project template to generate the starting project: a master view controller to display the grocery list and a detail view controller to display a single item. The tem-plate also generates boilertem-plate code that we can tweak to meet the particular needs of our project. If you like, you can reuse the project generated during the previous chapter. In this chapter, we will focus on the master view con-troller, since we’re interested only in displaying a list for now; we’ll need the detail view controller in later chapters.
Let’s open the SMMasterViewController.m file. We will put the code to build an array (_objects) to populate the table view in the viewDidLoad method. The key-value store includes a handy method called dictionaryRepresentation that returns its contents in the form of a dictionary. To populate our array, we use the keys of that dictionary, as follows:
- (void)viewDidLoad {
[super viewDidLoad];
NSUbiquitousKeyValueStore* store =
[NSUbiquitousKeyValueStore defaultStore]; NSDictionary *d = [store dictionaryRepresentation]; _objects = [NSMutableArray arrayWithArray:[d allKeys]];
UIBarButtonItem *addButton = [[UIBarButtonItem alloc]
initWithBarButtonSystemItem:UIBarButtonSystemItemAdd target:self
action:@selector(insertNewObject:)]; self.navigationItem.rightBarButtonItem = addButton;
}
The boilerplate code includes also an add (+) button, which appears in the upper-right corner of the screen shown in Figure 8, Displaying key-value storage items in a list, on page 20, to allow the insertion of new elements.
4. In Chapter 6, Handling Nontextual Information in a Data Model, on page 73, you will learn how to add an image to an item.
Each time the button is tapped, a new item is created. Here’s the code for the selector associated with the button:
Grocery-chp2/Grocery/SMMasterViewController.m
- (void)insertNewObject:(id)sender {
NSUUID *itemId = [NSUUID UUID];
NSString *itemIdString = [itemId UUIDString];
NSUbiquitousKeyValueStore* store = [NSUbiquitousKeyValueStore defaultStore]; [store setString:@"Untitled" forKey:itemIdString];
[store synchronize];
NSDictionary *d = [store dictionaryRepresentation]; _objects = [NSMutableArray arrayWithArray:[d allKeys]]; [self.tableView reloadData];
}
When invoked, the insertNewObject: method creates a new item, assigns it a unique identifier, and sets its default value to Untitled. Then it saves the new item, repopulates the array, and triggers a refresh of the table view.5
Now we need to write the code to populate each cell of the table view. This happens in tableView:cellForRowAtIndexPath:, as follows:
Grocery-chp2/Grocery/SMMasterViewController.m
- (UITableViewCell *)tableView:(UITableView *)tableView cellForRowAtIndexPath:(NSIndexPath *)indexPath {
static NSString *CellIdentifier = @"Cell";
NSString *itemKey = [_objects objectAtIndex:indexPath.row]; NSUbiquitousKeyValueStore* store =
[NSUbiquitousKeyValueStore defaultStore]; NSString *item = [store objectForKey:itemKey];
UITableViewCell *cell =
[tableView dequeueReusableCellWithIdentifier:CellIdentifier];
if (cell == nil) {
cell = [[UITableViewCell alloc]
initWithStyle:UITableViewCellStyleSubtitle reuseIdentifier:CellIdentifier];
5. You could call synchronize just once, when you close the application or it goes in back-ground. That would work, but to make the propagation of changes faster and avoid data losses, I prefer to save as often as possible. Remember that calling this method does not guarantee the propagation to trigger, because that is up to the operating system.
if ([[UIDevice currentDevice] userInterfaceIdiom] == UIUserInterfaceIdiomPhone) {
cell.accessoryType = UITableViewCellAccessoryDisclosureIndicator; }
}
cell.textLabel.text = item;
cell.detailTextLabel.text = itemKey;
return cell; }
In the preceding code, we extract the key corresponding to each cell from the list of objects populating the table view, and we use it to retrieve the value of the item it references. Then we display the key-value pair. Notice that we are using a cell of style UITableViewCellStyleSubtitle so that we can show both the key and the value in the cell.
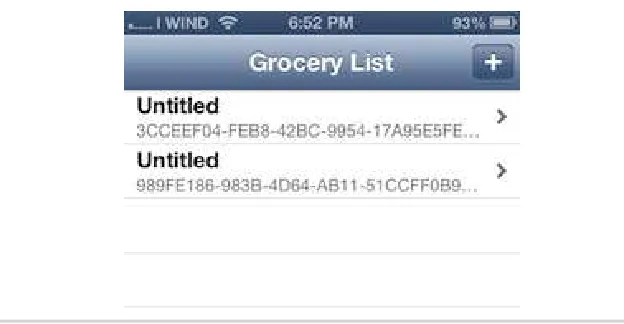
We can now run the application to see whether it works correctly. This is the first time we’ll see something working on iCloud outside of the console. Compile and run the application on one of your devices and add a few items by tapping the + button. You should see something like in Figure 8, Displaying key-value storage items in a list, on page 20.
Figure 8—Displaying key-value storage items in a list. The items in the list displayed here are first saved in key-value storage and then retrieved for display in a table view.
Now connect the other device to the Mac and compile and run the application. You won’t see any of the items we entered on the first device. Why not? Because although iCloud is trying to tell you there is something new in the list, you are not listening. In the next section, we will fix this.
2.4
Reacting to Changes in iCloud
One of the most important features of iCloud is notifications, messages sent to observing objects that provide information about an event. You can code any iOS application to listen for such messages, and that’s what you need to do to know when something in the key-value store of an application has changed.
Each type of iCloud storage provides its own notifications. In the case of key-value storage, the one to observe is NSUbiquitousKeyValueStoreDidChangeExternallyNo-tification. This notification is triggered whenever the server side of iCloud has some news for us. To hook up with that, you use the NSNotificationCenter class6
and specifically its addObserver:selector:name:object: method, as follows: [[NSNotificationCenter defaultCenter] addObserver:self
selector:@selector(kvsDidChange:)
name:NSUbiquitousKeyValueStoreDidChangeExternallyNotification object:nil];
[store synchronize];
Here what this code says: “Whenever you are notified of a change in the key-value storage from iCloud, trigger the selector kvsDidChange:.” After setting up the observer, you should call synchronize to detect whether yet another applica-tion has made changes to the key-value store.
These modifications require you to refactor the viewDidLoad as follows:
Grocery-chp2/Grocery/SMMasterViewController.m
- (void)viewDidLoad {
[super viewDidLoad];
NSUbiquitousKeyValueStore* store = [NSUbiquitousKeyValueStore defaultStore];
[[NSNotificationCenter defaultCenter] addObserver:self
selector:@selector(kvsDidChange:)
name:NSUbiquitousKeyValueStoreDidChangeExternallyNotification object:nil];
[store synchronize];
NSDictionary *d = [store dictionaryRepresentation]; NSLog(@"d is %@", d);
6. If you are not familiar with notifications in Objective-C, here is a “Getting Started”
guide from Apple: https://developer.apple.com/library/mac/#documentation/Cocoa/Conceptual/Notifications/ Introduction/introNotifications.html#//apple_ref/doc/uid/10000043i. I encourage you to read and understand it thoroughly, because notifications are key to working with iCloud and to the examples in this book.
_objects = [NSMutableArray arrayWithArray:[d allKeys]];
UIBarButtonItem *addButton = [[UIBarButtonItem alloc]
initWithBarButtonSystemItem:UIBarButtonSystemItemAdd target:self
action:@selector(insertNewObject:)];
self.navigationItem.rightBarButtonItem = addButton; }
The selector, kvsDidChange:, has two tasks to perform: first to update the current list of items and then to refresh the table view.
Grocery-chp2/Grocery/SMMasterViewController.m
- (void) kvsDidChange:(NSNotification *) notification { NSDictionary *userInfo = [notification userInfo]; NSLog(@"userInfo %@", userInfo)
NSArray *changedKeys =
[userInfo objectForKey:NSUbiquitousKeyValueStoreChangedKeysKey];
NSLog(@"kvs changed remotely %@", changedKeys);
NSUbiquitousKeyValueStore* store = [NSUbiquitousKeyValueStore defaultStore]; NSDictionary *d = [store dictionaryRepresentation];
NSLog(@"d is %@", d);
_objects = [NSMutableArray arrayWithArray:[d allKeys]]; [self.tableView reloadData];
}
This method extracts the list of changed keys from the userInfo attached to the notification object, reinitializes the array _objects that populates the table view, and then triggers a reload of the view to display updated information.
Now let’s test the completed application. Run it on one device and tap the + button to add a few items. Tap the home button on your device to put the application in background state and trigger synchronization of its key-value store with iCloud.
Now run the app on another device. You should find the same items that you created on the first device in the table view of the second. Congratulations! You have built your first iCloud-enabled application.
2.5
Key-Value Storage Limitations
Other Key-Value Storage Notifications
We explained the single most essential notification that you need in order to build a simple key-value application. If you are interested in exploiting all of the key-value storage support that iCloud provides, there are other notifications worth mentioning. For example, NSUbiquitousKeyValueStoreQuotaViolationChange tells you when you have ex-ceeded the quota assigned to your app. You can listen for it to gracefully warn the user about that. Other notifications include NSUbiquitousKeyValueStoreInitialSyncChange and
NSUbiquitousKeyValueStoreServerChange. To know more, you can check out the documentation of NSUbiquitousKeyValueStore here: http://developer.apple.com/library/ios/#documentation/Foundation/ Reference/NSUbiquitousKeyValueStore_class/Reference/Reference.html#//apple_ref/occ/cl/NSUbiquitousKey-ValueStore.
a limit of 1MB of storage, or a maximum of 1,024 pairs. A key-value store is an appropriate means to share small amounts of data for your app, especially data that does not change frequently, such as preference settings. For example, if you allow users to choose their own background colors, you can reasonably expect that value to change only rarely. For that, a key-value store is the perfect solution.
As for data types, key-value storage supports only five: NSNumber NSString, NSData, NSDate, NSArray, and NSDictionary. If your application stores a large amount of data or complex/custom types, you should turn to one of the other two types of iCloud storage: document-based or Core Data.
2.6
Moving On
In this chapter, I introduced the three types of storage that iCloud supports: key-value storage, document storage, and Core Data.
I focused on the simplest of these, key-value storage, and showed how to build an application where data is propagated across devices as it is created or changed. You learned how to work with the NSUbiquitousKeyValueStore class and its related NSUbiquitousKeyValueStoreDidChangeExternallyNotification notification method. The key steps to take in responding to a notification message are first to listen for one and then, in its associated selector, perform the tasks necessary to update the local key-value storage.7
While handy for small amounts of data that change infrequently, key-value storage is not fit for complex data types. It is time to move on to the next level, where you will learn how to store potentially large amounts of data using iCloud’s document-based storage.
7. The code for this chapter is available in the folder named Grocery-chp2.
CHAPTER 3
Working with Documents
As useful as synchronized key-value pairs can be, most applications must work with text, photos, video, music, or other data that is stored in files (or in Apple’s terminology, documents).
To support document data, iCloud provides a second type of storage known as document storage. Unlike key-value data, the amount of document storage available to a user is limited only by the quota associated with the user’s iCloud account, and documents can be used to store any type of data an application might require, even Core Data, as we’ll see in Working with Core Data and iCloud.
In this chapter, we are going to take a close look at the document-based approach to data storage. First you will learn how the interaction between your application files and iCloud is handled by means of a daemon, the background process we explained in Chapter 1, Preparing Your Application for iCloud, on page 1. Then you will learn how to work with UIDocument, the
class that provides an easy way to store and retrieve files so changes are propagated seamlessly to other devices via iCloud. And finally, you’ll modify the Grocery application to store its shopping list items in single files. You’ll start with a single item (in one file) in this chapter. In the following chapter, you’ll see how to use a collection of files to implement a list with more than one item.
3.1
Interacting with iCloud
or write to a document, you simply open or close the file using appropriate methods. The daemon handles the locking of the file and determines when it is safe to read or write to it. As the developer, your only tasks are to open and close the file as needed and to declare how to encode or decode its data. These operations are facilitated by document storage’s double queue architecture, shown in Figure 9, The double queue architecture for the open operation, on page 28.
The queues are threads that run on each device. The first queue is the main thread of the application, the one you can pilot via code and that draws the user interface. The second is the daemon, the background queue operated by iOS, which does all the read, write, and sync operations. This architecture is shared by all three types of iCloud data storage described in Section 2.1,
iCloud Storage Types, on page 15.
To store the grocery items generated by the user as plain files in the ubiquity container, you must learn how to extend the UIDocument class. UIDocument is handy because it already implements most of the functionality you need to interact with iCloud, leaving you with the tasks of mapping document contents into in-memory data structures when the file is opened and “dumping” them when the document is saved. Let’s see what’s required to extend UIDocument.
3.2
Extending the UIDocument Class
The easiest way to get started with document-based storage is to use UIDocument, a class meant to be extended to handle documents. A document is simply a collection of data that can be written to local storage as a single file or package of files (explained in Chapter 5, Wrapping Items in a Single File, on page 55). UIDocument provides two methods for reading data from a file via the daemon: openWithCompletionHandler and loadFromContents.
To read a file named doc that is an instance of UIDocument, here is the code you write:
[doc openWithCompletionHandler:^(BOOL success) { // code executed when the open has completed }]
with the application while data in the file is retrieved. Of course, if that file is a resource that the application needs to continue, you can block further interaction with the user and display a spinner while the application waits for the file to be loaded.
Once the read operation is complete, the data contained in the file is loaded into the application. This is where you have an opportunity to code your own custom behavior to specify how data contained in a file is to be decoded. The method to override is loadFromContents:ofType:error:, which belongs to UIDocument.
- (BOOL) loadFromContents:(id)contents
ofType:(NSString *)typeName error:(NSError **)outError { // decode data here
return YES; }
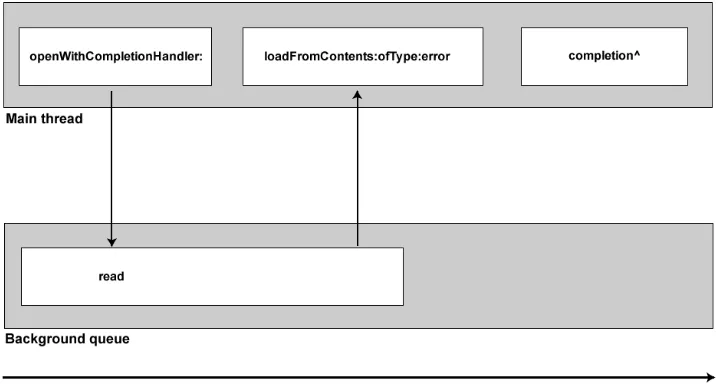
loadFromContents:ofType:error: is called when the daemon has completed the read operation in the background.1 One of its key parameters is contents, which is
usually of type NSData; it contains the actual information you need to create your data within the application. This is the place where you decode data and save it in a local variable for future use. This method is called before the completion block specified in openWithCompletionHandler:. Figure 9, The double queue architecture for the open operation, on page 28 shows a diagram of this flow over time.
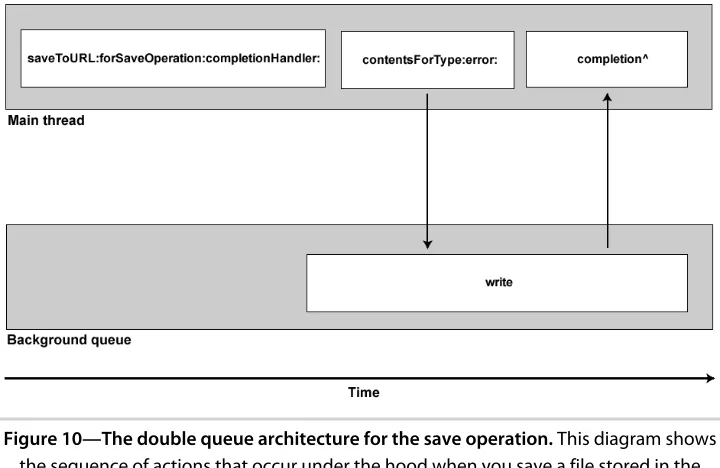
The write procedure is pretty similar, and it is based on the same double queue architecture. The key difference when writing is that you have to convert your document’s contents to NSData. In essence, you have to provide a “ snap-shot” of the current situation of your document. To explicitly save a document, you can call saveToURL:forSaveOperation:completionHandler:, like so:
[doc saveToURL:[NSURL ...]
forSaveOperation:UIDocumentChangeDone completionHandler:^(BOOL success) {
// code run when saving is done }];
Like the read operation, there is a completion block, triggered to notify that the operation has been completed. When the write is triggered on the back-ground queue, the daemon will ask for a snapshot of the document by calling contentsForType:error:. This is the place where you need to encode the information
1. The ofType: parameter allows you to specify the uniform type identifier (UTI). As you will see in Chapter 5, Wrapping Items in a Single File, on page 55, you can create a custom document file type.
Figure 9—The double queue architecture for the open operation.This diagram shows the sequence of actions that occur under the hood when you open a file stored in the
ubiquity container. The job of the daemon is illustrated in the background queue.
stored in your local variables and return them, usually as an instance of NSData.
- (id) contentsForType:(NSString *)typeName error:(NSError **)outError {
// encode data here and return them, usually as NSData }
Figure 10, The double queue architecture for the save operation, on page 29
shows the flow when saving an instance of UIDocument.
You can also work with a collection of files by storing them in a file package. Like an .app file, used to wrap iOS and Mac OS applications, a package is a directory that contains one or more files but is treated as a single file. I will provide more details in Section 5.1, Working with File Packages, on page 56, where I’ll use a package to store the grocery items.
Figure 10—The double queue architecture for the save operation.This diagram shows the sequence of actions that occur under the hood when you save a file stored in the
ubiquity container. The job of the daemon is illustrated in the background queue.
been modified. When the return value is YES, the save procedure is triggered. There are two ways to influence the return value of this method.
• Explicitly call updateChangeCount:
• Use the undo manager, which enables quickly implementing undo and redo changes on a document
Undo Manager
UIDocument has a built-in undo manager. This enables to you implement undo and redo functionality when, for example, a user edits a document. You can access the undo manager of a UIDocument via the property undoManager. This returns an instance of NSUndoManager, which has helper methods to allow the implementation of undo and redo functionalities. If you use an undo manager, you do not need to call updateChange-Count:. For more details about the undo manager, visit this link: http://developer.apple.com/ library/ios/#documentation/DataManagement/Conceptual/DocumentBasedAppPGiOS/ChangeTrackingUndo/ ChangeTrackingUndo.html#//apple_ref/doc/uid/TP40011149-CH5-SW1.
Either method will tell the daemon that something has changed and that it should start the save procedure.
Notice that in either case, data may not be pushed immediately to iCloud and in turn to other devices. The calls to these methods are just “hints” to the background queue. The daemon tries to push metadata as soon as possible, whereas actual data is pulled by the cloud when appropriate, depending, for example, on the type of device and the quality of the connection.
Summing up, when we subclass UIDocument, we need to override the following two methods:
• loadFromContents:ofType:error: • contentsForType:error:
The first method is called when the file is opened and allows the developer to “decode” the information and store it in an object or a property. The second is called when the file is saved and requires the developer to create a sort of “screenshot” of the current information held in the object to be written in the iCloud container.
Now that you’ve mastered the basics of extending a UIDocument, let’s move on to learn how to model a single grocery item, which will become the building block of our Grocery application.
3.3
Modeling a Grocery Item as a UIDocument
I’ll begin by creating the grocery list item. The data model for the item consists of its name and nothing else. To implement the model, I will create a UIDocument with a single property of type NSString to store the item name (lettuce, paper towels, and so on) as a string.
Let’s start building the model grocery item, which I’ll name SMGroceryItem. First open Xcode and create a new project using the Master-Detail project template. Name it Grocery. Choose Universal as the device family, and be sure to enable ARC. Assign the project your ID, and configure it for iCloud as explained in
Section 1.4, Enabling Your Application for iCloud, on page 6. Add code to check iCloud availability (Section 1.5, Checking for iCloud Availability, on page 12) in the application:didFinishLaunchingWithOptions: method.2
Now add a subclass of UIDocument to the project and name it SMGroceryItem. Add a single itemName property of type NSString to the class, which will be used to store a textual description of the item. Here’s the completed header file, SMGroceryItem.h:
2. If you like, you can reuse the project created in Chapter 1, Preparing Your Application for iCloud, on page 1.
Grocery-chp3/Grocery/SMGroceryItem.h
@interface SMGroceryItem : UIDocument
@property (nonatomic, strong) NSString* itemName; @end
Now open the implementation file named SMGroceryItem.m and override the two UIDocument methods, as we discussed in the previous section. Here’s the code:
Grocery-chp3/Grocery/SMGroceryItem.m
#import "SMGroceryItem.h"
@implementation SMGroceryItem
// called when the application reads data from the file - (BOOL) loadFromContents:(id)contents
ofType:(NSString *)typeName error:(NSError **)outError {
if ([contents length] > 0) {
self.itemName = [[NSString alloc] initWithBytes:[contents bytes] length:[contents length] encoding:NSUTF8StringEncoding]; } else {
self.itemName = @"Unnamed item"; }
return YES; }
// called when the app (auto)saves the content to the file - (id) contentsForType:(NSString *)typeName
error:(NSError **)outError {
if ([self.itemName length] == 0) { self.itemName = @"Unnamed item"; }
return [NSData dataWithBytes:[self.itemName UTF8String] length:[self.itemName length]]; }
@end
In the first method, loadFromContents:ofType:error:, where data is read, I transform the contents received by the daemon into a string, which I’ll save in the instance variable self.itemName. This essentially maps the contents stored in the file to an in-memory data structure, a property of a class in this case.
empty and I assign a default value, which might be needed when the document is created the first time. This is all you need to create a model for a grocery item. Crazy simple, huh?
Summing up, there is a simple data structure in the form of a string. When-ever you read, you update the value of the string. WhenWhen-ever you save, you dump the string into an NSData instance that iCloud will store in the ubiquity container.
You should now feel comfortable with the simple data model for our Grocery app. Let’s now move on to the next phase: displaying a grocery item’s content in a table view.
3.4
Displaying a Grocery Item
With the Grocery project still open, you can now add the ability to open a file and show its contents in a user interface, in particular in the SMMasterViewCon-troller. There is quite a lot of code to write and illustrate. So far, we have just a model that allows us to encode and decode information, but we still don’t know how to look for a file in the ubiquity container and show its content in the user interface. To keep things simple, I will show how to build an applica-tion that can handle just one grocery item, stored in a single file. I will explain how to extend it by adding multiple items and different resources (for example images) in Chapter 5, Wrapping Items in a Single File, on page 55. The flow of the application is as follows:
1. Set up a query in viewDidLoad to look for a specific file and add a notification observer.
2. Manage the notification, stop the query, and call the method to load data.
3. Cycle through the returned data and build corresponding instances of SMGroceryItem (just one in this case). If the item does not exist, create it (with the static name grocery.gro defined earlier) and then open it. When the file is open, add the item to the array populating the table view and call reloadData.
All this code will be added to SMMasterViewController. Let’s build what we need one step at a time.
Set Up a Query
Import SMGroceryItem.h and add a new property of class NSMetadataQuery. This is the class that enables looking for files. After these additions, the header file will look like this:
Grocery-chp3/Grocery/SMMasterViewController.h
#import <UIKit/UIKit.h> #import "SMGroceryItem.h"
@class SMDetailViewController;
@interface SMMasterViewController : UITableViewController
@property (strong, nonatomic) SMDetailViewController *detailViewController;
- (void) loadGrocery; @end
In the corresponding implementation file, define a constant for the filename grocery.gro,3 and add a helper method called loadData: to load information from
the query.
Grocery-chp3/Grocery/SMMasterViewController.m
#import "SMMasterViewController.h" #import "SMDetailViewController.h" #define kFILENAME @"grocery.gro"
@interface SMMasterViewController () { NSMutableArray *_objects;
NSMetadataQuery *_query; }
- (void) loadData:(NSMetadataQuery *)query; @end
@implementation SMMasterViewController
In viewDidLoad, we add two lines to initialize the array of objects populating the table, and we call loadGrocery.
Grocery-chp3/Grocery/SMMasterViewController.m
- (void)viewDidLoad {
[super viewDidLoad];
UIBarButtonItem *addButton = [[UIBarButtonItem alloc]
initWithBarButtonSystemItem:UIBarButtonSystemItemAdd target:self
action:@selector(insertNewObject:)];
self.navigationItem.rightBarButtonItem = addButton;
_objects = [[NSMutableArray alloc] init]; [self loadGrocery];
}
3. This is a constant because in this chapter we will deal with just one file, so we store its name right in the code.
Let’s take a closer look at the definition of loadGrocery. An instance of NSMetadata-Query is our discovery tool, which allows us to define the scope of a search (in our case within the ubiquity container) and the criteria to match. If you have ever worked with the Spotlight API on Mac OS X, you’ll be familiar with this code.4 Each query contains a predicate, which defines what we are looking
for. In our case, we will look for a filename. Before running the query, we set up a notification to receive a message when the query returns its results, as shown in the following method definition:
Grocery-chp3/Grocery/SMMasterViewController.m
- (void) loadGrocery {
_query = [[NSMetadataQuery alloc] init];
[_query setSearchScopes:[NSArray arrayWithObject:
NSMetadataQueryUbiquitousDocumentsScope]]; NSPredicate *pred = [NSPredicate predicateWithFormat:@"%K == %@",
NSMetadataItemFSNameKey, kFILENAME];
[_query setPredicate:pred];
[[NSNotificationCenter defaultCenter] addObserver:self
selector:@selector(queryDidFinishGathering:)
name:NSMetadataQueryDidFinishGatheringNotification object:_query];
[_query startQuery]; }
The first step in loadGrocery is to initialize the query and set its scope. In this case, we are looking at NSMetadataQueryUbiquitousDocumentsScope, which points to the ubiquity container of the Grocery application. Next we define a predicate to describe the matching criterion of the search. In this case, we are looking for the exact name of a file, so we use the equality operator (==). 5
Then we set up an observer to receive a notification when the search operation has been completed. As a last step, we run the query.
When we run the application, this code will initialize the query and run it against the ubiquity container. Once the gathering operation has completed, queryDidFinishGathering: will be triggered. Let’s see how it is defined in the next section.
4. http://developer.apple.com/library/mac/#documentation/Carbon/Conceptual/SpotlightQuery/Concepts/Introduc-tion.html
Manage the Query Notification
The selector queryDidFinishGathering:, called when the query returns its results, is defined as follows:
Grocery-chp3/Grocery/SMMasterViewController.m
- (void) queryDidFinishGathering:(NSNotification *) notification { NSMetadataQuery *query = [notification object];
[query disableUpdates]; [query stopQuery];
[[NSNotificationCenter defaultCenter] removeObserver:self
name:NSMetadataQueryDidFinishGatheringNotification object:query];
_query = nil;
[self loadData:query]; }
First, we stop the query; otherwise, it runs indefinitely through the cycle of the application. This step is also important; because of live updates, the result of a query can change while you are processing it. To be specific, disableUpdates prevents live updates, and stopQuery quits the process preserving results already loaded. Second, we remove the observer and trigger the actual loading of the results.
Now we have a query returning results from the ubiquity container. The next step is to write some code to unpack the results of the query and read the content of the returned grocery item.
Load the File
’
s Contents
The method loadData: will load results as follows:
Grocery-chp3/Grocery/SMMasterViewController.m
- (void) loadData:(NSMetadataQuery *)query { SMGroceryItem *groceryItem;
if ([query resultCount] == 1) {
NSMetadataItem *queryItem = [query resultAtIndex:0];
NSURL *itemUrl = [queryItem valueForAttribute:NSMetadataItemURLKey]; groceryItem = [[SMGroceryItem alloc] initWithFileURL:itemUrl];
[_objects addObject:groceryItem];
[groceryItem openWithCompletionHandler:^(BOOL success) { if (success) {
NSLog(@"item opened"); [self.tableView reloadData]; } else {
NSLog(@"failed opening item"); }
}]; }
else {
// Getting iCloud container
NSURL *ubiqContainer = [[NSFileManager defaultManager]
URLForUbiquityContainerIdentifier:nil];
// Building the URL for the new item NSURL *newItemUrl = [[ubiqContainer
URLByAppendingPathComponent:@"Documents"] URLByAppendingPathComponent:kFILENAME];
// Creating the new item
groceryItem = [[SMGroceryItem alloc] initWithFileURL:newItemUrl];
// Saving the new item
[groceryItem saveToURL:[groceryItem fileURL] forSaveOperation:UIDocumentSaveForCreating completionHandler:^(BOOL success) {
if (success) {
NSLog(@"new item created");
// Opening the new item
[groceryItem openWithCompletionHandler:^(BOOL success) { NSLog(@"New item opened");
[self.tableView reloadData]; }];
} }];
[_objects addObject:groceryItem]; }
The query instance is essentially an array of NSMetadataItem instances. Each instance carries a property NSMetadataItemURLKey, which is the URL of our file stored in iCloud. I use that URL to create a new instance of the grocery item and add it to the table’s array. If we do not open the item, we won’t be able to access its properties, such as to display its name in the table view. So, we call openWithCompletionHandler:, and we reload table view data when the item is opened successfully.
That’s why there is an else statement: when the query result has no elements, we create one using the ubiquity container and the constant, and we save it and open it.
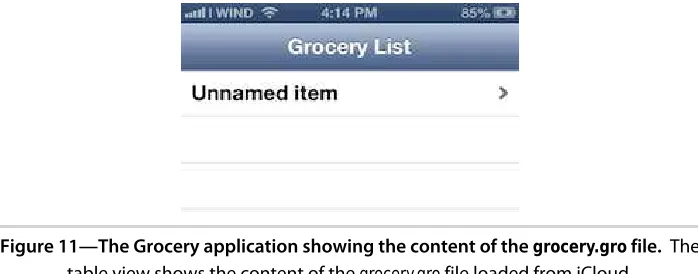
Run the App
Now at last we are ready to run our first