Java Succinctly Part 1
By
Christopher Rose
Copyright © 2017 by Syncfusion, Inc. 2501 Aerial Center Parkway Suite 200 Morrisville, NC 27560 USA All rights reserved.
mportant licensing information. Please read.
This book is available for free download from www.syncfusion.com on completion of a registration form.
If you obtained this book from any other source, please register and download a free copy from
www.syncfusion.com.
This book is licensed for reading only if obtained from www.syncfusion.com.
This book is licensed strictly for personal or educational use.
Redistribution in any form is prohibited.
The authors and copyright holders provide absolutely no warranty for any information provided.
The authors and copyright holders shall not be liable for any claim, damages, or any other
liability arising from, out of, or in connection with the information in this book.
Please do not use this book if the listed terms are unacceptable.
Use shall constitute acceptance of the terms listed.
SYNCFUSION, SUCCINCTLY, DELIVER INNOVATION WITH EASE, ESSENTIAL, and .NET
ESSENTIALS are the registered trademarks of Syncfusion, Inc.
Technical Reviewer: James McCaffrey
Copy Editor: John Elderkin
Table of Contents
The Story Behind the Succinctly Series of Books ... 7
About the Author ... 9
Chapter 1 Introduction ...10
Introduction to computer programming ...10
Chapter 2 Getting Started ...14
Downloading and installing Eclipse...14
Projects and workspaces ...17
Package explorer ...20
Java source code ...21
Do-nothing program ...24
Chapter 3 Writing Output...28
Foundations of Java ...29
Challenges ...34
Challenge solutions ...35
Chapter 4 Reading Input ...37
Reading System.in ...37
Reading multiple values ...42
Detour: debugging code ...45
Challenges ...50
Challenge Answers ...51
Chapter 5 Data Types and Variables...53
Memory ...53
Primitive data types ...54
Detour: strings ...58
Literals ...61
Detour: arrays ...63
Chapter 6 Operators and Expressions ...69
Operators and operands ...69
Arithmetic operators ...70
Assignment operators...76
Detour: binary numbers ...77
Bitwise operators ...77
Relational operators ...80
Logical operators ...81
String concatenation ...82
Other operators ...82
Challenges ...84
Challenge solutions ...85
Chapter 7 Control Structures ...88
If statements ...88
Loops ...91
Switch statements ...95
Try, catch, and finally...97
Study listing: Monty Hall program ... 100
Challenge ... 102
Challenge Solution ... 103
Chapter 8 Object-Oriented Programming ... 104
Classes and objects ... 104
Chapter 9 Example Programs and Conclusion ... 114
The game of Nim ... 114
3x+1 program ... 116
Challenges ... 119
Conclusion ... 120
The Story Behind the
Succinctly
Series
of Books
Daniel Jebaraj, Vice President Syncfusion, Inc.
taying on the cutting edge
As many of you may know, Syncfusion is a provider of software components for the Microsoft platform. This puts us in the exciting but challenging position of always being on the cutting edge.
Whenever platforms or tools are shipping out of Microsoft, which seems to be about every other week these days, we have to educate ourselves, quickly.
Information is plentiful but harder to digest
In reality, this translates into a lot of book orders, blog searches, and Twitter scans.
While more information is becoming available on the Internet and more and more books are being published, even on topics that are relatively new, one aspect that continues to inhibit us is the inability to find concise technology overview books.
We are usually faced with two options: read several 500+ page books or scour the web for relevant blog posts and other articles. Just as everyone else who has a job to do and customers to serve, we find this quite frustrating.
The
Succinctly
series
This frustration translated into a deep desire to produce a series of concise technical books that would be targeted at developers working on the Microsoft platform.
We firmly believe, given the background knowledge such developers have, that most topics can be translated into books that are between 50 and 100 pages.
This is exactly what we resolved to accomplish with the Succinctly series. Isn’t everything wonderful born out of a deep desire to change things for the better?
The best authors, the best content
Each author was carefully chosen from a pool of talented experts who shared our vision. The book you now hold in your hands, and the others available in this series, are a result of the authors’ tireless work. You will find original content that is guaranteed to get you up and running in about the time it takes to drink a few cups of coffee.
Free forever
Syncfusion will be working to produce books on several topics. The books will always be free. Any updates we publish will also be free.
Free? What is the catch?
As a component vendor, our unique claim has always been that we offer deeper and broader frameworks than anyone else on the market. Developer education greatly helps us market and sell against competing vendors who promise to “enable AJAX support with one click,” or “turn the moon to cheese!”
Let us know what you think
If you have any topics of interest, thoughts, or feedback, please feel free to send them to us at [email protected].
We sincerely hope you enjoy reading this book and that it helps you better understand the topic of study. Thank you for reading.
Please follow us on Twitter and “Like” us on Facebook to help us spread the word about the Succinctly series!
About the Author
Christopher Rose is an Australian software engineer. His background is mainly in data mining and charting software for medical research. He has also developed desktop and mobile apps and a series of programming videos for an educational channel on YouTube. He is a musician and can often be found accompanying silent films at the Majestic Theatre in Pomona,
Chapter 1 Introduction
This e-book provides an introduction to programming in Java. It covers the fundamental building blocks of the language and is designed for readers who have little or no programming
background. A second e-book, Java Succinctly Part 2, will cover the language in more
advanced terms, with topics such as GUI and multithreading. Code samples can be found here. Java is a high-level, cross-platform, object-oriented programming language. The main objective of Java is to allow applications to be written once and run on a multitude of different devices. Java achieves its cross-platform nature by using a virtual machine architecture called the Java Virtual Machine (JVM). Java applications are ubiquitous, and the language is consistently ranked as one of the most popular and dominant in the world. It can be found everywhere from mobile phones to web applications to full desktop applications.
Java is a curly bracket, or curly brace, language. This means it uses { and } braces to
designate blocks of code. The language inherits its roots from older languages such as C and C++. The curly bracket languages share many similarities, and once a programmer is familiar with one of them, it is not difficult to pick up another. Out of hundreds of computer programming languages used all over the world, Java is possibly the best introduction to programming
because it offers a degree of safety to new programmers while maintaining the power and flexibility of its low-level ancestry.
Java is an object-oriented programming language. Object-oriented programming is a very important programming paradigm that allows the programmer to create virtual modules of code for reuse and to separate a program into components. There are many other object-oriented programming languages, and Java offers the perfect introduction to how the paradigm operates. The main objective of this e-book is to describe the foundations of Java—from printing a line of text to the console all the way up to inheritance hierarchies in object-oriented programming. We will cover practical aspects of programming, such as debugging and using an IDE, as well as the core mechanics of the language.
If you are new to programming computers, or if you simply want to brush up on some core Java, I hope you have fun with the various challenges offered here.
Introduction to computer programming
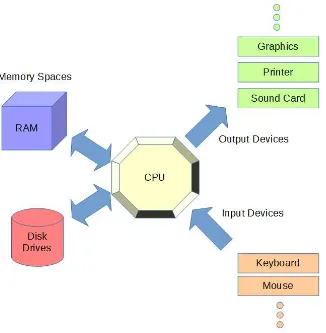
Figure 1: Outline of a Computer
Figure 1 illustrates the basic features of a computer. In the center, we have a very important piece of hardware, the Central Processing Unit (CPU), which is the brains of the machine. It reads input as a string of numbers from the keyboard, mouse, or other input device. It writes data to the graphics, printers, and sound devices. It also reads and writes data to memory spaces such as RAM and hard drives.
A CPU operates by executing a string of instructions. Everything in a computer is a number, even the instructions themselves. The instructions are generally very simple—they indicate that the CPU should perform a task such as adding two numbers or creating a copy of a number. The language of the CPU—Assembly language—is the lowest level of computer programming. Programming a CPU in its Assembly language is cumbersome because each instruction does almost nothing, and we need many thousands of instructions before our applications are useful. And every CPU has its own Assembly language. If we program an application to run on desktop PCs, the code will not be understood by an iPhone or a Samsung tablet.
Because it is difficult to program a CPU in its own language, people have invented high-level languages that are much closer to human languages (such as English and arithmetic). Java is one such high-level language. Instead of specifying a string of individual instructions, we can use mathematical expressions like a = a + b. This saves us a lot of time for two reasons:
• It is easier to program.
Code Listing 1.0: High-Level vs. Low-Level Languages
; Assembly Language: Low Level Language
mov rax, a ; Read the value of a
add rax, b ; Add the value of b to a
mov a, rax ; Write the result to a
// Java: High Level Language
a = a + b;
Code Listing 1.0 shows a clear distinction between a high-level language (such as Java) and a low-level language (such as Assembly Language). In the low-level language, the addition of two values, a and b, and the storage of the result back into a takes three steps. The computer must be instructed to perform every specific detail of every operation, from moving the values into internal registers, such as RAX, to the addition itself. In Java, we can express this entire
operation as a single, easy-to-read line of code that looks exactly like middle school algebra: a = a + b. The line means: Take the value in the variable a, add to it the value of b, and assign the result back to the variable a.
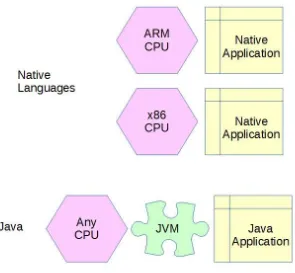
Code Listing 1.0 shows a simple expression in Java, and this expression would look the same in many other C-based languages. However, there is an additional advantage to programming an application in Java as opposed to C or C++. Java programs are designed to run on a virtual machine. Figure 2 shows an illustration of native applications versus a Java application. When we write native applications, we must compile our code for each type of system on which we need our application to run. This means we will need to create a version for ARM CPUs if we want our application to run on mobile devices and also create another version of the
programming for x86 if we want our application to run on desktops and laptops.
Chapter 2 Getting Started
In this section, we will examine how to install the Eclipse Integrated Development Environment (IDE). Eclipse is a tool used to program, maintain, debug, and compile Java applications. An IDE is a collection of tools that make application development easier. Java, like many
languages, can be programmed with nothing more than a console and a text editor (such as Notepad). However, using Notepad as an IDE is laborious and can lead to errors. A fully
functional IDE such as Eclipse can greatly reduce the amount of time it takes to solve problems in a language. Eclipse offers syntax highlighting, bug-fixing suggestions, single-click testing and debugging of an application, and literally thousands of other options for helping to make
programming simpler.
Downloading and installing Eclipse
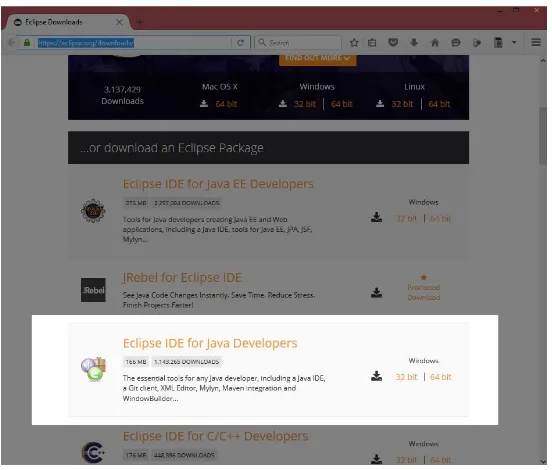
To get the latest version of Eclipse, head over to https://eclipse.org/downloads/.
Figure 3: Eclipse Download Page
On the right side of the highlighted region in Figure 4, you have two options: 32-bit and 64-bit. I recommend that you use the 64-bit version of Eclipse unless you are certain that your machine is only 32 bits.
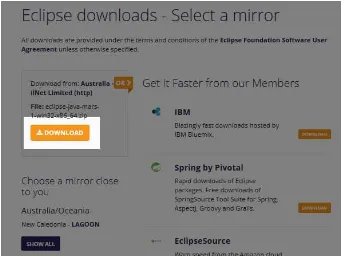
When you click the orange button marked “64-bit” (or the button marked “32-bit”), you will be taken to the site for selecting a mirror. This is the source from which to download Eclipse. Choose the mirror that is closest to your region (this is most likely the default mirror displayed on the left). See Figure 4.
Figure 4: Selecting a Mirror
Selecting different mirrors may alter the amount of time needed for your download to complete, and, generally speaking, the nearer the mirror to your geographical location, the faster you can download Eclipse.
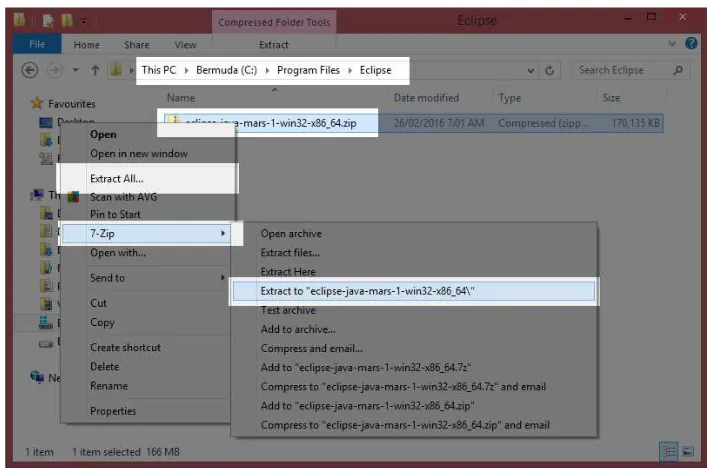
After you select the mirror, you will be taken to a page that allows you to donate to the Eclipse foundation if you wish. The download should begin. You will be asked where you want the file to download. The exact mechanisms for saving files are different depending on your web browser, but make sure that you know where the download is going because we need to extract the file when it is finished downloading. When the download is complete, you will have a file called something similar to “eclipse-java-mars-1-win32-x86_64.zip,” which is a compressed Zip archive of the Eclipse program.
Figure 5: Creating the Eclipse Folder
Figure 6: Extracting the Eclipse Zip File
Note: On Windows 8 and above, we are able to extract Zip files by right-clicking the
file and selecting “Extract All” from the context menu. Alternately, you can install dedicated archiving extraction and compression software. I recommend the program 7-Zip, which is a powerful and flexible freeware-compression tool.
you will see the main Eclipse files, as per Figure 7. In order to start the Eclipse IDE, double-click the file called Eclipse.exe.
Figure 7: Extracted Eclipse Files
Tip: If you right-click the file Eclipse.exe, you can select the option “Create Shortcut.” Clicking this option will create a shortcut to the Eclipse.exe file in the same folder as the EXE. You can then cut and paste this shortcut to your desktop for easy access.
Note: You will also need the Java Runtime Environment installed (this is installed automatically if you selected to download the Eclipse installer package from the website above). If you do not have the Java Runtime Environment installed, you can download and install it from http://www.oracle.com/technetwork/java/javase/downloads/index.html.
Projects and workspaces
A Java project is a collection of classes, files, and other resources that collectively form a coherent application. A workspace is a collection of Java projects in a folder on the developer's machine. In this section, we will look at creating a new Java project in Eclipse, adding a main class and an application entry point. Our program will not do anything visible at this point.
Workspaces
Eclipse organizes projects into folders called Workspaces. You can create a new workspace for each project, or you can use a single workspace for several related projects, such as libraries and a front end that uses them. When you first run Eclipse, you will be asked to specify the workspace in which you would like to store your applications while you develop. You can create more workspaces later, but for now let’s use the default workspace—located in the user’s folder
Figure 8: Selecting a Workspace
Selecting the option “Use this as the default and do not ask again” will cause all subsequent projects you create to be created in the same workspace. This is a good idea, except that eventually you might have hundreds of projects and locating the projects you need to work on can become tedious.
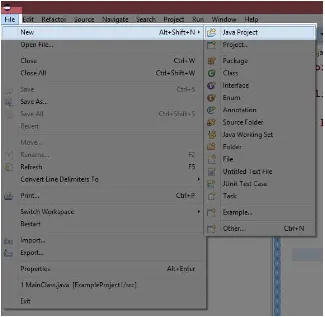
Projects
Figure 9: Creating a New Project
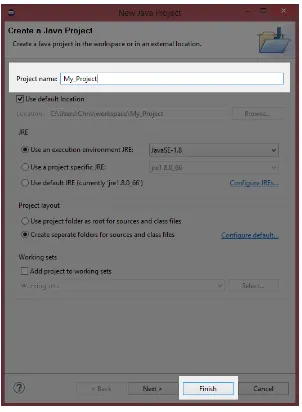
Figure 10: New Java Project Wizard
In the New Java Project Wizard dialog box, give your project a name and click Finish (the name of each project must be unique within the workspace—I have called the project My_Project in Figure 10). If you select Next instead of clicking Finish, you can change several more advanced features of your project, such as the output folder, and whether or not you wish to reference other existing projects.
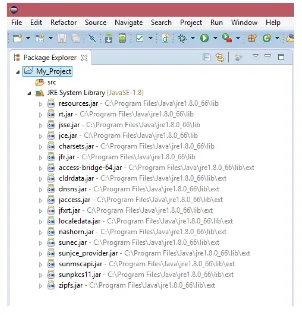
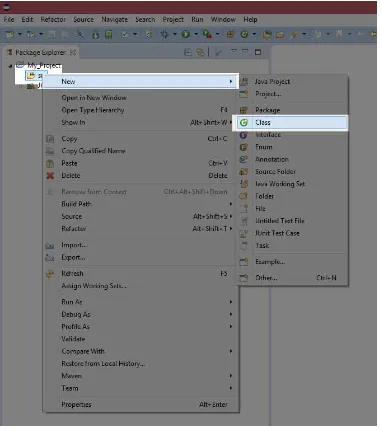
Package explorer
The package explorer (Figure 11) contains a tree view of all the projects in the current workspace. At the moment, it only holds a single project called My_Project. The nodes of the tree view can be expanded and collapsed by clicking the small triangles on the left.
Figure 11: Package Explorer
Java source code
Source code is a term meaning the text of a particular computer programming language. Java source is typed into plain text files that we add to our projects as classes. The Java Compiler (a program called javac.exe that was installed with the Java SDK along with Eclipse), reads the source code files in a project and converts them into machine code. The machine code can be understood and executed as an application by the JVM.
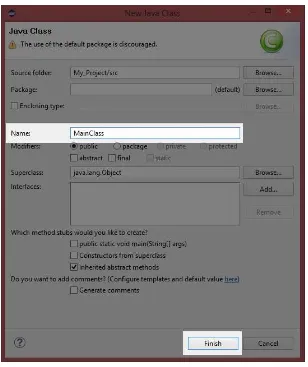
Figure 13: New Java Class Wizard
In the New Java Class window, type a name for your new class, such as MainClass, then click
Figure 14: The Code Window
In Figure 14, the code window shows the beginnings of our first program. We type our Java source code into this window. At the moment, it has the declaration of the class we requested, but nothing else. If you cannot see the MainClass.java code in your source code window, try locating the file in the package explorer—expand the src node and double-click the file called
MainClass.java.
We will add many classes to our projects in future chapters. The method for adding a class is always the same—right-click the src folder in the package explorer, select New and Java class, and give the class a unique name.
Do-nothing program
At the moment, we have a project, but it has no entry point. There is no place for the JVM to begin executing our code. The default entry point for a Java application is called the main
method. It consists of a public, static method called main that takes an array of strings as parameters. We will look at exactly what this means later. For now, in order to include a main
method we need to type the declaration of the method and add braces for the body inside the
Code Listing 2.0: Do-Nothing Program
public class MainClass {
public static void main(String[] args) { }
}
Code Listing 2.0 shows the simplest Java application possible. It is an application that does nothing but exit the moment it is run. When the JVM is asked to load an application (either by debugging our app or running it), it looks for an entry point. The default entry point is a method called main with the exact definition as per Code Listing 2.0: public static void
main(String[] args).
Note: Java is case sensitive. If you choose to type the code in the example listings in this e-book rather than copying and pasting the code, you must be very careful to match case exactly. This means that the compiler sees the terms PUBLIC, Public, PuBlIc, and public as completely different terms.
If there is no method exactly matching the definition of the main method in Code Listing 2.0, the JVM will not know where to start executing code and the program will not run.
Note: The main method must have the exact declaration, except for the identifier name of the args parameter. This parameter is simply an array of strings that can
potentially be passed to our application when invoking from the command line. When we invoke a program from the command line, we can optionally supply a list of arguments (hence the name args for this parameter). For our purposes, we will ignore this parameter and assume it will always be empty, and we will always call it args.
Project output
Figure 15: Project Output
Figure 15 shows several other folders. The .settings folder is used to store all of the configuration settings for the project in a preferences file that defaults to
org.eclipse.jdt.core.prefs. The bin folder is used to store the binary application output, which is
the executable machine code and other required resource files that the Java compiler produces from our source code.
Debugging and running applications
Let’s test our application. To debug an application is to run it in such a way that we are offered extra information that will help us track down and eliminate bugs. Typically, when we develop a Java application, we test the program at intervals in order to make sure everything is running smoothly. As our projects become larger, we must examine all of the interacting components in great detail in order to be certain that we have not done anything wrong.
Eclipse allows us to debug an application, but it also allows us to run the application. Running the application is like debugging, except that we get less information as to what's happening within the application. When we use Run, the compiler (javac.exe) might optimize our code and remove all debugging information. It is recommended that while an application is being
developed, we use Debug. When you are satisfied that your application is complete and working properly, you can use Run to build your application’s first release.
In order to debug your code in Eclipse, click Debug (it has a beetle icon, as in Figure 16). The Play button (to the right of the debug), is for running your application without debugging.
Figure 16: Debug and Run Buttons
Figure 17: Output Console
When we run or debug our application, the output of the application will appear in a window at the lower portion of the Eclipse screen. Notice that there is a collection of tabbed pages in Figure 17, including a tab named Console. Our current program does nothing, so this Console tab is blank after we debug or run the application from Code Listing 2.0, but in future chapters we will print text to this console and read data from the keyboard.
Chapter 3 Writing Output
Code Listing 3.0 shows the code to a basic “Hello, World!” application. The program prints some text to the console, then it exits. The numbers on the left side are included for reference and should not be typed into your code. Type or paste this code over the code in the MainClass.java file we created earlier.
Code Listing 3.0: Printing Output
1: public class MainClass { // Definition of MainClass
2: public static void main(String[] args) { // main method entry point
3: System.out.println("This is a test application!"); 4: } // Close brace for main method.
5: } // Close brace for MainClass.
When we execute this code with either Debugging or Running (use keys F11 or Ctrl+F11, or click the debug or run buttons), the program will print “This is a test application!” to the
system output.
Line 1:public class MainClass. This line declares a class called MainClass. The class is marked with the public modifier, which means it is visible to all other entities and packages in the application. After the public modifier, we use the keyword class, then we supply a unique name for our new class—MainClass, in this instance. This is followed by a curly brace, {, that indicates the beginning of the body of the class. Line 5 contains the matching closing curly brace, }, that marks the end of the body of this class.
Line 2: On line 2 we declare a static member method called main. The method is marked
public, so that classes outside of this one are able to call it. The method is marked static, which means it belongs to the class rather than to any particular instance of the class. The method does not return any data to the caller, so the return type is void. In the brackets, the
(String[] args) is the parameter list. This means an array of strings will be passed to this method when it is invoked. The array of strings is the command-line argument—when we run a program from the command line, we can optionally supply extra arguments. We will not be using the command line, and this array will always be empty in the example programs. After the parameter list, we see an open curly brace, {, that marks the beginning of the body for this method. The matching close brace for the main method is on line 4.
Line 3: This line invokes the println method, which belongs to the System.out class.
System.out is a class, and println is a public static method belonging to the class. The method takes a String parameter and prints the string to the console output. The string is enclosed in brackets that indicate that it is a parameter to the method call. The parameter is a
Stringbecause it is enclosed in double quotes. The line ends with a semicolon “;” that indicates that the statement is finished. All statements in Java end with a semicolon.
Line 5: This is the matching closing brace for the MainClass class. The opening brace appeared on line 1. This brace indicates that the description of the MainClass is finished. Don’t worry if some of these previous descriptions are too brief. We will look further into each of the keywords and other mechanisms as we progress through this book. Initially, Java has a fairly steep learning curve. In order to begin programming Java, even the most basic program contains a lot of syntax (syntax is the grammar of a programming language—the rules, spelling, and punctuation).
The name of the class can be any valid identifier. Valid identifier names contain letters and digits, but they cannot begin with a digit. Identifiers must be a single word (no spaces, tabs, or punctuation of any kind is allowed), but you are able to use the underscore character, e.g.,
Main_Class is a legal identifier, but “Main Class” is not because it contains a space.
When you run or debug the application from Code Listing 3.0, you will notice that message is printed to the Console panel at the lower portion of Eclipse, as per Figure 18.
Figure 18: Code Listing 3.0 Output
Foundations of Java
In this section, we will briefly look at several aspects of programming Java that will become second nature as you become more accustomed to the language.
White space
White space is the use of space within code. This includes new lines, spaces, and tabs.
Code Listing 3.1: White Space
Code Listing 3.1 shows two calls to the same method: c.setRadius(100); (this is a code snippet and has no main method—this code will not execute as an application). The compiler will read these two calls as being identical even though the second has a lot of white space and is very difficult to read.
Although white space is generally ignored by the compiler, we cannot break up tokens. The symbols used to express elements of the language are called tokens, and if we place white space between the characters of tokens, the compiler will not understand what we mean. For example, the term setRadius in Code Listing 3.1 is a token. If we place a space between the two words to create set Radius, it no longer forms a single token, but rather two. Likewise, we cannot place white space in the middle of numerical literals. For example, 150 is a single token meaning one hundred and fifty, but 1 50 is two tokens meaning one and fifty.
The use of white space is closely tied to programming style. There is no correct or best way to set out code, and no best way to use white space. For the code in this e-book, I have adopted common conventions used by many Java programmers that create code that is easy to read and debug. If you are new to programming, try to match the bracing and tabbing I have used here. This style of bracing and tabbing is very common, and if you are familiar with coding and reading it, you will have little trouble understanding other programmer’s code.
Tip: Learn to read and program in any style. How best to use white space is a hotly debated topic in many programming communities. But, as programmers, we need to read and understand other people's code, and we often need to program in teams in which the use of white space must be the same for all programmers. A programmer who can read anybody's code and can flip to any style without hesitation is far more valuable than one who argues about tabs versus spaces.
Identifiers
An identifier is a name a programmer selects to represent some entity or mechanism in the code. We select identifier names for our variables, methods, classes, and objects. In Code Listing 3.1, the terms MainClass, main, and args are all identifiers. System, out, and println
When we select an identifier, we must ensure that it is unique to the current scope (or unique to the current code block—we will look later at scope and code blocks in detail). We cannot name two variables myVariable in a single code block because the compiler has no way of knowing which variable we are trying to reference (however, we will see that there is a scope operator that enables us to bend this rule slightly!).
We are not allowed to name our identifiers after keywords (see the next section for a description of keywords). For instance, we cannot name our methods or variables if or while. Again, this comes down to the fact that the compiler needs to differentiate keywords from identifiers, and it cannot do this if the identifiers have the same names as the keywords.
Identifier names cannot contain any white space (this includes spaces, tabs, and new lines). Identifier names must be a single, unbroken word. Identifier names can contain letters, digits, the dollar sign, $, and underscores, “_”, but they cannot begin with a digit. The compiler sees any token beginning with a digit as a numerical literal, and it will not allow us to name our identifiers things such as 67Hello because this would mean the number 67 with the meaningless suffix Hello.
Identifier names are case sensitive, which means the identifiers patientData, PATIENTdata, and patientdata are all seen as distinct by the compiler. Naming multiple identifiers that differ only in case is not recommended because this can lead to confusing and difficult-to-read code, although the compiler will have no trouble differentiating the identifiers.
Example identifiers are: someVariable, i, the_timer_for_rendering_graphics,
iterator15, MY_CONSTANT, $euclideanDistance.
In Java, developers often use a technique called Camel Case for naming our identifiers. In Camel Case, the first letter of each of word is uppercase—except for the very first letter. For instance, a function for computing a score might be called computeScore, and a variable for summing a total of ages might be called sumTotalAges.
An exception to this rule of thumb is naming classes. When naming classes, Java programmers often use uppercase for the first letter of all words, including the first. A class for holding an automaton's generation grid might be called AutomatonGenerationGrid. This makes variables and classes easy to distinguish in the code. In Code Listing 3.1, the identifiers MainClass,
System, and String are all classes, which means they begin with an uppercase letter. Whereas the identifiers args, out, and println are variables and method names, so they begin with a lowercase letter.
In addition to Camel Case, it is common to name final variables (similar to constants in other languages) with all capital letters. A final variable is simply a named value that cannot be
changed, such as the mathematical variables PI or E. Because programmers use uppercase for all letters, when naming constants, it is common to split the words by using the underscore for spaces. A final variable for seconds per hour might be called SECONDS_PER_HOUR, or a final variable for the number of days in June might be called NUMBER_OF_DAYS_IN_JUNE or simply
DAYS_IN_JUNE.
and it is better to name a function computeMedianOfHouses rather than doThing or
cabbagesWithWhippedCream (assuming the function computes the median of houses). If we do not name our identifiers with logical, easy-to-understand names, other programmers might have difficulty comprehending and maintaining our code. And worse—we will not understand our own code, either. It is surprising how little time it takes before our own code becomes gibberish unless we are careful and name our identifiers intelligently.
Note: There are a few exceptions to naming identifiers with logical and descriptive names. For instance, it is common to call iterators (counter variables) in for loops single letter names such as i, j, x, y, or z. This provides no indication as to what the variable means, but their purposes will still be understood by other programmers. Also, some algorithms have specific variable names in their descriptions, and the common names for the variables are often used when programming an implementation of the algorithm, such as the A* path-finding algorithm, which uses the names t and h.
Keywords
Computer programming languages are very simple compared to human languages such as English. Java has a small collection of grammatical symbols (such as { and } braces) and a small collection of nonlexical terms called keywords. And Java has a series of rules for how to use these elements (i.e. it has a grammar). In Eclipse, we can identify keywords in our code because they are highlighted in dark purple, and they are bold, such as class and public in Code Listing 3.1.
Keywords form the main backbone of the way Java works. Keywords are reserved for specific uses in Java, and they cannot be used as identifier names. See the Appendix for a reference on the available keywords. The following is a list of the keywords we have encountered so far:
public: The public keyword is an access modifier. It means that external objects (objects that are not part of the class being defined) can access the methods or member variables.
class: The class keyword is used to indicate that the code block that follows is a description of a class.
static: The static keyword marks member methods and variables as belonging to the entire class rather than specific objects or instances of the class. This means we can access static members without creating objects from the class.
void: The void keyword is used as a placeholder for a return type when a method does not return any data. All methods must have a return type or must have the return type of void. The only exception to this rule is constructors that have no return type and have the same name as the class.
Dot operator
member variables. System is a class, and out is an entity belonging to the System class. When we supply the terms System.out connected by the dot operator, we are saying, “The out entity that belongs to the System class” or, in short, “System's out.”
The method println belongs to the out entity. When we invoke the method by specifying its name, System.out.println, followed by a parameter list, ("This is a test
application!"), we are really saying: Execute the code specified in the method called
println, which belongs to the entity out, which belongs to the class System. Notice how the dots indicate ownership from left to right—System owns out, and out owns println.
We will later look in more detail at object-oriented programming, but the main objective of object-oriented programming is to define hierarchies of objects, each owned by and potentially owning more objects, and each capable of performing methods with a collection of member variables. Different classes can contain variables and methods with the same names. For example, we might have multiple variables called cost, one belonging to a class called House
and another belonging to a class Vehicle. We can distinguish these variables by using the dot
House.cost vs. Vehicle.cost.
Comments
Code Listing 3.2 shows several comments, with the Eclipse highlights comments in green. A comment is a note to the programmer. The computer will ignore all comments when the program executes. There are many applications for comments, and every programmer has a unique style of commenting on his or her code. Although comments do not change the way a program runs, developing good commenting skills is extremely important. Comments allow a programmer to describe exactly what the code should be doing. This means that any other programmer should be able to read the comments and understand the implications of complex code at a glance.
In Java, there are two types of comments—single-line comments and multiline (or block) comments (see Code Listing 3.2).
Code Listing 3.2: Comments
// This is a single-line comment!
System.out.println("Press a key to continue..."); // Single-line comment! /*
This is a multiline comment. It extends from the opening symbol of a slash and
Code Listing 3.2 shows the two different types of comments. The first is the single-line comment. These begin with two slashes, //. All text to the right of the // is ignored by the computer. If a line of code begins with the //, the entire line is ignored, but you can also place the // after some statements, such as a println.
The multiline comment begins with /* and extends until the */. The programmer can place any text inside the /* and */, including new lines. This is sometimes called a block comment because it enables a programmer to write blocks of text or to comment out blocks of code. In the upcoming code examples, we will see many comments included to help the reader identify what the different lines of code are supposed to do.
Challenges
Challenge 3.0: Change the identifier args so that it is called arguments. Does the program compile and run?
Challenge 3.1: Change the identifier main to mainMethod. Does the program compile and run?
Challenge 3.2: Change the message that is printed to the screen to the string “Hello, World!”.
Challenge solutions
Challenge 3.0
The program compiles and runs when the args identifier is changed to arguments because this identifier is simply a parameter to the main method. Its name is up to the programmer.
Code Listing 3.3: Challenge 3.0
public class MainClass {
public static void main(String[] arguments) {
System.out.println("This is a test application!"); }
}
Challenge 3.1
The program does not compile and run if we change the main method’s name to mainMethod, because the JVM needs an entry point to the program and it searches for a method called main. When it cannot find such a method, it will not run the application.
Code Listing 3.4: Challenge 3.1
public class MainClass {
public static void mainMethod(String[] args) {
System.out.println("This is a test application!"); }
}
Challenge 3.2
Code Listing 3.5: Challenge 3.2
public class MainClass {
System.out.println("Hello, World!"); }
}
Challenge 3.3
The program will not compile and run if the name of MainClass is changed to MyClass without the name of the file (in which the code is written) also changing. In Java, classes should be placed into source code files with the same names.
Code Listing 3.6: Challenge 3.3
public class MyClass {
public static void main(String[] args) {
System.out.println("This is a test application!"); }
Chapter 4 Reading Input
Reading System.in
The program in Code Listing 4.0 illustrates how to read input from the user. Specifically, we ask users for their names and to read some text that they type at the keyboard.
Code Listing 4.0: Reading Input
Line 1 imports the Scanner class from the java.util package. A Scanner scans a stream, waiting for and reading data. There are literally thousands of prewritten tools included with Java that we can import in a similar way if we wish to use them. Code Listing 4.0 uses a scanner to scan System.in, which is a stream of bytes representing the data the user types to the console.
Line 2 is the opening declaration for the MainClass.
Line 3 is the opening declaration for the main method.
Line 4 is where we declare a java.util.Scanner object. We specify that our scanner is to scan the System.in stream. The Scanner class has a constructor that takes a stream as a parameter (a constructor is simply a special method used to create an instance of a class). A
scanner object (called scanner with a lowercase s because it is an object, not a class) is created when we use the new operator to call the constructor. We will look at exactly what this line does in a lot more detail when we cover the new operator in the chapter on object-oriented programming. For the moment, this line means create a Scanner object called scanner and have it scan the input stream System.in.
Line 5 prints a prompt to the console asking for the user’s name.
Line 6 is where we read text from the keyboard. We do this by calling the scanner object’s
Line 7prints out the string “Nice to meet you, Chris!” in which Chris is replaced with whatever name the user typed at the prompt. Notice how the string “Nice to meet you,” has
the variable str added to the middle by closing the double quotes and employing the string concatenation operator +. This is an example of how we join or concatenate two or more strings together.
Line 8 is the matching closing brace for the main method’s code block. At this point, the object
scanner and the String variable str fall out of scope (this means they no longer exist). Programs begin at the start of the main method, and they end at the closing brace of the main
method. So this line is really the close of our application. We can also use the return keyword in the body of the main method in order to return from the method, although note that this would also terminate the application. We will look more at the return keyword when we look at
defining methods.
Line 9 is the matching closing brace for the MainClass class.
In order to run the program, we can use the Debug or Run buttons. We will see that the program halts after it prints the message “What is your name?”. In order to input a string, click in the Console tab at the prompt. You should see a blinking cursor. Type your name (or any other string) and hit enter. After you hit enter, the scanner object has a line of text to read, and, where we set the value to the str variable, it will return this to the caller. (Figure 19 shows an example interaction with the program in Code Listing 4.0, in which the green text is what I typed at the prompt).
Figure 19: Code Listing 4.0 Output
In this e-book, Java Succinctly Part 1, we will concentrate on the core mechanisms of the Java language, and we will be restricted to this Console for input and output. We can create fully functional graphical user interfaces with Java, and in Java Succinctly Part 2 we will look at how to do this.
Warnings and errors
prevent the code from running, but which should probably be fixed) and errors (which are problems that prevent the code from running).
Generally, if we have any warnings in our programs, we should fix them because they can lead to unwanted behavior later if they go unchecked. In the next program, we will see two extra lines of code that are designed to close the scanner and fix the warning that Eclipse is highlighting.
Figure 20: Warning
Figure 20 shows the warning that our code has generated. This warning will only be visible when we attempt to debug or run our program. The warning tells us that the problem is
'scanner' is never closed. It tells us that the problem is in the file MainClass.java, and it occurs on line 4. If we double-click this warning in the Problems panel, Eclipse will take us to line 4 of the MainClass.java file so that we can fix the problem or gain some understanding as to what is causing it. Figure 21 shows an example of an error.
Figure 21: Error
In order to cause this error (Figure 21), I purposely changed line 6 of Code Listing 4.0 to read
String str = Scanner.nextLine();. Note the capital S in Scanner. This small change is a mistake, and it means that the program will not compile and run. Looking at the Problems panel, we get a cryptic error message that explains that nextLine is not static, and we are
Eclipse perspectives
A perspective is a layout of windows and panels in Eclipse. By default, Eclipse is set to the Java perspective (Figure 22). But when we debug our code, or when our program fails to compile due to errors, Eclipse will switch to the Debug perspective (Figure 23). The Debug perspective offers extra panels of information that might help us track down and fix bugs (later we will look at watching variables and stepping through code in the Debug perspective).
Figure 23: Debug Perspective
In order to switch between the two perspectives, we use the two perspective buttons in the upper-right corner of Eclipse (marked Java and Debug, as in Figure 24).
Figure 24: Java and Debug Perspective Buttons
Figure 25: Stopping a Running Application
Figure 25 shows the Stop button highlighted when Eclipse has paused our application. When you are in the Debug perspective, the Debug panel on the upper-left side of the screen shows all the running instances of our application (in Figure 25, there is only one instance). If you have multiple instances running, you can close each individually by selecting it in the panel, and clicking the Stop button.
Reading multiple values
Our next example code illustrates how Java code is usually executed in order, from top to bottom, one line after the other. Program 3 asks the user for both a name and a password. The program will not proceed past the first occurrence of scanner.nextLine() until the user has input a line of text at the console.
Code Listing 4.1: Reading Multiple Strings
import java.util.Scanner;
public class MainClass {
public static void main(String[] args) {
// Declare all variables.
String userName; String userPassword;
Scanner scanner = new Scanner(System.in);
// Request the user's name.
System.out.print("What is your name? "); userName = scanner.nextLine();
// Request the user's password.
userPassword = scanner.nextLine();
// Print out the info we read in a message.
System.out.println("Whoa! That was too easy! You're crazy, " + userName + ", you just told a complete stranger " +
"that your password is " + userPassword + "!");
// Close the scanner to avoid memory leaks.
if(scanner != null) scanner.close(); }
}
Code
Listing 4.1 shows some common conventions. First, I have declared all the variables at the beginning of the method (we will look at variable declarations in the next chapter). And, at the end of the method, I have called a method called “close” to ensure my scanner object does not cause any memory leaks (these two lines of code fix the warning we were getting in the first program of this chapter). I have also used an if statement (we will look at method calls and ifstatements shortly). The program illustrates that we can potentially read as many strings from a scanner as we like and print out prompts between each.
I have used System.out.print in place of println. The print method prints the strings in the same way as println, except that it does not place a new line at the end of the string. Figure 26 shows an example interaction with the program from
Code
Listing 4.1. Notice how the user input (the green text) is on the same line as the prompt. Had we used println, the green text would be on its own line.Figure 26: Example Output from Code Listing 4.1 Code blocks and curly braces
Code Listing 4.2 shows a program with the code blocks highlighted. This program is much more complicated than the programs we have seen so far. The details of how this program works will become apparent by the time we look at methods in a future chapter. For now, the program is meant to illustrate matching { and } braces and nested code blocks.
Code Listing 4.2: Code Blocks
public class MainClass {
// Method to return lowest prime factor of the integer x.
private static int GetLowestFactor(int x) { int sqrt = (int)Math.sqrt(x);
// Determines if x is prime by seeing if it is equal to // its own lowest factor.
private static Boolean IsPrime(int x) {
return GetLowestFactor(x) == x; }
// This program lists the prime numbers in the range 1 to 1000.
public static void main(String[] args) {
// Declare local variables.
int i = 2, count = 0, countPerLine = 10;
// Show a description of the program.
System.out.println("Prime numbers from 1 to 1000 are: ");
// Loop that finds the primes.
// If there's countPerLine items on this line, // print a new line.
if(count % countPerLine == 0) {
System.out.println();
}
// Increment i to the next number.
i++; }
} }
If you copy and paste the code from Code Listing 4.2 into Eclipse, you should get a list of the prime numbers between 1 and 1000. In Code Listing 4.2, each pair of matching braces has been highlighted in a different color. Notice that code blocks are nested inside other code blocks. That is—smaller code blocks begin and end within the braces of outer code blocks. The yellow braces surround the body of the MainClass, and the MainClass contains the code blocks for several methods, each of which contains its own code blocks.
Notice also that code blocks can be created for many different mechanisms—classes, loops, If statements, and methods all have associated code blocks depicted in Code Listing 4.2.
We will now take a brief detour into a completely different but very useful aspect of programming—debugging code.
Detour: debugging code
The ability to debug and maintain code is one of the most important attributes a programmer can have. With that in mind, when you first test your program in Eclipse, select the Debug icon, instead of the Run icon.
Printing out values
We often need to know the value of variables while our program runs. The most basic form of discerning the value of a variable is to output this value to the screen. We can use a
System.out.println to do this, such as System.out.println("The value of i is " + i);. This is a very primitive method for debugging, but in many circumstances it is all we will need. Generally, it is better to place a breakpoint and a watch on the variable, as described in the following section.
Setting breakpoints
Figure 27: Toggle Breakpoint
When a breakpoint is active (i.e. if the program will pause when it reaches the breakpoint), you will see a small breakpoint symbol in the margin of the code window, as illustrated in Figure 28.
Figure 28: Active Breakpoint
When the breakpoint indicator is blue, as in Figure 28, it means the breakpoint is active. You can disable a breakpoint by right-clicking the breakpoint symbol and selecting Disable Breakpoint from the context menu. When a breakpoint is disabled, the circle is white and the program will not pause when it reaches the breakpoint.
Debug perspective in Eclipse
Figure 29: Confirm Perspective Switch
The Debug perspective is illustrated in Figure 30.
Figure 30: Debug Perspective
Notice the line highlighted in green in Figure 30. This is the line that the program is ready to execute. At the top of the Eclipse screen, you will see a green Play button, a Pause button, and a Stop button. In order to stop the program from executing, click Stop. In order to resume
Figure 31: Play, Pause, and Stop Buttons
Tip: You can skip all breakpoints by clicking the button to the left of the Play button in Figure 29. This is handy when you have set a lot of breakpoints in order to examine the exact flow of the program, but you want to test the overall functionality without
permanently disabling the breakpoints.
You can switch between the Java and Debugging perspective by clicking the buttons in the top-right corner of Eclipse, as illustrated in Figure 32.
Figure 32: Changing the Perspective of Eclipse
Stepping Over and Into code
Stepping through code can be done in two ways: • Step Over
• Step Into
Figure 33: Step Over and Step Into Buttons
Step Over means the program will execute the current line of code, then pause again. It will not jump into method calls. Instead, it will execute the method as a single step. Step Into means the program will execute the next line, but if the line is a method call, it will jump to the body of the method and pause. The shortcut key for Stepping Into is F5, and the shortcut for Stepping Over is F6.
Watching variables
As we Step Over and Step Into our code, we can view exactly which values our variables contain by looking in the Variables tab, as in Figure 34.
Figure 34: Variables Tab
programs and step through the code, watching the way the program branches and executes loops. There is no better indication as to how Java works than looking at it one line at a time.
Challenges
Challenge 4.0: Change the program in Code Listing 4.0 to ask for the user's age instead of name.
Challenge 4.1: Change the program in Code Listing 4.1. Make it ask for a third string called website, which is the user's website used with the username and password. Ask the user to input the website after the user name and password are read.
Challenge Answers
Challenge 4.0
Code Listing 4.3: Challenge 4.0
import java.util.Scanner;
public class MainClass {
public static void main(String[] args) {
Scanner scanner = new Scanner(System.in); System.out.println("What is your age?"); String age = scanner.nextLine();
public static void main(String[] args) {
// Declare all variables.
System.out.print("What is your name? "); userName = scanner.nextLine();
// Request the user's password.
System.out.print("Ok, and what is your password? "); userPassword = scanner.nextLine();
System.out.print("And what website is this the password for? "); website = scanner.nextLine();
// Print out a message:
System.out.println("Ok, gotta go. I have to quickly check " + website + ".");
// Close the scanner to avoid memory leaks.
} }
Challenge 4.2
I have only included the relevant sections in the listing here, and I have highlighted the changes we need to make in yellow.
Code Listing 4.5: Challenge 4.2
int i = 2, count = 0, countPerLine = 2;
// Show a description of the program.
System.out.println("Prime numbers from 1 to 50 are as follows: ");
// Loop that finds the primes
while(i <= 50) {
// If i is prime...
Chapter 5 Data Types and Variables
Memory
In Java, as with all computer programming languages, we can read and write data to various memory spaces. A memory space is simply an area in which we can save and retrieve information. One of the most useful memory spaces that we can read and write to is called system RAM. RAM stands for Random Access Memory. It is a type of volatile memory used for temporary storage (volatile means it is cleared when the system reboots).
RAM is nothing more than a long string of 0s and 1s. The 0s and 1s are organized into bytes of 8 bits each (a bit is short for binary digit—it is a single 0 or 1). See Figure 35 for an illustration of several bytes in RAM.
Figure 35: RAM
Figure 35 shows seven bytes in RAM. Each byte in RAM has an address written above the boxes (real addresses on modern computers have 16 hexadecimal digits instead of the four I’ve used in the illustration). The addresses are simply consecutive numbers counting up as we move through RAM from right to left. The addresses are written in hexadecimal (so we have 02A8 instead of 680—hexadecimal is not important at the moment).
Note: In Java, we do not have access to the addresses in RAM. This is one of the biggest differences between Java and related languages C and C++. Accessing RAM directly with addresses can be dangerous—it is easy to accidentally address the wrong bytes and cause bugs in our programs. So, Java does not allow direct access to RAM.
In Figure 35, the byte at address 02A9 is zoomed in, and we can see the individual bits that make up the number 117 as written out in the binary counting system. In binary, bits are read from left to right, the same way we read normal decimal numbers. So, the bit on the left is the most significant (as in the 6 in 684), and the bit on the right is the least significant (as in the 4 in 684).
Programming a computer is difficult when we reference RAM by addresses (and Java does not allow us direct access to bytes by their addresses). Addresses are simply long hexadecimal numbers, and they do not appear meaningful to humans.
As programmers, we need to manipulate and control hundreds, thousands, and even millions of bytes in RAM, and doing so with addresses is extremely difficult. Therefore, instead of
referencing RAM by addresses, we name certain points in RAM and use the names instead of the addresses. These named points in RAM are called variables. A variable is literally a point that we have named and in which we can read and write in RAM. Variables often contain multiple bytes—for instance, an int variable in Java is built from four consecutive bytes and can be used to store larger numbers than a single byte can store.
Each variable in Java has a data type that is an indication as to what type of manipulations we will perform on the particular spot in RAM or which type of information the bits represent. For instance, we might wish to use a variable for floating-point computations such as 3.4+7.8, or we might wish to perform some operation with whole numbers (integers) such as 3+7.
Primitive data types
Name Type Size (Bytes) Size (Bits) Minimum Maximum
char Character 2 16 Unicode Unicode
* The size of boolean variables is dependent on the virtual machine that executes the code. Typically, the most conservative size of one byte is used.
Table 1 shows all eight of the primitive data types available in Java. The first column shows the keywords we use in Java when we declare variables (we will look at declaring variables shortly). The Type column shows the fundamental data type of each primitive. There are only two data types: Integer and Floating Point. Integer data types are whole numbers—they can be negative and positive—but they cannot have any decimal part: e.g., 6, 2378, or -1772. Floating-point data types are used to represent values with some fractional part, such as 28.7 or -1772.1671. The Boolean and Character types are actually integers, but there are various functions available in Java that treat these particular primitives differently than regular integers. For instance, when we print the value of a boolean variable, we will get true or false printed to the screen instead of 1 or 0 (even though the underlying data is literally an integer where 0 means false and anything else means true). And, when we print the value of a char variable, Java will print out the Unicode symbol that corresponds to the integer value of the char variable.
The third column shows the sizes in bytes for each of the primitive data types. Figure 36 shows an illustration of the sizes of each primitive. Each box represents one byte of RAM. The
numbers show the most common byte order—Java is Little Endian, the lowest byte in a multiple-byte data type, on the right side. Floats and doubles use a specific format that is very different from integers. The format of floats and doubles in Java follows the IEEE 754 Standard, which is a scientific notation for representing approximations to fractions in binary.
Figure 36: Primitive Data Type Sizes
The final two columns show the available ranges of the primitives—the minimum and maximum values that variables of each primitive can store.
Programmers should become familiar with all eight of the primitive data types, but in practice we tend to use some types more than others. Most programmers will use int for all numerical, whole-number variables. The smaller integer data types, byte and short, are used to save space in RAM when the range of values being stored is known to fall within the much smaller range of the byte or short. Similarly, the long data type is not typically used unless the programmer has a specific reason to do so—for instance, if the programmer needs to store values greater than 2.15 billion.
Note: If you require more range than a long can accommodate, there is a standard
class called “BigInteger” that offers arbitrarily large integers. BigInteger is not a primitive, but instead a class built of primitives that allows computation with very large values (used in encryption algorithms, for example). This range of computation comes at a cost, and BigInteger computations are much slower for the JVM to perform than computations with int or long. In order to use a BigInteger, we need to import java.math.BigInteger and declare a BigInteger object.
Programmers often use double as the default data type when they need to represent floating-point values. A double is twice as large as a float (64 bits for doubles, 32 for floats), which means that if you have a lot of variables (such as an array with one million elements), storing the elements as float will mean the array takes roughly four megabytes of RAM rather than eight. The downside to float is that it is far less accurate. The extra accuracy offered by doubles can be very important because every operation we perform on floating-point variables (double and float) has the potential to introduce and magnify rounding errors.
The boolean type has only two possible states—true and false. We use boolean variables when we know there are only two states to a variable, and the states need not necessarily be
true and false. For instance, a boolean variable could represent a person’s gender, a light switch being on or off, or the digits 0 and 1. And boolean values are commonly used to create conditional, or logical, expressions. We often use a logical expression without actually defining a variable, but behind the scenes a boolean variable is being created and evaluated for every logical expression that is executed (we will see many logical and conditional expressions in the section on control structures).
The char data type is used to store letters, digits, punctuation, and many other symbols (char
represents characters using the Unicode encoding scheme). The char data type is really just a
short, but the JVM treats the 16 bits differently. For example, if you set a short to 65 and print the results using a println, you will see 65. But if you use a char variable, set it to 65 and print the results with a println the program will print A. This is because the println function is designed to treat char data types as references to Unicode characters. The symbol in the Unicode table at position 65 is A, therefore println prints A to the screen instead of 65 when it sees that the data type is char.
Note: The primitive data types always have the same size, regardless of the value they store. All int variables consume four bytes, regardless of the value they store. For example, the number 3 could theoretically be stored using only two bits, 11, in binary. But, if we store 3 in an integer, it will be padded with many zeros to take up the remaining bits of the int: 00000000 00000000 00000000 00000011.
Variables
A variable is a named, primitive data type. Each variable is a collection of bytes acting as one of the primitive data types from Table 1, and which we have given a name. We refer to variables by their name (instead of their addresses in RAM) and can read or change their values of RAM using the variable names as our references. A variable stores information, such as the number 3 or the name Jane Smith.
Variable declaration and definition
To declare a variable is to state that it exists. We give the variable a data type and a name—that is, an identifier. To define a variable is to specify a value for it. Variables must be declared and defined before they are used.
Initialization comes when we define a variable’s value for the first time. A variable that is declared but not defined is called uninitialized, and the variable cannot be used in computation until it is initialized. In Java, we can declare and initialize a variable in a single line of code using the assignment operator “=” (see the section on operators for more information on the
assignment operator).
Code Listing 5.0 shows various declarations and definitions of variables. Code Listing 5.0: Declaring and Defining Variables
public class MainClass {
public static void main(String[] args) {
int i = 100; // Declare and initialize an int.
int b = 10, c = 5;// Declare and initialize two variables.
boolean mb = false;// Declare and define a Boolean.
char myLetter; // Declare a character.
myLetter = 'h'; // Define/set the character to be 'h'.
byte hp, bp, sp; // Declare 3 byte variables.
hp = bp = sp = 0; // Set all 3 bytes to 0.
short ss = 189; // Declare and define a short integer.
long p = ss; // Declare and define a long with the value of ss.
double myDouble = 100.0;// Declare and define a double.
float f = 0.1f; // Declare and define a float.