Tim Berglund
Gradle Beyond the Basics
by Tim Berglund
Copyright © 2013 Gradle, Inc. All rights reserved.
Printed in the United States of America.
Published by O’Reilly Media, Inc., 1005 Gravenstein Highway North, Sebastopol, CA 95472.
O’Reilly books may be purchased for educational, business, or sales promotional use. Online editions are also available for most titles (http://my.safaribooksonline.com). For more information, contact our corporate/ institutional sales department: 800-998-9938 or corporate@oreilly.com.
Editors: Mike Loukides and Meghan Blanchette
Production Editor: Kara Ebrahim
Proofreader: Kara Ebrahim
Cover Designer: Randy Comer
Interior Designer: David Futato
Illustrator: Rebecca Demarest July 2013: First Edition
Revision History for the First Edition:
2013-07-15: First release
See http://oreilly.com/catalog/errata.csp?isbn=9781449304676 for release details.
Nutshell Handbook, the Nutshell Handbook logo, and the O’Reilly logo are registered trademarks of O’Reilly Media, Inc. Gradle Beyond the Basics, the image of a Belgian shepherd dog, and related trade dress are trademarks of O’Reilly Media, Inc.
Many of the designations used by manufacturers and sellers to distinguish their products are claimed as trademarks. Where those designations appear in this book, and O’Reilly Media, Inc., was aware of a trade‐ mark claim, the designations have been printed in caps or initial caps.
While every precaution has been taken in the preparation of this book, the publisher and author assume no responsibility for errors or omissions, or for damages resulting from the use of the information contained herein.
ISBN: 978-1-449-30467-6
Table of Contents
Preface. . . v
1. File Operations. . . 1
Copy Task 1
Transforming Directory Structure 3
Renaming Files During Copy 3
Filtering and Transforming Files 4
Keyword Expansion 4
Filtering Line by Line 6
Filtering File by File 8
The File Methods 9
file() 9
files() 11
fileTree() 12
The FileCollection Interface 12
Converting to a Set 14
Converting to a Path String 14
Module Dependencies as FileCollections 15
Adding and Subtracting FileCollections 16
SourceSets as FileCollections 17
Lazy Files 18
Conclusion 19
2. Custom Plug-Ins. . . 21
Plug-In Philosophy 21
The Plug-In API 22
The Example Plug-In 22
Setup 23
Sketching Out Your Plug-In 24
Custom Liquibase Tasks 24
Applying Yourself 25
Extensions 26
Packaging a Plug-In 31
Conclusion 33
3. Build Hooks. . . 35
The Gradle Lifecycle: A Review 35
Advising the Build Graph 36
Advising Project Evaluation 36
Global Project Loading and Evaluation Hooks 38
Build Finished 39
Rules 41
Creating a Rule 42
Dealing with Imperative Rule Code 43
Generalizing Rules Beyond Tasks 45
Conclusion 46
4. Dependency Management. . . 47
What Is Dependency Management? 47
Dependency Concepts 48
Configurations 49
Module Dependencies 51
Dynamic Versions 53
File Dependencies 53
Project Dependencies 54
Internal Dependencies 55
Repositories: Dependency Resolution 56
Maven Repositories 56
Ivy 59
Repository Credentials 60
Static Dependencies 61
Buildscript Dependencies 63
Dependency Caching 64
Configuring Resolution Strategy 66
Failing on Version Conflict 66
Forcing Versions 66
Cache Expiration 67
Conclusion 67
Preface
Welcome to Gradle Beyond the Basics, the second book in the O’Reilly Gradle series. This book picks up from its predecessor, Building and Testing with Gradle, and takes you further into the Gradle programming model. We offer the recipes, techniques, and syntax that make Gradle more than just free-form scripting, and place your build instead on the foundation of a strong domain model. The difference is, it is your domain model, not a generic one from some build tool that is ignorant of the specifics of your project.
Having introduced you to the basic elements of Gradle in the first book, we can begin to explore the tool’s capabilities a bit more deeply. We will cover four discrete areas of Gradle functionality: file operations, custom Gradle plug-ins, build lifecycle hooks, and dependency management. We assume that you are familiar with the basics of how to use Gradle, and with a keen respect of your time and interest, offer no further intro‐ duction to the mechanics of simple Gradle builds. If you are brand new to the topic, you should definitely read Building and Testing first.
The Gradle APIs are rich, the possibilities for DSLs matching your domain are abundant, and the path towards finally having a build system that conforms to your product is clear. Let’s move forward.
Conventions Used in This Book
The following typographical conventions are used in this book:
Italic
Indicates new terms, URLs, email addresses, filenames, and file extensions.
Constant width
Used for program listings, as well as within paragraphs to refer to program elements such as variable or function names, databases, data types, environment variables, statements, and keywords.
Constant width bold
Shows commands or other text that should be typed literally by the user.
Constant width italic
Shows text that should be replaced with user-supplied values or by values deter‐ mined by context.
This icon signifies a tip, suggestion, or general note.
This icon indicates a warning or caution.
Safari® Books Online
Safari Books Online is an on-demand digital library that delivers expert content in both book and video form from the world’s lead‐ ing authors in technology and business.
Technology professionals, software developers, web designers, and business and crea‐ tive professionals use Safari Books Online as their primary resource for research, prob‐ lem solving, learning, and certification training.
Safari Books Online offers a range of product mixes and pricing programs for organi‐ zations, government agencies, and individuals. Subscribers have access to thousands of books, training videos, and prepublication manuscripts in one fully searchable database from publishers like O’Reilly Media, Prentice Hall Professional, Addison-Wesley Pro‐ fessional, Microsoft Press, Sams, Que, Peachpit Press, Focal Press, Cisco Press, John Wiley & Sons, Syngress, Morgan Kaufmann, IBM Redbooks, Packt, Adobe Press, FT Press, Apress, Manning, New Riders, McGraw-Hill, Jones & Bartlett, Course Technol‐ ogy, and dozens more. For more information about Safari Books Online, please visit us
online.
How to Contact Us
Please address comments and questions concerning this book to the publisher:
O’Reilly Media, Inc.
1005 Gravenstein Highway North Sebastopol, CA 95472
707-829-0515 (international or local) 707-829-0104 (fax)
We have a web page for this book, where we list errata, examples, and any additional information. You can access this page at http://oreil.ly/gradle-btb.
To comment or ask technical questions about this book, send email to bookques tions@oreilly.com.
For more information about our books, courses, conferences, and news, see our website at http://www.oreilly.com.
Find us on Facebook: http://facebook.com/oreilly
Follow us on Twitter: http://twitter.com/oreillymedia
Watch us on YouTube: http://www.youtube.com/oreillymedia
Acknowledgments
I would like to extend my thanks to my team of excellent tech editors who contributed ably to the quality of this book: Jason Porter, Spencer Allain, Darin Pope, and Rod Hilton. Special thanks go to Luke Daley, who didn’t just edit, but provided significant rewrites to the chapter on dependency management when the original version didn’t quite cap‐ ture the spirit of the subject matter. Luke was also a willing helper on the other end of a Skype chat window on more than one occasion when I had a technical question about some Gradle internal or other. He is a valued friend with whom I look forward to more collaboration in the future.
Additional thanks go to my friend, Matthew McCullough, for his early contributions to the chapter on Build Hooks. Matthew has a long history in the build tool space, and his insights into build metaprogramming were no small help in getting that chapter right.
Thanks of course to the longsuffering Hans Docktor, who waited perhaps a year longer than expected to get this book. It is likewise always a pleasure to work with him and to call him my friend.
I am obligated to acknowledge my editor, Meghan Blanchette, but in this case the ob‐ ligation is one I receive willingly. If Meghan and I work together on another book, she may want to create some automation around the emails she sends to me asking if I am going to keep my latest deadline, so frequent are those checkups. I will still enjoy hearing from her.
I tend to write very early in the morning, so my wife, Kari, never actually saw me work on this volume. She did, however, experience more than one spate of her husband falling asleep at 9:00 pm for many days on end so he could wake up early the next day and write. My thanks, and her name in print, is the least I can offer.
CHAPTER 1
File Operations
If the most essential operation in a build is to compile code, then surely the second most essential operation is to copy files. A real-world build routinely copies files from place to place, recursing directory trees, pattern-maching filenames, and performing string operations on file content. Gradle exposes a few methods, task types, and interfaces to make file operations flexible and easy. Collectively, these form Gradle’s file API.
To explore the file API, we’ll start with practical examples of how to use the Copy task. We’ll move from there to an exploration of the file-related methods of the Project
object, which are available to you anywhere inside a Gradle build. In the process, we’ll learn about the FileCollection interface. Finally, we’ll look at the ways the file API is used by common Gradle plug-ins—giving us a richer view of otherwise taken-for-granted structures like JAR files and SourceSets.
Copy Task
The Copy task is a task type provided by core Gradle. At execution, a copy task copies files into a destination directory from one or more sources, optionally transforming files as it copies. You tell the copy task where to get files, where to put them, and how to filter them through a configuration block. The simplest copy task configuration looks like Example 1-1.
Example 1-1. A trivial copy task configuration task copyPoems(type: Copy) {
from 'text-files' into 'build/poems' }
The example assumes there is a directory called text-files containing the text of some poems. Running the script with gradle copyPoems puts those files into the build/
poems directory, ready for processing by some subsequent step in the build.
By default, all files in the from directory are included in the copy operation. You can change this by specifying patterns to include or patterns to exclude. Inclusion and ex‐ clusion patterns use Ant-style globbing, where ** will recursively match any subdirec‐ tory name, and * will match any part of a filename. Include calls are exclusive by default; that is, they assume that all files not named in the include pattern should be excluded. Similarly, exclude calls are inclusive by default—they assume that all files not named in the exclude pattern should be included by default.
When an exclude is applied along with an include, Gradle prioritizes the exclude. It collects all of the files indicated by the include, then removes all of the files indicated by the exclude. As a result, your include and exclude logic should prefer more inclusive include patterns which are then limited by less inclusive exclude patterns.
If you can’t express your include or exclude rules in a single pattern, you can call exclude
or include multiple times in a single Copy task configuration (Example 1-2). You can
also pass a comma-separated list of patterns to a single method call (Example 1-3).
Example 1-2. A copy task that copies all the poems except the one by Henley
task copyPoems(type: Copy) {
from 'text-files' into 'build/poems' exclude '**/*henley*' }
Example 1-3. A copy task that only copies Shakespeare and Shelley task copyPoems(type: Copy) {
from 'text-files' into 'build/poems' include '**/sh*.txt' }
A common build operation is to gather files from several source directories and copy them into one place. To do this, simply include more than one from configuration, as in Example 1-4. Each call to from can even have its own sets of inclusions and exclusions if needed.
Example 1-4. A copy task taking files from more than one source directory task complexCopy(type: Copy) {
from('src/main/templates') {
include '**/*.gtpl' }
from('config') {
exclude 'Development*.groovy' }
into 'build/resources' }
Transforming Directory Structure
The outcome of Example 1-4 is to put all source files into one flat directory, build/
resources. Of course you may not want to flatten all of the source directories; you might
instead want to preserve some of the structure of the source directory trees or even map the source directories onto a new tree. To do this, we can simply add additional calls to
into inside the from configuration closures. This is shown in Example 1-5.
Example 1-5. A copy task mapping source directory structure onto a new destination structure
task complexCopy(type: Copy) {
from('src/main/templates') {
include '**/*.gtpl' into 'templates' }
from('i18n')
from('config') {
exclude 'Development*.groovy' into 'config'
}
into 'build/resources' }
Note that a top-level call to into is still required—the build file will not run without it —and the nested calls to into are all relative to the path of that top-level configuration. If the number of files or the size of the files being copied is large, then a copy task could be an expensive build operation at execution time. Gradle’s incremental build feature helps reduce the force of this problem. Gradle will automatically incur the full execution time burden on the first run of the build, but will keep subsequent build times down when redundant copying is not necessary.
Renaming Files During Copy
If your build has to copy files around, there’s a good chance it will have to rename files in the process. Filenames might need to be tagged to indicate a deployment environ‐ ment, or might need to be renamed to some standard form from an environment-specific origin, or might be renamed according to a product configuration specified by the build. Whatever the reason, Gradle gives you two flexible ways to get the job done: regular expressions and Groovy closures.
To rename files using regular expressions, we can simply provide a source regex and a destination filename. The source regex will use groups to capture the parts of the filename that should be carried over from the source to the destination. These groups are expressed in the destination filename with the $1/$2 format. For example, to copy some configuration-specific files from a source to a staging directory, see Example 1-6.
Example 1-6. Renaming files using regular expressions
task rename(type: Copy) {
from 'source' into 'dest'
rename(/file-template-(\d+)/, 'production-file-$1.txt') }
To rename files programmatically, we can pass a closure to the rename method (Example 1-7). The closure takes a single parameter, which is the name of the original file. The return value of the closure is the name of the renamed file.
Example 1-7. Renaming files programmatically
task rename(type: Copy) {
from 'source' into 'dest'
rename { fileName ->
"production-file${(fileName - 'file-template')}" }
}
In Groovy, subtracting one string from another string removes the first occurence of the second string from the first. So, 'one two one four' - 'one' will return 'two one four'. This is a quick way to perform a common kind of string processing.
Filtering and Transforming Files
Often the task of a build is not just to copy and rename files, but to perform transfor‐ mations on the content of the copied files. Gradle has three principal ways of doing this job: the expand() method, the filter() method, and the eachFile() method. We’ll consider these in turn.
Keyword Expansion
working directory into the build directory, it would be convenient to replace the deployment-variable strings as a part of the copy. The expand() method is how Gradle does this.
The expand() method takes advantage of the Groovy SimpleTemplateEngine class.
SimpleTemplateEngine adds a keyword substitution syntax to text files similar to the
syntax of Groovy string interpolation. Any string inside curly braces preceded by a dollar sign (${string}) is a candidate for substitution. When declaring keyword expansion in a copy task, you must pass a map to the expand() method (Example 1-8). The keys in the map will be matched to the expressions inside curly braces in the copied file, which will be replaced with the map’s corresponding values.
Example 1-8. Copying a file with keyword expansion versionId = '1.6'
task copyProductionConfig(type: Copy) {
from 'source'
include 'config.properties' into 'build/war/WEB-INF/config' expand([
databaseHostname: 'db.company.com',
version: versionId,
buildNumber: (int)(Math.random() * 1000),
date: new Date()
]) }
SimpleTemplateEngine has some other features that are exposed to you when you use the expand() method inside a copy task. Consult the online documentation for more details.
Note that the expression passed to the expand() method is a Groovy map literal—it is enclosed by square brackets, and a series of key/value pairs are delimited by commas, with the key and the value themselves separated by colons. In this example, the task doing the expanding is dedicated to preparing a configuration file for the production configuration, so the map can be expressed as a literal. A real-world build may opt for this approach, or may reach out to other, environment-specific config file fragments for the map data. Ultimately, the map passed to expand() can come from anywhere. The fact that the Gradle build file is executable Groovy code gives you nearly unlimited flexibility in deciding on its origin.
It’s helpful in this case to take a look at the source file, so we can directly see where the string substitution is happening.
Here’s the source file before the copy-with-filter operation:
Here’s the destination file after the copy-with-filter operation:
#
The expand() method is perfect for general-purpose string substitution—and even
some lightweight elaborations on that pattern—but some file transformations might need to process every line of a file individually as it is copied. This is where the filter()
method is useful.
The filter() method has two forms: one that takes a closure, and one that takes a class.
We’ll look at both, starting with the simpler closure form.
When you pass a closure to filter(), that closure will be called for every line of the filtered file. The closure should perform whatever processing is necessary, then return the filtered value of the line. For example, to convert Markdown text to HTML using
MarkdownJ, see Example 1-9.
Example 1-9. Use filter() with a closure to transform a text file as it is copied
import com.petebevin.markdown.MarkdownProcessor
buildscript {
repositories {
dependencies {
classpath 'org.markdownj:markdownj:0.3.0-1.0.2b4' }
}
task markdown(type: Copy) {
def markdownProcessor = new MarkdownProcessor()
into 'build/poems'
The source file processed by the example code is a short poem with some comments added. It looks like the following:
# A poem by William Carlos Williams so much depends
The copied and filtered file has blank lines instead of comments:
so much depends
Gradle gives you great flexibility in per-file filtering logic, but true to its form, it wants to give you tools to keep all of that filter logic out of task definitions. Rather than clutter your build with lots of filter logic, it would be better to migrate that logic into classes of its own, which can eventually migrate out of the build into individual source files with their own automated tests. Let’s take the first step in that direction.
Instead of passing a closure to the filter() method, we can pass a class instead. The class must be an instance of java.io.FilterReader. The Ant API provides a rich set of pre-written FilterReader implementations, which Gradle users are encouraged to re-use. The code shown in Example 1-9 could be rewritten as in Example 1-10.
Example 1-10. Use filter() with a custom Ant Filter class to transform a text file as it is copied
import org.apache.tools.ant.filters.*
import com.petebevin.markdown.MarkdownProcessor
buildscript {
repositories {
mavenRepo url: 'http://scala-tools.org/repo-releases' }
dependencies {
classpath 'org.markdownj:markdownj:0.3.0-1.0.2b4' }
}
class MarkdownFilter extends FilterReader {
MarkdownFilter(Reader input) {
super(new StringReader(new MarkdownProcessor().markdown(input.text)))
} }
task copyPoem(type: Copy) {
into 'build/poems' from 'source' include 'todo.md'
rename { it - ~/\.md$/ + '.html'}
filter MarkdownFilter
}
Eventually the MarkdownFilter class could move out of the build entirely and into a custom plug-in. That is an important topic with a chapter of its own.
Filtering File by File
The expand() and filter() methods apply the same transformation function to all of
the files in the copy scope, but some transformation logic might want to consider each file individually. To handle this case, we have the eachFile() method.
The eachFile() method accepts a closure, which is executed for every file as it is copied.
copies at other paths, and interact with the file programmatically as an instance of
java.io.File. You can do many of the same things through the Gradle DSL as described
previously, but you might prefer in some cases to drop back to direct manipulation. For example, perhaps you have a custom deployment process that copies a directory full of files and accumulates a SHA1 hash of all the file contents, emitting the hash into the destination directory. You might implement that part of the build as in Example 1-11.
Example 1-11. Use eachFile() to accumulate a hash of several files
import java.security.MessageDigest;
task copyAndHash(type: Copy) {
MessageDigest sha1 = MessageDigest.getInstance("SHA-1");
into 'build/deploy' from 'source'
eachFile { fileCopyDetails ->
sha1.digest(fileCopyDetails.file.bytes)
}
doLast {
Formatter hexHash = new Formatter()
sha1.digest().each { b -> hexHash.format('%02x', b) }
println hexHash }
}
The File Methods
There are several methods for operating on files that are available in all Gradle builds. These are methods of the Project object, which means you can call them from inside any configuration block or task action in a build. There are convenience methods for converting paths into project-relative java.io.File objects, making collections of files, and recursively turning directory trees into file collections. We’ll explore each one of them in turn.
file()
The file() method creates a java.io.File object, converting the project-relative path to an absolute path. The file() method takes a single argument, which can be a string, a file, a URL, or a closure whose return value is any of those three.
The file() method is useful when a task has a parameter of type File. For example,
the Java plug-in provides a task called jar, which builds a JAR file containing the default
sourceSet’s class files and resources. The task puts the JAR file in a default location
under the build directory, but a certain build might want to override that default. The Jar task has a property called destinationDir for changing this, which one might assume works as in Example 1-12.
1. This is an implementation detail not specified by the documentation for java.io.File. It is common be‐ havior, but even this much cannot be assumed between environments.
Example 1-12. Trying to set the destinationDir property of a Jar task with a string jar {
destinationDir = 'build/jar' }
However, this build will fail, because destinationDir is of type File, not String. A pedantic solution might look like Example 1-13.
Example 1-13. Trying to set the destinationDir property of a Jar task with a string
jar {
destinationDir = new File('build/jar') }
This build will run, but will not behave predictably in all cases. The File constructor will create an absolute path out of the supplied parameter, but the constructor argument will be considered as if it is relative to the directory in which the JVM started up.1 This
directory may change if you are invoking Gradle directly, through the wrapper, through an IDE, or through integration with a Continuous Integration server. The correct sol‐ ution is to use the file() method, as in Example 1-14.
Example 1-14. Setting the destinationDir property of a Jar task using the file() method jar {
destinationDir = file('build/jar') }
This build results in the destinationDir property being set to the build/jar directory under the build’s project root. This is the expected behavior, and will work regardless of how Gradle is being invoked.
If you already have a File object, the file() method will attempt to convert it into a project-relative path in the same way. The construction new File('build/jar') has no defined parent directory, so file(new File('build/jar')) will force its parent to the build’s project root directory. This example shows an awkward construction—real code would likely omit the inner File construction—but file()’s operation on File
objects works as the example shows. You might use this case if you already had the File
object lying around for some reason.
file() can also operate on java.net.URL and java.net.URI objects whose protocol
or scheme is file://. File URLs are not a common case, but they often show up when
URL in your build, you can easily convert it to a project-relative File object with the
file() method.
files()
The files() method returns a collection of files based on the supplied parameters. It is like file() in that it attempts to produce project-relative absolute paths in the File
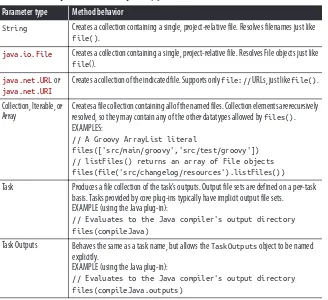
objects it creates, but it differs in that it operates on collections of files. It takes a variety of different parameter types as inputs, as shown in Table 1-1.
Table 1-1. The parameters accepted by files()
Parameter type Method behavior
String Creates a collection containing a single, project-relative file. Resolves filenames just like
file().
java.io.File Creates a collection containing a single, project-relative file. Resolves File objects just like
file().
java.net.URL or
java.net.URI
Creates a collection of the indicated file. Supports only file:// URLs, just like file().
Collection, Iterable, or Array
Creates a file collection containing all of the named files. Collection elements are recursively resolved, so they may contain any of the other datatypes allowed by files(). EXAMPLES:
// A Groovy ArrayList literal
files(['src/main/groovy','src/test/groovy']) // listFiles() returns an array of File objects files(file('src/changelog/resources').listFiles())
Task Produces a file collection of the task’s outputs. Output file sets are defined on a per-task basis. Tasks provided by core plug-ins typically have implicit output file sets. EXAMPLE (using the Java plug-in):
// Evaluates to the Java compiler's output directory files(compileJava)
Task Outputs Behaves the same as a task name, but allows the TaskOutputs object to be named explicitly.
EXAMPLE (using the Java plug-in):
// Evaluates to the Java compiler's output directory files(compileJava.outputs)
As you can see, files() is an incredibly versatile method for creating a collection of files. It can take filenames, file objects, file URLs, Gradle tasks, or Java collections con‐ taining any of the same.
Beginning Gradle developers often expect the return type of the method to be a trivial collection class that implements List. It turns out that files() returns a FileCollec tion, which is a foundational interface for file programming in Gradle. We will turn our attention to the section on file collections.
fileTree()
The file() method is an effective way to turn paths into files, and the files() method
builds on this to build lists of of files that can be managed as collections. But what about when you want to traverse a directory tree and collect all the files you find, and work with those as a collection? This is a job for the fileTree() method.
There are three ways to invoke fileTree(), and each of them borrows heavily from the configuration of the copy task. They all have several features in common: the method must be pointed to a root directory to traverse, and may optionally be given patterns to include or exclude.
The simplest use of fileTree() simply points it at a parent directory, allowing it to recurse through all subdirectories and add all of the files it finds into the resulting file collection. For example, if you wanted to create a collection of all of the production source files in a Java project, the expression fileTree('src/main/java') would get the job done.
Alternatively, you might want to perform some simple filtering to include some files and exclude others. Suppose, for example, that you knew that some backup files with the ~ extension were likely to exist in the source files. Furthermore, you knew some XML files were mixed in with the source files (rather than placed in the resources
source set where they belong), and you wanted to focus on that XML. You could create file collections to deal with both of the cases shown in Example 1-15.
Example 1-15. Using fileTree() with includes and excludes
def noBackups = fileTree('src/main/java') {
exclude '**/*~' }
def xmlFilesOnly = fileTree('src/main/java') {
include '**/*.xml' }
Alternatively, the directory and the include and exclude patterns can be provided in map form, as shown in Example 1-16. The use of this syntax in place of the closure configuration syntax is a matter of style.
Example 1-16. Using fileTree() with includes and excludes given in a map literal
def noBackups = fileTree(dir: 'src/main/java', excludes: ['**/*~'])
def xmlFilesOnly = fileTree(dir: 'src/main/java', includes: ['**/*.xml'])
The FileCollection Interface
2. There are actually several subtypes of FileCollection that may be in use in any of these cases. The behavior of these supertypes may be important in some cases, but we’ll confine our attention to the common supertype here.
and fileTree() methods don’t have a very friendly default toString() implementation
(Example 1-17). If they were simply ArrayLists as intuition would suggest, we would expect a dump of their contents. The fact that we don’t see this is a hint to something useful going on in the Gradle API (Example 1-18).
Example 1-17. The default toString() implementation of a FileCollection
task copyPoems(type: Copy) {
from 'text-files' into 'build/poems' }
println "NOT HELPFUL:" println files(copyPoems)
Here’s the output of the previous build, showing default toString() behavior:
$ gradle -b file-collection-not-helpful.gradle NOT HELPFUL:
file collection
Example 1-18. A more useful way to look at a FileCollection
task copyPoems(type: Copy) {
from 'text-files' into 'build/poems' }
println "HELPFUL:"
println files(copyPoems).files
Here’s the output of the previous build, showing the contents of the FileCollection:
$ gradle -b file-collection-helpful.gradle HELPFUL:
[~/oreilly-gradle-book-examples/file-operations-lab/build/poems]
The object returned by the files() method is not a List, but a FileCollection.2 The
FileCollection type shows up in many other places in Gradle: in the contents of
SourceSet objects, in task inputs and outputs, in Java classpaths, in dependency con‐
figurations, and more. Knowing the essential methods of the type goes a long way in equipping you to program file operations effectively, whether the files are transitive JAR dependencies fetched from a Maven repository, source files in the build of a Groovy project, or static resources in a web application. We will explore the key operations supported by the interface here.
To illustrate these features, we’ll start with a common build file that sets up some in‐ teresting collections of files (Example 1-19). We’ll add a task at a time to this example build to see each feature.
Example 1-19. The base build from which we will derive FileCollection examples apply plugin: 'java'
repositories {
mavenCentral() }
dependencies {
compile 'org.springframework:spring-context:3.1.1.RELEASE' }
Converting to a Set
We’ve already seen the files property of FileCollection. It returns an object of type
Set<File> containing all of the files or directories in the file collection. To list all of the source files in the previous project, we might add the task seen in Example 1-20.
Example 1-20. A naive way to list source files
task naiveFileLister {
doLast {
println fileTree('src/main/java').files }
}
Here’s the result of the naiveFileLister task:
$ gradle nFL :naiveFileLister
[~/file-collection-lab/src/main/java/org/gradle/example/ConsoleContentSink.java, ~/file-collection-lab/src/main/java/org/gradle/example/Content.java,
~/file-collection-lab/src/main/java/org/gradle/example/ContentFactory.java, ~/file-collection-lab/src/main/java/org/gradle/example/ContentRegistry.java, ~/file-collection-lab/src/main/java/org/gradle/example/ContentSink.java, ~/file-collection-lab/src/main/java/org/gradle/example/
DefaultContentFactory.java,
~/file-collection-lab/src/main/java/org/gradle/example/DonneContent.java, ~/file-collection-lab/src/main/java/org/gradle/example/PoetryEmitter.java, ~/file-collection-lab/src/main/java/org/gradle/example/ShakespeareContent.java]
BUILD SUCCESSFUL
Converting to a Path String
Internally, the core Java plug-in does this with compile-time dependencies when exe‐ cuting the javac compiler (Example 1-21). The Java compiler has a command-line switch for specifying the classpath, and that switch must be provided with an operating-specific string. The asPath property converts a FileCollection into this OS-specific string.
Example 1-21. Printing out all of the compile-time dependencies of the build as a path-like string
println configurations.compile.asPath
Here’s the results of the build with the previous addition:
$ gradle
~/.gradle/caches/artifacts-8/filestore/org.springframework/spring-context/
3.1.1.RELEASE/jar/ecb0784a0712c1bfbc1c2018eeef6776861300e4/spring-context-3.1.1.RELEASE.jar:
~/.gradle/caches/artifacts-8/filestore/org.springframework/spring-asm/ 3.1.1.RELEASE/jar/8717ad8947fcada5c55da89eb474bf053c30e57/spring-asm-3.1.1.RELEASE.jar:
~/.gradle/caches/artifacts-8/filestore/commons-logging/commons-logging/ 1.1.1/jar/5043bfebc3db072ed80fbd362e7caf00e885d8ae/commons-logging-1.1.1.jar: ~/.gradle/caches/artifacts-8/filestore/org.springframework/spring-core/ 3.1.1.RELEASE/jar/419e9233c8d55f64a0c524bb94c3ba87e51e7d95/spring-core-3.1.1.RELEASE.jar:
~/.gradle/caches/artifacts-8/filestore/org.springframework/spring-beans/ 3.1.1.RELEASE/jar/83d0e5adc98714783f0fb7d8a5e97ef4cf08da49/spring-beans-3.1.1.RELEASE.jar:
~/.gradle/caches/artifacts-8/filestore/aopalliance/aopalliance/1.0/jar/ 235ba8b489512805ac13a8f9ea77a1ca5ebe3e8/aopalliance-1.0.jar:
~/.gradle/caches/artifacts-8/filestore/org.springframework/spring-aop/ 3.1.1.RELEASE/jar/3c86058cdaea30df35e4b951a615e09eb07da589/spring-aop-3.1.1.RELEASE.jar:
~/.gradle/caches/artifacts-8/filestore/org.springframework/spring-expression/
3.1.1.RELEASE/jar/1486d7787ec4ff8da8cbf8752d30e4c808412b3f/spring-expression-3.1.1.RELEASE.jar
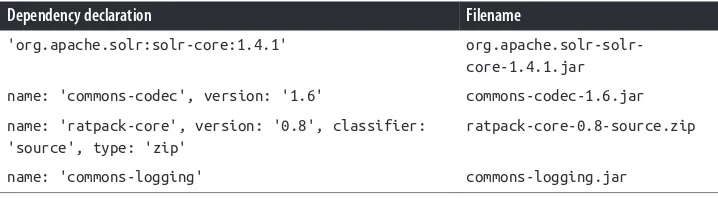
Module Dependencies as FileCollections
The most convenient way to illustrate converting a FileCollection to a path-like string is to use a collection of module dependencies, as shown in converting to a path string. It’s worth pointing out explicitly that dependency configurations are themselves File
Collections. When dependencies are listed in the dependencies { } section of the
3. The most commonly used dependency configurations are compile and runtime, which are defined by the Java plug-in, and not explicitly inside a configurations block. For a full treatment of configurations and dependencies, see Chapter 4.
4. You may prefer this scheme over repositories like Maven Central on principal. Gradle does not force you to use one mechanism of the other.
build, they are always assigned to a named configuration. Configurations are themselves defined in the configurations { } section of the build.3
As a teacher and frequent conference presenter on Gradle, sometimes I want to enable students to build Java code at times when there is no reliable internet connection. (Many US hotels and conference centers are still woefully unprepared for a few hundred soft‐ ware developers, each with two or three devices on the wireless network and a seemingly insatiable appetite for bandwidth.) While I strongly prefer dependencies to be managed by my build tool, it might make sense for me to prepare lab materials with all of the dependencies statically located in the project in the style of old Ant builds.4 For some
Java frameworks and APIs, chasing all of these JARs down by hand can be a burden. By using module dependencies as file collections, we can automate this work.
If we add the following trivial copy task to Example 1-19, we’ll find the lib directory quickly populated with all of the JARs we need after we run the task. Adding new de‐ pendencies to the project later will require only that we re-run the task, and the new JARs will appear as expected. Note that the from method of the Copy task configuration block, which took a directory name as a string in previous examples, can also take a
FileCollection as shown in Example 1-22.
Example 1-22. Using module dependencies as a FileCollection to capture JAR files.
task copyDependencies(type: Copy) {
from configurations.compile into 'lib'
}
Adding and Subtracting FileCollections
FileCollections can also be added and subtracted using the + and - operators. We can
derive a set of examples by using dependency configurations as file collections.
5. Compile-time dependencies are, by definition, run-time dependencies as well.
The classpath we want has two components: all of the compile-time dependencies of the project5 plus the classes compiled from the main Java sources of the project. The
former are available in the configurations.compile collection, and the latter in sour
ceSets.main.output. We will explore sourceSet collections more in the next section.
Example 1-23. Using FileCollection addition to create a runtime classpath
task run(type: JavaExec) {
main = 'org.gradle.example.PoetryEmitter'
classpath = configurations.compile + sourceSets.main.output
}
Subtracting one file collection from another creates a new collection containing all of the files in the left-hand collection that are not also in the right-hand collection. To create a collection of all of the text resources in our example build that are not Shelley poetry, we might add the code in Example 1-24 to our build.
Example 1-24. Creating an intersection of two FileCollections
def poems = fileTree(dir: 'src/main/resources', include: '*.txt')
def romantics = fileTree(dir: 'src/main/resources', include: 'shelley*')
def goodPoems = poems - romantics
Printing out the files property of goodPoems (or otherwise inspecting the contents of the collection) shows that it contains all of the .txt files in the src/main/resources
directory, but not the file whose name starts with shelley. In a practical build, this case might be accomplished with an excludes property, but more subtle intersections of
FileCollections are also possible, such as subtracting container-provided JARs from
the set of dependencies packaged up by a WAR task when building a Java web application.
SourceSets as FileCollections
In earlier examples, we used the fileTree() method to create a file collection of all of the source files in a project. It turns out that Gradle gives us a much cleaner way to get this same job done, using the same interface as we’ve been using all along. Source Sets are the domain objects Gradle uses to represent collections of source files, and they happen to expose source code inputs and compiled outputs as FileCollections.
The allSource property of a SourceSet object returns a file collection containing all
source inputs and, in the case of source sets compiled by the Java plug-in, all resource files as well. In our example build, inspecting the property would yield the results in
Example 1-25.
Example 1-25. Printing out the collection of source files in the main Java SourceSet println sourceSets.main.allSource.files
[~/file-collection-lab/src/main/resources/application-context.xml, ~/file-collection-lab/src/main/resources/chesterton.txt,
~/file-collection-lab/src/main/resources/henley.txt, ~/file-collection-lab/src/main/resources/shakespeare.txt, ~/file-collection-lab/src/main/resources/shelley.txt,
~/file-collection-lab/src/main/java/org/gradle/example/ConsoleContentSink.java, ~/file-collection-lab/src/main/java/org/gradle/example/Content.java,
~/file-collection-lab/src/main/java/org/gradle/example/ContentFactory.java, ~/file-collection-lab/src/main/java/org/gradle/example/ContentRegistry.java, ~/file-collection-lab/src/main/java/org/gradle/example/ContentSink.java, ~/file-collection-lab/src/main/java/org/gradle/example/
DefaultContentFactory.java,
~/file-collection-lab/src/main/java/org/gradle/example/DonneContent.java, ~/file-collection-lab/src/main/java/org/gradle/example/PoetryEmitter.java, ~/file-collection-lab/src/main/java/org/gradle/example/ShakespeareContent.java]
Likewise, the build outputs are provided in the outputs property. The outputs are not given as an exhaustive list of all of the files generated by the compiler—this would require that we run the compiler before interpreting the source set—but instead as a list of the directories into which compiled outputs will be placed (Example 1-26).
Example 1-26. Printing out the output directories the Java compiler will use for the main source set.
println sourceSets.main.output.files
[~/file-collection-lab/build/classes/main, ~/file-collection-lab/build/resources/main]
Lazy Files
When programming with file collections, it might be tempting to think of them as static lists. For example, a call to fileTree() might scan the filesystem at the time it is called, producing an immutable list that the build can then manipulate. Immutable data struc‐ tures have their uses, but in the Gradle lifecycle, this would make file collections difficult to use. As a result, instances of the FileCollection interface are lazily evaluated when‐ ever it is meaningful to do so.
For example, a task could use the fileTree() method to create a collection of all of the files in the build/main/classes directory that match the glob pattern **/
6. Gradle builds have three phases: initialization, configuration, and execution. Configuration-time build code sets up the task graph for Gradle to process. Actual build activity like copying, compiling, and archiving takes place during the execution phase.
likely),6 the files it is attempting to find may not exist until deep into the execution phase.
Hence, file collections are designed to be static descriptions of the collection semantics, and the actual contents of the collection are not materialized until they are needed at a particular time in the build execution.
Conclusion
In this chapter, we’ve looked at Gradle’s comprehensive support for file operations. We explored copy tasks, seeing their ability to move files around in trivial and non-trivial ways, performing various kinds of pattern-matching on files, and even filtering file contents during copy. We looked at keyword expansion and line-by-line filtering of file contents during copy, and also at renaming files as they’re copied—something that often comes in handy when modifying the contents of copied files. We reviewed the three important methods Gradle developers use to deal with files, and finally learned about the all-important FileCollection interface that describes so many important Gradle domain objects. Gradle doesn’t leave you with the bare semantics of the Java File object, but gives you a rich set of APIs to do the kinds of file programming you’re likely to do as you create custom builds and automation pipelines in your next-generation builds.
1. With apologies to Kurt Vonnegut.
CHAPTER 2
Custom Plug-Ins
Plug-In Philosophy
With its standard domain-specific language (DSL) and core plug-ins, Gradle intends to be a powerful build tool without the addition of any extensions or add-ons. Most com‐ mon build tasks can be accomplished with these tools as configured by simple build files. Common builds are easy to write; however, common builds are not so common.1
Projects that begin as simple collections of source files and a few static resources bundled into a standard archive format often evolve into complex multi-project hierarchies with requirements to perform database migration, execute repetitive transformations of static resources, perform and validate automated deployments, and accomplish still more build automation that doesn’t always easily conform to an existing standard or set of parameters.
Developing such a build is a specialized form of software development. The software in question is not the code that automates the business domain of the project itself, but code that automates the build domain of the project. This specialized code is software nevertheless, and it is precisely this kind of development that Gradle aims to facilitate.
To write this kind of code, an untutored Gradle developer might simply write a large amount of imperative Groovy code inside doLast() clauses of a build file. However, this code would be untestable, and would lead to large and unreadable build files of the kind other build tools are often criticized for creating. This practice is strongly discouraged. In its place, we offer the plug-in API.
The Plug-In API
A Gradle plug-in is a distributable archive that extends the core functionality of Gradle. Plug-ins extend Gradle in three ways. First, a plug-in can program the underlying Project object just as if an additional build file were mixed into the current build file. Tasks, SourceSets, dependencies, repositories, and more can be added or modified by applying a plug-in.
Second, a plug-in can bring new modules into the build to perform specialized work. A plug-in that creates WSDL files from an annotated Java web service implementation should not include its own code for scanning for annotations and generating content in a specialized XML vocabulary, but should instead declare a dependency on an existing library to do that work, and provide a mechanism for that library to be fetched from an online repository if it is not already present on the build system.
Finally, plug-ins can introduce new keywords and domain objects into the Gradle build language itself. There is nothing in the standard DSL to describe the servers to which a deployment might be targeted, the database schemas associated with the application, or the operations exposed by an underlying source control tool. Indeed, the standard DSL can’t possibly envision every scenario and domain that build developers may encounter. Instead, Gradle opts to provide a well-documented API that allows you, the build de‐ veloper, to extend Gradle’s standard build language in ways that are entirely customized to your context. This is a core strength of Gradle as a build tool. It allows you to write concise, declarative builds in an idiomatic language backed by rich, domain-specific functionality. This is accomplished through plug-ins.
The Example Plug-In
In this chapter, we will create a Gradle plug-in to automate the use of the open-source database refactoring tool, Liquibase. Liquibase is a command-line tool written in Java whose purpose is to manage change in a relational database schema. It can reverse-engineer an existing database schema into its XML change log, and track the version of that change log against running instances of the database scheme to determine whether any new database refactorings must be applied. For users who prefer a Groovy syntax over XML, an open-source Groovy Liquibase DSL is available.
You can learn more about Liquibase online at the Liquibase Quick Start.
Our goals in this chapter will be to do the following:
• Create Gradle tasks corresponding to the generateChangeLog, changeLogSync, and
updatecommands inside a Gradle build file.
• Make the Groovy DSL available to replace the default XML Changelog format. • Refactor the Gradle tasks into a custom task type.
• Introduce Gradle DSL extensions to describe Changelogs and database configurations.
• Package the plug-in as a distributable JAR file.
The Liquibase plug-in will begin its life as a standard Gradle build file. This is an easy way to begin sketching out and prototyping code whose final form you do not yet know, which is a typical workflow in the development of new forms of build automation. As the plug-in takes shape, we will slowly refactor it into a distributable plug-in project with a lifecycle of its own. Evolving plug-in development in this manner is a perfectly appropriate, low-ceremony path to learning the API and discovering the requirements of your build extension.
Setup
To run the example code in this chapter, you’ll need a database for Liquibase to connect to. The book’s example code has a build file that sets up the H2 database for this purpose. Using Git, clone the http://github.com/gradleware/oreilly-gradle-book-examples repos‐ itory, then change to the plugins/database-setup directory. Run the following two tasks:
$ gradle -b database.gradle createDatabaseScript $ gradle -b database.gradle buildSchema
The first command will provide a platform-specific script called starth2 that will run the H2 embedded database administrative console for you to inspect the schema at any time during plug-in development. The second command will create a sample database schema in desperate need of refactoring—just the kind of test environment we’ll need for our plug-in development.
You will have to move the database.gradle build file to the directo‐ ry in which you are doing plug-in development, and execute the build Schema task from there to ensure that the H2 database is in the right location for your plug-in to find it. Alternatively, you can place the database in a directory outside of your development directory and edit the JDBC URL to point to the correct path, but this step is left as an exercise for the reader.
Sketching Out Your Plug-In
Our Liquibase plug-in begins with the need to create tasks to perform Changlelog re‐ verse engineering, Changelog synchronization, and updating of the Changelog against the database. Some digging into the Liquibase API shows that the best way to run these three commands is to call the liquibase.integration.commandline.Main.main()
method. This method expects an array of command-line arguments indicating the da‐ tabase to connect to and which Liquibase sub-command to run. For each of its tasks that perform some Liquibase action, our plug-in will end up constructing this array and calling this method.
It’s worth thinking about precisely what those tasks might be. Given that we plan to support three Liquibase commands—generateChangeLog, changeLogSync, and
update—we can plan on creating three tasks by those same names. In a different sce‐
nario, you might decide to “namespace” the task names by prefixing them with lb or
liquibase to keep them from colliding with tasks from other plug-ins, but for our
purposes here we can keep the task names short and simple.
We also know we’re going to introduce some custom DSL syntax to describe databases and ChangeLogs, but let’s keep that as a footnote for now. We’ll revisit the idea and decide what that syntax should look like as soon as we’re ready to implement it.
Custom Liquibase Tasks
Our plug-in will eventually introduce some fully-implemented tasks that call Liquibase with little or no declarative configuration. Before it can do that, though, we will need to build a custom task type. The purpose of this task is to convert task parameters into the required argument list for the Liquibase command line entry point and call the
main() method. The implementation is shown in Example 2-1.
Example 2-1. The Liquibase task type prototype
import org.gradle.api.DefaultTask
import org.gradle.api.tasks.TaskAction
import liquibase.integration.commandline.Main
class LiquibaseTask extends DefaultTask {
String command
String url, password, username File changeLog
@TaskAction
def liquibaseAction() {
def args = [
"--url=${url}",
"--password=${password}",
"--username=${username}",
command ]
Main.main(args as String[])
} }
Remember, a custom task type is simply a class that implements the
org.gradle.api.Task interface, or more commonly extends the org.gradle.api.De
faultTask base class. The LiquibaseTask provides a basic interface between the rest
of the build and the core action of executing the Liquibase command-line driver through which all Liquibase operations are normally accessed. The properties of the Liquibase Task will become task configuration parameters when the plug-in tasks are used in an actual build later on.
Having defined the custom task, we need only to create an actual task having that type, and to configure it. Note in Example 2-2 that we can use Gradle’s configuration syntax to set instance variables in the task class. We assign values to the url, username, pass
word, changeLog, and command properties through a very standard assignment syntax.
Example 2-2. Instantiating the custom Liquibase task task generateChangeLog(type: LiquibaseTask) {
url = 'jdbc:h2:db/gradle_plugins' username = 'secret'
password = 'sa'
changeLog = file('changelog.xml')
command = 'generateChangeLog' }
Applying Yourself
Now that we’ve got a custom task type that makes it possible to run Liquibase from Gradle, let’s take a step back and begin building the plug-in proper. The simplest Gradle plug-in is a class that implements the org.gradle.api.Plugin<Project> interface. That interface defines a single method: void apply(Project project). We could begin with a method like what we see in Example 2-3.
The Plugin interface is type-parameterized because plug-ins can the‐ oretically be applied to any kind of Gradle object. Applying them to
Project is by far the most common use case, and is the only one we’ll look at here.
2. In Liquibase, generateChangeLog reverse engineers a database schema, changeLogSync places a new da‐ tabase under Liquibase’s control, and update pushes new changes into a database.
Example 2-3. The apply() method of the first version of the Liquibase plug-in
class LiquibasePlugin implements Plugin<Project> {
void apply(Project project) {
project.task('generateChangeLog', type: LiquibaseTask) {
group = 'Liquibase'
As a reminder, when you are first sketching out a plug-in as we are doing, you can code this class and the associated LiquibaseTask class directly in your build.gradle file. At this point in development, you are trying to learn the plug-in API and the scope and design of your plug-in itself. Deployment and packaging will eventually be very im‐ portant concerns, but we can happily ignore them for now.
This example creates three new build tasks: generateChangeLog, changeLogSync, and
update.2 Since the Liquibase plug-in is written in Groovy, we’re able to use a very
Gradle-like syntax to declare new tasks; indeed, the code shown here would work verbatim inside a build file, apart from any plug-in definition. Build masters don’t have to write plug-ins in Groovy, but it’s a rewarding choice due to its similarity to the Gradle build file syntax and its productivity advantages over Java as a language.
Extensions
At this point our plug-in is starting to be able to do some work, but its configuration is rather pedantic (Example 2-4). We must configure each and every task with the database username, password, URL, and the changelog file.
changeLogSync {
Clearly, we shouldn’t settle for this. The real power of Gradle plug-ins comes not just from the ability to hide a bunch of imperative code behind a plug-in declaration— custom Ant tasks and Maven plug-ins had already accomplished this a decade before Gradle had its 1.0 release—but rather from the ability to extend the domain model of the build. The Extension API is the primary means of doing so.
Design of plug-in extensions should begin with a sketch of what the desired build file syntax will look like. To design our build file syntax, we must first imagine what sorts of things our build will interact with in its now-expanding domain. In this case, this is simple: the build needs to know about databases and changelogs.
A database is a particular instance of a JDBC-connected database. A build automated with Liquibase database migrations will have separate domain objects representing the local database sandbox, a database instance on a staging server used for ad-hoc testing, a production database instance, and so on.
A Liquibase changelog is a file containing an ordered list of all of the refactorings per‐ formed on the database, expressed in an XML format. You can read more about Liqui‐ base changelogs on the Liquibase site. Example 2-5 will have a single changelog, but real-world builds using Liquibase may break up their database refactorings into two, three, four, or more separate files. Our domain model must support any number of changelog files.
Example 2-5. The goal of our plug-in’s new DSL.
liquibase {
url = 'jdbc:h2:db/liquibase_workshop;FILE_LOCK=NO'
username = 'sa' password = '' }
staging {
url = 'jdbc:mysql://staging.server/app_db' username = 'dev_account'
password = 'ab87d24bdc7452e557' }
}
defaultDatabase = databases.sandbox
}
Note what we have done here: we have proposed new Gradle build syntax for describing new domain objects not originally envisioned by the designers of Gradle. All of this new syntax is contained within a fixed namespace (liquibase), but otherwise we have sig‐ nificant control over what it looks like and how it represents our domain. This decep‐ tively simple observation is at the heart of the value of Gradle as a platform for creating customized builds. Gradle allows us not just to add custom code to our builds, but to add custom language as well. This is a key enabling feature for managing build complexity.
Plug-in extensions can hide complexity from build users by exposing a simple, idiomatic DSL in the build—and it isn’t even difficult to implement them. An extension takes the form of a class, usually written in Java or Groovy, that exposes the properties and meth‐ ods accessed in the extension block. Our example, written in Groovy, is shown in
Example 2-6.
Example 2-6. The Liquibase plug-in extension class
import org.gradle.api.NamedDomainObjectContainer
class LiquibaseExtension {
final NamedDomainObjectContainer<Database> databases final NamedDomainObjectContainer<ChangeLog> changelogs Database defaultDatabase
String context
LiquibaseExtension(databases, changelogs) {
this.databases = databases this.changelogs = changelogs }
def databases(Closure closure) {
databases.configure(closure)
}
def changelogs(Closure closure) {
3. In Java and Groovy, final fields can be initialized when the object is constructed, but can’t be changed thereafter. These two final fields are object collections, and the objects in the collections can be changed at runtime, but the collection instances themselves are fixed once the object is constructed.
4. POJO stands for Plain Old Java Object. It refers to a Java object whose type consists only of properties, methods, and an ordinary constructor, with no external requirement on a runtime container to create in‐ stances of it.
} }
The extension class defines two methods and two non-final properties.3 The two Name
dDomainObjectContainer instances, databases and changelogs, will hold collections
of domain objects created in the build syntax shown in Example 2-5. NamedDomainOb
jectContainer is a generic collection, and each instance holds domain objects of a
different type. The Database and ChangeLog classes will have to be defined as shown in
Example 2-7. The only feature that sets them apart from regular POJOs4 (or POGOs)
is that they must have a property called name and a constructor that accepts a String
and initializes the name property with it. Otherwise they do not extend any base class or implement any interface in the Gradle API.
The Liquibase-enabled Gradle build is able to maintain collections of databases and changelogs because of these two classes, and the way they are included in the extension class through the NamedDomainObjectContainer collection.
Example 2-7. The Database and ChangeLog classes
class ChangeLog
To apply this extension to the projects that use our plug-in, we will have to modify our
LiquibasePlugin.apply() method. The enhanced apply() method can be seen in
Example 2-8. The new functionality is in at the end, where the extensions.create()
method is called. This method call indicates that the extension context will be named
liquibase, and passes in the instances of the NamedDomainObjectContainers that will
be held by the extension object.
Example 2-8. The apply() method with the plug-in extension included
class LiquibasePlugin implements Plugin<Project> {
void apply(Project project) {
// Create and install custom tasks
project.task('generateChangeLog', type: LiquibaseTask) {
group = 'Liquibase'
// Create the NamedDomainObjectContainers
def databases = project.container(Database)
With all of that in hand, let’s take a look at the parts of the extension class itself, starting with the easiest part: the defaultDatabase property. This is an instance of the Data base class that can simply be assigned as a normal property inside the liquibase
extension block. In the DSL example we sketched out, you can see this in the default
Database = databases.sandbox line. This indicates to the LiquibaseTasks that they
should use the Database instance called sandbox if no other database configuration is provided.
domain object collection class will do two things: first, it will create a new instance of the domain object managed by the collection (either Database or ChangeLog). Second, it will set fields on that domain object using the property names referenced in the configuration block in the build file itself. Let’s refer again to just this piece of the pro‐ posed build DSL as shown in Example 2-9.
Example 2-9. The creation and configuration of a Database domain object
liquibase {
databases {
sandbox {
url = 'jdbc:h2:db/liquibase_workshop;FILE_LOCK=NO' username = 'sa'
password = 'secret' }
} }
The inner sandbox block causes the new Database domain name object to be named “sandbox.” (Remember, this is a named domain object container, so all of the objects we create in it must have names.) The property assignments inside the curly braces of the
sandbox block are converted into property assignments on the new instance of our
Database class.
The outer set of curly braces wrapping the sandbox block form the Groovy closure that is passed to the databases() method of the extension class. If you wanted to define additional databases for the build to access—perhaps a staging server or a production instance—those would be placed as peers to the sandbox definition.
The complete source code of the sketched-out plug-in is available in a GitHub Gist. Remember, all of this code was typed directly into a plain Gradle build file, with no compilation or build steps required. This is a very efficient way to create a prototype, but of course a properly managed plug-in will need a build of its own, so it can be decorated with all of the appropriate testing, versioning, and release processes that at‐ tend mature software development. We’ll look at this next.
Packaging a Plug-In
Converting our quick-and-dirty plug-in implementation to an independent project with a build all its own is not difficult. The process consists mainly of breaking up the classes developed in the previous section into files of their own, adding a little bit of metadata to the JAR file, and fixing up our classpath with the Gradle API. We’ll look at these things one at a time.
The plug-in we built has seven separate classes packaged in the com.august
techgroup.gradle.liquibase and com.augusttechgroup.gradle.liquibase.tasks
5. This line can be seen in the completed code.
packages. Since these are Groovy classes, we’ll place them under the src/main/groo vy directory of the build. You can browse the source of this chapter’s version of the plug-in on GitHub.
After locating the classes there, we’ll need to provide one additional file in the build to give the plug-in its ID in builds in which it is applied. In the previously sketched-out plug-in, we applied the plug-in directly by its classname with the line apply plugin:
LiquibasePlugin at the top of the build.5 A properly packaged Liquibase plug-in should
be applied just like the core plug-ins are, with the line apply plugin: 'liquibase'. This plug-in ID is provided through a metadata file.
We will add a file called liquibase.properties in the src/resources/META-INF/
gradle-plugins directory of the project. This directory will automatically be included
in the jar file under its META-INF directory. The purpose of the file is to translate from the string ID of the plug-in to the fully qualified name of the class that implements the plug-in. The file’s brief contents are shown in Example 2-10.
Example 2-10. The contents of the liquibase.properties meta file
implementation-class=com.augusttechgroup.gradle.liquibase.LiquibasePlugin
Finally, the plug-in code must have a build. Naturally, we will use Gradle for this task. The full build shown in the example project contains many extra features for packaging and deployment to the Central Repository, but it can be much simpler. The main prob‐ lem is solving the compile-time classpath dependency on the Gradle APIs themselves. (The plug-in also depends on Liquibase modules, but we already know how to bring in regular Maven-style dependencies from reading Buiding and Testing With Gradle.)
The answer to the Gradle API question is the gradleApi() convenience method. De‐ clared as a compile-time dependency, it brings in all of the internal Gradle classes needed to build a project that extends Gradle itself. The completed minimum subset build is shown in Example 2-11.
Example 2-11. A simplified plug-in build file apply plugin: 'groovy'
repositories {
mavenCentral() }
dependencies {
compile 'org.liquibase:liquibase-core:2.0.3' }
Conclusion
The Liquibase plug-in is a good example of a real-world product that introduces an external API to power new execution-time features and extends the build domain model in ways unique to its own domain. Hundreds of lines of build code are completely hidden inside the plug-in, and advanced functionality is introduced to the build tool as a native part of its vocabulary. And that vocabulary itself is expanded to encompass a new do‐ main that isn’t a part of the core build tool itself.
When built and packaged as a project of its own, the plug-in takes on life as a software project. We can introduce automated tests, or ideally even bake them in while we code as an integrated part of the development process. We can deploy a continuous integra‐ tion server. We can apply appropriate versioning, source repository tagging, and other release management protocols. In short, this extension to the build tool brings new functionality to bear on the system, is expressed in new build language, and is engineered within the context of contemporary software development practice. This is the essence of the Gradle plug-in story, which is a very powerful story indeed.