•Springfundamentals:SpringIoCcontainer,SpringAOP/AspectJ,andmore •Springenterprise:SpringJavaEEintegration,SpringIntegration,SpringBatch,
HadoopandMongoDB
•Springweb:SpringMVC,otherdynamicscripting,integrationwiththepopularGrails Framework(andGroovy),REST/webservices,andmore
Thisbookguidesyoustep-by-stepthroughtopicsusingcompleteandreal-worldcodeexamples. Whenyoustartanewproject,youcanconsidercopyingthecodeandconfigurationfilesfrom thisbook,andthenmodifyingthemforyourneeds.Thiscansaveyouagreatdealofworkover creatingaprojectfromscratch!
•HowtodevelopwiththecoreSpringFramework,aspectorientedprogramming, dependencyinjection,andinversionofcontrol
•HowtocreateSpringwebservicesusingSpringREST,SOAPandremoting
•HowtobuildawebclientusingSpringMVCandhowtoworkwithotherwebframeworks •HowtouseGrailsandGroovy
•HowtointegrateSpringwithsocialmediaandmobileapps
•HowtoworkwithSpringData,Batch,NoSQLandbigdata;thenintegratingwith Hadoop,MongoDB,Redisandmore
•HowtocreateandmanageSpringtransactions
•HowtohandleSpringmessaging,integration,testing,andcaching •HowtosecureyourSpringapplications
vers
Spring
Framew
For your convenience Apress has placed some of the front
matter material after the index. Please use the Bookmarks
v
Contents at a Glance
About the Authors ...
xxxiii
About the Technical Reviewer ...
xxxv
Acknowledgments ...
xxxvii
Introduction ...
xxxix
Chapter 1: Spring Development Tools
■
...
1
Chapter 2: Spring Core Tasks
■
...
47
Chapter 3: Spring Annotation Driven Core Tasks
■
...
135
Chapter 4: Spring @MVC
■
...
217
Chapter 5: Spring REST
■
...
275
Chapter 6: Spring Social
■
...
303
Chapter 7: Spring Security
■
...
331
Chapter 8: Spring Mobile
■
...
385
Chapter 9: Spring with Other Web Frameworks
■
...
.401
Chapter 10: Data Access
■
...
419
Chapter 11: Spring Transaction Management
■
...
475
Chapter 12: Spring Batch
■
...
511
Chapter 13: NoSQL and BigData
■
...
549
Chapter 14: Spring Java Enterprise Services and Remoting Technologies
■
...
591
vi
Chapter 16: Spring Integration
■
...
691
Chapter 17: Spring Testing
■
...
723
Chapter 18: Grails
■
...
757
xxxix
Introduction
The Spring framework is growing. It has always been about choice. Java EE focused on a few technologies, largely to the detriment of alternative, better solutions. When the Spring framework debuted, few would have agreed that Java EE represented the best-in-breed architectures of the day. Spring debuted to great fanfare, because it sought to simplify Java EE. Each release since marks the introduction of new features designed to both simplify and enable solutions.
With version 2.0 and later, the Spring framework started targeting multiple platforms. The framework provided services on top of existing platforms, as always, but was decoupled from the underlying platform wherever possible. Java EE is a still a major reference point, but it’s not the only target. Additionally, the Spring framework runs on different Cloud environments. With the introduction of Java based configuration and more XML schemas, the Spring framework created powerful configuration options. Frameworks built on top of the Spring framework have emerged supporting application integration, batch processing, messaging, and much more.
This is the 3rd edition of the superb Spring Recipes and it contains mostly updated frameworks, describing the
new features and explaining the different configuration (Java and/or XML) options. Additionally, new projects have been added to the Spring ecosystem like the Spring Data family of products.
It was impossible to describe each and every project in the Spring ecosystem, so we had to decide what to keep, what to add, and what to update. This was a hard decision but we think we have included the most important and used content.
Who This Book Is For
This book is for Java developers who want to simplify their architecture and solve problems outside the scope of the Java EE platform. If you are already using Spring in your projects, the more advanced chapters present discussions of newer technologies that you might not know about already. If you are new to the framework, this book will get you started in no time.
This book assumes that you have some familiarity with Java and an IDE of some sort. While it is possible, and indeed useful, to use Java exclusively with client applications, Java’s largest community lives in the enterprise space and that, too, is where you’ll see most of these technologies deliver the most benefit. Thus, some familiarity with basic enterprise programming concepts like the Servlet API is assumed.
How This Book Is Structured
Chapter 1, “Spring Development Tools”, gives an overview of tools supporting the Spring framework and how to use them. Chapter 2, “Spring core tasks,” gives a general overview of the Spring framework: how to set it up, what it is, and how it’s used.
Chapter 3, “Spring Annotation Driven Core Task,” reviews, in addition to Chapter 2 more annotation driven concepts that are still key to fully exploiting the container.
Chapter 4, “Spring @MVC,” covers web-based application development using the Spring Web MVC framework. Chapter 5, “Spring REST,” provides an introduction to Spring’s support for RESTful web services.
Chapter 6, “Spring Social,” provides an introduction of Spring Social, which lets you integrate easily with social networks. Chapter 7, “Spring Security,” provides an overview of the Spring Security project, to help you better secure your application.
xl
Chapter 9, “Integrating Spring with Other Web Frameworks,” introduces the core web-tier support that Spring provides. This provides a base for all technologies that Spring provides in the web tier.
Chapter 10, “Data Access,” discusses using Spring to talk to data stores using APIs like JDBC, Hibernate, and JPA. Chapter 11, “Transaction Management in Spring,” introduces the concepts behind Spring’s robust transaction management facilities.
Chapter 12, “Spring Batch,” introduces the Spring Batch framework, which provides a way to model solutions traditionally considered the domain of mainframes.
Chapter 13, “NoSQL and BigData,” an introduction to multiple Spring Data portfolio projects, covering different NoSQL technologies and BigData with Hadoop.
Chapter 14, “Spring Java Enterprise Services and Remoting Technologies,” introduces you to the JMX support, scheduling, e-mail support, and various facilities for RPC, including the Spring Web Services project.
Chapter 15, “Spring Messaging,” discusses using Spring with message-oriented middleware through JMS and RabbitMQ and the simplifying Spring abstractions.
Chapter 16, “Spring Integration,” discusses using the Spring Integration framework to integrate disparate services and data.
Chapter 17, “Spring Testing,” discusses unit testing with the Spring framework.
Chapter 18, “Grails,” discusses the Grails framework, with which you can increase your productivity by using best-of-breed pieces and gluing them together with Groovy code.
Appendix A, “Deployment to the Cloud,” shows how to deploy a Java (Web) application to the cloud using the Pivotals CloudFoundry solution.
Appendix B, “Spring Caching,” introduces the Spring Caching abstraction, including how to configure it and how to transparently add caching to your application.
Conventions
Sometimes, when we want you to pay particular attention to a part within a code example, we will make the font bold. Please note that the bold doesn’t necessarily reflect a code change from the previous version.
In cases when a code line is too long to fit the page’s width, we will break it with a code continuation character. Please note that when you try to type the code, you have to concatenate the line by yourself without any spaces.
Prerequisites
Because the Java programming language is platform independent, you are free to choose any supported operating system. However, some of the examples in this book use platform-specific paths. Translate them as necessary to your operating system’s format before typing the examples.
To make the most of this book, install JDK version 1.7 or higher. You should have a Java IDE installed to make
development easier. For this book, the sample code is Gradle based. If you’re running Eclipse and Install the Gradle plug-in, you can open the same code in Eclipse and the CLASSPATH and dependencies will be filled in the by the Gradle metadata.
If you’re using Eclipse, you might prefer SpringSource’s SpringSource Tool Suite (STS), as it comes preloaded with the plug-ins you’ll need to be productive with the Spring framework in Eclipse. If you use IntelliJ IDEA, you need to enable the Gradle (and Groovy) plugins.
Downloading the code
The source code for this book is available from the Apress web site (www.apress.com) in the Source Code / Download section. The source code is organized by chapters, each of which includes one or more independent examples.
Contacting the Authors
1
Spring Development Tools
In this chapter you’ll learn how to setup and work with the most popular development tools to create Spring applications. Like many other software frameworks, Spring has a wide array of development tools to choose from, from bare-bones command line tools to sophisticated graphical tools the software industry calls IDEs (Integrated Development Environments).
Whether you already use certain Java development tools or are a first-time developer, the following recipes will guide you on how to set up different toolboxes to do the exercises in the upcoming chapters, as well as develop any Spring application.
Table 1-1 describes a list of toolboxes and the corresponding recipes you need to follow to get the right tools to start a Spring application.
Table 1-1. Toolboxes to develop Spring applications
Toolbox A
Toolbox B
Toolbox C
Toolbox D
Spring Tool Suite Recipe 1-1
Eclipse IDE Recipe 1-2
IntelliJ IDE Recipe 1-3
w/Maven CLI Recipe 1-4
Text editor
w/Maven CLI Recipe 1-4
w/Gradle CLI Recipe 1-5 w/Gradle CLI Recipe 1-5
Bear in mind you don’t need to install every toolbox described in Table 1-1 to work with Spring. It can be helpful to try them all out, so you can use the toolbox you feel most comfortable with.
1-1. Build a Spring application with the Spring Tool Suite
Problem
You want to use the Spring Tool Suite (STS) to build a Spring application.
Solution
2
To install Gradle on STS, click on the ‘Extensions’ tab at the bottom of the dashboard window. Click on the ‘Gradle Support’ checkbox. Proceed with the Gradle extension installation and restart STS once the installation is complete. To open a Spring application that uses Gradle, from the top level ‘File’ menu select the ‘Import...’ option, click on the ‘Gradle’ icon and select the ‘Gradle project’. Next, select the Spring application based on Gradle from your workstation. Click on the ‘Build Model’ button and last click ‘Finish’ to start working on the project.
How It Works
STS is the IDE developed by SpringSource -- a division of Pivotal -- creators of the Spring framework. STS is
specifically designed to develop Spring applications, making it one of the most complete tools for this purpose. STS is an Eclipse-powered tool, so it has the same ‘look and feel’ as the Eclipse open source IDE.
STS can be downloaded for free from http://spring.io/tools/sts. STS is available for all six major operating system (OS) versions: Windows, Windows (64bit), Mac OS X (Cocoa), Mac OS X (Cocoa, 64bit), Linux (GTK), and Linux (GTK, 64bit). STS is also distributed in two versions of Eclipse, the Eclipse 3.x branch and the Eclipse 4.x branch. In addition, STS is itself versioned, so you have the option to download the latest stable release or a milestone/development version.
Download the version suited to your OS and I recommend you chose the Eclipse 4.x branch because it’s newer. At the time of this writing the latest stable release of the Spring Tool Suite is the 3.5 version. Therefore the download link you chose should have the title ‘SPRING TOOL SUITE 3.5.1.RELEASE - BASED ON ECLIPSE 4.3.2’ or you can choose a newer release if you prefer.
Once you download STS, ensure you have a Java SDK installed on your system since this is an STS installation requirement. Proceed to install STS. Follow the installation wizard and you should have STS setup in 5 to 10 minutes. Upon termination, a folder with the name STS_<VERSION> is created under the home folder of the user making the installation or where the user chooses to place the installation-based folder. If you inspect this folder, you’ll see the
STS executable which is used to start STS.
Start STS. At startup, STS asks you to define a workspace location. A workspace is where STS places all project information. You can keep the default directory which is under the main STS installation directory or define a different directory to your liking. After startup is complete you’ll see a screen like the one in Figure 1-1.
3
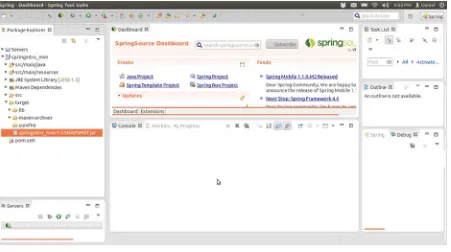
Click on the ‘Open Dashboard’ link. Then you’ll see the STS Dashboard illustrated in Figure 1-2.
Figure 1-2. STS Dashboard
On the STS Dashboard, in the center column inside the ‘Create’ box there’s a link called ‘Spring project’. You can click on this link to create a new Spring application. You can go ahead and create an empty application if you like. You’ll be asked for a name and to define a series of parameters which you can leave with default values.
A more common case than creating a Spring application from scratch is to continue development on a pre-existing Spring application. Under such circumstances, the owner of an application generally distributes the application’s source code with a build script to facilitate its ongoing development.
The build script of choice for most Java application is a pom.xml file designed around the build tool called Maven and more recently a build.gradle file designed around the build tool called Gradle. The book’s source code and its applications are provided with Gradle build files, in addition to a single application with a Maven build file.
JAVA BUILD TOOLS, A MEANS TO AN END: ANT, MAVEN, IVY, GRADLE
In a Java application there can be dozens or hundreds of menial tasks required to put together an application
(e.g., Copying JARs or configuration files, setting up Java’s classpath to perform compilation, downloading JAR
dependencies, etc.). Java build tools emerged to perform such tasks in Java applications.
4
Some of the newer Java build tools are more powerful and enhance the way their earlier counterparts work and
each build file uses its own syntax to define actions, dependencies, and practically any other task required to
build an application. However, you should never lose sight of the fact that a Java build tool is just a means to an
end. It’s a choice made by the creator of an application to streamline the build process.
Don’t panic if you see an application distributed with a build file from the oldest Ant version or the newest Gradle
version, from an end user perspective all you need to do is download and install the build tool to create the
application as its creator intended.
Since many Spring applications continue to use Maven and some of the newer Spring applications use Gradle, I’ll describe the import process into STS for both types of projects.
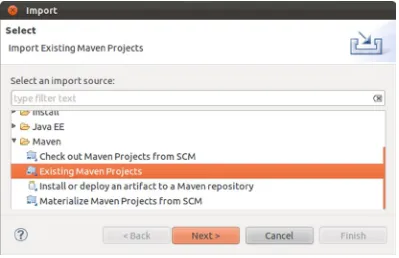
Once you download the book’s source and unpack it to a local directory, click on the STS top level ‘File’ menu and select the ‘Import...’ option. A pop-up window appears. In the pop-up window, click on the ‘Maven’ icon and select the ‘Existing Maven Projects’ option as illustrated in Figure 1-3.
5
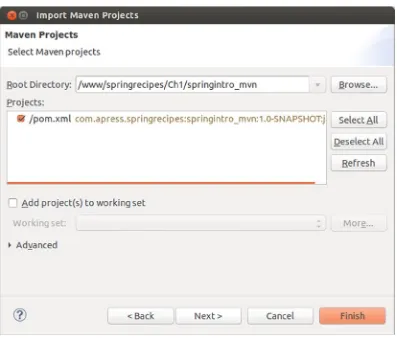
Notice in Figure 1-4 the ‘Projects:’ window is updated to include the line pom.xml com.apress.
springrecipes... which reflects the Maven project to import. Select the project checkbox and click on the ‘Finish’ button to import the project. All projects in STS are accessible on the left-hand side in the ‘Package Explorer’ window. In this case, the project appears with the name springintro_mvn.
If you click on the project icon in the ‘Package Explorer’ window, you’ll be able to see the project structure (i.e., java classes, dependencies, configuration files, etc.). If you double click on any of the project files inside the ‘Package Explorer’, the file is opened in a separate tab in the center window -- alongside the dashboard. Once a file is opened, you can inspect, edit, or delete its contents.
Select the project icon in the ‘Package Explorer’ window and click on the right button of your mouse.
A contextual menu appears with various project commands. Select the ‘Run as’ option followed by the ‘Maven build’ option. A pop-up window appears to edit and configure the project build. Just click on the ‘Run’ button in the bottom right. In the bottom center of STS you’ll see the ‘Console’ window appear. In this case, the ‘Console’ window displays a series of build messages produced by maven, as well as any possible errors in case the build process fails.
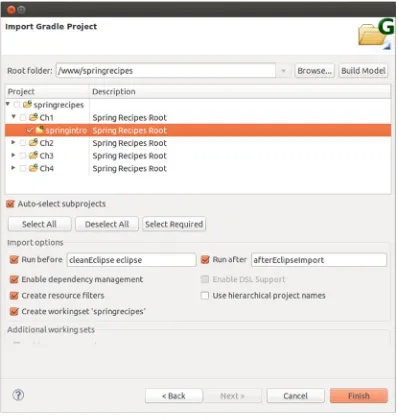
Next, click on the ‘Next’ button. In the following screen, on the ‘Select root directory’ line click on the ‘Browse’ button and select the directory of the book’s source code in Ch1 called springintro_mvn as illustrated in the Figure 1-4.
6
You’ve just built the application, congratulations! Now let’s run it. Select the project icon from the ‘Package Explorer’ window once again and press the F5 key to refresh the project directory. Expand the project tree. Toward the bottom you’ll see a new directory called target which contains the built application. Expand the target directory by clicking on its icon. Next, select the file springintro_mvn-1.0-SNAPSHOT.jar as illustrated in Figure 1-5.
7
Click on the ‘Run’ button in the bottom right. In the bottom center of STS you’ll see the ‘Console’ window. In this case, the ‘Console’ window displays the application logging messages, as well as a greeting message defined by the application.
Even though you’ve built and run a Spring application with STS, we’re still not done. The process you just completed with STS was mostly done behind the scenes by the build tool called Maven. Next, it’s time to import a Spring application that uses one of the newer build tools call Gradle.
While gradle is still a relatively new tool, there are signs that gradle will supplant Maven in the future. For example, many large Java projects -- such as the Spring framework itself -- now use Gradle instead of maven due to its greater simplicity and power. Given this tendency, it’s a worth describing how to use Gradle with STS.
Figure 1-6. Define main executable class in STS
8
Tip
■
If you have a Maven project (i.e.,
pom.xmlfile) you can use the bootstrap plugin or maven2gradle tool to create a
Gradle project (i.e.,
build.gradlefile). The bootstrap plugin is included with Gradle (See documentation at
http://gradle.org/docs/current/userguide/bootstrap_plugin.html) and the maven2gradle tool is available at https://github.com/jbaruch/maven2gradle.git.
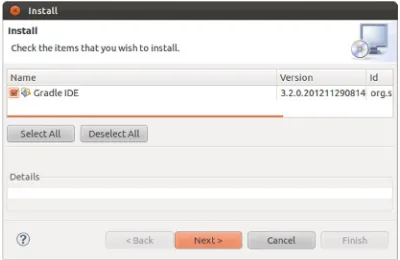
To install Gradle in STS go to the dashboard window. At the bottom of the dashboard window click on the ‘Extensions’ tab. A list of STS extensions is loaded in the window. Click on the ‘Gradle Support’ checkbox from the list as illustrated in Figure 1-7. If you don’t see the ‘Gradle Support’ extension in the list, type the word ‘gradle’ in the ‘Find:’ textbox. If you still don’t see the ‘Gradle Support’ extension after this step, click on the ‘Find Updates’ button.
9
Click on the ‘Next’ button in the bottom right to proceed with the Gradle extension installation. A confirmation pop-up window appears as illustrated in Figure 1-8.
Figure 1-8. Gradle STS installation confirmation
10
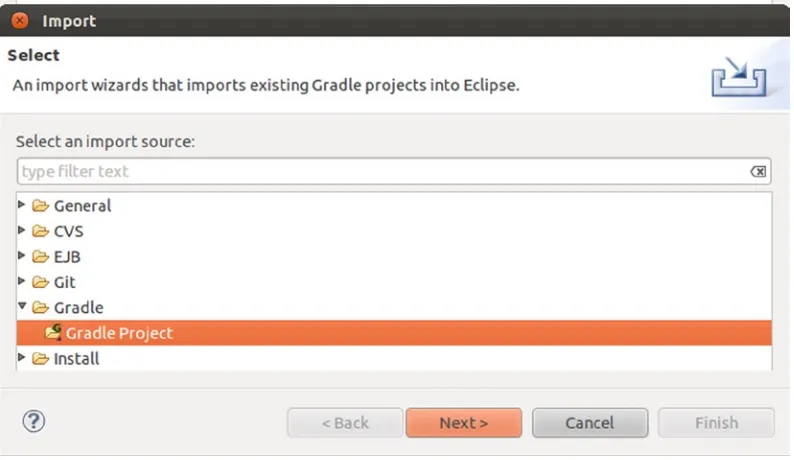
The book’s source contains numerous Spring applications designed to be built with Gradle, so I’ll describe how to import these Spring applications into STS. Once you download the book’s source and unpack it to a local directory, in STS click on the top level ‘File’ menu and select the ‘Import...’ option. A pop-up window appears. In the pop-up window, click on the ‘Gradle’ icon and select the ‘Gradle Project’ option as illustrated in Figure 1-9.
Figure 1-9. STS gradle import
11
Click on the ‘Finish’ button to import the project. If you look at the left-hand side of STS in the ‘Package Explorer’ window you’ll see the project is loaded with the name springintro. If you click on the project icon, you’ll be able to see the project structure (i.e., java classes, dependencies, configuration files, etc.).
Select the project icon and click on the right button of your mouse. A contextual menu appears with various project commands. Select the ‘Run as’ option followed by the ‘Gradle build’ option. A pop-up window appears to edit and configure the build. Click on the Project/task option ‘build’ and then click on the ‘Run’ button in the bottom right. In the bottom center of STS you’ll see the ‘Console’ window appear. In this case, the ‘Console’ window displays a series of build messages produced by gradle, as well as any possible errors in case the build process fails.
You’ve just built the application, now let’s run it. Select the project icon once again and press the F5 key to refresh the project directory. Expand the project tree. Toward the middle you’ll see a new directory called libs which contains the built application. Expand the libs directory by clicking on the icon. Next, select the file springintro-1.0-SNAPSHOT.jar.
12
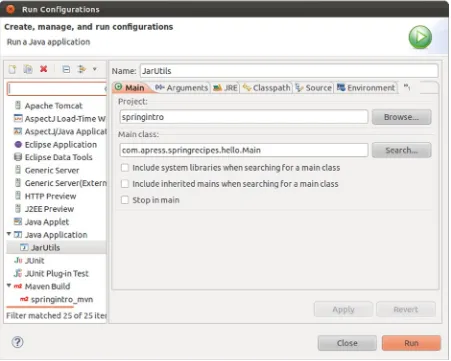
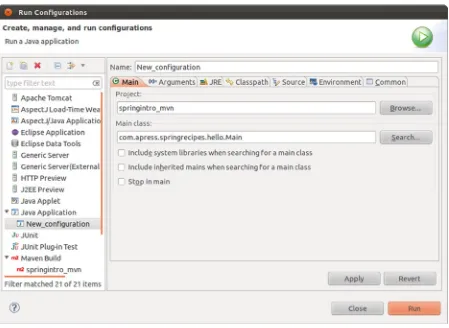
With the file selected, from the top level menu ‘Run’ select the ‘Run configurations...’ option. A pop-up window appears to edit and configure the run. Ensure the ‘Java application’ option is selected in the left-hand side. In the ‘Main class:’ box introduce com.apress.springrecipes.hello.Main. This is the main class for this project. Click on the ‘Run’ button in the bottom right. In the bottom center of STS you’ll see the ‘Console’ window. In this case, the ‘Console’ window displays the application logging messages, as well as a greeting message defined by the application.
1-2. Build a Spring application with the Eclipse IDE
Problem
You want to use the Eclipse IDE to build Spring applications.
Solution
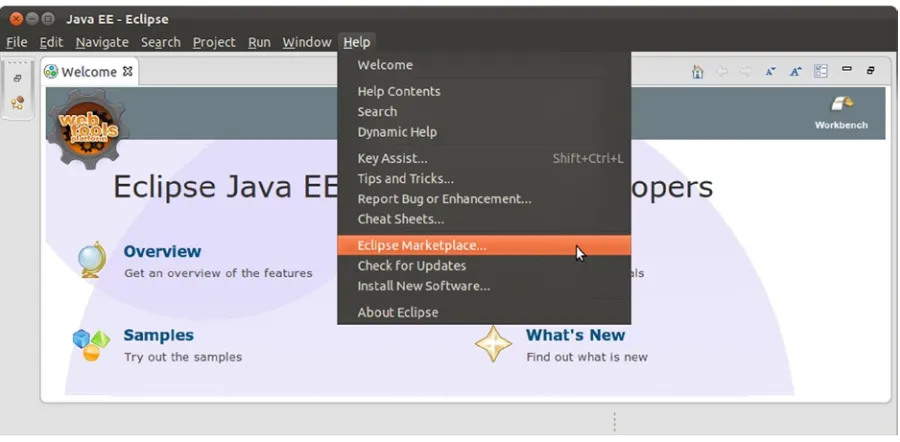
From Eclipse’s top level ‘Help’ menu select the ‘Eclipse Marketplace...’ . Install STS for Eclipse. To create a new Spring application, click on the top level ‘File’ menu select t ‘New’ and then the ‘Project’ . Next, click on the ‘Spring project’ option.
To open a Spring application that uses Maven, you first need to install Maven Integration for Eclipse
(a.k.a. m2eclipse). From Eclipse’s top level ‘Help’ menu select the ‘Eclipse Marketplace...’. Install Maven Integration for Eclipse. Click on the Eclipse top level ‘File’ menu and select the ‘Import...’ option. A pop-up window appears. In the pop-up window, click on the ‘Maven’ icon and select the ‘Existing Maven Projects’ option. Next, seledct the Spring application based on Maven from your workstation.
To open a Spring application that uses Gradle, you first need to install Gradle Integration for Eclipse. From Eclipse’s top level ‘Help’ menu select the ‘Eclipse Marketplace...’. Install Maven Integration for Eclipse. Click on the Eclipse top level ‘File’ menu and select the ‘Import...’ option. A pop-up window appears. In the pop-up window, click on the ‘Gradle’ icon and select the ‘Gradle Project’ option. Next, select the Spring application based on Gradle from your workstation.
How It Works
Eclipse is one of the most popular IDEs to develop Java applications, therefore it can be a natural choice to develop Spring applications. For this recipe I’ll assume you’ve already installed Eclipse and are familiar with its environment.
Tip
■
If you haven’t installed Eclipse, I recommend you try out STS which is described in Recipe 1-1. STS is an
Eclipse-powered tool -- meaning it has the same ‘look and feel’ as Eclipse -- but it’s a product made by the creators of the
Spring framework -- SpringSource -- so it’s specifically designed to fulfill the needs of Spring application development.
13
Warning
■
If you don’t see the ‘Eclipse Marketplace...’ option illustrated in Figure
1-11
it means your Eclipse version
doesn’t support the Eclipse Marketplace. The Eclipse Marketplace is included in all Eclipse packages available from the
Eclipse download page, except the Eclipse classic package.
Once you select the ‘Eclipse Marketplace...’ option a pop-up window appears where you can access and search the Eclipse marketplace.
Figure 1-11. Eclipse Marketplace option
14
Figure 1-12. STS for Eclipse installation
Click on the ‘Install’ button alongside the STS for Eclipse tool to begin the process. Follow the installation wizard. Once you read the license and accept the terms click on the pop-up window’s ‘Finish’ button. The STS for Eclipse tool installation process initiates. Once the installation process finishes, you’ll be prompted to restart Eclipse for the changes to take effect. Confirm the Eclipse restart to finish the STS for Eclipse installation.
15
With the STS for Eclipse tool you gain access to several Spring specific features not available in a regular Eclipse installation. For example, to create a new Spring project from the top level ‘File’ menu select the ‘New’ and then the ‘Project’ option as illustrated in Figure 1-13.
16
A pop-up window appears to create a new project. If you scroll toward the bottom you’ll see the option to create a Spring project as illustrated in Figure 1-14. You can go ahead and create an empty application if you like, you’ll be asked for a name and to define a series of parameters which you can leave with default values.
Figure 1-14. Create new Spring project in Eclipse
A more common case than creating a Spring application from scratch is to continue development of a pre-existing Spring application. Under such circumstances, the owner of an application generally distributes the application’s source code with a build script to facilitate its ongoing development.
The build script of choice for most Java application is a pom.xml file designed around the build tool called Maven and more recently a build.gradle file designed around the build tool called Gradle. The book’s source code and its applications are provided with Gradle build files, in addition to a single application with a Maven build file.
17
Figure 1-15. Maven Integration for Eclipse installation18
19
With access to both maven and gradle from Eclipse, let’s access some of the book’s applications. Once you download the book’s source and unpack it to a local directory, click on the Eclipse top level ‘File’ menu and select the ‘Import...’ option. A pop-up window appears. In the pop-up window, click on the ‘Maven’ icon and select the ‘Existing Maven Projects’ option as illustrated in Figure 1-17.
20
Notice in Figure 1-18 the ‘Projects:’ window is updated to include the line pom.xml com.apress.
springrecipes... which reflects the Maven project to import. Select the project checkbox and click on the ‘Finish’ button to import the project. All projects in Eclipse are accessible on the left-hand side in the ‘Project Explorer’ window. In this case, the project appears with the name sprintro_mvn.
If you click on the project icon in the ‘Project Explorer’ window, you’ll be able to see the project structure (i.e., java classes, dependencies, configuration files, etc.).If you double click on any of the project files inside the ‘Project Explorer’, the file is opened in a separate tab in the center window -- alongside the dashboard. Once a file is opened, you can inspect, edit, or delete its contents.
Select the project icon in the ‘Project Explorer’ window and click on the right button of your mouse. A contextual menu appears with various project commands. Select the ‘Run as’ option followed by the ‘Maven build’ option. A pop-up window appears to edit and configure the project build. Just click on the ‘Run’ button in the bottom right. In the bottom center of Eclipse you’ll see the ‘Console’ window. In this case, the ‘Console’ window displays a series of build messages produced by Maven, as well as any possible errors in case the build process fails.
Figure 1-18. Eclipse select maven project
21
You’ve just built the application, congratulations! Now let’s run it. Select the project icon from the ‘Project Explorer’ window once again and press the F5 key to refresh the project directory. Expand the project tree. Toward the bottom you’ll see a new directory called target which contains the built application. Expand the target directory by clicking on its icon. Next, select the file sprintro_mvn-1.0-SNAPSHOT.jar as illustrated in Figure 1-19.
22
Click on the ‘Run’ button in the bottom right. In the bottom center of Eclipse you’ll see the ‘Console’ window. In this case, the ‘Console’ window displays the application logging messages, as well as a greeting message defined by the application.
Figure 1-20. Define main executable class in Eclipse
23
Next, let’s build a Gradle application with Eclipse. Go to Eclipse’s top level ‘File’ menu and select the ‘Import...’ option. A pop-up window appears. In the pop-up window, click on the ‘Gradle’ icon and select the ‘Gradle Project’ option as illustrated in Figure 1-21.
24
Click on the ‘Finish’ button to import the project. If you look at the left hand side of Eclipse in the ‘Project Explorer’ window you’ll see the project is loaded with the name springintro. If you click on the project icon, you’ll be able to see the project structure (i.e., java classes, dependencies, configuration files, etc.).
Figure 1-22. Eclipse select Gradle subproject
25
Next, click on the ‘Run’ button in the bottom right. In the bottom center of Eclipse you’ll see the ‘Console’ window appear. In this case, the ‘Console’ window displays a series of build messages produced by gradle, as well as any possible errors in case the build process fails.
You’ve just built the application, now let’s run it. Select the project icon once again and press the F5 key to refresh the project directory. Expand the project tree. Toward the middle inside the build directory you’ll see a new directory called libs which contains the built application. Expand the libs directory by clicking on the icon. Next, select the file springintro-1.0-SNAPSHOT.jar.
With the file selected, from Eclipse’s top level ‘Run’ menu select the ‘Run configurations...’ option. A pop-up window appears to edit and configure the run. Ensure the ‘Java application’ option is selected in the left-hand side. In the ‘Main class:’ box introduce com.apress.springrecipes.hello.Main. This is the main class for this project.
Figure 1-23. Eclipse select Gradle ‘build’ option
26
Click on the ‘Run’ button in the bottom right. In the bottom center of Eclipse you’ll see the ‘Console’ window. In this case, the ‘Console’ window displays the application logging messages, as well as a greeting message defined by the application.
1-3. Build a Spring application with the IntelliJ IDE
Problem
You want to use the IntelliJ IDE to build Spring applications.
Solution
To start a new Spring application in the IntelliJ ‘Quick Start’ window click on the ‘Create New Project’ link. In the next window, assign a name to the project, a run-time JDK and select the ‘Java Module’ option. In the next window, click on the various Spring checkboxes so IntelliJ download’s the necessary Spring dependencies for the project.
To open a Spring application that uses Maven, you first need to install Maven to work from a command line interface (See Recipes 1-4). From the IntelliJ top level ‘File’ menu select the ‘Import Project’ option. Next, select the Spring application based on Maven from your workstation. In the next screen select the ‘Import project from external model’ option and select a ‘Maven’ type.
To open a Spring application that uses Gradle, you first need to install Gradle to work from a command line interface (See Recipe 1-5). From the IntelliJ top level ‘File’ menu select the ‘Import Project’ option. Next, select the Spring application based on Gradle from your workstation. In the next screen select the ‘Import project from external model’ option and select a ‘Gradle’ type.
How It Works
IntelliJ is one of the most popular commercial IDEs in the market. Unlike other IDEs which are produced by a foundation -- such as Eclipse -- or are made to support the flagship software of a company -- such as STS for the Spring framework -- IntelliJ is produced by a company called JetBrains whose sole business is to commercialize development tools. It’s this focus which makes IntelliJ particularly popular for professional developers in corporate environments.
For this recipe I’ll assume you’ve already installed IntelliJ ultimate edition and just want to get up and running with Spring applications.
Warning
27
To start a Spring application, in the IntelliJ ‘Quick Start’ window click on the ‘Create New Project’ link. In the next window, assign a name to the project, a run-time JDK and select the ‘Java Module’ option as illustrated in Figure 1-24.
28
A more common case than creating a Spring application from scratch is to continue development of a pre-existing Spring application. Under such circumstances, the owner of an application generally distributes the application’s source code with a build script to facilitate its ongoing development.
The build script of choice for most Java application is a pom.xml file designed around the build tool called Maven and more recently a build.gradle file designed around the build tool called Gradle. The book’s source code and its applications are provided with Gradle build files, in addition to a single application with a Maven build file.
Click on the ‘Next’ button. In the next window, click on the various Spring checkboxes -- as illustrated in Figure 1-25 -- for IntelliJ to download the necessary Spring dependencies for the project.
29
Once you download the book’s source and unpack it to a local directory, click on the IntelliJ top level ‘File’ menu and select the ‘Import Project’ option. A pop-up window appears as illustrated in Figure 1-26.
30
Ensure the project checkbox is selected and click on the ‘Next’ button to import the project. Next, choose the SDK version for the project. Confirm the project name, location and click on the ‘Finish’ button. All projects in IntelliJ are loaded on the left-hand side in the ‘Project’ window. In this case, the project appears with the name springintro_mvn.
If you click on the project icon, you’ll be able to see the project structure (i.e., java classes, dependencies, configuration files, etc.). If you double click on any of the project files inside the ‘Project’ window, the file is opened in a separate tab in the center window. You can inspect the contents of the file, as well as edit or delete its contents.
Next, we need to setup Maven to work with IntelliJ. Follow the instructions in Recipe 1-4 to install Maven to work from the command line. Once you do this, you can setup IntelliJ to work with Maven.
In the next window you’ll see the line 'com.apress.springrecipes:...' as illustrated in Figure 1-28.
Figure 1-27. IntelliJ import project
Figure 1-28. IntelliJ import Maven project
31
Figure 1-29. IntelliJ Maven configuration32
Select the project the ‘Introduction to Spring’ line in the Maven projects window and click on the right button of your mouse. A contextual menu appears with various commands for the project. Select the ‘Run Maven Build’ option. In the bottom center of IntelliJ you’ll see the ‘Run’ window appear. In this case, the ‘Run’ window displays a series of build messages produced by Maven, as well as any possible errors in case the build process fails.
Warning
■
If you see the error message ‘No valid Maven installation found. Either set the home directory in the
configuration dialog or set the M2_HOME environment variable on your system’ it means Maven is not being found by
IntelliJ. Verify the Maven installation and configuration process.
Figure 1-30. IntelliJ Maven projects window
33
You’ve just built the application, congratulations! Now let’s run it. By default, IntelliJ hides the target directory created by Maven to place the built application. You’ll need to deactivate this behavior in order to run the application directly from IntelliJ. Click on the IntelliJ top level ‘File’ menu and select the ‘Settings’ option. A pop-up window appears to configure IntelliJ settings. Double click on the ‘Maven’ option and click on the ‘Importing’ sub-option. Uncheck the box ‘Exclude build directory’ as illustrated in Figure 1-31. Click on the ‘Apply’ button and then click on the ‘OK’ button.
34
Figure 1-32. IntelliJ select application to run
35
Click on the IntelliJ top level ‘Run’ menu and select the ‘Run’ option. A small box appears to configure IntelliJ run configurations. Click on the small box and a pop-up window appears to configure the various types of applications supported by IntelliJ. Click on the ‘Application’ option. Add the com.apress.springrecipes.hello.Main value to the ‘Main class:’ box and ensure the remaining options are similar to Figure 1-33.
36
Click on the ‘Run’ button. In the bottom center of IntelliJ in the ‘Run’ window you’ll see the application logging messages, as well as a greeting message defined by the application.
Now let’s build a Gradle application with IntelliJ. First you need to install Gradle. Follow the instructions in Recipe 1-5 to install Gradle to work from the command line. Once you do this, you can setup IntelliJ to work with Gradle.
Click on the IntelliJ top level ‘File’ menu and select the ‘Import Project’ option. A pop-up window appears as illustrated in Figure 1-26. Click on the directory tree presented in the pop-up window until you select the file
build.gradle in the top level directory of the book’s source code.
Figure 1-34. Define IntelliJ application run
Click on the ‘Apply’ button. The ‘Run’ button is disabled because you’re working with the default run configurations. Click on the plus sign in the top-left of the pop-up window. The left column changes to ‘Add new configuration’, click on the ‘Application’ option. A new application configuration is added. Add the application name
37
Click on the ‘Next’ button. In the next screen select the ‘Import project from external model’ option and select a ‘Gradle’. In the next screen, introduce the Gradle home directory in the ‘Gradle home’ box, based on the Gradle installation of your system. This is illustrated in Figure 1-35.
Figure 1-35. Define Gradle home for IntelliJ
Figure 1-36. IntelliJ JetGradle project window
Click on the ‘Next’ button to confirm the import process and the click on the ‘Finish’ button to complete the import process. Next, on the right hand side of IntelliJ click on the vertical ‘Jet Gradle’ tab to show Gradle. Select the project the ‘springintro’ inside ‘Ch1’ in the projects window as illustrated in Figure 1-36.
38
In the ‘Script path’ box assign the build.gradle file from the Ch1 directory of the book’s source code. In the ‘Module’ box select the ‘Ch1’ option. In the ‘Script parameters:’ box introduce the text build, which is the parameter for the Gradle script. And in the ‘Working directory’ ensure you have the Ch1/springintro directory of the book’s source code.
Click on the ‘Apply’ button. Click on the plus sign in the top-left of the pop-up window. The left column changes to ‘Add new configuration’, click on the ‘Groovy’ option. A new application configuration is added. Add the application name to the ‘springintro’ box as illustrated in Figure 1-37 and click on the ‘Apply’ button once again.
Figure 1-37. IntelliJ Groovy application configuration
39
Figure 1-38. IntelliJ project structure show build folder40
Figure 1-39. IntelliJ select application to run
41
Click on the IntelliJ top level ‘Run’ menu and select the ‘Run...’ option. A small box appears to configure IntelliJ run configurations. Click on the ‘Edit configurations...’ of the small box, a pop-up window appears to configure the various types of applications supported by IntelliJ. Click on the ‘Application’ option inside the ‘Defaults’ list. Add
com.apress.springrecipes.hello.Main to the ‘Main class:’ box and ensure the remaining options are similar to Figure 1-40.
Click on the ‘Apply’ button. The ‘Run’ button is disabled because you’re working with the default run configurations. Click the plus sign in the top-left of the pop-up window. The left column changes to ‘Add new configuration’, click on the ‘Application’ option. A new application configuration is added. Add the application name ‘springintrojar’ to the ‘Name’ box and click on the ‘Apply’ button.
Select the file springintro-1.0-SNAPSHOT.jar inside the libs directory of the build directory once more and click on the right button of your mouse. From the contextual menu select the ‘Add as Library...’ option near the bottom. This is necessary due to Gradle with IntelliJ classpath bug. Finally, from the top level ‘Run’ menu select the ‘Run springintrojar...’ button. In the bottom center of IntelliJ in the ‘Run’ window you’ll see the application logging messages, as well as a greeting message defined by the application.
42
1-4. Build a Spring application with the Maven command
line interface
Problem
You want to build a Spring application with Maven from the command line.
Solution
Download Maven from http://maven.apache.org/download.cgi. Ensure the JAVA_HOME environment variable is set to Java’s SDK main directory. Modify the PATH environment variable to include Maven’s bin directory.
How It Works
Maven is available as a standalone command line interface tool. This allows Maven to be leveraged from a wide variety of development environments. For example, if you prefer to use a text editor like emacs or vi to edit an application’s code, it becomes essential to be able to access a build tool like Maven to automate the grunt work (e.g., copying files, one step compiling) typically associated with the build process for Java applications.
Maven can be downloaded for free from http://maven.apache.org/download.cgi. Maven is available in both source code and binary versions. Since Java tools are cross-platform, I recommend you download the binary version to avoid the additional compilation step. At the time of this writing the latest stable release of Maven is the 3.0.5 version.
Once you download Maven, ensure you have a Java SDK installed on your system as Maven requires it at run-time. Proceed to install Maven by unpacking it and defining the JAVA_HOME and PATH environment variables.
www@ubuntu:~$ tar -xzvf apache-maven-3.0.5-bin.tar.gz apache-maven-3.0.5/boot/plexus-classworlds-2.4.jar apache-maven-3.0.5/lib/maven-embedder-3.0.5.jar apache-maven-3.0.5/lib/maven-settings-3.0.5.jar ....
....
# Add JAVA_HOME variable
www@ubuntu:~$ export JAVA_HOME=/usr/lib/jvm/java-6-openjdk/ # Add Maven executable to PATH variable
www@ubuntu:~$ export PATH=$PATH:/home/www/apache-maven-3.0.5/bin/
Notice the maven binary installation is straightforward. After you unpack the maven binary, you need to define the JAVA_HOME environment so maven has access to Java libraries at run-time. In addition you should also add the maven bin directory to the PATH environment variable so maven is accessible from any location on your system.
Tip
43
The Maven executable is available through the mvn command. If you set the environment variables correctly as described previously, typing mvn from any directory on your system invokes Maven. Describing any more details about Maven execution would go beyond the scope of this recipe. However, next I’ll describe how to use Maven to build a Spring application from the book’s source code.
Once you download the book’s source code and unpack it to a local directory, go to the directory called
Ch1/springintro_mvn. Type mvn to invoke maven and build the application under springintro_mvn. The output should look like the following
www@ubuntu:/www/springrecipes/Ch1/springintro_mvn$ mvn [INFO] Scanning for projects...
[INFO] [INFO] ---[INFO] Building Introduction to Spring 1.0-SNAPSHOT
[INFO] ---[INFO]
[INFO] maven-resources-plugin:2.6:resources (default-resources) @ springintro ---...
... ...
[INFO] ---[INFO] BUILD SUCCESS
[INFO] ---[INFO] Total time: 8.004s
You’ve just built the application, congratulations! Now let’s run it. Descend into the directory called target
created by maven under the Ch1/springintro_mvn directory. You’ll see the file springintro_mvn-1-0.SNAPSHOT.jar
which is the built application. Execute the command java -jar springintro_mvn-1-0.SNAPSHOT.jar to run the application. You’ll see application logging messages, as well as a greeting message defined by the application.
1-5. Build a Spring application with the Gradle command line
interface
Problem
You want to build a Spring application with Gradle from the command line.
Solution
Download Gradle from http://www.gradle.org/downloads. Ensure the JAVA_HOME environment variable is set to Java’s SDK main directory. Modify the PATH environment variable to include Gradle’s bin directory.
How It Works
44
Gradle can be downloaded for free from http://www.gradle.org/downloads. Gradle is available in both source code and binary versions. Since Java tools are cross-platform, I recommend you download the binary version to avoid the additional compilation step. At the time of this writing the latest stable release of Gradle is the 1.11 version.
Once you download Gradle, ensure you have a Java SDK installed on your system as Gradle requires it at run-time. Proceed to install Gradle by unpacking it and defining the JAVA_HOME and PATH environment variables.
www@ubuntu:~$ unzip gradle-1.5-bin.zip Archive: gradle-1.5-bin.zip
creating: gradle-1.5/
inflating: gradle-1.5/getting-started.html inflating: gradle-1.5/LICENSE
inflating: gradle-1.5/NOTICE ....
....
# Add JAVA_HOME variable
www@ubuntu:~$ export JAVA_HOME=/usr/lib/jvm/java-6-openjdk/ # Add Maven executable to PATH variable
www@ubuntu:~$ export PATH=$PATH:/home/www/gradle-1.5/bin/
Notice the Gradle binary installation is straightforward. After you unpack the Gradle binary, you need to define the JAVA_HOME environment so Gradle has access to Java libraries at run-time. In addition you should also add the Gradle bin directory to the PATH environment variable so Gradle is accessible from any location on your system.
Tip
■
If you declare the variables
JAVA_HOMEand
PATHas illustrated previously, you’ll need to do this process every
time you open a new shell session to use Gradle. On Unix/Linux systems you can open the
.bashrcfile inside a user’s
home directory and add the same export lines to avoid the need to declare the environment variables each session.
On Windows systems you can set environment variables permanently by selecting the ‘My Computer’ icon, clicking on
the right mouse button and then selecting the ‘Properties’ option. Then in the pop-up window select the ‘Advanced’ tab
and click on the ‘Environment variables’ button.
The Gradle executable is available through the gradle command. If you set the environment variables correctly as described previously, typing gradle from any directory on your system invokes Gradle. Describing any more details about Gradle execution would go beyond the scope of this recipe. However, since the book’s source code has numerous Spring applications that use Gradle, I’ll describe how to use Gradle to build one of these Spring applications.
Once you download the book’s source and unpack it to a local directory, go to the directory called
Ch1/springintro. Type gradle to invoke Gradle and build the application under springintro. The output should look like the following
www@ubuntu:/www/springrecipes/Ch1/springintro$ gradle :springintro:clean UP-TO-DATE
:springintro:compileJava :springintro:processResources :springintro:classes
:springintro:copyDependenciesToLibDir :springintro:jar
:springintro:assemble
45
:springintro:processTestResources UP-TO-DATE:springintro:testClasses UP-TO-DATE :springintro:test
:springintro:check :springintro:build
BUILD SUCCESSFUL
Total time: 8.975 secs
You’ve just built the application, congratulations! Now let’s run it. Descend into the directory called libs created by gradle under the Ch1/springintro directory. You’ll see the file springintro-1-0.SNAPSHOT.jar which is the built application. Execute the command java -jar springintro-1-0.SNAPSHOT.jar to run the application. You’ll see application logging messages, as well as a greeting message defined by the application.
1.6 Build a Spring application with the Gradle Wrapper
Problem
You want to build a Spring application utilizing the Gradle Wrapper from the command line.
Solution
Run the gradlew script from the command line.
How It Works
Although Gradle (see Recipe 1.5) is available as a standalone command line tool, a lot of (Open Source) projects use the Gradle Wrapper to give you access to Gradle. The advantage of this approach is that the application is completely self-providing. You as a developer don’t need to have Gradle installed, as the Gradle Wrapper will download a specific version of Gradle to build the project.
Once you have a project that utilizes the Gradle Wrapper you can simply type ./gradlew build on the command line to have Gradle automatically download and run the build. The only prerequisite is to have a Java SDK installed as Gradle requires it at run-time and the Gradle Wrapper needs it to run.
Once you download the book’s source code and unpack it to a local directory, go to the directory called
46
TIP
■
The source code from the book can be built with either plain Gradle or by using the Gradle Wrapper. The latter is
preferable as the code will be built using the same Gradle version while developing the samples.
Summary
In this chapter you learned how to set up the most popular development tools to create Spring applications. You explored how to build and run the Spring application with five toolboxes.
Three toolboxes consisted of using IDEs. The Spring Tool Suite distributed by the creators of the Spring Framework. The Eclipse IDE distributed by the Eclipse Software foundation. And the IntelliJ IDE distributed by IntelliJ. Two toolboxes consisted of using command line tools. The Maven build tool and the newer Gradle build tool which is gaining popularity against the Maven build tool.
47
Spring Core Tasks
In this chapter, you’ll learn about the core tasks associated with Spring. At the heart of the Spring framework is the Spring Inversion of Control (IoC) container. The IoC container is used to manage and configure POJOs or Plain Old Java Objects.1 Because one of the primary appeals of the Spring framework is to build Java applications with POJOs,
many of Spring’s core tasks involve managing and configuring POJOs in the IoC container.
So whether you plan to use the Spring framework for web applications, enterprise integration, or some other type of project, working with POJOs and the IoC container is one of the first steps you need to take to work with the Spring framework. The majority of the recipes in this chapter cover tasks that you’ll use throughout the book and on a daily basis to develop Spring applications.
Note
■
The term ‘bean’ is used interchangeably with a POJO instance both in the book and the Spring documentation.
Both refer to an object instance created from a Java class. The term ‘component’ is used interchangeably with a POJO
class both in the book and the Spring documentation. Both refer to the actual Java class from which object instances
are created.
The source code download is organized to use gradle to build the different Recipe applications. Gradle takes care of loading all the necessary Java classes, dependencies and creating an executable. Chapter 1 describes how to setup the Gradle tool. Furthermore, if a Recipe illustrates more than one approach, the source code is classified with various examples with roman letters (e.g., Recipe_2_1_i, Recipe_2_1_ii, Recipe_2_1_iii, etc.).
Note
■
To build each application, go inside the Recipe directory (e.g.,
Ch2/Recipe_2_1_i/) and execute the
gradlecommand to compile the source code. Once the source code is compiled, a
build/libssub-directory is created with the
application executable. You can then run the application JAR from the command line (e.g.,
java -jar Recipe_2_1_i-1.0.SNAPSHOT.jar)1ThetermPOJOmeansanordinaryJavaobjectwithoutanyspecificrequirements,suchastoimplementaninterfaceortoextend
48
2-1. Manage and Configure POJOs with the Spring IoC Container
Problem
You want to manage POJOs with Spring’s IoC container.
Solution
Design a POJO class. Next, configure POJO instance values for the Spring IoC container in an XML file. Next, instantiate the Spring IoC container to gain access to the POJO instance values defined in an XML file. The POJO instances or bean instances become accessible to put together as part of an application.
How It Works
Suppose you are going to develop an application to generate sequence numbers. And that you are also going to need many series of sequence numbers for different purposes. Each sequence will have its own prefix, suffix, and initial value. So you have to create and maintain multiple generator instances for the application.
Create the POJO Class
Let’s create a SequenceGenerator class that has three properties— prefix, suffix, and initial. The class will have a private field counter to store the numeric value of each generator. Each time you call the getSequence() method on a generator instance, you get the last sequence number with the prefix and suffix joined. You declare this last method as synchronized to make it thread-safe.
package com.apress.springrecipes.sequence;
public class SequenceGenerator { private String prefix; private String suffix; private int initial; private int counter;
public SequenceGenerator() {}
public SequenceGenerator(String prefix, String suffix, int initial) { this.prefix = prefix;
this.suffix = suffix; this.initial = initial; }
public void setPrefix(String prefix) { this.prefix = prefix;
}
public void setSuffix(String suffix) { this.suffix = suffix;
}
public void setInitial(int initial) { this.initial = initial;
49
public synchronized String getSequence() {StringBuffer buffer = new StringBuffer(); buffer.append(prefix);
buffer.append(initial + counter++); buffer.append(suffix);
return buffer.toString(); }
}
Note this last SequenceGenerator class can be instantiated by setter methods or by a standard Java constructor. When you use the Spring IoC container to initialize POJOs, if you use the standard Java constructor the mechanism is called constructor injection, where as if you use setter methods the mechanism is called setter injection.
Create a XML Configuration for your POJO
To define instances of a POJO class in the Spring IoC container, you have to create an XML configuration with instantiation values.
Spring XML configuration files can have any name, but by convention we’ll call the configuration file beans.xml. You can put this file in the root of the classpath for easier testing within an IDE.
Tip
■
Spring allows you to configure POJO instances or beans in one or more XML configuration files. For a simple
application, you can just centralize your beans in a single configuration file (e.g.,
beans.xml). But for a large application
with a lot of beans, you should separate them in multiple configuration files according to their functionalities
(e.g., DAOs and controllers). One useful division is by the architectural layer of context services. Recipe 2-3, section
‘Resolve POJO references from multiple locations’ describes this process.
The Spring XML configuration allows you to use custom tags from different schemas (tx, jndi, jee, and so on) to make the bean configuration simpler and clearer. Here’s an example of the simplest XML configuration possible.
<beans xmlns="http://www.springframework.org/schema/beans" xmlns:xsi="http://www.w3.org/2001/XMLSchema-instance"
xsi:schemaLocation="http://www.springframework.org/schema/beans http://www.springframework.org/schema/beans/spring-beans-3.2.xsd"> ...
</beans>
Each POJO instance or bean should have a unique name or id and a fully qualified POJO class name so the Spring IoC container to instantiate it. For each bean property of a simple type (e.g., String and other primitive types), you can specify a <value> element for it. Spring will attempt to convert your value into the declaring type of this property. To configure a property via setter injection, you use the <property> element and specify the property name in its name attribute. A <property> requires that the underlying POJO class contain a corresponding setter method.
<bean name="sequenceGenerator"
class="com.apress.springrecipes.sequence.SequenceGenerator"> <property name="prefix">
50
<property name="suffix"> <value>A</value> </property>
<property name="initial"> <value>100000</value> </property>
</bean>
You can also configure bean properties via constructor injection by declaring them in the <constructor-arg>
elements. Note there’s no name attribute in <constructor-arg>, because constructor arguments are position based.
<bean name="sequenceGenerator"
class="com.apress.springrecipes.sequence.SequenceGenerator"> <constructor-arg>
<value>30</value> </constructor-arg> <constructor-arg> <value>A</value> </constructor-arg> <constructor-arg>
<value>100000</value> </constructor-arg> </bean>
In the Spring IoC container, each bean’s name should be unique for each context. Duplicate names are allowed for overriding bean declaration if more than one context is loaded. The concept of contexts is explained in the next section ‘Instantiate the Spring IoC container’.
Although a bean’s name can be defined by the name attribute of the <bean> element, the preferred way of identifying a bean is through the standard XML id attribute. In this way, if your text editor is XML-aware, it can help to validate each bean’s uniqueness at design time.
<bean id="sequenceGenerator"
class="com.apress.springrecipes.sequence.SequenceGenerator"> ...
</bean>
However, be aware XML has restrictions on the characters that can appear in the XML id attribute. For this reason alone, the name attribute can be helpful if you use such special characters in a bean name. In addition, Spring allows you to specify multiple bean names for the same bean separated by commas in the name attribute, something you can’t do this with the XML id attribute because commas are not allowed.
With respect to bean names it’s also worth mentioning that neither the name attribute nor the id attribute is required. A bean that has no name defined is called an anonymous bean. You will usually create these types of beans for administrative purposes, mainly because application beans are referenced by name or id to be used by other application beans.
Spring also supports a shortcut for specifying the value of a simple type property. You can present a value attribute in the <property> element instead of enclosing a <value> element inside.
<bean id="sequenceGenerator"
class="com.apress.springrecipes.sequence.SequenceGenerator"> <property name="prefix" value="30" />
51
This shortcut also works for constructor arguments.
<bean name="sequenceGenerator"
class="com.apress.springrecipes.sequence.SequenceGenerator"> <constructor-arg value="30" />
<constructor-arg value="A" /> <constructor-arg value="100000" /> </bean>
Spring also has another convenient shortcut to define properties via setter injection. It consists of using the p schema to define bean properties as attributes of the <bean> element. This can shorten the lines of XML configuration.
<beans xmlns="http://www.springframework.org/schema/beans" xmlns:xsi="http://www.w3.org/2001/XMLSchema-instance" xmlns:p="http://www.springframework.org/schema/p"
xsi:schemaLocation="http://www.springframework.org/schema/beans http://www.springframework.org/schema/beans/spring-beans-3.2.xsd">
<bean id="sequenceGenerator"
class="com.apress.springrecipes.sequence.SequenceGenerator" p:prefix="30" p:suffix="A" p:initial="100000" />
</beans>
And Spring also has another convenient shortcut to define properties via constructor injection. It consists of using the c schema to define constructor arguments as attributes of the <bean> element. This can shorten the lines of XML configuration.
<beans xmlns="http://www.springframework.org/schema/beans" xmlns:xsi="http://www.w3.org/2001/XMLSchema-instance" xmlns:c="http://www.springframework.org/schema/c"
xsi:schemaLocation="http://www.springframework.org/schema/beans http://www.springframework.org/schema/beans/spring-beans-3.2.xsd"> <bean id="sequenceGenerator"
class="com.apress.springrecipes.sequence.SequenceGenerator" c:prefix ="30 " c:suffix ="A" c:initial="100000" />
</beans>
Instantiate the Spring IoC Container
To create bean instances, you have to instantiate the Spring IoC container by reading the XML configuration files with bean instantiation values. Then, you can get the bean instances from the IoC container itself.
Spring provides two types of IoC container implementations. The basic one is called bean factory. The more advanced one is called application context, which is compatible with the bean factory. Note the configuration files for these two types of IoC containers are identical.
52
Since ApplicationContext is an interface, you have to instantiate an implementation of it. Spring has several application context implementations, we recommend you use GenericXmlApplicationContext which is the newest and most flexible implementation. With this class you can load the XML configuration file from the classpath.
ApplicationContext context = new GenericXmlApplicationContext("beans.xml");
Once the application context is instantiated, the object reference—in this case context—provides an entry point to access the POJO instances or beans.
Get POJO Instances or Beans from the IoC Container
To get a declared bean from a bean factory or an application context, you just make a call to the getBean() method and pass in the unique bean name. The return type of the getBean() method is java.lang.Object, so you have to cast it to its actual type before using it.
SequenceGenerator generator = (SequenceGenerator) context.getBean("sequenceGenerator");
The getBean() method also supports another variation where you can provide the bean class name to avoid making the cast.
SequenceGenerator generator = context.getBean("sequenceGenerator",SequenceGenerator.class);
Once you reach this step you can use the POJO or bean just like any object created using a constructor outside of Spring.
A Main class for running the sequence generator application would be the following:
package com.apress.springrecipes.sequence;
import org.springframework.context.ApplicationContext;
import org.springframework.context.support.GenericXmlApplicationContext;
public class Main {
public static void main(String[] args) { ApplicationContext context =
new GenericXmlApplicationContext("beans.xml");
SequenceGenerator generator =
(SequenceGenerator) context.getBean("sequenceGenerator");
System.out.println(generator.getSequence()); System.out.println(generator.getSequence()); }
}
If everything is available in the Java classpath (the beans.xml file, SequenceGenerator POJO class and the Spring JAR dependencies), you should see the following output, along with some logging messages: