2 Adobe Photoshop CS6 is a popular image editing software that provides a work environment consistent with Adobe Illustrator, Adobe InDesign, Adobe Photoshop and other products in the Adobe Creative Suite. This tutorial is an introduction to using Adobe Photoshop. Here you will learn how to get started, how to use the interface, and how to modify images with basic editing skills.
1. Begin by opening Adobe Photoshop CS6.
On a PC, click Start > Programs > Adobe > Photoshop CS6, or click on the shortcut on the desktop.
On a Mac, click Go > Applications > Adobe Photoshop CS6 > Photoshop CS6 shown in Figure 1, or click the icon in the Dock.
Figure 1. Navigation to Photoshop CS6 on a Mac
Setting up the document
Setting up your document correctly from the start will make your job much easier as you work through your project. This will require some advanced planning. For example, if your final output will be a brochure, you may need to set up your document to be horizontal and double-sided.
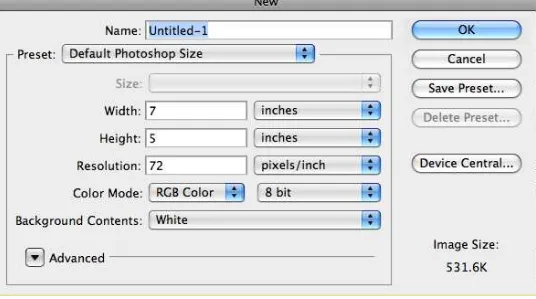
To create a new document, click File > New. This will open the Document Setup dialog box (Figure 2).
4
Figure 2. Document Setup dialog box
Here you will be able to name your file, set up the correct page size and orientation for your document. Options include, but are not limited to:
Page Size and Orientation
Change the page size by typing in new values for width and height. Page size represents the final size you want after bleeds or trimming other marks outside the page. In the Preset dropdown menu you can find such common sizes as letter, legal, tabloid, etc. Typing in exact values for Height and Width gives you more control over the size and orientation of your page.
Resolution
Resolution is the number of pixels on a printed area of an image. The higher the resolution, the more pixels there are on the page, the better the quality of the image. However, high resolution increases the size of the file. The standard recommended resolution for printed images is 150-300, for Web images it is 72.
Color Mode
Choose a color mode that will best fit your project. For example, when making a graphic for a web site, choose RGB. When making an image for print choose CMYK.
Background Contents
Choose the background: white, color or transparent. When you have entered all of your document settings, click Ok.
Opening an image from a disk
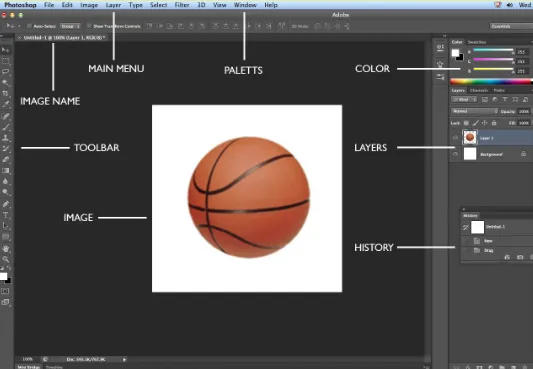
Figure 3. This is the layout of Adobe Photoshop interface.
Menu Bar
If you look at the top of the screen you will see the Menu bar (Figure 3), which contains all the main functions of Photoshop, such as File, Edit, Image, Layer, Select, Filter, Analysis, 3D, View, Window, and
Help.
6 Below is the description of the most commonly used palettes in Adobe Photoshop CS6. Palettes used for more advanced image editing will be covered in the Adobe Photoshop CS6 Tutorial - Intermediate.
Color, Swatches, Style
The Color palette (Figure 4) displays the current foreground and background colors and RGB values for these colors. You can use the sliders to change the foreground and background colors in different color modes. You can also choose a color from the spectrum of colors displayed in the color ramp at the bottom of the palette.
Figure 4. Color palette
In the Swatches palette (Figure 5) you can choose a foreground or background color and add a customized color to the library.
Figure 5. Swatches palette
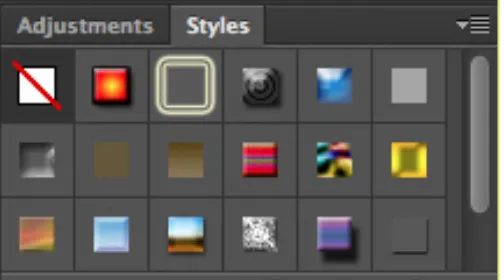
The Styles palette (Figure 6) allows you to view, select, and apply preset layer styles. By default, a preset style replaces the current layer style. You can use the styles in the palette or add your own using the Create New Style icon.
Figure 6. Styles palette
History
The History palette (Figure 7) stores and displays each action performed allowing you jump to any recent stage of the image alteration. The alterations should be created during the current working session. After saving or closing the document, the History palette clears all the contents. Each time you apply a change to an image, the new state of that image is added to the palette. It is important to know that once you click on any of the previ-ous stages, all the changes that were made after it will be lost.
Figure 7. History palette
Adjustments
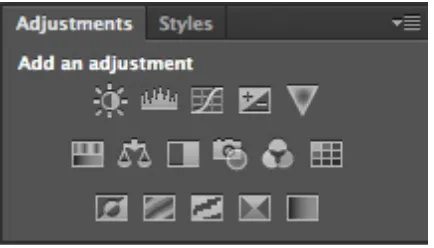
The Adjustment layers palette give you the ability to apply an effect to a group of layers in Photoshop, and then you can edit that effect later, while preserving the original layers.
8 Layers
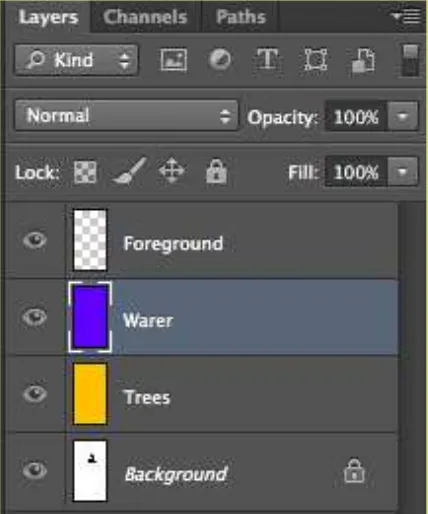
Layers let you organize your work into distinct levels that can be edited and viewed as individual units. Every Photoshop CS6 document contains at least one layer. Creating multiple layers lets you easily control how your artwork is printed, displayed, and edited. You will use the Layers palette (Figure 9) often while creating a docu-ment, so it is crucial to understand what it does and how to use it.
A) Layer Visibility -The eye shows that the selected layer is visible. Click on or off to see or to hide a layer.
B) Layer Locking Options -Click the checkered square icon to lock Transparency, click the brush icon to lock the Image, click the arrow icon to lock the Position, and click the lock icon to lock all options.
C) Layer Blending Mode -Defines how the layer’s pixels blend with underlying pixels in the image. By choosing a particular blending mode from the drop-down menu you can create a variety of special effects.
D) Fill -By typing in a value or dragging the slider you can specify the transparency.
E) Opacity -By typing in a value or dragging the slider, you can specify the transparency of the entire layer.
F) Layer Lock -The icon shows when the layer is locked and disappears when it is unlocked. Double-click the icon to unlock the layer.
G) Layer Options Menu -Click the black triangle to display the following options: New Layer, Duplicate Layer, Delete Layer, Layer Properties, etc. Some of the options are presented as icons at the bottom of the Layers palette.
H) Link Layers – Can be used to link layers together.
I) Layer Styles -If a layer has a style, an “F” icon shows at the bottom of the Layers palette. Click the little black triangle to see style options.
J) Layer Mask -Allows you to hide certain parts of the layer, which can then be revealed by using the paintbrush and the white paint color to expose portions of the layer.
K) Layer Set -This option helps to organize images with multiple layers. Click the icon to create a folder for several layers.
L) Create New Fill or Adjustment Layer -Have the same opacity and blending mode options as image layers and can be rearranged, deleted, hidden and duplicated in the same manner as image layers. Click the icon and select an option to create a new fill or adjustment layer.
M) Create New Layer -Click this icon to create a new layer.
10 If you used other Adobe products, such as Illustrator or InDesign, you should be familiar with the toolbox in Adobe Photoshop CS6 as it shares some of the tools from these applications. If you are a new user of Adobe products, you should keep in mind that you might not need to use all of the tools. In this tutorial, only the basic tools will be discussed in-depth.
Some tools in the toolbar have additional “hidden” tools. These tools have small black triangles in the right-hand corner. To view the “hidden” tools, click and hold down on any tool that has a gray triangle in the corner (Figure 10).
Figure 10. “Hidden” tools
Move
Used to select and move objects on the page.
Click the tool button, then click on any object on the page you wish to move.
Selects an object by drawing a rectangle or an ellipse around it.
Click the tool button, choose a rectangular or an elliptical marquee. Drag the marquee over the area of the image you wish to select.
Selects an object by drawing a freehand border around it.
Click the tool button, drag to draw a freehand border around the are of the image you wish to select.
Selects all objects in a document with the same or similar fill color, stroke weight, stroke color, opacity or blending mode. By specifying the color range or tolerance, you can control what the Magic Wand tool selects.
Click the tool button, then click and drag the tool over the part of the image that you want to keep. Resize the selected area dragging the squares at the sides and corners. Click the Return/Enter key when your crop box is sized correctly.
Takes color samples from colors on the page and displays them in the Color Boxes.
Select the tool, click on the color in the image you wish to sample. The Color Box will
12
Select the tool, hold down the ALT key and left-click on the base color you need to heal. Then left-click over the blemish.
Draws brush strokes of different thicknesses and colors.
Select the tool. Then click on the selected area, drag to draw lines. Use the Options bar to change the brush, mode, opacity and flow.
Takes a sample of an image and applies over another image, or a part of the same image.
Select the tool. Hold down the ALT key and left-click on a certain point of the document where you want to start your copy point. Then, put your mouse over whatever part of the new document you want the picture to go to. Hold down the left mouse button and drag the mouse across the page to copy the picture.
Paints over an image using the source data from a specified history state or snapshot.
Select the tool, specify the brush, blending mode, opacity, style, area and tolerance.
Removes part of an existing path or stroke. You can use the Erase tool on paths. Text can only be erased when rasterized.
Select the tool, click on the part of the image you wish to erase. Drag to erase pixels.
Applies a color fill to a selected part of the image or to an entire layer.
Select a layer you wish to apply the paint bucket to, click the tool button, click on the starting point, and click the area you wish to fill.
Blurs the sharp edges of an image.
Select an area where you wish to apply the tool. Click the tool button and choose the brush, mode, and strength. Drag the brush along the edges.
Path Selection
Select the tool, click anywhere on the path.
Types text on a page. Every time you click the Type Tool on a new portion of the page, a new layer will be created.
Select the type tool, click on the page and begin to type. You can specify the font and size in the Options bar. You can also resize and transform the text box by dragging the squares at the sides and corners. Use the Move Tool to move the text on the page.
Draws smooth-edged paths.
Select the tool, click on the page and drag to draw a path. Click and drag the anchor points to modify the path.
Draws a straight line. Other shapes that are hidden in this tool are: Rounded Rectangle Tool, Ellipse Tool, Polygon Tool, Line Tool, and Custom Shape Tool.
Select the tool, click and drag on the page to draw a line.
Allows you to move around within the image.
Select the tool, click on the spot on the page, hold the mouse button down, drag to move in the area.
7. Drawing and Selection Tools
14 The foreground color appears in the upper color selection box and represents a color that is currently active. The background color appears in the lower box and represents an inactive color.
1. To change the foreground color, click the upper color selection box in the Toolbox.
2. To change the background color, click the lower color selection box in the Toolbox.
3. To reverse the foreground and background colors, click the Switch Colors icon (the arrow) in the toolbox.
4. To restore the default foreground and background colors, click the Default Colors icon (the little black and white boxes) in the toolbox.
Note: If you are using the Gradient Tool, the currently selected foreground and background colors will be the default colors of the gradient.
Now that you know how to find your way around in the Adobe Photoshop CS6 interface and are familiar with the most common commands, palettes, and tools, you can start doing some basic image editing. In the next few chapters of this tutorial you will learn how to crop, resize, correct, and sharpen/blur your images.
Color Boxes
9. Color Boxes and Modes
Cropping is one of the most basic editing techniques that can improve your images. Cropping helps to bring out the most important features in your image and focus the viewers’ attention on these features. Cropping also allows you to make your image a standard photo size.
There are several ways to crop images in Adobe Photoshop: 1. Cropping with the Crop Tool
2. Cropping to a specific size 3. Cropping with the Marquee Tool
Cropping with the Crop Tool
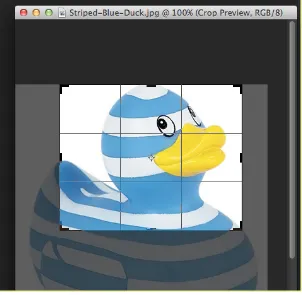
The Crop Tool allows you to make a precise selection of an image you wish to edit. To crop with the Crop Tool, follow these steps:
1. Open the image you wish to crop (see Getting Started for detailed instructions).
2. Select the Crop Tool from the Toolbox (see Selection Tools for location and description). 3. It will automatically select your entire image. Drag the edges to fit the dimensions you desire. (See Figure 11).
16 4. Resize the border by dragging the squares at the sides and corners untill you are satisfied with the way your image looks.
5. Once you are completely satisfied with your cropped image, press Enter.
Note: You can also rotate your cropping border. Move the cursor outside the border, you will see how it turns into a double-headed arrow (Figure 12). Drag the arrows in the directions you wish to rotate your selection.
Figure 12. Rotating the cropping border
Cropping to a specific size
If you wish to print your digital photos or other images on standard size photo paper, you will have to crop your images to a specific size, such as 8x10. To crop an image to a specific size, do the following:
1. Open the image you wish to crop. 2. Select the Crop Tool from the Toolbox.
3. In the Options bar, specify the values for Width and Height (Figure 13).
Figure 13. Crop Tool Options bar
Figure 14. Cropping to a specific size
5. Once you are completely satisfied with your cropped image, press Enter.
Cropping with the Marquee Tool
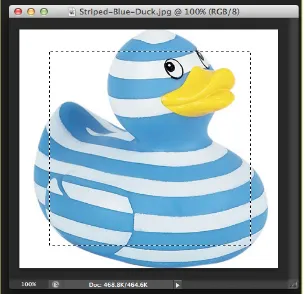
If you are in a hurry and need just a simple crop, you can use the Marquee Tool and a menu command. To crop with the Marquee Tool, follow the steps below:
1. Open the image you wish to crop.
2. Select the Rectangular Marquee Tool from the Toolbox (see Selection Tools).
18
Figure 15. Drawing a marquee
4. In the main menu, go to Image > Crop (Figure 16). The image will be immediately cropped.
Resizing in Photoshop can help you print your images in standard photo sizes, resize and preserve the high quality of digital photos, and enlarge small images to a poster size.
Resizing to a specific size
To resize your image to a preset size, follow the steps below:
1. In the main menu, go to File > New.
2. In the New dialog box, click on the Preset dropdown menu. You will see several preset sizes, such as 2x3, 4x6 and 5x7. Remember that 72 ppi is fine for online images, but a ppi of 150-300 is better for printed images. (Figure 17).
Figure 17. Preset size in the New dialog box
20 Resizing digital photos
Digital photos usually have large dimensions but low resolution, 72 ppi, which affects their quality when their size is decreased or increased. When printed, the photos with the changed size will look pixilated. To resize the digital photos without loosing the quality, follow these steps:
1. Open the digital photo you wish to resize.
2. In the main menu, go to View > Rulers. You will see the dimension of your photo (Figure 18).
Figure 18. Dimensions of a digital photo
3. In the main menu, go to Image > Image Size.
4. In the Image Size dialog box, check the Resample Image box off (Figure 19). Type in your desired resolution (anything between 150 and 300 ppi). The photo is now 3.208 x 3.083 inches.
Enlarging
If you want to make your digital photo into a poster size image, you can do it in the Image Size dialog box. However, just increasing the dimensions will make the image appear blurry and pixilated. To enlarge the image without losing the quality, follow these steps:
1. Open the digital image you wish to enlarge. 2. In the main menu, go to Image > Image Size.
3. In the Image Size dialog box, make sure the Resample Image box is checked off and choose Bicubic Smoother from the dropdown box (Figure 20).
22 Digital cameras tend to cause various problems, such as “red eye” or “hot spots”, if you use flash, or
underexposure, if you don’t. In Photoshop, you can correct these problems, as well as adjust the overall color of your digital photo.
Red Eye Removal
The digital camera flash is located right above the lens, which causes the “red-eye”; however, you can fix your photos easily in Photoshop. To remove the “red eye”, follow the steps below:
1. Open a photo you wish to correct.
2. Select the Zoom Tool from the Toolbox. Click and drag a rectangle around the eye (Figure 21).
Figure 21. Red eye zoomed in
3. Make sure your default Foreground and Background colors are black and white.
4. Click and hold on the little black triangle of the Healing Brush Tool button and select the Red Eye Tool (Figure 22).
Figure 22. Red Eye Tool
5. Click on the red part of the eye and paint, holding down the mouse button. You will see how the red will disappear (Figure 23).
Figure 23. Red eye corrected
Hot Spot Removal
Using a flash can also cause shiny areas on peoples’ faces or the flash to reflect on shiny surfaces. To correct this problem, follow the steps below:
1. Open the photo you wish to correct.
2. Select the Clone Stamp Tool from the Toolbox.
3. In the Options bar, change the Blend Mode from Normal to Darken (Figure 24).
Figure 24. Setting the options for the Clone Stamp Tool
4. Set the Opacity to 50 percent.
5. Choose a soft-edged brush, set the diameter to 40 or 50.
24 Adding Flash
If you took pictures indoors without a flash, they will turn out underexposed and dark. To fix underexposed photos, follow these steps:
1. Open a digital photo you wish to correct (Figure 27).
Figure 27. Underexposed photo
2. In the main menu, go to Layers > Duplicate. In the next window, name the layer Layer 1.
3. Make sure Layer 1 is selected in the Layers palette. Select Image from the menu, select Adjustments and select Exposure (Figure 28). Select the amount of exposure. The whole image will lighten.
4. Keep duplicating Layer 1 untill you are satisfied with the your image (Figure 29).
Figure 29. Corrected photo
Color Adjustment
Color adjustment options in Photoshop CS6 can help you to make your digital photos look more natural. To color correct your images, follow these steps:
1. Open the image you wish to correct.
26 3. Make sure the Preview box is checked off. Choose the channel you wish to change and drag the triangles. Dragging the black triangle to the right will make the shadows in your photo darker.
Dragging the white triangle to the left will make the highlights in your photo lighter, and dragging it to the right will make the midtones darker. You will be able to see the changes in your image. Figure 31 shows an underexposed photo. By correcting the highlights and making the image lighter, we are able to make the photo appear much brighter (Figure 32).
Figure 31. Underexposed photo
Remember to save your work often. Saving frequently lessens the risk of losing the work you have been doing. To save your Photoshop document, do the following:
1. Click File > Save As.
2. Navigate to the place you would like your document to be saved by using the drop down menu and the navigation window.
3. Enter the name of your document in the Save As text field.
4. Choose a format to save your project in from the Format drop-down menu (Figure 33)
