PhoneGap 2.x
Mobile Application
Development
HOTSH T
Create exciting apps for mobile devices using PhoneGap
Kerri Shotts
PhoneGap 2.x Mobile Application
Development HOTSH T
Copyright © 2013 Packt Publishing
All rights reserved. No part of this book may be reproduced, stored in a retrieval system, or transmitted in any form or by any means, without the prior written permission of the publisher, except in the case of brief quotations embedded in critical articles or reviews. Every effort has been made in the preparation of this book to ensure the accuracy of the information presented. However, the information contained in this book is sold without warranty, either express or implied. Neither the author, nor Packt Publishing, and its dealers and distributors will be held liable for any damages caused or alleged to be caused directly or indirectly by this book.
Packt Publishing has endeavored to provide trademark information about all of the companies and products mentioned in this book by the appropriate use of capitals. However, Packt Publishing cannot guarantee the accuracy of this information.
First published: February 2013
Production Reference: 1070213
Published by Packt Publishing Ltd. Livery Place
35 Livery Street
Birmingham B3 2PB, UK. ISBN 978-1-84951-940-3
www.packtpub.com
Credits
Author Kerri Shotts
Reviewers
Steve Husting Johnathan Iannotti Tony Pye
Acquisition Editor
Aarthi Kumaraswamy
Lead Technical Editor
Sweny M. Sukumaran
Technical Editor
Nitee Shetty
Project Coordinator
Abhishek Kori
Proofreader
Sandra Hopper
Indexers
Hemangini Bari Tejal Soni
Graphics
Aditi Gajjar
Production Coordinator
Manu Joseph
About the Author
About the Reviewers
Steve Husting
has been involved in the creation of iPhone and Android apps for several years. During daytime he helps manage the website for his employer’s company and at night he creates iPhone and Android apps to publish his Christian works for the public. He keeps up a hybrid app blogging website, http://iphonedevlog.wordpress.com, to publish his findings and store his notes about all things, PhoneGap/Cordova-related. He met the author of this book on the PhoneGap Google Groups forum, and was deeply appreciative of the breadth of her knowledge and ability to convey it to others.Johnathan Iannotti
is a software engineer and geek on an epic journey of life. He’s loved technology since he was young, writing Atari BASIC programs and surfing BBS’s into the morning hours. Over the years, his passion for technology evolved with the web and later into mobile apps built with both native and web technologies.His experience spans the financial, healthcare, and military industries. He has held positions with the federal government, digital agencies, medical manufacturers, EMR providers, and financial institutions throughout North America. He is also a Combat Veteran having served multiple tours of duty and almost a decade in the U.S. Army.
He spends his free time innovating, creating Arduino gadgets, mobile apps, and riding his motorcycle through the Texas Hill Country.
Tony Pye
has over 10 years of experience in producing web-based solutions. He strives to keep ahead of rapidly evolving web technologies in order to be able to offer innovative solutions.His passion is for matching the business goals with innovative use of technology. As head of digital production at INK Digital Agency, guiding clients through the complex digital world and integrating digital marketing with internal business systems is his specialty. Liaising with the creative and user experience team members, meeting clients, presenting ideas, and help define goals is just part of his normal day at INK. Some of the solutions he has helped to produce have delivered exciting results for companies including Ballymore, Morrisons, Renault, Tarmac, Aviva, LA fitness, and the University of Leeds.
He has also worked on a number of other books as the technical reviewer, including Pro HTML5 Programming, Apress and The Definitive Guide to HTML5 WebSocket, Apress (not yet published).
www.PacktPub.com
Support files, eBooks, discount offers and more
You might want to visit www.PacktPub.com for support files and downloads related to your book.Did you know that Packt offers eBook versions of every book published, with PDF and ePub files available? You can upgrade to the eBook version at www.PacktPub.com and as a print book customer, you are entitled to a discount on the eBook copy. Get in touch with us at [email protected] for more details.
At www.PacktPub.com, you can also read a collection of free technical articles, sign up for a range of free newsletters and receive exclusive discounts and offers on Packt books and eBooks.
http://PacktLib.PacktPub.com
Do you need instant solutions to your IT questions? PacktLib is Packt’s online digital book library. Here, you can access, read and search across Packt’s entire library of books.
Why Subscribe?
f Fully searchable across every book published by Packt
f Copy and paste, print and bookmark content
f On demand and accessible via web browser
Free Access for Packt account holders
Table of Contents
Preface
1
Project 1:
Let's Get Local!
9
What do we build? 9
Designing the app – UI/interactions 14
Designing the data model 20
Implementing the data model 23
Implementing the start view 34
Implementing our game view 41
Implementing the end view 54
Putting it all together 58
Game Over... Wrapping it up 67
Can you take the HEAT? The Hotshot Challenge 68
Project 2:
Let's Get Social!
69
What do we build? 69
Designing the app – UI/interaction design 72
Designing the app – the data model 76
Implementing the data model 77
Configuring the plugins 86
Implementing the social view 93
Implementing the tweet view 101
Game Over... Wrapping it up 108
Can you take the HEAT? The Hotshot Challenge 108
Project 3:
Being Productive
109
What do we build? 109
Designing the user interface 110
Table of Contents
Implementing documents view 125
Implementing the file view 136
Game Over... Wrapping it up 141
Can you take the HEAT? The Hotshot Challenge 141
Project 4:
Let's Take a Trip
143
What do we build? 143
Designing our UI and the look and feel 145
Designing our data model 149
Implementing our data model 151
Changing our document manager 157
Implementing our map view 159
Game Over... Wrapping it up 168
Can you take the HEAT? The Hotshot Challenge 169
Project 5:
Talking to Your App
171
What do we build? 171
Designing the user interface and the look and feel 172
Designing the data model 175
Implementing the data model 177
Implementing gesture support 185
Implementing the main view 194
Game Over... Wrapping it up 206
Can you take the HEAT? The Hotshot Challenge 206
Project 6: Say Cheese!
207
What do we build? 207
Designing the user interface and the look and feel 209
Designing the data model 211
Implementing the document view 213
Implementing the image view 230
Game Over... Wrapping it up 233
Can you take the HEAT? The Hotshot Challenge 234
Project 7: Let's Go to the Movies!
235
What do we build? 235
Preparing for the video thumbnail plugin 237
Implementing the video thumbnail plugin for iOS 240
Implementing the video thumbnail plugin for Android 247
Integrating with the video thumbnail plugin 251
Implementing recording and importing of video 253
Table of Contents
Game Over... Wrapping it up 259
Can you take the HEAT? The Hotshot Challenge 260
Project 8:
Playing Around
261
What do we build? 261
Designing the game 263
Implementing the options view 266
Generating levels 271
Drawing to the canvas 276
Keeping up 279
Performing updates 280
Handling touch-based input 284
Handling the accelerometer 286
Game Over... Wrapping it up 289
Can you take the HEAT? The Hotshot Challenge 291
Project 9: Blending In
293
What do we build? 293
Installing the plugins 294
Adding the navigation bar 298
Adding the tab bar 304
Adding the ActionSheet 308
Adding the message box 310
Adding the picker 312
Adding the e-mail composer 314
Game Over... Wrapping it up 316
Can you take the HEAT? The Hotshot Challenge 316
Project 10: Scaling Up
317
What do we build? 317
Designing the scaled-up UI 318
Implementing the scaled-up UI 321
Designing the split-view UI 326
Implementing the split-view UI 328
Game Over... Wrapping it up 337
Can you take the HEAT? The Hotshot Challenge 338
Appendix A: Quick Design Pattern Reference
339
The navigation list 340
The grid 341
Carousel 1 342
Table of Contents
The login screen 344
The sign-up form 346
The table 347
The list of choices 349
Doing things in bulk 350
Searching 351
Some things to keep in mind 353
Summary 354
Appendix B: Installing ShareKit 2.0
355
Preface
Developing apps for mobile devices can be done using many different approaches and languages. Many apps are developed natively; meaning that they are developed in Java, Objective C, or some other language natively understood by the SDK available for the device. While native development allows the greatest flexibility and performance, the problem arises when you want to move an app from one platform to another: suddenly you're writing the app nearly from scratch. Then if you want to move to another platform, the same thing occurs. There's got to be a better way!All current mobile platforms support the idea of web apps. These are applications coded entirely in HTML and JavaScript. For simple apps, or for apps that don't need to interact with the device's capabilities, this works just fine. But the moment you need to access the file system, work with the camera, and so on, you start needing more access to the device. This is where PhoneGap comes in. PhoneGap (built on Cordova) wraps your HTML and JavaScript with just enough of a native app to let your web app feel more at home on the device. This wrapper is different for each platform, but exposes common capabilities in a consistent way. This helps you to write less code across multiple platforms.
Since PhoneGap is wrapping your HTML and your JavaScript in a native shell, you also gain the ability to submit your app to the platform's app store—something you can't do with just a simple web app. Keep in mind, though, that most app stores want your app to look and feel something like a native app, and some are more strict than others when it comes to how the app should look and feel. Furthermore, don't just wrap your existing website that is hosted on some other server—many app stores will reject these kind of apps. Your app needs to have local HTML and JavaScript that supports the UI and interacts with the device.
This book will hopefully show you how to take PhoneGap and make interesting, even exciting apps that are also cross platform. While we focus only on iOS and Android, the techniques within this book can be easily extended to BlackBerry, Windows Phone, and others with minor modifications.
What this book covers
Project1, Let's Get Local!, introduces us to PhoneGap with a simple quiz game. We'll also be introduced to app localization by making the game available in English as well as in Spanish. We'll also be introduced to the simple framework we'll be using for the rest of the book. Project 2, Let's Get Social!, helps us develop a simple social app that displays feeds from select Twitter accounts. We'll cover plugin installation into PhoneGap, for when we need access to native functionality that PhoneGap doesn't supply.
Project3, Being Productive, introduces us to an app, which like most apps needs to work with the file system for persistent data storage. It is a simple note-taking app and will allow us to fully explore creating, renaming, copying, and deleting files.
Project4, Let's Take a Trip, helps us build an app that records the location of a user over a given period of time. This will require access to the GPS functionality of the device. We'll also need to use Google Maps. We'll build further on the file management introduced in Project 3.
Project5, Talk to Your App, helps us create an app that will record voice memos, and allow the user to play them back at will. Along the way we'll integrate with PhoneGap's audio capture and playback APIs.
Project6, Say Cheese!, covers how to display thumbnails in a memory-efficient manner as display and capture of media is critically important in most apps. We'll also interface with the device's camera and photo gallery.
Project7, Let's Go to the Movies!, is much like Project 6, only here we're dealing with video. We'll be introduced to playing video on iOS and Android (each very different), and we'll also be tasked with recording video. Finally, we'll write our first plugin to extract a thumbnail from the video for display in the app.
Project8, Playing Around, introduces us to a simple game that uses the HTML5 canvas to play a simple game, as there are plenty of apps that do something important, sometimes we just want to have fun. We'll also work with the device's accelerometer.
Project10, Scaling Up, introduces us to the concept of detecting a tablet, since so far each app in this book has been tailored for a phone-sized device but tablets are quite prolific as well. We will also get acquainted with the common design patterns used to scale our app up to a tablet-sized device.
Appendix A, Quick Design Pattern Reference, covers some of the common design patterns used in mobile apps.
Appendix B, Installing ShareKit 2.0, covers all the steps necessary to integrate ShareKit 2.0 with with your projects, because integrating it with iOS can get a bit painful at times.
What you need for this book
To build/run the code supplied for the book, the following software is required (divided by platform where appropriate):
Windows Linux OS X For iOS Apps
IDE XCode 4.5+
OS OS X 10.7+
SDK iOS 5+
For Android Apps
IDE Eclipse 4.x Classic Eclipse 4.x Classic Eclipse 4.x Classic
OS XP or newer Any modern distro
supporting Eclipse and Android SDK— Ubuntu, RHEL, and so on.
OS X 10.6+ (probably works on lower versions)
Java 1.6 or higher 1.6 or higher 1.6 or higher
SDK Version 15+ Version 15+ Version 15+
For All Platforms
Apache Cordova / PhoneGap
2.2 2.2 2.2
Plugins Current Current Current
Version Control* Git (Appdx B) Git (Appdx B) Git (Appdx B)
Websites that can be useful for downloads are as follows:
f Xcode: https://developer.apple.com/xcode/
f iOS SDK: https://developer.apple.com/devcenter/ios/index.action
f Eclipse: http://www.eclipse.org/downloads/packages/eclipse-classic-421/junosr1
f Android SDK: http://developer.android.com/sdk/index.html
f Apache Cordova/PhoneGap: http://phonegap.com/download
f Plugins: https://github.com/phonegap/phonegap-plugins
f Git: http://git-scm.com/downloads
Who this book is for
This book is for any developer who has a good sense of how to develop with HTML and JavaScript but wants to move into mobile app development. The developer should know how to write HTML and have a reasonable understanding of JavaScript. The developer should also be comfortable with setting up a development environment such as Eclipse or Xcode.
This book is also for any native developer who is looking for a way to create apps that can span multiple platforms with limited modifications. PhoneGap is a great tool with which you can build a single HTML/JavaScript codebase that works across many platforms. The examples in this book specifically use PhoneGap 2.2.
Conventions
In this book, you will find several headings appearing frequently.
To give clear instructions of how to complete a procedure or task, we use:
What do we build?
This section explains what you will build.What does it do?
Why is it great?
This section explains why the project is cool, unique, exciting, and interesting. It describes what advantage the project will give you.
How are we going to do it?
This section explains the major tasks required to complete your project.
f Task 1
f Task 2
f Task 3
f Task 4, and so on
What do I need to get started?
This section explains any pre-requisites for the project, such as resources or libraries that need to be downloaded, and so on.
Task 1
This section explains the task that you will perform.
Getting Ready
This section explains any preliminary work that you may need to do before beginning work on the task.
Getting on with it
This section lists the steps required in order to complete the task.
What did we do?
This section explains how the steps performed in the previous section allow us to complete the task.
In this book, you will also find a number of styles of text that distinguish between
different kinds of information. Here are some examples of these styles, and an explanation of their meaning.
Code words in text are shown as follows: "The addTranslation method adds a translation to a specific locale."
A block of code is set as follows:
self.addAnswer = function( theAnswer ) {
self.answers.push ( theAnswer ); return self;
}
When we wish to draw your attention to a particular part of a code block, the relevant lines or items are set in bold:
<div class="navigationBar"> <div id="gameView_title"></div>
<button class="barButton backButton"
id="gameView_backButton" style="left:10px"></button>
</div>
New terms and important words are shown in bold. Words that you see on the screen,
in menus or dialog boxes for example, appear in the text like this: " To the left of the text is a Back button."
Warnings or important notes appear in a box like this.
Reader feedback
Feedback from our readers is always welcome. Let us know what you think about this book—what you liked or may have disliked. Reader feedback is important for us to develop titles that you really get the most out of.
To send us general feedback, simply send an e-mail to [email protected], and mention the book title via the subject of your message.
If there is a topic that you have expertise in and you are interested in either writing or contributing to a book, see our author guide on www.packtpub.com/authors.
Customer support
Now that you are the proud owner of a Packt book, we have a number of things to help you to get the most from your purchase.
Downloading the example code
You can download the example code files for all Packt books you have purchased from your account at http://www.packtpub.com. If you purchased this book elsewhere, you can visit http://www.packtpub.com/support and register to have the files e-mailed directly to you.
Errata
Although we have taken every care to ensure the accuracy of our content, mistakes do happen. If you find a mistake in one of our books—maybe a mistake in the text or the code—we would be grateful if you would report this to us. By doing so, you can save other readers from frustration and help us improve subsequent versions of this book. If you find any errata, please report them by visiting http://www.packtpub.com/ submit-errata, selecting your book, clicking on the erratasubmissionform link,
Piracy
Piracy of copyright material on the Internet is an ongoing problem across all media. At Packt, we take the protection of our copyright and licenses very seriously. If you come across any illegal copies of our works, in any form, on the Internet, please provide us with the location address or website name immediately so that we can pursue a remedy. Please contact us at [email protected] with a link to the suspected pirated material.
We appreciate your help in protecting our authors, and our ability to bring you valuable content.
Questions
Project 1
Let's Get Local!
There are a lot of languages in the world, and chances are good that you want your app to have the widest possible use and distribution, which means that you will need to provide your app with the ability to be multilingual. This can be a thorny task; a lot goes in to localization, translations, currency formats, date formats, and so on. But thankfully, there are some very smart people out there who have already worked through a lot of the pain involved. Now it's up to us to put that work to good use.
What do we build?
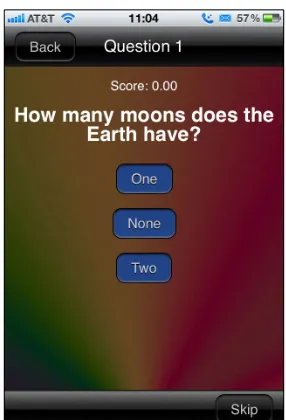
The project that we will create is a simple game entitled Quiz Time! The game will essentially ask the player ten random questions in their native language and then tally and present their score when the game is finished. At the end, the app will ask the user if they want to try again as well.
The app itself will serve to introduce you to creating mobile apps using a simple framework named YASMF (Yet Another Simple Mobile Framework). There are a multitude of fantastic
The app itself will also serve as a foundation to creating localized apps in the future. Localization is absolutely critical to get right, even in the beginning stages of development, which is why we start with it here, and why we assign it such importance. In essence, this first project is intended to make the rest of your app development career easier.
What does it do?
As an app, Quiz Time! is pretty simple. There are only three screens, and only one of them is remotely complex. The game has ten built-in questions that it will randomly ask of the player. If the question is correct, the player is notified, and their score is increased by an arbitrarily large number. This is to show that we correctly handle the display of numbers in the player's locale. If the question is incorrect, we also notify the user, and then decrement their score. If they get enough questions wrong, they'll end up in negative territory, which is another great test for our localization skills.
Once the game is over, we'll display the score and the date to the player, along with the opportunity to try again. If the player does elect to try again, we'll reset everything and start the game over.
Why is it great?
You'll be primarily learning two things: building a simple game in PhoneGap, and localizing that app from the very beginning. A lot of projects forget about localization until near the end of the project, and then the poor developers find out that it is very difficult to shoehorn localization in after most of the project has already been developed. For example, the space assigned to some text might turn out to be too small for certain languages, or the images used as buttons or other widgets might not be large enough to hold the localized text. The app itself might crash in a certain language because it didn't expect to receive any non-English characters. By implementing localization at the start of your app development, you'll be saving yourself a lot of effort down the road, even if the first release of your app is only localized to one locale.
How are we going to do it?
We're going to follow the typical development cycle: design, implement, and test the app. Our design phase won't just include the user interface, but also the data model, that is, how our questions are stored and retrieved. The implementation will focus on our three stages of the app: the start view, the game view, and the end view. After implementation, we'll test the app not only to make sure it properly handles localization but also to make sure that the game works correctly.
Here's the general outline:
f Designing the app, UI/interactions
f Designing the data model
f Implementing the data model
f Implementing the start view
f Implementing the game view
f Implementing the end view
f Putting it all together
What do I need to get started?
First, be sure to download the latest version of PhoneGap fromhttp://phonegap.com/ download, currently 2.2.0 (as this was being written), and extract it to the appropriate directory. (For example, I use /Applications/phonegap/phonegap220.) Make sure that you have also installed the appropriate IDEs (Xcode for iOS development and Eclipse for Android development).
Next, download the latest version of the YASMF framework fromhttps://github.com/ photokandyStudios/YASMF/downloads, and extract it anywhere. (For example, I used my Downloads folder.)
If you want a copy of the projects for this book in order to look at, or to avoid the following project-creation steps, you can download them at https://github.com/ photokandyStudios/phonegap-hotshot.
The following steps are just the steps that I use when setting up a project. You can, of course, structure it however you would like, but you'll need to make any modifications with regards to the file references and the likes on your own.
The following steps assume that you have downloaded PhoneGap (Cordova) 2.2.0. If you download a more recent version, the following steps should work with minimal modification:
Downloading the example code
You can download the example code files for all Packt books you have purchased from your account at http://www.packtpub.com. If you purchased this book elsewhere, you can visit http://www.packtpub.com/support and register to have the files e-mailed directly to you.
1. Use the following code snippet:
3. Search for UIWebViewBounce.
4. Change the <true/> tag just below it to <false/>. 5. Search for ShowSplashScreenSpinner.
6. Change the <true/> tag just below it to <false/>. 7. Search for ExternalHosts.
8. Remove the <array/> line and replace it with "<array>", "<string>*</ string>" and "</array>". This isn't always something you'd want to do for a production app, but as it allows for our apps to access the Internet with no restrictions, it's good for testing purposes.
9. Save the file. 10. Start Eclipse.
11. Navigate to File | New | Project….
12. Select Android Project.
13. Click on Next>.
14. Select the Create project from existing source option.
15. Click on Browse.
16. Navigate to $PROJECT_HOME/Android/QuizTime/. 17. Click on Open.
18. Click on Next>.
19. Uncheck and re-check the highest Google APIs entry. (For some reason, Eclipse
doesn't always keep the correct SDK version when doing this, so you may have to go back after the project is created and reset it. Just right-click any directory,
Configure Build Paths… and go to the Android section. Then you can re-select
the highest SDK.) 20. Click on Next>.
21. Change the Minimum SDK value to 8.
22. Click on Finish.
23. Start Xcode.
24. Navigate to File | Open….
25. Navigate to the project in $PROJECT_HOME/iOS. 26. Click on Open.
When the project is created, the following directory structure results:
f /Android: The Android project
f /iOS: The iOS project
f /www
/cordova: We'll place the PhoneGap support libraries here. /framework: Our framework will be in this directory.
/cultures: Any localization configuration will be placed here. The framework comes with en-US.
/images: All of our images will be in this directory. /views: All of our views will be here.
/models: All of our data models will be here.
/style: Any custom CSS we need to use will live here.
Once you've created the project, you also need to download the jQuery/Globalize repository from https://github.com/jquery/globalize. There's a lot of content there, but we're most interested in the lib directory. Copy the globalize.culture.en-US.js and globalize.culture.es-ES.js files to the www/framework/cultures directory. (If you want, feel free to copy other culture files as well, if you want to try your hand at localizing in a language you know.)
If you are using Eclipse, you must make absolutely certain that all the files you use in the www directory are set to the proper encoding. The easiest way to do this is to right-click on the assets directory, click on Properties, and then click on Other. Select the UTF-8 option from the drop-down list and click on Apply. If you don't do this, it is entirely possible that some of your localized content will not be displayed correctly.
Designing the app – UI/interactions
Getting on with it
The difficulty when it comes to designing an app that can run on more than one platform is that each platform has many different ideas when it comes to how things should look on the screen. There are several ways to approach this; they are discussed as follows:
f You can build the user interface for the majority of your market, and use the exact interface on all the other devices (but be careful; this will often lead to poor reviews).
f You could decide to customize the app's user interface for each device. This often requires a significant amount of work to accomplish and get it just right, but it can be very rewarding, especially when the end user has no idea the app wasn't written just for their own platform.
Our start view is a fairly simple view. At the top of the view we will have a navigation bar containing our app's title. In other views, this bar would often have other buttons in it, including one to go back to the previous view. At the bottom of the view, we will have a toolbar which will contain buttons relevant to the current view.
The app's title will be an image containing the title of the application. This image should be made using a font that's fun and stylistic. The image will be appropriately localized. We'll have one button in the toolbar: a Start button. The text needs to be localized.
Below the navigation bar is the content area. Here we describe what the app will do. We won't have anything terribly fancy here; our space is limited, especially since we are restricted to the phone's screen size. In the future, we'll talk about how to allow content to scroll, but for now we'll keep it short and simple.
We do want to add a little bit of pizazz to the view, so we'll add a color splash to the background. You could make this anything you want, we'll go with rays of color shooting up from the bottom.
Our game view looks like the following screenshot:
At the top, our navigation bar will indicate the current question number. This lets the player know how many questions they've answered. To the left of the text is a Back button. If clicked,
it should take the player back to the start view.
At the bottom, our toolbar contains a single button: Skip. This button will allow the player to
skip any question they don't want to answer. For now, we won't assign any penalty to skipping a question, but you could always add a score deduction or something worse if you wanted to do so. If you removed the button entirely, it would be wise to remove the toolbar as well. In the middle is our content area, the most complex portion of the view; at the top we have the player's score, which needs to be localized. Below it is the question being asked, again, properly localized.
Below the question, we have several buttons; these need to be generated dynamically based on the question being asked. Not every question will have three answers; there may be some with two answers or some with four or more. The answers themselves also need to be properly localized.
Tapping a button will check to see if the button is labeled with the correct answer. If it is, we'll display a nice notice and increment the score. If it isn't, we'll indicate such and decrement the score.
The end view is similar to the start view in that it isn't terribly complex, but it does have a little more going on. It needs to properly display the final score and permit the player to play the game again.
The navigation bar contains the text Results and also a Back button. If tapped, it is the
same thing as starting the game all over again.
The toolbar contains the TryAgain? button. If tapped, it also starts the game again.
In the content area, we display a message containing the final score, and the date when it was achieved.
Of course, all of the content on the view needs to be properly localized. Numbers are hard enough; dates are even worse. It's a good thing that we have jQuery/Globalize to fall back on, or we'd have to do the hard work of localizing the date ourselves.
Now that we've sketched the user interface, it's time to start building some of the resources we'll need in our app. Open up your graphics editor and build a template of what any one of the views would look like. What we're doing here is determining what parts of the display will need to have images generated, and what parts will be able to be text or CSS-generated. It's not super critical that you have the exact dimensions of any specific device. After all, the app can run on many different devices, each of which has a different screen size. We'll use 640 x 920 px, which just happens to be the available area on the screen for an iPhone 4 with a Retina display.
You do need to design using a high-enough resolution to get Retina-quality assets out of the design. That is, if you expect an icon to be 32 x 32 px, you will actually want it to be 64 x 64 px. Now whether you build on an exact size is up to you, but it's best to target the device you think will get the most use.
There's a little bit of a texture there. While it's possible to do this in CSS, it's easiest to use images instead. The texture itself is tile-able and so it can adapt to any screen size. The navigation bar should be placed in the images directory and named NavigationBar.png. Notice the title? While this could also be handled by CSS and adding the font to your app, that gets into a lot of sticky licensing issues. Instead, we'll use an image of it, which means the font itself will never get distributed. The title should be placed in the images directory and named AppTitle-enus.png. The Spanish version (which should read ¡Examen
Tiempo!) should be named AppTitle-eses.png.
The background will also be an image, though you could likely approximate it with CSS (though getting the texture there would be a bit painful). Since we're supporting many platforms and screen sizes, the image approach is the best. This image should be saved in the images directory and named Background.jpg.
We'll build the app so that the image stretches to fill the screen. There will be some minor distortion, of course, but since this image is just a color splash, it doesn't really matter. (Other options include creating the background at various resolutions, or to create a tile-able background that fills easily to any resolution.)
The middle area is where everything else will go, the player's score, the current question, the answers to the question, and so on. Since all of that is easily achievable with HTML, CSS, and JavaScript, we're not going to worry about putting those elements into the template.
What did we do?
In this task we designed our user interface and also spelled out the interaction between the various views and widgets. We indicated what parts we knew would need to be localized (everything!) and then drew up a pretty version of it in our favorite graphics editor. From this version we can splice the various elements that need to be saved as images while also identifying what portions can be rendered with HTML, CSS, and JavaScript.
Designing the data model
The data model is very important to get right: this is how we'll store our questions, the answers to those questions, and which answer is the correct answer for each of the questions. We'll also define how we should interact with the model, that is, how do we get a question, ask it if the answer is correct, and so forth.
Getting ready
Let's get out our pencil and paper again, or if you'd prefer, a diagramming tool that you're comfortable with. What we're really trying to do in this step is to come up with the properties the model needs in order to store the questions, and the interactions it will need in order to properly do everything we're asking of it.
Getting on with it
We'll essentially have two data models: a single question, and a collection of questions. Let's start with what the question model should do:
f Store the actual question
f Have a list of all the possible answers
f Know the correct answer
f Set the question when created
f Return the question when asked
f Return the list of answers when asked (in a random order)
f Set the correct answer
f Give the correct answer when asked
f Return a specific answer in the list when asked
f Check if a given answer is correct
f Return the number of answers
We can indicate this by creating a simple diagram as follows:
Our collection of questions should:
f Have a list of all the questions
f Be able to add a question to that list
f Return the total number of questions in the list
The diagram covering these points would look like the following screenshot:
Having both of the models defined, let's come up with the questions we're going to ask, as well as the answers that will go along with them (for the full list of questions, see chapter1/www/models/quizQuestions.js in the download for this book):
# English Spanish
1 What is the color of the Sun? ¿Cuál es el color del Sol?
Green
White
Yellow (correct)
Verde
Blanco
Amarillo (correct)
2 What is the name of the fourth planet? ¿Cuál es el nombre del cuarto planeta?
Mars (correct)
Venus
Mercury
Marzo (correct)
Venus
Mercurio
With the design of our model complete, and the questions we're going to ask, this task is complete. Next we'll write the code to implement the model.
What did we do?
Implementing the data model
We'll be creating two JavaScript files in the www/models directory named quizQuestion.js and quizQuestions.js. The file quizQuestion.js will be the actual model: it will specify how the data should be formatted and how we can interact with it. quizQuestions.js will contain our actual question data.
Getting on with it
Before we define our model, let's define a namespace where it will live. This is an important habit to establish since it relieves us of having to worry about whether or not we'll collide with another function, object, or variable of the same name.
While there are various methods used to create a namespace, we're going to do it simply using the following code snippet:
// quizQuestion.js
var QQ = QQ || {};
Now that our namespace is defined, we can create our question object as follows:
QQ.Question = function ( theQuestion ) {
var self = this;
Note the use of self: this will allow us to refer to the object using self rather than using this. (Javascript's this is a bit nuts, so it's always better to refer to a variable that we know will always refer to the object.)
Next, we'll set up the properties based on the diagram we created from step two using the following code snippet:
We've set the self.correctAnswer value to -1 to indicate that, at the moment, any answer provided by the player is considered correct. This means you can ask questions where all of the answers are right.
Our next step is to define the methods or interactions the object will have. Let's start with determining if an answer is correct. In the following code, we will take an incoming answer and compare it to the self.correctAnswer value. If it matches, or if the self. correctAnswer value is -1, we'll indicate that the answer is correct:
self.testAnswer = function( theAnswerGiven ) {
We're going to need a way to access a specific answer, so we'll define the answerAtIndex function as follows:
self.answerAtIndex = function ( theIndex ) {
return self.answers[ theIndex ]; }
To be a well-defined model, we should always have a way of determining the number of items in the model as shown in the following code snippet:
self.answerCount = function () {
return self.answers.length; }
Next, we need to define a method that allows an answer to be added to our object. Note that with the help of the return value, we return ourselves to permitting daisy-chaining in our code:
self.addAnswer = function( theAnswer ) {
self.answers.push ( theAnswer ); return self;
In theory we could display the answers to a question in the order they were given to the object. In practice, that would turn out to be a pretty boring game: the answers would always be in the same order, and chances would be pretty good that the first answer would be the correct answer. So let's give ourselves a randomized list using the following code snippet:
The randomized list is just an array of numbers that indexes into the answers[] array. To get the actual answer, we'll have to use the answerAtIndex() method.
Our model still needs a way to set the correct answer. Again, notice the return value in the following code snippet permitting us to daisy-chain later on:
self.setCorrectAnswer = function ( theIndex ) {
self.correctAnswer = theIndex; return self;
}
Now that we've properly set the correct answer, what if we need to ask the object what the correct answer is? For this let's define a getCorrectAnswer function using the following code snippet:
self.getCorrectAnswer = function () {
return self.correctAnswer; }
Of course, our object also needs to return the question given to it whenever it was created; this can be done using the following code snippet:
self.getQuestion = function() {
return self.question; }
}
That's it for the question object. Next we'll create the container that will hold all of our questions using the following code line:
QQ.questions = Array();
We could go the regular object-oriented approach and make the container an object as well, but in this game we have only one list of questions, so it's easier to do it this way.
Next, we need to have the ability to add a question to the container, this can be done using the following code snippet:
QQ.addQuestion = function (theQuestion) {
Like any good data model, we need to know how many questions we have; we can know this using the following code snippet:
QQ.count = function () {
return QQ.questions.length; }
Finally, we need to be able to get a random question out of the list so that we can show it to the player; this can be done using the following code snippet:
QQ.getRandomQuestion = function () {
var theQuestion = Math.floor (Math.random() * QQ.count()); return QQ.questions[theQuestion];
}
Our data model is officially complete. Let's define some questions using the following code snippet:
// quizQuestions.js //
// QUESTION 1 //
QQ.addQuestion ( new QQ.Question ( "WHAT_IS_THE_COLOR_OF_THE_SUN?" ) .addAnswer( "YELLOW" )
.addAnswer( "WHITE" ) .addAnswer( "GREEN" ) .setCorrectAnswer ( 0 ) );
Notice how we attach the addAnswer and setCorrectAnswer methods to the new question object. This is what is meant by daisy-chaining: it helps us write just a little bit less code.
You may be wondering why we're using upper-case text for the questions and answers. This is due to how we'll localize the text, which is next:
PKLOC.addTranslation ( "en", "WHAT_IS_THE_COLOR_OF_THE_SUN?", "What is the color of the Sun?" );
PKLOC.addTranslation ( "en", "YELLOW", "Yellow" ); PKLOC.addTranslation ( "en", "WHITE", "White" ); PKLOC.addTranslation ( "en", "GREEN", "Green" );
PKLOC.addTranslation ( "es", "YELLOW", "Amarillo" ); PKLOC.addTranslation ( "es", "WHITE", "Blanco" );
PKLOC.addTranslation ( "es", "GREEN", "Verde" );
The questions and answers themselves serve as keys to the actual translation. This serves two purposes: it makes the keys obvious in our code, so we know that the text will be replaced later on, and should we forget to include a translation for one of the keys, it'll show up in uppercase letters.
PKLOC as used in the earlier code snippet is the namespace we're using for our localization library. It's defined in www/framework/localization.js. The addTranslation method is a method that adds a translation to a specific locale. The first parameter is the locale for which we're defining the translation, the second parameter is the key, and the third parameter is the translated text.
The PKLOC.addTranslation function looks like the following code snippet:
PKLOC.addTranslation = function (locale, key, value) {
if (PKLOC.localizedText[locale]) {
PKLOC.localizedText[locale][key] = value; }
else {
PKLOC.localizedText[locale] = {};
PKLOC.localizedText[locale][key] = value; }
}
The addTranslation method first checks to see if an array is defined under the PKLOC. localizedText array for the desired locale. If it is there, it just adds the key/value pair. If it isn't, it creates the array first and then adds the key/value pair. You may be wondering how the PKLOC.localizedText array gets defined in the first place. The answer is that it is defined when the script is loaded, a little higher in the file:
PKLOC.localizedText = {};
Continue adding questions in this fashion until you've created all the questions you want. The quizQuestions.js file contains ten questions. You could, of course, add as many as you want.
What did we do?
What else do I need to know?
Before we move on to the next task, let's cover a little more of the localization library we'll be using. Our localization efforts are split into two parts: translation and data formatting. For the translation effort, we're using our own simple translation framework, literally just an array of keys and values based on locale. Whenever code asks for the translation for a key, we'll look it up in the array and return whatever translation we find, if any. But first, we need to determine the actual locale of the player, using the following code snippet:
// www/framework/localization.js
PKLOC.currentUserLocale = "";
PKLOC.getUserLocale = function() {
Determining the locale isn't hard, but neither is it as easy as you would initially think. There is a property (navigator.language) under WebKit browsers that is technically supposed to return the locale, but it has a bug under Android, so we have to use the userAgent. For WP7, we have to use one of three properties to determine the value.
Because that takes some work, we'll check to see if we've defined it before; if we have, we'll return that value instead:
if (PKLOC.currentUserLocale) {
return PKLOC.currentUserLocale; }
Next, we determine the current device we're on by using the device object provided by Cordova. We'll check for it first, and if it doesn't exist, we'll assume we can access it using one of the four properties attached to the navigator object using the following code snippet:
var currentPlatform = "unknown"; if (typeof device != 'undefined') {
currentPlatform = device.platform; }
We'll also provide a suitable default locale if we can't determine the user's locale at all as seen in the following code snippet:
Next, we handle parsing the user agent if we're on an Android platform. The following code is heavily inspired by an answer given online at http://stackoverflow. com/a/7728507/741043.
if (currentPlatform == "Android") {
var userAgent = navigator.userAgent;
var tempLocale = userAgent.match(/Android.*([a-zA-Z]{2}-[a-zA-Z] {2})/);
if (tempLocale) {
userLocale = tempLocale[1]; }
}
If we're on any other platform, we'll use the navigator object to retrieve the locale as follows:
else {
userLocale = navigator.language ||
navigator.browserLanguage || navigator.systemLanguage || navigator.userLanguage; }
Once we have the locale, we return it as follows:
PKLOC.currentUserLocale = userLocale; return PKLOC.currentUserLocale; }
Translation of text is accomplished by a convenience function named __T(). The convenience functions are going to be our only functions outside of any specific namespace simply because we are aiming for easy-to-type and easy-to-remember names that aren't arduous to add to our code. This is especially important since they'll wrap every string, number, date, or percentage in our code.
The __T() function depends on two functions: substituteVariables and lookupTranslation. The first function is defined as follows:
PKLOC.substituteVariables = function ( theString, theParms ) {
var currentValue = theString;
// handle replacement variables if (theParms)
{
for (var i=1; i<=theParms.length; i++) {
currentValue = currentValue.replace("%" + i, theParms[i-1]); }
}
return currentValue; }
All this function does is handle the substitution variables. This means we can define a translation with %1 in the text and we will be able to replace %1 with some value passed into the function.
The next function, lookupTranslation, is defined as follows:
PKLOC.lookupTranslation = function ( key, theLocale ) {
var userLocale = theLocale || PKLOC.getUserLocale();
if ( PKLOC.localizedText[userLocale] ) {
if ( PKLOC.localizedText[userLocale][key.toUpperCase()] ) {
return PKLOC.localizedText[userLocale][key.toUpperCase()]; }
}
Essentially, we're checking to see if a specific translation exists for the given key and locale. If it does, we'll return the translation, but if it doesn't, we'll return null. Note that the key is always converted to uppercase, so case doesn't matter when looking up a translation. Our __T() function looks as follows:
function __T(key, parms, locale) {
var userLocale = locale || PKLOC.getUserLocale(); var currentValue = "";
First, we determine if the translation requested can be found in the locale, whatever that may be. Note that it can be passed in, therefore overriding the current locale. This can be done using the following code snippet:
if (! (currentValue=PKLOC.lookupTranslation(key, userLocale)) ) {
Locales are often of the form xx-YY, where xx is a two-character language code and YY is a two-character character code. My locale is defined as en-US. Another player's might be defined as es-ES.
If you recall, we defined our translations only for the language. This presents a problem: the preceding code will not return any translation unless we defined the translation for the language and the country.
Sometimes it is critical to define a translation specific to a language and a country. While various regions may speak the same language from a technical perspective, idioms often differ. If you use an idiom in your translation, you'll need to localize them to the specific region that uses them, or you could generate potential confusion.
Therefore, we chop off the country code, and try again as follows:
userLocale = userLocale.substr(0,2);
But we've only defined translations for English (en) and Spanish(es)! What if the player's locale is fr-FR (French)? The preceding code will fail, because we've not defined any translation for the fr language (French). Therefore, we'll check for a suitable default, which we've defined to be en-US, American English:
userLocale = "en-US";
if (! (currentValue=PKLOC.lookupTranslation(key, userLocale)) ) {
Of course, we are now in the same boat as before: there are no translations defined for en-US in our game. So we need to fall back to en as follows:
userLocale = "en";
if (! (currentValue=PKLOC.lookupTranslation(key, userLocale)) ) {
But what happens if we can't find a translation at all? We could be mean and throw a nasty error, and perhaps you might want to do exactly that, but in our example, we're just returning the incoming key. If the convention of capitalizing the key is always followed, we'll still be able to see that something hasn't been translated.
currentValue = key; }
} } }
Finally, we pass the currentValue parameter to the substituteVariables property in order to process any substitutions that we might need as follows:
return PKLOC.substituteVariables( currentValue, parms );
Implementing the start view
To create our view, we need to create the file for it first. The files should be called startView.html, and should live under the www/views directory. The view we're creating will end up looking like the following screenshot for iOS:
Before we actually create the view though, let's define the structure of our view. Depending upon the framework in use, the structure of a view can be vastly different. For the YASMF framework, our view will consist of some HTML that will depend on some pre-defined CSS, and some JavaScript defined below that same HTML. You could easily make the case that the JavaScript and inline styles should be separated out as well, and if you wish, you can do so. The HTML portion for all our views will be of the following form:
<div class="viewBackground"> <div class="navigationBar">
<div id="theView_AppTitle"></div> <button class="barButton backButton"
id="theView_backButton" style="left:10px" ></button> </div>
<div class="content avoidNavigationBar avoidToolBar" id="theView_anId">
</div>
<div class="toolBar">
<button class="barButton" id="theView_aButton" style="right:10px"></button>
</div> </div>
As you can see, there's no visible text anywhere in this code. Since everything must be localized, we'll be inserting the text programmatically via JavaScript.
The viewBackground class will be our view's container: everything related to the view's structure is defined within. The style is defined in www/framework/base.css
and www/style/style.css; the latter is for our app's custom styles.
The navigationBar class indicates that the div class is just a navigation bar. For iOS users, this has instant meaning, but it should be pretty clear to everyone else: this bar holds the title of the view, as well as any buttons that serve for navigation (such as a back button). Notice
Finally, the toolbar is defined. This is a bar much like the navigation bar, but is intended to hold buttons that are related to the view. For Android this would be commonly shown near or at the top of the screen, while for iPhone and WP7 display this bar is at the bottom. (iPad, on the other hand, would display this just below the navigation bar or on the navigation bar. We'll worry about that in Project 10, Scaling Up.)
Below this HTML block, we'll define any templates we may need for localization, and then finally, any JavaScript we need.
Getting on with it
With these pointers in mind, let's create our start view, which should be named startView. html in the www/views directory as follows:
<div class="viewBackground"> <div class="navigationBar">
<div id="startView_AppTitle"></div> </div>
<div class="content avoidNavigationBar avoidToolBar" id="startView_welcome">
</div>
<div class="toolBar">
<button class="barButton" id="startView_startButton" style="right:10px"></button>
</div> </div>
The preceding code looks almost exactly like our view template defined earlier except that we're missing a back button. This is due to the fact that the first view we display to the user doesn't have anything to go back to, so we omit that button. The id values have also changed to include the name of our view.
None of these define what our view will look like, though. To determine that, we need to override our framework styles in www/framework/base.css by setting them in www/ style/style.css.
First, to define the look of navigationBar, we use the glossy black bar from our template defined earlier in this project as follows:
The toolbar is defined similarly as follows:
.toolBar {
background-image: url(../images/ToolBar.png); }
The view's background is defined as follows:
.viewBackground {
background-image: url(../images/Background.jpg); background-size: cover;
}
That's everything needed to make our start view start to look like a real app. Of course, there's a lot of pre-built stuff in www/framework/base.css, which you're welcome to analyze and reuse in your own projects.
Now that we've defined the view and the appearance, we need to define some of the view's content. We're going to do this by using a couple of hidden div elements that have the locale attached to their id values, as follows:
<div id="startView_welcome_en" class="hidden"> <h2>PhoneGap-Hotshot Sample Application</h2> <h3>Chapter 1: Let's Get Local!</h3>
<p>This application demonstrates localization between two languages, based on your device's language settings. The two languages implemented are English and Spanish.</p>
</div>
<div id="startView_welcome_es" class="hidden"> <h2>Ejemplo de aplicación de PhoneGap-Hotshot</h2> <h3>Capítulo 1: Let's Get Local!</h3>
<p>Esta aplicación muestra la localización
entre los dos idiomas, sobre la base de su dispositivo de la configuración de idioma. Las dos lenguas aplicadas son Inglés y Español.</p>
</div>
Next comes the JavaScript as follows:
<script>
var startView = $ge("startView") || {}; // properly namespace
Our first act is to put all our script into a namespace. Unlike most of our other namespace definitions, we're actually going to piggyback onto the "startView" element (which the astute reader will notice has not been defined yet; that'll be near the end of this project). While the element is a proper DOM element, it also serves as a perfect place for us to attach to, as long as we avoid any of the cardinal sins of using the DOM method names as our own, which, I promise, we won't do.
You might be wondering what $ge does. Since we're not including any JavaScript framework like jQuery, we don't have a convenience method to get an element by its ID. jQuery does this with the $() method, and because you might actually be using jQuery along with the framework we're using, I chose to use the $ge() method, short for get element. It's defined in www/framework/utility.js like the following code snippet and all it does is act as a shortened version of document.getElementById:
function $ge ( elementId ) {
return document.getElementById ( elementId ); }
Getting back to our start view script, we define what needs to happen when the view is initialized. Here we hook into the various buttons and other interface elements that are in the view, as well as localize all the text and content as follows:
startView.initializeView = function () {
PKLOC.addTranslation ("en", "APP_TITLE_IMAGE", "AppTitle-enus.png");
PKLOC.addTranslation ("es", "APP_TITLE_IMAGE", "AppTitle-eses.png");
startView.applicationTitleImage = $ge("startView_AppTitle");
startView.applicationTitleImage.style.backgroundImage = "url('./images/" + __T("APP_TITLE_IMAGE") + "')";
PKLOC.addTranslation ("en", "START", "Start"); PKLOC.addTranslation ("es", "START", "Comenzar");
startView.startButton = $ge("startView_startButton"); startView.startButton.innerHTML = __T("START");
Now we've properly localized our start button, but how do we make it do anything? We use a little function defined in www/framework/ui-core.js called PKUI.CORE. addTouchListener() as follows:
PKUI.CORE.addTouchListener( startView.startButton, "touchend", startView.startGame );
Finally, we need to display the correct welcome text in the content area using the following code snippet:
var theWelcomeContent = $geLocale("startView_welcome"); $ge("startView_welcome").innerHTML =
theWelcomeContent.innerHTML; }
We now introduce another convenience function: the $geLocale() function. This function acts like the $ge() function, except that it assumes there will be a locale appended to the ID of the element we're asking for. It's defined in the same file (utility.js) and looks like the following:
function $geLocale ( elementId ) {
var currentLocale = PKLOC.getUserLocale();
var theLocalizedElementId = elementId + "_" + currentLocale; if ($ge(theLocalizedElementId)) { return
$ge(theLocalizedElementId); }
theLocalizedElementId = elementId + "_" + currentLocale.substr(0,2);
if ($ge(theLocalizedElementId)) { return $ge(theLocalizedElementId); }
theLocalizedElementId = elementId + "_en-US"; if ($ge(theLocalizedElementId)) { return $ge(theLocalizedElementId); }
if ($ge(theLocalizedElementId)) { return $ge(theLocalizedElementId); }
return $ge( elementId ); }
Much like our __T() function, it attempts to find an element with our full locale attached (that is, _xx-YY). If it can't find it, it tries _xx, and here it should succeed if our locale is English- or Spanish-speaking. If it isn't, we'll then look for _en-US, and if that isn't found, we'll look for _en. If no suitable element is found, we'll return the original element –which in our case doesn't exist, which means we'll return "undefined".
Next up in our start view script, we have the function that is called whenever the start button is tapped as shown in the following code snippet:
startView.startGame = function() {
PKUI.CORE.pushView ( gameView ); }
</script>
Real short, but packs a punch. This displays our game view to the player, which actually starts the game. For devices that support it (as this was being written, iOS and Android), the player also sees a nice animation between this view (start) and the next one (game).
If you want to know more about how the pushView() method works, visit
https://github.com/photokandyStudios/YASMF/wiki/PKUI.CORE.pushView.
Whew! That was a lot of work for a pretty simple view. Thankfully, most of the work is actually done by the framework, so our actual startView.html file is pretty small.
What did we do?
We implemented our start view, which is presented to the player when they first launch the app. We properly localized the view's title image based on the player's locale, and we also properly localized HTML content based on the locale.
We defined the various hooks and text for the widgets on the view such as the Start button,
and attached touch listeners to the them to make them function correctly.
What else do I need to know?
It probably doesn't take much to guess, but there are several complementary functions to the pushView method: popView, showView, and hideView.
The popView function does the exact opposite of pushView, that is, it moves the views right (instead of left) by popping them off the view stack.
TheshowView and hideView functions do essentially the same thing, but simpler. They don't do any animation at all. Furthermore, since they don't involve any other view on the stack, they are most useful at the beginning of an app when we have to figure out how to display our very first view with no previous view to animate. If you want to know more about view management, you might want to visit https://github.com/photokandyStudios/YASMF/wiki/Understanding-the-View-Stack-and-View-Management and explore https://github.com/ photokandyStudios/YASMF/wiki/PKUI.CORE.
Implementing our game view
For Android, the view will look like the following screenshot:
The view stack is really just a stack that maintains the list of previously visible views and the currently visible view. When our app first starts, the stack will be empty as identified in the first step in the preceding screenshot. Then, the startView view is pushed onto the stack using the showView method, and you have the stack in (2). When the player taps the Start
button, the gameView view is pushed onto the stack, which results in the stack as seen in (3). Then, when the game is over, we'll push the endView view on the stack, resulting in (4). Because we're tracking all these views, including the ones that are no longer visible (especially at the end of the game), it makes it easy to go back to a previous view. For iOS, this is done via the back button. For Android, the device often has a physical back button that is used instead.
Regardless of how a back event is triggered, we need to be able to go backwards in the stack. Let's say that the user now decides to go back in the stack; we would have the stack in (5). If they decide to go back another step, (6) would result. At this point, iOS would permit no further backtracking, but for Android, another back event should exit the user out of the app.
Getting on with it
The game view will be very similar to our start view, except that it is a little more complicated. After all, it plays an entire game. Thankfully, there's really nothing terribly new here, so it should be smooth going.
Let's start with the HTML portion of the view given as follows:
<div class="viewBackground"> <div class="navigationBar"> <div id="gameView_title"></div>
<button class="barButton backButton"
id="gameView_backButton" style="left:10px"></button>
</div>
<div class="content avoidNavigationBar avoidToolBar" id="gameView_gameArea">
<div id="gameView_scoreArea" style="height:1em; text- align: center;"></div>
<div id="gameView_questionArea" style="text-align: center"></div>
</div>
<div class="toolBar">
<button class="barButton" id="gameView_nextButton" style="right:10px" ></button>
</div> </div>