LAMPIRAN A
A.1 Instalasi Virtual Box
Sebelum menginstall dionaea, terlebih dulu kita harus menyiapkan kedua software berikut ini.
1. Virtual box
Bagi pengguna windows yang tidak ingin menginstall linux pada computer atau laptopnya, dapat menggunakan virtual machine. Untuk virtual machine, kami menggunakan virtualBox.
2. OS Ubuntu
Pada panduan ini, kami menggunakan OS Ubuntu server 11.04 yang berbasiskan linux.
A.2 Instalasi Dionaea
Sebelum menginstall dionaea, anda harus masuk ke mode Super User terlebih dahulu. Cara nya adalah dengan memasukkan perintah :
sudo su
Kemudian masukkan password anda. Setelah itu masukkan script dibawah ini pada komputer:
aptitude install libudns-dev libglib2.0-dev libssl-dev libcurl4-openssl-dev \
libreadline-dev libsqlite3-dev python-dev \ libtool automake autoconf build-essential \ subversion git-core \
flex bison \
pkg-config python2.6-pysqlite2 sqlite3 libsqlite3-0 \ libxslt1-dev libxml2-dev
cd /opt/dionaea
git clone git://git.carnivore.it/liblcfg.git liblcfg cd liblcfg/code autoreconf -vi ./configure --prefix=/opt/dionaea make install cd .. cd ..
git clone git://git.carnivore.it/libemu.git libemu
cd libemu
autoreconf -vi
./configure --prefix=/opt/dionaea
make install
cd ..
git clone git://git.kernel.org/pub/scm/libs/netlink/libnl.git
cd libnl autoreconf -vi export LDFLAGS=-Wl,-rpath,/opt/dionaea/lib ./configure --prefix=/opt/dionaea make make install cd .. wget http://dist.schmorp.de/libev/libev-4.04.tar.gz tar xfz libev-4.04.tar.gz cd libev-4.04 ./configure --prefix=/opt/dionaea make install cd .. wget http://www.sqlite.org/sqlite-autoconf-3070701.tar.gz tar xfz sqlite-autoconf-3070701.tar.gz cd sqlite-autoconf-3070701 ./configure make make install cd ..
apt-get install sqlite3
wget http://python.org/ftp/python/3.2/Python-3.2.tgz tar xfz Python-3.2.tgz
cd Python-3.2/
./configure --enable-shared --prefix=/opt/dionaea --with-computed- gotos \
--enable-ipv6 LDFLAGS="-Wl,-rpath=/opt/dionaea/lib/" make
make install cd ..
git clone https://github.com/cython/cython.git cd cython
/opt/dionaea/bin/python3 setup.py install cd ..
git clone https://github.com/lxml/lxml.git lxml cd lxml
/opt/dionaea/bin/2to3 -w src/lxml/html/_diffcommand.py /opt/dionaea/bin/2to3 -w src/lxml/html/_html5builder.py /opt/dionaea/bin/python3.2 setup.py build
/opt/dionaea/bin/python3.2 setup.py install cd ..
wget http://www.corpit.ru/mjt/udns/old/udns_0.0.9.tar.gz tar xfz udns_0.0.9.tar.gz cd udns-0.0.9/ ./configure make shared cp udns.h /opt/dionaea/include/ cp *.so* /opt/dionaea/lib/ cd /opt/dionaea/lib ln -s libudns.so.0 libudns.so cd - cd .. wget http://c-ares.haxx.se/c-ares-1.7.3.tar.gz tar xfz c-ares-1.7.3.tar.gz cd c-ares-1.7.3 ./configure --prefix=/opt/dionaea make make install cd .. wget http://curl.haxx.se/download/curl-7.20.0.tar.bz2 tar xfj curl-7.20.0.tar.bz2 rm curl-7.20.0.tar.bz2 cd curl-7.20.0 ./configure --prefix=/opt/dionaea make make install cd .. wget http://www.tcpdump.org/release/libpcap-1.1.1.tar.gz tar xfz libpcap-1.1.1.tar.gz cd libpcap-1.1.1 ./configure --prefix=/opt/dionaea make make install cd ..
Setelah selesai menginstall semua dependency yang dibutuhkan, maka selanjutnya install dionaea pada komputer. Masukkan script :
cd usr/local/src
git clone git://git.carnivore.it/dionaea.git dionaea cd dionaea autoreconf -vi ./configure --with-lcfg-include=/opt/dionaea/include/ \ --with-lcfg-lib=/opt/dionaea/lib/ \ --with-python=/opt/dionaea/bin/python3.2 \ --with-cython-dir=/opt/dionaea/bin \ --with-udns-include=/opt/dionaea/include/ \ --with-udns-lib=/opt/dionaea/lib/ \ --with-emu-include=/opt/dionaea/include/ \ --with-emu-lib=/opt/dionaea/lib/ \ --with-gc-include=/usr/include/gc \ --with-ev-include=/opt/dionaea/include \ --with-ev-lib=/opt/dionaea/lib \ --with-nl-include=/opt/dionaea/include \
--with-nl-lib=/opt/dionaea/lib/ \ --with-curl-config=/opt/dionaea/bin/ \ --with-pcap-include=/opt/dionaea/include \ --with-pcap-lib=/opt/dionaea/lib/ make make install
A.3 Instalasi dan Konfigurasi Carniwwwhore
Sebelum menginstall Carniwwwhore, dionaea harus diinstall terlebih dahulu pada komputer lain yang sedang aktif.
Requirements yang harus disiapkan terlebih dahulu adalah : • python o python-django >= 1.2.3 o python-psycopg2 o python-pygame o python-numpy o python-pychart o python-pythonmagick • Postgres database >= 8.3
• Data (dari dionaea)
Masukkan perintah :
aptitude install django psycopg2 numpy python-pygame python-pychart python-pythonmagick
nb: Jika versi django yang dimiliki <1.2.3 maka anda harus menginstall django versi yang baru.
Download django versi terbaru Django 1.3. Masukkan script :
wget http://media.djangoproject.com/releases/1.3/Django-1.3.tar.gz tar xzvf Django-1.3.tar.gz
cd Django-1.3
sudo python setup.py install apt-get install postgresql
Kemudian buat database untuk user 'xmpp'.
sudo -u postgres createuser no-createdb encrypted login --pwprompt --no-createrole --no-superuser ‘username’
Ubah script pada /etc/postgresql/8.4/main/pg_hba.conf
Ketikkan atau tambahkan informasi username untuk database:
local xmpp ‘username’ md5 # <- tambahkan baris ini local all all ident
Restart posgresql
sudo /etc/init.d/postgresql restart Buat database xmpp
sudo -u postgres createdb --owner ‘username’ xmpp Download pg_schema.sql
wget ftp://ftp.carnivore.it/projects/carniwwwhore/pg_schema.sql Buat table
psql -U ‘username’ xmpp < ‘PATH’/pg_schema.sql
*PATH adalah tempat kita menyimpan file pg_schema.sql tersebut. Misalkan file tersimpan pada /usr/local/src/schema, maka perintah yang harus dituliskan adalah :
psql -U ‘username’ xmpp < /usr/local/src/schema/pg_schema.sql Install Carniwwwhore
cd /opt
git clone git://git.carnivore.it/carniwwwhore.git Setup database
Selanjutnya, database harus diatur terlebih dahulu. Masukkan perintah : cp settings.py-example settings.py
editor settings.py
# adjust DATABASES = { 'default': { 'ENGINE': 'django.db.backends.postgresql_psycopg2', 'NAME': 'xmpp', 'USER' : 'xmpp', 'PASSWORD' : 'test', } }
Atur sesuai dengan konfigurasi yang anda inginkan Mulai webserver
cd /opt/carniwwwhore
python manage.py runserver
Untuk dapat diakses oleh computer lain, masukkan IP address di sebelah runserver. python manage.py runserver ‘IP:port’
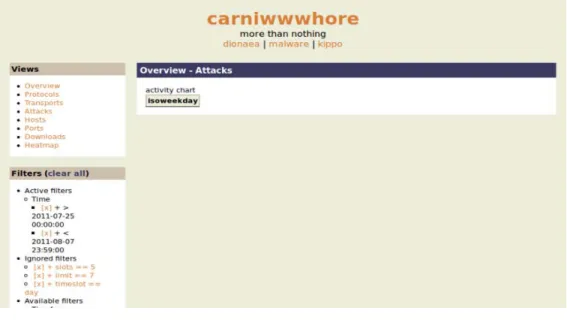
Kemudian masuk ke browser dan ketik IP address yang telah dimasukkan beserta dengan portnya.
Masuk ke web browser untuk melihat data.
Masuk ke program firefox dan masuk ke alamat
http://127.0.0.1:8000/dionaea
Tampilan diatas adalah web carniwwwhore yang belum dimasukkan data dari dionaea. Setelah dionaea mengalami serangan, maka semua file akan disimpan pada log dionaea. Logsql.sqlite adalah salah satu wadah untuk menyimpan semua log yang berhubungan dengan dionaea tersebut.
Untuk memindahkannya , kita harus mengupgrade logsqlite yang ada di dionaea ke logsqlite2postgresql.
Ubah logsql pada mesin yang terinstall dionaea ke postgres
wget http://python.projects.postgresql.org/files/py-postgresql-1.0.2.tar.gz tar zxvf py-postgresql-1.0.2.tar.gz
cd py-postgresql-1.0.2/
sudo /opt/dionaea/bin/python3 setup.py install
Setelah step ini, kita dapat mengambil data dari logsql.sqlite database ke postgres database. Masukkan script :
time dionaea/modules/python/util/logsql2postgres.py -s localhost -d xmpp –u xmpp -p ‘MYPASSWORD’ -f /tmp/logsql.sqlite connections dcerpcservices \ dcerpcrequests downloads emu_profiles p0fs dcerpcserviceops dcerpcbinds \ offers emu_services mssql_fingerprints logins mssql_commands virustotals \ virustotalscans
Untuk mendapat akses dari postgresql yang terinstall di carniwwwhore, kita harus mengubah beberapa file pada postgresql yang terdapat pada /etc/postgresql/8.4/main/pg_hba.conf.
Gambar A.3.2 Connection setting Save configurasi yang telah diubah tersebut.
Ubah pengaturan konfigurasi postgresql yang terdapat pada /etc/postgresql/8.4/main/postgresql.conf.
Cari bagian “CONNECTIONS AND AUTHENTICATIONS” lalu ubah listen
addressnya menjadi ‘*’. Kemudian restart postgresql dan jalankan Carniwwwhore dan lihat data yang telah diambil oleh Dionaea.
Setelah menginstall dionaea dan carniwwwhore, selanjutnya kita dapat menginstall xmpp server untuk memudahkan mengambil data dari dionaea ke carniwwwhore. Dengan xmpp ini, kita dapat langsung melihat data yang ada pada dionaea secara real time melalui carniwwwhore.
A.4 Prosody
1. Install requirement :
aptitude install lua5.1 expat0 socket2 liblua5.1-filesystem0 libssl-dev libidn11-dev liblua5.1-0-dev
wget http://www.inf.puc-rio.br/~brunoos/luasec/download/luasec-0.4.tar.gz tar xfz luasec-0.4.tar.gz cd luasec-0.4 make linux make install Ubah konfigurasi makefile yang ada di luasec‐0.4.tar.gz. LUAPATH=/usr/share/lua/5.1 LUACPATH=/usr/lib/lua/5.1 INCDIR=-I/usr/include/lua5.1 -I/usr/local/openssl-0.9.8/include LIBDIR=-L/usr/local/openssl-0.9.8/lib -R/usr/local/openssl-0.9.8/lib Install prosody
git clone git://git.carnivore.it/users/common/prosody.git
cd prosody
./configure --prefix=/opt/prosody --with-lua-include=/usr/include/lua5.1/
make
make install
Ubah konfigurasi dari prosody
cd /opt/prosody/
cp etc/prosody/prosody.cfg.lua etc/prosody/prosody.cfg.lua.orig
Contoh file konfigurasi prosody :
https://p.carnivore.it/Qnth12
Setelah itu, buat beberapa directory yang dibutuhkan dalam proses ini :
mkdir -p /opt/prosody/var/log/prosody
mkdir -p /opt/prosody/var/run
chown prosody /opt/prosody/ -R
Untuk menjalankan prosody diperlukan domain, jadi buat sebuah domain yang akan dipakai sebagai domain dari prosody
Buat user “prosody” untuk sensor dan untuk anda :
/opt/prosody/bin/prosodyctl adduser backend@ example.com /opt/prosody/bin/prosodyctl adduser sensor@ example.com
Jalankan prosody :
/opt/prosody/bin/prosodyctl start
Update dionaea :
git pull;
make clean install
Ubah konfigurasi bagian logxmpp pada dionaea.conf. dionaea.conf terletak pada /opt/dionaea/etc/dionaea/dionaea.conf menjadi : https://p.carnivore.it/4fRgXG
Jalankan dionaea
Untuk menjalankan dionaea dengan fitur logxmpp, masukkan perintah :
/opt/dionaea/bin/dionaea -l all -L '*' -D
Jalankan pg_backend.py
./pg_backend.py -U [email protected] -P XMPPPASS -M
dionaea.sensors.carnivore.it -C anon-files -C anon-events -s
DBHOST -u DBUSER -d xmpp -p DBPASS -f /tmp/
wget
http://src.carnivore.it/dionaea/tree/modules/python/util/xmpp/pg_
schema.sql
Buat ulang database di postgresql carniwwwhore. Caranya dapat dilihat pada panduan install carniwwwhore diatas. Setelah database telah dibuat, jalankan carniwwwhore. A.5 Instalasi Glastopf
Untuk menginstal Glastopf dibutuhkan beberapa requirement: • Python 2.6 • Python-mysqldb • Subversion • LAMP-server • phpmyadmin Masukkan script :
sudo apt-get install python2.5 python-mysqldb subversion sudo apt-get install lamp-server^
sudo apt-get install phpmyadmin Download glastopf via subversion. Ada 2 versi:
• Untuk versi development/ unstable gunakan perintah:
svn co svn://82.165.193.71:9090/glastopf/branches/unstable glastopf • Untuk versi yang stable gunakan perintah:
svn co svn://82.165.193.71:9090/glastopf/trunk glastopf Konfigurasi
Konfigurasi glastopf dapat dilakukan di folder conf/ seperti:
Plugin yang ingin digunakan harus ditulis dibagian ini:
Gambar A.5.2 Konfigurasi Plugin
• Bagian Mysql. Jika ingin menggunakan mysql database, kita harus load mysql.pyplug.in terlebih dahulu. Mysql plug-in juga digunakan untuk fitur dynamic dork list.
Gambar A.5.3 Konfigurasi MySql • Bagian miscellaneous.
Gambar A.5.4 Konfigurasi miscellaneous
*Costumpage: jika ingin menggunakan fitur custompage,ubah Display custom pages dari false menjadi true .
request,maka kita harus mengubah parameter whois server ini.
*Domain whois lookup:Domain whois lookup ini diubah jadi true ,jika kita membutuhkan informasi tentang whois.
*IP whois lookup: jika kita membutuhkan informasi tentang IP MNT-BY maka kita mengubah ip whois ini menjadi true.
*Select parser version: untuk beberapa parser sebelumnya kita memilih old.
• Bagian Vulnpath. Modul VulnPath menyimpan semua Google dork di database mysql.
Gambar A.5.5 Konfigurasi vulnpath
• Bagian dyndork. Modul dyndork menggunakan vulnpath database untuk membuat dork list untuk Google web crawler.
Gambar A.5.6 Konfigurasi dyndork
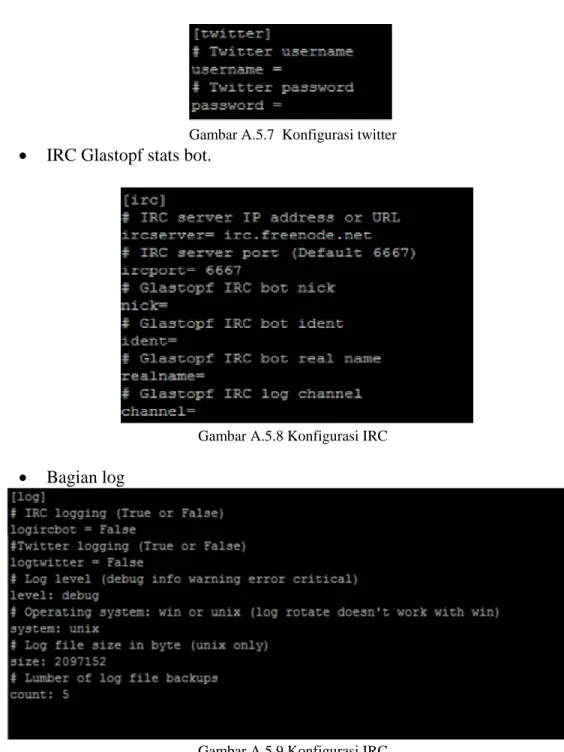
Gambar A.5.7 Konfigurasi twitter • IRC Glastopf stats bot.
Gambar A.5.8 Konfigurasi IRC • Bagian log
Gambar A.5.9 Konfigurasi IRC
Sebelum menjalankan glastopf dengan fitur mysql dan dyndork harus dibuat table yang dibutuhkan di database seperti table log, files dan table path. Struktur tablenya dapat dilihat dibagian structure/
Jalankan Glastopf dengan perintah di glastopf/ dan tunggu mendapat serangan: Sudo python webserver.py
Gambar A.5.11 Tampilan Glastopf
A.6 Install Glasif Masukkan script Wget http://dev.glastopf.org/attachments/download/8/GlasIF-0.0.1-RC1.tar.gz untar xfz GlasIF-0.0.1-RC1 cp –r GlasIF-0.0.1-RC1 /var/www/GlasIF cd /var/www
chown –R www-data:www-data GlasIF
Buka firefox dan ketik url : localhost/GlasIF *localhost dapat diganti ip anda.
Kemudian masukkan ip database tempat glastopf anda ,user , password, dan nama database yang digunakan di glastopf tersebut.
Prosedur
A.1 Instalasi Virtual Box
Sebelum menginstall dionaea, terlebih dulu kita harus menyiapkan kedua software berikut ini.
1. Virtual box
Bagi pengguna windows yang tidak ingin menginstall linux pada computer atau laptopnya, dapat menggunakan virtual machine. Untuk virtual machine, kami menggunakan virtualBox.
2. OS Ubuntu
Pada panduan ini, kami menggunakan OS Ubuntu server 11.04 yang berbasiskan linux.
A.2 Instalasi Dionaea
Sebelum menginstall dionaea, anda harus masuk ke mode Super User terlebih dahulu. Cara nya adalah dengan memasukkan perintah :
sudo su
Kemudian masukkan password anda. Setelah itu masukkan script dibawah ini pada komputer:
aptitude install libudns-dev libglib2.0-dev libssl-dev libcurl4-openssl-dev \
libreadline-dev libsqlite3-dev python-dev \ libtool automake autoconf build-essential \ subversion git-core \
flex bison \
pkg-config python2.6-pysqlite2 sqlite3 libsqlite3-0 \ libxslt1-dev libxml2-dev
cd /opt/dionaea
git clone git://git.carnivore.it/liblcfg.git liblcfg cd liblcfg/code autoreconf -vi ./configure --prefix=/opt/dionaea make install cd .. cd ..
git clone git://git.carnivore.it/libemu.git libemu
cd libemu
autoreconf -vi
./configure --prefix=/opt/dionaea
make install
cd ..
git clone git://git.kernel.org/pub/scm/libs/netlink/libnl.git
cd libnl autoreconf -vi export LDFLAGS=-Wl,-rpath,/opt/dionaea/lib ./configure --prefix=/opt/dionaea make make install cd .. wget http://dist.schmorp.de/libev/libev-4.04.tar.gz tar xfz libev-4.04.tar.gz cd libev-4.04 ./configure --prefix=/opt/dionaea make install cd .. wget http://www.sqlite.org/sqlite-autoconf-3070701.tar.gz tar xfz sqlite-autoconf-3070701.tar.gz cd sqlite-autoconf-3070701 ./configure make make install cd ..
apt-get install sqlite3
wget http://python.org/ftp/python/3.2/Python-3.2.tgz tar xfz Python-3.2.tgz
cd Python-3.2/
./configure --enable-shared --prefix=/opt/dionaea --with-computed- gotos \
--enable-ipv6 LDFLAGS="-Wl,-rpath=/opt/dionaea/lib/" make
make install cd ..
git clone https://github.com/cython/cython.git cd cython
/opt/dionaea/bin/python3 setup.py install cd ..
git clone https://github.com/lxml/lxml.git lxml cd lxml
/opt/dionaea/bin/2to3 -w src/lxml/html/_diffcommand.py /opt/dionaea/bin/2to3 -w src/lxml/html/_html5builder.py /opt/dionaea/bin/python3.2 setup.py build
/opt/dionaea/bin/python3.2 setup.py install cd ..
wget http://www.corpit.ru/mjt/udns/old/udns_0.0.9.tar.gz tar xfz udns_0.0.9.tar.gz cd udns-0.0.9/ ./configure make shared cp udns.h /opt/dionaea/include/ cp *.so* /opt/dionaea/lib/ cd /opt/dionaea/lib ln -s libudns.so.0 libudns.so cd - cd .. wget http://c-ares.haxx.se/c-ares-1.7.3.tar.gz tar xfz c-ares-1.7.3.tar.gz cd c-ares-1.7.3 ./configure --prefix=/opt/dionaea make make install cd .. wget http://curl.haxx.se/download/curl-7.20.0.tar.bz2 tar xfj curl-7.20.0.tar.bz2 rm curl-7.20.0.tar.bz2 cd curl-7.20.0 ./configure --prefix=/opt/dionaea make make install cd .. wget http://www.tcpdump.org/release/libpcap-1.1.1.tar.gz tar xfz libpcap-1.1.1.tar.gz cd libpcap-1.1.1 ./configure --prefix=/opt/dionaea make make install cd ..
Setelah selesai menginstall semua dependency yang dibutuhkan, maka selanjutnya install dionaea pada komputer. Masukkan script :
cd usr/local/src
git clone git://git.carnivore.it/dionaea.git dionaea cd dionaea autoreconf -vi ./configure --with-lcfg-include=/opt/dionaea/include/ \ --with-lcfg-lib=/opt/dionaea/lib/ \ --with-python=/opt/dionaea/bin/python3.2 \ --with-cython-dir=/opt/dionaea/bin \ --with-udns-include=/opt/dionaea/include/ \ --with-udns-lib=/opt/dionaea/lib/ \ --with-emu-include=/opt/dionaea/include/ \ --with-emu-lib=/opt/dionaea/lib/ \ --with-gc-include=/usr/include/gc \ --with-ev-include=/opt/dionaea/include \ --with-ev-lib=/opt/dionaea/lib \ --with-nl-include=/opt/dionaea/include \
--with-nl-lib=/opt/dionaea/lib/ \ --with-curl-config=/opt/dionaea/bin/ \ --with-pcap-include=/opt/dionaea/include \ --with-pcap-lib=/opt/dionaea/lib/ make make install
A.3 Instalasi dan Konfigurasi Carniwwwhore
Sebelum menginstall Carniwwwhore, dionaea harus diinstall terlebih dahulu pada komputer lain yang sedang aktif.
Requirements yang harus disiapkan terlebih dahulu adalah : • python o python-django >= 1.2.3 o python-psycopg2 o python-pygame o python-numpy o python-pychart o python-pythonmagick • Postgres database >= 8.3
• Data (dari dionaea)
Masukkan perintah :
aptitude install django psycopg2 numpy python-pygame python-pychart python-pythonmagick
nb: Jika versi django yang dimiliki <1.2.3 maka anda harus menginstall django versi yang baru.
Download django versi terbaru Django 1.3. Masukkan script :
wget http://media.djangoproject.com/releases/1.3/Django-1.3.tar.gz tar xzvf Django-1.3.tar.gz
cd Django-1.3
sudo python setup.py install apt-get install postgresql
Kemudian buat database untuk user 'xmpp'.
sudo -u postgres createuser no-createdb encrypted login --pwprompt --no-createrole --no-superuser ‘username’
Ubah script pada /etc/postgresql/8.4/main/pg_hba.conf
Ketikkan atau tambahkan informasi username untuk database:
local xmpp ‘username’ md5 # <- tambahkan baris ini local all all ident
Restart posgresql
sudo /etc/init.d/postgresql restart Buat database xmpp
sudo -u postgres createdb --owner ‘username’ xmpp Download pg_schema.sql
wget ftp://ftp.carnivore.it/projects/carniwwwhore/pg_schema.sql Buat table
psql -U ‘username’ xmpp < ‘PATH’/pg_schema.sql
*PATH adalah tempat kita menyimpan file pg_schema.sql tersebut. Misalkan file tersimpan pada /usr/local/src/schema, maka perintah yang harus dituliskan adalah :
psql -U ‘username’ xmpp < /usr/local/src/schema/pg_schema.sql Install Carniwwwhore
cd /opt
git clone git://git.carnivore.it/carniwwwhore.git Setup database
Selanjutnya, database harus diatur terlebih dahulu. Masukkan perintah : cp settings.py-example settings.py
editor settings.py
# adjust DATABASES = { 'default': { 'ENGINE': 'django.db.backends.postgresql_psycopg2', 'NAME': 'xmpp', 'USER' : 'xmpp', 'PASSWORD' : 'test', } }
Atur sesuai dengan konfigurasi yang anda inginkan Mulai webserver
cd /opt/carniwwwhore
python manage.py runserver
Untuk dapat diakses oleh computer lain, masukkan IP address di sebelah runserver. python manage.py runserver ‘IP:port’
Kemudian masuk ke browser dan ketik IP address yang telah dimasukkan beserta dengan portnya.
Masuk ke web browser untuk melihat data.
Masuk ke program firefox dan masuk ke alamat
http://127.0.0.1:8000/dionaea
Tampilan diatas adalah web carniwwwhore yang belum dimasukkan data dari dionaea. Setelah dionaea mengalami serangan, maka semua file akan disimpan pada log dionaea. Logsql.sqlite adalah salah satu wadah untuk menyimpan semua log yang berhubungan dengan dionaea tersebut.
Untuk memindahkannya , kita harus mengupgrade logsqlite yang ada di dionaea ke logsqlite2postgresql.
Ubah logsql pada mesin yang terinstall dionaea ke postgres
wget http://python.projects.postgresql.org/files/py-postgresql-1.0.2.tar.gz tar zxvf py-postgresql-1.0.2.tar.gz
cd py-postgresql-1.0.2/
sudo /opt/dionaea/bin/python3 setup.py install
Setelah step ini, kita dapat mengambil data dari logsql.sqlite database ke postgres database. Masukkan script :
time dionaea/modules/python/util/logsql2postgres.py -s localhost -d xmpp –u xmpp -p ‘MYPASSWORD’ -f /tmp/logsql.sqlite connections dcerpcservices \ dcerpcrequests downloads emu_profiles p0fs dcerpcserviceops dcerpcbinds \ offers emu_services mssql_fingerprints logins mssql_commands virustotals \ virustotalscans
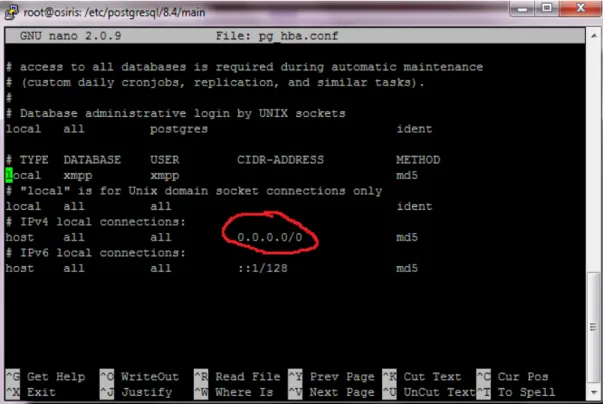
Untuk mendapat akses dari postgresql yang terinstall di carniwwwhore, kita harus mengubah beberapa file pada postgresql yang terdapat pada /etc/postgresql/8.4/main/pg_hba.conf.
Gambar A.3.2 Connection setting Save configurasi yang telah diubah tersebut.
Ubah pengaturan konfigurasi postgresql yang terdapat pada /etc/postgresql/8.4/main/postgresql.conf.
Cari bagian “CONNECTIONS AND AUTHENTICATIONS” lalu ubah listen
addressnya menjadi ‘*’. Kemudian restart postgresql dan jalankan Carniwwwhore dan lihat data yang telah diambil oleh Dionaea.
Setelah menginstall dionaea dan carniwwwhore, selanjutnya kita dapat menginstall xmpp server untuk memudahkan mengambil data dari dionaea ke carniwwwhore. Dengan xmpp ini, kita dapat langsung melihat data yang ada pada dionaea secara real time melalui carniwwwhore.
A.4 Prosody
1. Install requirement :
aptitude install lua5.1 expat0 socket2 liblua5.1-filesystem0 libssl-dev libidn11-dev liblua5.1-0-dev
wget http://www.inf.puc-rio.br/~brunoos/luasec/download/luasec-0.4.tar.gz tar xfz luasec-0.4.tar.gz cd luasec-0.4 make linux make install Ubah konfigurasi makefile yang ada di luasec‐0.4.tar.gz. LUAPATH=/usr/share/lua/5.1 LUACPATH=/usr/lib/lua/5.1 INCDIR=-I/usr/include/lua5.1 -I/usr/local/openssl-0.9.8/include LIBDIR=-L/usr/local/openssl-0.9.8/lib -R/usr/local/openssl-0.9.8/lib Install prosody
git clone git://git.carnivore.it/users/common/prosody.git
cd prosody
./configure --prefix=/opt/prosody --with-lua-include=/usr/include/lua5.1/
make
make install
Ubah konfigurasi dari prosody
cd /opt/prosody/
cp etc/prosody/prosody.cfg.lua etc/prosody/prosody.cfg.lua.orig
Contoh file konfigurasi prosody :
https://p.carnivore.it/Qnth12
Setelah itu, buat beberapa directory yang dibutuhkan dalam proses ini :
mkdir -p /opt/prosody/var/log/prosody
mkdir -p /opt/prosody/var/run
chown prosody /opt/prosody/ -R
Untuk menjalankan prosody diperlukan domain, jadi buat sebuah domain yang akan dipakai sebagai domain dari prosody
Buat user “prosody” untuk sensor dan untuk anda :
/opt/prosody/bin/prosodyctl adduser backend@ example.com /opt/prosody/bin/prosodyctl adduser sensor@ example.com
Jalankan prosody :
/opt/prosody/bin/prosodyctl start
Update dionaea :
git pull;
make clean install
Ubah konfigurasi bagian logxmpp pada dionaea.conf. dionaea.conf terletak pada /opt/dionaea/etc/dionaea/dionaea.conf menjadi : https://p.carnivore.it/4fRgXG
Jalankan dionaea
Untuk menjalankan dionaea dengan fitur logxmpp, masukkan perintah :
/opt/dionaea/bin/dionaea -l all -L '*' -D
Jalankan pg_backend.py
./pg_backend.py -U [email protected] -P XMPPPASS -M
dionaea.sensors.carnivore.it -C anon-files -C anon-events -s
DBHOST -u DBUSER -d xmpp -p DBPASS -f /tmp/
wget
http://src.carnivore.it/dionaea/tree/modules/python/util/xmpp/pg_
schema.sql
Buat ulang database di postgresql carniwwwhore. Caranya dapat dilihat pada panduan install carniwwwhore diatas. Setelah database telah dibuat, jalankan carniwwwhore. A.5 Instalasi Glastopf
Untuk menginstal Glastopf dibutuhkan beberapa requirement: • Python 2.6 • Python-mysqldb • Subversion • LAMP-server • phpmyadmin Masukkan script :
sudo apt-get install python2.5 python-mysqldb subversion sudo apt-get install lamp-server^
sudo apt-get install phpmyadmin Download glastopf via subversion. Ada 2 versi:
• Untuk versi development/ unstable gunakan perintah:
svn co svn://82.165.193.71:9090/glastopf/branches/unstable glastopf • Untuk versi yang stable gunakan perintah:
svn co svn://82.165.193.71:9090/glastopf/trunk glastopf Konfigurasi
Konfigurasi glastopf dapat dilakukan di folder conf/ seperti:
Plugin yang ingin digunakan harus ditulis dibagian ini:
Gambar A.5.2 Konfigurasi Plugin
• Bagian Mysql. Jika ingin menggunakan mysql database, kita harus load mysql.pyplug.in terlebih dahulu. Mysql plug-in juga digunakan untuk fitur dynamic dork list.
Gambar A.5.3 Konfigurasi MySql • Bagian miscellaneous.
Gambar A.5.4 Konfigurasi miscellaneous
*Costumpage: jika ingin menggunakan fitur custompage,ubah Display custom pages dari false menjadi true .
request,maka kita harus mengubah parameter whois server ini.
*Domain whois lookup:Domain whois lookup ini diubah jadi true ,jika kita membutuhkan informasi tentang whois.
*IP whois lookup: jika kita membutuhkan informasi tentang IP MNT-BY maka kita mengubah ip whois ini menjadi true.
*Select parser version: untuk beberapa parser sebelumnya kita memilih old.
• Bagian Vulnpath. Modul VulnPath menyimpan semua Google dork di database mysql.
Gambar A.5.5 Konfigurasi vulnpath
• Bagian dyndork. Modul dyndork menggunakan vulnpath database untuk membuat dork list untuk Google web crawler.
Gambar A.5.6 Konfigurasi dyndork
Gambar A.5.7 Konfigurasi twitter • IRC Glastopf stats bot.
Gambar A.5.8 Konfigurasi IRC • Bagian log
Gambar A.5.9 Konfigurasi IRC
Sebelum menjalankan glastopf dengan fitur mysql dan dyndork harus dibuat table yang dibutuhkan di database seperti table log, files dan table path. Struktur tablenya dapat dilihat dibagian structure/
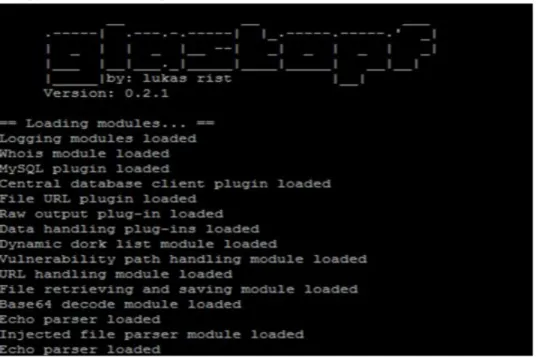
Jalankan Glastopf dengan perintah di glastopf/ dan tunggu mendapat serangan: Sudo python webserver.py
Gambar A.5.11 Tampilan Glastopf
A.6 Install Glasif Masukkan script Wget http://dev.glastopf.org/attachments/download/8/GlasIF-0.0.1-RC1.tar.gz untar xfz GlasIF-0.0.1-RC1 cp –r GlasIF-0.0.1-RC1 /var/www/GlasIF cd /var/www
chown –R www-data:www-data GlasIF
Buka firefox dan ketik url : localhost/GlasIF *localhost dapat diganti ip anda.
Kemudian masukkan ip database tempat glastopf anda ,user , password, dan nama database yang digunakan di glastopf tersebut.