Copyright Notice for the printed version of this work:
Copyright Notice for the electronic (online) version of this work, based on the OpenContent License (OPL), Version 1.0, July 14, 1998.
This document outlines the principles underlying the OpenContent (OC) movement and may be redistributed provided it remains unaltered. For legal purposes, this document is the license under which OpenContent is made available for use. The original version of this document may be found at http://opencontent.org/opl.shtml .
LICENSE
Terms and Conditions for Copying, Distributing, and Modifying
Items other than copying, distributing, and modifying the Content with which this license was distributed (such as using, etc.) are outside the scope of this license.
1. You may copy and distribute exact replicas of the OpenContent (OC) as you receive it, in any medium, provided that you conspicuously and appropriately publish on each copy an appropriate copyright notice and disclaimer of warranty; keep intact all the notices that refer to this License and to the absence of any warranty; and give any other recipients of the OC a copy of this License along with the OC. You may at your option charge a fee for the media and/or handling involved in creating a unique copy of the OC for use offline, you may at your option offer instructional support for the OC in exchange for a fee, or you may at your option offer warranty in exchange for a fee. You may not charge a fee for the OC itself. You may not charge a fee for the sole service of providing access to and/or use of the OC via a network (e.g. the Internet), whether it be via the world wide web, FTP, or any other method.
2. You may modify your copy or copies of the OpenContent or any portion of it, thus forming works based on the Content, and distribute such modifications or work under the terms of Section 1 above, provided that you also meet all of these conditions:
a) You must cause the modified content to carry prominent notices stating that you changed it, the exact nature and content of the changes, and the date of any change.
b) You must cause any work that you distribute or publish, that in whole or in part contains or is derived from the OC or any part thereof, to be licensed as a whole at no charge to all third parties under the terms of this License, unless otherwise permitted under applicable Fair Use law.
These requirements apply to the modified work as a whole. If identifiable sections of that work are not derived from the OC, and can be reasonably considered independent and separate works in themselves, then this License, and its terms, do not apply to those sections when you distribute them as separate works. But when you distribute the same sections as part of a whole which is a work based on the OC, the distribution of the whole must be on the terms of this License, whose permissions for other licensees extend to the entire whole, and thus to each and every part regardless of who wrote it. Exceptions are made to this requirement to release modified works free of charge under this license only in compliance with Fair Use law where applicable.
3. You are not required to accept this License, since you have not signed it. However, nothing else grants you permission to copy, distribute or modify the OC. These actions are prohibited by law if you do not accept this License. Therefore, by distributing or translating the OC, or by deriving works herefrom, you indicate your acceptance of this License to do so, and all its terms and conditions for copying, distributing or translating the OC.
NO WARRANTY
4. BECAUSE THE OPENCONTENT (OC) IS LICENSED FREE OF CHARGE, THERE IS NO WARRANTY FOR THE OC, TO THE EXTENT PERMITTED BY APPLICABLE LAW. EXCEPT WHEN OTHERWISE STATED IN WRITING THE COPYRIGHT HOLDERS AND/OR OTHER PARTIES PROVIDE THE OC "AS IS" WITHOUT WARRANTY OF ANY KIND, EITHER EXPRESSED OR IMPLIED, INCLUDING, BUT NOT LIMITED TO, THE IMPLIED WARRANTIES OF MERCHANTABILITY AND FITNESS FOR A PARTICULAR PURPOSE. THE ENTIRE RISK OF USE OF THE OC IS WITH YOU. SHOULD THE OC PROVE FAULTY, INACCURATE, OR OTHERWISE UNACCEPTABLE YOU ASSUME THE COST OF ALL NECESSARY REPAIR OR CORRECTION.
Table of Contents
Acknowledgments...16
Foreword...17
Chapter 1 - Introducing Gambas...19
Gambas Architecture...19
The Gambas Programming Environment...22
Gambas IDE Components...25
Chapter 2 – Gambas Language Concepts...30
Gambas Variables, Data-types and Constants...30
Variable Assignment...35
Assignment Using The WITH Statement...35
Operators and Expressions...36
Comparison operators ...36
Arithmetic Operators...36
Let's Start Coding Gambas...37
END, RETURN and QUIT Statements...37
String Operators...44
Chapter 3 - Keywords and Program Flow Control...46
The PRINT Statement...46
The IF Statement...47
The SELECT / CASE Statement...48
GOTO and LABELS...49
The FOR / NEXT Statement...49
DO [WHILE] LOOP...51
WHILE [Expression] WEND Loops ...52
The REPEAT UNTIL loop ...53
Defining and Using Arrays in Gambas...53
Collections...55
The FOR EACH Statement...55
Chapter 4 – Introducing the Gambas ToolBox...57
The Button Control...61
Common Control Properties...62
Button Events...78
The Picture Class...78
Chapter 5 – Controls for Gathering Input...80
TextLabel...82
TextBox...83
ComboBox...85
ListBox...89
Frame...92
ToggleButton...93
Checkbox...93
Panel...95
RadioButton...95
Chapter 6 – Menus, Modules, Dialogs and Message Boxes...97
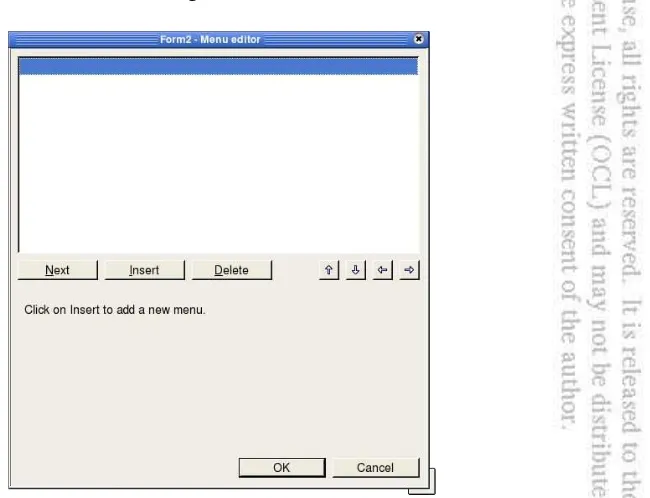
The Gambas Menu Editor...98
Building Menus...101
Dialogs...103
Modules...105
MessageBoxes...112
Information Messages...112
Query/Confirm Messages...114
Error Messages...115
Warning or Alert Messages...115
Delete Messages...116
Dialog Class File-related Functions...117
Dialog OpenFile Function...117
Dialog SaveFile Function...118
Dialog SelectDirectory Function...119
Complete Example Listing...120
Module1.module listing...123
Chapter 7 – Handling Strings and Converting Data-types...125
String Functions...125
Upper$/Ucase$/Ucase and Lower$/Lcase$/Lcase ...126
Trim$, LTrim$, and RTrim$...127
Left$, Mid$, and Right$ ...128
Space$...130
Replace$ ...130
String$ ...131
Subst$ ...131
InStr...132
RInStr...134
Split...134
Converting Data-types...135
Asc and Chr$ ...135
Bin$...136
CBool ...137
CByte...138
CDate...138
CFloat...139
CInt / Cinteger and CShort ...140
CStr / CString ...140
Hex$...141
Conv$ ...141
Val and Str$ ...142
Str$ ...142
Format$...145
Datatype management ...147
TypeOf...148
Chapter 8 – Using Advanced Controls...149
IconView Control...149
ListView Control...158
Using the Gambas Icon Edit Tool...162
The TreeView Control...163
The GridView Control...171
The ColumnView Control...174
Layout Controls – HBox, VBox, HPanel and Vpanel. .176 HBox and VBox...177
The TabStrip Control...181
Chapter 9 – Working with Files...188
Access...188
Dir...189
Eof...190
Exist...190
IsDir / Dir? ...191
Stat ...191
Temp / Temp$ ...192
OPEN and CLOSE...192
LINE INPUT...193
READ, SEEK, WRITE and FLUSH...194
COPY, KILL and RENAME...195
MKDIR, RMDIR...196
Chapter 10 – Math Operations...215
Precedence of Operations...215
Abs...216
Acs / ACos...216
Acsh / ACosh...217
Asn / ASin...217
Asnh / ASinh...218
Atn / ATan...218
Atnh / ATanh...219
Cos...219
Cosh...220
Deg and Rad...221
Exp...221
Fix and Frac...222
Int...223
Log...223
Max and Min...224
Pi...225
Randomize and Rnd...225
Round...227
Sgn...227
Sin...228
Sinh...229
Sqr...229
Tan...230
Tanh...231
Derived Math Functions...231
Chapter 11 – Object-Oriented Concepts...237
Fundamentals of Object Oriented Programming...238
Objects...239
Data Abstraction...239
Encapsulation...240
Polymorphism...240
Inheritance...240
The Gambas Approach to OOP...241
Gambas Classes...241
Sample program: Contacts...242
The Contact class...242
Contact.GetData Method...243
Contact.PutData Method...246
Form1.class file...247
Form1 Constructor...249
Form_Open Subroutine...250
Adding Controls to Form1.Form...250
The ToolButtons...251
The Quit Button...251
Adding the Labels and TextBoxes...252
UpdateForm() Subroutine...253
Coding Toolbuttons: First, Prev, Next, and Last...254
Coding ToolButtons: Adding a record...256
Coding ToolButtons: Clearing data...258
Adding a Search Feature...260
The DoFind Subroutine...262
ToolButtons again: Updating a Record...263
Toolbuttons again: Deleting a Record...264
ToolButtons again: Saving Data...265
Creating a Stand-alone Executable...266
Chapter 12 – Learning to Draw...267
Draw Properties...267
BackColor/Background and ForeColor/Foreground...267
Clip...268
FillColor,FillStyle,FillX,FillY...268
Font...269
Invert...269
LineStyle/LineWidth...270
Transparent...270
Draw Methods...270
Text/TextHeight/TextWidth...272
Draw Primitives: Point/Rect/Ellipse/Line...274
Draw Primitives: Polygon and Polyline...280
Image/Picture/Tile...284
Drawing with a Drawing object...292
Chapter 13 – Error Management...298
General Concepts of Error Management...298
Error Handling...298
Boundary-Related Errors...299
Calculation Errors...299
Initial and Later States...300
Control Flow Errors...300
Errors in Handling or Interpreting Data...301
Race and Load Conditions...301
Platform and Hardware Issues...302
Source, Version, and ID Control Errors...303
Testing Errors...303
Test Plan Reviews...303
Gambas Error management...304
Catch and Finally Statements...306
Gambas Event management...309
Chapter 14 – Mouse, Keyboard and Bit Operations...312
Mouse Operations...312
Keyboard Operations...316
Bit Operations...318
Chapter 15 – Gambas and Databases...326
Connection Class...327
Connection Properties...328
Charset...328
Databases...328
Host...329
Login...329
Name...329
Password...330
Port...330
Tables...330
Type...330
Users...330
Version...330
The Concept of a Transaction...331
Connection Class Methods...332
Open/Close...332
Begin/Commit/Rollback...333
Find...333
Create...334
Edit...334
Exec...334
Quote...335
Result Objects...335
DB Class...336
Database...337
Field...337
Index...337
Table...337
The Database Example Program...338
Chapter 16 – Global Gambas...351
Internationalization...351
Localization...351
Universal Character Set (UCS)...352
Unicode...352
UTF-8...353
Table of Figures
Figure 1- General overview of Gambas architecture...20
Figure 2- the Gambas Opening Screen...21
Figure 3- The Gambas Project Creation Wizard...22
Figure 4- A dialog to select the type of Gambas project you wish to create...23
Figure 5- Project Name Selection Dialog...24
Figure 6- Project Directory Selection Dialog...24
Figure 7- New Project confirmation dialog...25
Figure 8- The Gambas IDE...26
Figure 9- Project Explorer File Menu...27
Figure 10- Project Menu...27
Figure 11- Project Explorer View Menu...27
Figure 12- Project Explorer Tools Menu...27
Figure 13- Project Explorer Menu and Toolbar...28
Figure 14- A Division by Zero Error Dialog...40
Figure 15- The Gambas ToolBox...58
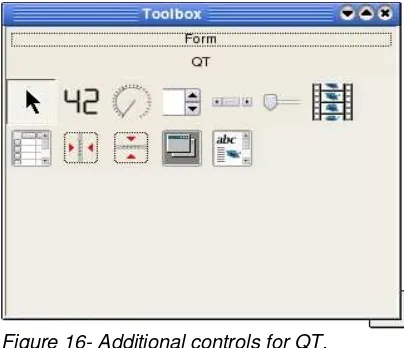
Figure 16- Additional controls for QT...60
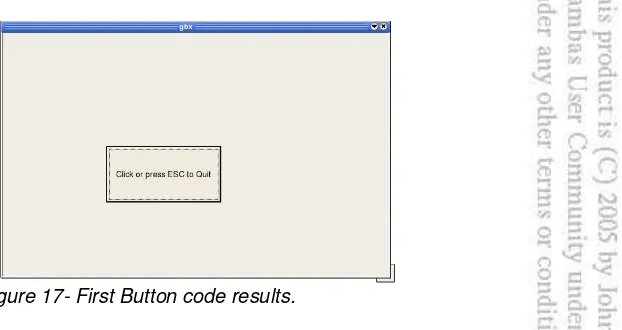
Figure 17- First Button code results...65
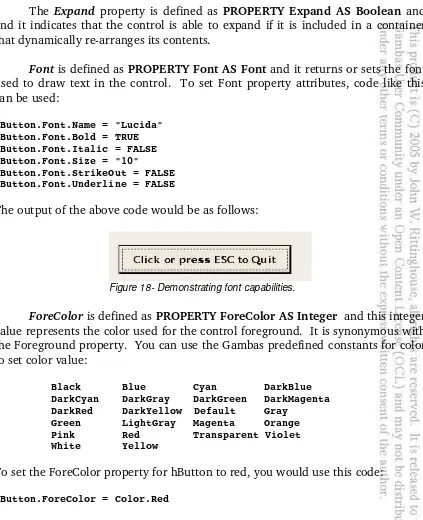
Figure 18- Demonstrating font capabilities...67
Figure 19- The dotted line indicates focus for a control...72
Figure 20- The layout for SecondProject Form1.form...72
Figure 21-A partially constructed form with our first four controls...73
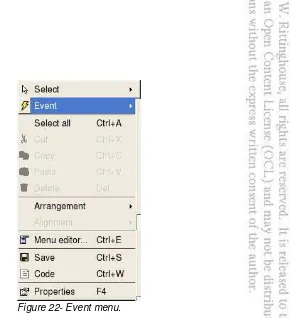
Figure 22- Event menu...74
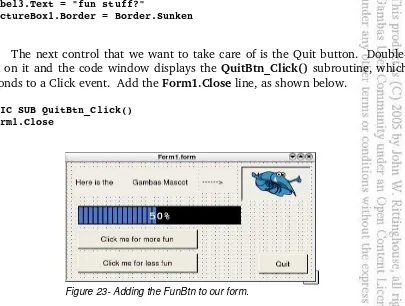
Figure 23- Adding the FunBtn to our form...76
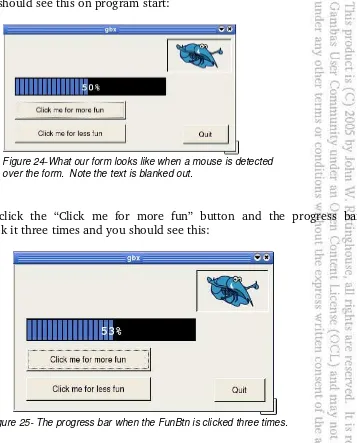
Figure 24-What our form looks like when a mouse is detected over the form. Note the text is blanked out. ...77
Figure 25- The progress bar when the FunBtn is clicked three times...77
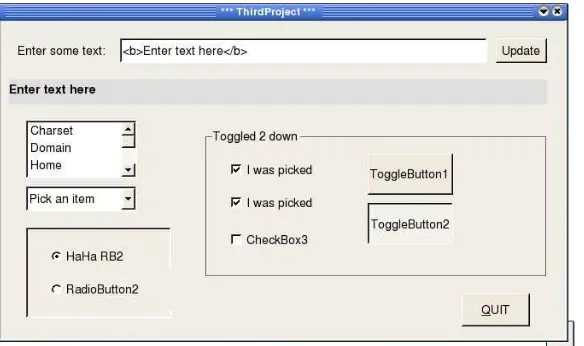
Figure 26- ThirdProject (almost) final result...80
Figure 27- Using HTML to format TextLabel output...82
Figure 28- Modified TextLabel output using HTML formatting...83
Figure 29- Adding a ToolTip to inform the user how to show/hide a control...85
Figure 30- Our ComboBox...86
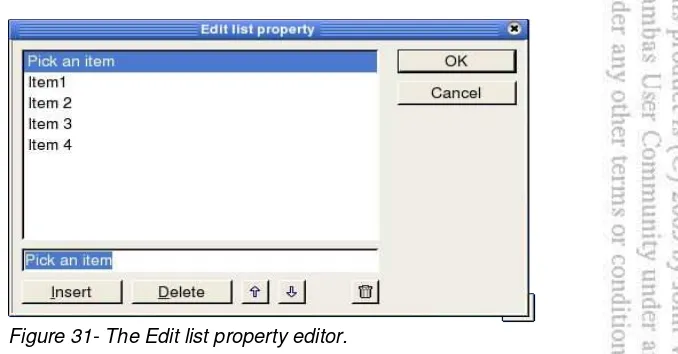
Figure 31- The Edit list property editor...87
Figure 32- Formatting a TextLabel with HTML...88
Figure 33- Plus and minus buttons to alter the ComboBox list...88
Figure 34- What our ListBox will look like...90
Figure 35- ListBox Edit list property editor...90
Figure 37- A Panel with RadioButtons...95
Figure 38- Menu Project Final results...97
Figure 39- The Gambas Menu Editor when it first starts...98
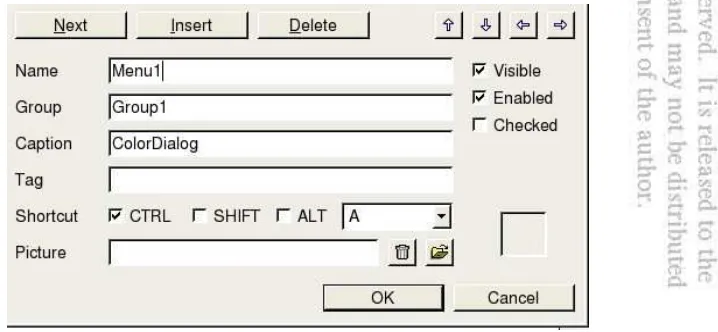
Figure 40- Edit fields for the Menu Editor...99
Figure 41- Building our project menu...101
Figure 42- A formatted text label displaying the color value...104
Figure 43- Selecting colors and fonts...111
Figure 44- Making a new default font for the TextLabel1 control...112
Figure 45- An Information MessageBox...113
Figure 46- A checked menu item...113
Figure 47- A Question MessageBox...115
Figure 48- An Error Message...115
Figure 49- A Warning message...116
Figure 50- Delete message with three buttons...117
Figure 51- The Open File Dialog...118
Figure 52- Save File Dialog...119
Figure 53- The Select Directory Dialog...119
Figure 54- Choosing the Explorer example...149
Figure 55- Layout for our ListView example...159
Figure 56- Creating a new Icon image in Gambas...163
Figure 57- Our square icon image...163
Figure 58- Icon Editor ToolBox ...163
Figure 59- Our circle icon image...163
Figure 60- The TreeView Project window...164
Figure 61- What our GridView will look like...171
Figure 62- Our ColumnView example...174
Figure 63- Layout project icons...178
Figure 64- Form1 design mode showing layout of our controls...178
Figure 65- Layout program when it starts up...181
Figure 66- A TabStrip control...182
Figure 67- Tab Project Form1.form Design...183
Figure 68- Tab0 layout...183
Figure 69- Tab1 layout...184
Figure 70- Tab2 ToolButton layout with icons...185
Figure 71- Tab3 layout with a ComboBox...185
Figure 72- The FileOps program at runtime...196
Figure 73- Form2.form design mode...210
Figure 74- Finished Contacts program...248
Figure 76- Contacts search form design...261
Figure 77- Contacts Manager running standalone on my desktop...266
Figure 78- gfxDemo Form1 layout...271
Figure 79- Results of clicking the Text Button...274
Figure 80- Results of InvRect button click. Note the tiny black crosshair center screen...275
Figure 81- Ellipses demonstrates drawing lines and ellipses...278
Figure 82- Output after clicking the FillRect button...280
Figure 83- Using Draw.Polygon to draw a triangle...282
Figure 84- Using Draw.Polyline to draw lines...284
Figure 85- Using tiled images with the TileImg button of our demo program....292
Figure 86- Loading an SVG file in Gambas...295
Figure 87- Error results caught with TRY...305
Figure 88- CATCH test program opening screen...307
Figure 89- Div by Zero error caught by CATCH...307
Figure 90- The TextLabel updated with error info...308
Figure 91- Info message that the error is cleared...308
Figure 92- Main screen after error has been cleared...308
Figure 93- Default Gambas error dialog...309
Figure 94- Our event was raised...311
Figure 95- MouseOps program running...315
Figure 96- KbdOps program running...318
Figure 97- The BitOps program in design mode...320
Figure 98- Our bitOps program running...325
Figure 99- The FMain form in design mode...339
Figure 100- FRequest Form in design mode...339
Figure 101- Choosing the Translate option in Gambas...356
Acknowledgments
First of all, a very special thanks to Benoît Minisini for the creation of Gambas and for his support of this effort to further document this wonderful language. Without Benoît's initiative, we would all be struggling to find a better tool than what exists today on Linux platforms. Much of the initial documentation of the Gambas language was put on the Gambas Wiki by Benoît and he deserves special credit for making this information available. As it was the only known published source of definitive documentation in existence prior to this writing, much of the reference material herein was gleaned from that initial set of documentation. As with any written material, there is no guarantee that this documentation is as accurate as what you may find in the latest release of the Gambas product.
The author would like to extend a special thanks to Fabien Bodard for his help in making this work become a reality. Fabien tirelessly edited code, reviewed the sample projects presented herein, and provided great insight into the inner workings of Gambas – all at the time of harvest for his vineyard. Laurent Carlier and Steve Starr both also deserve my gratitude for their meticulous work editing the code and ensuring everything worked as advertised. Their feedback, suggestions and corrections were greatly appreciated. I would also like to thank Daniel Campos Fernández who was a great asset in helping me to understand some of the finer points of Gambas. Nigel Gerrard
also contributed to the success of this project by providing a final review and edit of the database material. From among these Gambas Hall of Fame coders, who else could have done it better?
Countless emails were received from many members of the Gambas community, all of which provided ongoing encouragement and support which motivated me to complete this effort and make it available to everyone. Given the difficulties of writing a book in the first place, it was a great feeling of satisfaction to receive such support from complete strangers who all share the single vision of making Gambas a success. I can only hope that this book will do justice to that effort and welcome any suggestions for change, as well as any compliments or constructive criticism. It has been a lot of fun to learn this wonderful new language and to explore the possibilities it offers. I dedicate this book to all of those Gambas users and developers who have relied on each other in the Gambas user/developer community to make this product become reality. Shared vision, common goals, and open software are powerful forces that should not ever be underestimated. Such forces have been known to change the world and will continue to do so long after this book has been read and forgotten.
Foreword
For the last three years, I have plunged headfirst into the Linux programming environment. Considering my first installation of Linux was back in 1996, it should not be considered a good first start. As an enthusiastic Basic developer, the Linux environment lacked a tool that would allow me to easily program in the Linux environment. By chance, I stumbled upon a small project, the fruit of more than two years of work from a man named Benoit Minisini. After figuring out how to get past the idiosyncrasies of compilation, I discovered what was to be the embryonic stages of one of the most fabulous projects i could have imagined, Gambas! At that time, Gambas was already implemented with it's own Integrated Development Environment (IDE) and a syntax highlighter. The ability of Gambas to dynamically load components and remain fairly true to the Basic language as used under Windows was an added benefit.
Today, Gambas has arrived as a mature product that, in it's first version, allows a user to construct graphical applications or console based applications, supports database management, connection to the Internet or to socket servers, utilizes data compression, supports DCOP with KDE applications, and much more. A Gambas application can be translated directly from the IDE and packaged in binary form for different Linux distributions. What was initially alluring to me still is -- Gambas has gone beyond being just another programming language because it supports all of the features of a "professional" product while retaining its simplicity. Gambas provides a real tool for the beginning programmer and makes it possible for a novice programmer to develop high quality applications. Here, in this book, you will find the first comprehensive treatment of Gambas. It makes approaching the Gambas language simple and the reader can easily progress from the beginner's level topics to the more advanced topics professional programmers use daily.
and change do not rest solely in the heads of a stable of chosen developers working on the Gambas 2 project. They come from all Gambas users who provide the ideas that make Gambas 2 even better than before. Already it can do so much more than version 1.0. I strongly recommend that while you are waiting for the stable release of Gambas 2, you begin your Gambas training with your machine and what you will find in this book. It will prepare you for a wonderful programming experience in the Linux environment.
Chapter 1 - Introducing Gambas
Gambas was initially created by Benoît Minisini, a resident of the suburbs of Paris. According to Benoît, Gambas is a Basic language with object extensions. The name itself is a play on the words "Gambas almost means Basic" and, according to the author, Gambas evolved because of his personal programming experiences with the Microsoft Visual Basic® software product1. Rather than
contend with the horrendous number of bugs and idiosyncrasies found in that product, he decided to create Gambas.
Gambas is licensed under the GNU Public License2 and has taken on a life
of it's own due to its immense popularity. Gambas runs on most of the major Linux platforms and the current (at the time of this writing) stable version is Release 1.0.9. Minisini makes it very clear that Gambas is not compatible with Visual Basic and it will never be made compatible. The syntax and internal workings of Gambas are far better and more user friendly. Minisini stated [sic] that he “took from Visual Basic what he found useful: the Basic language, the development environment, and the ability to quickly [and easily] make programs with [graphical] user interfaces.”3
Minisini disliked the overall poor level of programming that is common among many Visual Basic programs. Many believe that this problem may be due to the “enforced” use of quirky programming practices imposed on developers as a result of the wide range of bugs and the strange idiosyncrasies of the proprietary VB language. Gambas has been developed to be as coherent, logical and reliable as possible. Because it was developed with an approach designed to enhance programming style and capture the best the Basic programming language has to offer, the addition of object-based programming has allowed Gambas to become a popular, modern, stable, usable programming environment for Linux developers.
Gambas Architecture
Every program written with Gambas Basic is comprised of a set of project files. Each file within a project describes a class. The class files are initially compiled and subsequently executed by the Gambas Interpreter. This is very similar to how Java works. Gambas is made up of the following programs:
1 The reader is encouraged to visit http://gambas.sourceforge.net/index.html to learn more about the Gambas project.
2 For information about the license, visit http://www.gnu.org/licenses/licenses.html#GPL .
✔ A compiler ✔ An interpreter ✔ An archiver
✔ A graphical user interface component ✔ A development environment
Figure 1 below4 is an illustration of the overall architecture of Gambas. In
Gambas, a project contains class files, forms, modules, and data files. A Gambas project is stored in a single directory. Compiling a project uses in incremental compile method that only requires recompilation of the modified classes. Every external reference of a class is solved dynamically at runtime. The Gambas archiver transforms the entire project directory structure into a standalone executable. The Gambas development environment was written with Gambas to demonstrate the fantastic capabilities of the language.
Some other features that set Gambas apart from other languages include the fact that Gambas has an extensible component architecture that allows programmers to extend the language. Anyone can write components as shared libraries that dynamically add new native classes to the interpreter. The component architecture is documented online in the Gambas Wiki encyclopedia5.
4 See URL http://gambas.sourceforge.net/architecture.html, for the original graphic.
5 Copyright (c) 1999-2005 by contributing authors. All material on the Gambas Wiki is the property of the contributing
We will cover Gambas components in greater detail later in this book. By default, the Gambas Interpreter is a text-only (console-based) program. The component architecture is used for the graphical user interface (GUI) part of the language. Because the GUI is implemented as a Gambas component, it has the ability to be independent of any specific GUI toolkit. With Gambas, you can write a program and choose which toolkit, such as GTK+6, Qt7, etc., to use later. The current
release of Gambas implements the graphical user interface with the Qt toolkit. The GUI components are derived directly from the QT library. It is recommended that the reader also consult with the QT documentation8 to better understand the
GUI controls. According to Minisini, a GTK+ component with a nearly identical interface as the Qt component is planned.
authors.
6 For more info about GTK+, visit http://www.gtk.org/ .
7 For more info about Qt, visit http://www.trolltech.com/products/qt/ . 8 http://doc.trolltech.com/3.3/index.html
Another feature of Gambas that sets it apart from other programming languages is the capability of any window or dialog box to be used like a control. This feature is not directly supported in other programming languages. Also, Gambas projects are easily translatable, into almost any other language. We will demonstrate this feature later in the book when we cover Internationalization (i18n).
The Gambas Programming Environment
For now, let's take a quick tour of Gambas and introduce you to the Gambas programming environment. All of the examples and code written for this book were developed using Gambas version 1.0.9 running on Linspire® 5.09.
They should work on any platform that you can install Gambas on successfully. For Linspire® users, it is as simple as the click of a button using the Click-N-Run®
warehouse feature of that product. When you first click the desktop icon to start the Gambas program, you will be presented with an opening screen similar to that found in Figure 2 above. The welcome screen allows you to create a new project, open an existing project, view and select from recent projects, look at examples, or quit. For our quick tour of Gambas, we are going to select the New Project option and create our first Gambas project. You will see a dialog similar to Figure 3 below appear.
9 For more info about Linspire, visit http://www.linspire.com .
Simply click the Next>> button and you will be presented with another dialog that requires you to choose the type of project you want to create (see Figure 4, below). This dialog requires you to pick between a GUI project or a console project.
For our example, choose the first selection, “Create a graphical project” and click the Next>> button at the bottom of the dialog. The next dialog that you will see requires you to name your project and choose where it will be located on your local file system. It is shown in Figure 5 below.
This section of the wizard has you to specify the name of the project as it will be stored on disk. Remember, in Gambas a project is entirely self-contained in a directory or folder. The folder name you choose as the name for the project is what will be created on your system.
The title of the project will be what you specify in the second text input field of the dialog. Additionally, the Options section allows you to choose whether or not your project will be translatable and if the controls used on your forms are going to be made publicly accessible. We will discuss these option in more detail later in this book. For now, just fill out the dialog as shown in Figure 5 and click Next>>.
Choose a directory appropriate for your file system and click the Next>>
button to proceed to the final dialog screen of the wizard, as shown on the following page in Figure 7. This dialog is simply a confirmation screen of the choices you have made. The most important thing to remember about this screen is that it is the last chance you have to back up and make changes before your new project is created.
Figure 5- Project Name Selection Dialog.
Figure 7- New Project confirmation dialog.
Once you have clicked on the “OK” button to finish this wizard, Gambas will present you with the Gambas integrated development environment (IDE). The IDE consists of several components that are shown in Figure 8 on the next page.
Gambas IDE Components
The Project Explorer is the main Gambas window. It show you a TreeView of the types of files found within your project (i.e., class files, forms, modules, and other types of files such as data and picture or icon files) and the Project Explorer allows you to perform most Gambas project management operations, such as opening and saving projects, building executables, running your program or debugging it, showing or hiding various Gambas dialogs, etc. From the TreeView in the Project Explorer, you will see the items listed as follows:
✔ Classes ✔ Forms ✔ Modules
✔ Data
Forms lists the various forms you create for your project. Forms are the windows the user actually interacts with.
Modules display the modules you've written for your project. Modules are simply sets of subroutines and functions to be used anywhere in your program. Unlike classes, you can't make objects out of them at runtime and they have no event handlers.
Data lists the other files in your project. These can include any other kind of file used to build your project, such as graphic files, icons, bitmaps, text or HTML files, and even media files. At the bottom of the Project Explorer you will find the Status Bar which is used to indicate what Gambas is currently doing.
When you start to develop a project in Gambas, you will usually want to begin with a main form. The main form is where the program startup and initialization will occur and it is usually the first thing your user will see when they execute (or run) the application you have built. This is the form you will add controls to and specify what actions are to be taken when the user interacts with
those controls. Such interaction between the user and the GUI is referred to as events. The controls are found in the ToolBox window. You can change the appearance and behavior of the controls by setting the properties for each control. Properties can be seen in the properties window.
Now, lets take a look at the menus and buttons found at the top of the Project Explorer. The menus (see Figures 9 through 12 below) control all the main Gambas management tasks. The File menu will allow you to open a project, save a project, create a new project, open some Gambas example projects, or quit using Gambas. The Project Menu is where program compilation occurs. You can also create the program executable, make a source archive, or create an installation package. This menu offers you the option of translating your program into another language. Finally, you can set Gambas IDE properties from this menu.
Figure 9- Project Explorer File Menu.
Figure 10- Project Menu.
Figure 11- Project Explorer View Menu.
The View menu will allow you to bring up the properties window or the ToolBox window. You can open a console or use the Icon Editor to create program icons. The Hierarchy option will open a window and show you your project's class hierarchy. Finally, from this menu, you can close all of the windows that are currently open in the IDE. The ToolBar buttons (see Figure 13 below)
provide single-click access to the most common menu items. Hovering your mouse cursor over one of the buttons will display a ToolTip that will tell you what menu action that particular button will perform.
Figure 13 below shows you the File menu and ToolBar. From the Project Explorer TreeView you can double-click on a form and it will pop up for you to edit. Editing forms is simply a matter of selecting what type of control you'd like to place on the form and then using the mouse to resize (draw) it on your form.
Right clicking on the form or any of its children (controls) will show you a pop-up menu that will allow you to perform operations on the control, edit its properties or delete it. The currently selected control is indicated by four black squares called handles. Clicking on a handle and using the mouse to drag the control where you want it will allow you to move or resize the control. Double-clicking on a control will bring up the code editor window and display any existing event handler for the control or display a default event handler if there have been none specified.
The Gambas Code Editor enables you to write code to handle events for the controls you've placed on your form. In the ToolBox window, the Selection Tool is the only item in the ToolBox that isn't actually a control. The Selection Tool simply gives you control of the default mouse pointer. You use this pointer to select controls and perform positioning and resizing operations on forms and their associated controls.
From the Project Explorer File Menu, choose the Quit option and save your project. When we reopen it, all your work will be saved. In the next section, we will begin to cover the essentials you need to understand in order to program with
Chapter 2 – Gambas Language
Concepts
In this chapter, we will begin to learn the basic concepts needed to master the Gambas programming language. The topics we will cover in this chapter include learning about Gambas data-types, constants, and variables and how to declare and assign values to those constants and variables. We will learn about the basic arithmetic operators, comparison operators, and string operators.
Gambas Variables, Data-types and Constants
Variables must be defined at the beginning of a class, method or function. Variable declarations can either be local to a procedure or function or they can be declared global to a class. A global variable is accessible everywhere in the class
it is declared. The format of a global variable declaration in Gambas takes the following general form:
[STATIC](PUBLIC|PRIVATE) Identifier [Array declaration] AS [NEW] Data-type
If the PUBLIC keyword is specified, it is also accessible to the other classes that have any reference to an object of that class. If the PRIVATE keyword is specified, it is not accessible outside the class in which it was defined. If the STATIC keyword is specified, the same variable will be shared with every object of the class where it is declared. If the NEW keyword is specified, the variable is initialized with (i.e., instantiated with) a new instance of the class using the data-type specified. For local variable declarations, the format is like this:
[DIM] Identifier AS Datatype
This will declare a local variable in a procedure or function. This variable is only accessible to the procedure or function where it is declared. An example of several local declarations is shown below:
DIM iValue AS INTEGER DIM stMyName AS STRING
There are currently nine basic data-types a programmer can use to write program code in Gambas10. These data-types include the following:
Boolean Byte Short
Integer Float Date
String Variant Object
Boolean data-types can contain only a single value, either TRUE or FALSE. TRUE is defined as 1 and FALSE is defined as 0. The declaration of a Boolean variable occupies 1 byte of memory and the default value is FALSE. An example of a variable declaration for a Boolean variable looks like this:
STATIC PRIVATE bGrid AS Boolean
Typically, a programmer would use a Boolean data-type when the only values for the variable would be yes/no, TRUE/FALSE, 1/0, etc. If the values used in your program could be anything else, Boolean would be an inappropriate selection for the variable data-type. Another thing to note in the variable declaration above is the placement of the lowercase letter b in from of the variable name.
Good programming convention encourages this practice, known as the Hungarian Notation11, as it allows the programmers to know what data-type the
variable is by simply knowing that the 'b' stands for Boolean. What happens when a programmer wants to use a Byte data-type instead of a Boolean data-type? Typically, a second letter is added to the variable declaration so rather than using 'b' in front of the variable name the programmer would use 'by' as below:
STATIC PRIVATE bySomething AS Byte
The letters 'ar' 's', 'i', 'f', 'd', 'st', 'v' and 'o' are commonly used notations when declaring variables while programming in Gambas. It is good programming practice to force yourself to adhere to this technique so that others can pick up your code and use it without having to search around to find the data-type for each variable encountered. Some programmers even use more than the first letter (s) to name their variables. For example, they would code IntMyNumber or
ByteSomething.
10 In the second release of Gambas (Gambas2) "Long" and "Single" data types are planned. These data-types are like the C LONG LONG and FLOAT data types. This is a significant improvement because Gambas2 will provide direct programming access to the C API and will also support 64 bit platforms.
The Byte data-type can contain values from 0 to 255 and occupies one byte of memory when declared. The default value when a Byte data-type is declared is 0. If you are certain your values will not exceed 255 then this data-type is appropriate for use. If it is possible that the values assigned to this variable would exceed 255, then the likely result would be a program crash at run time. It is better to use the Short data-type or an Integer data-type for such situations. For a Short data-type, values can range from -32768 to +32767. Short data-types occupy two bytes of memory and default to a zero value when declared. Integer data-types occupy twice as much memory, taking up four bytes. The range of values you can use with the Integer data-type is from -2,147,483,684 to +2,147,483,647. This is similar to the LONG data-type used in VB. Examples of Short and Integer data-type variable declarations are:
STATIC PUBLIC sSomeShort AS Short STATIC PUBLIC iSomeInteger AS Integer
When integers will not work for your purposes, Gambas provides you with the Float data-type. This data-type allows you to use floating point numbers for your program. Float data-types are like Double data-types used in C and VB. The range of values for float data-type variables is from -1.79769313486232E308 to -4.94065645841247E-324 for negative values and from 4.94065645841247E-324 to 1.79769313486232E308 for positive values. Float variables occupy eight bytes of memory and default to a zero value when declared. A sample declaration for a float would be as follows:
DIM fRadius AS Float
The last numeric data-type we have in Gambas is the Date data-type. Date variables also take up eight bytes of memory. The date portion of the date is stored in a four byte integer and the time portion is stored in a four byte integer. It is stored as [Year, Month, Day ][, Hours, Minutes, Seconds] and is usually used with the Gambas built-in Date and Time functions, which we will explain about later in this book. The date data-type defaults to a NULL value when initialized. Here is how to declare a Date data-type:
DIM ddate AS Date DIM dtime AS Date
means that the data can contain any combination of letters and integers or special characters such as $%^&*. Strings, when declared take four bytes of memory. This means the maximum size for a string is 4 bytes * 8 bits per byte, or 32 bits squared (1,024 bytes). String variables default to a NULL value when declared. Declare a string variable just like you would any other variable:
STATIC PUBLIC stSomeString AS String
The Variant data-type is used when you do not know what kind of data-type the variable will be receiving. For example, if reading data from a file, you could read an integer, a string, a single character, floating point numbers, etc. To ensure the data is placed in a variable without causing a program crash, the variant data-type is used. You can then test the variant data using some built-in functions of Gambas to determine the data-type or you can just convert the data to the data-type you need using a conversion function. We will demonstrate this later in the book. For now, it is only important that you understand that variant data-types exist and that they are used when you are not sure of the type of data the variable will hold.
The Object data-type is a special data-type that holds and references objects such as controls and forms. Later, when we begin to discuss OO programming, we will cover the use of object data-types in greater detail. The table shown below is presented as a convenient reference:
Gambas data-types
Name Description Memory size Default
Boolean True or False 1 byte FALSE
Byte 0 ... 255 1 byte 0
Short -32768 ... +32767 2 bytes 0
Integer -2147483648 ... +2147483647 4 bytes 0
Float Similar to the double data-type in C 8 bytes 0
Date Date/time, each stored in a 4 byte integer. 8 bytes NULL
String A reference to a variable length string. 4 bytes NULL
Variant Can consist of any data-type. 12 bytes NULL
Object An indirect reference to an object. 4 bytes Null
constant throughout the program. This type of data is known as a Constant in Gambas. Gambas constants is used to represent a NULL object reference, a zero length string, a NULL date, or an uninitialized variant. Examples of constants include the values NULL, TRUE and FALSE. To declare a constant in Gambas use the following format:
( PUBLIC | PRIVATE ) CONST Identifier AS Datatype = value
This declares a class global constant. This constant is accessible everywhere in the class it is declared. If the PUBLIC keyword is specified, it is also accessible to the other classes having a reference to an object of this class. Constant values must be Boolean, integers, floating point or string data-types. Here are some examples of constant declarations:
PUBLIC CONST MAX_FILE AS Integer = 30
PRIVATE CONST MAGIC_HEADER AS String = "# Gambas form file"
The built-in constants you would use in Gambas are listed in the table below:
Gambas Constants
Constant Example
The TRUE value. TRUE The FALSE value. FALSE
Integer numbers. 0, 562, 17, -32769
Hexadecimal short signed integers. &H100F3, &HF0FF, &FFFF
Hexadecimal signed integers. &H1ABF332E, &1CBF302E Hexadecimal unsigned integers. &H80A0&, &HFCFF&
Binary integers. &X1010111101, %101000011
String constants can also contain the following escape characters:
Escape character ASCII equivalent
\n CHR$(13)
\r CHR$(10)
\t CHR$(9)
\” Double quote
\\ Backslash
\xx CHR$(&Hxx)
You can write a string constant in several successive parts. For example, "My son" " is " "sixteen" is seen by Gambas as "My son is sixteen".
Variable Assignment
A programmer can assign any value to a variable in Gambas by using the following general format:
Variable = Expression
This assignment statement assigns the value of an expression to one of the following elements:
✔ A local variable ✔ A function parameter ✔ A global (class) variable ✔ An array element
✔ A public object variable or property
Here are some example of variable assignments:
iMyVal = 1984
stMyName = "Orwell" fMyNum = 123.45
Assignment Using The WITH Statement
is used. The expression will begin with dot notation, i.e., .Text could be used. WITH assigns the dotted expression on the left of the equal sign the value found on the right side of the equal sign. Expression must be an object. Here is a sample of how the WITH structure looks:
WITH Expression
.object = “something”;. END WITH
As an example, the code below is code equivalent to hButton.Text = "Exit"
WITH hButton .Text = "Exit" END WITH
Operators and Expressions
Now that we know how to declare variables and constants and how to assign values to these variables and constants, lets take a look at the operations that can be performed with them. We will begin with comparison operators then take a look at arithmetic operators and string operators.
Comparison operators
Comparison of two variables requires finding answers to questions like
“does x equal y” or “is a less than b”. The following comparisons are supported in Gambas:
Operator Meaning Example
= Is equal to IF a = b THEN ...
<> Is not equal IF a <> c THEN ...
< Is less than IF a < d THEN ...
> Is greater than IF a > e THEN ...
<= Is less than or equal to IF a <= f THEN ...
>= Is greater than or equal to IF a >= g THEN ...
Arithmetic Operators
operators include addition, subtraction, multiplication, and division. The standard symbols for these operations are '+', '-', '*', and '/'. For example, Number + Number will add two numbers. When a value or variable is preceded by a minus sign, -222, for example, Gambas computes the opposite sign of that number. The value Zero is the opposite of itself. Now, we will start to write some Gambas code using the Gambas terminal application feature. The console window will display our output so lets use Gambas to experiment with the operators as we learn about them.
Let's Start Coding Gambas
Now that we know about data-types and variable assignments, lets get our feet wet with Gambas. Start Gambas and from the Project Explorer File Menu select New Project. As you go through the New Project Wizard, select a Terminal Project and click Next. Name this project TerminalTest and place it in a directory called TerminalTest. Don't worry about any of the other options. Just click
Next>> until the wizard completes. Once the IDE appears with your new project we will need to create a startup class in order to run our code. From the Project Explorer find the TreeView item called Classes and right-click the mouse. Choose the New... option and take the default name Class1. The code window will appear and inside the window it should look something like this:
' Gambas class file
STATIC PUBLIC SUB Main()
END
Let's take a look at some Gambas keywords you should know a bit more about before we proceed.
END, RETURN and QUIT Statements
RETURN [ Expression ]
When Gambas executes the RETURN command, it quits a procedure or a function and completes its work by returning the value of Expression. Now, enter the following code after the ' Gambas class file line (note that comments in Gambas start with the ' [aka the tick mark]) and between the STATIC PUBLIC SUB Main() and END statements. Once you have entered the code below in the Gambas code window, click the green ► button from the Project Explorer ToolBar to execute your program. Here is the code you want to try first:
STATIC PUBLIC SUB Main() DIM N AS Integer DIM R AS Integer N = 3
R = -6
PRINT “===> “;N;" | ";R; " and "; -N ; " | "; -R; END
If all goes well (and it should), you will see the blue shrimp (a.k.a., the Gambas mascot) dance and the console window will respond with the following:
===> 3 | -6 and -6 | 3
Note that the value of variable N changed from a positive 3 to -3 and the value of -6 changed to a positive value of 6. Don't worry about the syntax of the PRINT statement or the use of the keyword DIM used to declare our variables for now. We will cover these keywords later in the book.
To subtract values, use the format Number - Number and Gambas will subtract the second number from the first.
STATIC PUBLIC SUB Main() DIM N AS Integer DIM R AS Integer N = 8
R = 5
PRINT "===> "; N-R; END
The console will respond with the following:
To multiply numbers, we use the format of Number * Number and Gambas will multiply the two numbers. Here is another console example to try:
STATIC PUBLIC SUB Main() DIM N AS Integer DIM R AS Integer N = 8
R = 5
PRINT "===> "; N * R; END
The console will respond with the following:
==> 40
Division is no different than multiplication. Use the format of Number / Number to have Gambas divide two numbers. A division by zero error will occur if the value of the number to the right of the slash is zero. Try this console example:
STATIC PUBLIC SUB Main() DIM N AS Integer DIM R AS Integer N = 9
R = 3
PRINT "===> "; N / R; END
The console will respond with the following:
==> 3
Now try using the \ to divide instead of the / character:
STATIC PUBLIC SUB Main() DIM N AS Integer DIM R AS Integer N = 9
R = 5
PRINT "===> "; N \ R; END
The console will respond with the quotient:
If you use a backslash to divide numbers, i.e., Number \ Number Gambas computes the quotient of the two numbers. A division by zero error will occur if the value of the number to the right of the backslash is zero. A \ B is the equivalent of INT(A/B). To get the remainder, we can use the built-in MOD function like this:
STATIC PUBLIC SUB Main() DIM N AS Integer DIM R AS Integer N = 9
R = 5
PRINT "===> "; N \ R; " and the remainder is: ";9 MOD 5; END
The console responds with:
===> 1 and the remainder is: 4
Using Number MOD Number computes the remainder of the quotient of the two numbers. A division by zero error will occur if the value of the number to the right of the MOD operator is zero. Finally, we can test the Division by Zero error by typing this example:
STATIC PUBLIC SUB Main()
DIM N AS Integer DIM R AS Integer
N = 9 R = 0
PRINT "===> "; N / R; END
Gambas will respond with the following:
NOTE: Click the Stop button when you see this dialog appear.
In order to raise a number to a given power (exponent), use the format of Number ^ Power and Gambas raises Number to the power the Power operator specified. Try this:
STATIC PUBLIC SUB Main() DIM N AS Integer DIM R AS Integer N = 2
R = 3
PRINT "===> "; N ^ R; END
The console will respond with the following:
==> 8
Gambas also has the ability to support logical arithmetic operations12.
Using the format of Number AND Number instructs Gambas to use the AND operator to compute the mathematical AND of the binary values of both of the numbers. Try this:
STATIC PUBLIC SUB Main()
DIM N AS Integer DIM R AS Integer
N = 0 R = 0
PRINT "=> ";N AND R;" is the AND result of ";N;" and ";R R = 1
PRINT "=> ";N AND R;" is the AND result of ";N;" and ";R N = 1
PRINT "=> ";N AND R;" is the AND result of ";N;" and ";R END
The console window responds with:
=> 0 is the AND result of 0 and 0 => 0 is the AND result of 0 and 1 => 1 is the AND result of 1 and 1
Likewise, Number OR Number used the OR operator and computes the mathematical OR of the binary value of the two numbers.
STATIC PUBLIC SUB Main() DIM N AS Integer
DIM R AS Integer
N = 0 R = 0
PRINT "=> ";N OR R;" is the OR result of ";N;" OR ";R R = 1
PRINT "=> ";N OR R;" is the OR result of ";N;" OR ";R N = 1
PRINT "=> ";N OR R;" is the OR result of ";N;" OR ";R END
The console window responds with:
=> 0 is the OR result of 0 OR 0 => 1 is the OR result of 0 OR 1 => 1 is the OR result of 1 OR 1
Number XOR Number uses the XOR operator and computes the mathematical exclusive OR of the binary value of the two numbers.
STATIC PUBLIC SUB Main() DIM N AS Integer
DIM R AS Integer
N = 0 R = 0
PRINT "=> ";N XOR R;" is the XOR result of "; N; " XOR "; R R = 1
PRINT "=> ";N XOR R;" is the XOR result of "; N; " XOR "; R N = 1
PRINT "=> ";N XOR R;" is the XOR result of "; N; " XOR "; R END
The console window responds with:
=> 0 is the XOR result of 0 XOR 0 => 1 is the XOR result of 0 XOR 1 => 0 is the XOR result of 1 XOR 1
Additionally, the following operators manipulate one or more numeric values and return a numeric value:
The DEC operator is used to decrement a value by one. The INC operator will increment the value by one. The variable can be any target of an assignment but must be a numeric value.
STATIC PUBLIC SUB Main() DIM N AS Integer DIM R AS Integer
N = 5 R = 5 DEC N INC R
PRINT "===> "; N; " | "; R; END
The console will respond with the following:
==> 4 | 6
LIKE is used to perform a Boolean comparison of a string. It takes the format of String LIKE Pattern and it returns TRUE if the String matches the Pattern. The pattern can contain the following pattern-matching characters :
* Match N number of any type of character. ? Match any single character.
[abc] Match any character specified between the bracket symbols. [x-y] Match any character that exists in the interval x-y.
[^x-y] Match any character that does not exist in the interval x-y.
STATIC PUBLIC SUB Main()
PRINT "Rittinghouse" LIKE "R*" END
The console responds with:
TRUE
The special character \ prevents the next character following it in a string from being interpreted as a generic part of the string. Think of the \ character as a control code. Try this:
PRINT "Gambas" LIKE "?[Aa]*" PRINT "Leonard" LIKE "G[Aa]\\*" PRINT "Alfred" LIKE "G[^Aa]*" END
The console responds with:
TRUE TRUE FALSE FALSE
Note: you must use a double backslash character, \\ to print a backslash or special string sequence containing backslashes. Otherwise the \ will be interpreted by the compiler as a special character like '\n', '\t', '\*', etc. Alternatively, you can use this pattern string:LIKE "G[Aa][*]"
The NOT operator is used to return a result of an expression. The format is as follows:
Result = NOT Expression
When Gambas evaluates this expression, it computes the logical NOT of the expression. If the expression is a string or an object, Gambas returns TRUE if the expression is NULL. Here are some examples to try on your console:
STATIC PUBLIC SUB Main() PRINT NOT TRUE
PRINT NOT FALSE PRINT NOT 11
PRINT NOT "Gambas" PRINT NOT "" END
The console responds with:
False True -12 False True
String Operators
the string operators. These operators allow you to concatenate strings and file paths, perform LIKE operations as explained above, determine if strings are equal or not equal, less than, greater than, less than or equal to, or greater than or equal to each other. The following table of string operations is shown for your convenience:
Gambas String Operations
String Operation Result to determine
String & String Concatenate two strings.
String &/ String Concatenate two strings that contain file names. Add a path separator between the two strings if necessary.
String LIKE Pattern Perform pattern matching using the LIKE operator.
String = String Determine if the two strings are equal.
String <> String Determine if the two strings different.
String < String Determine if the first string is lower than the second string
String > String Determine if the first string is greater than the second string
String <= String Determine if the first string is lower or equal to the second string
String >= String Determine if the first string is greater or equal to the second string Note : all string operator comparisons are case sensitive.
Here are some things to try using Gambas console:
STATIC PUBLIC SUB Main() DIM a AS String
DIM b AS String a = "ham"
b = "burger"
PRINT "===> "; A & B; a = "Gambas"
b = 1
PRINT "===> "; A & " is number " & B; END
The console responds with:
===> hamburger
Chapter 3 - Keywords and Program
Flow Control
In Gambas, the programmer controls the program by using keywords and conditional expressions. Gambas is an event driven language. The programmer has the ability to direct what happens whenever any event occurs. The programmer uses Gambas keywords (which are reserved words with very specific syntax) to create instructions that guide what the program will do in a given circumstance. Conditionals are tests of an expression or a variable. The test could be an evaluation of the result of an operation or comparison of equality, for example. The following table shows all of the Gambas keywords currently supported:
BREAK CASE CONTINUE DEFAULT DO ELSE
END ENDIF END SELECT END WITH
FOR FOR EACH GOTO IF LOOP NEXT
QUIT REPEAT RETURN SELECT STEP THEN
TO UNTIL WAIT WEND WHILE WITH
The best way to understand what these keywords and conditionals mean is to gradually introduce them with examples. Rather than go through the list of keywords in alphabetical order, let's take the approach of introducing them based on the type of functionality they support. We will start with the most basic statements and commands and progress through the more complex ones as we continue. Let's start with the Gambas PRINT statement.
The PRINT Statement
The PRINT statement prints expressions to the standard output. The expressions are converted to strings by the Str() function. PRINT takes the format of:
PRINT Expression [(;|,) Expression ...] [(;|,)]
Input and Output. When using PRINT to write output to a file, expressions are sent to the stream File and this format is used:
PRINT # File, Expression[(;|,) Expression ...] [(;|,)]
Here is something to try using PRINT:
STATIC PUBLIC SUB Main() DIM b AS Integer
b = 1
PRINT "===> " & "b is: " & B PRINT "===> ", " b is:", B PRINT "===> "; "b is: " & B END
The console displays the following output:
===> b is: 1 ===> b is: 1 ===> b is: 1
The IF Statement
The IF statement is used to make a decision. IF is one of the most common structures used by programmers to make comparisons and decisions based on the result of that comparison. Using IF logic, your program can perform comparisons using operators you have learned about and subsequently make decisions based on the result of such comparisons. IF takes the general form of:
IF Expression THEN do something...
[ ELSE IF Expression THEN do something else... ] [ ELSE
do something completely different... ] ENDIF
Here is an example using IF that you can try on the console:
STATIC PUBLIC SUB Main()
IF b = 1 THEN
PRINT "===> " & "Gambas is number " & B; ELSE IF b <> 1 THEN
PRINT "Should not print me!"; ELSE
PRINT "Something bad is happening" ENDIF
END
The console responds with:
===> Gambas is number 1
The SELECT / CASE Statement
The SELECT statement evaluates an expression, comparing it to each CASE specified, and will execute the code enclosed in the matching CASE statement if the expression evaluated is TRUE. If no CASE statement matches the expression under evaluation, the DEFAULT or CASE ELSE statement is executed. The SELECT/CASE statement allows a programmer to build a code block capable of evaluating many expression results without having to code an excessive amount of IF/ELSEIF/ELSE statements. The format of the SELECT statement is:
SELECT Expression
[CASE Expression [, Expression ...] [CASE Expression [, Expression ...] [CASE ELSE | DEFAULT ...]
END SELECT
Here is some code to show you how to use the SELECT statement:
STATIC PUBLIC SUB Main()
DIM w AS Integer w = 1
' START: is a LABEL, used with GOTO explained below.
START:
PRINT "The value of w is: " & w
INC w GOTO START CASE 3
INC w GOTO START CASE ELSE
PRINT "The variable w has no handler for: " & w END SELECT
PRINT "Final value of w IS: " & w END
The console should respond with the following output:
The value of w is: 1 The value of w is: 2 The value of w is: 3 The value of w is: 4
The variable w has no handler for: 4 Final value of w IS: 4
Because the variable w was incremented to the value of 4 and there was to CASE to handle that value, the CASE ELSE block is executed. CASE ELSE can also be written as CASE DEFAULT. Either way, it is where code defaults to when no case satisfies the value of the variable being checked.
GOTO and LABELS
Note the use of the LABEL named START: in the previous code example. The colon must be used with the label name and it must follow it without any spaces between the label and the colon. Labels are the targets where a GOTO instruction will direct program flow. While the use of GOTO should be judicious it is sometimes necessary. It is used in the above example to demonstrate how to use GOTO and LABELS. Later, when we study looping structures, we will rewrite this code to use a Gambas looping mechanism.
The FOR / NEXT Statement
Many times when writing code, programmers find the need to iterate through a set of values (called looping) to process data. The FOR statement is a looping statement commonly used in programs. It takes the general form of:
The FOR statement repeats a loop while at each iteration of the loop incrementing a variable. Note that the variable must be a numeric data-type (i.e., a byte, a short, an integer or a floating point number) and it must be declared as a local variable. If the initial expression the FOR statement evaluates is higher than the TO expression (for positive STEP values) or if the initial expression is less than the TO Expression (for negative STEP values) the loop will not be executed at all. The STEP keyword allows the programmer to define the size of the interval incremented between loop iterations. Here is an example:
STATIC PUBLIC SUB Main() DIM I AS Integer
DIM J AS Integer
J = 1
FOR I = 1 TO 21 STEP 3
PRINT "LOOP iteration: " & J & ", I is equal to: " & I INC J
NEXT
PRINT "J IS: " & J & " and I is: " & I END
This code results in the following output:
LOOP iteration: 1, I is equal to: 1 LOOP iteration: 2, I is equal to: 4 LOOP iteration: 3, I is equal to: 7 LOOP iteration: 4, I is equal to: 10 LOOP iteration: 5, I is equal to: 13 LOOP iteration: 6, I is equal to: 16 LOOP iteration: 7, I is equal to: 19 J IS: 8 and I is: 22
Note that once the value of J exceeds the test of 21 in the loop, the loop stops and code flow moves past the NEXT statement. The value of J remains unchanged when exiting the loop. Experiment with the code above, changing the STEP value from 3 to 1, for example. Try to modify the FOR statement like this:
FOR I = 21 to 1 STEP -1
examples and change variable values, practice using the PRINT statement, etc. Get to know the console and you will quickly learn it is a great tool to test expressions, code segments, etc. Do not be afraid to experiment with Gambas! The very worst thing that can happen is your program blows up and you have to restart your computer – unlikely, but indeed possible. Play around and get comfortable with Gambas. It is the best way to learn.
DO [WHILE] LOOP
The DO [WHILE] LOOP structure begins execution of a loop that will not end until a condition is met or code within the loop structure forces an exit. The code executed in the loop is delimited by the keywords DO and LOOP. If the optional keyword WHILE is not specified, the loop would execute forever (an infinite loop) or until some condition within the loop structure forced an exit. If the optional keyword WHILE is specified, the loop is stopped once the evaluated result of the expression becomes FALSE. In other words, while the results of this expression are TRUE, continue to iterate (do) the loop. If the expression is FALSE when the loop is started, the loop will n