For your convenience Apress has placed some of the front
matter material after the index. Please use the Bookmarks
Contents at a Glance
About the Author ...
xlv
About the Technical Reviewers ...
xlvii
Acknowledgments ...
xlix
Introduction ...
li
Chapter 1: Sourcing Data from MS Office Applications
■
...
1
Chapter 2: Flat File Data Sources
■
...
61
Chapter 3: XML Data Sources
■
...
133
Chapter 4: SQL Databases
■
...
179
Chapter 5: SQL Server Sources
■
...
241
Chapter 6: Miscellaneous Data Sources
■
...
285
Chapter 7: Exporting Data from SQL Server
■
...
343
Chapter 8: Metadata
■
...
425
Chapter 9: Data Transformation
■
...
481
Chapter 10: Data Profiling
■
...
559
Chapter 11: Delta Data Management
■
...
619
Chapter 12: Change Tracking and Change Data Capture
■
...
681
Chapter 13: Organising And Optimizing Data Loads
■ CONTENTS AT A GLANCE
Chapter 14: ETL Process Acceleration
■
...
801
Chapter 15: Logging and Auditing
■
...
853
Appendix A: Data Types
■
...
931
Appendix B: Sample Databases and Scripts
■
...
973
Introduction
Microsoft SQL Server 2012 is a vast subject. One part of the ecosystem of this powerful and comprehensive database which has evolved considerably over many years is data integration – or ETL if you want to use another virtually synonymous term. Long gone are the days when BCP was the only available tool to load or export data. Even DTS is now a distant memory. Today the user is spoilt for choice when it comes to the plethora of tools and options available to get data into and out of the Microsoft RDBMS. This book is an attempt to shed some light on many of the ways in which data can be both loaded into SQL Server and sent from it into the outside world. I also try to give some ideas as to which techniques are the most appropriate to use when faced with various different challenges and situations.
This book is not, however, just an SSIS manual. I have a profound respect for this excellent product, but do not believe that it is the “one stop shop” which some developers take it to be. I wanted to show readers that there are frequently alternative technologies which can be applied fruitfully in many ETL scenarios. Indeed my philosophy is that when dealing with data you should always apply the right solution, and never believe that there is only one answer. Consequently this book includes recipes on many of the other tools in the SQL Server universe. Sometimes I have deliberately shown varied ways of dealing with essentially the same challenge. I hope by doing this to arouse your curiosity and also to provide some practical examples of ways to get data from myriad sources into SQL Server databases cleanly and efficiently.
Although this book specifically targets users of SQL Server 2012 I try, wherever feasible, to say if a recipe can be applied to previous versions of the database. I also try and highlight any new features and differences between SQL Server 2012 and older versions. This is because it is unlikely that users will only ever deal with the latest version of this RDBMS, and are likely to have multiple versions in production on most sites. I only ever go back to SQL Server 2005 when pointing out how the database has evolved, as this was the version which introduced SSIS - which was the major turning point in SQL Server-based ETL.
As the book is focused on SQL Server nearly all the code used is T-SQL. Some of the samples given are extremely simple, others are more complex. All of it is concentrated on ETL requirements. Consequently you will find no OLTP or DBA-based examples in this book. You will find a few touches of MDX where handling Analysis Services data is concerned and some VB.Net where SSIS script tasks are used. I have chosen to use VB.Net in nearly all the SSIS script tasks described in this book as it is, in my experience, the .Net language that many T-SQL programmers are most familiar with. Nonetheless I have added one or two snippets of C# (particularly where CLR assemblies are used) to avoid accusations of neglecting this particular language.
Data integration is a vast subject. Consequently, in an attempt to apply a little structure to a potentially enormous and disparate domain, this book is divided into two main parts.
The first part—Chapters 1 through 7—deals with the mechanics of getting data into and out of SQL Server. Here you will find the essential details of how to connect to various data sources, and then ingurgitate the data. As many potential pitfalls and traps as possible are brought to your attention for each data source.
The second part—Chapters 8 through 15—deal with the wider ETL environment. Here we progress from the nuts and bolts to the coordinated whole of extracting, transforming, and (efficiently) loading data. These chapters take the reader on a trip through the process of metadata analysis, data transformation, profiling source data, logging data processes, and some of the ways of optimizing data loads.
■ INTRODUCTION
structure so that the reader is free to focus on the essence of what is being explained, and not the data itself. Secondly I wished to avoid the added complexity of the multiple interrelated tables and foreign keys present in AdventureWorks. Finally I did not want to be using data which took time to load. This way, once again, you can concentrate on process and principle, and not develop “ETL-stare” while you watch a clock ticking as thousands of records churn into a table, accompanied by whirling on-screen images or the blinking of a bleary-eyed hard disk indicator. Consequently I have preferred to use an extremely uncluttered set of source data. A full description of the source database(s) is given in Appendix B.
Please also note that this book is not destined to be a progressive self-tuition manual. You are strongly advised to drop and recreate the sample databases between recipes to ensure a clean environment to test the examples that are given. Indeed the whole philosophy of the recipe-based approach is that you can dip in anywhere to find help, except in the rare cases where there are specific indications that a recipe requires prior reading or builds on a previous explanation.
The recipes in this book cover a wide variety of needs, from the extremely simple to the relatively complex. This is in an attempt to cover as wide a range of subjects as possible. The consequence is that some recipes may seem far too simplistic for certain readers, while others may wonder if the more advanced solutions are relevant to their work. I can only hope that SQL Server beginners will find easy answers and that advanced users will nonetheless find tweaks and suggestions which add to their knowledge. In all cases I sincerely hope that you will find this book useful.
Inevitably, not every question can be answered and not every issue resolved in one book. I truly hope that I have covered many of the essential ETL tasks that you will face, and have provided ways of solving a reasonable number of the problems that you may encounter. My apologies, then, to any reader who does not find the answer to their specific issue, but writing an encyclopaedia was not an option. In any case, I can only encourage you to read recipes other than those that cover the precise subject that interests you, as you may find potential solutions elsewhere in this book.
I wish you good luck in using SQL Server to extract, transform, and load data. And I sincerely hope that you have as much fun with it as I had writing this book.
Sourcing Data from MS Office
Applications
I suspect that many industrial-strength SQL Server applications have begun life as a much smaller MS Office-based idea, which has then grown and been extended until it has finished as a robust SQL Server application. In any case, two Microsoft Office programs—Excel and Access—are among the most frequently used sources of data for eventual loading into SQL Server. There are many reasons for this, from their sheer ubiquity to the ease with which users can enter data into Access databases and Excel spreadsheets. So it is no wonder that we developers and DBAs spend so much of our time loading data from these sources into SQL Server.
There are a number of ways in which data can be pushed or pulled from MS Office sources into SQL Server. These include:
Using T-SQL (
• OPENDATASOURCE and OPENROWSET)
Linked Servers (yes, an Access database or even an Excel spreadsheet can be a linked server) •
SSIS •
The SQL Server Import Wizard •
The SQL Server Migration Assistant for Access •
This chapter examines all these techniques and tries to give you some guidelines on their optimal uses (and inevitable limitations).
Any sample files used in this chapter are found in the C:\SQL2012DIRecipes\CH01 directory—assuming that you have downloaded the samples from the book’s companion web site and installed them as described in Appendix B.
1-1. Ensuring Connectivity to Access and Excel
Problem
You want to be able to import data from all versions of Excel and Access (including the latest file formats) in both 32-bit and 64-bit environments.
Solution
You need to install the Microsoft Access Connectivity Engine (ACE) driver. Here are the steps to follow:
CHAPTER 1 ■ SOURCING DATA FROM MS OFFICE APPLICATIONS
Note
■
The ACE driver can be found at
www.microsoft.com/en-us/download/details.aspx?id=13255. This
location could change over time—but a quick Internet search should point you to the current source fast enough.
2. Double-click the AccessDatabaseEngine.exe file that you have downloaded. This will be AccessDatabaseEngine_x64.exe for the 64-bit version.
3. Follow the instructions.
4. In SSMS, expand Server Objects ➤Linked Servers ➤Providers. 5. Assuming that the driver installation was successful, you should see the
Microsoft.ACE.OLEDB.12.0 provider.
6. Double-click the provider and check Allow InProcess and Dynamic Parameter.
As an alternative to steps 4-6, if you prefer a command-line approach, run the following T-SQL snippet (C:\SQL2012DIRecipes\CH01\SetACEProperties.Sql in the samples for this book):
EXECUTE master.dbo.sp_MSset_oledb_prop N'Microsoft.ACE.OLEDB.12.0' , N'AllowInProcess' , 1; GO
EXECUTE master.dbo.sp_MSset_oledb_prop N'Microsoft.ACE.OLEDB.12.0' , N'DynamicParameters' , 1; GO
You now have the driver installed and ready to use.
How It Works
Before attempting to read data from Excel or Access, it is vital to ensure that the drivers that allow the files to be read are installed on your server. Only the “old” 32-bit Jet driver is currently installed with an SQL Server installation, and that driver has severe limitations. These are principally that it cannot read the latest versions of Access and Excel, and that it will not function in a 64-bit environment.
Using the latest ACE driver generally makes your life much easier, as the newest versions have all the capabilities of the older versions as well as adding extra functionality. Despite being called the “AccessDatabaseEngine,” this driver also reads and writes data to Excel files, as well as to text files.
Confusingly, the 2007 Office System Driver and the Microsoft Access Engine 2010 redistributable are both found as “Microsoft.ACE.OLEDB.12.0” in the list of linked server providers in SSMS. The 64-bit SQL Server applications can access to 32-bit Jet and 2007 Office System files by using 32-bit SQL Server Integration Services (SSIS) on 64-bit Windows.
Table 1-1. MS Office Drivers
Driver Title
Driver Name
Source
Comments
OLEDB Provider for Microsoft Jet
Microsoft.Jet. OLEDB.4.0
SQL Server Installation (installed with the client tools)
32-bit only
Reads and writes Excel & Access 97-2003
Accepts .xls and .mdb formats
2007 Office
Reads and writes Excel & Access 97-2007
32-bit or 64-bit versions available
Reads and writes Excel & Access 97-2010
Accepts .xls/.xlsx/.xslm/.xlsx/. xlsb and .mdb/.accdb formats
Hints, Tips, and Traps
If you still want to use the old 32-bit Jet driver, then you can do so provided that you save •
the Excel source in Excel 97–2003 format and are working in a 32-bit environment.
The ACE drivers are supported by Windows 7; Windows Server 2003 R2, 32-bit x86; •
Windows Server 2003 R2, x64 editions; Windows Server 2008 R2; Windows Server 2008 with Service Pack 2; Windows Vista with Service Pack 1; and Windows XP with Service Pack 3.
You can only install
• either the 64-bit version of the ACE driver or the 32-bit version on the same server. This means that you cannot develop in Business Intelligence development Studio (BIDS) or SQL Server Development Tools (SSDT) with the 64-bit ACE driver installed—as BIDS/SSDT is a 32-bit environment. However, if you install the 32-bit ACE driver instead, then you cannot run a 64-bit package, and have to use one of the 32-bit workarounds. Ideally, you should develop in a 32-bit environment with the 32-bit ACE driver installed (or on a 64-bit machine, but do not expect to run the package normally), and deploy to a 64-bit environment where the 64-bit driver is ready and waiting.
1-2. Importing Data from Excel
Problem
CHAPTER 1 ■ SOURCING DATA FROM MS OFFICE APPLICATIONS
Solution
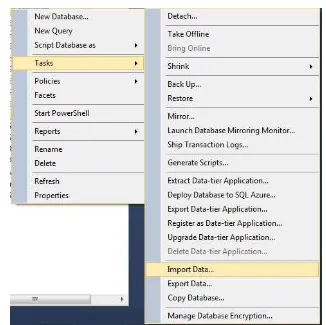
Run the SQL Server Import and Export Wizard and use it to guide you through the import process. Here is the process to follow:
1. In SQL Server Management Studio, right-click a database (preferably the one into which you want the data imported), click Tasks ➤Import Data (see
Figure
1-1
).
Figure 1-1. Launching the Import/Export Wizard from SSMS
2. Skip the splash screen. The Choose a Data Source screen appears.
Figure 1-2. Choosing a Data Source in the Import/Export Wizard
CHAPTER 1 ■SOURCING DATA FROM MS OFFICE APPLICATIONS
Figure 1-3. Choosing a Destination in the Import/Export Wizard
5. Ensure that the destination is SQL Server Native Client, that the server name is correct, and that you have selected the right destination database (CarSales_Staging in this example) and the authentication mode which you are using (with the appropriate username and password for SQL Server authentication).
7. Accept the default “Copy data from one or more tables or views”.
CHAPTER 1 ■ SOURCING DATA FROM MS OFFICE APPLICATIONS
Figure 1-5. Choosing the Source Table(s) in the Import/Export Wizard
9. Select the worksheet(s) to import.
Figure 1-6. Running the Import/Export Wizard package
CHAPTER 1 ■ SOURCING DATA FROM MS OFFICE APPLICATIONS
Figure 1-7. Completing the Import/Export Wizard
Figure 1-8. Successful execution using the Import/Export Wizard
14. Click Close to end the process.
How It Works
CHAPTER 1 ■ SOURCING DATA FROM MS OFFICE APPLICATIONS
As this is the first time that the Import and Export Wizard is explained in this book, I have tried to make the explanation as complete as possible. The advantage is that you will find many of the techniques explained here useable for other types of source data, too.
You should use the SQL Server Import and Export Wizard:
When you need to import data from an Excel spreadsheet into an SQL Server table just •
once.
When you do not intend to perform the action regularly or frequently. •
When you rarely import Excel data, you don’t want to get lost in the arcane world of SSIS •
and/or rarely used SQL commands. You want the data imported fast.
When you want to import data from multiple worksheets or ranges in the same workbook. •
Assuming that your Excel data is clean and structured like a data table, then the data will load. It can either be transferred to a new table (or new tables), which are created in the destination database with the same name(s) as the source worksheets, or into existing SQL Server tables. You can decide which of these alternatives you prefer in step 8.
Hints, Tips, and Traps
If you are working in a 64-bit environment, the 32-bit version of the Import/Export •
Wizard runs from SSMS. To force the 64-bit version to run, choose Start ➤All Programs
➤Microsoft SQL Server 2012 ➤Import and Export Data (64 bit). Should you need to install the 32-bit version of the wizard, select either Client Tools or SQL Server Data Tools (SSDT) during setup.
If you plan on using the DtsWizard.exe frequently, add the path to the executable to your •
system path variable—unless it has already been added.
You can also launch the SQL Server Import and Export Wizard executable by entering •
Start ➤Run ➤DtsWizard.exe (normally found in C:\Program Files\Microsoft SQL Server\110\DTS\Binn), or by double-clicking on the executable in a Windows Explorer window (or even a command window).
1-3. Modifying Excel Data During a Load
Problem
You want to import data from an Excel spreadsheet, but need to perform a few basic modifications during the import. These could include altering column mapping, changing data types, or choosing the destination table(s), among other things.
Solution
Querying the Source Data
To filter the source data, at step 6, choose the “Write a query to specify the data to transfer”option. You see the dialog box in Figure 1-9.
Figure 1-9. Specifying a source query to select Excel data
Here you can enter an SQL query to select the source data. If you have a saved an SQL query, you can browse to load it. Note that you use the same kind of syntax as when using OPENROWSET, as described in Recipe 1-4. When writing queries, note that worksheet data sources have a “$” postfix, but ranges do not.
CHAPTER 1 ■ SOURCING DATA FROM MS OFFICE APPLICATIONS
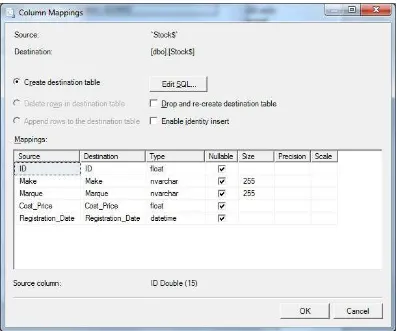
Replacing the Data in the Destination Table
Another available option is to replace all the data in the destination table. Of course, this will only affect an existing table—if the table does not exist, then DTSWiz creates one whichever option is selected.
To do this, at step 8 from earlier, click Edit Mappings. The Column Mappings dialog box appears (see Figure 1-10).
Figure 1-10. Editing column mappings in the Import/Export Wizard
Selecting Delete Rows in Destination Table truncates the destination table before inserting the new data. This option is only available if the file exists already.
Adjusting Column Mappings
The Column Mappings dialog box also lets you specify which source column maps to which specific destination column. Simply select the required destination column from the pop-up list—or <Ignore> if you do not wish to import the data for a specific column.
Changing Field Types for New Tables
You can—within the permissible limits of data type mappings—change both field types and lengths/sizes. Altering the size of a text field avoids the default 255-character import text field length. Changing the field type modifies the field type during the data load.
If you are creating a new table, then the new table is created with the newly defined field types and sizes. However, be warned, altering data types will not alter the data, and any types or data lengths that you choose must be compatible with the source data, or the load will fail.
Creating an SQL Server Integration Services (SSIS) Package
from the Import/Export Wizard
An extremely useful feature of the Import/Export Wizard is the ability to create a fully-fledged SSIS package from the parameters that you have set when configuring your import. This is probably no surprise, as the Import/ Export Wizard is, essentially, an SSIS package generator. While the packages that it generates are not perfect, they are a good—and fast—start to an ETL creation process.
To generate the SSIS package, simply check the Save SSIS Package box in the Save and Execute
Package dialog box (see step 9, Figure 1-6). You are prompted for a file location. The package is created when you click Finish.
How It Works
Having stressed (I hope) that DtsWizard is a fabulous tool for rapid, simple data imports, I wanted to extend your understanding by showing how versatile a tool the DtsWizard can prove to be in more complex import scenarios. This is due to the wide range of options and parameters that are available to help you to fine-tune Excel imports.
Hints, Tips, and Traps
If you are using SQL Server 2005, then you will find a couple of minor differences in the •
Choose a Data Source dialog box shown in Figure 1-2.
Clicking on any messages in the message column of the final dialog box (see Figure
• 1-8) is
invaluable for getting error messages should there be any problems.
1-4. Specifying the Excel Data to Load During an Ad-Hoc Import
Problem
CHAPTER 1 ■SOURCING DATA FROM MS OFFICE APPLICATIONS
Solution
Use SQL Server’s OPENROWSET command as part of a SELECT statement. This lets you use standard T-SQL to subset the source data. For example, you can run the following code snippets:
1. In the CarSales_Staging database, create a destination table named LuxuryCars defined as follows (C:\SQL2012DIRecipes\CH01\tblLuxuryCars.Sql):
2. Enable remote queries, either by running the Facets/Surface Area Configuration tool (or the Surface Area Configuration tool directly in SQL Server 2005), or running the T-SQL given in the following
(C:\SQL2012DIRecipes\CH01\AllowDistributedQueries.Sql):
EXECUTE master.dbo.sp_configure 'show advanced options', 1; GO
reconfigure ; GO
EXECUTE master.dbo.sp_configure 'ad hoc distributed queries', 1 ; GO
reconfigure; GO
3. Run the following SQL snippet
(C:\SQL2012DIRecipes\CH01\OpendatasourceInsertACE.Sql):
INSERT INTO CarSales_Staging.dbo.LuxuryCars (InventoryNumber, VehicleType) SELECT CAST(ID AS INT) AS InventoryNumber, LEFT(Marque, 50) AS VehicleType FROM OPENDATASOURCE(
'Microsoft.ACE.OLEDB.12.0',
'Data Source = C:\SQL2012DIRecipes\CH01\CarSales.xls;Extended Properties = Excel 12.0')... Stock$
WHERE MAKE LIKE '%royce%' ORDER BY Marque;
How It Works
Indeed, as you will see shortly, once you know how to connect to the source file, even quite complex T-SQL SELECT statements can be used on Excel source data. And, as you are writing standard SQL commands, they can be run from a query window or as part of a stored procedure. This is particularly useful when:
You want to read the contents of an Excel worksheet, but don’t want to clutter up your •
database with extra tables of information.
The data will be read infrequently. •
You know the file (workbook) and worksheet names, and have a good idea of the data •
structures—in other words, you can open the file to read it.
When you want to perform ad hoc querying, and choose the columns and filter the data •
using standard SQL commands.
Without attempting to be exhaustive, there are some variations on this theme. I use either the Jet driver or the ACE driver indiscriminately. I use Excel worksheets in both 97–2003 and 2007–2010 formats because the techniques described works with all these formats. I am not adding INSERT INTO or SELECT ... INTO Code here, but presume that you will be selecting one or the other in a real–world scenario,
Note
■
As this is, after all, an ad-hoc scenario, you could well have to run SSMS in "Administrator” mode – by
right-clicking on SQL Server Management Studio from the start menu and selecting "Run as Administrator”. This
is because the user running SSMS must have read and Write permissions on the TEMP directory used by the SQL
Server Startup account.
Assuming that you have a named range (TinyRange in the sample file), then you can return the data in the range using T-SQL like this:
SELECT ID, Marque FROM OPENROWSET('Microsoft.Jet.OLEDB.4.0',
'Excel 8.0;Database = C:\SQL2012DIRecipes\CH01\CarSales.xls', TinyRange);
If the range does not contain column headers, then you will need to add the HDR = NO property to the T-SQL, as follows. Otherwise, the first row is presumed to be column headers.
SELECT ID, Marque FROM OPENROWSET('Microsoft.Jet.OLEDB.4.0',
'Excel 8.0;HDR = NO;Database = C:\SQL2012DIRecipes\CH01\CarSales.xls', TinyRange);
If you know the Excel range references corresponding to the data that you want to return, then you can use an SQL snippet like this:
SELECT ID, Marque FROM OPENROWSET('Microsoft.ACE.OLEDB.12.0', 'Excel 12.0;Database = C:\SQL2012DIRecipes\CH01\CarSales.xlsx', 'SELECT * FROM [Stock$A2:B3]');
You must remember to provide the worksheet as well as the range, as no default worksheet is presumed. Similarly, remember to add HDR = NO if the range does not contain column headers.
As the previous snippet showed, you can pass an entire SELECT statement via the OLEDB driver to Excel. This presents a whole range of possibilities, such as choosing individual columns. For example:
CHAPTER 1 ■ SOURCING DATA FROM MS OFFICE APPLICATIONS
Just as in a standard T-SQL statement, you can alias the columns returned. For example:
SELECT InventoryNumber,VehicleType FROM OPENROWSET('Microsoft.ACE.OLEDB.12.0', 'Excel 12.0;Database = C:\SQL2012DIRecipes\CH01\CarSales.xlsx',
'SELECT ID AS InventoryNumber, Marque AS VehicleType FROM [Stock$A2:C3]');
The “pass-through” query that you send to Excel can also sort the data that is returned. The following example sorts by Marque:
SELECT ID, Marque FROM OPENROWSET('Microsoft.ACE.OLEDB.12.0', 'Excel 12.0;Database = C:\SQL2012DIRecipes\CH01\CarSales.xlsx', 'SELECT ID, Marque FROM [Stock$A2:C3] ORDER BY Marque');
Finally, if you want to add a WHERE clause, you can do so:
SELECT InventoryNumber,VehicleType FROM OPENROWSET('Microsoft.ACE.OLEDB.12.0', 'Excel 12.0;Database = C:\SQL2012DIRecipes\CH01\CarSales.xlsx',
'SELECT ID AS InventoryNumber, Marque AS VehicleType FROM Stock$ WHERE MAKE LIKE ''%royce%'' ORDER BY Marque');
In the provider options, you need to check Supports ‘Like’Operator for such a sort to work. Note also that you will need to duplicate the single quotes if you are using the LIKE operator.
You might have a source file without headers for the data. In this case, all you need to do is add HDR = NO; to the syntax. In these circumstances, it is probably best to use column aliases to give the output data greater readability, or the OLEDB provider will merely rename all the columns F1, F2, and so forth. For example:
SELECT InventoryNumber,VehicleType FROM OPENROWSET('Microsoft.ACE.OLEDB.12.0', 'Excel 12.0;HDR = NO;Database = C:\SQL2012DIRecipes\CH01\CarSales.xlsx',
'SELECT F1 AS InventoryNumber, F2 AS VehicleType FROM [Stock$A2:C3] WHERE MAKE LIKE ''%royce%'' ORDER BY Marque');
HDR is not the only property that you might need to know about when importing Excel data. Table 1-2 describes your options. Understanding the IMEX (mixed data types) property is also useful in some cases.
Table 1-2. Jet and ACE Extended Properties
Property Name
Description
Examples
HDR Specifies if the first row returned contains headers. HDR = NO IMEX Allows for mixed data types to be imported inside a single column. IMEX = 1
1-5. Planning for Future Use of a Linked Server
Problem
You want to import only a subset of data from an Excel spreadsheet, but you suspect that you will need to carry out this operation repeatedly, and eventually migrate it to a linked server solution. You do not want to have to rewrite everything further down the line.
Solution
Use SQL Server’s OPENDATASOURCE command as part of a SELECT statement. For example, (C:\SQL2012DIRecipes\CH01\OpendatasourceSelect.Sql):
SELECT ID AS InventoryNumber, LEFT(Marque,20) AS VehicleType INTO RollsRoyce
FROM OPENDATASOURCE( 'Microsoft.ACE.OLEDB.12.0',
'Data Source = C:\SQL2012DIRecipes\CH01\CarSales.xls;Extended Properties = Excel 8.0')...Stock$ WHERE MAKE LIKE '%royce%'
ORDER BY Marque;
How It Works
The OPENROWSET command is suited to ad hoc querying. However, you may be evaluating data connection possibilities with a view to eventually using a linked server. In this case, you may prefer to use the
OPENDATASOURCE command as a kind of “halfway house” to linked servers (described in the next recipe). This sets the scene for you to update your code to replace OPENDATASOURCE with a four-part linked server reference.
Inevitably, there are many variations on this particular theme (which only selects all the data from a source worksheet and uses only the ACE driver), so here are a few of them. As the objective is to import data into SQL Server, I will let you choose whether to include this code in either a SELECT..INTO or an INSERT INTO ...SELECT clause. Of course, you can use the Jet driver if you prefer. If you are using Excel 2007/2010, you must set the extended properties in the T-SQL to Excel 12.0.
SELECT ID, Marque FROM OPENDATASOURCE( 'Microsoft.ACE.OLEDB.12.0',
'Data Source = C:\SQL2012DIRecipes\CH01\CarSales.xlsx;Extended Properties = Excel 12.0')...Stock$;
To select all the data in a named range, use the following T-SQL:
SELECT ID, Marque FROM OPENDATASOURCE( 'Microsoft.ACE.OLEDB.12.0',
'Data Source = C:\SQL2012DIRecipes\CH01\CarSales.xls;Extended Properties = Excel 8.0')... TinyRange;
To select—and if you wish alias—columns in the Excel source data, use T-SQL like in the following. Note that this is applied to the T-SQL, and is not part of a pass-through query.
SELECT ID AS InventoryNumber, Marque AS VehicleType FROM OPENDATASOURCE(
'Microsoft.ACE.OLEDB.12.0',
CHAPTER 1 ■ SOURCING DATA FROM MS OFFICE APPLICATIONS
Finally, to use WHERE and ORDER BY when returning Excel data, merely extend the T-SQL like this:
SELECT ID AS InventoryNumber, Marque AS VehicleType FROM OPENDATASOURCE(
'Microsoft.ACE.OLEDB.12.0',
'Data Source = C:\SQL2012DIRecipes\CH01\CarSales.xls;Extended Properties = Excel 8.0')...Stock$ WHERE MAKE LIKE '%royce%'
ORDER BY Marque;
In this case, the Excel file must not be password-protected. It is worth noting that OPENDATASOURCE only works when the DisallowAdhocAccess registry option is explicitly set to 0 for the specified provider, and the Ad Hoc Distributed Queries advanced configuration option is enabled as described in Recipe 1-3. OPENDATASOURCE also expects the source data to resemble a table complete with header rows, so ensure that any named ranges have a header row.
Whether using ACE for Office 2007 or for Office 2010, you must set the Excel version to 12.0—not 14.0 as the download page suggests. Also, if you are using the Jet driver when connecting to Excel (and Access), these approaches will not work in a 64- bit environment in SQL Server (2005–2012), even if the Excel format is 97–2003. If you have to use a driver that causes problems when there are mixed data types in a column, then you can force the driver to scan a larger number of rows (the default is 8)—or indeed the entire worksheet—to test for mixed data types. To do this, edit the following registry setting:
HKEY_LOCAL_MACHINE\Software\Microsoft\Jet\4.0\Engines\Excel\TypeGuessRows
Setting this value to a figure other than 8 scans that number of rows.Setting it to 0 scans the entire sheet. This, however, inevitably causes a severe performance hit.
Should you wish to alter the mixed data setting, it is in the following registry hive for Office 2010:
HKEY_LOCAL_MACHINE\Software\Microsoft\Office\14.0\Access Connectivity Engine\Engines\Excel\ ImportMixedTypes
The usual caveats apply to changing registry settings: back up your registry first, and be very careful!
Hints, Tips, and Traps
An error message along the lines of “
• Msg 7314, Level 16, State 1, Line 2 The OLE DB
provider "Microsoft.Jet.OLEDB.4.0” for linked server "(null)” does not contain the table "Sheet1$”. “Either the table does not exist or the current user does not have permissions on that file or folder. It could also mean that you have not specified the right file and/or path.
An error message such as
• “Msg 7399, Level 16, State 1, Line 4 The OLE DB provider "Microsoft.Jet.OLEDB.4.0” for linked server "(null)” reported an error. The provider did not give any information about the error. Msg 7303, Level 16, State 1, Line 4 Cannot initialize the data source object of OLE DB provider "Microsoft.Jet.OLEDB.4.0” for linked server “(null)”. " This could very well mean that the Excel workbook file is open, thus it cannot be opened by SQL Server. All you have to do is close the Excel Workbook. Alternatively there could be a permissions problem - are you running SSMS as an Administrator?
The Excel file must not be password-protected. •
1-6. Reading Data Automatically from an Excel Worksheet
Problem
You need to be able to query or import data directly from an Excel spreadsheet without (re)loading data every time.
Solution
Configure the Excel spreadsheet as a linked server. This is how to do it:
1. Define the linked server using the following code snippet (C:\SQL2012DIRecipes\CH01\AddExcelLinkedServer.Sql):
2. Query the source data, only using the linked server name and worksheet (or range) name in four-part notation using a T-SQL snippet like
(C:\SQL2012DIRecipes\CH01\SelectEXcelLinkedServer.Sql):
SELECT ID, Marque INTO XLLinkedLoad FROM Excel...Stock$;
How It Works
There are occasions when data in an Excel worksheet is used as a quasi-permanent source of data, yet you do not want to import the data, but prefer to leave it in Excel. To handle this you might need to set up a linked server to an Excel spreadsheet. The advantage to this approach is that the syntax used to query the data is the standard four-part notation used with any linked server (Server.Database.Schema.Table), and that all the configuration information is defined once for the linked server itself, and not every time that a query is used, as is the case with OPENROWSET and OPENDATASOURCE. This is particularly useful in the following situations:
When you need to return data from an Excel spreadsheet on a regular basis. •
When you feel that spreadsheet data is sufficiently trusted to be a reliable source for your •
application.
The risk with this approach is the same that you face with all spreadsheet data— it is all too frequently incoherent, erroneous, or just plain wrong because human error introduced the wrong data into the wrong cells. Because no automated process can obviate such errors, there is no process that can alleviate the problem. If the Excel file can be trusted to be sufficiently accurate, then this technique can be a great way to allow SQL Server to read Excel data without having to reload the file every time that it is modified, because all that has to be done is to drop the Excel workbook into the required directory. Moreover, there are a few tricks that you might find useful when dealing with Excel linked servers.
CHAPTER 1 ■ SOURCING DATA FROM MS OFFICE APPLICATIONS
This returns a “Command completed successfully” if all works—and an error message if there is a problem. Unfortunately, the error messages can be somewhat cryptic, so be prepared to be patient when deciphering them.
To alter the connection to an Excel linked server, you are, in most cases, better off dropping the old linked server and re-creating. The following is the code to drop the linked server:
IF EXISTS (SELECT name FROM sys.servers WHERE server_id ! = 0 AND name = 'Excel')
EXECUTE master.dbo.sp_dropserver @server = 'Excel';
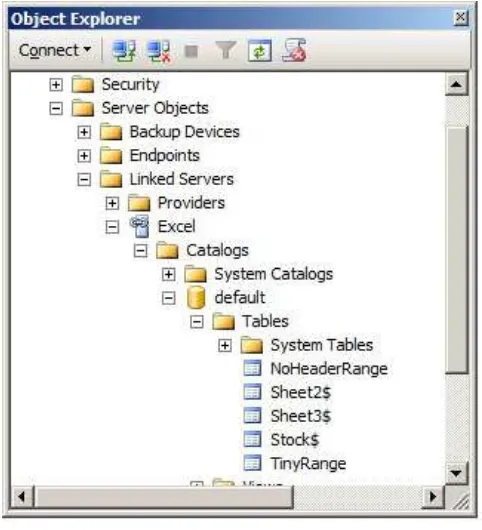
To list the available worksheets and named ranges for an Excel linked server, use the following system-stored procedure:
EXECUTE master.dbo.sp_tables_ex EXCEL;
For a more visual representation of the data ranges available via your linked server, you can use SQL Server Management studio. All you have to do is expand Server Objects ➤Linked Servers ➤(Server Name) ➤Catalogs
➤Default ➤Tables, as shown in Figure 1-11.
Figure 1-11. Excel linked server tables
to set up two linked servers, one with HDR = NO and the other with HDR = YES. Also, you need to be aware that a linked server to an Excel spreadsheet is extremely slow, and that if you are reusing the data in your ETL process, then loading it into a staging table is probably a lot faster overall.
Querying the data uses a standard T-SQL SELECT query, and you can restrict the selection using specified column names (or F1, F2, and so forth, if there is no header row), a WHERE clause, ORDER BY, and so on. This means that you can also use CAST and CONVERT to change data types, and all the usual text functions (LTRIM, RTRIM, and LEFT spring to mind) to apply elementary data manipulation to text fields. As I gave plenty of examples of this in Recipes 1-4 and 1-5, I refer you back to those recipes for more details on this.
Hints, Tips, and Traps
Be sure to set the provider to the ACE or Jet connection string. You also have to set the •
@PROVSTR argument to Excel 8.0 (for Jet) or Excel 12.0 (for ACE). The
• @SRVPRODUCT argument is purely decorative.
The Excel file need not exist when the linked server is defined. •
You can see the linked server by expanding Server Objects/Linked Servers in SSMS. •
Double-click the linked server name in SSMS to view the properties which you set using the sp_addlinkedserver command.
You can also define a linked server using SSMS. This is described (for Access) in •
Recipe 1-13. The principles are virtually identical, however.
The Excel source file must not be password-protected. •
Note that you do not need either a schema or a database reference in the four-part •
notation. Just type in the three periods.
If the Excel workbook contains multiple data sets (either as separate worksheets or •
named ranges), then you, in effect, only have to configure the connection once (by setting up the linked server. You can then query the various source data sets merely by altering the worksheet/range name that is the final part of the four-part notation in the SELECT query (Stock$ in this example).
1-7. Loading Excel Data as Part of a Structured ETL Process
Problem
You want to perform industrial-strength data loads from an Excel workbook. This will be performed regularly as part of a controlled ETL process.
Solution
Create an SSIS package to load the Excel source data. This opens all the power and flexibility of Microsoft’s principal ETL tool to manage your data loads.
CHAPTER 1 ■ SOURCING DATA FROM MS OFFICE APPLICATIONS
1. Create a new SSIS package.
2. Add a Data Flow task onto the Control Flow area.
3. Double-click the Data Flow task to jump to the Data Flow pane. 4. Add an Excel Source onto the Data Flow area.
5. Double-click the Excel Source task to open the Excel Source Editor. Click New to open the Excel Connection Manager dialog box.
6. Click Browse and select your Excel source file.
7. Select the Excel version corresponding to the version of the Excel workbook (.xls for Excel 97–2003, .xlsx for Excel 2007/2010). You should see something similar to Figure 1-12.
Figure 1-12. Excel Connection Manager
8. Click OK. You return to the Excel Source Editor dialog box.
10. Click OK to return to the Data Flow pane.
11. Add an OLEDB destination task to the Data Flow pane, preferably under the Excel source task.
12. Drag the green connection (or Precedence Constraint as it is called) from the Excel Source task to the OLEDB destination task.
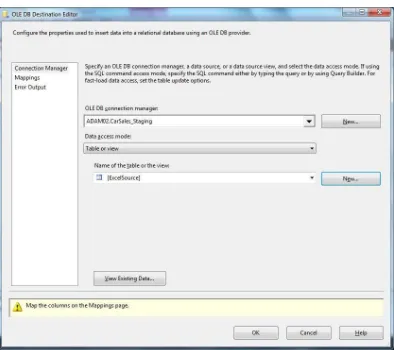
13. Double-click the OLEDB destination task to open the OLEDB Destination Editor. Click New to create a new OLEDB Connection, and then click New again to specify the connection manager.
CHAPTER 1 ■SOURCING DATA FROM MS OFFICE APPLICATIONS
15. Click OK twice to return to the OLEDB Destination Editor. Then select the name of an existing destination table, or click New to create a new table. You can change the table name (if you so wish). If you have created a new table, click OK to finish this step. You should see something like Figure 1-15.
Figure 1-15. SSIS destination task for Excel import
16. Click Mappings to create the input to output mappings. Drag columns from left to right to map. Click Delete to remove mappings.
17. Click OK to finish configuring the OLEDB destination.
Hints, Tips, and Traps
If you prefer,you can create the OLEDB destination connection manager before adding •
the OLEDB destination. Then all you have to do is to select it from the list of available connection managers in theOLEDB Destination Editor dialog box. In SSIS 2012, this could be a package-level connection manager.
If your destination table exists, you can select it from the list of those appearing in the •
Name of the Table or View.
If you prefer,you can create the Excel connection manager before adding the data Flow •
task. You can even create package-level connection managers (in SSIS 2012). However in my experience, this is rarely useful for the essentially “single use” connection managers that are used with spreadsheet sources.
If the Excel worksheet is filtered, then SSIS will only import the filtered data, not the entire •
range or worksheet.
1-8. Importing Excel 2007/2010 Data Using SSIS 2005
Problem
You want to import Excel data from an Excel 2007 or 2010 workbook, which cannot be read natively by SQL Server 2005.
Solution
Use the ACE driver and tweak the connection manager extended properties to allow it to read the more modern format.
Importing Excel 2007 worksheets using SSIS 2005 is very similar to the process described in Recipe 1-7. You need to be aware of a couple of tweaks, however, which are required to make it work properly. So here they are:
1. As for ad hoc queries or linked servers using Excel 2007 or above, you must first download the 2007/2010 Office System driver (the ACE driver described at the start of the chapter).
2. In step 4, use an OLEDB data flow source, not an Excel source.
CHAPTER 1 ■ SOURCING DATA FROM MS OFFICE APPLICATIONS
Figure 1-16. Excel 2007/2010 data source in SSIS 2005
Figure 1-17. Extended Properties for Importing Excel 2007/2010 in SSIS 2005
You can now run the package and import the spreadsheet data.
How It Works
Instead of using the Excel data source in SSIS, you choose the OLEDB source. This is then configured to use the ACE provider.
Hints, Tips, and Traps
Excel 2007 is not limited to 65,536 rows, as is the case with earlier versions, so you can •
CHAPTER 1 ■ SOURCING DATA FROM MS OFFICE APPLICATIONS
You can alter the registry entry that SSIS uses to guess the data type of an Excel 2007 column •
using the following registry key:
HKEY_LOCAL_MACHINE\Software\Microsoft\Office\12.0\Access Connectivity Engine\Engines\ Excel\TypeGuessRows.
Setting this to 0 forces SSIS to read every row for each column; otherwise, you can alter the default of 8 to strike a happy medium between incorrectly guessing the data type and long minutes spent waiting for SSIS to finish parsing the spreadsheet.
1-9. Handling Source Data Issues When Importing Excel
Worksheets Using SSIS
Problem
You have data in Excel files that are failing to load due to truncation errors or that cannot be mapped to destination columns due to data type errors.
Solution
2. Select the Input and Output Parameters tab, and expand Output Columns. Then click the column whose column length you wish to change. This is shown in Figure 1-19.
Figure 1-19. Modifying datasource types in Excel
3. Select Unicode String [DT_WSTR] and enter a length (500 in this example). Of course, the columns will be those of your source data.
4. Confirm by clicking OK.
5. Add a Data Conversion task to the Data Flow pane and connect the Excel Source task to it. Then double-click the Data Conversion task to edit it.
CHAPTER 1 ■ SOURCING DATA FROM MS OFFICE APPLICATIONS
How It Works
When the Excel worksheet is simple, you probably do not need to make many tweaks to an SSIS import package. However, there could be times when you need to “coerce” SSIS to import the source data correctly. Specifically, you mayoccasionally need to specify the length of the data in a column imported from Excel. This is because the old Excel 255-character limit on the amount of data that a cell could hold has been lifted for some time now. Indeed, SSIS detects cells containing more than this character amount (if they are in the first “n” rows specified using the TypeGuessRows Registry setting).
There are occasions when you will have to adjust some of the standard settings in order to:
Import text longer than 255 characters by selecting Unicode Text Stream [DT_NTEXT] to •
specify text more than 255 characters in the Input and Output properties of the Excel Source.
Specify a different source data type. •
Convert Excel Unicode data into non-Unicode text data using a Data Conversion task. •
Should you wish, you could override Excel’s choice of source data to force a data type conversion. The available conversions are shown in Table 1-3.
Table 1-3. Excel to SSIS Data Type Mapping
Excel Data Type
SSIS Type Name
SSIS Data Type
Date: Date [DT_DATE]
Short Text: Unicode String [DT_WSTR]
Number: Double precision float [DTR8]
Long Text: Unicode Text Stream [DT_NTEXT]
In step 3 of this recipe, select any of these data types from the Input and Output Properties tab for the field you wish to change. Excel data is read as Unicode, and try as you might, you cannot specify that it is otherwise (for instance, by changing the source data type). So you have to convert the data from Unicode to a non-Unicode string using the SSIS Data Conversion task. You can do this as follows
1. Add a Data Conversion task to the Data Flow pane and connect the Excel Source task to it. Then double-click the Data Conversion task to edit it.
2. Select the input column that you modified in step 3, and specify that the output data type is String [DT_STR] with the length you require.
3. Confirm with OK.
Hints, Tips, and Traps
You will need to handle Unicode character conversion errors by configuring the error •
output. At the very least, set the Data Conversion to ignore errors.
1-10. Pushing Access Data into SQL Server
Problem
You want to transfer some or all the tables in an Access database into SQL Server directly from Access itself.
Solution
Use the Access Upsizing Wizard, which you can run from inside Access as follows:
1. From Access 2007/2010/2013 Activate the Database Tools ribbon, click SQL Server. (From Access 2000 or Access XP, click Tools ➤ Database Utilities ➤ Upsizing Wizard).
2. Click Use Existing Database, and then Next.
3. Select an ODBC driver that you have created, or configure a new one at this point as described in Recipe 6-12, and then click OK.
4. Select the table(s) you wish to import, add them to the Export to SQL Server pane using the Chevron buttons, and then click Next.
5. Uncheck all the table attributes to upsize, and “No, never” for the “Add timestamp fields to tables” pop-up. Then click Next.
6. Select “No application changes”. Click Next and then Finish. 7. Close the upgrade report.
8. If you now switch to SSMS, you can see the results of the upsizing process—and the real work refactoring the database can begin!
How It Works
The Access Upsizing Wizard is a venerable tool that has been around for at least 15 years to my knowledge (possibly more, but I cannot remember exactly). Despite its simplicity and extreme slowness, it is a tried and trusted solution that works well for small data loads and RAD development where small to medium-sized data transfers from Access into SQL Server are all that is required.
Here, I am only considering using this tool to transfer into SQL Server. I am not looking at application conversion because this area is a matter of considerable divergence of opinion. Fortunately, many products and books and papers exist on this subject, so I will leave you to consult them while I avoid the field completely, and stick to this book’s subject matter—data ingestion into SQL Server.
That said, in my experience with upsizing Access databases, the real problem is not anything technical at all, but is all too often the lack of proper database design in the source Access database. All too frequently, third normal form is a distant dream in databases drawn up over time by end users and/or enthusiastic amateurs. This can be accompanied by the total lack of a coherent naming convention for source tables and fields, and redundant, duplicated, or superfluous data. In other words, you can be dealing with vast amounts of rubbish masquerading as a database. So attempting to re-create the same mess only bigger and faster is to miss the point, which is that you should perhaps be seizing the opportunity to redesign the database and clean up the data. However, even if this is the case, at some point you will have to transfer data from Access to SQL Server. So, to remain resolutely positive, the Upsizing Wizard can most likely help you in the following situations:
When the source data is simple and without complex data structures. •
CHAPTER 1 ■ SOURCING DATA FROM MS OFFICE APPLICATIONS
When you want a quick transfer of most—or all—of an Access database into SQL Server to •
handle the data structures and the data itself.
The Access Upsizing Wizard can fail. The keys to a successful upsizing process are to do the following:
Work on a copy of the source database. •
Alter all table and field names in the copy of the source database to conform to SQL •
standards (remember to remove any special characters and possibly apostrophes)—and use your SQL Server naming convention.
Do not transfer indexes, validation rules, defaults, and referential integrity—re-create •
these in SQL Server. At the very least, you will be able to define constraint names using your own naming convention. These areas seem to cause the Upsizing Wizard to fail most often, in my experience. This mostly seems due to missing defaults or foreign key relationships.
The Upsizing Wizard converts Microsoft Access primary keys to Microsoft SQL Server nonclustered, unique indexes and sets them as primary keys in SQL Server. Removing primary keys from Access tables lets you specify the index type (clustered, for instance, sorts in TempDB and other SQL Server index settings) and a Primary Key constraint.
Hints, Tips, and Traps
You can create a new database during the process; but for greater control over where the •
database files are created, and to define database properties precisely, it is probably wiser to create the destination database first.
To upgrade data from a view, run a “create table” query in Access to create a table based •
on the view first, and then upsize the resulting table.
Note that you can use the Upsizing Wizard to create table structures, and transfer the data •
once you have tweaked and perfected the tables using SSIS. This approach also lets you move tables to a schema other than dbo—the default for the Upsizing Wizard.
Autoincrement fields are not transferred as
• IDENTITY fields in SQL Server, but as INTs, so
you have to modify your SQL Server table structure to specify identity fields.
Upsizing the OLE object keeps OLE image data as an OLE object—remember, this is not •
the binary image data!
Hyperlink fields are transferred as text fields. •
To avoid date overflow errors with SQL Server 2008 and above, ensure that you are using •
DATETIME2 fields.
When upsizing data to SQL Server 2005, you frequently see overflow errors. In this case, •
query the source data in Access to ensure that any Access date fields do not contain data outside the SQL Server date ranges (January 1, 1753, through December 31, 9999). A good initial workaround is to set all dates greater than the upper limit (31 Dec 9999) and dates less than the lower limit (1 Jan 1753) using an Access query before attempting the conversion.
If you have databases from earlier versions of Access, open and save the databases •
in Access 97 or a later version. See the Office Online web site for information about converting Access databases.
1-11. Importing Multiple Access Tables
Problem
You want to import as quickly and easily one or more tables from an Access database. This is destined to be a one-off operation.
Solution
Use the SQL Server Import Wizard. Here is how:
1. In SQL Server Management Studio, right-click a database (preferably the one into which you want the data imported). Click Tasks ➤ Import Data. Alternatively, you can run this from Start-All programs ➤ Microsoft SQL Server 2012 ➤ Import and Export Data (32-bit or 64-bit). The Choose a Data Source window appears.
2. Select Microsoft Access (Microsoft Access Database Engine). 3. Browse to the source file, and click OK.
4. Select the destination server and database, and the authentication type, specifying the user and password if you are not using Windows authentication. Click Next. The Specify Table Copy or Query window appears.
5. Accept the default Copy Data from one or more tables or views. Click Next. The Select Source Tables or Views dialog box appears.
6. Select the tables and/or views to import. Click Next. The Save and Execute Package dialog box appears.
7. Click Next. The Complete the Wizard dialog box appears. 8. Click Finish. The Execution results dialog box appears.
How It Works
For Access (as was the case with Excel), there are occasions when you want to import data from an Access database into SQL Server table(s) quickly and efficiently, without setting up an SSIS package to do the job. Here too, the Data Import Wizard is one of the best tools for the job. Be warned that importing data and metadata will probably not avoid a lot of refactoring work. This approach is probably most practicable when you need to import data from Access into SQL Server only occasionally, or when the objective is an initial analysis of the data.
As the screenshots for an Access import are virtually identical to those given in Recipe 1-2 for importing Excel data using the SQL Server Import Wizard, I have not reproduced the same ones here. Also, as when importing data from Excel, you can specify a range of parameters and options to fine-tune the import process. To recapitulate, these include:
Enabling identity insert •
CHAPTER 1 ■SOURCING DATA FROM MS OFFICE APPLICATIONS
Specifying data types •
Column mapping •
A couple techniques were not outlined previously that you may find interesting,however. These are:
Creating a new database •
Querying the source data •
Creating a new database while importing Access data is as easy as clicking the New button in the Choose a Destination dialog box, and then entering a database name. You get some choice of database properties that you can define, as shown in Figure 1-20.
Querying the source data lets you write SQL to select the data from a table (or a series of joined tables) and filter the source data using a WHERE clause if you so desire. Unfortunately, you need to write the query in full to do this because there is no query generator built into the Import Wizard. Fortunately, there is a handy workaround for this:
1. At step 4, select “Write a query to specify the data transfer”.
2. In the source Access database, create a new Access query. Join the tables you wish to query. Add your source columns and any criteria, sorting, and column aliases.
3. Click View/SQL View from the Design ribbon in Access 2007/2010 to display the SQL for the query.
4. Copy and paste the SQL into the Provide a Source Query dialog box of the SQL Server Import Wizard.
Hints, Tips, and Traps
The Parse button of the “Provide a source query” dialog box validates your Access-based SQL. •
As was the case with Excel,you can define column properties when creating a new table •
as part of the import. This can be useful to get round defaults such as the 255-character specification for all text fields.
If you need to specify datafile names or disk locations, you are better off creating the •
database manually first.
As is the case with the Upsizing Wizard, dates outside the SQL Server 2005 date data •
type range can cause problems, so it is advised to use a query to set all dates greater than the upper limit to 31 Dec 9999 and dates less than the lower limit to 1 Jan 1753 before attempting the conversion. Or use the DATETIME2data type in SQL Server 2008 and above.
An old alternative technique when faced with troublesome dates in the source data is to •
map Access date data types to VARCHAR(30) SQL Server data types, and convert the data in SQL Server.
1-12. Ad Hoc Imports of Access Data
Problem
You want to import Access databases using T-SQL. This will probably only be carried out occasionally.
Solution
Use OPENROWSETto query the Access database in T-SQL.
The following query selects all the rows from the “stock” table in the Access database (C:\SQL2012DIRecipes\CH01\AccessACEOpenrowset.Sql):
SELECT ID, Marque INTO MyAccessTempTable
FROM OPENROWSET('Microsoft.ACE.OLEDB.12.0',
CHAPTER 1 ■ SOURCING DATA FROM MS OFFICE APPLICATIONS
It is also worth paying attention to the use of semicolons to separate the three “subelements” composing the Access database parameters, and commas to separate the driver and source data from these.
Finally, you can refine your query in several ways. In the following code snippets I will not be adding the INSERT INTO ... SELECT or SELECT ... INTO code which you will doubtless be using. To start, you could send an Access pass-through query, like this:
SELECT ID, Marque
FROM OPENROWSET('Microsoft.ACE.OLEDB.12.0',
'C:\SQL2012DIRecipes\CH01\CarSales.accdb';'admin';'', 'SELECT ID, Marque FROM stock WHERE ID = 5');
Or, if the WHERE clause is slightly more complex and involves quotes, you could try this:
How It Works
This is very similar to reading—or importing—data from Excel, as described in Recipe 1-4. Indeed, it is so similar that most of the comments stated for Excel will apply here, so I refer you to that recipe for the full details. Here, I will only draw your attention to a subset of important points.
First, you are better off (in most cases), downloading and installing the latest ACE driver because it can read all versions of Access from 97 upward. The old Jet driver cannot read Access 2007/2010 and the Jet driver exists only as a 32-bit version. Also note the following:
If you are using Access 2007/2010/2013, then first download the 2007 ACE driver, as •
described in Recipe 1-1.
Ad hoc queries must be enabled, as described in Recipe 1-4. •
Second, I find that OPENROWSET is best when you will not be querying the database regularly, but just want to see the data from inside SQL Server or perform an ad hoc load, and when you know the table names that you will be querying. Note that you are sending the five parameters described in Table 1-4 to the OPENROWSET command.
Thirdly – you could need to be running SSMS as an Administrator.
Table 1-4. OPENROWSET Parameters
Parameter
Example
Comments
Driver 'Microsoft.ACE.OLEDB.12.0' The Jet driver can be used.
Source path and database 'C:\SQL2012DIRecipes\CH01\ CarSales.accdb'
You need the full path.
User 'admin' The Access database user.
Password '' Use an empty string if
there is no password.
You can also be selective in the data that is returned by tuning the SQL Server SELECT statement, in this way:
SELECT MAKE, MARQUE as CarType
FROM OPENROWSET('Microsoft.ACE.OLEDB.12.0',
'C:\SQL2012DIRecipes\CH01\CarSales.accdb';'admin';'', stock) WHERE ID = 5;
And of course, the OPENDATASOURCE syntax works just as well, and of course, it allows you to alias columns and apply a WHERE clause (here using the Jet driver, for a bit of variety):
SELECT MAKE, MARQUE as CarType FROM OPENDATASOURCE( 'Microsoft.Jet.OLEDB.4.0',
'Data Source = C:\SQL2012DIRecipes\CH01\CarSales.mdb;')...stock WHERE ID = 5;
Although the title of this recipe states that this technique is for occasional data loads, there is nothing to prevent you from using it as part of a regular T-SQL-based ETL process. However, SSIS does provide more enhanced logging and error-trapping capacity – as well as none of the permissions issues which you can experience with SSMS – which is why it is preferable in many cases.
Hints, Tips, and Traps
Remember that here you are writing T-SQL, not Access SQL. So, for instance, you cannot •
use the IIF function with older versions of SQL Server and must use % instead of * in WHERE clauses, as well as many other Access-specific SQL tricks!
You can use double-quotes (
• "") instead of doubled single quotes (‘‘ ‘‘) in LIKE clauses in the pass-through query.
If the Access database file is password-protected, then you need to add the password to •
the OPENROWSET parameters, for instance:
SELECT MAKE, MARQUE as CarType FROM OPENDATASOURCE(
'Microsoft.ACE.OLEDB.12.0',
'Data Source = C:\SQL2012DIRecipes\CH01\CarSales.accdb;User Id = Admin;Password = MyPassword')...stock;
If
• OPENDATASOURCE and OPENROWSET are using the Jet driver, they will not work in a 64-bit environment in SQL Server (2005 and 2008). Remember that later versions of Access and/or 64-bit environments necessitate the ACE driver. Consequently, the connection parameter will be 'Microsoft.ACE.OLEDB.12.0'.
Unlike Excel worksheets—or Access files when using the SQL Server Import Wizard— •
Access files and tables can be open when being queried with OPENROWSET and OPENDATASOURCE.
It is a good idea to compact and repair Access files before attempting to read data from •
CHAPTER 1 ■ SOURCING DATA FROM MS OFFICE APPLICATIONS
If you are using Access workgroup security (by definition on an Access 97–2003 database) •
you need to add: 'Jet OLEDB:System database = C:\Windows\System.mdw'—or the path to the workgroup security file.
1-13. Obtaining Access Data Without Regular Imports
Problem
You need to read data in an Access database on a regular basis, without importing the data every time.
Solution
Set up a linked server to Access. This is one way to do it:
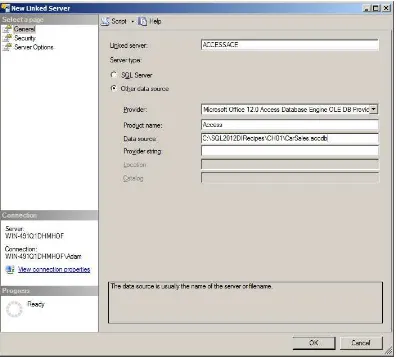
1. In SQL Server Management Studio, expand Server Objects. Right-click Linked Servers and fill in the New Linked Server dialog box using the following parameters:
Linked Server AccessACE
Provider Microsoft Office 12.0 Access Database Engine OLEDB Provider
Product Name Access
Data Source C:\SQL2012DIRecipes\CH01\CarSales.accdb
Figure 1-21. Creating an Access linked server in SSMS
2. Click OK. You then see a linked server named Access2010 in the list of linked servers. Of course, you have to enter your own Access data file and path in the Data Source field.
3. To read the data from a linked Access database, use the following four-part T-SQL syntax:
SELECT ID, Marque from ACCESSACE...Stock WHERE ID IN(1,3) ORDER BY ID;
How It Works
This approach works best:
When you are querying the Access data regularly, but do not want to load the data into •
CHAPTER 1 ■ SOURCING DATA FROM MS OFFICE APPLICATIONS
When the Access data is reliable and no data types in the tables that you query map •
incorrectly to SQL Server data types. Specifically, dates outside SQL data ranges (especially in SQL Server 2005).
This is standard T-SQL, so column aliases and complex WHERE clauses—indeed almost all T-SQL—are at your disposal. Alternatively, you can use the OPENQUERY syntax, as was described for Excel:
SELECT ID, Marque
FROM OPENQUERY(ACCESSACE, 'SELECT * FROM Stock WHERE ID = 1 ORDER BY ID');
One thing that you probably want to do is see the available tables and views. Run the following T-SQL (where 'AccessACE' is the linked server name ) to list all the tables and queries (views) in a linked server:
EXECUTE master.dbo.sp_tables_ex 'ACCESSACE';
Alternatively, if you expand the relevant Linked server object in SSMS, you can display the tables in the linked Access database, as shown in Figure 1-22.
Figure 1-22. Viewing Access linked servers in SSMS
As was described earlier for Excel, you can use SELECT...INTO as well as INSERT INTO...SELECT statements, which refer to the table in a linked Access server.
To link to an Access 2007/2010/2013 file, you have to use the Microsoft Office 12.0 Access Database Engine OLEDB provider. For an Access 97–2003 database, you can use the Jet provider—if you must. You cannot add a linked server if a linked server with the same name already exists. In this case, first delete the existing linked server (by right-clicking the linked server name, selecting Delete from the shortcut menu, followed by OK).
boundaries for dates (for example), or functions to set N/A for invalid data. Then link to these queries rather than to the source data tables.
Hints, Tips, and Traps
It is a good idea to compact and repairAccess files before linking—corrupt data can •
cause problems.
You can use T-SQL to create the linked server extremely easily. The following code •
snippet will do it (C:\SQL2012DIRecipes\CH01\CreateAccessLinkedServer.Sql):
EXECUTE master.dbo.sp_addlinkedserver @SERVER = 'ACCESSACE'
,@SRVPRODUCT = 'ACE 12.0'
,@PROVIDER = 'Microsoft.ACE.OLEDB.12.0'
,@DATASRC = 'C:\SQL2012DIRecipes\CH01\CarSales.accdb';
If you have expanded the list of tables in the linked server (as illustrated earlier), you can •
drag these to the query pane in SSMS, just as you would with SQL Server tables.
1-14. Importing Access Data as Part of a Regular ETL Process
Problem
You are importing Access data into SQL Server regularly, or as part of a repeatable process. Moreover, you need to transform data as part of the load process.
Solution
Use SSIS to import and transform Access data. It can be done in the following way:
1. Install the latest ACE driver, if this is not already done. 2. Create a new SSIS package.
3. Create an OLEDB destination Configuration Manager, named CarSales_OLEDB, which you configure to point to your chosen destination database.
4. Add a Data Flow task to the Control Flow pane, and double-click to edit it. 5. Add an OLEDB Source component, and double-click to edit.
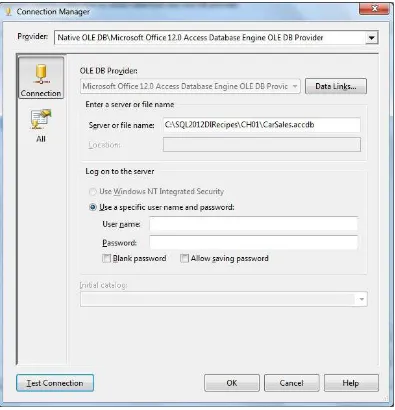
6. Click New to create a new Connection Manager. 7. Click New to add a new Data Connection.
8. Select the Microsoft Office 12.0 Access Database Engine OLEDB Provider from the pop-up list of installed drivers.
9. Click in the Server field or file name and enter the full path to the Access file (mdb or accdb).
CHAPTER 1 ■ SOURCING DATA FROM MS OFFICE APPLICATIONS
11. Click OK to return to the OLEDB Source Editor. 12. Select Table or View as the data access mode.
13. Select the Access table from which you wish to import data. 14. Click OK to return to the Data Flow pane.