Practical
Django
Projects
James Bennett
Django Release Manager
James Bennett
All rights reserved. No part of this work may be reproduced or transmitted in any form or by any means, electronic or mechanical, including photocopying, recording, or by any information storage or retrieval system, without the prior written permission of the copyright owner and the publisher.
ISBN-13 (pbk): 978-1-59059-996-9
ISBN-10 (pbk): 1-59059-996-9
ISBN-13 (electronic): 978-1-4302-0868-6
Printed and bound in the United States of America 9 8 7 6 5 4 3 2 1
Trademarked names may appear in this book. Rather than use a trademark symbol with every occurrence of a trademarked name, we use the names only in an editorial fashion and to the benefit of the trademark owner, with no intention of infringement of the trademark.
Java™ and all Java-based marks are trademarks or registered trademarks of Sun Microsystems, Inc., in the US and other countries. Apress, Inc., is not affiliated with Sun Microsystems, Inc., and this book was written without endorsement from Sun Microsystems, Inc.
Lead Editors: Steve Anglin, Tom Welsh Technical Reviewer: Russell Keith-Magee
Editorial Board: Clay Andres, Steve Anglin, Ewan Buckingham, Tony Campbell, Gary Cornell, Jonathan Gennick, Matthew Moodie, Joseph Ottinger, Jeffrey Pepper, Frank Pohlmann, Ben Renow-Clarke, Dominic Shakeshaft, Matt Wade, Tom Welsh
Project Manager: Richard Dal Porto
Copy Editors: Kim Benbow, Nicole Abramowitz Associate Production Director: Kari Brooks-Copony Production Editor: Kelly Gunther
Compositor: Dina Quan Proofreader: Nancy Sixsmith Indexer: Carol Burbo Cover Designer: Kurt Krames
Manufacturing Director: Tom Debolski
Distributed to the book trade worldwide by Springer-Verlag New York, Inc., 233 Spring Street, 6th Floor, New York, NY 10013. Phone 1-800-SPRINGER, fax 201-348-4505, e-mail [email protected], or visit http://www.springeronline.com.
For information on translations, please contact Apress directly at 2855 Telegraph Avenue, Suite 600, Berkeley, CA 94705. Phone 510-549-5930, fax 510-549-5939, e-mail [email protected], or visit http://www.apress.com.
Apress and friends of ED books may be purchased in bulk for academic, corporate, or promotional use. eBook versions and licenses are also available for most titles. For more information, reference our Special Bulk Sales—eBook Licensing web page at http://www.apress.com/info/bulksales.
The information in this book is distributed on an “as is” basis, without warranty. Although every precau-tion has been taken in the preparaprecau-tion of this work, neither the author(s) nor Apress shall have any liability to any person or entity with respect to any loss or damage caused or alleged to be caused directly or indirectly by the information contained in this work.
all around the world to freely contribute their code, their ideas, and their time to improving the state of our art never ceases to amaze me.
Contents at a Glance
About the Author
. . . xiiiAbout the Technical Reviewer
. . . xvIntroduction
. . . xvii■
CHAPTER 1
Welcome to Django
. . . 1■
CHAPTER 2
Your First Django Site: A Simple CMS
. . . 9■
CHAPTER 3
Customizing the Simple CMS
. . . 23■
CHAPTER 4
A Django-Powered Weblog
. . . 43■
CHAPTER 5
Expanding the Weblog
. . . 77■
CHAPTER 6
Templates for the Weblog
. . . 97■
CHAPTER 7
Finishing the Weblog
. . . 123■
CHAPTER 8
A Social Code-Sharing Site
. . . 147■
CHAPTER 9
Form Processing in the Code-Sharing Application
. . . 165■
CHAPTER 10
Finishing the Code-Sharing Application
. . . 187■
CHAPTER 11
Writing Reusable Django Applications
. . . 205■
INDEX
. . . 225Contents
About the Author
. . . xiiiAbout the Technical Reviewer
. . . xvIntroduction
. . . xvii■
CHAPTER 1
Welcome to Django
. . . 1What’s a Web Framework and Why Should I Want One?
. . . 1Say Hello to Django
. . . 2Say Hello to Python
. . . 3Installing Django
. . . 4Your First Steps with Django
. . . 5Exploring Your Django Project
. . . 7Looking Ahead
. . . 8■
CHAPTER 2
Your First Django Site: A Simple CMS
. . . 9Configuring Your First Django Project
. . . 9Putting Together the CMS
. . . 12A Quick Introduction to the Django Template System
. . . 18Looking Ahead
. . . 21■
CHAPTER 3
Customizing the Simple CMS
. . . 23Adding Rich-Text Editing
. . . 23Adding a Search System to the CMS
. . . 26Improving the Search View
. . . 31Improving the Search Function with Keywords
. . . 33Looking Ahead
. . . 40■
CHAPTER 4
A Django-Powered Weblog
. . . 43Feature Checklist
. . . 43Writing a Django Application
. . . 44Projects vs. Applications
. . . 44Standalone and Coupled Applications
. . . 45Creating the Weblog Application
. . . 45Designing the Models
. . . 47The Entry Model
. . . 52Basic Fields
. . . 53Slugs, Useful Defaults, and Uniqueness Constraints
. . . 54Authors, Comments, and Featured Entries
. . . 55Different Types of Entries
. . . 56Categorizing and Tagging Entries
. . . 58Writing Entries Without Writing HTML
. . . 59Finishing Touches
. . . 61The Weblog Models So Far
. . . 62Writing the First Views
. . . 65Using Django's Generic Views
. . . 69How Did Django Do That?
. . . 70Decoupling the URLs
. . . 72Looking Ahead
. . . 75■
CHAPTER 5
Expanding the Weblog
. . . 77Writing the Link Model
. . . 77Views for the Link Model
. . . 83Setting Up Views for Categories
. . . 84Using Generic Views (Again)
. . . 86Views for Tags
. . . 87Cleaning Up the URLConf
. . . 89Handling Live Entries
. . . 93Looking Ahead
. . . 95■
CHAPTER 6
Templates for the Weblog
. . . 97Dealing with Repetitive Elements: The Power of Inheritance
. . . 97How Template Inheritance Works
. . . 99Limits of Template Inheritance
. . . 100Defining the Base Template for the Blog
. . . 100Section Templates
. . . 103Archives of Entries
. . . 104Entry Index
. . . 104Yearly Archive
. . . 105Monthly and Daily Archives
. . . 106Templates for Other Types of Content
. . . 110Extending the Template System with Custom Tags
. . . 111How a Django Template Works
. . . 112A Simple Custom Tag
. . . 113Writing a More Flexible Tag with Arguments
. . . 116Writing the Compilation Function
. . . 116Writing the LatestContentNode
. . . 119Registering and Using the New Tag
. . . 120Looking Ahead
. . . 122■
CHAPTER 7
Finishing the Weblog
. . . 123Comments and django.contrib.comments
. . . 123Installing the Comments Application
. . . 123Basic Setup
. . . 124Retrieving Lists of Comments for Display
. . . 128Comment Moderation
. . . 129Signals and the Django Dispatcher
. . . 130Building the Automatic Comment Moderator
. . . 131Adding Akismet Support
. . . 132E-mail Notification of Comments
. . . 135Dealing with Moderated Comments in Public-Facing
Templates
. . . 137Adding Feeds
. . . 138LatestEntriesFeed
. . . 139Entries by Category: A More Complex Feed Example
. . . 142Looking Ahead
. . . 146■
CHAPTER 8
A Social Code-Sharing Site
. . . 147Feature Checklist
. . . 147Setting Up the Application
. . . 148Building the Initial Models
. . . 148The Language Model
. . . 149The Snippet Model
. . . 151Testing the Snippets Application
. . . 154Initial Views for Snippets and Languages
. . . 155CSS for pygments Syntax Highlighting
. . . 156Views for Languages
. . . 157An Advanced View: Top Authors
. . . 158Improving the View of Top Authors
. . . 159Adding a top_languages View
. . . 162Looking Ahead
. . . 163■
CHAPTER 9
Form Processing in the Code-Sharing Application
. . . 165A Brief Tour of Django’s Form System
. . . 165A Simple Example
. . . 166Validating the Username
. . . 168Validating the Password
. . . 169Creating the New User
. . . 169How Form Validation Works
. . . 171Processing the Form
. . . 173A Form for Adding Code Snippets
. . . 175Writing a View to Process the Form
. . . 178Automatically Generating a Form for Adding Snippets
. . . 180Simplifying Templates That Display Forms
. . . 183Editing Snippets
. . . 184Looking Ahead
. . . 186■
CHAPTER 10
Finishing the Code-Sharing Application
. . . 187Bookmarking Snippets
. . . 187Basic Bookmark Views
. . . 188A New Template Tag: {% if_bookmarked %}
. . . 192Parsing Ahead in a Django Template
. . . 193Resolving Variables Inside a Template Node
. . . 194Using RequestContext to Automatically Populate Template
Variables
. . . 196Adding the User Rating System
. . . 198Rating Snippets
. . . 201Adding an {% if_rated %} Template Tag
. . . 202Retrieving a User’s Rating
. . . 203■
CHAPTER 11
Writing Reusable Django Applications
. . . 205One Thing at a Time
. . . 206Staying Focused
. . . 206Advantages of Tightly Focused Applications
. . . 207Developing Multiple Applications
. . . 208Drawing the Lines Between Applications
. . . 209Splitting Up the Snippets Application
. . . 210Building for Flexibility
. . . 210Flexible Form Handling
. . . 211Flexible Template Handling
. . . 212Flexible Post-Form Processing
. . . 213Flexible URL Handling
. . . 214Taking Advantage of Django’s APIs
. . . 215Staying Generic
. . . 215Distributing Django Applications
. . . 217Python Packaging Tools
. . . 217Writing a setup.py Script with distutils
. . . 218Standard Files to Include in a Package
. . . 219Documenting an Application
. . . 220Looking Ahead
. . . 224About the Author
■JAMES BENNETTis a web developer at the Lawrence Journal-Worldin Lawrence, Kansas, where Django was originally developed. He is both a regular contributor to and the release manager for the open source Django project.
About the Technical Reviewer
■DR. RUSSELL KEITH-MAGEEhas been a core developer on the Django proj-ect since January 2006. He is a cofounder of Django Evolution, a schema evolution framework for Django. He is an active participant on the Django Users and Django Developers mailing lists and is a mentor in the Google Summer of Code 2008.
In addition to his work with Django, Russell has worked at two startup companies—one very successful and one still in development. In those jobs, he has used his passion for good design, powerful tools, and automated testing to find elegant solutions to real-world problems faced by real-world users.
Russell lives with his wife, son, and two cats in Perth, Western Australia.
Introduction
T
he past few years have seen an explosion in the development of dynamic, database-driven web sites. Where many sites were once built using nothing but handwritten HTML, or a few CGI scripts or server-side includes, today database-backed web applications have become the norm for everything from personal blogs to online stores to the social networking sites that have revolutionized the way many people use the Web.But this has come at a cost. Developing these applications, even for relatively simple uses, involves a significant amount of complex work, and much of that work ends up being repeated for each new application. Although web developers have always had access to libraries of code that could automate certain tasks, such as HTML templating or database querying, the process of bringing together all the necessary pieces for a fully polished appli-cation has largely remained difficult and tedious.
This has led to the recent development, and subsequent popularity, of “web frameworks,” reusable collections of components that handle many of the common and repetitive tasks of application development in an integrated fashion. Instead of requiring you to obtain disparate libraries of code and find ways to make them work together, web frameworks provide all the necessary components in a single package and take care of the integration work for you.
Django is one of the most recent crop of web frameworks, growing out of the needs of a fast-paced online news operation. Django's original developers needed a set of tools that would not only help them quickly develop new and highly dynamic web applications in response to the rapidly evolving requirements of the news industry, but would also let them save time and effort by reusing pieces of code, and even entire applications, whenever possible.
In this book, you'll see how Django can help you achieve both of these goals—rapid appli-cation development and flexible, reusable code—through the tools it provides to you directly and the development practices that it makes possible. I'll guide you through the development of several example applications and show you how the various components and applications bundled with Django can help you to write less code at each stage of the development process. You'll also see firsthand a number of best practices for reusable code and learn how you can apply them in your own applications, as well as see how to integrate existing third-party libraries into Django-powered applications to minimize the amount of code you'll need to write from scratch.
I've written this book from a pragmatic viewpoint. The sample applications are all intended to be useful in real-world situations, and once you've worked through them, you'll have more than just a technical understanding of Django and its components. You'll have a clear understanding of how Django can help you become a more productive and more effec-tive developer.
Welcome to Django
W
eb development is hard, and don’t let anybody tell you otherwise. Building a fully func-tional dynamic web application with all the features users will want is a daunting task with a seemingly endless list of things you have to get just right. And before you can even start thinking about most of them, there’s a huge amount of up-front work: you have to set up a database, create all the tables to store your data, plan out all the relationships and queries, come up with a solution for dynamically generating the HTML, work out how to map specific URLs to different bits of the code, and the list goes on. Just getting to the point where you can add features your users will see or care about is a vast and largely thankless job.But it doesn’t have to be that way.
This book will teach you how to use Django, a “web framework” that will significantly ease the pain of embarking on new development projects. You’ll be able to follow along and build real applications—code you can actually use in the real world—and at every step you’ll see how Django is there to help you out. And at the end, you’ll come to a wonderful realization— that web development is fun again.
What’s a Web Framework and Why Should
I Want One?
The biggest downside of web development is the sheer amount of tedium it involves. All those things I’ve listed previously—database creation and querying, HTML generation, URL map-ping—and dozens more are lurking behind every new application you develop, and they quickly suck all the joy out of even the most exciting projects. Web frameworks like Django aim to take all that tedium away by providing an organized, reusable set of common libraries and components that can do the heavy lifting, freeing you up to work on the things that make your project unique.
This idea of standardizing a set of common libraries to deal with common tasks is far from new. In fact, in most areas of programming it’s such an established practice that you’d get strange looks if you suggested somebody should just start writing code from scratch. And in enterprise web development, frameworks of various sorts have been in use for years. Most companies that routinely need to develop large-scale applications rely heavily on frameworks to provide common functionality and speed up their development processes.
But in the world of web development, frameworks have traditionally been, almost out of necessity, just as heavyweight as the applications they’re used in. They tend to be written in Java or C#, targeted at large corporate development projects, and sometimes come with a
frameworks targeted at a broader audience: developers who don’t necessarily have the weight of a multinational conglomerate’s needs bearing down on their shoulders, but who still need to get things done quickly. Not to put too fine a point on it, developers like you and me.
The past couple of years have seen a number of these new web frameworks burst onto the scene, written in and for programming languages that are much more accessible to the aver-age web developer (and, just as importantly, to the averaver-age web host): PHP, Perl, Python, and Ruby. Each one has a slightly different philosophy when it comes to things like code organiza-tion and how many “extras” should be bundled directly in the framework, but they all share a common baseline goal: provide an integrated, easy-to-use set of components that handle the tedious, repetitive tasks of web development with as little fuss as possible.
Say Hello to Django
Django began life as a simple set of tools used by the in-house web team of a newspaper com-pany in a small college town in Kansas. Like anybody who spends enough time doing web development, they quickly got tired of writing the same kinds of code—database queries, tem-plates, and the whole nine yards—over and over again, and extremely quickly, in fact, because they had the pressure of a newsroom schedule to keep up with. It wasn’t (and still isn’t) unusual to need custom code to go with a big story or feature, and the development timelines needed to be measurable in days, or even hours, in order to keep pace with the news.
In the space of a couple of years, they developed a set of libraries that worked extremely well together and, by automating or simplifying the common tasks of web development, helped them get their work done quickly and efficiently. In the summer of 2005, they got per-mission from the newspaper’s management to release those libraries publicly, for free, and under an open source license so that anyone could use and improve them. They also gave it a snappy name, “Django,” in honor of the famous gypsy jazz guitarist Django Reinhardt.
As befits its newsroom heritage, Django bills itself as “the web framework for perfection-ists with deadlines.” At its core is a set of solid, well-tested libraries covering all of the repetitive aspects of web development:
• An object-relational mapper, a library that knows what your database looks like, what your code looks like, and how to bridge the gap between them with as little hand-written SQL as possible.
• A set of HTTP libraries that knows how to parse incoming web requests and hand them to you in a standard, easy-to-use format and turns the results of your code into well-formed responses.
• A URL routing library that lets you define exactly the URLs you want and map them onto the appropriate parts of your code.
• A validation library for displaying forms in web pages and processing user-submitted data.
• A templating system that lets even nonprogrammers write HTML mixed with data generated by your code and just the right amount of presentational logic.
also bundled with it and provide out-of-the-box solutions for specific needs like administra-tive interfaces and user authentication. In the example applications used in this book, you’ll see all of these features, and more, in action. So let’s dive in.
Say Hello to Python
Django is written in a programming language called Python, so the applications you develop with it will also be written in Python. That also means you’ll need to have Python installed on your computer before you can get started with Django. Python can be downloaded for free from http://python.org/download/and is available for all major operating systems. It’s best to install the latest version of Python—Python 2.5.1 at the time of this writing—in order to have the latest features and bug fixes for the Python language.
ADMONITION: LEARNING PYTHON
If you don’t know any Python, or even if you’ve never done any programming before, don’t worry. Python is easy to learn (when I first started with Python, I learned the basics in a weekend by reading online tutorials), and you don’t need to know much of it to get started with Django. In fact, many first-time Django users learn Python and Django at the same time.
Throughout this book, I’ll call attention to important Python concepts when needed, but it would be a good idea to look at a Python tutorial before going very far into this book. The Python documentation index (available online athttp://python.org/doc/) has a good list of tutorials and books (several of which are available for free online) to help you learn the basics of Python. (I’d recommend knowing at least how Python functions and classes work.) You’ll be able to pick up the rest as you go along.
If you’re looking for a good reference to keep handy as you’re learning Django,Beginning Python: From Novice to Professionalby Magnus Lie Hetland, and Dive Into Pythonby Mark Pilgrim (both from Apress) are good options.
Once you’ve installed Python, you should be able to open a command prompt (Command Prompt on Windows, Terminal on Mac OS X, or any terminal emulator on Linux) and enter the Python interactive interpreter by typing the command python. Normally, you’ll be saving your Python code into files to be run as part of your applications, but the interactive interpreter will let you explore Python—and, once it’s installed, Django—in a more freeform way: the inter-preter lets you type in Python code, a line at a time, and see the results immediately. You can also use it to access and interact with code in your own Python files or in the Python standard libraries and any third-party libraries you’ve installed, which makes it a powerful learning and debugging tool.
When you first fire up the Python interpreter, you’ll see something like this:
Python 2.5.1 (r251:54869, Apr 18 2007, 22:08:04) [GCC 4.0.1 (Apple Computer, Inc. build 5367)] on darwin
The >>>is Python’s command prompt. You can type a line of Python code and press Enter, and if that code returns a result, you’ll see it immediately. Let’s test this with a simple line that just prints a line of text. At the Python interpreter prompt, type the following and press Enter:
>>> print "Hello, world!"
You’ll see the result appear on the next line:
Hello, world! >>>
Anything you can type into a file as part of a Python program can be typed directly into the interpreter, and there’s also a full help system built in, which you can access at any time by typing help()and pressing Enter. When you’re ready to exit the Python interpreter, press Ctrl+D, and it will shut down.
Installing Django
Now that you’ve got Python installed and working, it’s time to install Django and start explor-ing its features. You can get a copy from the official Django web site; just visit
www.djangoproject.com/download/and follow the instructions for downloading the “develop-ment version” of Django.
ADMONITION: PACKAGED RELEASES VS. DEVELOPMENT CODE
Django is always being worked on and improved and, in addition to the official release, the current in-development code is available for download. The Django web site has instructions for installing this code on your computer, and you can follow that to obtain the development version of Django.
The advantage of using the development version is that new features are available as soon as they’re added, so you can begin using them immediately instead of waiting for the next official release. In this book, I'll be assuming that you've installed the development version of Django, and several of the features we'll use are only available in the development version. This code will, in the near future, become Django's packaged 1.0 release, so starting out with it will minimize the amount of work you'll need to do to upgrade when that takes place. So when you download Django, be sure to follow the specific instructions for the development version found at www.djangoproject.com/documentation/install/#installing-the-development-version.
Once you’ve downloaded the Django code onto your computer, you can install it by typ-ing a styp-ingle command. On Linux or Mac OS X, open a terminal, navigate to the directory Django downloaded into, and you should see a file named setup.py. Type the following com-mand, and enter your password when prompted:
On Windows, you’ll need to open a command prompt with administrative privileges; then you can navigate to the Django directory and type the following:
python setup.py install
The setup.pyscript is a standard installation procedure for Python modules, and takes care of installing all of the relevant Django code into the correct locations for your operating system. If you’re curious, Table 1-1 summarizes where the Django code will end up on various systems.
Table 1-1.Django Installation Locations
Operating system Django location
Linux /usr/local/lib/python2.5/site-packages/django
Mac OS X /Library/Frameworks/Python.framework/Versions/2.5/lib/python2.5/ site-packages/django
Windows C:\Python\site-packages\django
Your First Steps with Django
You should now be able to verify that Django installed correctly on your computer. Next, start the interactive Python interpreter and type in the following:
>>> import django >>> print django.VERSION
The result of this should be a set of numbers in parentheses, which represents the version of Django you’re using. The Django 0.96 release, for example, will show (0, 96). Python software typically uses a tuple—a parenthesized, comma-separated list of numbers and/or words—to represent version numbers internally (which makes it easy for Python programs to automati-cally parse otherwise complex version numbers like “1.0 beta 3” or “2.4 prerelease”).
Now you’re ready to create your first Django project. A Django projectis a wrapper of sorts, which contains settings for one or more Django-powered applications and a list of which applications it uses. Later on, when you’re deploying your Django applications behind a real web server, you’ll use projects to organize and configure them.
To set up your first project, create a directory on your computer where you’ll keep your in-progress Django projects, and then navigate to it in a terminal or at a command prompt. It’s often a good idea to have a single directory where you keep all of your own custom Python code. As you’ll see a bit later on, doing so will simplify the process of telling Python how to find and use that code.
Now you can use the built-in Django management script, django-admin.py, to create your project. django-admin.pylives in the bin/subdirectory of the directory Django was installed into, and it knows how to handle various management tasks involving Django projects. The one you’re interested in is called startproject, and it will create a new, empty Django project. In the directory where you want to create your project, type the following (refer to Table 1-1 for the correct path for your operating system):
This will create a new subdirectory called cms(you’ll see why it’s named that in the next chapter, when you start to work with this project) and populate it with the basic files needed by any Django project.
ADMONITION: PERMISSION ERRORS
If you’re using Linux or Mac OS X, you may see an error message saying “permission denied.” If this hap-pens, you need to tell your operating system that the django-admin.pyscript is safe to run as a program. You can do this by navigating to the directory that django-admin.pyis in and typing the commandchmod +x django-admin.py. Then you can run the django-admin.pyscript as previously shown.
In the next section you’ll see what each of the files in the project directory is for, but for now the most important one is called manage.py. Like django-admin.py, it’s there to take care of common project and application management tasks for you. The manage.pyscript can start a simple web server that will host your project for testing purposes, and you can start it by going into your project directory and typing the following:
python manage.py runserver
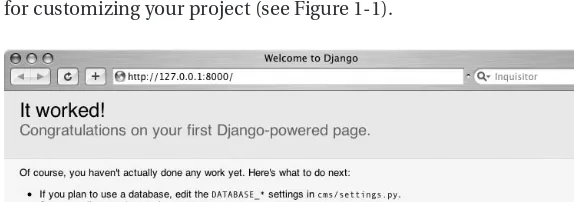
Then you should be able to open up a web browser and visit the address http:// 127.0.0.1:8000/. The development web server, by default, runs on your computer’s local “loopback” network address, which is always 127.0.0.1 and binds to port 8000. When you visit that address, you should see a simple page saying “It worked!” with some basic instructions for customizing your project (see Figure 1-1).
ADMONITION: CHANGING THE ADDRESS AND PORT
If something else is already using port 8000 on your computer, if you’re not allowed to run programs that bind to that port, or if you want to view pages served by Django’s development server from another com-puter, you’ll need to manually specify the address and port to use when you launch the development server. The syntax for this is python manage.py runserver ip_address:port_number. So, for example, to listen on all of your computer’s available IP addresses (so that other computers can view pages from the development server) and bind to port 9000 instead of 8000, you could type python manage.py runserver 0.0.0.0:9000.
You can stop the server by pressing Ctrl+C at the command prompt.
Exploring Your Django Project
The startprojectcommand of django-admin.pycreated your project directory for you and automatically filled in a few files. Each one serves a specific purpose, and in future chapters you’ll see what each one does, but for now here’s a quick primer:
__init__.py: This will be an empty file. For now you don’t need to put anything into it (and in fact, most of the time you won’t need to). It’s used to tell Python that this directory contains executable code. Python can treat any directory containing an __init__.pyfile as a Python module.
manage.py: As explained previously, this is a helper script that knows how to handle com-mon management tasks. It knows how to start the built-in development web server, create new application modules, set up your database, and numerous other things that you’ll see as you build your first Django applications.
settings.py: This is a Django settings module, which holds the configuration for your Django project. Over the next few chapters, you’ll see some of the most common settings and how to edit them to suit your projects.
urls.py: This file contains your project’s master URL configuration. Unlike some lan-guages and frameworks that simply mimic HTML by letting you place code into the web server’s public directory and access it directly by file name, Django uses an explicit config-uration file to lay out which URLs point to which parts of your code, and this file defines the set of “root” URLs for an entire project.
Looking Ahead
In the next chapter, you’ll walk through setting up your first real Django project, which will provide a simple content management system, or CMS. If you’re ready to dive in, keep read-ing, but you should also feel free to pause and explore Python or Django a bit more on your own. Both the django-admin.pyand manage.pyscripts accept a helpcommand, which will list all of the things they can do; and the Python interpreter’s built-in help system can also auto-matically extract documentation from most Python modules on your computer, including the ones inside Django. There’s also a special shellcommand to manage.pythat you may find use-ful because it will launch a Python interpreter with a use-fully configured Django environment (based on your project’s settings module) you can explore.
Your First Django Site:
A Simple CMS
O
ne extremely common task in web development is building a simple content management system (CMS), which lets users create and edit pages on a site dynamically through a web-based interface. Sometimes called brochurewaresites because they tend to be used in the same fashion as traditional printed brochures handed out by businesses, they’re usually fairly simple feature-wise, but can be tedious to code over and over again.In this chapter, you’ll see how Django makes these sorts of sites almost trivially easy to build: I’ll walk you through the setup of a simple CMS, and then in the next chapter, you’ll see how to add a few extra features and provide room to expand it in the future.
Configuring Your First Django Project
In the last chapter, you created a Django project called cms. But before you can do much with it you’ll need to do some basic configuration, so launch your favorite code editing program and use it to open up the settings.pyfile in your project.
ADMONITION: WRITING PYTHON
From here to the end of this book, you’ll be writing Python code and the occasional template. If you haven’t already looked at a Python tutorial to get a feel for the basics, now would be a good time. I’ll explain some of the most important concepts as we go, but that’s no substitute for a dedicated Python tutorial, which will cover them in depth.
And if you don’t have an editing program suitable for working with programming code, you’ll want to get one. Nearly all programmers’ editors have support for Python (and other popular languages) built in, and this will make the process of writing code much easier.
Don’t be daunted by the size of this file or the number of things you’ll find in it. django-admin.pyautomatically filled in default values for a lot of them, and for now most of the defaults will be fine. Near the top of the file is a group of settings whose names all start with DATABASE. These settings tell Django what type of database to use and how to connect to it, and right now that’s all you’ll need to fill in.
Assuming you installed the latest version of Python, you’ll already have a database adapter module that can talk to SQLite databases (Python 2.5 and later include this module in the standard Python library). SQLite stores the entire database in a single file on your com-puter and doesn’t require any of the complex server or permissions setup of other database systems, so it’s a great system to use when you’re just starting out or exploring Django.
To use SQLite, you’ll only need to change two settings. First, find the DATABASE_ENGINE setting and change it from this:
DATABASE_ENGINE = ''
to this:
DATABASE_ENGINE = 'sqlite3'
Now you’ll need to tell Django where to find the SQLite database file. This goes into the DATABASE_NAMEsetting and can be anywhere on your computer’s hard drive where you have permission to read and write files. You can even fill in a nonexistent file name, and the SQLite database engine will create the file for you automatically. Keeping the database file inside your project folder isn’t a bad idea in this case, so go ahead and do that. I keep all of my Django projects in a folder called django-projectsinside my home directory (on a laptop running Mac OS X), so I’ll fill it in like so:
DATABASE_NAME = '/Users/jbennett/django-projects/cms/cms.db'
On other operating systems this will look a bit different, of course. On Windows it might be C:\Documents and Settings\jbennett\django-projects\cms\cms.db, for example, while on a Linux system it might be /home/jbennett/django-projects/cms/cmd.db.
I’m telling Django the SQLite database file should live inside the cms project directory and be named cms.db. The .db file extension isn’t required, but it helps me to remember what that file is for, and so I’d recommend you use something similar.
ADMONITION: USING A DIFFERENT DATABASE
If you’d like to set up a MySQL, PostgreSQL, or Oracle database instead of using SQLite, consult the Django settings documentation online at www.djangoproject.com/documentation/settings/to see the correct values for the database settings. However, bear in mind that you will also need to install a Python adapter module for the database you’re using—as of Python 2.5, SQLite is the only database system directly supported in the standard Python library.
If you’re using a version of Python prior to 2.5, you’ll need to install an adapter module for your database no matter which database you use. See the Django installation instructions for details at
www.djangoproject.com/documentation/install/#get-your-database-running.
uses names in zoneinfo format; zoneinfois a standard format used by many computer operat-ing systems and is also easy for humans to read. The default settoperat-ing is
TIME_ZONE = "America/Chicago"
which is equivalent to the US Central time zone, six hours behind UTC. Full lists of zoneinfo time zone names are available online, and the official Django settings documentation at www.djangoproject.com/documentation/settings/includes a link to one such list. You should change your TIME_ZONEsetting to the zone in which you live.
ADMONITION: TIME ZONES ON WINDOWS
If you’re using Microsoft Windows, you’ll want to be careful with the TIME_ZONEsetting. Because of quirks in Windows’ operating environment, it’s not possible to reliably use a time zone other than the one the com-puter as a whole is currently using. So for best results you’ll want to specify TIME_ZONEto be the same as the time zone Windows is using.
You won’t need to change it yet, but you’ll also want to scroll down to the bottom of the settings file, where you’ll see a setting called INSTALLED_APPS. As mentioned previously, a Django project is made up of one or more Django-powered applications, and this setting is how Django knows which applications are used by your project. The default value looks like this:
INSTALLED_APPS = (
'django.contrib.auth',
'django.contrib.contenttypes', 'django.contrib.sessions', 'django.contrib.sites', )
Each of these is an application bundled with Django itself, and each one provides a useful piece of common functionality; django.contrib.auth, for example, provides a mechanism for storing data about users and for authenticating them, while django.contrib.sitesprovides an easy way to run multiple web sites from a single Django project and to specify which items in your database should be accessible to each site.
In time, you’ll see examples of these applications in action, but for now it’s best to leave the defaults as they are. They provide a “quick start” to your project by taking care of a lot of tasks right away, and you’ll be building on their functionality in just a moment.
Now that you’ve provided some basic configuration data to Django, you can tell it to set up your database. Open up a terminal or command prompt, navigate to your project’s direc-tory, and type this command:
python manage.py syncdb
Django will ask if you’d like to create a “superuser” account for web-based administration. Type yes, and then enter a username, e-mail address, and password when prompted. You’ll see shortly how you can use this account to log in to a Django administrative interface.
ADMONITION: WHAT GOES ON DURING SYNCDB
When you run manage.py syncdb, Django actually does several things in order, and the output on your screen shows each step. First, Django looks in each application module listed in INSTALLED_APPSand finds the data models. These are Python classes that define the different types of data the application uses, and Django knows how to automatically generate appropriate CREATE TABLESQL statements from them. In Chapter 3, you’ll write your first data model and see how Django generates the SQL for it.
Once the database tables have been created, Django looks for, and runs, any application-specific initial-ization code for each application. In this case,django.contrib.authincludes code that prompts you to create a user account.
Finally, Django finishes the database setup and installs any initial data you’ve provided. The default set of bundled applications doesn’t use this feature, but later on you’ll see how to supply an initial data file that can kick-start an application by giving it data to work with right away. You won't be providing any initial data with this application, but some of Django's bundled applications do provide data which will be inserted into the database when installed.
Putting Together the CMS
Most of the applications you’ll build with Django will require you to write a fair amount of code on your own. Django will take care of the heavy lifting and the repetitive tasks, but it’ll still be up to you to handle features unique to each specific application. Sometimes, though, features built in to Django or applications bundled with it will provide most or all of what you need. Django’scontribapplications are designed with just this aim in mind: some types of applications are so common and so repetitive that it’s best to just provide a single customiz-able version and reuse it from project to project.
A simple brochureware CMS is a good example of this, and you’ll build it by relying heav-ily on two applications bundled with Django: django.contrib.flatpagesand django.contrib. admin.
The first of these, django.contrib.flatpages, provides a data model for a simple page, with a title, content, and a few configurable options, such as custom templates or authentica-tion. The other,django.contrib.admin, provides a powerful administrative interface that can work with any Django data model, letting you create a more or less “instant” web-based inter-face to administer a site.
The first step here is to add these applications to the INSTALLED_APPSsetting. You’ll remember that by default four applications were placed in the list, and now you can add two more:
INSTALLED_APPS = (
'django.contrib.auth',
'django.contrib.sites', 'django.contrib.admin', 'django.contrib.flatpages', )
Once you’ve made that change and saved your settings file, run syncdbagain:
python manage.py syncdb
You’ll see the output scroll by as Django creates database tables for the data models defined in these applications. Now, open up the urls.pyfile in your project, which—as you saw in the previous chapter—contains the root URL configuration for your project. There’s a line that says, “Uncomment this for admin:” followed by this line (the hash mark at the begin-ning indicates a Python comment and means the line will not be executed as code):
# (r'^admin/', include('django.contrib.admin.urls')),
Uncomment that line and save the file. This will add a set of URLs, included in django.contrib.admin, to your project’s URL configuration.
ADMONITION: HOW DJANGO URL CONFIGURATION WORKS
A Django URL configuration file, or URLConf, defines a list of URL patterns and indicates how they map to parts of your code. Each URL pattern has at least two parts: a regular expression that describes what the URL looks like and either a view (a Python function that can respond to HTTP requests) to map that URL to or an
include, which points to a different URLConfmodule. The ability to include other URLConfmodules makes it easy to define reusable and “pluggable” sets of URLs, which can be dropped into any point in your project’s URL hierarchy.
Aregular expression, in case you’ve never encountered that term before, is a common way to represent a particular pattern of text, and most programming languages have support for checking whether a given piece of text matches the pattern specified in a regular expression. Most introductory programming books cover regular expressions.Dive Into Pythonby Mark Pilgrim (Apress, 2004) has a good chapter that covers the basics.
Also, note that regular expressions are quite strict about matching. Ordinarily, a web server will be somewhat lax and treat, for example,/adminand /admin/as the same URL, returning the same result either way. But if you specify a regular expression that ends in a slash—as I’m doing here—you must
include the slash on the end when you visit that address in your browser, or the pattern will not match and you’ll get a “Page not found” error.
Now you’ll be able to launch the built-in web server again and see the administrative interface:
python manage.py runserver
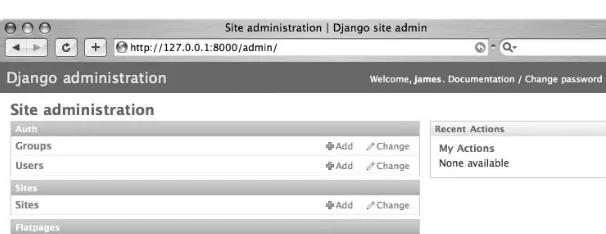
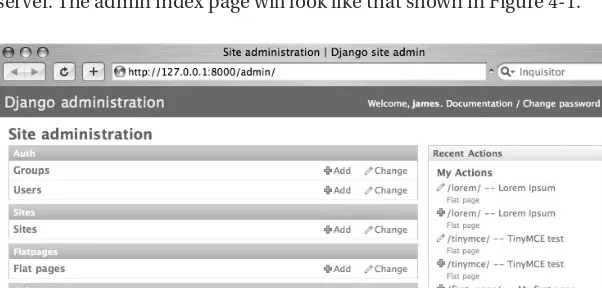
see the main admin index page, as shown in Figure 2-1. But note that URLs beginning with admin/are the only ones that will work right now; you haven’t set up any other URLs yet.
Figure 2-1.Home page of the Django administrative interface
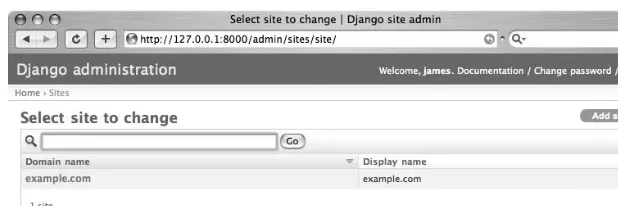
Each item listed on the index page corresponds to a data model in one of the installed applications. They’re grouped according to which application they belong to. The auth appli-cation, django.contrib.auth, provides models for users and groups; the sitesapplication, django.contrib.sites, provides a model to represent a web site; and the flatpages applica-tion you just installed provides a “flat page” model. To the right of this list is a sidebar, which will report actions you’ve taken recently in the admin interface. Since you haven’t done any-thing yet, it’s empty, but as soon as you start making changes to site content it will show a summary of your actions. As a first step, click on the Sites link. You’ll see a listing like the one shown in Figure 2-2.
Figure 2-2.The default site object created by Django
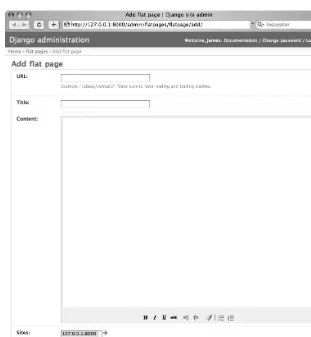
You’ll notice that the main admin page, next to each type of item, displays an Add link and a Change link; let’s add a new flat page by clicking the Add link next to the Flat Page link. This will bring up a blank form, automatically generated from the appropriate data model. Enter the following values:
• In the URL field, enter /first-page/. • In the Title field, enter My first page.
• In the Content field, enter This is my first Django flat page.
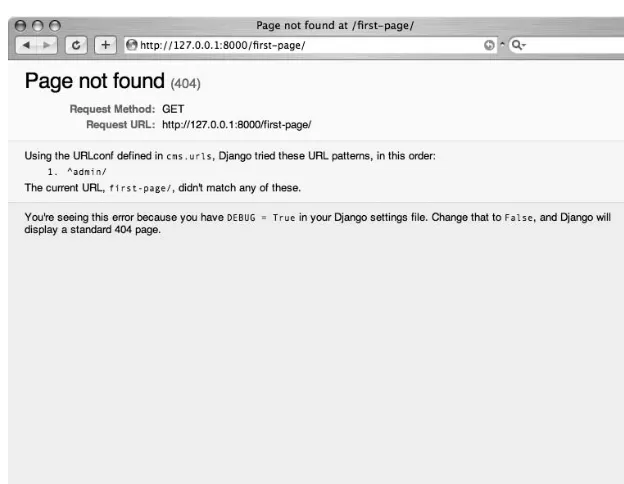
Figure 2-3.A Django “Page not found” error
This is a 404 “Page not found” error, but with a twist—every new Django project starts out in a debugging mode, which displays more helpful error messages to help you get up and run-ning. In this case, Django shows you the URL patterns it found in your project’s URLConf, and explains that the URL you tried to visit didn’t match any of them, which makes sense because you haven’t yet added anything that looks like the URL /first-page/. So let’s fix that. Open up the urls.pyfile again and add the following line right below the one for the admin interface:
(r'', include('django.contrib.flatpages.urls')),
The pattern part of this is simply an empty string (''), which means it will actually match
anyURL. You could, if you wanted, go into urls.pyand add a new line each time you add a flat page. In applications you’ll develop later on, you’ll mostly be defining individual URLs, but because django.contrib.flatpageslets you specify anything for the URL of a page, it’s easiest in this case to simply place a “catch-all” URL pattern to handle it.
ADMONITION: ORDER OF URL PATTERNS
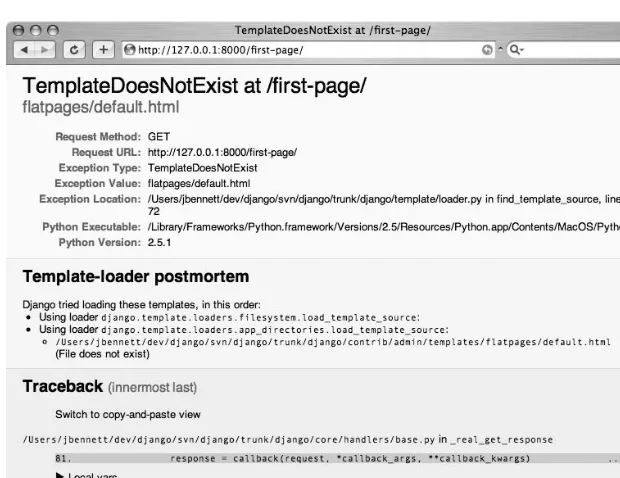
This pattern, like the previous one for the admin, takes advantage of the “pluggable” URLs the includedirective provides and says to use another URLConfmodule, django.contrib. flatpages.urls, for anything that matches the pattern. Save your urls.pyand either refresh the page in your browser or navigate again to http://127.0.0.1:8000/first-page/. It’s still going to display an error, but now you’re closer to having the simple CMS working (see Figure 2-4).
Figure 2-4.A Django server error page
This page looks a little scary, but it’s actually not. Once again, Django’s debugging mode is trying to give you as much information as it can. The top of the page shows a short summary of the error, followed by more detailed information, including a full stack trace(a copy of everything Python and Django were doing when the error happened), a listing of the incom-ing HTTP request, and your Django project’s settincom-ings (with any sensitive settincom-ings, such as database passwords, blanked out for security reasons).
A Quick Introduction to the Django
Template System
Django includes a templating system (in the module django.template, if you’ve been explor-ing the Django codebase and want to take a look at it), which has two major design goals:
• Provide an easy way to express the logic needed for your application’s presentation.
• As much as possible, avoid restricting the types of output you can generate.
Some template languages allow you to embed nearly any form of programming code directly in the templates. While this is sometimes handy, it also creates a tendency for your application’s core programming logic to migrate slowly out of other parts of the code and into the templates, which really ought to confine themselves to the presentational aspects. And some templating languages force you to write XML or other specific types of markup, even if what you want to produce isn’t XML at all. Django’s template system does its best to avoid both of these pitfalls by keeping the allowed programming to a minimum and by not con-straining you to specific markup languages. (I’ve used the Django template system to generate content for e-mail messages and even Excel spreadsheets, for example.)
Ultimately, a Django template file for a web page—in other words, a template whose out-put is HTML—doesn’t end up looking all that different from a normal hand-written web page. The biggest distinction is in two features that the Django template system provides:
• Variables: Fed to the template by a view—the actual Python function that responds to an HTTP request—and are wrapped in double curly braces, like so: {{ variable_ name_here }}. These are simply replaced with the actual value of the variable.
• Tags: Wrapped in a single curly braces and a percent sign, like this: {% tag_name_here %}. Tags can do almost anything, and the exact effect depends on the particular tag. You can also write and use your own custom tags in Django templates, so if there’s some-thing you need that isn’t provided out of the box, you can add it.
Whenever Django needs a template file, it can look in any of several places, defined by configurable modules called template loaders. By default, Django looks in the following places:
• Inside any directories specified in your settings module by the setting TEMPLATE_DIRS
• Inside your installed applications, if any of them include a directory named templates/
This lets you provide a set of default templates with any given application, but also gives you the power to override those on a project-by-project basis by listing specific directories you’ll put customized templates into. The administrative interface, for example, uses this to great effect: django.contrib.admincontains a templates/directory with the default templates, but if you need to customize the admin interface you can add your own templates in a project-specific template directory.
TEMPLATE_DIRS = (
'/Users/jbennett/html/django-templates/cms/', )
You’ll note that I’m specifying a completely different directory from the one where the project’s code is kept. This is often a good idea because it reinforces the idea that the particu-lar presentation—in the form of a set of HTML templates—can and should be decoupled from the back-end code whenever possible. It’s also a useful practice for any application you might end up reusing across multiple web sites. Different sites will obviously have different sets of templates, and so being able to switch them at will without needing to move lots of files in and out of a project-specific location is extremely handy.
ADMONITION: TRAILING COMMAS
As you may have already learned from a tutorial, Python offers two simple ways to represent sequences of items: lists and tuples. A tuple is usually wrapped in parentheses, as you’ve seen so far with the
INSTALLED_APPSand now the TEMPLATE_DIRSsettings, both of which accept tuples as legal values. But Python tuples require a comma after everyitem, even if there’s only one item in the tuple, and leaving off the comma is a common annoyance for users who are getting used to the language. I’ve been writing Python for several years now, and I still sometimes forget to do that. Generally, I find it helpful to remember that in Python, the comma—and not parentheses, which technically aren’t required—is what makes a tuple.
Now, inside the template directory you chose, create a subdirectory called flatpages/, and in that subdirectory create a new file called default.html. Refresh the flat page in your web browser, and you should see a blank white page. Now you have a template directory spec-ified in your settings, and the file flatpages/default.htmlexists inside it, so there’s no longer an error. But the template file is empty, and so it doesn’t produce any output. Let’s fix that by opening up the default.htmlfile and adding some content:
<html> <head>
<title>{{ flatpage.title }}</title> </head>
<body>
<h1>{{ flatpage.title }}</h1> {{ flatpage.content }} </body>
</html>
Figure 2-5.Your first Django flat page
You’ll see that this template uses two variables—flatpage.titleand flatpage.content— and no tags. Those variables actually come from a single source: a variable flatpage, which was passed to the template by a Python view function defined inside django.contrib. flatpages. The value of this variable is a FlatPageobject, an instance of the data model for flat pages. This was created by querying the database for a row with a URL column that matched the URL /first-page/. It then used the data from that row to create a Python object with attributes named titleand content, matching what you entered in the admin interface (along with other attributes—for example, url—which aren’t as important for the presentational aspect of things).
ADMONITION: HOW DID DJANGO DO THAT?
With this template in place, you now have—literally—a simple dynamic content manage-ment system that will let you define as many pages as you’d like, title them, fill in content, and place them at any URL (except for URLs starting with admin/because they’ll be matched by the URL pattern for the admin interface). You could, if you wanted to, dress up the template with fancier HTML and a nice cascading style sheet (CSS), create a few more user accounts through the administrative interface, and deploy this onto a live web server for real-world use. But so far, you’ve only written a couple of lines of actual code: the URL pattern for the pages in your urls.pyfile, a few Django settings, and a little HTML.
Obviously, it won’t always be quite this easy to get an application up and running with Django, but hopefully you’ve seen that taking advantage of Django’s components can signifi-cantly cut down the amount of work you have to do.
Looking Ahead
Pause here for a few moments to play with the simple CMS and explore the Django adminis-trative interface. Take particular note of the Documentation link that appears in the upper-right corner of each page in the admin. It provides automatically generated documentation for all of the data models, URL patterns, and template tags available in your Django project. Not all of it will be immediately understandable at this point, but click around in the docu-mentation area and get a feel for what’s in there. When you’re developing or working with more complex applications, the admin documentation system will be an important resource for learning about and understanding the code you’re using.
Customizing the Simple CMS
T
he simple CMS you put together in the last chapter is already in pretty good shape; it’s something that most developers wouldn’t mind showing to clients as an initial prototype, for example. But so far it’s just using a few stock applications bundled with Django and hasn’t added any extra features on top of that. In this chapter, you’ll see how to take this simple proj-ect as a foundation and start adding your own customizations, like rich-text editing in the admin and a search system for quickly finding particular pages.Adding Rich-Text Editing
The default administrative interface Django provides for the flatpagesapplication is already production quality. Many Django-based sites already use it as is to provide an easy way to manage the occasional simple About page or to handle similar tasks. But it would be nice to make it just a little bit friendlier by adding a rich-text interface to it so that users of the web-based administrative interface don’t have to type in raw HTML.
There are a number of JavaScript-based rich-text editors (RTEs), available with different features and configurations, but I’ll be using one called TinyMCE. It’s one of the most popular options and has roughly the best cross-browser support of any of the existing RTEs. (Due to differences in the APIs implemented by web browsers, there’s no truly consistent cross-platform RTE at the moment.) TinyMCE is also free and released under an open source license. You can download a copy of the latest stable version from http://tinymce.moxiecode.com/.
Once you’ve unpacked TinyMCE, you’ll see it contains a jscripts/directory, inside which is a tiny_mcedirectory containing all the TinyMCE code. Make a note of where that directory is, and go to the project’surls.pyfile. In urls.py, add a new line so that it looks like the following:
from django.conf.urls.defaults import *
urlpatterns = patterns('', # Example:
# (r'^foo/', include('foo.foo.urls')),
# Uncomment this for admin:
(r'^admin/', include('django.contrib.admin.urls')), (r'^tiny_mce/(?P<path>.*)$', 'django.views.static.serve',
{ 'document_root': '/path/to/tiny_mce' },
Replace the /path/to/tiny_mcepart with the actual location on your computer of the tiny_mcedirectory. For example, if it’s at /Users/jbennett/javascript/TinyMCE/jscripts/ tiny_mce, you’d use that value.
ADMONITION: MEDIA FILES IN PRODUCTION VS. DEVELOPMENT
In production, you’ll usually want to avoid having the same web server handle both Django and static media files, like style sheets or JavaScript. Because the web server process needs to keep a copy of Django’s code and your applications in memory, it’s a waste of resources to use that same process for the simple task of serving a file off the disk.
For now I’m using a helper function built into Django that can serve static files, but keep in mind this should only be used for development on your own computer. Using it on a live, deployed site will severely impact your site’s performance. When you deploy a Django application to a live web server, consult the offi-cial Django documentation at www.djangoproject.com/documentation/to see instructions for your specific server setup.
Now you just need to add the appropriate JavaScript calls to the template used for adding and editing flat pages. In the last chapter, when you filled in the TEMPLATE_DIRSsetting, I men-tioned that Django can also look directly inside an application for templates and that this lets an application author provide default templates while still allowing individual projects to use their own. That’s precisely what we’re going to take advantage of here. The adminapplication is not only designed to use its own templates as a fallback, but it also lets you provide your own if you’d like to customize it.
By default, the adminapplication will look for a template in several places, using the first one it finds. The template names it looks for are as follows, in order:
1. admin/flatpages/flatpage/change_form.html
2. admin/flatpages/change_form.html
3. admin/change_form.html
ADMONITION: CHOOSING FROM MULTIPLE TEMPLATES
The adminapplication only provides the last template in this list—admin/change_form. html—and uses that for all adding and editing of items if you don’t supply a custom template. But as you can see, there are a couple of other options. By using a list of possible template names, rather than a single prebuilt template, the adminapplication lets you override the interface for a specific application (in this case, the flatpagesapplication, by supplying the template admin/flatpages/change_form.html) or for a specific data model (by supplying the template admin/flatpages/flatpage/change_form.html). Right now you only want to cus-tomize the interface for one specific model. So inside your templatesdirectory, create an adminsubdirectory. Then create a flatpagessubdirectory inside of adminand a flatpage subdirectory inside of flatpages. Finally, copy the change_formtemplate from django/ contrib/admin/templates/admin/change_form.htmlin your copy of Django into the admin/flatpages/flatpage/directory you just created.
Now you can open up the change_form.htmltemplate in your templatedirectory and edit it to add the appropriate JavaScript for TinyMCE. This template is going to look fairly com-plex—and it is, because the adminapplication has to adapt itself to provide appropriate forms for any data model—but the change you’ll be making is pretty simple. On line 4 of the tem-plate, you’ll see the following:
<script type="text/javascript" src="../../../jsi18n/"></script>
Immediately below that, add the following:
<script type="text/javascript" src="/tiny_mce/tiny_mce.js"></script> <script type="text/javascript">
tinyMCE.init({ mode: "textareas", theme: "simple" });
</script>
This will make use of the URL you set up to serve the TinyMCE files. Now save the file and go back to your web browser. The form displayed for adding and editing flat pages will now have the basic TinyMCE editor attached to the text area for the page’s content, as shown in Figure 3-1.
Figure 3-1.The flat pages admin form with rich-text editor
Adding a Search System to the CMS
So far you’ve just been using the applications bundled with Django itself and making small customizations to the templates they use. Up to now that’s accomplished a lot, but for most of your projects, you’ll be writing your own applications in Python. So let’s add a new feature— written in Python—to the simple CMS: a simple search system that will let users type in a query and get back a list of any pages whose titles or contents match.
It would be possible to add this directly to the flatpagesapplication bundled with Django, but that’s not really a good idea, for two reasons:
• It makes upgrading Django a hassle. You have extra Python code that didn’t come with Django and the code needs to be preserved across the upgrade.
So let’s make this into its own application. Go to your project directory and type the fol-lowing command:
python manage.py startapp search
Just as the startprojectcommand to django-admin.pycreated a new, empty project directory, the startappcommand to manage.pycreates a new, empty application module. It will set up the search/directory inside your project and add the following files to it:
• __init__.py: Just like the one in the project directory, this __init__.pyfile starts out empty. Its job is to indicate that the directory is also a Python module.
• models.py: This file will contain any data models defined for the application. A little later in this chapter, you’ll write your first model in this file.
• views.py: This is where the view functions, which respond to HTTP requests and do most of the work of user interaction, will go.
For now you’ll just be writing a simple view, so open up the views.pyfile. The first step is to import the things you’ll be using. Part of Python’s (and Django’s) design philosophy is that you should be able to clearly see what’s happening with as little implicit “magic” as possible. So each file needs to contain Python importstatements for things it wants to reference from other Python modules. To start with, you’ll need three importstatements:
from django.http import HttpResponse from django.template import loader, Context
from django.contrib.flatpages.models import FlatPage
This gives you a solid foundation for writing your search view:
• HttpResponseis the class Django uses to represent an HTTP response. When an HttpResponseis given as the return value of a view, Django will automatically convert it into the correct response format for the web server it’s running under.
• The loadermodule indjango.templateprovides functions for specifying the name of a template file, which will be located (assuming it’s in a directory specified in TEMPLATE_DIRS), read from disk, and parsed for rendering.
• Contextis a class used to represent the variables for a template. You pass it a Python dictionary containing the names of the variables and their values. (If you’re familiar with other programming languages, a Python dictionary is similar to what some lan-guages call a hash tableor associative array.)
ADMONITION: PYTHON NAMING STYLE
Every programming language has a set of standard conventions for how to name things. Java, for example, tends to use camel case, where things are given NamesThatLookLikeThis, while PHP tends to favor underscores, or names_that_look_like_this.
The standard practice in Python is that classes should have capitalized names—hence Context—and use the camel-case style for multiword names like HttpResponseor FlatPage. Modules, functions, and normal variables use lowercase names and underscores to separate multiple words in a name. Following this convention will help Python programmers—including you—quickly understand a new piece of code when reading it for the first time.
If you’re interested in learning more about standard Python style, you can read the official Python style guide online at www.python.org/dev/peps/pep-0008/.
Now you’re ready to write a view function that will perform a basic search. Here’s the code, which will go into views.pybelow the importstatements you added:
def search(request):
query = request.GET['q']
results = FlatPage.objects.filter(content__icontains=query) template = loader.get_template('search/search.html') context = Context({ 'query': query, 'results': results }) response = template.render(context)
return HttpResponse(response)
Let’s break this down line by line. First, you’re defining a Python function using the key-worddef. The function’s name is search, and it takes one argument named request. This will be an HTTP request (an instance of the class django.http.HttpRequest), and Django will ensure that it’s passed to the view function when needed.
Next, look at the HTTP GETvariable qto see what the user searched for. Django automati-cally parsed the URL, so a URL like this:
http://www.example.com/search?q=foo
results in an HttpRequestwhose GETattribute is a dictionary containing the name qand the value foo. Then you can read that value out of it just as you would access any Python dictionary.
ADMONITION: DJANGO DATABASE LOOKUP SYNTAX
As you’ll see shortly, a Django data model has special attributes called fields, which usually correspond to the names of the columns in the database. When you use Django’s object-relational mapper (ORM) to run a query, each argument in the query is made up of a combination of a field name and a lookup operator, sepa-rated by double underscores.
In this case, the field name is contentbecause that’s the field on the FlatPagemodel that repre-sents the page’s contents (each FlatPagealso has fields named title,url, and so on). The lookup operator is icontains, which checks to see whether the value in that column contains the string you’ve passed to it. The “i” at the front means it’s case-insensitive, so, for example, a query for “hello” would match both “hello” and “Hello”. The Django ORM supports a large number of other lookup operators, many of which you’ll see in action throughout this book