Alan Thorn
•• • • • • •
Learn
Unity
for
2D Game
For your convenience Apress has placed some of the front
matter material after the index. Please use the Bookmarks
iii
Contents at a Glance
About the Author ...xiii
About the Technical Reviewer ...
xv
Acknowledgments ...
xvii
Introduction ...
xix
Chapter 1: Unity Basics for 2D Games
■
...1
Chapter 2: Materials and Textures
■
...27
Chapter 3: Quick 2D Workflow
■
...57
Chapter 4: Customizing the Editor with Editor Classes
■
...85
Chapter 5: Procedural Geometry and Textured Quads
■
...101
Chapter 6: Generating Atlas Textures
■
...121
Chapter 7: UVs and Animation
■
...139
Chapter 8: Cameras and Pixel Perfection
■
...163
Chapter 9: Input for 2D Games
■
...189
Chapter 11: Completing the 2D Card Game
■
...241
Chapter 12: Optimization
■
...259
Chapter 13: Wrapping Things Up
■
...
273
xix
Introduction
If you log on to any online or mobile marketplace for games and browse the titles offered today, it’s likely that the majority of games you see will be 2D and not 3D. If you think back over the relatively short history of video games, or if you listen to industry veterans talking about their inspirations and favorite games, it’s likely that the titles most mentioned are in the 2D style. Frequently listed titles in these video game reminiscences include: Pacman, Sonic the Hedgehog, Super Mario Brothers, Tetris, Lemmings, Arkanoid, Bejewelled, Angry Birds, Plants vs Zombies, Minesweeper, Civilization, Donkey Kong, and Sim City. Despite the manifold differences between all these landmark games both new and old, they all share the common ingredient of 2D-ness; of having their graphics presented in a very specific way that doesn’t rely on three-dimensional space. In short, the 2D style represents some of the most well-known titles in video games history, and it is also a style that is alive and well today. 2D games are not simply stuck in history. They are not a thing of the past; a phenomena that has been and is no longer relevant to the demands of contemporary gamers. Rather, these games represent a significant and lucrative segment of the video game market. Often has been the occasion when this or that learned person has predicted the demise of 2D games, and yet despite all such predictions 2D games have not gone away. This resilience and strength is due primarily to their general popularity, charm, and stylistic simplicity. 2D imparts a classical and timeless feel to games that is technically difficult to replicate by alternative means. For this reason, gamers keep coming back to the 2D style and find within it new ways of enjoying games and experiencing richness. 2D games today play an especially prominent role in two large market areas, and for different reasons. These markets are the casual game market and the so-called “indie games market.” In the casual games market, including games such as Mystery Case Files and Bejewelled, the 2D style is deployed to add an accessible “pick up and play” feel that does not require the user to learn any complex control systems or to concern themselves with moving a camera in 3D space. The Indie Games market, including games such as Retro City Rampage and Super Meat Boy, have used the 2D style to create a retro or old school feel that is popular to a general audience.
Some involve the use of many tools and some involve the use of only a few. This book and the method presented here involve the use of the Unity Engine, and the pathway I discuss is intended to be a smooth and reliable one that will have relevance for most 2D games conceivable.
What Is This Book About?
This book is first and foremost a practical guide to making 2D games using the Unity Engine. That statement however, while informative, requires further clarification. First, the book is practical. This means most of the chapters are hands-on and project-based, as opposed to theoretical and abstract. They require you to be seated at the computer with the tools installed, and to follow along with me, step by step, as I do things. Practical does not mean however that I offer no explanations or detailed discussions about what is happening, and nor does it mean I simply expect you to repeat what I do verbatim in parrot-fashion. I do explore deeper theories, concepts, and ideas. But these are all presented around practical and real-world projects, which are the main focus, so that you can see how these ideas relate to game development in the field. The benefit of this is that you get to learn the theory and practice at the same time. You don’t only understand what it is happening and why, but you can apply that understanding to your own games.
Second, this book is about 2D (two-dimensional) games. It is not about 3D or 2.5D games, or even about 4D games! But what does that really amount to in practice? What does it really mean to say 2D? After all, if every game is ultimately shown to the gamer on a flat, plane-like surface called a monitor, then isn’t every game really 2D? Surely, the only truly 3D game is one shown as a holographic image or in some kind of virtual reality helmet as seen in cyberpunk movies? Well; that is true in the strictest sense possible. But 2D is used here in this book, and generally in the games industry, in only a conventional and relative sense. It refers to any video game whose graphics and gameplay mechanics do not use 3D space. It refers to games whose worlds exist on a mathematical plane with an X axis and a Y axis, but not a Z axis. In a 2D game, characters typically move up and down and left and right, but they do not move closer to and further from the camera. In a 2D game, the gamer cannot rotate the camera freely; they cannot look around in all dimensions to see objects and things from different angles and perspectives, as they can in a first person shooter game. What makes a game 2D is largely about the limitations and restrictions it places on gamers and developers: the third dimension of space (depth) is off limits so to speak. There are, as we shall see, exceptions and caveats to this general rule, but the basic idea holds that 2D games are called 2D because objects in those games live on a 2D plane.
In short, then this book details not only how to make 2D games, but how to make them in Unity while overcoming the hurdles we will face by trying to use a 3D engine to make 2D games. Further, it also explores how to optimize our games and assets so they can perform better on mobile devices. Not better in the sense of performing faster on mobiles than on desktop counterparts, but better in the sense of our games performing faster than they might do if we did not take certain precautions. In addition, this book also covers, as it inevitably must, a whole range of ideas, tips, techniques, and workflows that are useful life-skills generally and which are transferrable not only to non-2D games, but to practically any project-based work, whether game development or not.
Who Is This Book For?
Every technical book is apparently written with a target audience in mind. That is, it is written for a specific type of reader. Essentially, this means that when writing this book I, the author, must make certain assumptions about you, the reader. These assumptions are not about whether you might be male or female, or tall or short, or American or French, or like cheese or ice cream. Rather, the assumptions are about all the book-relevant topics that I think you will know about already, before even starting to read this title. The point of this is to help the reader get the best possible book they were hoping for. It is to ensure I write a book about only the subject-matter you are truly interested in, and also that I present it in a language that is both accessible and concise. Making assumptions and judgments about others is not something I like doing as a general rule, but it’s something I must do here for the book to be possible. I’ll write these assumptions in the form of five character profiles, as given here; though they don’t represent real people. Three describe typical readers of this book. They’re characters I’ve created to illustrate the skills and knowledge I think a reader of this book should have already. And the final two characters are people I think may not be suited to this book. I do recommend however that these profiles are not taken too seriously. If you happen not to match any of the profiles, or if you match to the latter two, then it certainly does not mean that you will inevitably not benefit from this book. These profiles are intended only as a guide and it is no part of my purpose to dissuade any person from reading this book who is keen to learn and succeed. Game development is infinitely knowable stuff, and nobody that has ever lived was born a game developer; everybody had to begin somewhere.
This book is probably for you if you match any of the following profiles:
Rosalind
n
n —Rosalind is a second-year university student of game development. She has worked both in a team and alone making sample games in Unity. She knows the basics of the engine for 3D games. She can import meshes, arrange them in scenes, and create basic script files. She is looking to take her knowledge to the next level by creating 2D games with Unity.
Arnold
n
Roger
n
n —Roger has been making 2D games for a long time in tools such as GameMaker Studio, Construct2, Stencyl, SDL, GameSalad, and others. He’s looking to switch from these tools to the Unity engine for his next project. He’s hasn’t used Unity specifically before, but he is familiar with using other 3D engines and is familiar with the basic concepts of 3D, including meshes, vertices, edges, faces, and UV mapping. He is now keen to get started at continuing with this 2D game business in Unity.
This book may not be for you if you match any of the following profiles:
Caitlin
n
n —Caitlin has no experience with game development, though she wants to get started because she thinks it’ll be an easy career move. She has never even run Unity. She heard about it from a friend. She believes the best place to start is by learning how to use it for making 2D games.
Pierre
n
n —Pierre is an experienced artist, game designer, and level designer but he really dislikes coding. He has recently decided to start up his own games company but wants to make 2D games in a visual way without having to code.
Note If you want to learn the basics of Unity before proceeding with this title, then I recommend any of the following resources: Beginning 3D Game Development with Unity 4 by Sue Blackman, Unity 4 Fundamentals by Alan Thorn, or the Complete Beginner’s Guide to Unity for Game Development by Alan Thorn (Online Video Course). In addition, if you’d rather avoid coding altogether (like Pierre in the preceding list), there are still development options for you in Unity. Specifically, you can use the Unity add-on PlayMaker (http://www.hutonggames.com/), which is a Visual Scripting tool. That being said, this book will make extensive use of traditional code-based scripting.
Why Is This Book Necessary?
all be put to creative use to further enhance and improve the quality of our 2D games. This book demonstrates how these techniques and workflows work in practice.
The second reason one may doubt the value of this book is as follows: there’s nothing in this book that I cannot find out independently, and for free, by searching around the Internet; by looking on forums, searching on Google, watching videos on YouTube, and scanning blogs and tutorial sites. By doing this, I can gradually piece together everything I need to know without reading this book at all. Now in reply, it must be admitted that a reader probably can learn everything contained in this book by searching elsewhere, given enough time and effort and dedication. But this is not to be taken as a legitimate criticism of the book, just as it is not legitimate to criticize an encyclopedia for containing information that can be known elsewhere. This book is not supposed to contain secret, mystical or arcane knowledge that cannot be known through other means. On the contrary, it can be known from elsewhere. That should be a source of comfort, because it means everything I say here can be corroborated, technically reviewed, and verified. The purpose of this book is more modest but not unimportant. It is to bring together and synthesize valuable knowledge about how to make 2D games in Unity, and to structure it into a solid and complete course you can follow from start to finish. Consequently, pursuing this course saves you hours, days, and even weeks of time searching around and trying to piece together everything that is presented to you here in just one volume.
How Should This Book Be Read?
There are two main types of readers for technical books like this: the reference reader and the tutorial reader. The reference reader expects a book they read alongside their working practice. They expect something they can flick-through, visiting different sections in any order and finding the relevant material they need to continue with what they are doing. The tutorial reader expects a “classroom in a book”; a complete course they can read from start to finish, considering each chapter in sequence from left to right to gain a solid foundation and understanding of the relevant subject matter. This book has been written to be amenable to both types of readers. The chapters and materials are presented in a linear sequence allowing the book to be read as a complete course from start to finish. But the sections have also been divided in such a way as to be helpful and accessible to the reference reader. To get the most from this book, however, I recommend you read it through once completely as a tutorial reader, and then afterward to consider it as reference material that you can return to and read in any order as necessary.
Is This Book Out of Date Already?
At first sight, the lifetime of this book might appear to be very short, because the Unity engine changes frequently. The Unity developers release software patches and updates frequently through the official website. In fact, it’s likely that by the time this book is published and in your hands the Unity engine will have been updated even further to feature fixes and bugs and new features that I cannot possibly be aware of when writing this book. However, this frequency need not trouble us unduly because, despite the frequency of updates, the overall interface, tools, and workflow for the Unity engine for 2D games has remained intact for a long time, and there is no strong reason to suspect a radical departure in the near future. Subsequent releases of the engine maintain backward compatibility to some extent, and the overall mechanics and workflow of the engine is typically retained across releases to ensure usability for existing Unity users familiar with the tools. Even if the code samples of this book were invalidated by future versions for reasons of semantics and class renaming, the fundamental concepts, ideas, techniques, and workflows presented here would still hold relevance and have practical value. Consequently, it is reasonable to have confidence and to take comfort from the knowledge that the information presented here is likely to have value for the foreseeable future.
What Are the Companion Files?
As mentioned earlier, this book has a practical focus. That means it encourages you not just to read, but to do things. In each chapter, we’ll be working in software, using the features of Unity and MonoDevelop, and other software, to create working 2D games. This book has been designed and configured so that you can follow along with each chapter without having to use any external files or dependencies at all. None of the chapters require you to have any files, except for the software itself. However, each chapter does have associated companion files if you want to use them. These are optional and can be downloaded from the Apress companion webpage. For each relevant chapter, the companion files are the result of all the work that I demonstrate, and using them will save you the trouble of having to repeat every step that I list. These files include Unity projects, assets, script files, scenes, and other data. Each chapter features notes and comments directing you to the relevant companion files when appropriate; so please keep a look-out for those as we progress. The Apress companion files for this book can be found at the following URL: http://www.apress.com/9781430262299.
What Is the General Structure of this Book?
This book features a total of 13 chapters grouped into three wider parts or sections. Chapters 1 to 3 together provide a recap over the basic Unity features relevant to 2D games, and offer background details about exporting and preparing 2D assets ready for importing into Unity. They offer advice also about how to get up and running quickly in Unity for creating 2D games. Together these chapters offer a foundation and starting point from which we’ll delve deeper. Some of the topics in these chapters include:
What are Scenes, GameObjects, Components and Assets? n
n
What is the optimal way to export texture files? n
n
How can I create textures with transparency? n
n
How do I create script files? n
n
How can I quickly create a 2D game in Unity? n
Section 2 includes Chapters 4 to 9 and represents the core developmental work that we’ll need to perform to achieve high quality and highly controllable results in our 2D games. Here, we’ll look at the technical hurdles that Unity throws our way whenever we use its 3D tools for 2D purposes, and we’ll also see issues that arise generally in a 2D workflow. This includes issues relating to resolution, aspect ratio, and pixel perfection. We’ll also look at how to solve these issues in flexible ways that do not involve compromising our power as a developers or the quality of our game. Section 2 addresses the following questions:
How can I achieve pixel-perfect 2D games? n
n
How can I configure my scene cameras for 2D games? n
n
How can I make the screen coordinates correspond to scene coordinates? n
n
How can I make my textures look sharp and crisp, and not blurry? n
n
How can I handle multiple resolutions and aspect ratios with my textures? n
n
What are Atlas Textures and how can I create them? n
n
How can I generate geometry for my 2D game? n
n
How can I animate 2D characters and objects? n
n
How can I control the game resolution? n
n
Section 3 encompasses Chapters 10 to 13. In this section we’ll move forward from our foundation, and from all the code we have created, and apply it to creating a complete 2D game. The game will be simple, but its purpose is to be a vehicle to demonstrate clearly the 2D workflow in action, and how the features and code we develop throughout this book can be used in practice. The final chapters close by consider possible ways forward and techniques for optimizing our 2D workflow even further. Section 3 addresses the following questions:
How can I make a 2D game from start to finish? n
n
How can I apply our 2D tools to making a real 2D game? n
n
What runtime performance issues should I consider? n
n
How can I improve runtime performance on mobile devices? n
Chapter
1
Unity Basics for 2D Games
This book is about making 2D games using the Unity engine. It will focus not only on the central concepts critical to 2D games, such as 2D space and projections, but also on the practical workflow that can be followed in Unity for creating 2D games. I use the term 2D game (two-dimensional game) to mean any game that principally relies on only 2D coordinates. Famous 2D games include Tetris, Super Mario Brothers, Angry Birds, and many more.
In a 2D game, players typically cannot rotate or move the camera freely in 3D space to view objects from other angles and perspectives. The game objects themselves typically move in only two dimensions as well, such as along the X and Y axes (left/right and up/down) but not along the Z axis (forward/backward); like the characters in a side-scrolling platform game. There are, of course, some exceptions to these rules. But generally, 2D games are defined by the restrictions they put on the developer—they negate or remove the third dimension as a principle element in the game.
Unity Projects, Assets, and Scenes
When you make a game in Unity, you’ll come into contact with projects, assets, and scenes. These are high-level concepts that every developer needs to know about upfront.
Project Wizard and Project Panel
Let’s start with projects: Unity is a project-based application. In practice this means every time you make a new game, you’ll make a new project. In Unity, 1 project = 1 game. It doesn’t matter whether your game is 2D or 3D, a project is simply a container for all your game files and data. It corresponds to a folder on your hard drive, and that folder houses all the files for your game project during its
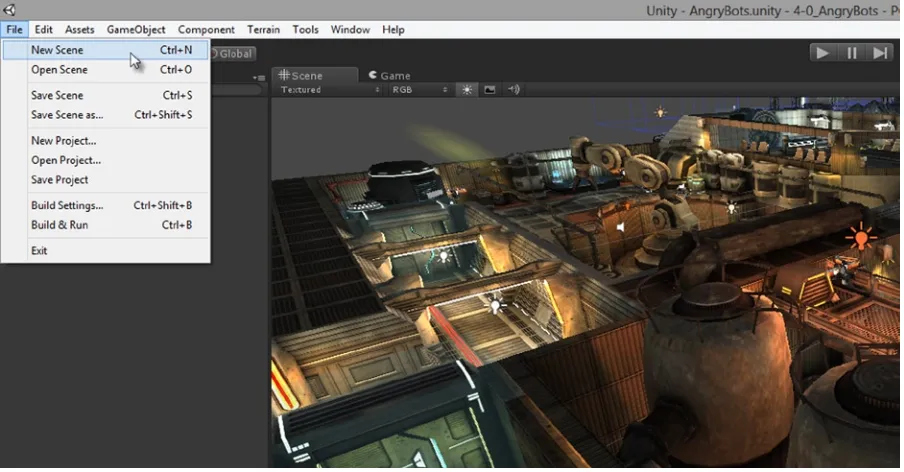
development. To create a new project in Unity, click the File ➤ New Project option from the application menu. This is the equivalent of saying “I want to make a new game.” Do not however press the
keyboard shortcut Ctrl+N, because this creates a new scene and not a new project. In Unity, a scene
refers to a level. That is, a complete environment in the game.
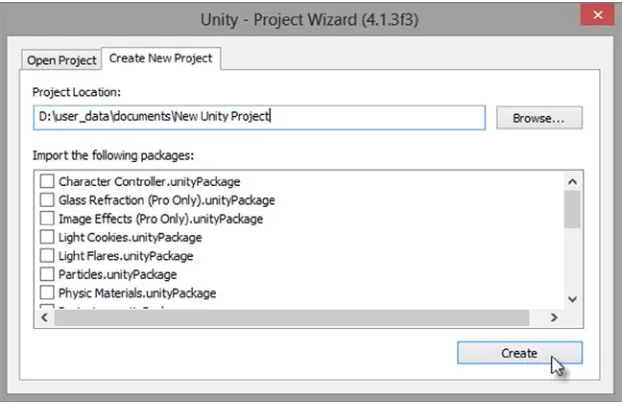
Figure 1-1. The Project Wizard dialog displays settings for creating a new project
Note You can also open an existing project with File ➤ Open Project. Unity version 3.4 upward ships with a demo project known as AngryBots, as shown in Figure 1-2. This is a 3D game but is nonetheless worth examining in more depth if you’re new to Unity.
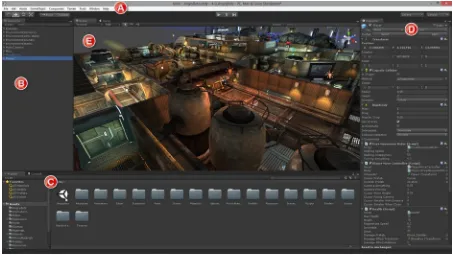
Once the project is generated, Unity displays the default interface. This is where we’ll spend a lot of time making games. Running along the bottom of the interface is the Project Panel (see C in Figure 1-2). This acts much like a folder view, showing the contents of the Project folder on the hard drive. For new projects, this panel typically begins completely empty. But as we add our own meshes, images, and other data, it populates with items. You can open the Project folder directly from the Project Panel in either Windows Explorer on Windows orFinder on Mac. To do that, right-click the mouse inside the Assets Panel (inside the Project Panel) and select Show in Explorer from the context menu.
Figure 1-2. The Unity interface for Unity 4 in its default layout: A) The application menu B) The Scene Hierarchy C) Project Panel D) Object Inspector E) Scene Viewport
Note You can make the Project Panel, or any panel, larger by hovering the cursor over it and pressing the spacebar. This maximizes the panel to the size of the editor window. You can toggle the panel back to its original size by a second spacebar press.
Assets and Project Files
The project is the home of all your game files; all the files that make up your game. These may include meshes, textures, movies, animations, sounds, music, text data, and more. These files are together named Assets (plural) by the Unity engine. Each file is a unique asset (singular). When you want to put a mesh or object or file inside your game, you’ll need to import it first as an asset of the project. Only assets in the Project Panel can be included in your game. You can import assets into the Project using either of two methods. You can select Asset ➤ Import New Asset from the application menu (See Figure 1-3) or, you can drag and drop files from Windows Explorer or Finder directly into the Project Panel. The former method allows you to import only one file at a time, while the latter allows multiple files to be imported together.
Figure 1-3. Importing asset files into Unity. Assets can be meshes, textures, audio files, movie files, animation data, text data, and more
Note Any meshes not exported directly to FBX format (such as MA or BLEND) require the appropriate 3D modelling software to be installed on the system during import into Unity. Unity internally uses this software to export native formats to FBX.
Table 1-1. File Formats Accepted by Unity
Meshes Textures Audio Movies
.FBX .PSD .MP3 .MOV .MA .TIFF .OGG .AVI .MB .PNG .MOD .OGG .MAX .BMP .IT .ASF .BLEND .JPG .XM .MPG .3DS .TGA .S3M
.DXF .DDS/PVR .WAV .C4D
Assets that are imported into Unity are automatically assigned a range of settings and properties by the Unity engine during the import process. These control how the assets work when included into your games. You can view these settings and change them easily. Just select your asset in the Project Panel and adjust its settings, which appear in the Object Inspector (D in Figure 1-2). Be sure to click the Apply button at the bottom of the Inspector when you’re done to confirm and save the changes for the selected asset.
Scenes
When you’ve created a project and imported all your assets, it’s usually time to start making the levels in your game. In Unity, a level (or an environment) is termed a scene. 1 scene = 1 level. Most games feature multiple levels, and so most projects feature multiple scenes. Unity is primarily a 3D engine, and this means that the only kinds of scenes available to us are 3D ones. A 3D scene features a 3D coordinate space, with an X and Y and Z axis. To create 2D levels in Unity, we simply create standard 3D scenes and then configure them to behave like 2D ones. The player will probably never know the difference—unless they’re a Unity developer too! To create a new scene, select File ➤ New Scene from the application menu, or press the keyboard shortcut Ctrl+N (see Figure 1-5). After creating a scene, be sure to save it by selecting File ➤ Save Scene. Once saved, the scene will be added to the project as an asset. Scenes are assets too.
Navigating Scenes and Viewports
You can open up and examine any scene in your project by double-clicking it from the Project Panel. Every time you create a new scene, it will automatically be opened for you. When you open a scene in the Unity editor, you can build your levels and examine them. The Viewport component of the interface allows you to see inside your scene (see E in Figure 1-2). The Scene Hierarchy Panel (see B in Figure 1-2) also lists every object by name: all your lights, cameras, environments, creatures, power-ups, and other objects are listed here, even if the object is not actually visible to you or the player. The list is exhaustive; if an object lives within the active scene, then it is included in the Hierarchy Panel. By double-clicking an object in that list, you not only select the object in the scene but center the viewport on it for a better view. Further, the properties for the selected object are shown in the Object Inspector (see Figure 1-6).
Note The Viewport area is divided across two tabs, named Scene and Game. The Scene tab is a director’s eye view of the scene. We use this tab to build up our scenes and turn them into believable worlds. The Game tab displays the same scene but from the perspective of the player rather than the developer. It shows us how the scene will look when played. We’ll work in both tabs for 2D games.
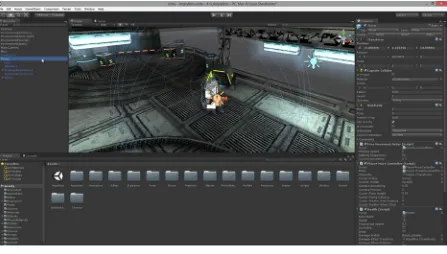
Figure 1-6. Selecting the player object from the Hierarchy Panel in the AngryBots sample project that ships with Unity. The Viewport centers on the selected object with a double-click, and the object’s properties show in the Object Inspector
Even though we’re making 2D games in this book, it’s essential to know how to navigate around the viewport in 3D space. We need to see how our scenes are arranged and the positions of objects. For this reason, the navigation controls should become second nature to us. If you’re a Maya user or a Blender user with the Maya pre-set active, then the Unity viewport controls will likely be familiar to you already. They use a combination of the mouse and keyboard. To start, try zooming the camera in and out of the Viewport. To do this, just scroll the mouse wheel: up zooms in and down zooms out. You can also center the Viewport camera on the object selected in the Hierarchy Panel by pressing the F key (F for Frame).
You can pan or slide around the Viewport by holding down the middle mouse button while moving the mouse around. You can rotate the camera around the selected object by holding down the Alt
You can also simulate first-person perspective controls to move around. To achieve this, hold down the right-mouse button while using the WASD keys on the keyboard. Movement of the mouse controls the head movement, while A strafes left, D strafes right, W moves forward and S moves backward.
GameObjects, Transforms, and Components
Everything inside a scene is a GameObject. Characters, cameras, lights, ammo, weapons, particle systems, power-ups, sounds, music, spaceships, enemies; all of these are examples of
GameObjects—each individual thing is a GameObject (singular). If you’ve imported a mesh asset into Unity, you can drag and drop it from the Project Panel into the Scene Viewport to instantiate an instance of it in the scene. That instance is a GameObject. You can drag and drop the object multiple times to create multiple instances in the scene, and thereby multiple game objects. In short, the Hierarchy Panel lists all GameObjects in the scene, and in order to create a game you’ll need to work with lots of GameObjects.
Note Unity allows you to create simple primitive objects in a scene, such as cubes and spheres, should you require them. To create these objects, choose GameObject ➤ Create Other ➤ Cube, or GameObject ➤ Create Other ➤ Sphere, or GameObject ➤ Create Other ➤ Cylinder. The Plane object can be useful for 2D games because it can easily display flat images aligned to the camera. We’ll see more on this later.
The GameObject is not however the smallest thing or atom in the scene. Each GameObject is
Now, you can duplicate that cube in Figure 1-8 in the scene in at least two ways. You could select the cube and press Ctrl+D on the keyboard. Or, you could create a completely new and empty game object from scratch and then replicate its component setup to reproduce a cube. The former method is easier, but the latter helps us to see the importance of components. If you want to try this “manual method” of GameObject creation, you can do so as follows: Select GameObject ➤ Create Empty (or press Ctrl+Shift+N) from the application menu to create an empty game object. Once created, ensure this object is selected in the Hierarchy Panel. Then add components to it by selecting
Component from the application menu and choosing the appropriate components to add. For example, to add the Mesh Filter component, select Component ➤ Mesh ➤ Mesh Filter from the menu. Take a look a Figure 1-8 to see how I created a replicated mesh object with the Mesh Filter, Box Collider, and Mesh Renderer Components.
In programming terms, each component is a unique class. A GameObject is made from multiple components and thus from multiple classes, all of which interact and define the behavior of that object. Because objects in the scene will naturally differ (players do not act like enemies, and guns do not act like volcanoes, and so on) then each GameObject will be composed from different components with different settings. Despite the differences between objects, every GameObject in a scene has one component in common. That is the Transform Component (see Figure 1-9).
Each GameObject has a Transform Component, and its purpose is to record the position, rotation, and scale of the object. You can change these settings to adjust the location, orientation, and size of object respectively. This can be achieved in several ways: by typing in values in the Object Inspector, or by using script files to adjust the properties of the Transform Component as a class, or more simply by using the Transform tools on the Editor toolbar. These tools are also accessible with keyboard shortcut keys W (Translate or move), E (Rotate), and R (Scale or resize). See Figure 1-10.
Figure 1-10. The transformation tools. Translate moves an object, Rotate can turn or revolve an object, and Scale will enlarge or shrink an object. Avoid using Scale where possible as it can lead to buggy collision detection and problems with third-party plugins
Tip Remember, by holding the V key while translating you can snap an object to vertices, which is great for fast, precision aligning. Also, you can lock translating to planar axes (XY, XZ, and YZ) by clicking the colored rects between the axis arrows on the gizmo.
Figure 1-11. Use the Translate tool to move objects interactively in the Viewport using the Translate Gizmo
You can rotate objects with the E key in conjunction with the Rotate Gizmo, and you can scale objects with the R key in conjunction with the Scale Gizmo. Beware of scaling as a general rule, and use it only where essential. Scaling can corrupt our understanding of size if caution is not exercised. If a texture of 512×512 pixels is imported into Unity and is scaled upward by a factor of 2 to appear on-screen at 1024×1024, the texture internally is still of a 512×512 size and Unity recognizes it as such. This has implications when reading and referring to texture sizes in script using the width and
height properties of the Texture2D class. It’s important to recognize that a texture or a mesh that has been scaled to appear at one size can really be at a different size as far as its internal representation goes. Only a scale factor of 1 corresponds to the true size of an object or texture.
Cameras
and even show the view from more than one camera at the same time in a split screen mode or in a picture-in-picture style. Like all other GameObjects, the camera has a Transform Component. Using this, you can set the position and rotation of the camera in 3D space. For 2D games, the camera will not typically rotate during gameplay, and its position will normally only change in one plane (on two axes rather than three). However, these are simply limitations we choose to put on the camera to create 2D-looking games, and they do not represent any limitations that the Unity engine puts on us. To add a new camera to the scene, select GameObject ➤ Create Other ➤ Camera from the application menu. When selected in the scene, a preview of the camera’s view will show in the Scene Viewport (see Figure 1-12).
Figure 1-12. Selecting a camera object in the scene displays a render preview in the Scene Viewport. This can be helpful to position and orient the camera to get the best looking view and angles of your scene at runtime. Remember, the camera is a GameObject and can be controlled and accessed like any other object
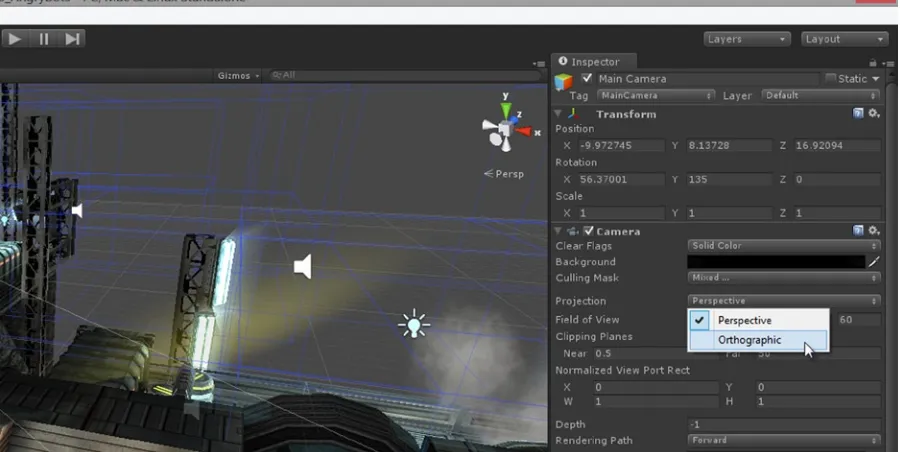
Each camera has a Projection property, which is accessible in the Camera Component in the Object Inspector. It’s also accessible in script via the Projection property of the Camera class. This property can be one of two values: Perspective (Default) or Orthographic (see Figure 1-13).This value controls how the camera renders or converts a 3D scene to the flat monitor or display. Typically 3D games will have the Projection property set to Perspective, because this mode ensures the scene is rendered according to the laws of perspective: lines and angles converge toward the horizon line, objects get smaller with distance, and distortion occurs to objects the further they move from the center of the view due to the curvature of the lens at its extremities. For 2D games however,
Each newly created camera features an active AudioListener Component by default. This component acts like a virtual ear. In a scene without an AudioListener Component you cannot hear anything: no sound or music is played to the speakers. When an AudioListener Component is attached to an object, you hear the scene as though you were standing in the position of that object—sounds nearer to you are louder than those further away. Typically, a game will have only one AudioListener Component active at one time during gameplay. This ensures the player hears a sensible range of sounds, and not a chaotic cacophony of sounds from different parts of the scene. If you add more than one camera, it’s likely they’ll both come with an AudioListener Component, and these will clash when you try to run the game because Unity will not know which Listener to choose. Be sure to configure the AudioListener Components, if you have multiples, so that only one is active at any one time.
Meshes and Geometry
camera-aligned quads: one for each object in the scene. Unity comes with a Plane object that can behave like this. It can be added to the scene by selecting GameObject ➤ Create Other ➤ Plane (see Figure 1-14). However, the Unity Plane is highly tessellated with vertices and edges running in rows and columns across the plane surface. This makes it an unsuitable choice for games that need a lot of quads and graphical objects, because more edges and more vertices lead to greater complexity and performance intensiveness, especially on mobile devices.
Figure 1-14. Quads can be generated into the scene through Unity’s Plane object. Quads are like sheets of paper, aligned to the camera and are used to display textures
Note Many 2D games also utilize skeleton animation, rigging, and bones straight from 3D applications, to handle a lot of their animation needs. This is especially true for animations involving translation, rotation, and scaling.
A more effective alternative to using the Unity Plane is to generate your own quad mesh from script, using the properties and methods of the Mesh class. Chapter 5 shows you how to do this in-depth. With this method, you can build a tailor-made quad with the minimal number of vertices needed, and also have fine control over the mapping to control how a texture is painted across its surface.
during gameplay, then it qualifies as a static element of the scene. This applies to both 3D and 2D games. Static elements such as these provide us with an opportunity for optimizing our games and improving their runtime performance. In short, if your scene has static objects, then be sure to select those objects and enable their Static check box from the Object Inspector, as select those objects and enable their Static check box from the Object Inspector, as shown in Figure 1-15. Doing this allows Unity to batch those objects together and render them as a single batch with the minimum of computational overhead. Though ticking a check box in the editor is a very simple thing to do, do not underestimate the significant performance benefits this can have on your game. I recommend investing extra time and effort, checking through your scene and objects, ensuring that no static element is left unmarked.
Note Unity ships as two separate versions: Free and Pro. Static batching is a Pro Only feature.
Figure 1-15. Be sure to always enable the Static check box for meshes that don’t move or change or deform during gameplay. This helps Unity batch together meshes and optimize the geometry of your scene, improving its runtime performance
Scripting and the Unity API
This helps avoid confusion and having to jump between different mind-sets and coding paradigms. So select only one language to use for your project. The code samples in this book use C#
exclusively. This should not to be taken as a comment or reflection on any of the other languages—all are capable in their own ways of achieving results. I’ve selected C# partly because of its popularity and partly because of my own background and experience. To create a new script file for your project from the application menu, select Assets ➤ Create ➤ C# Script, or Assets ➤ Create ➤ Javascript, or Assets ➤ Create ➤ Boo Script.
Note You can also add existing script files to your project. Just drag and drop them into the Project Panel like any other asset.
MonoDevelop
You can edit your source files using any third-party code editor, including Microsoft Visual Studio and Notepad++. Unity however ships with a code editor and IDE named MonoDevelop that is associated with C# source files by default (see Figure 1-16). To open your files, simply double-click your source files in the Project Panel. When you’ve made code changes that you want to compile, save your source file and return to the Unity Editor. When the Unity Editor window becomes focused and activated, it will automatically detect file changes and recompile your code. Errors and warnings found, if any, will be listed in the Unity console. Warnings are printed in yellow and errors in red.
Every new script file in C# is typically generated with template code inside of it to reflect the most common usage of scripts. Normally, scripts are object oriented and each defines a class. The template class descends from MonoBehaviour, and that is a premade class in the Unity API—along with a range of other useful classes. MonoBehaviour is the base class for almost all components. This means that C# scripts are, by default, configured to be a component. It’s the kind of thing that can be dragged and dropped from the Project Panel and onto GameObjects in the scene. Once attached to a GameObject, the script acts as a component that is instantiated on the object, and it shows up in the Object Inspector. One really useful feature of Unity is that it shows all public properties of a class in the Object Inspector, where they can be viewed and edited, both at design time and runtime (see Figure 1-17).
Figure 1-17. Scripts can be attached to objects as components. Public properties of a class can be edited and shown in the Object Inspector at design time and runtime
Tip Public properties set from the Object Inspector override the default values assigned to them in code.
Components
the GameObject (to which it is attached) is created in the scene. For objects that are created in the editor and are always present, this event is called when the scene begins. The Update function in contrast is called once per frame (not once per second). This means Update is typically called many times per second: for a 25 frames per second game, it’ll be called 25 times per second. The Update function is useful for coding behaviour that moves or animates objects over time. More information on the MonoBehaviour class can be found at: http://docs.unity3d.com/Documentation/
ScriptReference/MonoBehaviour.html.
The Unity API (Application Programming Interface) is a library of classes that developers can use to make their scripting life a lot easier for game development. The API reference documentation can be found at the following URL: http://docs.unity3d.com/Documentation/ScriptReference/. This library features more classes and properties than can possibly be documented here comprehensively. But it is enough here to simply say that many of the key classes and structures of the API that apply to 2D games will be explored and detailed as this book progresses. For now, some of the key classes can be listed as: Vector2, Vector3, Mathf, Screen, Texture2D, MonoBehaviour, ScriptableWizard,
GameObject, Transform, Mesh, Input, MeshFilter, and MeshRenderer.
Performance, Profiling, and the Stats Panel
Figure 1-19. The Stats Panel can be a helpful tool, especially during early and mid-development, to help you keep your game on-track and to tailor its performance and demands to your target hardware
Note The Profiler is a Pro Only feature.
The Profiler
The Profiler window can be accessed from the application menu by selecting Window ➤ Profiler, or by pressing Ctrl + 7 on the keyboard. This tool is only effective and informative if it is viewed while the game is running in Play mode. While running, the Profiler takes snapshots or regular measurements of the game on a per frame basis and plots them onto its graphs so developers can visualize the game’s performance over time, seeing potential trends and trouble spots. The Profiler window is divided into two main sections: the upper half of the window (Areas A and B in Figure 1-18) and the lower half (Area C in Figure 1-18). Areas A and B together represent a collection of vertically aligned graphs displaying a graphical overview of the runtime performance for your game. The horizontal axis charts
the tasks into even smaller categories, telling you how long each function takes to complete, or how intensive a specific GameObject is. In short, the Profiler can be a handy feature when used appropriately. But it is of most value when you are only dimly aware of a performance problem in your game but have little or no clue as to its whereabouts.
Note The Profiler can also be connected to standalone builds of your game to give you an insight to its runtime performance. This can be useful for mobile development. More information can be found online here:
http://docs.unity3d.com/Documentation/Manual/Profiler.html.
The Stats Panel
The Stats Panel is another useful diagnostic tool. It can be accessed from the Game tab: press the toggle-button Stats in the top-right corner of the Game Viewport. During gameplay this panel offers a live-update summary of your game’s performance and its overall statistics concerning frame rate, memory footprint, texture usage, and more for the target hardware. That is, the Stats Panel applies to the computer on which you are running the game. So, when assessing performance, be sure to test your game and measure it on your target hardware (your minimum specification). Testing on other hardware can lead to different statistics and cause confusion about your performance metrics. Key properties to watch for on the Stats Panel include: FPS (frames per second), Draw Calls, Saved by Batching, Tris, VRAM Usage, and Shadow Casters. Let’s consider these in turn, as follows:
FPS (frames per second). This records the number of frames that your game is actually sustaining per second. There is no right or wrong or magic number for this field per se. Two ingredients are important: first, the FPS should almost never be below 15 FPS, because the human eye begins to perceive lag and stutter at frame rates below this value; and ideally the frame rate will be above 25. Second, the FPS should generally be consistent. It will likely fluctuate up and down between values depending on the processing overhead on the computer—that is to be expected and is normal behaviour. But, generally speaking, consistency is good.
Draw Calls. This value will become especially important for us later when developing 2D games, as we’ll see. It refers to the total number of times per frame that the Unity engine calls on the lower-level rendering functionality to render your scene to the screen. The higher this value, the more complex and expensive your scene is to render. For this reason, lower values are generally to be preferred. There are some steps and methods available to us for reducing the number of draw calls per frame, and we’ll explore what those are throughout this book.
Saved by Batching indicates the number of batching operations Unity managed to perform on your objects to reduce the number of draw calls. Typically, each
Tris lists the total number of triangles currently being rendered to the screen in the current frame (not the total number of triangles in the scene). Most contemporary graphics hardware on desktop computers and consoles is adept at processing triangles quickly, meaning very high tri-counts can in principle be achieved. The same cannot always be said of mobile devices however.
For this reason, the lower this value is the better it will be for performance across devices. That advice should, of course, be taken within reasonable limits: reduce the tri-count to a level that is consistent with your artistic vision and which respects your target hardware.
VRAM Usage. Again, the lower this value is the better for performance—keeping within reasonable limits. It tells us how much of the video memory on the
graphics hardware is being used for processing and texture storage.
Shadow Casters. This lists the total number of real-time shadow casters in the scene: it does not include shadow-casters during light-mapping operations and baked lighting. Real-time shadow casters are computationally expensive and should be reduced to a minimum or eliminated entirely, if possible. These can be among the most significant performance hits a game can take. For many 2D games, real-time shadow casters will not be necessary.
Note Be sure to check whether your version of Unity supports the shadow types you need.
Editor Add-Ons
The Unity Editor is featured-filled especially in the context of 3D games, but that doesn’t mean it is necessarily comprehensive or all-encompassing. The extent to which the Editor meets all the requirements of a project depends on the project and your needs. In the case of most 2D games, the Unity Editor lacks some valuable GUI features—specifically the ability interactively generate meshes, such as quads. In addition, it lacks the ability to control the UV mapping coordinates for vertices, and also the ability to generate 2D textures in an optimized and clean way, as we’ll see. These hurdles can all be addressed however, and in different ways. One helpful way is to use the Unity Editor classes in scripting to extend the Unity interface and develop our own custom add-ins and GUI tools to provide the missing features. Specifically, we can develop our own custom editors for 2D games that work as seamlessly with the Editor interface as if they’d been part of the native Unity package all along. This kind of behaviour is achievable through Editor classes like ScriptableWizard, and later chapters (4, 5, 6, and 7) will show you how.
Unity Interface Configuration
with any interface arrangement (I recommend working with the arrangement you like best), I want to share with you a layout I find very helpful for developing 2D games. This layout can be seen in Figure 1-20. The key difference between the default layout and this one is that the Scene and Game
tabs are aligned side by side in a split-screen view.
Figure 1-20. Unity Interface layout that can be helpful for 2D game development
The reason for this arrangement stems from the fact that 2D graphics tend to be measured and sized in pixels, as opposed to 3D meshes, which are measured and sized in world units (often in meters). This difference often means we need to precisely place and arrange our 2D graphics not just in world space, as we do in the Scene tab, but also in screen space, which is measured in pixels and is rendered from the scene camera (in the Game tab). For this reason, much of our work will have us constantly switching between the Scene tab and the Game tab where we can preview the results of our work. We could, of course, jump between the tabs, as we do in the Default layout, if we wanted. But personally, I find it more convenient to have the two tabs aligned side by side.
Summary
This chapter outlined some of the concepts fundamental to creating 2D games in Unity, and I’ll assume you’re familiar with them as we proceed. By now you should be able to:
Create Unity projects and scenes
Navigate the Scene Viewport
Understand that GameObjects are built from components
Understand that components are defined in script
Understand that components are mostly classes derived from
MonoBehaviour
Edit and view class properties from the Object Inspector
Translate, Rotate, and Scale GameObjects
Create cameras and understand their Projection Type
Chapter
2
Materials and Textures
Materials and textures are the raw materials for 2D games. They are to 2D games what 3D meshes are for 3D games. Practically, all your game graphics, from characters and backgrounds to special effects and in-game menus, will be implemented in the form of materials and textures. If you can see
it on-screen, then it’s due to materials and textures. There’s simply no getting around them, so it’s important to have a solid understanding of them—and not just for 2D games either but for games more generally. This chapter aims to provide that understanding. It’ll explain the crucial difference and relationship between materials and textures. It’ll also discuss how you can create both of them, as well as many other relevant considerations to keep in mind when working with Unity. So fire up your PC and let’s get started.
Using Materials and Textures
By now you’ve probably created some scenes and gameplay in Unity. In doing this you’ve likely made use of materials and the Material Editor to change the surface appearance of objects in the scene. If you haven’t, however, then don’t worry. Here we’ll take a closer look at the Material Editor and its features to see how to use it, and also what the difference is between materials and textures. Both are related and both have the power to fundamentally alter how the surface of a 3D model looks in the scene. In Unity, whenever you want to change how an object looks, you’ll need to either
create a new material, or use an existing material, if you have one. If you want a plane object to look like a brick wall, or a sphere to look like a marble, or a cube to look like a crate, or any similar case to this, then materials have an important role to play.
Getting Started with Materials
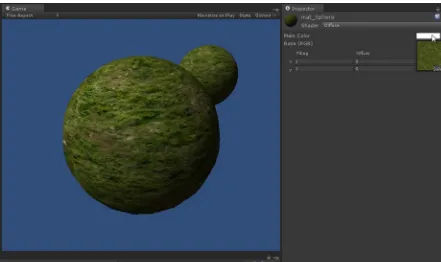
Let’s make the Sphere surface red instead of leaving it at its default gray colour. To do this, we’ll create a material asset: so select Assets ➤ Create ➤ Material from the application menu, or right-click inside the Project Panel and select Create ➤ Material from the context menu. This creates a new material in the Asset view of the Project Panel. Name the material mat_sphere and then select it to show its properties in the Object Inspector. Together these properties form the Material Editor. From the Editor, left-click inside the Main Color swatch, changing the material color from white to red. Then assign the material to the Sphere object by simply dragging and dropping the material from the Project Panel onto the Sphere object in the Viewport. The Sphere surface then changes to red, because its surface information is now being defined by the material. You can even change the color of the material from red to, say, green and the Sphere will automatically update to the new color.
Figure 2-1. Starting a new project to explore materials. The Material Editor is used to change the properties of materials: this includes material colors, textures, and other properties such as Specularity, Bumpiness, and Transparency
Mesh Renderers
Now select the Sphere object in the Viewport. In the Object Inspector, expand the Materials
property of the MeshRenderer component to see the material assigned to the object. You can click the name of the material to locate and select it quickly in the Project Panel, if required. The
Materials property of the MeshRenderer is important because it defines the material assigned to the mesh. You can change a mesh’s material by changing the materials property, even in script. In addition, it’s possible for two or more meshes to share the same material: you can drag and drop the material onto multiple meshes. When you do this, all the assigned meshes will reference the same
material; meaning that changes to the material (such as changes in color) will be propagated and applied to all associated meshes. See Figure 2-2.
Shaders
Materials are not just about specifying an object’s color. There’s more to them. The material is essentially an algorithm or formula defining how the surface of an object should look. Different appearances and looks often require us to use different types of materials. These types are known as Shaders. The default Shader is the Diffuse Shader. But if we wanted to add a shiny highlight to the red sphere, for example, to make it look metallic or smooth as opposed to rough or cloth-like, then we can use a Bumped Specular Shader. To do this, click the Shader drop-down list from the Object Inspector and select Bumped Specular. This adds a shine to the sphere, which can be seen in the Viewport. You can control the size and power of the shine using the Specular Color and
Shininess properties in the Material Editor. See Figure 2-3.
Figure 2-3. Changing the Shader type for a material controls its method of shading an object’s surface
Working with Textures
Materials define not just shader types and other properties like shininess and bumpiness, but also how the surface color normally looks to the eye when illuminated- and not simply in terms of bold colors like red or blue. To define color more completely, materials use textures. A material may
contain none, one or more textures. A texture is a pixel-based image (like a BMP, JPEG, or PNG file) that can be loaded into a material to color an object’s surface. The UV mapping of a mesh controls how the texture of a material is wrapped around its surface. The details on how to import and load-in textures optimally is discussed later in this chapter. For now, let’s make the sphere appear to have a grassy/earthy surface. To do this, we’ll load in some textures from the Unity standard terrain assets. Select Assets ➤ Import Package ➤ Terrain Assets from the application menu, and then import the package. Doing this imports a range of texture assets into the project, and these can be viewed in the Project Panel at Standard Assets ➤ Terrain Assets ➤ Terrain Textures. See Figure 2-4.
Figure 2-4. Import textures from an Asset Package into your project. You can also import textures like any other asset, by dragging and dropping them from the file explorer into the Unity Editor’s Project Panel. Take care when importing textures (and all assets), as guidelines and techniques apply that can help you optimize them and achieve the best quality possible. Details for importing textures optimally are considered later in this chapter
Materials for 2D Games
In practice, almost all materials and shader types provided with Unity are designed to work with 3D objects in 3D space. This means most materials are configured to shade the surfaces of objects in combination with scene lights. The bumpiness, normal, and specularity effects common to materials in games rely heavily on meshes being illuminated by lights in a 3D environment. Similarly, the brightest regions of a mesh in the scene (the highlights) and its darkest regions (the shadows) are determined by how lighting falls in the environment, in relation to the positions, sizes, and shapes of objects. Meshes obscured from lighting by other intervening objects will appear darker because they are in shadow, and objects standing close to lights will appear brighter in the areas most exposed to light. Both the lights in the scene and the material shader types make these kinds of effects possible. Now while this behaviour and mechanic can produce highly believable results for many 3D games, it can stand in the way of 2D games. It can act as an obstacle and a hindrance rather than a help and a benefit. This is because most 2D textures and graphics are created with lighting and shading baked into them by the artist, and they are not supposed to be shaded or illuminated any further by the engine. Backgrounds for adventure games and hidden-object games, and tile sets for RPG games, are all prominent examples of these kinds of graphics. With these, you usually just want to show them on screen without any further illumination or shading, as shown in Figure 2-6.
Unity does not ship with a “2D Game” material or shader type that we can simply select and apply. Rather, we must resort to a range of tricks and techniques to achieve the result we need. The result is that we want to have multiple objects in a scene, with a material applied, and for those objects to show their materials and textures on-screen as they appear in the image file. We don’t want the shading of objects to be affected by scene lighting, appearing darker in some areas and lighter in others. This result of creating “lighting-immunity” can be achieved in Unity through many different methods. Here are two of them that’ll be used throughout this book.
Method 1: Use White Ambient Light
remove all lights from your scenes and change the Ambient Light to white, allowing all materials and textures to be shown at their full, default brightness. To control the ambient light, ensure your scene is open and active in the Editor, and select Edit ➤ Render Settings from the application menu. Then in the Object Inspector, change the Ambient Light color swatch to white. See Figure 2-7.
Figure 2-7. You can display 2D textures at full brightness on-screen, as defined in the image file, by removing all scene lights and setting the Ambient Light to white
Note The project files (Project_Files/Chapter02/ambient_light_disable) demonstrate a project with Ambient Light set to white.
The main drawback of the Ambient Light method is its all-pervasiveness. For objects to appear correctly in your game with white ambient light, your scenes should have no lights at all. This is often fine for many 2D games, but there might be times when you want to mix and match 2D and 3D elements in a game, or put the scene lighting to creative uses. In these cases, you want to keep scene lighting and be able to selectively disable lighting on specific objects in the scene. Method 2 shows you how to achieve this.
Method 2: Use Light-Immune Shaders
If you want to keep the benefits of scene lighting but be able to pick and choose specific objects in the scene to be immune from lighting entirely, then you’ll need a specific shader and workflow. This involves a two-step process. First, select the material you want to be immune from lighting and set its Shader type to Self-Illumination / Diffuse. This is shown in Figure 2-8.
Figure 2-8. Self-illuminated materials remain unaffected by the darkening that can result from scene lighting or shadows. It’s still possible however to brighten self-illuminated shaders by using other lights, and also to colorize them using colored lights
Setting a material to a self-illuminated shader is not enough however to secure complete light-immunity for an object in the scene. Even though a self-illuminated object cannot be darkened, it’s still possible for it to be brightened or colorized by surrounding lights. To protect against this, a second step is required. You need to create a new Scene Layer to which all light-immune objects are attached, and then exclude the layer from scene lights by using their Culling Mask property. To do this, create a new layer by selecting Layers ➤ Edit Layers . . . from the Layers drop-down list at the top-right side of the Editor interface. Then type the layer name into the next available slot. Here, I’ve named the layer
IgnoreLights. See Figure 2-9.
Figure 2-9. Creating a new layer in the scene to contain all light-immune objects. Remember to assign objects to the layer after it has been created!
Once the IgnoreLights layer is created, be sure to add all light-immune objects to it. Select the relevant objects in the scene and assign them to the layer by clicking in their Layer drop-down list from the Object Inspector and choose the IgnoreLights layer. Then select all lights in the scene, and use the Culling Mask property in the Object Inspector to remove a check mark from the
Note The setup for Method 2 can be found in the book’s companion files (Project_Files/Chapter02/lighting_selective_disable).
Figure 2-10. Use the Culling Mask property for lights to selectively remove objects from scene lighting while keeping them illuminated
Creating Textures
freely available content-creation tools. These tools include: GIMP (http://www.gimp.org/), Inkscape
(http://inkscape.org/), and Blender (http://www.blender.org/). I recommend taking a look at all
the tools listed here to see what works best for your project.
For the remainder of this chapter, I’ll restrict my discussion to creating 2D textures for Unity using the software Photoshop CS6 and GIMP. Specifically, I’ll go through many of the requirements Unity makes about textures and consider ways of optimizing textures for import at the best quality. In short, there are three rules to keep in mind for creating textures:
Make your textures a power-2 size (in almost all cases).
Work nondestructively at the highest quality settings.
Expand alpha channels for transparent textures.
Let’s examine each of these rules in more detail.
Note Remember, Unity is not typically a content-creation application. It’s possible to download add-ons from the Asset Store to turn it into 3D modelling software and image editing software. But normally game assets are created in external third-party applications. For this reason, the remainder of this chapter will consider the image editing software of Photoshop and GIMP. Though these applications are not a part of Unity, and thus might not strictly fall within the scope of a Unity-based book, the workflow in those applications is highly relevant to how textures look and perform in Unity. Thus, they are addressed here.
Rule #1: Power-2 Dimensions
Every pixel-based image has a width and height measured in pixels, and each pixel is a block of color. The image is essentially a grid of juxtaposed pixels: the content of the image (the picture itself) emerges from the collection of pixels. The width and height of the image in pixels is known as the pixel dimensions of the image. It is also commonly referred to as the resolution of the image. Whenever you create a new image inside either Photoshop or GIMP, you get the choice to set the dimensions, specifying the width and height in pixels. Though Unity imports textures of practically any size from 4096x4096 downwards, this does not mean that all textures will look and work equally well when imported. This is because resolution matters. Due to limitations in graphics hardware and real-time rendering, most textures should be of a power-2 resolution. That is, their width and height should be a power-2 size. What does that mean? In short, it means the dimensions can be any value such as: 4, 8, 16, 32, 64, 128, 256, 512, 1024, 2048 and 4096. These values are termed a power of 2 size because: 22=4, 23=8, 24=16, 25=32, 26=128, and so on. The textures do not need to be square,
There is an exception to the power-2 rule in Unity and it relates to GUI Textures. If you select any valid texture in the Unity Project Panel and examine its import properties in the Object Inspector, you’ll see a Type drop-down list. From this list you can choose the option GUI Texture and then click Apply. Doing this converts your texture into a GUI Texture, which is used exclusively for images drawn in 2D screen space. This refers to elements for user interfaces: such as buttons, menus, drop-down lists, icons, power-up bars, heads-up displays, and more. These textures cannot be assigned to models and meshes in 3D space. Textures used for these purposes can be of any dimension (though ideally with an even-numbered dimension). This works because of the way Unity internally handles these sorts of textures. See Figure 2-12. We will not have reason to use these kinds of textures in this book, however.
Figure 2-12. Setting the selected texture to a GUI Texture type from the Object Inspector in Unity
Note You might wonder whether we couldn’t just use the GUI Textures for making 2D games? After all, if Unity already allows us to draw GUIs in 2D screen-space using textures of non-power 2 sizes, then why can’t this system be adapted for 2D games? The answer is: Yes, it can be adapted in the way suggested. That’s one way of making 2D games. But that method involves complications we can avoid by using the method described in this book. The GUI Texture method involves performance issues for games with many textures and objects, and those issues are especially prominent on mobile devices.
Rule #2: Retain Quality
are looking grainy, jagged, rough-edged, blurry or distorted; or if you detect that something is wrong with the image but cannot quite see what it is, then it’s likely your image has become a victim to one or both of these enemies. The question of retaining quality is about how to either completely avoid these enemies, or (at least) encounter them as few times as possible. Thankfully, there are steps we can take to protect our images from most degrading processes.
The first sub-rule here is to save your image files in a lossless format. In practice this means: save your images in the PNG, TGA, TIFF, or PSD format, and not JPG. Both Photoshop and GIMP support all these formats. For lossy formats like JPG, image quality is lost on each file-save operation: JPG only saves an approximation of the original image. This means that more and more data from the original is compromised on each successive save. To retain the quality without data loss, a Lossless format is needed. I recommend either PNG for standard textures and PSD or TGA for textures with transparency. Take a look at Figure 2-13 to see image export options for Photoshop and GIMP.
Figure 2-13. Save your images to lossless formats to preserve quality. In GIMP Choose File ➤ Export (Left) and In Photoshop choose File ➤ Save or File ➤ Save As . . . (right)