Copyright
Introduction to Python® Programming and Developing GUI Applications with PyQT B.M. Harwani
Publisher and General Manager, Course Technology PTR:
Stacy L. Hiquet
Associate Director of Marketing:
Sarah Panella
Manager of Editorial Services:
Heather Talbot
Marketing Manager: Mark Hughes
Senior Acquisitions Editor:
Mitzi Koontz
Project Editor: Kim Benbow
Technical Reviewer: Keith Davenport
Copy Editor: Gene Redding
Interior Layout: MPS Limited, a Macmillan Company
Cover Designer: Mike Tanamachi
Indexer: BIM Indexing Services
Proofreader: Brad Crawford
© 2012 Course Technology, a part of Cengage Learning.
ALL RIGHTS RESERVED. No part of this work covered by the copyright herein may be reproduced, transmitted, stored, or used in any form or by any means graphic, electronic, or mechanical, including but not limited to photocopying, recording, scanning, digitizing, taping, Web distribution, information networks, or information storage and retrieval systems, except as permitted under Section 107 or 108 of the 1976 United States Copyright Act, without the prior written permission of the publisher.
For product information and technology assistance, contact us at
Cengage Learning Customer & Sales Support, 1-800-354-9706
For permission to use material from this text or product, submit all requests online at
www.cengage.com/permissions
Further permissions questions can be emailed to permissionrequest@cengage.com
Python and the Python logos are trademarks or registered trademarks of the Python Software Foundation.
All other trademarks are the property of their respective owners. All images © Cengage Learning unless otherwise noted.
Library of Congress Control Number: 2011936040 ISBN-13: 978-1-4354-6097-3
ISBN-10: 1-4354-6097-9 eISBN-10: 1-4354-6098-7
Course Technology, a part of Cengage Learning
20 Channel Center Street Boston, MA 02210
USA
Cengage Learning is a leading provider of customized learning solutions with office locations around the globe, including Singapore, the United Kingdom, Australia, Mexico, Brazil, and Japan. Locate your local office at: international.cengage.com/region Cengage Learning products are represented in Canada by Nelson Education, Ltd. For your lifelong learning solutions, visit courseptr.com
Visit our corporate website at cengage.com Printed in the United States of America 1 2 3 4 5 6 7 13 12 11
Dedication
This book is dedicated to my mother, Mrs. Nita Harwani, and American inventor and entrepreneur, the late Steve Jobs.
My mother is next to God for me, and whatever I am today is because of the moral values taught by her.
Steve Jobs, co-founder, chairman, and chief executive officer of Apple Inc. has been and will always be a great inspiration for me.
Acknowledgments
I owe a debt of gratitude to Mitzi Koontz, Senior Acquisitions Editor at
Course Technology, Cengage Learning for her initial acceptance and giving
me an opportunity to create this work. I am highly grateful to the whole
team at Cengage for their constant cooperation and contribution to create
this book.
I must thank Keith Davenport, the technical editor for his excellent,
detailed review of the work and the many helpful comments and
suggestions he made. He offered a significant amount of feedback that
helped to improve the book’s content. He played a vital role in improving
its structure and the quality of information.
Special thanks to Gene Redding, the copy editor for first class structural
and language editing. I appreciate his efforts in enhancing the contents of
the book and giving it a polished look.
Big and ongoing thanks to Kim Benbow, my project editor, for doing a
great job and her sincere efforts to get the book published on time.
A great big thank you goes to the production staff who worked tirelessly to
produce this book. I enjoyed working with each of you.
I am also thankful to my family (my small world): Anushka (my wife) and
my two little darlings, Chirag and Naman, for always inspiring me and
giving me the courage to work harder.
I should not forget to thank my dear students who have been good
teachers for me, as they help me to understand the basic problems they
face with a subject, which enables me to directly teach those topics. Their
endlessly interesting queries help me to write books with a practical
approach.
About the Author
B.M. Harwani
is founder and owner of Microchip Computer Education
(MCE), based in Ajmer, India, which provides computer education on all
programming and web developing platforms. Harwani graduated with a BE
in computer engineering from the University of Pune, and also has a C
Level (master’s degree) in computer technology from DOEACC,
Government of India. Being involved in the teaching field for over 16 years,
he has developed the art of explaining even the most complicated technical
topics in a straightforward and easily understandable fashion. He has
written several books on various subjects that include JSP, JSF, EJB, PHP,
.NET, Joomla, jQuery, and smartphones. His latest books include
Beginning
Web Development for Smartphones
(Shroff, 2011),
Core Data iOS
Essentials
(Packt Publishing, 2011) and
Blogging with WordPress 3 for
Beginners
(CreateSpace, 2011). He also writes articles on a variety of
computer subjects, which can be seen on a number of websites. To find out
more, visit his blog at
http://bmharwani.com/blog
.
Copyright 2
Acknowledgments 4
About the Author 5
Contens 6
Intrduction 11
Chapter 1 Python and Its Features 15
1.1 Python 16
1.2 Installing Python 19
1.3 Interacting with Python 24
1.4 Writing Your First Python Program 27
1.5 Data Types in Python 29
1.6 Basic Elements in a Program 31
1.7 Comments 32
1.8 Continuation Lines 33
1.9 Printing 34
Summary 37
Chapter 2 Getting Wet in Python 38
2.1 Performing Arithmetic Operations 39
2.2 Bitwise Operations 49
2.3 Complex Numbers 52
2.4 Making Decisions 54
Table of Contents
2.5 Logical Operators 58
2.6 Chaining Comparison Operators 60
2.7 Loops 63
Summary 73
Chapter 3 Sequences 74
3.1 Sequences 75
3.2 Strings 76
3.3 Lists 90
3.4 Tuples 96
3.5 Sets 100
Summary 103
Chapter 4 Functions and Modules 104
4.1 Functions 105
4.2 Function Attributes 115
4.3 Recursion 117
4.4 Iterators 120
4.5 Modules 124
Summary 129
Chapter 5 Classes 130
5.1 The Class Statement 131
5.2 Class Methods 139
5.3 Static Methods 141
5.4 Garbage Collection 144
5.5 Inheritance 146
5.6 Multilevel Inheritance 153
5.7 Operator Overloading 163
5.8 Descriptors 168
Summary 172
Chapter 6 File Handling 173
6.1 Exception Handling 186
6.2 Raising an Exception 191
Summary 193
Chapter 7 PyQt 194
7.1 Qt Toolkit 196
7.2 PyQt 197
7.3 Installing PyQt 198
7.4 Window and Dialogs 201
7.5 Creating a GUI Application with Code 202
7.6 Using Qt Designer 205
7.7 Understanding Fundamental Widgets 220
7.8 Event Handling in PyQt 223
7.9 First Application in Qt Designer 224
7.10 Using Custom Slots 231
7.11 Converting Data Types 234
7.12 Defining Buddies 237
Summary 242
Chapter 8 Basic Widgets 243
8.1 Using Radio Buttons 244
8.2 Using Checkboxes 249
8.3 Entering Integer and Float Values Using a Spin Box
256
8.4 ScrollBars and Sliders 260
8.5 Working with a List Widget 266
Summary 274
Chapter 9 Advanced Widgets 275
9.1 Displaying System Clock Time in LCD Format 276
9.2 Working with Calendar and Displaying Dates in Different
Formats 280
9.3 Using Combo Box 286
9.4 Displaying a Table 291
9.5 Displaying Web Pages 295
9.6 Displaying Graphics 299
Summary 303
Chapter 10 Menus and Toolbars 304
10.1 Understanding Menus 305
10.2 Creating a Toolbar 312
10.3 Dock Widget 319
10.4 Tab Widget 325
10.5 Converting a Tab Widget 332
Summary 337
Chapter 11 Multiple Documents and Layouts 338
11.1 Multiple-Document Interface 339
11.2 Layouts 347
Summary 355
Chapter 12 Database Handling 356
12.1 Why MySQL? 357
12.2 Creating a Database 361
12.3 Database Maintenance Through Console-Based Programs
365
12.4 Database Maintenance Through GUI Programs 374
Summary 387
Index 388
Introduction
Python is an interpreted, general-purpose, high-level programming
language that is very popular among developers and professionals because
of its vast library of addon modules. It is a platform-independent scripted
language that is supported by many individuals as an open-source project.
The fact that it is freely available and runs on all platforms makes it ever
more popular.
The goal of
Introduction to Python Programming and Developing GUI
Applications with PyQT
is to teach the Python programming language
through practical examples. Whether you are new to computers or are an
experienced programmer, this book is intended to help you develop your
programming skills. It is written with the requirements of all levels in mind
—developers, professionals, and beginners. The book begins with a solid
introduction of Python from scratch—loops, control structures, sequences,
functions, classes, and exception handling. Thereafter, the book explains
persistence through file handling and targets developers by introducing
GUI application development in PyQT.
As you read through the book, you will acquire the skills needed for
building practical Python programming applications and will learn how
these skills can be put into use in real-world scenarios.
Like any good book,
Introduction to Python Programming
explains the more
basic concepts, one step at a time, by writing small programs to
demonstrate each step. Gradually, once the reader is acquainted with
logical blocks, the book explains using the blocks for understanding more
complex concepts. By the time you finish the book, you will understand
how to break problems down into manageable chunks, and then refine your
code into applications.
How This Book is Organized
Chapter 1
,
“Python and its Features
”: In this chapter, you will have a
detailed introduction to Python and its features, such as installing Python
on different platforms, interacting with Python through Command Line
mode and the IDLE IDE. You will also learn to write your first Python
program. The chapter also introduces the Python basics, like its different
data types, literals, variables, and keywords. Finally, the chapter explains
how to write comments, continuation lines, and print messages.
Chapter 2
,
“Getting Wet in Python
”: In this chapter, you will learn to
apply arithmetic operations and different logical and membership operators
in Python programs. You will see the use of escape sequences. You will
learn to get data from the user as well as process incoming data. You will
also see how to convert data into different types, learn to display octal and
hexa values, perform bitwise operations, and use complex numbers. You
will also learn how to use the
if...else
statement in making decisions.
Finally, the chapter explains how to use
while
and
for
loops for doing
repetitive tasks.
Chapter 3
,
“Sequences
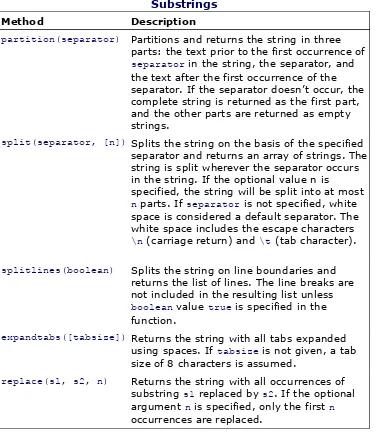
”: This chapter focuses on using different
containers. You will learn to perform different operations on strings,
including concatenating strings, splitting strings, and then converting them
into different cases, such as uppercase, title case, and lowercase, etc. Also,
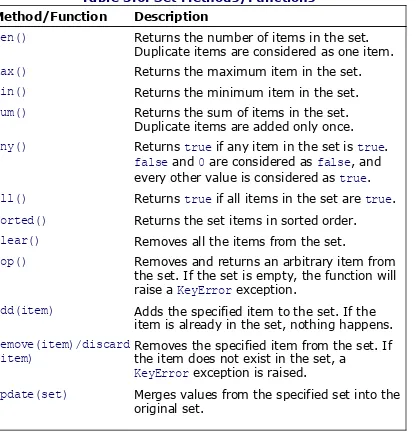
you will learn to do list slicing, searching elements in tuples, and
performing operations on sets, such as finding their union, intersection,
and differences. You will learn how key/value pairs are maintained in a
dictionary and how to append, delete, or and modify key/value pairs.
Finally, the chapter explains how to create one- and two-dimensional
arrays.
Chapter 4
,
“Functions and Modules
”: In this chapter, you will learn
about different statements that define and return values from functions.
Also, you will learn to use default value parameters and keyword
arguments in a function, as well as use local and global variables. The
chapter explains how to create lambda functions for smaller expressions.
Also, you will learn how to apply functions to sequences using different
function attributes and implement recursion. For accessing collections of
data, the chapter explains how to use iterators, generators, and generator
expressions. You will learn to import and use modules for built-in functions.
The chapter also explains how to pass command-line arguments to a
Python program.
Chapter 5
,
“Classes
”: This chapter focuses on classes. You will learn how
to define a class, define functions for it, initialize its instance variables, and
use class and static methods. You will also learn to use class attributes to
display specific information related to the class. You will learn the concept
of garbage collection and its role in freeing up memory consumed by
objects that are out of scope. Also, you will learn to apply single,
apply method overriding and operator overloading to perform arithmetic
operations on instances. Finally, the chapter explains polymorphism and
setting and getting values of instance attributes through properties and
descriptors.
Chapter 6
,
“File Handling
”: In this chapter, you will learn to perform
different operations on files. You will learn to open a file in different modes
and to read its contents, update existing content, delete content, and
append new content. You will also see how to copy a file, read a file
sequentially or randomly, and read only specific content. You will learn to
create a binary file as well as pickle and unpickle objects. Finally, the
chapter explains how to implement exception handling and the procedure
for raising exceptions.
Chapter 7
,
“PyQt
”: In this chapter, you will be introduced to the Qt
toolkit, Qt Designer, and PyQt. You will learn about different Qt Designer
components, such as the toolbar, the Object Inspector, the Property Editor,
and the Widget Box. You will also learn to create a GUI application through
coding. Also, you will learn about the fundamental Label, Line Edit, and
Push Button widgets as well as learn to develop applications using them.
You will also learn about signal/slot connection in the Qt Designer and how
to connect signals to both predefined slots and to custom slots.
Chapter 8
,
“Basic Widgets
”: This chapter demonstrates how to create a
GUI application using Radio Buttons, which enable the user to select one
option out of several. You will also learn how to select more than one option
by using CheckBoxes and specify integers as well as float values using Spin
Boxes. Also, you will learn to use ScrollBars and Sliders to display large
documents and represent integer values. Finally, the chapter explains how
to display options with a List widget, add items to a List widget, and delete
and edit existing items in a List widget.
Chapter 9
,
“Advanced Widgets
”: This chapter explains how to access
and display system clock time in LCD digits. You also will see how to
display a calendar and display a selected date in different formats. You will
learn to create an application that displays options with a Combo Box,
displays information with a Table widget, displays web pages, and displays
graphics.
Chapter 10
,
“Menus and Toolbars
”: In this chapter, you will learn to
create menus and toolbars. Also, you will learn about the Action Editor and
how it can help you define actions for menus and toolbars. You will also
learn how to manage application resources in one place through a resource
file. You will see how to create dockable windows and how to display
information in small chunks with the Tab widget. Finally, the chapter
explains how to convert a Tab widget into a Tool Box or Stacked widget.
MDI. You will see how child windows in MdiArea can be arranged in
cascading and tile fashions. You will also learn to place a collection of
widgets that do similar tasks in a Group Box. You will also learn to organize
widgets in different layouts.
Chapter 12
,
“Database Handling
”: In this chapter, you will learn to
install and use the MySQLdb module, which is required in order to access
the MySQL Database Server through Python. Also, you will learn to
maintain a database through console-based programs and through GUI
programs. You will also learn to write Python scripts to insert, fetch, delete,
search, and update rows in a database table.
Companion Website Downloads
You may download the companion website files from
Chapter 1. Python and Its Features
This chapter covers the following:
Introduction to Python and its features
Installing Python on different platforms
Interacting with Python through Command Line Mode and IDLE
Writing Your First Python Program
Understanding data types and basic elements in Python
Python
Python is a very powerful high-level, dynamic object-oriented programming
language created by Guido van Rossum in 1991. It is implemented in C,
and relies on the extensive portable C libraries. It is a cross-platform
language and runs on all major hardware platforms and operating systems,
including Windows, Linux/UNIX, and Macintosh. Python has an easy-to-use
syntax and is quite easy to learn, making it suitable for those who are still
learning to program. Python has a rich set of supporting libraries, and
many third-party modules are available for it. Python is a programming
language that also supports scripting, making it suitable for rapid
application development. Python comes with a powerful and easy to-use
graphical user interface (GUI) toolkit that makes the task of developing
GUI applications in Python quite easy. It is freely available.
Python Implementations
Python currently has three implementations, known as CPython, Jython,
and Iron-Python. In this book, you will be using CPython, the most widely
used implementation, which I will refer to as just Python for simplicity. A
small description of all three implementations is as follows:
CPython.
Classic Python (often just called Python) is the fastest, most
up-to-date, and complete implementation of Python. It is
implemented in C (i.e., its libraries and modules are all coded in
standard C). It is cross-platform and runs on almost all platforms.
Jython.
Jython is a Python implementation that is Java Virtual
Machine (JVM) compliant. With Jython, we can use all Java libraries
and frameworks.
IronPython.
IronPython is a Python implementation for the Microsoft
designed Common Language Runtime (CLR), popularly known as .NET.
With Iron Python, you can use all CLR libraries and frameworks.
Features of Python
library of add-on modules. It supports integration of pre-built components
for creating complex applications. Python has full access to operating
system (OS) services. Following are a few of its features:
Python is easy to learn
. Programmers familiar with traditional
languages will find all the familiar constructs, such as loops,
conditional statements, arrays, and so on.
It has easier to read syntax
. It avoids the use of punctuation
characters like { } $ / and \.
It uses white space
to indent lines for defining blocks instead of
using brackets.
Python is free
. You can download and install any version of Python
and use it to develop software for commercial or personal applications
without paying a penny. Python is developed under the open-source
model. You can copy Python, modify it, and even resell it.
It comes with a large number of libraries included
, and there are
many more that you can download and install.
Python can be integrated with other languages
, like C, C++, and
Java. That is, the components written in these languages can be
embedded with Python programs, thus making it easier to develop
complex solutions.
Python is an interpreted language
, therefore it supports a complete
debugging and diagnostic environment making the job of fixing
mistakes much faster. Also, the software development is quite rapid
and flexible in it.
Python is a good choice for web development
, networking,
games, data processing, and business applications.
For efficient memory management
, Python uses garbage collection,
so you don’t have to worry about memory leaks. The Python run-time
environment handles garbage collection of all Python objects. Each
object has a reference counter to make sure that no live objects are
removed. Only the object with a reference counter value equal to 0 is
garbage collected.
Python supports exception handling
. That is, errors are raised as
exceptions so that you can take corrective measures. Python signals
almost all errors with an exception.
Installing Python
To install Python, you will need to download its most recent distribution
from the following URL:
www.python.org
. Don’t worry if you already have
an earlier version of Python installed on your machine. You can have
multiple versions of Python on the same computer. The new version of
Python is installed in a separate location and will not interfere with the
older version on your computer. Many Linux distributions and Mac OS X
come with Python 2.x as part of the operating system. Let’s have a look at
the steps for installing Python on Microsoft Windows.
Installing Python on Microsoft Windows
For Microsoft Windows, download the latest Python installer program from
its site. This book is based on Python version 3.2, and its installer program
is python-3.2.msi. Download it, and then double-click on it to begin the
installation wizard.
Note
You need to be logged in as the administrator to run the install.
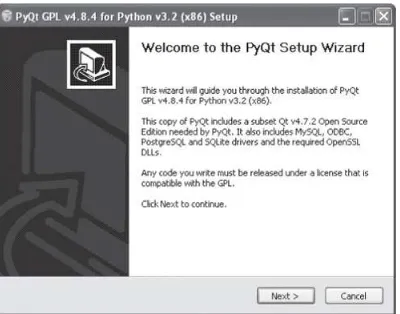
The first dialog box of the installation wizard, shown in
Figure 1.1
, asks
whether you want to install this Python version for all the users or only for
one user (i.e., the administrator). Select the option Install For All Users,
followed by selecting the Next button.
In the next dialog, you will be asked for the destination folder where you
want to install Python files. The wizard also displays a folder name by
default that represents the Python version being installed. In this case, the
default folder will be C:\Python32\. You can either keep the default folder
or specify a new folder for your Python installation. Select the Next button
to continue. If you have a previous installation, then you will be asked
whether you wish to back up replaced files. The option to make backups is
already selected, and the default folder for the backup appears as C:
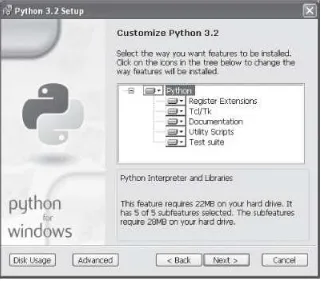
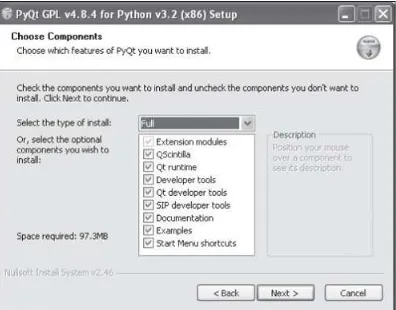
\Python32\BACKUP. Click Next to continue. The next dialog is to specify the
Python features (i.e., the components) that you want to install, as shown in
Figure 1.2
. You can select or unselect the features as per your requirement.
On selecting a feature, the hard disk space needed by its files will be
displayed. Keeping the default components selected, click Next to continue.
Figure 1.2. Selecting Python components to install.
The installer program will copy the Python files to the selected folder, and
you will be asked to select the Finish button to exit the installation wizard.
On successful installation of Python, you will find a new group, called
Python 3.2, added to your Windows system that you can see by selecting
the Start > All Programs option. The Python 3.2 group shows several
options, such as IDLE (Python GUI), Module Docs, Python (Command Line),
Python Manuals, and Uninstall Python.
On selecting the Python (Command Line) menu item, you see the Python
Command Line window displaying the Python prompt (>>>), as shown in
Figure 1.3
. The window informs you which version of Python is running, the
date the version was released, and a few hints for viewing copyright,
credits, and license information. Below the hints messages is displayed the
Python prompt (>>>) where you can issue Python commands. To execute
Python commands, you write them at the prompt followed by pressing the
Enter key. To close the Python Command Line window, press Ctrl+Z
followed by the Enter key.
Figure 1.3. Python Command Line window.
Congratulations for successfully installing Python on Windows! Now I’ll
show you how to install Python on Mac OS X.
Installing Python on the Mac
Python is part of the Mac OS environment. Tiger (Mac OS 10.4) includes
Python 2.3.5 and IDLE (Integrated DeveLopment Environment). Leopard
(Mac OS 10.5) includes Python 2.5.1. Snow Leopard (Mac OS 10.6)
includes Python 2.6. The Python files can be found in the
/System/Library/Frameworks/Python.framework/Versions folder. To install
or upgrade to Python 3.2, download the pre-built Mac OS X installer from
www.python.org
. The file name will be python-3.2.macosx.dmg. To initiate
the installation procedure, double-click the file. It will create a disk image
named Universal MacPython 3.2. The disk image will contain a license, a
ReadMe file, and the MacPython.mpkg file. You need to double-click the
MacPython.mpkg file to install Python on your computer. The installer will
take you through a few steps that include agreeing to the license terms
and conditions for using Python, specifying a destination folder, and
selecting installation type (e.g., whether it is an upgrade or a fresh
installation).
To test whether the upgraded version of Python is successfully installed on
your Mac platform, open the Terminal window and type python followed by
the Enter key. The Python command invokes Python and displays its
prompt (>>>) along with the version information. If the prompt displays
the version as 3.2, it confirms that the upgraded version of Python is
successfully installed on your computer, and you can execute Python
commands at the prompt. To close the prompt and exit Python, press
Ctrl+D.
Installing Python on UNIX
To install Python on the UNIX platform, the first step, as usual, is to
download and extract its installer program from
www.python.org
. The next
step is to give the following command to configure options for your UNIX
system:
./configure
Thereafter, the following commands are needed to begin the installation
procedure:
make
The preceding commands will install Python files in the /usr/local/bin folder
and install its libraries in /usr/local/lib/python32 folder. Since the
make
install command can overwrite your previous Python installation, it is
better to use the
make altinstall
command:
make altinstall prefix=~ exec-prefix=~
prefix=~ installs all platform-independent files in the ~/lib folder, and
exec-prefix=~
installs all binary and other platform-specific files in the
~/bin folder. The
make altinstall
command creates
Interacting with Python
There are two ways to work with Python interactively:
Using Command Line Mode
Using IDLE IDE
Command Line Mode
In command line mode, you type Python instructions one line at a time.
You can also import code from other files or modules. To open Python’s
command line mode in Windows, select Start > All Programs > Python 3.2
to open the Python 3.2 group. The group shows several options, such as
IDLE (Python GUI), Module Docs, Python (command line), Python Manuals,
and Uninstall Python. Select the Python (command line) option from the
group. Alternatively, you can open a command prompt window and type
python
followed by pressing the Enter key. If you get an error message
saying that the Python program couldn’t be found, it means that your
operating system could not find the path for the Python installation. To
define the correct path for the Python installation, right-click on the My
Computer icon and select Properties from the shortcut menu that appears.
Select the Advanced tab from the dialog that appears, and click the
Environment Variables button at the bottom. A list of environment
variables will be displayed. Double click the
Path
variable to edit it. In the
Edit box, add the location of your Python installation (i.e.,
;C:\python32
)
at the end of the line, and select OK. Also, click the OK button in all of the
windows that are open until you get back to your desktop. Open another
command prompt window (because the old window will still have the old
path settings) and invoke Python by typing
python
followed by Enter.
On Mac OS X, open the Terminal window and type
python3
followed by the
Enter key. On UNIX, open a new shell window and type
python3.2
at a
command prompt.
End, Page Up, and Page Down keys, to scroll through the commands used
previously. Since whatever you type in command line mode is not saved, it
is better to save code in a file and then execute it. The following section
shows you how to use this method, too.
IDLE (Integrated DeveLopment Environment)
IDLE is a simple IDE that comes with the standard Python distribution.
IDLE combines an interactive interpreter with code editing, debugging
tools, and several specialized browsers/viewers built into it. It provides
automatic indentation and colors to the code based on Python syntax
types, making your program more readable. Also, you can navigate to the
previously given commands that are in the buffer using the mouse, arrow
keys, or Page Up and Page Down keys. You can also toggle up and down
through the previously given commands using the Alt+P and Alt+N key
commands. You can also complete Python keywords or user-defined values
by pressing Alt+/.
To start IDLE on Windows, select Start > All Programs > Python 3.2 > IDLE
(Python GUI). On Mac OS X, navigate to the Python 3.2 subfolder in the
Applications folder, and run IDLE from there. On UNIX, type
idle3.2
at a
command prompt. The Python Shell window opens upon invoking IDLE, as
shown in Figure 1.4.
Figure 1.4. Python Shell window.
Besides executing individual Python commands in the Python Shell
window, you can also write and edit Python programs in any editor and
execute them through IDLE. You can use any text editor, like Notepad on
Windows or ed on Linux, for writing and editing Python programs. Besides
using external editors, you can also use IDLE’s built-in editor for the same
purpose. To open IDLE’s editor, select File > New Window. A blank window
appears where you can type a Python program. To save the program, select
File > Save As. The program will be saved with extension .py. The .py
extension shows that it is a Python program. To execute the program,
select Run > Run Module or press the F5 key. While running a program,
IDLE will display the line(s) where errors, if any, occur. You can also open
and edit programs written in other editors by selecting File > Open.
Writing Your First Python Program
As mentioned earlier, you can write your first Python program either
through IDLE’s built-in editor or through any editor. I will be using IDLE’s
editor throughout the book for writing programs. You can launch IDLE by
selecting Start > All Programs > Python 3.2 > IDLE (Python GUI). Then
select the File > New Window option to open IDLE’s built-in editor and
write the following small program:
arearect.py
# The program calculates area of rectangle
l=8
b=5
a=l*b
print ("Area of rectangle is ", a)
Save it to your computer in any desired folder by any name, for example,
arearect.py.
Note
Remember to add the .py extension when saving the file, as IDLE
does not add the extension automatically.
The program consists of two variables, l and b, initialized to values 8 and 5,
respectively. The l and b variables here represent the length and breadth of
a rectangle. The l and b are multiplied, and the result is stored in a third
variable, a, that is then displayed as the area of a rectangle. To run the
program, select Run > Run Module from the menu or just press F5. You will
get the following output:
Area of rectangle is 40
Python program.
Running Python Programs from the Command
Prompt
You can run Python programs from the command prompt, too. Open the
command prompt and type
python arearect.py
followed by the Enter key
to open Python and tell it to run the script file, arearect.py. You will get the
output of the program as previously shown. You might have noticed that
variables l, b, and a are of integer types. What are other data types in
Data Types in Python
Python has a rich set of fundamental data types. The operations that are
applicable on an object depend on its data type (i.e., an object’s data type
determines which operations are applicable on it). The list of data types are
as follows:
Integers:
Integers are 32 bits long, and their range is from –2
32to
2
32– 1 (i.e., from –2,147,483,648 to 2,147,483,647).
Long Integers:
It has unlimited precision, subject to the memory
limitations of the computer.
Floating Point Numbers:
Floating-point numbers are also known as
double-precision numbers and use 64 bits.
Boolean:
It can hold only one of two possible values: True or False.
Complex Number:
A complex number has a real and an imaginary
component, both represented by float types in Python. An imaginary
number is a multiple of the square root of minus one, and is denoted
by j. For instance, 2+3j is a complex number, where 3 is the
imaginary component and is equal to 3 × √−1.
Strings:
Sequences of Unicode characters.
Lists:
Ordered sequences of values.
Tuples:
Ordered, immutable sequences of values.
Sets:
Unordered collections of values.
Dictionaries:
Unordered collections of key-value pairs.
Note
Unicode is a standard that uses 16-bit characters to represent
characters on your computer. Unlike ASCII (American Standard
base 16.
A number does not include any punctuation and cannot begin with a
leading zero (0). Leading zeros are used for base 2, base 8, and base 16
numbers. For example, a number with a leading 0b or 0B is binary, base 2,
and uses digits 0 and 1. Similarly, a number with a leading 0o is octal,
base 8, and uses the digits 0 to 7, and a number with a leading 0x or 0X is
hexadecimal, base 16, and uses the digits 0 through 9, plus a, A, b, B, c,
C, d, D, e, E, f, and F.
Note
An object that can be altered is known as a
mutable
object, and one
that cannot be altered is an
immutable
object.
Basic Elements in a Program
Every program consists of certain basic elements, a collection of literals, variables, and keywords. The next few sections explain what these terms mean.
Literals
A literal is a number or string that appears directly in a program. The following are all literals in Python:
10 # Integer literal
10.50 # Floating-point literal 10.50j # Imaginary literal 'Hello' # String literal "World!" # String literal '''Hello World!
It might rain today # Triple-quoted string literal Tomorrow is Sunday'''
In Python, you can use both single and double quotes to represent strings. The strings that run over multiple lines are represented by triple quotes.
Variables
Variables are used for storing data in a program. To set a variable, you choose a name for your variable, and then use the equals sign followed by the data that it stores. Variables can be letters, numbers, or words. For example,
l = 10 length = 10
length_rectangle = 10.0 k="Hello World!"
You can see in the preceding examples the variable can be a single character or a word or words connected with
underscores. Depending on the data stored in a variable, they are termed as integer, floating point, string, boolean, and
list or tuple variables. Like in above examples, the variables l and length are integer variables, length_rectangle is a floating-point variable, and k is a string variable. Following are examples of boolean, list, and tuple variables:
a=True # Boolean variable b=[2,9,4] # List variable
c=('apple', 'mango', 'banana') # tuple variable
A tuple in python language refers to an ordered, immutable (non changeable) set of values of any data type.
Keywords
Python has 30 keywords, which are identifiers that Python reserves for special use. Keywords contain lowercase letters only. You cannot use keywords as regular identifiers. Following are the keywords of Python: