• • • •
For your convenience Apress has placed some of the front
matter material after the index. Please use the Bookmarks
Contents at a Glance
About the Author ...
xv
About the Technical Reviewer ...
xvii
Acknowledgments ...
xix
Introduction ...
xxi
Chapter 1: The JavaScript You Need to Know
■
...
1
Chapter 2: A First Look at jQuery
■
...
33
Chapter 3: ASP.NET Controls and jQuery Selectors
■
...
63
Chapter 4: Event Handling
■
...
103
Chapter 5: DOM Manipulation and Dynamic Content
■
...
135
Chapter 6: Traversal and Other Useful Methods
■
...
157
Chapter 7: Effects and Animations
■
...
179
Chapter 8: Ajax Techniques
■
...
193
Chapter 9: Creating and Using Plugins
■
...
231
Chapter 10: jQuery UI and jQuery Mobile
■
...
255
Chapter 11: Useful jQuery Recipes for ASP.NET Applications
■
...
.281
Appendix: Learning Resources
■
...
301
Introduction
Welcome to the exciting world of jQuery! If you’re an ASP.NET developer looking to turbocharge your ASP.NET applications with jQuery, you picked the right book. Modern web applications leverage browsers’ resources through client-side scripting. Although JavaScript is a de facto standard as far as client-side scripting is concerned, there are several libraries built on top of JavaScript that help developers accomplish their job quickly and easily. jQuery is one of the most popular JavaScript libraries available today. If you want to develop Ajax-driven, dynamic, and
cross-browser web applications using ASP.NET, understanding jQuery is an invaluable skill.
While using jQuery in ASP.NET Web Forms and ASP.NET MVC projects, you need to combine the power of jQuery with server controls, controllers, services, and APIs. It is crucial to understand how jQuery can be used effectively in combination with ASP.NET features and technologies.
To that end, this book teaches you how to harness the power of the jQuery library in your ASP.NET Web Forms and MVC applications. It helps you understand the foundations of jQuery from the perspective of an ASP.NET developer in a clear, step-by-step way, so that you can quickly ensure you have this invaluable skill under your belt.
Who This Book Is For
This book is for ASP.NET web developers who want to tap the power of jQuery in their existing or new web
applications. This book doesn’t teach you ASP.NET features. I assume that you’re already comfortable working with ASP.NET and doing web application development in general.
All the code samples discussed in this book use C# as the server-side programming language, so you should also know C#. Although no prior knowledge of jQuery is expected, I assume that you’re familiar with the basics of JavaScript.
The examples illustrated throughout the book use SQL Server and Entity Framework. Although you need not have a detailed understanding of these technologies, you should at least be familiar with them.
The book uses Visual Studio as the development tool. You should know how to work with Visual Studio to perform basic tasks such as creating projects and debugging code.
Software Required
To work through the examples in this book, you need the following software:
Visual Studio 2013
•
SQL Server 2012
•
jQuery, jQuery UI, and jQuery Mobile library files
•
Web browsers: Internet Explorer 9+, Firefox, Chrome, Opera, and Safari
•
All the data-driven examples were developed using SQL Server 2012 Express Edition. I use the Northwind sample database in many examples, and I suggest you install it. You can download the Northwind database and its script from the MSDN downloads web site.
I used jQuery 2.0.3 to write the examples presented in this book. You should consider downloading the latest versions of jQuery, jQuery UI, and jQuery Mobile from their official web sites.
It’s always a good idea to test the client scripts you write in all the major browsers. So you might consider installing the latest versions of Internet Explorer, Firefox, Chrome, Opera, and Safari.
How This Book Is Structured
This book is organized into 11 chapters and one appendix. Here’s a quick overview:
Chapter 1
• gives you a quick recap of JavaScript programming. You can brush up on your JavaScript skills before taking on jQuery.
Chapter 2
• gives you a peek into jQuery. You learn the basics, such as downloading and installing jQuery on your machine. You also develop a simple application in ASP.NET Web Forms and MVC.
Chapter 3
• gives you a detailed understanding of jQuery selectors. You learn to match DOM elements using powerful and flexible selectors. This chapter also details techniques to deal with server controls while selecting them in the jQuery code.
Chapter 4
• teaches you one of the most commonly used features: event handling. It covers commonly used events such as window, keyboard, and mouse events. Some advanced concepts relating to event handling, such as passing custom data to the event handler, are also covered.
Chapter 5
• is about DOM manipulation using jQuery. Topics covered include applying CSS styles, working with attributes, and manipulating DOM elements.
Chapter 6
• covers DOM navigation and filtering techniques, including tree traversal, iterating, searching, working with custom data attributes, and more.
Chapter 7
• teaches you how to apply jQuery effects and animations to Web Form controls and page elements. You learn to apply fancy effects such as fade-in, fade-out, slide-up and slide-down. You also learn to apply custom animation effects to page elements.
Chapter 8
• covers an important topic: Ajax techniques offered by jQuery. This chapter discusses how ASMX web services, WCF services, MVC action methods, and the Web API can be called from the jQuery code. It also discusses the JSON format and its use in Ajax communication.
Chapter 9
• discusses plugins—a technique to extend the jQuery core. You can develop plugins to enhance and extend the core functionality offered by jQuery. The chapter discusses the steps involved in building a plugin and gives you some recommendations to be followed during the process.
Chapter 10
• gives you an overview of jQuery UI and jQuery Mobile. jQuery UI provides various widgets that you can add to ASP.NET web applications to provide professional user interface elements such as dialogs, menus, accordions, and sliders. jQuery Mobile helps you develop web applications targeted at mobile devices.
Chapter 11
• presents a few recipes that you will find useful in real-world applications. The recipes covered include implementing Ajax-based paging, client-side sorting, file upload, autocomplete text box, and cascading drop-down lists.
The Appendix lists some jQuery learning resources.
Downloading the Source Code
The complete source code for the book is available for download at the book’s companion web site. Visit
http://www.apress.com and go to the book’s information page at http://www.apress.com/9781430263043. You can then download the source code from the Source Code/Downloads section.
Contacting the Author
The JavaScript You Need to Know
JavaScript is a programming language that adds interactivity and dynamic content to otherwise static HTML pages. Behind most fancy frills such as mouseover effects, animations, drop-down menus, and form validations, you will usually find JavaScript being used in some way or another. jQuery is a JavaScript library that simplifies your client-side programming tasks and uses the same programming constructs as JavaScript for variables, branching, and looping. While writing jQuery code, you often need to use these JavaScript programming constructs. Therefore, before you delve into jQuery programming, you must refresh your JavaScript skills. This chapter is intended to give you a quick overview of commonly used JavaScript features so that you can use the knowledge gained in this chapter in the remainder of the book. If you are already familiar with JavaScript, you can skip this chapter, or glance over its content and jump to the next chapter.
Specifically, you will learn how to do the following:
Understand basic programming constructs used in JavaScript for branching and looping
•
Work with JavaScript variables and data types
•
Use built-in string, number, and date functions
•
Create and use your own functions
•
Note
■
Although this chapter is intended to give you an overview of the JavaScript language, it does not
cover all JavaScript features. For more information on JavaScript programming, see
https://developer.mozilla.org/en-US/docs/Web/JavaScript
.
Your First JavaScript Program
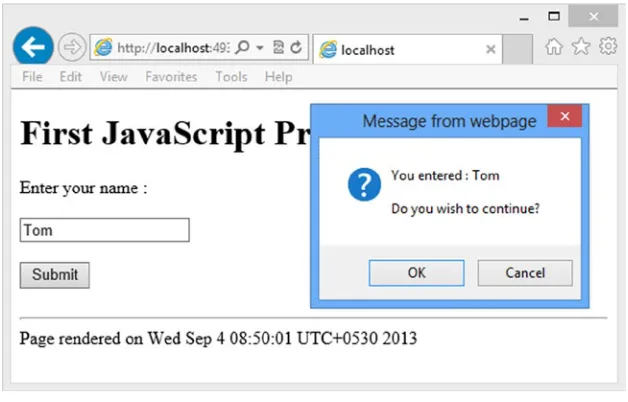
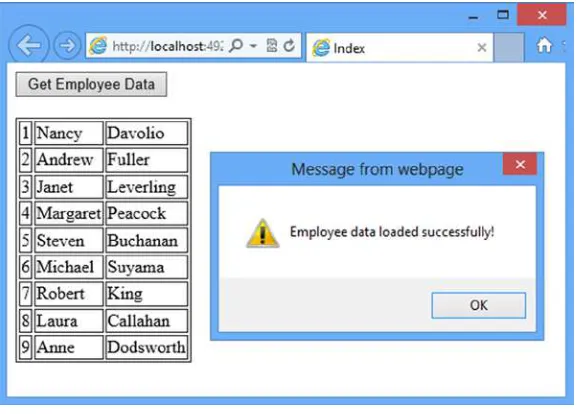
As shown in Figure 1-1, the Web Form consists of a couple of Label controls, a TextBox, and a Button server control. Once you enter a name and hit the Submit button, a confirmation dialog is shown that seeks your consent to submit the form. Depending on your choice, either the form submission is canceled or the form is submitted to the server. Upon postback, the entered name is displayed in a Label control.
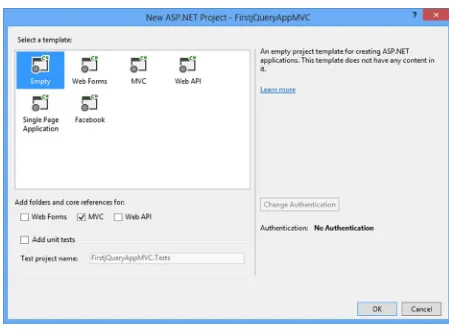
To begin developing this application, create a new ASP.NET Web Application based on the Empty project template using Visual Studio (see Figure 1-2).
Figure 1-1. Your first JavaScript program
Add a new Web Form to the project and name it FirstJS.aspx. Design the Web Form as shown in Figure 1-1 by dragging and dropping the respective server controls from the toolbox. The HTML and server control markup of the Web Form is shown in Listing 1-1.
Listing 1-1. Markup of FirstJS.aspx
<%@ Page Language="C#" AutoEventWireup="true" CodeBehind="FirstJS.aspx.cs" Inherits="Chapter_01. FirstJS" %>
...
<body>
<form id="form1" runat="server"> <h1>First JavaScript Program</h1>
<asp:Label ID="Label1" runat="server" Text="Enter your name :"></asp:Label> <br />
<br />
<asp:TextBox ID="TextBox1" runat="server"></asp:TextBox> <br />
<br />
<asp:Button ID="Button1" runat="server" Text="Submit" OnClick="Button1_Click" /> <br /><br />
<asp:Label ID="Label2" runat="server" Font-Bold="True" ForeColor="Red"></asp:Label> </form>
</body> </html>
The markup contains two Label controls: one that acts as the prompt for the name text box, and the other that is placed below the Submit button. The server-side click event handler of Button1 simply outputs the name entered by the user in Label2. Listing 1-2 shows this event handler.
Listing 1-2. Submit Button Server-Side Click Event Handler
protected void Button1_Click(object sender, EventArgs e) {
Label2.Text = "Hello " + TextBox1.Text; }
So far, the application doesn’t use any JavaScript. In the next step, you add some JavaScript code that is invoked when the user clicks the Submit button. To do so, modify the markup of the Submit button as shown here:
<asp:Button ID="Button1" runat="server" Text="Submit" OnClientClick="return confirmName();" ... />
You can add the OnClientClick attribute in two ways: you can either switch to the source view of Visual Studio IDE and key in the markup shown in bold letters, or set the OnClientClick property of Button1 in the Properties window. The OnClientClick property is used to specify the client-side (JavaScript) code that is to be executed when the button is clicked. In this case, you set the OnClientClick property to return confirmName(). confirmName() is a custom JavaScript function that you will write next.
Listing 1-3. confirmName() Function
<script type="text/javascript"> function confirmName() {
var textbox = document.getElementById("TextBox1");
var flag = window.confirm("You entered : " + textbox.value + "\n\nDo you wish to continue?"); if (flag) {
return true; }
else {
return false; }
} </script>
The <script> block shown in Listing 1-3 contains a custom JavaScript function named confirmName(). The
confirmName() function is intended to seek confirmation from the end user and accordingly cancel or continue with the form submission. First, it grabs a reference to the text box using the getElementById() method of the document
object. The document object represents the current web page loaded in the browser window. The getElementById()
method accepts an ID of an HTML element and returns a Document Object Model (DOM) object representing the element. The return object is stored in a JavaScript variable named textbox. Notice the use of the var keyword to declare a variable.
Note
■
The Document Object Model, or DOM, is a tree structure of the entire HTML page loaded in the browser
window. Each HTML element from the page has a corresponding object in the DOM tree that can be used to manipulate
the underlying HTML element.
The next line declares a JavaScript variable named flag to store the return value of a built-in function:
window.confirm(). The confirm() function belongs to the window object and allows you to display a dialog to the user with a developer-defined message. The dialog has OK and Cancel buttons. If the user selects OK, confirm() returns a Boolean value of true; otherwise, it returns false. The window object represents the container of the document being displayed (the browser window or a tab in which the page is loaded).
In this example, you display the name entered by the user. Notice the use of the escape sequence \n\n in the message string to add new lines in the message. The value property of the text box DOM element returns the text entered in the text box. An if-else block checks the flag variable. If flag is true, the if block returns true; otherwise, the else block returns false. Depending on the value returned by the confirmName() function, the form is submitted (true) or the form submission is canceled (false).
Note
■
Although
confirm()is a method of the
windowobject, in most of the browsers you can simply call it as if it
were a stand-alone function. So,
window.confirm()and
confirm()mean the same thing in your JavaScript code.
Listing 1-4. Outputting the Timestamp in the Page Footer
... ... </form>
<script type="text/javascript"> document.write("<hr />");
document.write("Page rendered on " + new Date().toString()); </script>
</body>
This time, you use another method of the document object: write(). The write() method accepts a string and writes it in the document at the place where the call to write() is placed. In this case, the first call to write()
outputs a horizontal rule; the second call outputs the timestamp. Notice how the timestamp is obtained: you use the JavaScript Date object and invoke its toString() method to get a string representation of the current date and time.
This completes your code. Run the Web Form in the browser, enter a name in the text box, and click the Submit button. Figure 1-3 shows a sample run of the Web Form.
Figure 1-3. Sample run of the Web Form
Notice that the name entered by the user is displayed, followed by new lines and then the message seeking confirmation.
Basic Programming Constructs
Statements
A JavaScript program consists of one or more statements. Simply put, a statement is an instruction to the JavaScript engine to do something. Every statement ends with a semicolon (;). For example, here are a couple of statements:
document.write("Hello World!");
var textbox = document.getElementById("TextBox1");
The first statement uses the write() method of the document object to output a string: Hello World! The second statement declares a variable named textbox and stores a reference to the TextBox1 DOM element in it.
Comments
Comments are used to add explanatory text to your program. As a good developer, you should place comments in your code so that you and fellow developers can understand the code at some later stage. JavaScript has two types of comments: single line comments and block comments. The syntax for both of them is exactly the same as C# commenting syntax. The following example makes it clear:
// this is a single line comment
/*
This is a block comment That can span multiple lines */
Keep in mind that JavaScript code gets downloaded from the web server to the client browser. Every line of comment that you add to the code also adds to the overall network bandwidth, so you should use ASP.NET’s “minification” feature to strip away comments to make the resulting code compact and tidy. Of course, during development you can place comments as required to ease the overall debugging experience and apply minification to the release version of the JavaScript code.
Note
■
Minification
of JavaScript involves many steps, including removal of white spaces, new line characters,
comments, and so on. Of course, the minification process preserves the original functionality of the code.
Built-in Functions
Earlier in this chapter, you created a function called confirmName(). This was a developer defined function. JavaScript also has several built-in functions that you can use in your code. Just like any .NET Framework method, a JavaScript function encapsulates certain functionality so you need not rewrite it. For example, the confirmName() function that you created earlier uses a built-in function, confirm(), which displays a developer defined message to the end user and seeks confirmation in the form of OK and Cancel. Two more JavaScript functions that you will find yourself using often are alert() and prompt().
Let’s modify the confirmName() function to use these two functions. Listing 1-5 shows the modified
Listing 1-5. Using alert() and prompt()
function confirmName() {
var textbox = document.getElementById("TextBox1"); alert("You will now be asked to enter your name.");
var enteredName = prompt("Please enter your name below:", "name goes here..."); var flag = confirm("You entered : " + enteredName + "\n\nDo you wish to continue?"); if (flag) {
textbox.value = enteredName; return true;
} else {
return false; }
}
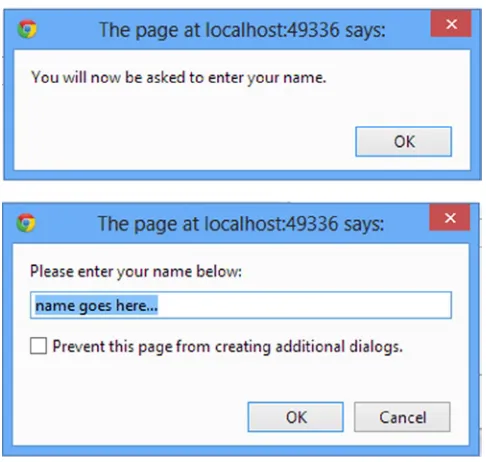
Notice the lines marked in bold. The first line uses alert() to display a message box to the user with a specified text. The alert dialog has an OK button. The second line uses the prompt() function to prompt the user to enter a name. The prompt() function displays a dialog with a text box and has OK and Cancel buttons. The two parameters supplied to prompt() are the prompt text and a default value for the text box. Figure 1-4 shows how these two dialogs are displayed in Chrome.
Figure 1-4. The alert() and prompt() functions displayed in Chrome
Notice that the prompt dialog displays a default value in the text box. Once the user clicks OK, the prompt()
function returns the entered value (or the default value if the user didn’t make any changes). If the user clicks Cancel,
Tip
■
JavaScript contains many built-in objects and functions. This section merely touches on a few of them. As you
continue through the book, you will come across other built-in functions that will be discussed.
Data Types
Unlike .NET languages such as C# and Visual Basic, JavaScript doesn’t offer a plethora of data types. Broadly speaking, data involved in JavaScript can be of the string, number, Boolean, and object data types.
String
The string data type is used often in JavaScript programs. JavaScript strings are enclosed in either double quotes (“...”) or single quotes ('...'). This is unlike C#, in which strings are always enclosed in double quotes, and a character is enclosed in single quotes. A string enclosed in quotes can include quotes as part of the string data. However, you need to use the escape character (\) to embed quotes into a string. The following are a few examples of JavaScript strings:
"Hello World!" 'Hello Universe!' "Hello 'Tom'" 'Hello "Jerry"'
"Hello \"Tom & Jerry\""
The first two examples are quite straightforward. The third string embeds single quotes inside a double quote, and the third string embeds double quotes inside single quotes. Although this process doesn’t create any problem for the code, if you want to embed double quotes in a string that uses double quotes as the enclosure, you need to escape the embedded double-quote characters (as shown in the last example). The same principle applies to single-quote characters embedded in a string enclosed by single quotes.
Number
Just like C#, you can use numbers in JavaScript. Unlike C#, in which there are different data types such as int, float, decimal, and double to represent a number, JavaScript treats all types of numeric values as numbers. A number can be an integer or a floating point number, and it can be positive or negative. Unlike strings, numbers don’t use enclosures. Following are a few examples of JavaScript numbers:
100 1.23 -200
Boolean
Object
In addition to the string, number, and Boolean data types, JavaScript code often uses objects. An object can be built-in or developer defined. For example, while working with dates and times, you use the JavaScript Date object. While making Ajax calls to the server you often send and receive data as a custom object. These are developer defined objects and are often referred to as JavaScript Object Literals or plain objects.
Variables
In .NET languages such as C#, you normally declare a variable of a specific data type to store some value. For example, a variable of type int is declared in C# as follows:
int a = 100;
Unlike C#, JavaScript doesn’t allow you to declare a variable with a specific data type; it has the keyword var for declaring any type of variable. Depending on whether you store a string, a number, or a Boolean value in the variable, it is treated as a string, a number, or a Boolean. Consider the following variables:
var name = "Tom"; var age = 25; var flag = true;
In the preceding example, name is a string variable, age is a numeric variable, and flag is a Boolean variable. It is not necessary to assign a value to a variable at the time of declaring it. If no value is assigned to a variable, it is treated as undefined. Have a look at the following code fragment:
var myvariable;
alert(typeof myvariable); myvariable = "Tom"; alert(typeof myvariable); myvariable = 100;
alert(typeof myvariable);
The first line of the code block declares a variable named myvariable. It then uses alert() and the typeof
operator to display the type of the variable. Because myvariable is not yet assigned, the first alert() displays ‘undefined’. Then the code assigns a string "Tom" to myvariable, and the second alert() displays the type of
myvariable as ‘string’. Then a value of 100 is assigned to myvariable, and the third alert() displays the type of
myvariable as ‘number’. Notice that the same variable is treated first as a string and then as a number, depending on the value it holds.
Caution
Although you can name your JavaScript variables anything you want, the names you choose must adhere to the following basic rules:
Just like C#, JavaScript variable names are case sensitive (e.g.,
• FNAME and fname are treated as
different variables).
Variable names can contain only letters, numbers, _, and $ (e.g.,
• age, _fname, $age2),
Variable names must begin with a letter, _, or $ (e.g.,
• 123age is an invalid variable name).
Caution
■
It is important that you give readable and meaningful names to JavaScript variables; otherwise, your code
may become difficult to understand. Also, use a consistent naming convention for your variables throughout the application.
Arrays
JavaScript arrays allow you to store multiple values together in the form of a list. An array consists of zero or more items called elements. Each element is capable of storing a value. An array element can be accessed by its sequence number, called the array index, which starts from 0 (the first element can be accessed at index 0, the second at index 1, and so on). The total number of elements in an array is referred to as its length or size. Although JavaScript arrays are similar to C# arrays in many ways, C# arrays are fixed in size, and you can’t add or remove array elements dynamically. JavaScript allows you to add or remove elements even after an array is declared, dynamically changing its size.
Arrays come in handy when you are dealing with too many variables that are related. For example, suppose that you are dealing with a calendaring application that deals with month names. One option is to declare 12 independent variables to hold the month names (January, February, and so on). Although this is possible, doing so makes your code difficult because you need to track 12 different variables. Alternatively you can declare an array and store all 12 month names in it. Another example is when you don’t know the number of variables in advance. In such cases, arrays can be useful because you can dynamically add data to them.
To understand how arrays are created and used, let’s develop a simple Web Form (see Figure 1-5).
As shown in Figure 1-5, the Web Form consists of a text box and three button controls. Clicking the Store button stores the value specified in the text box into an array. The text box serves two purposes: it specifies a string that gets stored in the array and specifies an array index while retrieving an array element. Clicking the Remove button removes the last array element (the array gets truncated from the bottom, one element at a time). Clicking the Retrieve button retrieves an array element whose index is specified in the text box. At the bottom of the Web Form is a Label control that displays the total number of elements in the array at a given point in time. Listing 1-6 shows the relevant markup from the Web Form.
Listing 1-6. Markup of Web Form Dealing with Arrays
<form id="form1" runat="server">
<asp:TextBox ID="TextBox1" runat="server" Width="235px"></asp:TextBox> <br />
<br />
<asp:Button ID="Button1" runat="server" OnClientClick="return storeData();" Text="Store" Width="75px" /> <asp:Button ID="Button2" runat="server" OnClientClick="return retrieveData();" Text="Retrieve" Width="75px" />
<asp:Button ID="Button4" runat="server" OnClientClick="return removeData();" Text="Remove" Width="75px" />
<br /> <br />
<asp:Label ID="Label1" runat="server" Font-Bold="True" ForeColor="Red"></asp:Label> </form>
Notice the OnClientClick property of the button controls. It is set to call the storeData(), retrieveData(), and
removeData() JavaScript functions, respectively. These three functions go in a <script> block placed in the head section of the Web Form (see Listing 1-7).
Listing 1-7. Declaring and Manipulating an Array
var myData = ["This","is","Array"];
function storeData() {
var data = document.getElementById("TextBox1").value; myData.push(data);
document.getElementById("Label1").innerHTML = "Array contains " + myData.length + " elements"; return false;
}
function retrieveData() {
var index = document.getElementById("TextBox1").value; alert(myData[index]);
return false; }
function removeData() { myData.pop();
document.getElementById("Label1").innerHTML = "Array contains " + myData.length + " elements"; return false;
The code begins by declaring an array variable named myData. Notice how myData is initialized to some default values. You use [ and ] to enclose all the initial elements that go in the array. In this case, you store three string elements: This, is, and Array, respectively. If you want to create an empty array, you can use [] (square brackets without any default values). There is an alternative syntax for declaring an array:
var myData = new Array("This","is","Array");
This line does the same thing as before, but uses an Array object and its constructor to specify initial elements. The myData variable is declared globally because you need to access it in all three functions.
Tip
■
For the sake of simplicity, this example doesn’t perform any checks to see whether the array indexes are within
permissible values. In a real-world application, of course, you will add such checks and associated error handling.
The storeData() function stores user-specified values in the myData array. It first grabs the value entered by the user into the text box using the getElementById() method and value property. It then calls the push() method on the array. The push() method accepts a new element and adds it at the bottom of the array. Notice how the number of elements in the array is displayed. The length property of myData returns the total number of elements in the array. You then display this count in the Label. To set the Label value, use the innerHTML property of the Label1 DOM element.
The retrieveData() function retrieves an array element based on an index entered in the text box. First, it grabs the index entered in the text box and stores it in a variable named index. It then retrieves an array element at that index using the myData[index] syntax. So, if a user enters 2 in the text box, myData[2] returns the third element from the array. The array element thus retrieved is displayed to the user using an alert().
The removeData() function calls the pop() method on myData. The pop() method removes the last element from the array. In other words, it truncates the array one element at a time. removeData() then displays the total number of array elements again.
All three functions—storeData(), retrieveData(), and removeData()—return false because you don’t want to submit the form in this example.
Tip
■
The
unshift()and
shift()methods are similar to
push()and
pop(). The
unshift()method adds an array
element at the beginning of the array, and the
shift()method removes an element from the beginning.
Conditional Checking
One of the most frequently needed tasks in a JavaScript program is checking for some condition. For example, you may want to see whether values entered in various form controls have the appropriate format (valid e-mail, URLs, phone numbers, and so on) so you can proceed with or cancel the form submission. Just like C#, JavaScript has an if-else construct to check for conditions. The following code fragment shows a simple if-else block:
var textbox = document.getElementById("TextBox1"); if (textbox.value == "Blue")
{
//display something in blue color }
else {
The code consists of an if-else block that checks a value entered in a text box for some condition. The if keyword is followed by a condition in brackets. In this case, the condition says “If the textbox value is equal to Blue, perform some developer defined task”. You can have multiple conditions in the if block, as shown here:
if(textbox.value == "Blue" || textbox.value == "Red") {
//do something }
This example uses the OR operator (||). Other operators are summarized in Table 1-1.
Table 1-1. Comparison Operators
Operator
Name
Description
== Equal to Compares two values for equality.
!= Not equal to Checks whether two values are not the same.
> Greater than Checks whether the value on the left side is greater than the value on the right side.
< Less than Checks whether the value on the left side is less than the value on the right side.
>= Greater than or equal to Checks whether the value on the left is greater than or equal to the value on the right side.
<= Less than or equal to Checks whether the value on the left side is less than or equal to the value on the right side.
=== Strict equal to Checks the left side and right sides not only for equality of value but also for equality of data type. For example, if(3==“3”) evaluates to true because the value is the same. However, if(3===“3”) evaluates to false because although the values are the same, their data types aren’t. The left side is a number; the right side is a string.
!== Strict not equal to Compares values as well as data types of the left and right sides for inequality. For example, if(3!= “3”) evaluates to false, and if(3!== “3”) evaluates to true because of different data types.
Notice the Strict equal to and Strict not equal to operators shown in Table 1-1. They don’t have any direct equivalent in C#. Although the normal Equal to and Not equal to operators compare values, these operators compare data types as well as values.
The else block specifies a piece of code that you want to execute if the condition specified in the if block evaluates to false. You can have a series of conditions specified using if-else if-else blocks, as shown here:
if (textbox.value == "Blue") {
else if (textbox.value == "Red")
In this case, you first check whether the textbox value is Blue; if not, you then check whether it is Red, and so on. If none of the conditions matches, the code in the else block is executed.
Although a series of if-else if-else blocks is a great way to check for multiple conditions in sequence, there is an alternative that you can use: the switch statement. It allows you to compare a source value against a series of target values and then a block of code is executed according to the matched value. You can use string, number, or Boolean types in switch statements, but they always check the values using the equality operator. The following example shows how the same if-else if-else block can be rewritten using a switch statement:
switch(textbox.value)
A switch statement has one or more case blocks and an optional default block. Each case block contains code for that specific value (Blue, Red, and so on). The previous code checks whether the value entered in the textbox equals Blue, Red, or Green. Accordingly, the appropriate code block is executed.
If the value is other than Blue, Red, or Green, code from the default block is executed. Notice the break
statement at the end of each case block. If you forget to include the break statement, the execution runs through that block, but instead of halting before the next case, it continues with the following case until a break is found or until the end of the switch statement is reached.
Looping
JavaScript programs often need to perform repetitive tasks, which is where looping comes into the picture. JavaScript looping constructs allow you to execute the same set of instructions repeatedly until some condition evaluates to true. There are three looping constructs in JavaScript:
while loop
do-while loop
•
for loop
•
A while loop executes a block of code as long as a certain condition evaluates to true. For example, consider the following while loop that iterates through all the array elements of an array named myData:
var i = 0;
while (i < myData.length) { //do something here i++;
}
Here, you declare a variable named i that holds an initial value of 0. You then run a while loop. The terminating condition for the while loop says, “Run this loop while i is less than the length of the myData array. Thus, if myData
contains three elements, the code inside the while loop is executed three times. It is important to increment the value of i inside the while loop; otherwise, the while loop never terminates. Just like an if block, the while loop can also use multiple conditions and the same set of operators.
In the case of a while loop, the terminating condition is checked first, and depending on its outcome, the loop is entered. There is another flavor of looping (do-while) that checks for the terminating condition after executing the block of statements. So unlike the while loop, a while loop runs at least once. The following code shows how a do-while loop can be used:
do {
//some code here i++;
} while (i < myData.length);
The block following the do keyword defines one or more code statements, and the while condition is placed at the end.
The third type of looping construct, the for loop, comes in handy for iterating through an array or collection where index is relevant in the code. It requires an iterator variable that increments or decrements from a start value to an end value. The statements enclosed within a for loop are executed that many times (the difference between the start and end values). The following example shows how a for loop can be used to iterate through a myData array:
for ( var i = 0 ; i < myData.length ; i ++) {
// do something }
The for loop specifies three parts, separated by a semicolon (;). The first part declares an iterator variable i that has an initial value of 0. The second part specifies the terminating condition. In this case, as long as the value of i is less than the total number of elements in myData, the code is executed. The third part increments (or decrements) the iterator variable by a certain amount. In this case, it increments i by one after every iteration.
Working with Strings
Finding String Length
Sometimes you need to find out the length of a string. For example, you might have a user registration page and want to ensure that the first name, last name, username, and password all meet certain requirements of minimum and maximum length. In such cases, knowing how many characters a string contains becomes necessary. The length
property of a String object allows you to do just that. The following example shows how the length property is used:
var firstName = document.getElementById("txtFirstName").value; if ( firstName.length < 3 || firstName.length > 50 )
{
alert("Invalid First Name! "); }
This code retrieves the value entered in the txtFirstName text box and stores it in a variable: firstName. Because you store a string value in the firstName variable, you can call any of the String object methods and properties on it. In this case, an if statement is used to check the length property of firstName. If the length is fewer than 3 characters or more than 50 characters, an error message is shown using an alert dialog.
Finding a String within Another String
Sometimes you need to search for a string within another string. For example, you may want to find out whether an e-mail address contains an @ character or whether a URL contains www. JavaScript offers two methods that can be used in such situations: indexOf() and lastIndexOf(). The indexOf() method accepts a string to be searched within another string and then returns the start position of the first occurrence of that string. The position starts from 0. The
lastIndexOf() method is similar to indexOf(), but it searches for the last occurrence of a given string. Both these methods return -1 if the specified string cannot be found. The following code shows how they are used:
var url="http://www.somewebsite.com"; var result=url.indexOf("www"); alert(result);
result = url.lastIndexOf("."); alert(result);
The first line of the code creates a variable named url and stores a URL string in it. The indexOf() method is then called on the url variable for searching www. The return value of indexOf() is stored in the variable. An alert()
displays the result to the user. In this example, indexOf() returns 7 because www begins at the seventh position (positioning starts from 0).
Next, the lastIndexOf() method is called on the url variable to find out the last occurrence of a dot. In this case, the result is 22 because the last dot is found just before com.
Extracting Part of a String
JavaScript provides two ways to extract a portion of a string: substr() and substring(). The substr() method accepts two parameters: the start index within the string where the extraction should begin (again, counting from 0 for the first character) and the total number of characters to be extracted. If the second parameter is omitted, the rest of the string is extracted. The substring() method is similar, but with a minor difference. The second parameter of substring()specifies the end index (not the length) before which the extraction should stop. The following code shows how these methods are used:
alert(result);
result = data.substring(1,7); alert(result);
The first line of this code declares a data variable and stores a string (hello world) into it. It then calls the
substr() method. The start index is specified as 1, and the number of characters to extract is mentioned as 3. Thus, the first alert() outputs ell.
The code then proceeds to call the substring() method on the data variable. The first parameter of substring()
is the start index, and the second parameter is the end index. In this case, substring() returns hello w. Notice that at the seventh position is the letter o (from world) and it is excluded from the extraction.
Replacing Part of a String
Sometimes you need to look for a string within another string and then replace that string with something else. JavaScript provides the replace() method to do just that. The replace() method takes two parameters. The first parameter indicates a string that is to be searched, and the second parameter indicates a string that is to be substituted in place of the first string. If there are multiple occurrences of a search string, only the first occurrence is substituted. The following code shows how the replace() method can be used:
var data = "hello world";
var result = data.replace("world", "universe"); alert(result);
The first line of the code declares the data variable and stores hello world into it. It then calls the replace()
method on the data variable with an intention to replace world with universe. The replace() method returns the substituted string as a new string that is displayed using alert(). In this example, the result is hello universe.
Getting an Array from a String
Sometimes you need to convert a comma or | delimited string into an array. You can, of course, use string
manipulation functions discussed so far to devise such a mechanism, but that’s too much work. Luckily, JavaScript offers the split() method that does this job for you. The split() method accepts a delimiter character or string as a parameter and then returns an array by splitting the string at all the occurrences of the delimiter. split() can also accept an optional second parameter that controls the maximum number of elements in the array. The following code shows how the split() method can be used:
var data = "blue,red,green,yellow";
Note
■
An array object has the
join()method that does the reverse of
split():it returns a string after joining all the
elements of the array with a specified separator.
Changing String Character Casing
The toUpperCase() and toLowerCase() String object methods allow you to convert character casing of a string to uppercase and lowercase, respectively. The following code fragment shows how they are used:
var data = "Hello World"; var result = data.toUpperCase(); alert(result);
result = data.toLowerCase(); alert(result);
The first line of the code creates a data variable and stores Hello World into it. Then the toUpperCase() method is called on data, and the uppercase string returned is stored in the result variable. The first alert() confirms that the string is indeed converted into uppercase and outputs HELLO WORLD. The toLowerCase() method is called on data, and the result is stored in the result variable. This time, the alert() displays hello world, which indicates that the string has been converted to lowercase characters.
Removing White Spaces from the Beginning and End of a String
Sometimes strings contain leading and trailing white spaces that are undesirable. For example, a user registration page might accept a first name from the end user, but that user might add leading or trailing white spaces to the name. While processing this data or sending it to the server, it is necessary to remove these white spaces, and the trim()
method allows you to do just that. The following code shows how trim() can be used:
var data = " Hello World "; var result = data.trim(); alert("'" + result + "'");
The data variable stores a string with leading and trailing white spaces. It then calls the trim() method on data
and stores the returned string in the result variable. The alert() function confirms that leading and trailing white spaces are indeed removed by the trim() method.
Working with Numbers
While working with JavaScript, you may need to deal with numeric data. Unlike string data, which “just works” in almost all cases, dealing with numbers can be a bit tricky and prone to errors (for example, if you accept numeric data in a text box, and a user enters a string instead of a number). There can also be calculation-related errors such as dividing by zero. Additionally, you may want to convert numbers to some fixed format (currency, for example) for the sake of displaying it on the page.
Converting a String into a Number
You often accept numeric data as string values. For example, you may accept information such as a user’s age and salary in text boxes. Any value entered in a text box is essentially a string, and you may want to convert it into a number before processing it any further. What happens if such a conversion is not done? Have a look at the following code that illustrates this:
var val1 = document.getElementById("TextBox1").value; var val2 = document.getElementById("TextBox2").value; alert(val1 + val2);
The first two lines of the code grab values entered in two text boxes—TextBox1 and TextBox2—and store them in variables val1 and val2 respectively. The alert() outputs the addition of val1 and val2. If you enter numbers, say 10 and 20, into the text boxes, you probably expect the alert() to show you 30. But because anything entered in a text box is a string, val1 and val2 are treated as string variables, and (val1 + val2) returns 1020!
To convert a string into a number, JavaScript offers three useful functions: Number(), parseInt(), and
parseFloat(). The Number() function accepts a value and returns a number after converting the value into a number. If for some reason the Number() fails to convert the value into a number, it returns a special value NaN, which stands for “not a number.” Number() deals with integers as well as floating point numbers. The following code shows how the
Number() function can be used:
var val1 = Number(document.getElementById("TextBox1").value); var val2 = Number(document.getElementById("TextBox2").value); alert(val1 + val2);
In the code, the Number() function is used to convert the values entered in TextBox1 and TextBox2 into the corresponding numbers. Assuming that you entered 10 and 20 in these text boxes, this time the alert() correctly outputs 30.
The Number() function works great if the source value contains a string representation of only the number under consideration. Sometimes a number may accompany some text. For example, in a salary text box, the user may enter “5000 dollars per month” instead of just 5000. In this case, Number() will fail to convert the number because the numeric data has some text appended to it. That is where parseInt() and parseFloat() come into the picture. These functions parse a string and return an integer or floating point number, respectively. The following code shows how they are used:
var val1 = parseInt(document.getElementById("TextBox1").value); var val2 = parseFloat(document.getElementById("TextBox2").value); alert("Age : " + val1);
alert("Salary : " + val2);
The code assumes that TextBox1 is intended to specify age, and TextBox2 is used to specify salary. Age being an integer value, the first line calls the parseInt() method to parse the value entered in TextBox1. The second line uses parseFloat() because salary can be a floating point number. If you enter age as “25 years” and salary as “5000 dollars” in the text boxes, the alerts show 25 and 5000, respectively.
As mentioned earlier, if conversion from a string to a number fails for any reason, the result is NaN. To check whether a value is NaN, JavaScript provides the isNaN() function. The following code shows how isNaN() can be used:
if (!isNaN(val1) && !isNaN(val2)) { var result = val1 + val2;
The code uses the isNaN() function to check whether val1 and val2 are valid numbers. If so, it adds val1 and
val2 and displays the result.
Deciding the Number of Digits after the Decimal Point
When you work with currencies, a common task is to convert numbers into a string maintaining a specified number of digits after the decimal point. The resulting value is often used for onscreen display purposes. You can use the toFixed()
method to accomplish this task. The toFixed() method accepts a number indicating the number of decimals and returns a string representation of the number. Consider the following piece of code that shows how toFixed() is used:
var salary = 20000.12345; var amount = salary.toFixed(2); alert(amount);
The code stores a floating point number with five decimal places in the salary variable. The toFixed() method is called on the salary variable by passing a value of 2. This indicates that you intend to convert the salary value to a two-decimal number. The alert() shows 20000.12 as its output.
Determining the Total Number of Digits in a Number
Although the toFixed() method deals with decimal places, there is another method, toPrecision(), that deals with the total number of digits in a number. The toPrecision() method accepts the total number of digits in a number and converts a number into a string with that much length. The following code shows how toPrecision() works:
var salary = 20000.12345;
var amount = salary.toPrecision(6); alert(amount);
The first line of code stores 20000.12345 in the salary variable. The second line calls the toPrecision() method and specifies 6 as the total number of digits in the resulting value. In this case, the amount variable will be 20000.1, as outputted by alert().
Note
■
You can also use the
toString()method on a number to convert it into a string. However, in most of the cases
in which a number is concatenated with string data, calling
toString()explicitly is not needed.
Working with Dates and Times
JavaScript offers the Date object to work with dates and times. JavaScript dates are counted as the number of milliseconds since midnight on January 1, 1970. The Date object has many methods that allow you to access various parts of a date such as year, month, day, and hour. You can create Date objects in several ways, as shown here:
var dt1 = new Date();
var dt2 = new Date(2013, 3, 15);
The first line creates a Date object that represents the current date and time. You can create a Date object that represents a specific date and time by passing parameters to the Date constructor, as shown in the next two lines. The second line creates a Date object by passing a year, month, and date. Month numbers start from 0 (January is 0, February is 1, and December is 11). Date values are between 1 and 31. So the second line of code represents April 15, 2013. On the same lines, hours take values between 0 and 23, minutes between 0 and 59, and seconds between 0 and 59. Thus, the third Date object represents February 20, 2013 at 10:29:00 a.m. Table 1-2 lists some of the most commonly used Date object methods.
Table 1-2. Date Object Methods
Method
Description
getFullYear() Returns a full year from a Date object (e.g., 2013).
setFullYear(val) Sets the year of a Date object.
getMonth() Returns the month from a Date object. Month values are between 0 and 11 (January is 0, and December is 11).
setMonth(val) Sets the month in a Date object.
getDate() Returns the day of the month from a Date object. Date values are between 1 and 31.
setDate(val) Sets the day of the month in a Date object.
getDay() Returns the day of the week from a Date object. Weekday values are between 0 and 6, 0 being Sunday and 6 being Saturday.
setDay(val) Sets the weekday of a Date object.
getHours() Returns the number of hours from a Date object. Hour values are between 0 and 23.
setHours(val) Sets the number of hours of a Date object.
getMinutes() Returns the number of minutes from a Date object. Minute values are between 0 and 59.
setMinutes(val) Sets the number of minutes of a Date object.
getSeconds() Returns the number of seconds from a Date object. Second values are between 0 and 59.
setSeconds(val) Sets the number of seconds of a Date object.
getTime() Returns the total number of milliseconds since midnight on January 1, 1970.
toString() Returns the string representation of a Date object that includes date, time, and time zone information (e.g., Mon Apr 15 2013 10:29:00 GMT+0530 [Indian Standard Time]).
toDateString() Returns just the date part of a Date object as a string (e.g., Mon Apr 15 2013).
toTimeString() Returns just the time part of a Date object as a string (e.g., 10:29:00 GMT+0530 [Indian Standard Time]).
The following code illustrates how some of the methods listed in Table 1-2 are used:
var dt = new Date();
alert(dt.getDate() + " - " + (dt.getMonth() + 1) + " - " + dt.getFullYear()); dt.setFullYear(2010);
dt.setMonth(3); dt.setDate(10);
The first line of code creates a new Date object that holds the current date and time. The second line calls the
getDate(), getMonth(), and getFullYear() methods and displays the date in the dd-MM-yyyy format using alert(). The getMonth() and getDate() methods return integers and can be single digit or two digits depending on the month and day number. The code then sets year, month, and date of the same Date object using the setFullYear(),
setMonth(), and setDate() methods. The toDateString() method then outputs the new Date using an alert(). In this case, the new date is outputted as Sat Apr 10 2010.
Many times you need to convert a string into a Date object. For example, you might accept a date from the end user in dd-MM-yyyy format and then want to convert it into a Date object for further processing. Here’s a simple way to do this:
var str = "30/12/2013"; var dtArray = str.split("/");
var dt = new Date(dtArray[2],dtArray[1]-1,dtArray[0]); alert(dt.toDateString());
The first line of code stores a date in a dd-MM-yyyy format str variable. It then uses the split() method to split the date string and retrieve an array. It constructs a Date object by passing the appropriate elements of the array. Notice that the second parameter of the Date object is reduced by one because month values are between 0 and 11. Finally, toDateString() displays the string representation of the date as Mon Dec 30 2013.
Writing Functions
In the preceding sections, you created simple custom functions. A JavaScript program can consist of dozens of functions, which provide a way to reuse your code across the application. A JavaScript function is similar to a C# method in that it allows you to reuse your code easily. However, unlike C#, in which methods always belong to a class, a JavaScript function is just a stand-alone piece of code that you create for convenience and to promote reuse. The general syntax of a JavaScript function is as follows:
function function_name([parameter list]) {
//code goes here
//optionally return some value return <return_value>;
}
A function definition begins with the function keyword followed by a function name. A function may or may not have parameters. If a function takes some parameters, a comma separated list of parameters is placed inside the round brackets ( and ). Otherwise, an empty () is placed. A function may or may not return a value. If a function returns a value, the return value is passed from the function to the calling code using a return statement.
The Web Form consists of a text box and a button. The user enters a temperature value in the text box and clicks the Convert to Fahrenheit button. Doing so displays the result of conversion in an alert box.
Begin by creating a new ASP.NET web site and add a Web Form to it. Drag and drop a TextBox server control and a button control on it, and design the Web Form as shown in Figure 1-6. Set the Text property of the button to Convert to Fahrenheit and the OnClientClick property of the button control to return calculate();. Listing 1-8 shows the relevant markup of the Web Form.
Listing 1-8. Markup of Web Form Converting Celsius to Fahrenheit
<form id="form1" runat="server">
<asp:Label ID="Label1" runat="server" Text="Enter temperature value in Celsius :"></asp:Label> <br /><br />
<asp:TextBox ID="TextBox1" runat="server" Width="136px"></asp:TextBox> <br /><br />
<asp:Button ID="Button1" runat="server" OnClientClick="return calculate();" Text="Convert to Fahrenheit" />
</form>
Once the Web Form is ready with the text box and the button, add a <script> block in the head section of the Web Form and write the two functions shown in Listing 1-9.
Listing 1-9. calculate() and celsiusToFahrenheit() Functions
<script type="text/javascript"> function calculate() {
var result = celsiusToFahrenheit();
alert("Result = " + result + " degrees Fahrenheit"); return false;
}
function celsiusToFahrenheit() {
var textbox = document.getElementById("TextBox1"); var celsius = textbox.value;
return fahrenheit; }
</script>
The calculate() function declares a variable named result and stores the return value of the
celsiusToFahrenheit() function in it. The celsiusToFahrenheit() function is another custom function that is shown below the calculate() function. The value returned in the result variable is then displayed to the user using
alert(). The calculate() function returns false to cancel the form submission to the server.
The celsiusToFahrenheit() function gets a reference to the text box DOM object using the getElementById()
method. It then stores the value entered in the text box in the celsius variable. It then converts this Celsius value into Fahrenheit using a formula. The result of the formula is stored in the fahrenheit variable. Finally, the value of the
fahrenheit variable is returned to the caller.
Run the Web Form, enter a temperature value in the text box and click the Convert to Fahrenheit button. You should see an alert box with the converted value. Figure 1-7 shows a sample run of the Web Form.
Figure 1-7. Temperature conversion in action
As you can see, the text box has a value of 100. This value in Celsius is converted to 212 degrees Fahrenheit and displayed to the user.
Now let’s try to improve the code written in the preceding example so that it becomes more independent and reusable. In the preceding example, the celsiusToFahrenheit() function grabbed the value entered in the text box. To make the celsiusToFahrenheit() function more independent of the Web Form and its controls, it is better if
need not include any code to extract the temperature values from the form controls; it can come from form controls, or you can supply it programmatically. To do this, modify the calculate() and celsiusToFahrenheit() functions as shown in Listing 1-10.
Listing 1-10. CelsiusToFahrenheit() Now Accepts a Parameter
function calculate() {
var textbox = document.getElementById("TextBox1"); var result = celsiusToFahrenheit(textbox.value); alert("Result = " + result + " degrees Fahrenheit"); return false;
The calculate() function now grabs a reference to the text box using the getElementById() method. It then passes textbox.value to the celsiusToFahrenheit() function. Notice the new signature of celsiusToFahrenheit(): it now accepts one parameter named celsius. Inside, it uses the parameter value to calculate the temperature in Fahrenheit.
In its current form, celsiusToFahrenheit() can be used only to convert temperatures from Celsius to Fahrenheit. What if you also need to convert Fahrenheit to Celsius? Wouldn’t it be nice to have a function that does both types of conversion? Let’s code such a function and use it in place of celsiusToFahrenheit(). Listing 1-11 shows such a function.
The convertTemperature() function accepts two parameters: value and scale. The value parameter indicates the temperature value to be converted; the scale parameter indicates whether the value is in Celsius ("C") or Fahrenheit ("F"). Inside, the function has an if-else if-else statement to check the scale of the value. If the scale is passed as "C", it converts the value into Fahrenheit; if the scale is passed as "F", it converts the value into Celsius. The converted value is stored in a variable named convertedValue. If anything else is passed as the scale parameter, it stores NaN in convertedValue, indicating an error. You can call the convertTemperature() function from the
calculate() function or from any other part of the Web Form like this:
It is possible to invoke a JavaScript function that accepts parameters without supplying one or more parameter values. for example, you could have called convertTemperature(), as shown here:
var result = convertTemperature(100);
What happens in such cases? What value is assumed for the missing parameters? It is important to remember that such a call is perfectly valid and in the preceding example you would have received -1 as the result because the if-else if block would have been skipped.
Sometimes you want to find out from within the function body whether a particular parameter has been supplied. When you don’t supply a parameter while calling a function, its value is undefined, and you can check the value of a parameter as shown in Listing 1-12.
Listing 1-12. Checking for Missing Parameters
function convertTemperature(value, scale) { if (typeof scale == "undefined") { scale = "C";
In its modified form, convertTemperature() checks the scale parameter against undefined using the typeof
keyword. If a parameter is not supplied, it is undefined and you can set its value to be "C". This time, calling
convertTemperature() with just the first parameter returns 212 because the scale is assumed to be Celsius.
Tip
■
There are several ways to determine whether all the function parameters have been supplied. The example
shown here is one common approach.
Writing JavaScript Code in a Separate File
So far in this chapter, you wrote JavaScript code right into the Web Form .aspx file. Although this approach is common practice and serves the purpose, there are a few shortcomings, as follows:
As your JavaScript code grows, placing a huge amount of JavaScript in a web page hampers
•
the readability of the web page markup due to a lack of separation between page markup and JavaScript code.
A piece of JavaScript code placed inside a web page can be used only by that web page, not by
•
If the web page and JavaScript code are being developed by two different developers, merging
•
them in a single page and dealing with future modifications can be difficult.
Putting JavaScript code in a separate file also enables the browser to cache the script file so
•
that the same file need not be downloaded again for other pages that need it.
It is recommended to place your JavaScript code in a separate file if it grows to a considerable size. To do so, you can add a new JavaScript file to a project using the Add New Item dialog of Visual Studio (see Figure 1-8).
Figure 1-8. Adding a new JavaScript file to an ASP.NET project
The dialog shows a new file being added named JavaScript1.js. Once you add a JavaScript file, you can write all the code inside the file. Remember not to include the <script> blocks inside the file. How do you use the code from a JavaScript file into your web page? You need to use a <script> tag that points to the JavaScript file like this:
<script src = "JavaScript.js" type="text/javascript"></script>
In this example, a web page contains a <script> tag in the <head> section, and its src attribute is pointing to the JavaScript file. The type attribute is used to identify the scripting language used inside the script and is specified as the MIME type. Some possible values include text/javascript (JavaScript) and text/ecmascript (ECMA script). If you don’t include the type attribute, by default script is assumed to be JavaScript. Just like a <script> block, a script
reference usually appears in the <head> section. After referencing a JavaScript file, you can use any of the code inside the file as if it were in the same page.