Introducing
Introducing
ZBrush
®
E R I C K E L L E R
P r o d u c t i o n E d i t o r : Rachel Gunn
Copyright © 2008 by Wiley Publishing, Inc., Indianapolis, Indiana Published simultaneously in Canada
ISBN: 978-0-470-26279-5
No part of this publication may be reproduced, stored in a retrieval system or transmitted in any form or by any means, electronic, mechanical, photocopying, recording, scanning or otherwise, except as permitted under Sections 107 or 108 of the 1976 United States Copyright Act, without either the prior written permission of the Publisher, or authorization through payment of the appropriate per-copy fee to the Copyright Clearance Center, 222 Rosewood Drive, Danvers, MA 01923, (978) 750-8400, fax (978) 646-8600. Requests to the Publisher for permission should be addressed to the Legal Department, Wiley Publishing, Inc., 10475 Crosspoint Blvd., Indianapolis, IN 46256, (317) 572-3447, fax (317) 572-4355, or online at http://www.wiley.com/go/permissions.
Limit of Liability/Disclaimer of Warranty: The publisher and the author make no representations or warranties with respect to the accu-racy or completeness of the contents of this work and specifically disclaim all warranties, including without limitation warranties of fitness for a particular purpose. No warranty may be created or extended by sales or promotional materials. The advice and strategies contained herein may not be suitable for every situation. This work is sold with the understanding that the publisher is not engaged in rendering legal, accounting, or other professional services. If professional assistance is required, the services of a competent professional person should be sought. Neither the publisher nor the author shall be liable for damages arising herefrom. The fact that an organization or Web-site is referred to in this work as a citation and/or a potential source of further information does not mean that the author or the publisher endorses the information the organization or Website may provide or recommendations it may make. Further, readers should be aware that Internet Websites listed in this work may have changed or disappeared between when this work was written and when it is read. For general information on our other products and services or to obtain technical support, please contact our Customer Care Depart-ment within the U.S. at (800) 762-2974, outside the U.S. at (317) 572-3993 or fax (317) 572-4002.
Wiley also publishes its books in a variety of electronic formats. Some content that appears in print may not be available in electronic books.
Library of Congress Cataloging-in-Publication Data Keller, Eric.
Introducing ZBrush / Eric Keller. p. cm.
ISBN 978-0-470-26279-5 (paper/dvd) 1. Computer graphics. 2. ZBrush. I. Title.
T385.K397827 2008 006.6—dc22
2008008346
TRADEMARKS: Wiley, the Wiley logo, and the Sybex logo are trademarks or registered trademarks of John Wiley & Sons, Inc. and/or its affiliates, in the United States and other countries, and may not be used without written permission. ZBrush is a registered trademark of Pixologic, Inc. All other trademarks are the property of their respective owners. Wiley Publishing, Inc., is not associated with any product or vendor mentioned in this book.
mium quality Sybex books, all written by outstanding authors who combine practical experience with a gift for teaching.
Sybex was founded in 1976. More than thirty years later, we’re still committed to producing consistently exceptional books. With each of our titles we’re working hard to set a new standard for the industry. From the authors we work with, to the paper we print on, our goal is to bring you the best books available.
I hope you see all that reflected in these pages. I’d be very interested to hear your com-ments and get your feedback on how we’re doing. Feel free to let me know what you think about this or any other Sybex book by sending me an email at [email protected], or if you think you’ve found a technical error in this book, please visit http://sybex.custhelp.com. Customer feedback is critical to our efforts at Sybex.
Best regards,
Neil Edde
I’d like
to thank the editors at Sybex and Wiley for helping make this book a possi-bility. In particular, thanks to Mariann Barsolo for her support. Thanks to Stephanie Bar-ton for her excellent editorial work. I’d also like to thank Gael McGill, my tech editor, for agreeing to much more than he anticipated. And thanks to all the folks on the book team who brought it all together: Rachel Gunn and Judy Flynn.■ Special thanks goes to theEric Keller
is a freelance animator working in Hollywood, California, at some of the finer design and effects studios. He got his start in the field of digital visual effects developing animations for scientific visualization at the prestigious Howard Hughes Medical Institute, where he had the opportunity to work with some of the world’s lead-ing researchers. He has been a professional 3D artist for 10 years and has been uslead-ing ZBrush since 2004. Along with molecular visualization, bacterial invasion, and cellular function, Eric has pitched in on numerous animations for film, commercials, and televi-sion. Eric used ZBrush to create the surrealistic intracellular environment sequence seen at the end of the feature film Invasion. He has also been a guest lecturer on animation and scientific visualization at Harvard Medical School. He has written articles and tuto-rials for numerous industry magazines and authored Maya Visual Effects: The Innova-tor’s Guide (Sybex, 2007).Introduction ■ xv
Chapter 1 ■ Pixels, Pixols, Polygons, and the Basics of Creating Digital Art 1
Chapter 2 ■ Facing the ZBrush Interface 21
Chapter 3 ■ Painting with Pixols, Part 1 71
Chapter 4 ■ Painting with Pixols, Part 2 105
Chapter 5 ■ Digital Sculpting 141
Chapter 6 ■ Advanced Sculpting Techniques 191
Chapter 7 ■ Color, Texture, and Alpha 251
Chapter 8 ■ Rendering, Lighting, and Materials 299
Chapter 9 ■ ZBrush with Other 3D Applications 349
Chapter 10 ■ Plug-ins and ZScripts 395
Appendix ■ About the Companion DVD 423
Introduction xv
Chapter 1 ■Pixels, Pixols, Polygons, and
the Basics of Creating Digital Art 1
An Introduction to ZBrush 2
Understanding Digital Images 4
Understanding Resolution 11
Understanding 3D Space 14
Resources 19
Chapter 2 ■Facing the ZBrush Interface 21
The Zen of ZBrush 22
Trays and Palettes 37
The Title Bar 66
Hotkeys 67
Summary 70
Chapter 3 ■Painting with Pixols, Part 1 71
Setting Up the Document 72
Working with Document Layers 79
Working with Parametric
Primitive 3D Tools 81
Loading Tutorial Macros 87
Working with Deformations
and Materials 89
Chapter 4 ■Painting with Pixols, Part 2 105
Introducing ZSpheres 106
Creating the Vent 113
Creating the Ocean Floor 119
Adding Fog and Distant
Background Elements 123
Creating a Sea Creature with 3D Tools 133
Merging Layers and Final Changes 137
Summary 139
Chapter 5 ■Digital Sculpting 141
Subdivision Levels 142
Sculpting Brushes 146
Creating Reference Planes 157
Roughing Out the Forms of the Skull 165
Creating a Turntable Movie 188
Summary 189
Chapter 6 ■Advanced Sculpting Techniques 191
Hiding Geometry 192
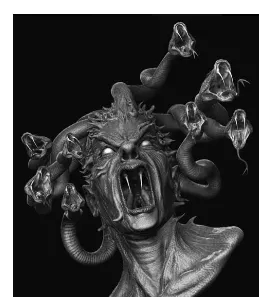
The Medusa Maquette 204
Finishing Touches 247
Summary 249
Chapter 7 ■Color, Texture, and Alpha 251
Understanding Color, Alpha, and Texture 252
3D Layers 258
Creating Tiling Alphas 263
Using the Stencil 268
Detailing the Medusa Maquette 272
Polypainting 291
Summary 298
Chapter 8 ■Rendering, Lighting, and Materials 299
Rendering Basics 300
Using Lights 306
Understanding Materials 318
ZBrush and Poser 355
Bump, Displacement, and Normal Maps 366
ZBrush and Maya 370
Summary 393
Chapter 10 ■Plug-ins and ZScripts 395
Projection Master 396
ZAppLink 404
Multi Displacement Exporter 407
Transpose Master 411
ZMapper 414
ZScripts 420
Summary 422
Appendix ■About the Companion DVD 423
What You’ll Find on the DVD 424
System Requirements 424
Using the DVD 425
Troubleshooting 425
ZBrush is
an easy program to use once you know how. Learning how to use it is the trick. The whole point of this book is to provide you with an engaging way to learn how the software works. The software can be a little difficult at first, and at times you may be frustrated. The good news is that with a little effort, practice, and patience, you’ll quickly learn all you need to know to start creating amazing digital sculptures and compositions. With many 3D packages, it seems like there is no end to the amount of information you need to absorb before you can create anything. With ZBrush, once you get a handle on the interface, you can get to work immediately; there’s only so much you need to learn. And just like riding a bike—once you figure out how not to fall over, you can spend your time enjoying yourself.ZBrush has introduced a unique approach to creating models on the computer. In fact, it is the first program to replace the concept of digital modeling with digital sculpting. This means that instead of the more tedious approach to modeling—where polygons are extruded, split, and sewn together—creating forms in ZBrush feels more like sculpting virtual clay. ZBrush began as a 2.5-dimensional paint program, but it quickly evolved into a 3D sculpt-ing tool. Many of the 2.5-dimensional paint features were adapted for use on 3D models, and thus a digital sculpting tool was born.
Along with sculpting, ZBrush offers an excellent way to paint colors and textures directly on a 3D model. The models and textures can be imported and exported from ZBrush for use in other 3D animation programs. This makes ZBrush extremely easy to incorporate into any digital modeling production pipeline.
ZBrush is not an animation tool, which is part of why there’s only so much you need to learn. Among the most common uses for ZBrush are creating digital characters and crea-tures for use in animation programs, enhancing digital models created in other animation programs, creating digital maquettes for conceptual development in production, and cre-ating illustrations and digital compositions.
Who Can Benefit from This Book
art software installed on your machine. Only Chapter 9 discusses using ZBrush with other software packages. The first chapter introduces basic computer graphic (CG) concepts that will help you understand the terminology used throughout the book. If you’ve never used a 3D modeling program before, you may have a slight advantage over those who have. ZBrush’s interface is very different from typical 3D programs, and this has been known to throw experienced modelers off. Either way, try to approach learning ZBrush with an open mind and see how far you can go.
If you are an experienced CG artist looking to incorporate ZBrush into your produc-tion pipeline, you will find that this book covers every essential aspect of working with ZBrush, including tips on how to use ZBrush with other 3D programs and with plug-ins that are designed to improve ZBrush’s compatibility in a production environment.
About This Book
This book was written in conjunction with Scott Spencer’s ZBrush Character Creation: Advanced Digital Sculpting (Sybex, 2008). Scott’s book is about the art of sculpting on the computer, and this book is an in-depth guide to how ZBrush works. The two books are meant to work together to provide the reader with a complete understanding of how to become a digital sculptor using ZBrush. Although this book is introductory, it is not meant to replace the ZBrush documentation. You are encouraged to use the free docu-mentation as well as this book to gain a complete understanding of ZBrush. However, I recommend using the search feature on the documentation rather than trying to read through every section.
Each chapter of this book provides an overview of how the various aspects of ZBrush work together and then demonstrates their use in a series of exercises. Some exercises are short and some span several chapters. The key to mastering ZBrush is practice, and that is why this book takes a hands-on approach to learning ZBrush.
Chapters 5, 6, and 7 are the core of the book. They cover digital sculpting, which is the most popular use for ZBrush. The approach taken in these chapters is as simplified as pos-sible, but they are still meant to be a challenge. The methods I use are not the only meth-ods possible or available, but they are, I believe, the most suited for beginners. Chapters 5, 6, and 7 should be read in order to achieve the best results.
Chapter 8 covers rendering, lighting, and materials in ZBrush. It is a self-contained chapter. Chapter 9 covers using ZBrush with other software programs. Maya is used as an example since it is the most commonly used 3D application; however, ZBrush can be used with any 3D application that can import models and textures. Chapter 9 also covers using ZBrush with Curious Labs Poser.
Finally, Chapter 10 covers some of the more useful ZBrush plug-ins and includes a brief introduction to ZScripts. ZScripting is covered in detail in ZBrush Character Creation: Advanced Digital Sculpting. If you find that ZScripting is something that interests you, check out Scott’s book.
As you go through the exercises in this book, take the time to practice the concepts before moving on to the next section, otherwise you may feel overwhelmed rather quickly. Practice is the key to mastering any art form, including art created on a computer. A fast processor is no substitute for experience.
The Companion DVD
This book is actually more of a learning kit than a book. There are so many files that accompany the lessons that a CD could not provide enough space. The DVD has the entire example scene files as well as files at various stages in each project. You can use the files to pick up a lesson at almost any point. You can also use them to compare your results with the examples in the lesson. To get the most out of this book, the student is encouraged to take advantage of these files.
before your eyes. Macros work well for short sessions, while movies work better for longer sessions because they can be paused and rewound. This is why movies are used for the later chapters. Loading and playing macros in ZBrush is described in Chapter 3.
ZBrushCentral.com
ZBrushCentral.com is the heart of the ZBrush community. You are encouraged to visit this site often for inspiration, learning materials, software updates, news, advice from users, and most importantly, the opportunity to upload your own ZBrush artwork for praise and critique. The ZBrush community is full of great artists and great people with more enthusiasm for ZBrush than should be legally allowed. Without ZBrushCentral.com, the software is incomplete!
Mouse vs. Tablet
Using a mouse as an input device while working in ZBrush is possible, but it’s a lot like sculpting clay while wearing ski gloves. ZBrush is really designed to be used with a digital tablet input device like those created by Wacom (www.wacom.com). Sculpting and painting brushes in ZBrush are meant to take advantage of a tablet’s pressure sensitivity, and many controls, such as the Transpose handle, are specifically designed to work with a tablet. Plus, using a mouse to create the thousands of strokes necessary for digital sculpture could lead to repetitive wrist strain injuries. Therefore, if you don’t have a digital tablet, you should seriously consider purchasing one to use with ZBrush. You don’t need the largest or most expensive tablet model; as long as it has a pressure-sensitivity feature and works with your computer, you should be fine.
Throughout the book the term clickis used when referring to activating buttons in the ZBrush interface. Typically, clickrefers to clicking a mouse button while holding the cur-sor over a button in the interface. When you use a tablet, tapping the pen on the tablet while the cursor is over the interface button performs the same action. When you see the phrase “click on the button” in an exercise, understand that tapping the pen on the tablet can perform the same action.
Apple Macintosh vs. Windows
When the Macintosh version is released, give special consideration to the hotkeys used in the book. The Command key replaces the Ctrl key modifier in most Macintosh applications. Most likely this will be the case with the Macintosh version of ZBrush.
Whether you are using a PC with Windows or an Apple Macintosh running Windows as an alternative OS, please pay attention to Pixologic’s recommended software and hard-ware requirements when running ZBrush. The system requirements for running the software are described in this book’s appendix. For the most up-to-date information, check www.pixologic.com/zbrush/system.
Preferences and Interface Customization
The ZBrush interface is fully customizable. As you first start learning ZBrush, you may want to stick with the standard layout until you are comfortable with what all the tools, settings, and controls do. Keep in mind that the entire interface can be rearranged to suit your own needs. When you’ve gained confidence working with ZBrush, feel free to experi-ment with your own customization. This section offers a few tips; more details on cus-tomization can be found in the ZBrush documentation.
Hotkeys ZBrush, like many software programs, uses hotkey shortcuts for many com-mands. A single key or a combination of keys is reserved to quickly enact frequently used commands. A list of these is found at the end of Chapter 1.
You can also quickly create your own hotkey by following these steps:
1. Simply press and hold the Ctrl key, then click the button or command you’d like to assign a hotkey to.
2. Release the Ctrl key and then press the key or key combination you want assigned to that command.
3. Upon leaving ZBrush, you’ll be asked if you want the hotkeys saved for future ZBrush sessions.
You can save your own color configuration using the controls in the Preferences palette. To make ZBrush start up with a particular configuration, click the Store Config button in the Preferences palette.
Layout Presets ZBrush has a number of layout presets available to suit your own working style. You can cycle through these layouts using the buttons in the upper-right corner of the title bar. To save a configuration as the default, click the Save UI button in the Prefer-ences palette.
Quick Info To learn more about a particular button or control in ZBrush, you can hold the cursor over the button in question while pressing the Ctrl key. A brief explanation will appear in a pop-up window. The settings for the quick info pop-up display are found in the Preferences palette.
Customize UI You can customize the interface by dragging buttons and controls to other parts of the interface or to your own custom menus. To do this, you must first activate the Enable Customize button in the Custom UI subpalette of the Preferences palette. Then you can hold the Ctrl key down while dragging a button to a new position on the interface. The Customize UI subpalette also has controls for creating your own menu.
Memory and Performance ZBrush periodically compacts memory. This means it will store data to a file in order to free up available RAM. The compact memory slider in the Mem subpalette of the Preferences palette allows you to set the number of megabytes of RAM used before ZBrush executes a compacting memory routine. The Mem subpalette also contains settings for the number of undos available for both the document and tools as well as the maximum number of polygons ZBrush will allow for a polymesh tool.
The Performance subpalette contains settings for multithreading. You can test the multi-threading capabilities of your machine by clicking the Test Multimulti-threading button. ZBrush will execute a number of commands designed to test your system. It will then adjust the multithreading settings based on the results of this test.
Tablet Settings The Tablet subpalette has controls for adjusting the sensitivity of your tablet input device. If you’re using a mouse with ZBrush, disable the Use Tablet button. Otherwise, use these controls to adjust how the pressure sensitivity feature of the tablet will affect the brushes within ZBrush.
Pixels, Pixols, Polygons, and the
Basics of Creating Digital Art
Any experienced
artist knows that the composition of the tools they use— the chemistry of the paint, the ingredients of the clay—affects the quality of a finished work of art. When you are learning to become an artist, you spend a great deal of time studying how the tools behave. It is the same with digital art. This chapter reviews the fundamentals of digital art. Just as an oil painter learns how the mixture of pigments and oils works with the canvas, a digital artist needs to learn how color depth, channels, file formats, and other elements factor into the quality of a digital masterpiece.This chapter includes the following topics:
• An introduction to ZBrush
• Understanding digital images
• Understanding 3D space
An Introduction to ZBrush
Imagine walking into a fully stocked artist’s studio. Inside you find cabinets and drawers full of paints and brushes, a large canvas, a closet full of every type of sculpting medium imaginable, a lighting rig, a camera, a projector, a kiln, armatures for maquettes, and a seemingly infinite array of carving and cutting tools. On top of this, everything has been neatly arranged for optimal use while working. This is ZBrush, a self-contained studio where you can digitally create paintings and sculptures—and even combinations of the two. Furthermore, you are not limited to what you find in ZBrush. Digital 3D models and 2D textures can easily be imported from other applications and used as tools within ZBrush. ZBrush can function as a self-contained digital art workspace and it can be inte-grated into a production pipeline for the purpose of creating and editing digital models for animation.
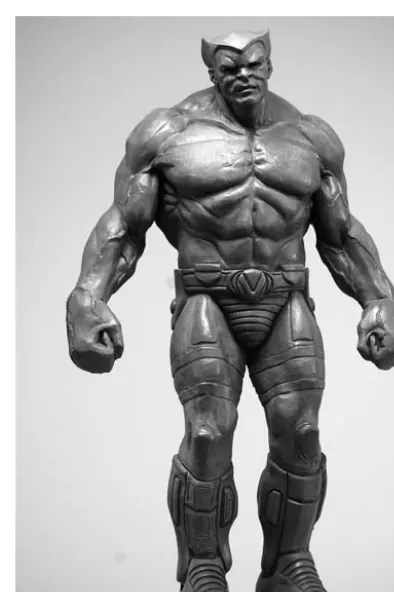
The most common use of ZBrush is for creating and editing digital models that are then animated and rendered in other 3D packages, such as Autodesk’s Maya and 3ds Max, and Softimage XSI. Artists choose to create and edit models in ZBrush to use in another package because the unique technology behind ZBrush allows them to work with very dense models (literally millions of polygons) to create a stunningly rich level of detail on organic surfaces in a way that traditional 3D packages just can’t. Fine wrinkles, fleshy folds, pores, bumps, scales, scars, and scratches can be easily sculpted into the model and then exported either as part of the geometry or as bump and displacement textures that can enhance the geometry of a model when the model is rendered in another package. The result is often an amazing level of detail and realism built into a virtual object (see Figure 1.1). Color texture maps can also be painted directly on the model in ZBrush in an intuitive fashion and then exported for use in shaders applied to the same model in other 3D packages. Production pipelines at studios such as ILM, Weta, and Sony Imageworks have used ZBrush in this way to create many of the characters, monsters, and set pieces seen in such films as The Lord of the Rings, Pirates of the Caribbean, and Sky Captain and the World of Tomorrow.
the need for an actual clay maquette. The artists can now start their work directly in the computer, and the director can make changes in the model’s design as it is devel-oped. With the introduction of 3D printers and rapid prototyping technology, an actual physical model can now be fabricated from the ZBrush digital sculpt. ZBrush sculptors are now finding their way into the production pipeline for toy and collectable figure markets.
ZBrush can also be used as an illustration tool: the program has digital sculpting and painting tools as well as its own unique rendering technology. With ZBrush, artists can create custom materials, which can be procedurally designed or captured from digital images. These materials can be applied to an artistic composition and, when rendered, react to virtual lights and shadows. Many artists have taken advantage of the flexible workspace and powerful tools to create amazing compositions entirely within ZBrush. In addition, ZBrush works very well with other 2D paint programs such as Photoshop and Painter. Digital 3D models and 2D images can be exported and imported freely between these programs, so there is no limit to what can be achieved when ZBrush is incorporated into the digital artist’s toolbox.
Figure 1.1
Understanding Digital Images
Now let’s take a brief look at how computers actually create images that are displayed on the screen, on a printed page, or in an animated movie. There are actually several ways a com-puter can create digital imagery. The two most common technologies use pixels and vectors.
Anatomy of a Pixel
A pixel is a colored square that appears on the screen at a specified position—pretty simple, at least to begin with. A raster graphic refers to an image made up of thousands of pixels. A pixel is imbued with a certain amount of color and position information that is stored in memory. If you load a rasterized graphic into a digital viewing program and then scale the image up (or zoom in), you can actually see how the image is composed of these pixels (see Figure 1.3).
A digital image file stores the positional information of these pixels in terms of x- and y-coordinates. The y-coordinate is the vertical position and the x-coordinate is the hori-zontal position. It may seem obvious, but it’s important to note that when you zoom in or Figure 1.2
scroll around on a digital image in the software, the position and size of each pixel changes relative to the screen. However, the software still needs to remember the position and size of each pixel relative to the digital image that is being viewed. You should be aware of this fact, but don’t spend too much time thinking about it now; that’s your computer’s job.
The amount of random access memory (RAM) your computer hardware has will affect how much information it can keep track of at one time and thus the performance of the software as you move all this information around on the screen.
Taking the Edge off with Anti-Aliasing
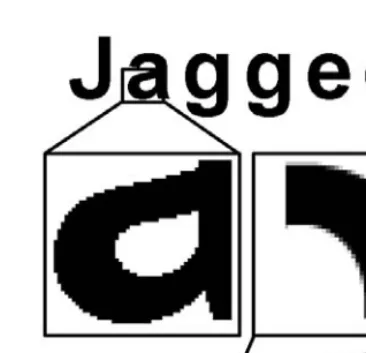
Aliasing refers to the situation in which a curving line or shape displayed on a computer screen appears jagged. This is because the image is composed of tiny squares. In order to correct this problem, graphic software employs anti-aliasing, which smoothes the edges of curving shapes by blending pixels along the edge with other pixels of similar hue but varying degrees of lightness or opacity. This fools the eye into perceiving the edge as being smooth.
In Figure 1.4, the edge of the letters in the word jaggedappear jagged because the square pixels are visible along the curving edges of the letters; this image is aliased. The edges of the letters in the word smoothappear smooth because of the blending technique that mixes pixels of varying lightness along the curving edge of the letter. The image is anti-aliased.
Figure 1.3
Channels and Color Depth
Along with positional data, the pixel stores information about how to display colors. A computer screen creates color by mixing red, green, and blue light. If a pixel is 100 percent red mixed with 0 percent blue and 0 percent green, it looks red. If a pixel is composed of 50 percent red with 50 percent blue and 0 percent green values, the pixel will look purple. When all three values are 0 percent, the pixel is black, and when all three are 100 percent, the pixel is white.
Color depth refers to how much color information is stored for each pixel in the image. A grayscale image discards all color information except for black, white, and the range of gray in between; this usually comes out to 256 shades of gray. The result is a black-and-white image, like the images in this chapter. Since color information is limited to the 256 shades of gray, the file has less information that needs to be stored.
If you have studied painting you may have learned that the primary colors are red, yel-low, and blue. The secondary color green, for example, is created when blue is mixed with yellow. This is true for paint but not so for colors created by a lighted computer screen. As far as computers are concerned, red, green, and blue are the primary colors. Red and green mixed together produce the secondary color yellow.
An RGB image stores red, green, and blue information. The information is divided into three channels (red, green, and blue) and each channel stores the values (or percentage) of red, green, and blue for each pixel. To see a demonstration of how this works, follow these instructions to open up the system palette on your computer.
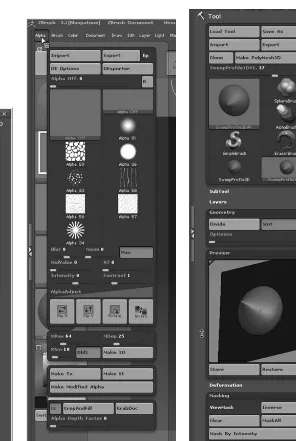
1. Start up ZBrush; on the opening screen, choose Other (see Figure 1.5).
2. Click Color on the menu bar to open up the Color menu/palette.
3. Click the button labeled SysPalette to open the System palette (see Figure 1.6). Figure 1.4
Figure 1.6
Click SysPalette to open the System palette.
Figure 1.5
4. In the System palette, move the picker around in the color area and observe the values in the Red, Green, and Blue fields. These values change depending on the mixture required to create the selected color. Notice that the highest value possible for each channel is 255 and the lowest is 0 (see Figure 1.7).
5. Type in values in the Red, Green, and Blue fields. Set Red to 255, Green to 0, and Blue to 255. The resulting color is a bright fuchsia.
An image in an RGBA format has an additional, fourth channel known as the alpha channel. The alpha channel stores information on the opacity of individual pixels. This allows for an image to have regions of transparency. The left side of Figure 1.8 shows a basic scene rendered in a 3D program; the floating spheres are transparent. The right side of Figure 1.8 shows the alpha channel. White areas are 100 percent opaque and black areas are 100 percent transparent. The gray areas show the amount of transparency.
Figure 1.8
The left side of the image shows the combined RGB chan-nels; the right side shows the alpha channel.
Figure 1.7
ZBrush can use an alpha channel as a filter, which it applies to a sculpting brush as a modifier or to the canvas as a stencil. In general practice, the term “alpha” refers to an additional channel of information that is stored in an image file.
Color depth refers to how much information is used for each of these color channels. Computers use bits to store information. A bit is a series of 1s and 0s (known as binary because there are only two options, 1 and 0). A 24-bit RGB image uses 8 bits of informa-tion for each channel (3 ×8 = 24). Each 8-bit channel stores a range of 256 shades of color, allowing for an image to have a total of 16 million colors. A 32-bit RGBA image uses an additional 8 bits for the alpha channel.
The more bits you have, the more information you can store, and with more bits, the image can be displayed using a wider range of color. More memory is required to store and work with higher-bit images. An image that uses 16 bits per channel (48 bits total for an RGB image, 64 bits for RGBA) can be confusingly referred to as a 16-bit image (as in a 16-bit TIFF or 16-bit SGI).
Beware; this is not the same as a 16-bit or high color image that uses about 5 bits for each channel. Welcome to the confusing world of computer terminology. You will get used to these kinds of naming conflicts with some experience. Although computers are strictly logical, the humans that create and use them are not always so! If you are working as an artist in television or film production, you will be using 16-bit (per channel) images much more often than 16-bit (5 bits per channel) high color images.
Image Formats
A digital image can be stored in a number of ways, known as formats. A format is simply the arrangement of information in a file. Typical image formats include Tagged Image File Format (TIFF), Joint Photographic Experts Group (JPEG), and Graphics Interchange Format (GIF).
Many programs have their own native document format. Photoshop can read many file formats but also has its own Photoshop Document (PSD) format. Likewise, Corel’s Painter stores special information in a format called Resource Interchange File Format (RIFF). ZBrush has its own ZBR document format.
An image format can be compressed to conserve storage space. Some image formats have compression built in (such as JPEG and GIF), and some can exist with or without compression (such as SGI, or Silicon Graphics Image). Compression usually affects the quality of the image. If you look closely at a JPEG image from a typical website using a browser, you may notice that it is blurry or grainy or that the colors are not quite right. Image quality has been sacrificed to allow faster download when viewing images over the Internet.
Graphics (PNG), result in file sizes that are larger than those for which lossy compression is used. Compression applied to sequences of images is also used for video.
In Figure 1.9, the image on the left is uncompressed and the image on the right is com-pressed. Look closely and you can see the distortion, known as artifacts,in the image on the right. This distortion is especially apparent in the squirrel’s fur and on the edges of the fence posts.
Understanding file formats and compression will become important as you work with computer graphics, not only with respect to images you create and share in ZBrush, but also with textures and alphas created in ZBrush and used on 3D models in other programs. Some 3D applications and rendering engines will prefer some formats more than others. This will be covered in more depth later in this book.
Vector Images
As stated earlier, computers can also use vectors to create digital images. A vector graphic is created from formulas and mathematical calculations performed by the computer and its software. The results of these calculations are smooth lines and shapes that are often filled with colors. Vector graphics are continually drawn and updated when the image is scaled, moved, or rotated, so the graphic is always of the same quality no matter what its size and position.
Adobe Illustrator and Adobe Flash are popular vector graphic programs. Vectors are used in a modeling interface to represent 3D objects in 3D packages such as Maya and 3d Studio Max, and these packages have special rendering engines that can create vector graphics as final output as well. Vector graphics are not used very much in ZBrush, so I’ll end the discussion of vectors for now.
Figure 1.9
Understanding Resolution
It is hard to overstate the importance of understanding resolution when working with ZBrush. Unfortunately, computer resolution is kind of a tricky concept. There’s a lot of confusing terminology as well as different ways to measure and calculate resolution and different types of resolution. This is a topic that I will revisit often throughout this book, so don’t panic if you haven’t mastered complete understanding of resolution by the end of this section.
Simply put, resolution refers to the density of information within a given area. Most often in computer graphics, resolution is applied to the number of pixels that occupy a given area of the screen or a document. However, it can also refer to the number of polygons or vertices in a given part of the surface of a 3D model. The resolution of your computer screen can determine how the resolution of your images is displayed and cre-ated. In addition, when you apply a 2D image texture to a 3D model, the pixel resolution of the 2D image and the polygon resolution of the 3D model must be taken into account or the results achieved may be somewhat disappointing. You do this kind of work a lot in ZBrush, thus resolution is something you must always keep in mind.
Screen Resolution
Let’s start with screen resolution. The computer you use to create your ZBrush images and models no doubt has a computer monitor attached to it (if not, your career in com-puter graphics may be getting off to a rocky start). The monitor displays text and images on the screen. Screen resolution refers to the number of square-sized pixels that appear on the screen, and this is measured horizontally and vertically. The physical size of the screen itself is usually described in diagonal terms. A 22-inch monitor refers to a screen size that measures 22 inches from one corner diagonally to the opposite corner.
Your particular screen should be able to display text and images in a number of differ-ent resolutions. The currdiffer-ent resolution is set in the operating system’s control panel or system preferences. Screen resolution is described in the number of pixels available hori-zontally times the number of pixels available vertically. Some typical resolutions include 640×480, which used to be the common standard in the old days when monitors were smaller; 720×486, which is the standard for broadcast television in the United States; and 1920×1080, which is used for high-definition television (HDTV). The iMac I am using to write this book is currently set to a resolution of 1440×990.
Document Resolution
Next, let’s look at document resolution. In an earlier discussion on pixels, I mentioned that when you zoom in on a digital image using a graphics program, you can see the individual pixels that make up the image. Now, the actual pixels that display the image on the screen do not get any larger or smaller, and you do not affect the resolution set-tings in your computer’s hardware. Rather, the graphics program allows you to see a visual representation of the image at a higher magnification than the document’s native resolution.
If you take a document that is 320×240 in size and set the magnification to 200 per-cent, the document is now shown at 640×480 and each pixel on the document is using twice as many computer monitor pixels. Thus it looks blocky. Likewise, when you zoom out, or shrink the document, half the number of pixels is displayed. Zooming in and out of a document is a useful feature for graphics programs. It can allow you to work on the fine details of an image. But of course, here is where things get tricky: Because of the ability of computer software to zoom in and out of an image, document resolution can be different than screen resolution. When working with computer images, you must always keep in mind the resolution of your document regardless of how it appears on the screen.
Dots per inch (DPI)is typically used to describe document resolution (sometimes referred to as PPI, or pixels per inch), even in countries such as France that have long used the metric system. An image that is displayed on a computer monitor at 100 percent of its resolution is usually 72dpi. An image destined for the printed page needs to be at a higher resolution, usually 300dpi.
3D Resolution
When speaking with 3D texture artists, you’ll often hear terms like 2K texture map thrown around. What they mean is an image that is 2048 pixels ×2048 pixels. The term 2Kmeans two thousand to normal people, but to computer graphics artists, 2K = 2048. This is because most texture images are set to a resolution that is a multiple of 12. Thus 1K = 1024, 4K= 4096, and 512 means, well, 512×512.
Since this book is focused on ZBrush, I’ll be talking the language of texture artists. So 2K means 2048×2048. If and when you move to animation software such as Maya, you may need to be aware that 2K means different things to different people, depending on the context. The safest bet is to get the people you’re talking with to be specific about what they want. Geeks love jargon, but it’s more often a hindrance than a help.
Aspect Ratio in 3D
Aspect ratio refers to the dimensions of the image size as a ratio. When you create an image at 320×240 or 640×480, the aspect ratio is 4:3. If the aspect ratio is 16:9 or 1.85:1, the image size is widescreen. A typical 16:9 resolution is 1280×720. This is something you may be more concerned with when rendering an animation for final output from an animation package such as Maya. In ZBrush, aspect ratio may only enter the conversation when you’re creating a composition that could be used as a matte painting in an animation or for another purpose.
Polygon Resolution
Finally, resolution can also be used to describe the number or points or polygons that make up a 3D model. I’ll discuss polygons in more detail later on in this chapter, but for now you should understand that the surface of a 3D model is composed of geometric shapes defined by three or more points (polygons in ZBrush are restricted to three or four points, but in other modeling programs they can have more). A model can be subdivided, which increases its smooth appearance and allows for a higher level of detail to be sculpted into the surface.
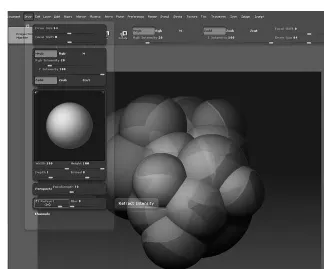
In ZBrush, a model can consist of millions and millions of polygons, as you can see in Figure 1.10. Because of the special way ZBrush handles memory, these high-resolution models can easily be edited with much less of a performance slowdown than would be experienced using other 3D applications. Furthermore, ZBrush stores many levels of sub-division resolution within a single model file, so you can raise and lower the resolution of the 3D geometry while you are working as well as export the same model at several differ-ent resolutions for use in another 3D animation package.
This ends our introduction to the concept of resolution. Rest assured that this topic will be popping up again throughout this book!
Understanding 3D Space
In a typical 3D software package such as Maya, 3D space is defined in terms of x-, y-, and z-coordinates. The horizontal dimension is usually described by the x-axis, vertical space is usually defined by the y-coordinates, and depth is usually defined by the z-coordinates (some packages reverse the meaning of the y- and z-axes). In Maya, the virtual world con-tains a grid. It’s also crucial to understand that a point in 3D space, such as an individual vertex on a piece of 3D geometry, has an absolute position in the 3D world. This is known as its world space coordinates. It also has a position relative to the object it is part of; this is known as its local, or object, space coordinates.
Think of it this way: You are wearing a pointy party hat. The point at the very tip of the hat exists in the world at the top of your head; the world space Y coordinates of this point is very high relative to the points that make up the rest of you. At the same time, the object space Y coordinates of the tip of the hat are also very high relative to the rest of you. How-ever, if you decided to hang upside down while wearing the party hat, the world space Figure 1.10
coordinates of the tip of the hat would now be lower than the world space coordinates that make up the rest of you. Yet, in terms of object space, we understand that the tip of the hat is still the very top of the object, even when the hat is upside down. This is based on how we understand the object and its purpose in the world. If you were to model that hat using 3D modeling software, you would understand that the tip of the hat is the top, even when you rotate the hat upside down. The 3D software also keeps track of these ideas using the two sets of coordinates—world and object (see Figure 1.11).
You have no doubt noticed that our software of choice for this book is called ZBrush. The reason the software is named with a Zexplains much about how the interface works within ZBrush. Unlike in typical 3D software, the artwork you create in ZBrush does not exist on a 3D grid within a 3D world. Rather, it is painted on a canvas that contains depth information along the z-axis.
For many 3D artists who are accustomed to programs such as Maya, in which model-ing and animation take place in a 3D world, the concept of workmodel-ing on a canvas can be a little disconcerting at first. However, once you understand how space in ZBrush works, you often find that focusing on sculpting a 3D model is much easier. Think of ZBrush as a virtual workshop with a sculpting stand that can rotate along every axis.
Anatomy of a Polygon
There really is no such thing as a 3D object in computer graphics. Unless you are working with rapid prototyping machines that can fabricate a physical object based on data stored
Figure 1.11
in a virtual 3D file, you will always be working with two-dimensional representations of three-dimensional objects on a computer screen. (Subsequent editions of this book will no doubt have to deal with rapid prototyping as the technology becomes cheaper and more accessible to artists. For now it’s safe to say you’ll mostly be dealing with what you see on a 2D screen.)
When we speak of 3D we are using shorthand that assumes we are talking about a 3D vir-tual object that exists on a 2D screen. A typical digital painting program such as Photoshop plots pixels horizontally and vertically, along the x- and y-axis respectively. A 3D program stores information with additional coordinates along the z-axis, which gives the virtual image depth. A virtual object existing in the 3D space of the software is made of polygons. The polygons give the object a surface which can be deformed, translated, and animated.
A polygon is a geometric shape defined by 3 or more points (points are also referred to as vertices); examples of polygons are shown in Figure 1.12.
In other programs you may encounter other types of 3D geometry, such as NURBS and subdivision surfaces. These are converted at render time to triangle-shaped polygons by the rendering engine, thus polygons are the standard currency of 3D software. When it comes to 3D models, ZBrush works only with polygon geometry.
ZBrush restricts the polygons to 3 or 4 points, but other software packages can have polygons with any number of vertices. This is important to remember when importing objects from another package into ZBrush. ZBrush will automatically convert an n-sided (more than 4-point) polygon into a 4-point polygon (or quadrilateral) when it is imported.
Figure 1.12
As was discussed in the section titled “Understanding Resolution,” the number of poly-gons an object has with affect how smooth the surface appears and how much detail can be modeled into that surface. The resolution of a 3D object is also referred to as its density. ZBrush is programmed in such a way that a 3D object can have millions of polygons and an astonishing level of detail while still maintaining a high level of response on the com-puter during the sculpting and editing process. This is what allows the ZBrush artist to feel as if they are sculpting digital clay in a very intuitive and artistic fashion.
A polygon appears in ZBrush as a shaded shape with three or four vertices. A virtual 3D object is made up of adjacent polygons that form the surface. (In ZBrush, the term 3D tool is used to refer to a 3D object; the reason for this is explained in Chapter 2.) The surface of a polygon has an inside and an outside. The information regarding which side of a polygon faces out and which side faces in is known as the polygon’s normal. A 3D tool made up of millions of polygons has millions of normals that describe how the surface appears when it reacts to virtual light and shadow (see Figure 1.13).
Figure 1.13
An image of a model in ZBrush with its normals visible. The normal is displayed as a line that shows which side of the polygon is pointing “out.”
Normals are an important aspect of working with polygon geometry. Information about the direction of normals on a dense object can be stored in a special texture known as a normal map. Rendering engines for 3D software and video games can use these maps to make a lower-density version of the same model appear to have more detail than its geom-etry will allow by using a normal map to help shade the object. ZBrush is an extremely popular tool in the gaming industry because of the ease with which normal maps can be created and exported from the software.
Pixols versus Pixels
As was stated earlier, an image created in a typical digital painting program is usually com-posed of thousands of pixels. A pixel is a square that contains information about color, transparency, and its location along the x- and y-axis. The unique innovation of ZBrush is the pixol, which is like a pixel with added information about its location along the z-axis. In other words, a pixol contains depth information as well as color, transparency, and x and y positional data (see Figure 1.14). Furthermore, the Pixol also stores information on the material applied to it. This means each Pixol knows how to react to the lighting, shad-ing, and the environment of a ZBrush composition when it is rendered.
When Pixologic first introduced ZBrush, it began as a paint program that could create images in two and a half dimensions (known as 2.5D). A brush stroke in ZBrush is painted on the canvas and then can be rotated, scaled, and positioned anywhere on the canvas. This explains why the ZBrush interface does not use the typical 3D world with a grid that you find in other 3D programs. Everything exists on a canvas. ZBrush added 3D objects that could be incorporated into 2.5 dimensional compositions as well as materials and lights that added shadow, reflections, and occlusion. Subsequent versions of ZBrush refined Figure 1.14
the sculpting tools and improved the portability of 3D objects with animation projects that led to the overwhelming popularity of ZBrush as a digital sculpting program.
Pixols are a big part of ZBrush, especially if an artist is interested in creating 2.5D com-positions entirely in ZBrush. If your primary interest in ZBrush is as a polygonal sculpting tool, then you may not need to delve into pixol technology too deeply; however, it certainly is a fun area to explore. Painting with pixols will be explored deeper in chapters 3 and 4 of this book. If you are eager to get right into sculpting with 3D tools, read chapter 2 and then feel free to skip to Chapters 5, 6, and 7.
Being a Digital Artist
It is almost as easy to create bad art on a computer as it is to create good art. There is noth-ing inherent in the computer or the software that will turn you into a great artist. Becomnoth-ing a good artist still must be achieved the old-fashioned way—through hard work, practice, and study. Nine times out of ten, when you see some jaw-dropping, amazing piece of digi-tal art in an Internet forum or as part of a film, the artist who created it has spent a fair amount of time studying traditional art. Even if the artist has never held a real paintbrush, they still have studied what it takes to make a great work.
This book is concerned with making you feel comfortable using ZBrush. There will not be much discussion on the fundamentals of art or sculpting. That said, you should understand that composition, balance, positive and negative space, lighting, form, and silhouette are just a few of the concepts a real artist (digital or traditional) must master. The student is strongly encouraged to step away from the computer monitor, pick up a pencil or a brush, and attend some life drawing classes. Likewise, working with digital clay is much more meaningful if you’ve spent time sculpting with actual clay. Your digital artwork will reveal much about who you are as well as how much time you have taken to study and explore traditional art techniques as well as the natural world.
Resources
This book is just the beginning. While working through the exercises in this book on your way to mastering the ZBrush interface and its tools, you should also take the time to explore more using the resources on this list. In addition, ZBrush Character Creation: Advanced Digital Sculpting by Scott Spencer (Sybex, 2008), which is now being written, will pick up where this book leaves off. His book will incorporate a deep level of understanding of the art of digital sculpture and the concepts behind creating great artwork into more advanced ZBrush topics and lessons.
Websites
• www.pixologic.com
• www.zbrushcentral.com
• www.cgchannel.com
• www.gnomon3d.com
• www.gnomononline.com
• www.digitaltutors.com
• www.3d.sk
• www.conceptart.org
Books
• ZBrush Character Creation: Advanced Digital Sculptingby Scott Spencer (Sybex, 2008)
• The Artist’s Complete Guide to Facial Expressions by Gary Faigin (Watson-Guptill, 1990)
• Constructive Anatomy by George Bridgman (Dover, 1973)
• Bridgman’s Life Drawing by George Bridgman (Dover, 1971)
• Artistic Anatomy by Dr. Paul Richer (Winston-Guptill, 1971)
• Anatomy for the Artist by Sarah Simblet (DK Publishing, 2001)
DVDs
• The Gnomon workshop has a large number of DVDs devoted to ZBrush as well as an excellent series of maquette sculpture DVDs by John Brown. These can be ordered online at www.thegnomonworkshop.com.
• Digital Tutors has a large selection of ZBrush DVDs available at
Facing the ZBrush Interface
From the moment
the ZBrush interface appears, its creative potential is obvious. Few other digital art packages boast such an elegant working environment. The ZBrush interface may seem a little intimidating, but once you grasp the philosophy behind the design, you’ll find that it is a comfortable place for digital sculpting and painting.This chapter walks you through the ZBrush interface; it’s much like a tour of an artist’s studio. If, on a real studio tour, an artist pointed out various objects and tools without an explanation, you might get pretty frustrated. On the other hand, the artist could never adequately explain every tool in a short amount of time.
The situation is the same with this chapter. There’s a lot to cover in the interface and only so much space to do it. In this interface tour, I will try to strike a balance between explaining where the ZBrush tools are and explaining what they do. The rest of the book will provide deeper explanations about the tools and interface features. To get the most out of this chapter you may want to have ZBrush at the ready. There are a few exercises to help you make sense of all the information.
This chapter includes the following topics:
• The Zen of ZBrush
• Using the transformation gyro in Paint mode
• Tools in Edit mode
• Palettes and trays
• The title bar
The Zen of ZBrush
If you’ve never done any 3D modeling or animation, you might actually be able to approach ZBrush with a slight advantage over someone who has spent a lot of time in programs such as Maya, 3ds Max, or XSI. This is because the tools in ZBrush are very different from the typical 3D modeling and animation tools. If you are an experienced 3D modeler, you may panic a little bit at the fact that ZBrush lacks a grid, a 3D compass, and any of the standard modeling tools. Either way, the best thing to do when you first open ZBrush is to shed your preconceived ideas of how a 3D program is supposed to work. In fact, don’t think of ZBrush as a 3D modeling program, a paint program, or even a texturing program. Instead, step back for a moment and accept the “isness” of what ZBrush actually is. It is a digital sculpting and painting workshop.
While in ZBrush, you don’t have to juggle animation, modeling, dynamics, and render modes. There are only two modes you truly need to be aware of when you are working: Draw and Edit. When you draw a stroke on the canvas using a ZBrush tool, you bring it into being, place it on the three-dimensional canvas, then position, scale, and rotate it.
When you edit a tool, the canvas becomes a virtual workspace. You suspend work on all other strokes that may exist on the canvas so that you can focus and refine that one particular object (known as a “3D Tool” in ZBrush parlance) until you are satisfied. Then you can export that particular 3D tool as a 3D model or use the 3D tool as a brush to paint copies of itself on the canvas for use in a composition. The same workspace is used in both cases. Some settings and controls work differently in Edit mode than they do in Draw mode, some settings are only available in one mode or the other, and some settings are universal. This tour will explain how the ZBrush controls work in either mode.
All objects are tools. A brush is a tool and so is a model of a dragon. In fact, you can think of a model of a dragon as a tool for painting dragon-shaped brush strokes. These tools are always within easy reach during a ZBrush session. We’ll delve into these concepts more deeply as we go forward. For now, this explanation should provide you with enough background to understand why the interface is set up as it is.
The ZBrush Canvas
Open up ZBrush and the start page will present you with a number of options. You can work with some of the preset tools that ship with ZBrush or you can start with a blank docu-ment. Choose the Other option from the list to open a blank document (hotkey = Esc) to start with.
using all of it all of the time. Furthermore, ZBrush helps you keep your studio neat by allowing you to put the tools you need most within easy reach.
Let’s start with the center of the interface and work our way outward. Breaking the interface down like this will help to make it more accessible. The best place to start is with the canvas.
You see a ZBrush document on the canvas. The canvas is the square that dominates the center of the program, and it has some special properties that are part of what makes ZBrush so different. It’s quite obvious from the outset that the canvas has height and width, which we refer to as the y- and x-axes. The ZBrush canvas also has depth axis, or a z-axis. Hence
ZBrush ships with a number of interface configurations, and you can create custom interface layouts. This guided tour of the interface will show you the standard interface setup. To fol-low along properly, make sure you have this configuration loaded: click on the Preferences palette at the top of the page, expand the Config submenu, and click the Restore Standard UI button. You may also want to initialize ZBrush by clicking on the Init ZBrush button. This will clear all custom tools and settings from the palette. The colors of the interface have been changed in the figures to make the images more legible in print. Don’t be alarmed if the images don’t match exactly.
menus/palettes
canvas
left shelf top shelf
right shelf brush cursor
palette within a tray subpalette
Figure 2.1
the name, ZBrush. When you use a tool to paint a brush stroke on the canvas, you can move it backward and forward in space, placing it in front of or behind other brush strokes. The default gradient you see on the canvas is meant to suggest the depth dimension in the canvas.
There are two ways to look at the canvas. If you are interested in using ZBrush as a self-contained painting and sculpting program, the canvas is the place where your artwork will be created, rendered, and saved for the world to see. What you place on the canvas is your art in progress. However, if you intend to use ZBrush as a modeling workshop where you create, edit, and texture 3D models to be used in scenes in another modeling and anima-tion program, then think of the canvas as a sculpture stand. When you draw your model as a 3D tool onto the canvas and switch to Editmode, you can mold your sculptures, push and pull their parts, and carve and tweak and even add additional parts until you are ready to export. Furthermore, you can continually switch and swap tools on the canvas while you work. You can use the canvas to record simple movies of your work in progress as well as turntable animations to show off your sculptures on a demo reel.
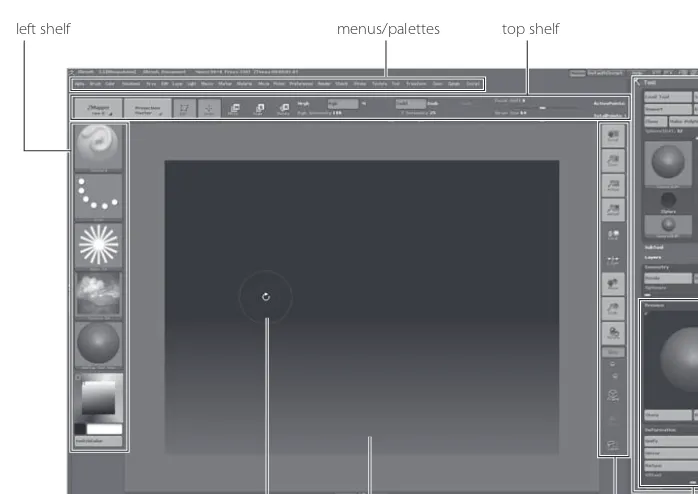
The ZBrush Shelves
On the top and either side of the canvas are shelves that hold the ZBrush buttons and con-trols (see Figure 2.2). We’ll explore these shelves by moving from left to right around the canvas.
Figure 2.2
The Shelf on the Left
The left shelf holds several items that you will access often in a typical ZBrush editing ses-sion. These items include the current brush at the top, the brush stroke mode, the current alpha (if any), the current texture (if any), and the current material. Below these items is the all-important color picker.
The brushes are a used for sculpting 3D tools in Edit mode. If a 3D tool is not in Edit mode the icon is grayed out and the brushes are unavailable (Edit mode is explained in detail later in this chapter). Holding the cursor over the Brush icon causes it to appear enlarged and with more details about the current brush. Clicking on the icon reveals the inventory of available brushes. The Stroke icon below the brushes shows how the current brush will apply its stroke to the 3D tool you are editing. Clicking on the Stroke icon opens up an inventory palette of stroke types that can be used with the brushes.
The Alpha, Texture, and Material icons provide easy access to the standard inventory of ZBrush alphas, textures, and materials that load when you start ZBrush as well as any custom alphas, textures, and materials you may make along the way or import from your own custom library (see Figure 2.4). Alphas, textures, and materials are each big topics that will be explored more deeply in Chapter 7 and Chapter 8.
The color picker has one square within another. You select the value and saturation of the current color from the inner square and you select the current hue with the outer square. Below the picker are two swatches for holding colors in memory.
You can select any color on the screen or applied to the 3D tool by dragging the mouse from the center square to any spot on the screen within the ZBrush interface. The picker will not select the colors of shadows on strokes or tools on the canvas, just the color applied to the stroke or tool.
Figure 2.3
The inventory of 3D sculpting brushes
The Shelf at the Top
The top shelf has a number of buttons and sliders devoted to manipulating tools and brushes within ZBrush. At the far left are buttons that allow you to access two commonly used ZBrush plug-ins: ZMapper and Projection Master (see Figure 2.5). ZMapper allows you to create and edit normal maps; Projection Master is an advanced texturing environ-ment you can use for your tools. Explanations of these plug-ins can be found in Chapter 10.
Next to the ZMapper and Projection Master buttons on the top shelf, there are a series of five important buttons. The first two are crucial. Understanding the purpose of the Edit and Draw buttons is key to unlocking the mysteries of the ZBrush environment. So let’s begin our discussion by stepping back a few thousand years…
Human beings are tool users. Once we as a species started using and creating tools, we separated ourselves from the rest of the animals. Everything humans use to communicate, socialize, and survive is a tool, including language, culture, and microwave ovens. Likewise, you use tools to draw strokes on the canvas. A brush stroke is a tool. A model of a centaur is also a tool, or rather, it’s a centaur-shaped tool that draws copies of itself on the canvas.
The Draw button puts you in Draw mode, which allows you to draw a stroke on the canvas using a tool (tools are found in the Tool palette; this will be discussed more in the Figure 2.5
Buttons for Edit and Draw modes as well as two common plug-ins, ZMapper and Projection Master
Figure 2.4
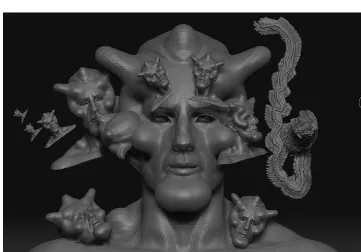
section “Trays and Palettes” later in this chapter), thus calling it into existence within the frame of your artwork. This is just as true for simple 2.5-dimensional brush strokes as it is for complex 3D centaur models or a model of a head, as shown in Figure 2.6. That’s the essence of working in Draw mode.
You use the Edit mode to edit a 3D tool. When you use a 3D tool to draw a stroke on the canvas and switch to Edit mode, it places the tool into a temporary state where the 3D tool can be edited. So when you draw your centaur tool on the canvas and then turn on the Edit button, you can modify the geometry of the centaur, paint texture maps and dis-placement maps, and add additional subtools to the centaur. When you are done editing the tool, you can either export it for use in another 3D modeling and animation program as a model or drop it on to the canvas for use in a composition. Or use the centaur tool to paint copies of the newly edited centaur all over the canvas; that’s the quickest way ever to call up an army of centaurs! Chapter 5 will explore editing 3D tools in greater detail. As you edit a 3D tool, a version of the tool is updated in the tool inventory. As long as the ZBrush session is in progress the changes you make to a 3D tool will be stored in the tool inventory. The icon in the inventory will update to reflect the changes.
Figure 2.6
The DemoHead 3D tool paints copies of the DemoHead.
The next three buttons on the top shelf are the Move, Scale, and Rotate buttons. They will behave differently depending on the status of the Edit and Draw buttons. When you draw a tool on the canvas, these three buttons will allow you to position the tool as a whole on the canvas using the special gyro manipulator. However, if you draw a tool on the can-vas and then turn on the Edit button, these buttons will allow you to use the special Trans-pose handle to move, scale, and rotate either the whole tool or unmasked parts of the tool. Okay, that’s a lot to fit into your head. Let’s continue the interface tour and we’ll revisit the concepts in the upcoming exercise, “Using the Transformation Gyro in Draw Mode.”
The next section of the top shelf is a series of buttons and sliders. The buttons are labeled Mrgb, Rgb, and M. The Mstands for materialand the Rgbstands for red green blue, which to a computer is the same thing as saying color. So these buttons choose between painting modes. You can paint material and color (Mrgb), just color (Rgb), or just material (M). The slider below controls the intensity of the color contribution of the current brush. If none of these buttons are activated, the brush will affect the canvas only according to the settings applied by the next set of buttons.
A similar triad of buttons follows. These buttons are labeled ZAdd, ZSub, and ZCut, and they control whether or not a sculpting brush raises the surface of a 3D tool (ZAdd), pushes it down (ZSub), or cuts into it (ZCut). The Z intensity slider controls how much each stroke of the brush raises, lowers, or cuts into the surface of the 3D tool. If none of these buttons are activated, the brush may simply be set to paint color, material, or both without changing the 3D tool.
Finishing off the top shelf are the sliders that control the focal shift and the size of the brush. The brush appears on the canvas as a circle within a circle (Figure 2.7). The Size slider controls the diameter of both circles as a group, which in turn controls how much of the canvas or tool is affected by the brush. The focal shift controls the softness or the falloff of the edge of the brush. Moving this slider back and forth will cause the inner circle to grow and shrink. If both circles are the same size, the brush will have a hard edge; if there is a large gap between the size of the outer circle and the inner circle, there will be a sizable falloff from the center to the edge of the area affected by the brush.
The Shelf on the Right
The right shelf contains controls that are meant to help you navigate the canvas (see Fig-ure 2.8). The Scroll and Zoom controls move the canvas around. When you use the Zoom tool to move into the canvas, you’ll see the edges of the strokes on the canvas become jagged. It’s just like zooming into an image in a paint program such as Photoshop.
The top four controls on the right shelf are used mostly when you are creating a com-position in ZBrush as if it were a painting program. The rest of the controls in this shelf are used most often when a tool is in Edit mode, in particular, 3D tools.
The Local pivot button will make the last area of an edited 3D tool become the center of rotation during editing. This is a very useful function and helps keep you from getting lost on your 3D tool as you spin it around. The L.Sym button is used when editing a 3D tool comprising many subtools. L.Sym causes sculpting and editing brushes to operate symmetrically in local space rather than global space. This ensures that symmetry is preserved when you’re editing subtools.
The Move, Scale, and Rotate buttons on the right shelf can be a bit confusing at first because there are also Move, Scale, and Rotate buttons on the top shelf. They do not do the same thing. The buttons on the right shelf are for use on 3D tools in Edit mode. They help you manipulate a 3D tool while working. Think of them as controls for manipulating the sculpture stand that is the ZBrush canvas.
The Frame button turns on a wireframe display on the current 3Dtool. This is combined with whatever material is applied to the 3D tool, which will affect how the wireframe looks. When the Frame button is activated, you can get a better idea of the topology of the tool as well as see how the tool is grouped into various parts.
focal shift
Figure 2.7
The distance between the con-centric circles of the cursor represents the focal shift, or the falloff of the brush.
Figure 2.8
The three buttons labeled XYZ, Y, and Z set the axis of rotation for the Rotate button on the right shelf. The Transp button allows you to make subtools transparent while work-ing, and the final button activates lasso selection, which is helpful when selecting the indi-vidual polygons of a 3D tool in Edit mode.
Using the Transformation Gyro in Draw Mode
Okay, so all those tools on the shelves were a lot to take in and we’re just getting started. Before we continue the interface tour, let’s take a moment to test out some of these con-trols so the descriptions become clearer. To do this, we’ll play with one of the models that ships with ZBrush.
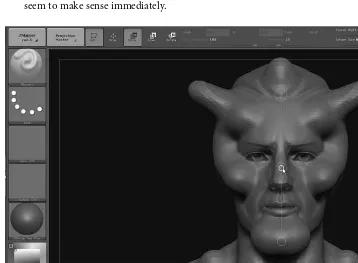
1. If ZBrush is not loaded on your computer, go ahead and load it now. On the open-ing splash screen, choose the DemoHead. If ZBrush is open, you can activate the startup screen by clicking the DefaultZScript button at the very upper right of the screen next to the Help button. Once the startup page loads, choose the DemoHead (see Figure 2.9).
Figure 2.9