Matt Neuburg
Programming iOS 7, Fourth Edition by Matt Neuburg
Copyright © 2014 Matt Neuburg. All rights reserved.
Printed in the United States of America.
Published by O’Reilly Media, Inc., 1005 Gravenstein Highway North, Sebastopol, CA 95472.
O’Reilly books may be purchased for educational, business, or sales promotional use. Online editions are also available for most titles (http://my.safaribooksonline.com). For more information, contact our corporate/ institutional sales department: (800) 998-9938 or [email protected].
Editor: Rachel Roumeliotis Production Editor: Kristen Brown Proofreader: O’Reilly Production Services Indexer: Matt Neuburg
Cover Designer: Randy Comer Interior Designer: David Futato Illustrator: Matt Neuburg
May 2011: First Edition
March 2012: Second Edition
March 2013: Third Edition
December 2013: Fourth Edition
Revision History for the Fourth Edition: 2013-12-09: First release
See http://oreilly.com/catalog/errata.csp?isbn=9781449372347 for release details.
Nutshell Handbook, the Nutshell Handbook logo, and the O’Reilly logo are registered trademarks of O’Reilly Media, Inc. Programming iOS 7, the image of a kingbird, and related trade dress are trademarks of O’Reilly Media, Inc.
Many of the designations used by manufacturers and sellers to distinguish their products are claimed as trademarks. Where those designations appear in this book, and O’Reilly Media, Inc., was aware of a trade‐ mark claim, the designations have been printed in caps or initial caps.
While every precaution has been taken in the preparation of this book, the publisher and author assume no responsibility for errors or omissions, or for damages resulting from the use of the information contained herein.
ISBN: 978-1-449-37234-7
Table of Contents
Preface. . . xv
Part I. Views
1. Views. . . 3
The Window 4
Experimenting With Views 7
Subview and Superview 8
Visibility and Opacity 11
Frame 12
Bounds and Center 13
Transform 16
Layout 22
Autoresizing 23
Autolayout 27
Constraints in the Nib 38
Order of Layout Events 45
Autolayout and View Transforms 46
2. Drawing. . . 49
UIImage and UIImageView 49
Resizable Images 53
Image Rendering Mode 56
Graphics Contexts 58
UIImage Drawing 61
CGImage Drawing 63
Snapshots 66
CIFilter and CIImage 68
Drawing a UIView 72
Graphics Context Settings 74
Paths and Shapes 75
Clipping 79
Gradients 80
Colors and Patterns 82
Graphics Context Transforms 84
Shadows 86
Erasing 87
Points and Pixels 88
Content Mode 89
3. Layers. . . 91
View and Layer 92
Layers and Sublayers 94
Manipulating the Layer Hierarchy 97
Positioning a Sublayer 98
CAScrollLayer 99
Layout of Sublayers 99
Drawing in a Layer 100
Content Resizing and Positioning 104
Layers that Draw Themselves 106
Transforms 108
Depth 111
Shadows, Borders, and Masks 115
Layer Efficiency 116
Layers and Key–Value Coding 118
4. Animation. . . 121
Drawing, Animation, and Threading 122
UIImageView and UIImage Animation 125
View Animation 126
Block-Based View Animation 127
View Animation Options 129
Springing View Animation 134
Keyframe View Animation 134
Transitions 136
Implicit Layer Animation 138
Animation Transactions 140
Media Timing Functions 141
Core Animation 143
CABasicAnimation and Its Inheritance 143
Keyframe Animation 149
Making a Property Animatable 150
Grouped Animations 151
Transitions 155
Animations List 157
Actions 159
What an Action Is 160
Action Search 160
Hooking Into the Action Search 162
Nonproperty Actions 164
Emitter Layers 166
CIFilter Transitions 171
UIKit Dynamics 174
Motion Effects 180
Animation and Autolayout 181
5. Touches. . . 185
Touch Events and Views 186
Receiving Touches 187
Restricting Touches 189
Interpreting Touches 190
Gesture Recognizers 195
Gesture Recognizer Classes 195
Gesture Recognizer Conflicts 200
Subclassing Gesture Recognizers 203
Gesture Recognizer Delegate 205
Gesture Recognizers in the Nib 207
Touch Delivery 208
Hit-Testing 208
Initial Touch Event Delivery 214
Gesture Recognizer and View 214
Touch Exclusion Logic 216
Gesture Recognition Logic 216
Touches and the Responder Chain 218
Part II. Interface
6. View Controllers. . . 223
View Controller Responsibilities 224
View Controller Hierarchy 225
View Controller Creation 231
How a View Controller Gets Its View 234
Manual View 235
Generic Automatic View 237
View in a Separate Nib 238
Nib-Instantiated View Controller 241
Storyboard-Instantiated View Controller 243
View Resizing and the Status Bar 245
Rotation 251
Rotation and Layout Events 254
Initial Orientation 258
Presented View Controller 261
Presenting a View 262
Communication With a Presented View Controller 264
Presented View Animation 267
Presentation Styles 268
Rotation of a Presented View 271
Presenting a View in Response to Rotation 273
Tab Bar Controllers 274
Tab Bar Items 276
Configuring a Tab Bar Controller 277
Navigation Controllers 279
Bar Button Items 282
Navigation Items and Toolbar Items 284
Configuring a Navigation Controller 287
Custom Transition Animations 290
Noninteractive Custom Transition Animation 291
Interactive Custom Transition Animation 294
Custom Presented View Controller Transition 301
Transition Coordinator 308
Page View Controller 310
Container View Controllers 315
Storyboards 320
Segues 322
Container Views 324
Unwind Segues 325
View Controller Lifetime Events 329
Incoherencies in View Controller Events 332
Appear and Disappear Events 332
Manual Event Forwarding to a Child View Controller 333
View Controller Memory Management 335
State Restoration 337
Participating in State Restoration 339
Restoration ID, Identifier Path, and Restoration Class 341
Restoring View Controller State 348
Restoration Order of Operations 353
Restoration of Other Objects 355
Snapshot Suppression 357
7. Scroll Views. . . 359
Creating a Scroll View in Code 360
Using a Content View 363
Scroll View in a Nib 365
Scrolling 367
Paging 371
Tiling 373
Zooming 375
Zooming Programmatically 376
Zooming with Detail 377
Scroll View Delegate 380
Scroll View Touches 382
Floating Scroll View Subviews 386
Scroll View Performance 387
8. Table Views and Collection Views. . . 389
Table View Cells 392
Built-In Cell Styles 393
Registering a Cell Class 399
Custom Cells 401
Table View Data 408
The Three Big Questions 409
Reusing Cells 411
Table View Sections 413
Section Index 418
Refreshing Table View Data 419
Variable Row Heights 423
Table View Cell Selection 426
Managing Cell Selection 426
Responding to Cell Selection 427
Navigation From a Table View 429
Cell Choice and Static Tables 430
Table View Scrolling and Layout 432
Table View State Restoration 432
Table View Searching 433
Table View Editing 442
Deleting Table Items 445
Editable Content in Table Items 446
Inserting Table Items 448
Rearranging Table Items 450
Dynamic Table Items 451
Table View Menus 453
Collection Views 455
Collection View Classes 459
Using a Collection View 462
Custom Collection View Layouts 465
Switching Layouts 469
Collection Views and UIKit Dynamics 470
9. Popovers and Split Views. . . 473
Preparing a Popover 475
Popover Size 476
Popover Appearance Customization 477
Summoning and Dismissing a Popover 480
Popover Segues 480
Managing a Popover Controller 481
Dismissing a Popover 482
Popovers During Rotation or Backgrounding 485
Popovers and Presented Views 486
Automatic Popovers 487
Split Views 489
Using a Split View 489
Split Views in a Storyboard 491
Other Split View Configurations 492
10. Text. . . 493
Fonts 494
Fonts and Dynamic Type 494
Font Descriptors 497
Attributed Strings 499
Attributed String Attributes 500
Making an Attributed String 503
Modifying and Querying an Attributed String 508
Measuring and Drawing an Attributed String 509
Labels 511
Number of Lines 511
Label Resizing 513
Customized Label Drawing 514
Text Fields 515
Summoning and Dismissing the Keyboard 517
Keyboard Covers Text Field 519
Configuring the Keyboard 524
Text Field Delegate and Control Event Messages 525
Text Field Menu 528
Text Views 530
Text View as Scroll View 531
Text View and Keyboard 532
Text Kit 534
Text Container 535
Alternative Text Kit Stack Architectures 538
Layout Manager 540
Text Kit Without a Text View 543
11. Web Views. . . 549
Web View Content 550
Loading Web View Content 554
Designing Web View Content 556
Paginated Web Views 558
Web View State Restoration 558
Communicating with a Web View 559
12. Controls and Other Views. . . 563
UIActivityIndicatorView 563
UIProgressView 565
UIPickerView 567
UISearchBar 569
UIControl 574
UISwitch 578
UIStepper 579
UIPageControl 581
UIDatePicker 581
UISlider 584
UISegmentedControl 587
UIButton 590
Custom Controls 595
Bars 598
Bar Position and Bar Metrics 599
Bar Appearance 601
UIBarButtonItem 602
UINavigationBar 604
UIToolbar 607
UITabBar 607
Tint Color 612
Appearance Proxy 614
13. Modal Dialogs. . . 619
Alert View 620
Action Sheet 622
Dialog Alternatives 627
Local Notifications 628
Activity View 632
Part III. Some Frameworks
14. Audio. . . 639
System Sounds 639
Audio Session 640
Interruptions 643
Routing Changes 645
Audio Player 646
Remote Control of Your Sound 648
Playing Sound in the Background 651
Further Topics in Sound 654
15. Video. . . 657
MPMoviePlayerController 658
MPMoviePlayerViewController 664
UIVideoEditorController 665
Introduction to AV Foundation 668
Some AV Foundation Building Blocks 668
Displaying a Movie 669
Synchronizing Video With Animation 671
Building Media 672
Further Exploration of AV Foundation 673
16. Music Library. . . 675
Exploring the Music Library 675
Querying the Music Library 676
Music Player 681
MPVolumeView 684
Playing Songs With AV Foundation 686
Music Picker 688
17. Photo Library and Image Capture. . . 693
Choosing From the Photo Library 693
Assets Library Framework 697
Using the Camera 701
Customizing the Image Capture Interface 703
Image Capture With AV Foundation 705
18. Address Book. . . 709
Address Book Database 709
Address Book Interface 714
ABPeoplePickerNavigationController 715
ABPersonViewController 717
ABNewPersonViewController 718
ABUnknownPersonViewController 719
19. Calendar. . . 721
Calendar Database 721
Creating Calendars and Events 725
Recurrence 727
Fetching Events 729
Reminders 731
Proximity Alarms 732
Calendar Interface 732
EKEventViewController 733
EKEventEditViewController 735
EKCalendarChooser 736
20. Mail and Messages. . . 739
Mail Message 739
Text Message 741
Twitter Post 742
21. Maps. . . 743
Displaying a Map 743
Annotations 746
Custom Annotation View 747
Custom Annotation Class 751
Other Annotation Features 752
Overlays 754
Custom Overlay Class 755
Custom Overlay Renderer 758
Other Overlay Features 760
Map Kit and Current Location 761
Communicating With the Maps App 762
Geocoding, Searching, and Directions 764
Geocoding 764
Searching 766
Directions 766
22. Sensors. . . 769
Core Location 770
Basic Location Determination 771
Heading 775
Background Location 776
Acceleration and Attitude 779
Shake Events 780
Raw Acceleration 781
Gyroscope 785
Part IV. Final Topics
23. Persistent Storage. . . 793
The Sandbox 793
Basic File Operations 794
Saving and Reading Files 796
User Defaults 798
File Sharing 799
Document Types 800
Handing Off a Document 803
Document Architecture 806
iCloud 811
XML 814
SQLite 821
Core Data 821
Image File Formats 827
24. Basic Networking. . . 831
Simple HTTP Request 833
Formal HTTP Request 834
Multiple Tasks 839
Background Downloads 845
Background App Refresh 847
In-App Purchases 848
Bonjour 852
25. Threads. . . 855
Main Thread 855
Why Threading Is Hard 858
Three Ways of Threading 860
Manual Threads 861
NSOperation 863
Grand Central Dispatch 867
Threads and App Backgrounding 872
26. Undo. . . 875
Undo Manager 875
Target–Action Undo 876
Undo Grouping 878
Invocation Undo 879
Undo Interface 880
Shake-To-Edit 880
Undo Menu 881
A. Application Lifetime Events. . . 883
Index. . . 889
Aut lego vel scribo; doceo scrutorve sophian.
—Sedulius Scottus
Preface
This book, now in its fourth edition, has grown in size to encompass the growth in its subject, until it can grow no more. The previous editions — Programming iOS 4 (May 2011), Programming iOS 5 (March 2012), and Programming iOS 6 (March 2013) — were approximately 800 pp., 950 pp., and 1150 pp. in length, respectively, not because I had more to say each time, but because Apple, as it added features to iOS 4 to make iOS 5, and to iOS 5 to make iOS 6, had given me more to describe.
Now iOS 7 has come along with even more new features, and drastic action was needed. Accordingly, the book has been ripped violently but neatly in two — neatly, because there was already a perfectly natural place to do the ripping, namely right after the end of what used to be Part III (Chapter 13). There are now two books:
• A new book, iOS 7 Programming Fundamentals, comprising chapters 1–13 of the earlier books.
• This book, Programming iOS 7, comprising chapters 14–40 of the earlier books.
The truth is that this is a division I had wanted to make even before Programming iOS 4 was published — indeed, before it was even conceived of. My original proposal to O’Reilly Media, back in early 2010, had been for a book to be called Fundamentals of Cocoa Programming, intended to cover very much the same material as iOS 7 Program‐ ming Fundamentals covers now. But the proposal was accepted only on condition that it be extended to cover much more of Cocoa Touch (iOS) programming; so I complied and set to work on this longer project, and later, despite my impassioned pleas in the autumn of 2010, I was unable to persuade the publisher to break up the lengthy manu‐ script into two: by that time, all the king’s horses and all the king’s men could no longer crack Humpty Dumpty apart.
The new situation, therefore, is just what I always wanted in the first place — but not quite, because what I most desired was a single book in two volumes. My idea was that
the books would have the same title, distinguished as Volume I and Volume II, with successive numbering of pages and chapters: if Volume I ended, say, with Chapter 13 and page 400, then Volume II would start with Chapter 14 and page 401. To this de‐ lightfully Victorian extreme, I’m sorry to say, O’Reilly Media were implacably opposed.
Thus, Programming iOS 7, though it starts with its own Chapter 1 and page 1, never‐ theless still picks up exactly where iOS 7 Programming Fundamentals leaves off. They complement and supplement one another. Those who desire a complete grounding in the knowledge needed to begin writing iOS apps with a solid and rigorous understand‐ ing of what they are doing and where they are heading will, I hope, obtain both books. At the same time, the two-book architecture should, I believe, render the size and scope of each book individually more acceptable and attractive to more readers.
Those who feel that they know already all there is to know about C, Objective-C, Xcode, and the linguistic and architectural basis of the Cocoa framework, or who are content to pick up such underpinnings as they go along, need no longer (as some in the past have done) complain that the book is occupied with 13 preliminary chapters before the reader starts really writing any significant iOS code, because those 13 chapters have now been abstracted into a separate volume, iOS 7 Programming Fundamentals, and this book, Programming iOS 7, now begins, like Homer’s Iliad, in the middle of the story, with the reader jumping with all four feet into views and view controllers, and with a knowledge of the language and the Xcode IDE already presupposed. And if such a reader subsequently changes his or her mind and decides that a thorough grounding in those underpinnings might in fact be desirable, iOS 7 Programming Fundamentals will still be available and awaiting study.
Moreover, the existence of iOS 7 Programming Fundamentals means that I, as author and teacher, can make the same assumption in this edition about you, as reader and student, that I made in previous editions — namely, that you have a command of the material in that book. If you find yourself mystified by terminology or concepts used in this book, then it might be wise to stop reading it and take up iOS 7 Programming Fundamentals first! In it, I explain such things as:
• The Objective-C language, starting with C and building up to the object-oriented concepts and mechanics of classes and instances in Objective-C itself.
• The Cocoa Touch framework, which provides important foundational classes and adds linguistic and architectural devices such as categories, protocols, delegation, and notifications, as well as the pervasive responsibilities of memory management, plus key–value coding and key–value observing.
With those basics having been laid down in iOS 7 Programming Fundamentals, this book, Programming iOS 7, assumes that you already know Objective-C and how to work with Xcode to edit code and nibs, make properties and outlets and actions, and so forth, and proceeds to explain the constituents of practical iOS app construction:
• Part I describes views, the fundamental units of an iOS app’s interface. Views are what the user can see and touch in an iOS app. To make something appear before the user’s eyes, you need a view. To let the user interact with your app, you need a view. This part of the book explains how views are created, arranged, drawn, layered, animated, and touched.
• Part II starts by discussing view controllers. Perhaps the most remarkable and im‐ portant feature of iOS programming, view controllers enable views to come and go coherently within the interface, thus allowing a single-windowed app running on what may be a tiny screen to contain multiple screens of material. This part of the book talks about all the ways in which view controllers can be manipulated in order to make their views appear. It also describes every kind of view provided by the Cocoa framework — the built-in “widgets” with which you’ll construct an app’s interface.
• Part III surveys many of the secondary frameworks provided by iOS. These are clumps of code, sometimes with built-in interface, that are not part of your app by default, but are there for the asking if you need them, allowing you to work with such things as sound, video, user libraries, mail, maps, and the device’s sensors.
• Part IV wraps up the book with some miscellaneous but important topics: files, networking, threading, and how to implement Undo and Redo.
• Appendix A summarizes the most important lifetime event messages sent to your app delegate.
Someone who has read this book (and who, it goes without saying, is conversant with the material in iOS 7 Programming Fundamentals) will, I believe, be capable of writing a real-life iOS app, and to do so with a clear understanding of what he or she is doing and where the app is going as it grows and develops. The book itself doesn’t show how to write any particularly interesting iOS apps (though it is backed by dozens of example projects that you can download from my GitHub site, http://github.com/mattneub/ Programming-iOS-Book-Examples), but it does constantly use my own real apps and real programming situations to illustrate and motivate its explanations.
Just as important, this book is intended to prepare you for your own further explorations. In the case of some topics, especially in Part III and Part IV, I guide you past the initial
barrier of no knowledge into an understanding of the topic, its concepts, its capabilities, and its documentation, along with some code examples; but the topic itself may be so huge that there is room only to introduce it here. Your feet, nevertheless, will now be set firmly on the path, and you will know enough that you can now proceed further down that path on your own whenever the need or interest arises.
Indeed, there is always more to learn about iOS. iOS is vast! It is all too easy to find areas of iOS that have had to be ruled outside the scope of this book. In Part IV, for example, I peek at Core Data, and demonstrate its use in code, but a true study of Core Data would require an entire book of its own (and such books exist); so, having opened the door, I quickly close it again, lest this book suddenly double in size. By the same token, many areas of iOS are not treated at all in this book:
OpenGL
An open source C library for drawing, including 3D drawing, that takes full ad‐ vantage of graphics hardware. This is often the most efficient way to draw, especially when animation is involved. iOS incorporates a simplified version of OpenGL called OpenGL ES. See Apple’s OpenGL Programming Guide for iOS. Open GL interface configuration, texture loading, shading, and calculation are simplified by the GLKit framework; see the GLKit Framework Reference.
Sprite Kit
New in iOS 7, Sprite Kit provides a built-in framework for designing 2D animated games.
Accelerate
Certain computation-intensive processes will benefit from the vector-based Accel‐ erate framework. See the vDSP Programming Guide.
Game Kit
The Game Kit framework covers three areas that can enhance your user’s game experience: Wireless or Bluetooth communication directly between devices (peer-to-peer); voice communication across an existing network connection; and Game Center, which facilitates these and many other aspects of interplayer communica‐ tion, such as posting and viewing high scores and setting up combinations of players who wish to compete. See the Game Kit Programming Guide.
Advertising
The iAD framework lets your free app attempt to make money by displaying ad‐ vertisements provided by Apple. See the iAD Programming Guide.
Newsstand
Your app may represent a subscription to something like a newspaper or magazine. See the Newsstand Kit Framework Reference.
Printing
Security
This book does not discuss security topics such as keychains, certificates, and en‐ cryption. See the Security Overview and the Security framework.
Accessibility
VoiceOver assists visually impaired users by describing the interface aloud. To par‐ ticipate, views must be configured to describe themselves usefully. Built-in views already do this to a large extent, and you can extend this functionality. See the Accessibility Programming Guide for iOS.
Telephone
The Core Telephony framework lets your app get information about a particular cellular carrier and call.
Pass Kit
The Pass Kit framework allows creation of downloadable passes to go into the user’s Passbook app. See the Passbook Programming Guide.
External accessories
The user can attach an external accessory to the device, either directly via USB or wirelessly via Bluetooth. Your app can communicate with such an accessory. See External Accessory Programming Topics.
Versions
This book is geared to iOS 7 and Xcode 5. In general, only very minimal attention is given to earlier versions of iOS and Xcode. It is not my intention to embrace in this book any detailed knowledge about earlier versions of the software, which is, after all, readily and compendiously available in my earlier books. There are, nevertheless, a few words of advice about backward compatibility, and now and then I will call out a particularly noteworthy change from earlier versions.
(For example, it has been hard to refrain from pointing out the confusion caused by the changes in how the status bar works, or in the meaning of tintColor, or the nightmarish way in which your perfectly viable iOS 6 project, when recompiled against iOS 7, will try to resize and reposition its views incorrectly, underlapping the navigation bar.)
Xcode 5 no longer offers the user, creating a new app project from one of the project templates, an option as to whether or not to use Automatic Reference Counting (ARC), the compiler-based manual memory management technology that has made life so much easier for iOS programmers in recent years. ARC is simply turned on by default. Therefore, this book assumes from the outset that you are using ARC.
Xcode also no longer provides a template-based option as to whether or not to use a storyboard. All projects (except the Empty Application template) come with a main storyboard, and there is no option to use a main .xib file instead. Taking my cue from
this, I have adapted my teaching style to assume that storyboards are primary and that you’ll usually be using one. (I do also assume that you know how to make and work with a .xib file when you need one, as this is explained in iOS 7 Programming Funda‐ mentals.)
I have also embraced, often without much fanfare, the various other iOS 7 and Xcode 5 innovations. Apple has clearly set out, with this generation of their software, to make iOS programming easier and more pleasant than ever; and by and large they have suc‐ ceeded. For example, modules and autolinking have made it much simpler than in the past to work with additional frameworks, and I simply assume as a matter of course that you will be using them; thus, when telling you what to do in order to employ a certain framework, I give simply the relevant @import command. Similarly, in discussing draw‐ ing and images in Chapter 2, I naturally steer you toward the use of asset catalogs.
Acknowledgments
My thanks go first and foremost to the people at O’Reilly Media who have made writing a book so delightfully easy: Rachel Roumeliotis, Sarah Schneider, Kristen Brown, and Adam Witwer come particularly to mind. And let’s not forget my first and long-standing editor, Brian Jepson, who had nothing whatever to do with this edition, but whose influence is present throughout.
As in the past, I have been greatly aided by some fantastic software, whose excellences I have appreciated at every moment of the process of writing this book. I should like to mention, in particular:
• git (http://git-scm.com)
• SourceTree (http://www.sourcetreeapp.com)
• TextMate (http://macromates.com)
• AsciiDoc (http://www.methods.co.nz/asciidoc)
• BBEdit (http://barebones.com/products/bbedit/)
• Snapz Pro X (http://www.ambrosiasw.com)
• GraphicConverter (http://www.lemkesoft.com)
• OmniGraffle (http://www.omnigroup.com)
From the Programming iOS 4 Preface
A programming framework has a kind of personality, an overall flavor that provides an insight into the goals and mindset of those who created it. When I first encountered Cocoa Touch, my assessment of its personality was: “Wow, the people who wrote this are really clever!” On the one hand, the number of built-in interface widgets was severely and deliberately limited; on the other hand, the power and flexibility of some of those widgets, especially such things as UITableView, was greatly enhanced over their OS X counterparts. Even more important, Apple created a particularly brilliant way (UIView‐ Controller) to help the programmer make entire blocks of interface come and go and supplant one another in a controlled, hierarchical manner, thus allowing that tiny iPhone display to unfold virtually into multiple interface worlds within a single app without the user becoming lost or confused.
The popularity of the iPhone, with its largely free or very inexpensive apps, and the subsequent popularity of the iPad, have brought and will continue to bring into the fold many new programmers who see programming for these devices as worthwhile and doable, even though they may not have felt the same way about OS X. Apple’s own annual WWDC developer conventions have reflected this trend, with their emphasis shifted from OS X to iOS instruction.
The widespread eagerness to program iOS, however, though delightful on the one hand, has also fostered a certain tendency to try to run without first learning to walk. iOS gives the programmer mighty powers that can seem as limitless as imagination itself, but it also has fundamentals. I often see questions online from programmers who are evidently deep into the creation of some interesting app, but who are stymied in a way that reveals quite clearly that they are unfamiliar with the basics of the very world in which they are so happily cavorting.
It is this state of affairs that has motivated me to write this book, which is intended to ground the reader in the fundamentals of iOS. I love Cocoa and have long wished to write about it, but it is iOS and its popularity that has given me a proximate excuse to do so. Here I have attempted to marshal and expound, in what I hope is a pedagogically helpful and instructive yet ruthlessly Euclidean and logical order, the principles and elements on which sound iOS programming rests. My hope, as with my previous books, is that you will both read this book cover to cover (learning something new often enough to keep you turning the pages) and keep it by you as a handy reference.
This book is not intended to disparage Apple’s own documentation and example projects. They are wonderful resources and have become more wonderful as time goes on. I have depended heavily on them in the preparation of this book. But I also find that they don’t fulfill the same function as a reasoned, ordered presentation of the facts. The online documentation must make assumptions as to how much you already know; it can’t guarantee that you’ll approach it in a given order. And online documentation is
more suitable to reference than to instruction. A fully written example, no matter how well commented, is difficult to follow; it demonstrates, but it does not teach.
A book, on the other hand, has numbered chapters and sequential pages; I can assume you know views before you know view controllers for the simple reason that Part I precedes Part II. And along with facts, I also bring to the table a degree of experience, which I try to communicate to you. Throughout this book you’ll find me referring to “common beginner mistakes”; in most cases, these are mistakes that I have made myself, in addition to seeing others make them. I try to tell you what the pitfalls are because I assume that, in the course of things, you will otherwise fall into them just as naturally as I did as I was learning. You’ll also see me construct many examples piece by piece or extract and explain just one tiny portion of a larger app. It is not a massive finished program that teaches programming, but an exposition of the thought process that de‐ veloped that program. It is this thought process, more than anything else, that I hope you will gain from reading this book.
Conventions Used in This Book
The following typographical conventions are used in this book:
Italic
Indicates new terms, URLs, email addresses, filenames, and file extensions.
Constant width
Used for program listings, as well as within paragraphs to refer to program elements such as variable or function names, databases, data types, environment variables, statements, and keywords.
Constant width bold
Shows commands or other text that should be typed literally by the user.
Constant width italic
Shows text that should be replaced with user-supplied values or by values deter‐ mined by context.
This icon signifies a tip, suggestion, or general note.
Using Code Examples
Supplemental material (code examples, exercises, etc.) is available for download at https://github.com/mattneub/Programming-iOS-Book-Examples.
This book is here to help you get your job done. In general, if example code is offered with this book, you may use it in your programs and documentation. You do not need to contact us for permission unless you’re reproducing a significant portion of the code. For example, writing a program that uses several chunks of code from this book does not require permission. Selling or distributing a CD-ROM of examples from O’Reilly books does require permission. Answering a question by citing this book and quoting example code does not require permission. Incorporating a significant amount of ex‐ ample code from this book into your product’s documentation does require permission.
We appreciate, but do not require, attribution. An attribution usually includes the title, author, publisher, and ISBN. For example: “Programming iOS 7 by Matt Neuburg (O’Reilly). Copyright 2014 Matt Neuburg, 978-1-449-37234-7.”
If you feel your use of code examples falls outside fair use or the permission given above, feel free to contact us at [email protected].
Safari® Books Online
Safari Books Online is an on-demand digital library that delivers expert content in both book and video form from the world’s lead‐ ing authors in technology and business.
Technology professionals, software developers, web designers, and business and crea‐ tive professionals use Safari Books Online as their primary resource for research, prob‐ lem solving, learning, and certification training.
Safari Books Online offers a range of product mixes and pricing programs for organi‐ zations, government agencies, and individuals. Subscribers have access to thousands of books, training videos, and prepublication manuscripts in one fully searchable database from publishers like O’Reilly Media, Prentice Hall Professional, Addison-Wesley Pro‐ fessional, Microsoft Press, Sams, Que, Peachpit Press, Focal Press, Cisco Press, John Wiley & Sons, Syngress, Morgan Kaufmann, IBM Redbooks, Packt, Adobe Press, FT Press, Apress, Manning, New Riders, McGraw-Hill, Jones & Bartlett, Course Technol‐ ogy, and dozens more. For more information about Safari Books Online, please visit us online.
How to Contact Us
Please address comments and questions concerning this book to the publisher:
O’Reilly Media, Inc.
1005 Gravenstein Highway North Sebastopol, CA 95472
800-998-9938 (in the United States or Canada) 707-829-0515 (international or local)
707-829-0104 (fax)
We have a web page for this book, where we list errata, examples, and any additional information. You can access this page at http://oreil.ly/programmingiOS7_4e.
To comment or ask technical questions about this book, send email to [email protected].
For more information about our books, courses, conferences, and news, see our website at http://www.oreilly.com.
Find us on Facebook: http://facebook.com/oreilly
Follow us on Twitter: http://twitter.com/oreillymedia
PART I
Views
The things that appear in your app’s interface are, ultimately, views. A view is a unit of your app that knows how to draw itself. A view also knows how to sense that the user has touched it. Views are what your user sees on the screen, and what your user interacts with by touching the screen. Thus, views are the primary constituent of an app’s visible, touchable manifestation. They are your app’s interface. So it’s going to be crucial to know how views work.
• Chapter 1 discusses views in their most general aspect — their hierarchy, visibility, and position, including an explanation of autolayout.
• Chapter 2 is about drawing. A view knows how to draw itself; this chapter explains how to tell a view what you want it to draw, from displaying an existing image to constructing a drawing in code.
• Chapter 3 explains about layers. The drawing power of a view comes ultimately from its layer. To put it another way, a layer is effectively the aspect of a view that knows how to draw — with even more power.
• Chapter 4 tells about animation. An iOS app’s interface isn’t generally static; it’s lively. Much of that liveliness comes from animation. iOS gives you great power to animate your interface with remarkable ease; that power, it turns out, resides ulti‐ mately in layers.
CHAPTER 1
Views
A view (an object whose class is UIView or a subclass of UIView) knows how to draw itself into a rectangular area of the interface. Your app has a visible interface thanks to views. Creating and configuring a view can be extremely simple: “Set it and forget it.” For example, you can drag an interface widget, such as a UIButton, into a view in the nib editor; when the app runs, the button appears, and works properly. But you can also manipulate views in powerful ways, in real time. Your code can do some or all of the view’s drawing of itself (Chapter 2); it can make the view appear and disappear, move, resize itself, and display many other physical changes, possibly with animation (Chap‐ ter 4).
A view is also a responder (UIView is a subclass of UIResponder). This means that a view is subject to user interactions, such as taps and swipes. Thus, views are the basis not only of the interface that the user sees, but also of the interface that the user touches (Chapter 5). Organizing your views so that the correct view reacts to a given touch allows you to allocate your code neatly and efficiently.
The view hierarchy is the chief mode of view organization. A view can have subviews; a subview has exactly one immediate superview. Thus there is a tree of views. This hierarchy allows views to come and go together. If a view is removed from the interface, its subviews are removed; if a view is hidden (made invisible), its subviews are hidden; if a view is moved, its subviews move with it; and other changes in a view are likewise shared with its subviews. The view hierarchy is also the basis of, though it is not identical to, the responder chain.
A view may come from a nib, or you can create it in code. On balance, neither approach is to be preferred over the other; it depends on your needs and inclinations and on the overall architecture of your app.
The Window
The top of the view hierarchy is the app’s window. It is an instance of UIWindow (or your own subclass thereof), which is a UIView subclass. Your app should have exactly one main window. It is created at launch time and is never destroyed or replaced. It occupies the entire screen and forms the background to, and is the ultimate superview of, all your other visible views. Other views are visible by virtue of being subviews, at some depth, of your app’s window.
If your app can display views on an external screen, you’ll create an additional UIWindow to contain those views; but in this chapter I’ll behave as if there were just one screen, the device’s own screen, and just one window. I repeat: if there is just one screen, your app should create just one UIWindow. You may encounter online tutorials that advise explicit creation of a second UIWindow as a way of making content appear in front of the app’s main interface; such statements are wrong and should be disregarded. To make content appear in front of the interface, add a view, not another entire window.
The window must fill the device’s screen. Therefore, its size and position must be iden‐ tical to the size and position of the screen. This is done by setting the window’s frame to the screen’s bounds as the window is instantiated (and I’ll explain later in this chapter what “frame” and “bounds” are):
UIWindow* w = [[UIWindow alloc] initWithFrame:[[UIScreen mainScreen] bounds]];
The window must persist for the lifetime of the app. To make this happen, the app delegate class has been given a window property with a strong retain policy. As the app launches, UIApplicationMain (called in the main function in main.m) instantiates the app delegate class and retains the resulting instance. This is the app delegate instance; it is never released, so it persists for the lifetime of the app. The window instance is assigned to the app delegate instance’s window property; therefore it, too, persists for the lifetime of the app.
the main window a reasonable backgroundColor. But this seems unlikely, and in general you’ll have no reason to change anything about the window itself.
Your app’s interface is not visible until the window, which contains it, is made the app’s key window. This is done by calling the UIWindow instance method makeKeyAnd-Visible.
All of the configuration that I’ve just described is trivial to perform, because the Xcode app templates implement all of it for you:
App with a main storyboard
If your app has a main storyboard, as specified by its Info.plist key “Main storyboard file base name” (UIMainStoryboardFile) — the default for most Xcode 5 app templates, except the Empty Application template — then UIApplicationMain instantiates UIWindow with the correct frame and assigns that instance to the app delegate’s window property. It also instantiates the storyboard’s initial view controller and assigns that instance to the window’s rootViewController property. All of that happens before the app delegate’s application:didFinishLaunchingWith-Options: is called (Appendix A).
Finally, UIApplicationMain calls makeKeyAndVisible to display your app’s inter‐ face. This in turn automatically causes the root view controller to obtain its main view (typically by loading it from a nib), which the window adds as its own root view. That happens after application:didFinishLaunchingWithOptions: is called.
App without a main storyboard
If your app has no main storyboard, then creation and configuration of the window must be done in some other way. Typically, it is done in code. You can see this in a project generated from the Empty Application template, where all the configuration I’ve just described is performed explicitly, in code, in application:didFinish-LaunchingWithOptions:, like this:
self.window =
[[UIWindow alloc] initWithFrame:[[UIScreen mainScreen] bounds]]; // Override point for customization after application launch. self.window.backgroundColor = [UIColor whiteColor];
[self.window makeKeyAndVisible];
It is extremely improbable that you would ever need to subclass UIWindow. If, however, you wanted to create a UIWindow subclass and make an instance of that subclass your app’s main window, then how you proceed depends on how the window is instantiated in the first place:
App with a main storyboard
As the app launches, after UIApplicationMain has instantiated the app delegate, it asks the app delegate instance for the value of its window property. If that value is
nil, UIApplicationMain instantiates UIWindow and assigns that instance to the app delegate’s window property. If that value is not nil, UIApplicationMain leaves it alone and uses it as the app’s main window. Therefore, the way to instantiate a UIWindow subclass and use that instance as your app’s main window is to imple‐ ment the getter for the app delegate’s window property in such a way as to generate the UIWindow subclass instance exactly once (that is, instantiate the UIWindow subclass only if you haven’t already done so), like this:
- (UIWindow*) window {
UIWindow* w = self->_window; if (!w) {
w = [[MyWindow alloc] initWithFrame: [[UIScreen mainScreen] bounds]]; self->_window = w;
}
return w; }
App without a main storyboard
You’re already instantiating UIWindow and assigning that instance to the app del‐ egate’s self.window, in code. So instantiate your UIWindow subclass instead.
Once the app is running, there are various ways to refer to the window:
• If a UIView is in the interface, it automatically has a reference to the window through its own window property.
You can also use a UIView’s window property as a way of asking whether it is ulti‐ mately embedded in the window; if it isn’t, its window property is nil. A UIView whose window property is nil cannot be visible to the user.
• The app delegate instance maintains a reference to the window through its window property. You can get a reference to the app delegate from elsewhere through the shared application’s delegate property, and through it you can refer to the window:
UIWindow* w = [[[UIApplication sharedApplication] delegate] window];
• The shared application maintains a reference to the window through its key-Window property:
UIWindow* w = [[UIApplication sharedApplication] keyWindow];
Experimenting With Views
In the course of this and subsequent chapters, you may want to experiment with views in a project of your own. Since view controllers aren’t formally explained until Chap‐ ter 6, I’ll just outline two simple approaches.
One way is to start your project with the Single View Application template. It gives you a main storyboard containing one scene with one view controller instance which itself contains its own main view; when the app runs, that view controller will become the app’s main window’s rootViewController, and its main view will become the window’s root view. You can drag a view from the Object library into the main view as a subview, and it will be instantiated in the interface when the app runs. Alternatively, you can create views and add them to the interface in code; the simplest place to do this, for now, is the view controller’s viewDidLoad method, which has a reference to the view con‐ troller’s main view as self.view. For example:
- (void)viewDidLoad { [super viewDidLoad];
UIView* mainview = self.view;
UIView* v = [[UIView alloc] initWithFrame:CGRectMake(100,100,50,50)]; v.backgroundColor = [UIColor redColor]; // small red square
[mainview addSubview: v]; // add it to main view }
Alternatively, you can start your project with the Empty Application template. It has no .xib or .storyboard file, so your views will have to be created entirely in code. The Empty Application template does not supply any view controllers, and does not assign any view controller to the window’s rootViewController property. This situation caus‐ es the runtime to complain when the application is launched: “Application windows are expected to have a root view controller at the end of application launch.” A simple solution is to put your code in the app delegate’s application:didFinishLaunching-WithOptions:, creating a minimal root view controller and accessing its main view through its view property. For example:
- (BOOL)application:(UIApplication *)application
didFinishLaunchingWithOptions:(NSDictionary *)launchOptions { // (template code:)
self.window =
[[UIWindow alloc] initWithFrame:[[UIScreen mainScreen] bounds]]; // Override point for customization after application launch. // (your code:)
self.window.rootViewController = [UIViewController new]; UIView* mainview = self.window.rootViewController.view;
UIView* v = [[UIView alloc] initWithFrame:CGRectMake(100,100,50,50)]; v.backgroundColor = [UIColor redColor]; // small red square
[mainview addSubview: v]; // add it to the main view // (template code:)
Figure 1-1. Overlapping views
self.window.backgroundColor = [UIColor whiteColor]; [self.window makeKeyAndVisible];
return YES; }
Subview and Superview
Once upon a time, and not so very long ago, a view owned precisely its rectangular area. No part of any view that was not a subview of this view could appear inside it, because when this view redrew its rectangle, it would erase the overlapping portion of the other view. No part of any subview of this view could appear outside it, because the view took responsibility for its own rectangle and no more.
Those rules, however, were gradually relaxed, and starting in OS X 10.5, Apple intro‐ duced an entirely new architecture for view drawing that lifted those restrictions com‐ pletely. iOS view drawing is based on this revised architecture. In iOS, some or all of a subview can appear outside its superview, and a view can overlap another view and can be drawn partially or totally in front of it without being its subview.
For example, Figure 1-1 shows three overlapping views. All three views have a back‐ ground color, so each is completely represented by a colored rectangle. You have no way of knowing, from this visual representation, exactly how the views are related within the view hierarchy. In actual fact, the view in the middle (horizontally) is a sibling view of the view on the left (they are both direct subviews of the root view), and the view on the right is a subview of the middle view.
Figure 1-2. A view hierarchy as displayed in the nib editor
in code, you know their hierarchical relationship because you created that hierarchy. But the visible interface doesn’t tell you, because view overlapping is so flexible.
To see an outline of a view’s subview hierarchy at runtime while paused in the debugger, use the debugger console to send the
recursiveDescription command to that view; for example, po [someView recursiveDescription].
Nevertheless, a view’s position within the view hierarchy is extremely significant. For one thing, the view hierarchy dictates the order in which views are drawn. Sibling sub‐ views of the same superview have a definite order: one is drawn before the other, so if they overlap, it will appear to be behind its sibling. Similarly, a superview is drawn before its subviews, so if they overlap it, it will appear to be behind them.
You can see this illustrated in Figure 1-1. The view on the right is a subview of the view in the middle and is drawn on top of it. The view on the left is a sibling of the view in the middle, but it is a later sibling, so it is drawn on top of the view in the middle and on top of the view on the right. The view on the left cannot appear behind the view on the right but in front of the view in the middle, because those two views are subview and superview and are drawn together — both are drawn either before or after the view on the left, depending on the ordering of the siblings.
This layering order can be governed in the nib editor by arranging the views in the document outline. (If you click in the canvas, you may be able to use the menu items of the Editor → Arrange menu instead — Send to Front, Send to Back, Send Forward, Send Backward.) In code, there are methods for arranging the sibling order of views, which we’ll come to in a moment.
Here are some other effects of the view hierarchy:
• If a view is removed from or moved within its superview, its subviews go with it.
• A view’s degree of transparency is inherited by its subviews.
• A view can optionally limit the drawing of its subviews so that any parts of them outside the view are not shown. This is called clipping and is set with the view’s clipsToBounds property.
• A superview owns its subviews, in the memory-management sense, much as an NSArray owns its elements; it retains them and is responsible for releasing a subview when that subview ceases to be its subview (it is removed from the collection of this view’s subviews) or when it itself goes out of existence.
• If a view’s size is changed, its subviews can be resized automatically (and I’ll have much more to say about that later in this chapter).
A UIView has a superview property (a UIView) and a subviews property (an NSArray of UIViews, in back-to-front order), allowing you to trace the view hierarchy in code. There is also a method isDescendantOfView: letting you check whether one view is a subview of another at any depth. If you need a reference to a particular view, you will probably arrange this beforehand as an instance variable, perhaps through an outlet. Alternatively, a view can have a numeric tag (its tag property), and can then be referred to by sending any view higher up the view hierarchy the viewWithTag: message. Seeing that all tags of interest are unique within their region of the hierarchy is up to you.
Manipulating the view hierarchy in code is easy. This is part of what gives iOS apps their dynamic quality, and it compensates for the fact that there is basically just a single window. It is perfectly reasonable for your code to rip an entire hierarchy of views out of the superview and substitute another! You can do this directly; you can combine it with animation (Chapter 4); you can govern it through view controllers (Chapter 6).
The method addSubview: makes one view a subview of another; removeFrom-Superview takes a subview out of its superview’s view hierarchy. In both cases, if the superview is part of the visible interface, the subview will appear or disappear; and of course this view may itself have subviews that accompany it. Just remember that re‐ moving a subview from its superview releases it; if you intend to reuse that subview later on, you will wish to retain it first. This is often taken care of through a property with a retain policy.
Events inform a view of these dynamic changes. To respond to these events requires subclassing. Then you’ll be able to override any of these methods:
• didAddSubview: and willRemoveSubview:
• didMoveToSuperview and willMoveToSuperview:
• didMoveToWindow and willMoveToWindow:
• insertSubview:atIndex:
• insertSubview:belowSubview:, insertSubview:aboveSubview:
• exchangeSubviewAtIndex:withSubviewAtIndex:
• bringSubviewToFront:, sendSubviewToBack:
Oddly, there is no command for removing all of a view’s subviews at once. However, a view’s subviews array is an immutable copy of the internal list of subviews, so it is legal to cycle through it and remove each subview one at a time:
for (UIView* v in view.subviews) [v removeFromSuperview];
Here’s an alternative way to do that:
[view.subviews makeObjectsPerformSelector:@selector(removeFromSuperview)];
Visibility and Opacity
A view can be made invisible by setting its hidden property to YES, and visible again by setting it to NO. This takes it (and its subviews, of course) out of the visible interface without the overhead of actually removing it from the view hierarchy. A hidden view does not (normally) receive touch events, so to the user it really is as if the view weren’t there. But it is there, so it can still be manipulated in code.
A view can be assigned a background color through its backgroundColor property. A color is a UIColor; this is not a difficult class to use, and I’m not going to go into details. A view whose background color is nil (the default) has a transparent background. It is perfectly reasonable for a view to have a transparent background and to do no additional drawing of its own, just so that it can act as a convenient superview to other views, making them behave together.
A view can be made partially or completely transparent through its alpha property: 1.0 means opaque, 0.0 means transparent, and a value may be anywhere between them, inclusive. This affects subviews: if a superview has an alpha of 0.5, none of its subviews can have an apparent opacity of more than 0.5, because whatever alpha value they have will be drawn relative to 0.5. (Just to make matters more complicated, colors have an alpha value as well. So, for example, a view can have an alpha of 1.0 but still have a transparent background because its backgroundColor has an alpha less than 1.0.) A view that is completely transparent (or very close to it) is like a view whose hidden is YES: it is invisible, along with its subviews, and cannot (normally) be touched.
A view’s alpha property value affects both the apparent transparency of its background color and the apparent transparency of its contents. For example, if a view displays an
image and has a background color and its alpha is less than 1, the background color will seep through the image (and whatever is behind the view will seep through both).
A view’s opaque property, on the other hand, is a horse of a different color; changing it has no effect on the view’s appearance. Rather, this property is a hint to the drawing system. If a view completely fills its bounds with ultimately opaque material and its alpha is 1.0, so that the view has no effective transparency, then it can be drawn more efficiently (with less drag on performance) if you inform the drawing system of this fact by setting its opaque to YES. Otherwise, you should set its opaque to NO. The opaque value is not changed for you when you set a view’s backgroundColor or alpha! Setting it correctly is entirely up to you; the default, perhaps surprisingly, is YES.
Frame
A view’s frame property, a CGRect, is the position of its rectangle within its superview, in the superview’s coordinate system. By default, the superview’s coordinate system will have the origin at its top left, with the x-coordinate growing positively rightward and the y-coordinate growing positively downward.
Setting a view’s frame to a different CGRect value repositions the view, or resizes it, or both. If the view is visible, this change will be visibly reflected in the interface. On the other hand, you can also set a view’s frame when the view is not visible — for example, when you create the view in code. In that case, the frame describes where the view will be positioned within its superview when it is given a superview. UIView’s designated initializer is initWithFrame:, and you’ll often assign a frame this way, especially because the default frame might otherwise be {{0,0},{0,0}}, which is rarely what you want.
Forgetting to assign a view a frame when creating it in code, and then wondering why it isn’t appearing when added to a superview, is a common beginner mistake. A view with a zero-size frame is effective‐ ly invisible. If a view has a standard size that you want it to adopt, especially in relation to its contents (like a UIButton in relation to its title), an alternative is to send it the sizeToFit message.
We are now in a position to generate programmatically the interface displayed in Figure 1-1:
Figure 1-3. A subview inset from its superview
v3.backgroundColor = [UIColor colorWithRed:1 green:0 blue:0 alpha:1]; [mainview addSubview: v1];
[v1 addSubview: v2]; [mainview addSubview: v3];
In that code, we determined the layering order of v1 and v3 (the middle and left views, which are siblings) by the order in which we inserted them into the view hierarchy with addSubview:.
Bounds and Center
Suppose we have a superview and a subview, and the subview is to appear inset by 10 points, as in Figure 1-3. The utility function CGRectInset makes it easy to derive one rectangle as an inset from another, so we’ll use it to determine the subview’s frame. But what rectangle should this be inset from? Not the superview’s frame; the frame repre‐ sents a view’s position within its superview, and in that superview’s coordinates. What we’re after is a CGRect describing our superview’s rectangle in its own coordinates, because those are the coordinates in which the subview’s frame is to be expressed. The CGRect that describes a view’s rectangle in its own coordinates is the view’s bounds property.
So, the code to generate Figure 1-3 looks like this:
UIView* v1 = [[UIView alloc] initWithFrame:CGRectMake(113, 111, 132, 194)]; v1.backgroundColor = [UIColor colorWithRed:1 green:.4 blue:1 alpha:1]; UIView* v2 = [[UIView alloc] initWithFrame:CGRectInset(v1.bounds, 10, 10)]; v2.backgroundColor = [UIColor colorWithRed:.5 green:1 blue:0 alpha:1]; [mainview addSubview: v1];
[v1 addSubview: v2];
You’ll very often use a view’s bounds in this way. When you need coordinates for drawing inside a view, whether drawing manually or placing a subview, you’ll often refer to the view’s bounds.
Figure 1-4. A subview exactly covering its superview
Interesting things happen when you set a view’s bounds. If you change a view’s bounds size, you change its frame. The change in the view’s frame takes place around its cen‐ ter, which remains unchanged. So, for example:
UIView* v1 = [[UIView alloc] initWithFrame:CGRectMake(113, 111, 132, 194)]; v1.backgroundColor = [UIColor colorWithRed:1 green:.4 blue:1 alpha:1]; UIView* v2 = [[UIView alloc] initWithFrame:CGRectInset(v1.bounds, 10, 10)]; v2.backgroundColor = [UIColor colorWithRed:.5 green:1 blue:0 alpha:1]; [mainview addSubview: v1];
[v1 addSubview: v2]; CGRect r = v2.bounds; r.size.height += 20; r.size.width += 20; v2.bounds = r;
What appears is a single rectangle; the subview completely and exactly covers its su‐ perview, its frame being the same as the superview’s bounds. The call to CGRectInset started with the superview’s bounds and shaved 10 points off the left, right, top, and bottom to set the subview’s frame (Figure 1-3). But then we added 20 points to the subview’s bounds height and width, and thus added 20 points to the subview’s frame height and width as well (Figure 1-4). The center didn’t move, so we effectively put the 10 points back onto the left, right, top, and bottom of the subview’s frame.
When you create a UIView, its bounds coordinate system’s {0,0} point is at its top left. If you change a view’s bounds origin, you move the origin of its internal coordinate system. Because a subview is positioned in its superview with respect to its superview’s coordinate system, a change in the bounds origin of the superview will change the apparent position of a subview. To illustrate, we start once again with our subview inset evenly within its superview, and then change the bounds origin of the superview:
Figure 1-5. The superview’s bounds origin has been shifted
[v1 addSubview: v2]; CGRect r = v1.bounds; r.origin.x += 10; r.origin.y += 10; v1.bounds = r;
Nothing happens to the superview’s size or position. But the subview has moved up and to the left so that it is flush with its superview’s top-left corner (Figure 1-5). Basically, what we’ve done is to say to the superview, “Instead of calling the point at your upper left {0,0}, call that point {10,10}.” Because the subview’s frame origin is itself at {10,10}, the subview now touches the superview’s top-left corner. The effect of chang‐ ing a view’s bounds origin may seem directionally backward — we increased the su‐ perview’s origin in the positive direction, but the subview moved in the negative direc‐ tion — but think of it this way: a view’s bounds origin point coincides with its frame’s top left.
We have seen that changing a view’s bounds size affects its frame size. The converse is also true: changing a view’s frame size affects its bounds size. What is not affected by changing a view’s bounds size is the view’s center. This property, like the frame property, represents the view’s position within its superview, in the superview’s coordinates, but it is the position of the bounds center, the point derived from the bounds like this:
CGPoint c = CGPointMake(CGRectGetMidX(theView.bounds), CGRectGetMidY(theView.bounds));
A view’s center is thus a single point establishing the positional relationship between a view’s bounds and its superview’s bounds. Changing a view’s bounds does not change its center; changing a view’s center does not change its bounds.
Thus, a view’s bounds and center are orthogonal (independent), and describe (among other things) both the view’s size and its position within its superview. The view’s frame is therefore superfluous! In fact, the frame property is merely a convenient expression of the center and bounds values. In most cases, this won’t matter to you; you’ll use the
frame property anyway. When you first create a view from scratch, the designated ini‐ tializer is initWithFrame:. You can change the frame, and the bounds size and center will change to match. You can change the bounds size or the center, and the frame will change to match. Nevertheless, the proper and most reliable way to position and size a view within its superview is to use its bounds and center, not its frame; there are some situations in which the frame is meaningless (or will at least behave very oddly), but the bounds and center will always work.
We have seen that every view has its own coordinate system, expressed by its bounds, and that a view’s coordinate system has a clear relationship to its superview’s coordinate system, expressed by its center. This is true of every view in a window, so it is possible to convert between the coordinates of any two views in the same window. Convenience methods are supplied to perform this conversion both for a CGPoint and for a CGRect:
• convertPoint:fromView:, convertPoint:toView:
• convertRect:fromView:, convertRect:toView:
If the second parameter is nil, it is taken to be the window.
For example, if v2 is a subview of v1, then to center v2 within v1 you could say:
v2.center = [v1 convertPoint:v1.center fromView:v1.superview];
When setting a view’s position by setting its center, if the height or width of the view is not an integer (or, on a single-resolution screen, not an even integer), the view can end up misaligned: its point values in one or both dimensions are located between the screen pixels. This can cause the view to be displayed incorrectly; for example, if the view contains text, the text may be blurry. You can detect this situation in the Simulator by checking Debug → Color Misaligned Images. A sim‐ ple solution is to set the view’s frame, after positioning it, to the CGRect-Integral of its frame.
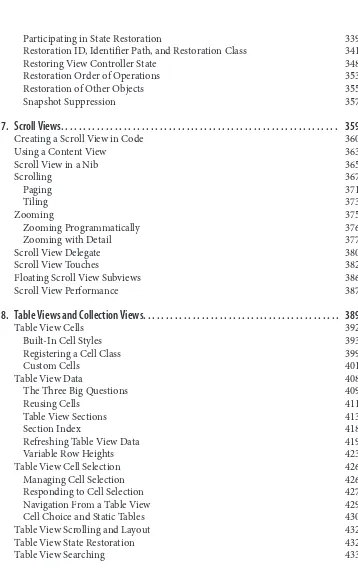
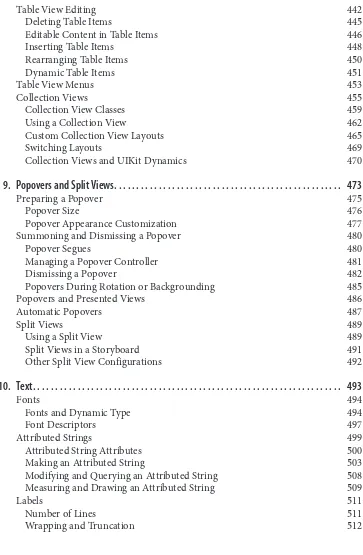
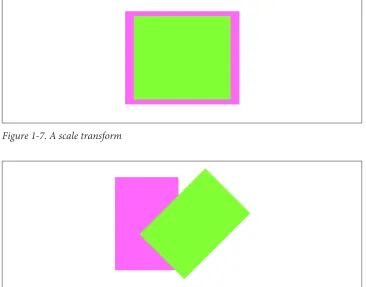
Transform
A view’s transform property alters how the view is drawn — it may, for example, change the view’s perceived size and orientation — without affecting its bounds and center. A transformed view continues to behave correctly: a rotated button, for example, is still a button, and can be tapped in its apparent location and orientation.