by John Walkenbach
Excel
VBA
Programming
FOR
DUMmIES
‰111 River Street Hoboken, NJ 07030-5774
www.wiley.com
Copyright © 2013 by John Wiley & Sons, Inc., Hoboken, New Jersey Published by John Wiley & Sons, Inc., Hoboken, New Jersey Published simultaneously in Canada
No part of this publication may be reproduced, stored in a retrieval system or transmitted in any form or by any means, electronic, mechanical, photocopying, recording, scanning or otherwise, except as permit-ted under Sections 107 or 108 of the 1976 Unipermit-ted States Copyright Act, without either the prior written permission of the Publisher, or authorization through payment of the appropriate per-copy fee to the Copyright Clearance Center, 222 Rosewood Drive, Danvers, MA 01923, (978) 750-8400, fax (978) 646-8600. Requests to the Publisher for permission should be addressed to the Permissions Department, John Wiley & Sons, Inc., 111 River Street, Hoboken, NJ 07030, (201) 748-6011, fax (201) 748-6008, or online at http:// www.wiley.com/go/permissions.
Trademarks: Wiley, the Wiley logo, For Dummies, the Dummies Man logo, A Reference for the Rest of Us!, The Dummies Way, Dummies Daily, The Fun and Easy Way, Dummies.com, Making Everything Easier, and related trade dress are trademarks or registered trademarks of John Wiley & Sons, Inc. and/or its affili-ates in the United Staffili-ates and other countries, and may not be used without written permission. All other trademarks are the property of their respective owners. John Wiley & Sons, Inc. is not associated with any product or vendor mentioned in this book.
LIMIT OF LIABILITY/DISCLAIMER OF WARRANTY: THE PUBLISHER AND THE AUTHOR MAKE NO REPRESENTATIONS OR WARRANTIES WITH RESPECT TO THE ACCURACY OR COMPLETENESS OF THE CONTENTS OF THIS WORK AND SPECIFICALLY DISCLAIM ALL WARRANTIES, INCLUDING WITH-OUT LIMITATION WARRANTIES OF FITNESS FOR A PARTICULAR PURPOSE. NO WARRANTY MAY BE CREATED OR EXTENDED BY SALES OR PROMOTIONAL MATERIALS. THE ADVICE AND STRATEGIES CONTAINED HEREIN MAY NOT BE SUITABLE FOR EVERY SITUATION. THIS WORK IS SOLD WITH THE UNDERSTANDING THAT THE PUBLISHER IS NOT ENGAGED IN RENDERING LEGAL, ACCOUNTING, OR OTHER PROFESSIONAL SERVICES. IF PROFESSIONAL ASSISTANCE IS REQUIRED, THE SERVICES OF A COMPETENT PROFESSIONAL PERSON SHOULD BE SOUGHT. NEITHER THE PUBLISHER NOR THE AUTHOR SHALL BE LIABLE FOR DAMAGES ARISING HEREFROM. THE FACT THAT AN ORGANIZA-TION OR WEBSITE IS REFERRED TO IN THIS WORK AS A CITAORGANIZA-TION AND/OR A POTENTIAL SOURCE OF FURTHER INFORMATION DOES NOT MEAN THAT THE AUTHOR OR THE PUBLISHER ENDORSES THE INFORMATION THE ORGANIZATION OR WEBSITE MAY PROVIDE OR RECOMMENDATIONS IT MAY MAKE. FURTHER, READERS SHOULD BE AWARE THAT INTERNET WEBSITES LISTED IN THIS WORK MAY HAVE CHANGED OR DISAPPEARED BETWEEN WHEN THIS WORK WAS WRITTEN AND WHEN IT IS READ. FULFILLMENT OF EACH COUPON OFFER IS THE SOLE RESPONSIBILITY OF THE OFFEROR.
For general information on our other products and services, please contact our Customer Care Department within the U.S. at 877-762-2974, outside the U.S. at 317-572-3993, or fax 317-572-4002. For technical support, please visit www.wiley.com/techsupport.
Wiley publishes in a variety of print and electronic formats and by print-on-demand. Some material included with standard print versions of this book may not be included in e-books or in print-on-demand. If this book refers to media such as a CD or DVD that is not included in the version you purchased, you may download this material at http://booksupport.wiley.com. For more information about Wiley products, visit www.wiley.com.
Library of Congress Control Number: 2012956413
ISBN 978-1-118-49037-2 (pbk); ISBN 978-1-118-49038-9 (ePub); ISBN 978-1-118-49181-2 (eMobi); ISBN 978-1-118-49174-4 (ePDF)
John Walkenbach is the best-selling author of more than 50 spreadsheet books and lives in southern Arizona. When he’s not using Excel, he’s probably playing clawhammer banjo.
Dedication
Sub Book_Dedication()
name = Application.UserName
reason = InputBox(“What makes “ & name & “ so special?”)
msg = “This book is dedicated to “ & name msg = msg & “ because “ & reason
MsgBox msg, vbInformation, “Dedication” End Sub
Author’s Acknowledgments
outside the U.S. at 317-572-3993, or fax 317-572-4002.
Some of the people who helped bring this book to market include the following:
Acquisitions and Editorial
Project Editor: Kelly Ewing
(Previous Edition: Colleen Totz Diamond)
Senior Acquisitions Editor: Katie Mohr
Technical Editor: Niek Otten
Editorial Manager: Jodi Jensen
Editorial Assistant: Anne Sullivan
Sr. Editorial Assistant: Cherie Case
Cover Photo: ©Konstantin Inozemtsev/ iStockphoto
Composition Services
Project Coordinator: Katherine Crocker
Layout and Graphics: Jennifer Creasey, Christin Swinford
Proofreaders: Melissa Cossell, Jessica Kramer, Tricia Liebig, Rob Springer
Indexer: BIM Indexing & Proofreading Services
Publishing and Editorial for Technology Dummies
Richard Swadley, Vice President and Executive Group Publisher
Andy Cummings, Vice President and Publisher
Mary Bednarek, Executive Acquisitions Director
Mary C. Corder, Editorial Director Publishing for Consumer Dummies
Kathleen Nebenhaus, Vice President and Executive Publisher Composition Services
Introduction ... 1
Part I: Getting Started with Excel VBA Programming ... 9
Chapter 1: What Is VBA? ... 11
Chapter 2: Jumping Right In ... 21
Part II: How VBA Works with Excel ... 31
Chapter 3: Working in the Visual Basic Editor ... 33
Chapter 4: Introducing the Excel Object Model ... 53
Chapter 5: VBA Sub and Function Procedures ... 67
Chapter 6: Using the Excel Macro Recorder ... 79
Part III: Programming Concepts ... 91
Chapter 7: Essential VBA Language Elements ... 93
Chapter 8: Working with Range Objects ... 115
Chapter 9: Using VBA and Worksheet Functions... 129
Chapter 10: Controlling Program Flow and Making Decisions... 143
Chapter 11: Automatic Procedures and Events ... 163
Chapter 12: Error-Handling Techniques ... 183
Chapter 13: Bug Extermination Techniques ... 197
Chapter 14: VBA Programming Examples... 209
Part IV: Communicating with Your Users ... 231
Chapter 15: Simple Dialog Boxes ... 233
Chapter 16: UserForm Basics ... 249
Chapter 17: Using UserForm Controls ... 265
Chapter 18: UserForm Techniques and Tricks ... 283
Chapter 19: Accessing Your Macros through the User Interface ... 307
Part V: Putting It All Together ... 327
Chapter 20: Creating Worksheet Functions — and Living to Tell about It ... 329
Chapter 23: (Almost) Ten Excel Resources ... 365 Chapter 24: Ten VBA Do’s and Don’ts ... 369
Introduction ... 1
Is This the Right Book? ... 1
So You Want to Be a Programmer. . . . ... 2
Why Bother? ... 2
What I Assume about You ... 3
Obligatory Typographical Conventions Section ... 4
Check Your Security Settings ... 5
How This Book Is Organized ... 6
Part I: Getting Started with Excel VBA Programming ... 6
Part II: How VBA Works with Excel ... 6
Part III: Programming Concepts ... 6
Part IV: Communicating with Your Users ... 7
Part V: Putting It All Together ... 7
Part VI: The Part of Tens ... 7
Icons Used in This Book ... 7
Getting the Sample Files ... 8
Now What? ... 8
Part I: Getting Started with Excel VBA Programming ... 9
Chapter 1: What Is VBA? . . . .11
Okay, So What Is VBA? ... 11
What Can You Do with VBA? ... 12
Inserting a bunch of text ... 13
Automating a task you perform frequently ... 13
Automating repetitive operations ... 13
Creating a custom command... 13
Creating a custom button ... 13
Developing new worksheet functions ... 14
Creating custom add-ins for Excel ... 14
Creating complete, macro-driven applications ... 14
Advantages and Disadvantages of VBA ... 14
VBA advantages ... 14
VBA disadvantages ... 15
VBA in a Nutshell ... 15
Chapter 2: Jumping Right In . . . .21
First Things First ... 21
What You’ll Be Doing ... 22
Taking the First Steps ... 22
Recording the Macro ... 23
Testing the Macro ... 24
Examining the Macro ... 25
Modifying the Macro ... 27
Saving Workbooks That Contain Macros ... 27
Understanding Macro Security ... 28
More about the NameAndTime Macro ... 30
Part II: How VBA Works with Excel ... 31
Chapter 3: Working in the Visual Basic Editor . . . .33
What Is the Visual Basic Editor? ... 33
Activating the VBE ... 33
Understanding VBE components ... 34
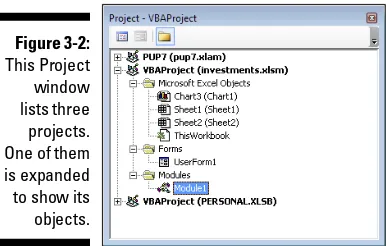
Working with the Project Window ... 36
Adding a new VBA module ... 37
Removing a VBA module ... 38
Exporting and importing objects ... 38
Working with a Code Window ... 39
Minimizing and maximizing windows ... 39
Creating a module ... 40
Getting VBA code into a module ... 41
Entering code directly ... 41
Using the macro recorder ... 44
Copying VBA code ... 46
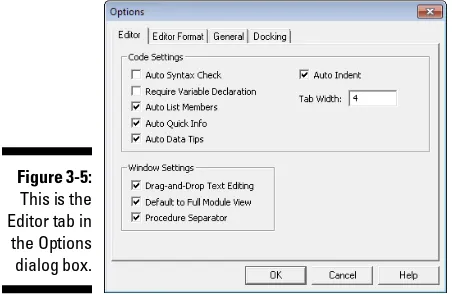
Customizing the VBA Environment ... 47
Using the Editor tab ... 47
Using the Editor Format tab ... 50
Using the General tab ... 51
Using the Docking tab ... 52
Chapter 4: Introducing the Excel Object Model . . . .53
Excel Is an Object? ... 54
Climbing the Object Hierarchy ... 54
Wrapping Your Mind around Collections ... 55
Referring to Objects ... 56
Navigating through the hierarchy ... 57
Simplifying object references ... 57
Diving into Object Properties and Methods ... 58
Object properties ... 60
Object methods ... 61
Finding Out More ... 63
Using VBA’s Help system ... 63
Using the Object Browser ... 64
Automatically listing properties and methods ... 65
Chapter 5: VBA Sub and Function Procedures . . . .67
Subs versus Functions ... 67
Looking at Sub procedures ... 68
Looking at Function procedures ... 68
Naming Subs and Functions ... 69
Executing Sub procedures ... 69
Executing the Sub procedure directly ... 71
Executing the procedure from the Macro dialog box ... 72
Executing a macro by using a shortcut key... 72
Executing the procedure from a button or shape ... 74
Executing the procedure from another procedure ... 75
Executing Function procedures ... 76
Calling the function from a Sub procedure ... 76
Calling a function from a worksheet formula ... 77
Chapter 6: Using the Excel Macro Recorder. . . .79
Is It Live, or Is It VBA? ... 79
Recording Basics ... 80
Preparing to Record ... 82
Relative or Absolute? ... 82
Recording in absolute mode... 82
Recording in relative mode ... 83
What Gets Recorded? ... 85
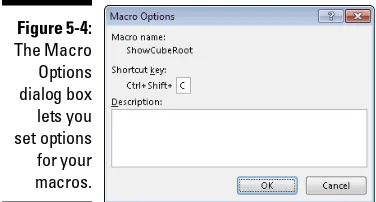
Recording Options ... 86
Macro name ... 87
Shortcut key ... 87
Store Macro In ... 87
Description ... 87
Is This Thing Efficient? ... 88
Part III: Programming Concepts ... 91
Chapter 7: Essential VBA Language Elements . . . .93
Using Comments in Your VBA Code ... 93
Using Variables, Constants, and Data Types ... 95
Understanding variables ... 95
What are VBA’s data types? ... 96
Declaring and scoping variables ... 98
Working with constants ... 104
Pre-made constants ... 105
Working with strings ... 106
Using Assignment Statements ... 108
Assignment statement examples ... 108
About that equal sign ... 109
Smooth operators ... 109
Working with Arrays ... 111
Declaring arrays ... 111
Multidimensional arrays ... 112
Dynamic arrays ... 113
Using Labels ... 114
Chapter 8: Working with Range Objects . . . .115
A Quick Review ... 115
Other Ways to Refer to a Range ... 117
The Cells property ... 117
The Offset property ... 118
Some Useful Range Object Properties ... 119
The Value property... 120
The Text property... 121
The Count property ... 121
The Column and Row properties ... 121
The Address property ... 122
The HasFormula property ... 122
The Font property... 123
The Interior property ... 125
The Formula property ... 125
The NumberFormat property ... 126
Some Useful Range Object Methods ... 126
The Select method ... 126
The Copy and Paste methods ... 127
The Clear method ... 128
The Delete method ... 128
Chapter 9: Using VBA and Worksheet Functions . . . .129
What Is a Function? ... 129
Using Built-In VBA Functions ... 130
VBA function examples ... 130
VBA functions that do more than return a value ... 132
Discovering VBA functions ... 133
Using Worksheet Functions in VBA ... 136
Worksheet function examples ... 136
Entering worksheet functions ... 139
More about using worksheet functions ... 140
Chapter 10: Controlling Program Flow and Making Decisions . . . . .143
Going with the Flow, Dude ... 143
The GoTo Statement ... 144
Decisions, Decisions ... 145
The If-Then structure ... 146
The Select Case structure ... 150
Knocking Your Code for a Loop ... 153
For-Next loops ... 153
Do-While loop ... 159
Do-Until loop ... 159
Using For Each-Next Loops With Collections ... 160
Chapter 11: Automatic Procedures and Events. . . .163
Preparing for the Big Event ... 163
Are events useful? ... 165
Programming event-handler procedures ... 165
Where Does the VBA Code Go? ... 166
Writing an Event-Handler Procedure ... 167
Introductory Examples ... 168
The Open event for a workbook ... 168
The BeforeClose event for a workbook ... 171
The BeforeSave event for a workbook ... 172
Examples of Activation Events ... 173
Activate and deactivate events in a sheet ... 173
Activate and deactivate events in a workbook ... 174
Workbook activation events... 175
Other Worksheet-Related Events ... 176
The BeforeDoubleClick event ... 176
The BeforeRightClick event ... 176
The Change event ... 177
Events Not Associated with Objects ... 179
The OnTime event ... 179
Keypress events ... 181
Chapter 12: Error-Handling Techniques. . . .183
Types of Errors ... 183
An Erroneous Example ... 184
The macro’s not quite perfect ... 185
The macro is still not perfect ... 186
Is the macro perfect yet? ... 186
Giving up on perfection ... 187
Handling Errors Another Way ... 188
Revisiting the EnterSquareRoot procedure... 188
Handling Errors: The Details ... 190
Resuming after an error ... 190
Error handling in a nutshell ... 192
Knowing when to ignore errors ... 192
Identifying specific errors ... 193
An Intentional Error ... 194
Chapter 13: Bug Extermination Techniques . . . .197
Species of Bugs ... 197
Identifying Bugs ... 198
Debugging Techniques ... 199
Examining your code ... 199
Using the MsgBox function ... 200
Inserting Debug.Print statements ... 201
Using the VBA debugger ... 202
About the Debugger ... 202
Setting breakpoints in your code ... 202
Using the Watch window ... 205
Using the Locals window ... 207
Bug Reduction Tips ... 208
Chapter 14: VBA Programming Examples . . . .209
Working with Ranges ... 209
Copying a range ... 210
Copying a variable-sized range ... 211
Selecting to the end of a row or column ... 212
Selecting a row or column ... 213
Moving a range ... 213
Looping through a range efficiently ... 214
Looping through a range efficiently (Part II) ... 216
Prompting for a cell value ... 216
Determining the selection type ... 217
Identifying a multiple selection ... 218
Changing Excel Settings ... 219
Changing Boolean settings ... 219
Changing non-Boolean settings ... 220
Working with Charts ... 220
AddChart versus AddChart2 ... 221
Modifying the chart type ... 223
Looping through the ChartObjects collection ... 223
Modifying chart properties... 224
Applying chart formatting ... 224
VBA Speed Tips ... 225
Turning off screen updating ... 226
Turning off automatic calculation ... 227
Eliminating those pesky alert messages ... 227
Simplifying object references ... 228
Declaring variable types ... 229
Part IV: Communicating with Your Users ... 231
Chapter 15: Simple Dialog Boxes . . . .233
UserForm Alternatives ... 233
The MsgBox Function ... 234
Displaying a simple message box ... 235
Getting a response from a message box ... 235
Customizing message boxes ... 236
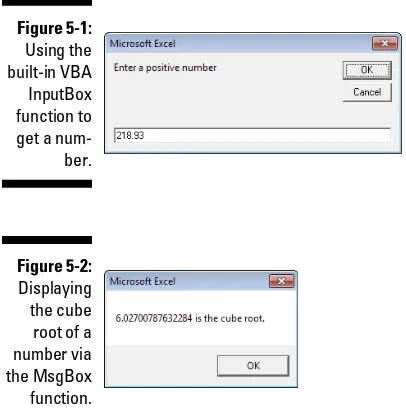
The InputBox Function ... 240
InputBox syntax ... 240
An InputBox example ... 240
Another type of InputBox ... 242
The GetOpenFilename Method ... 243
The syntax for the GetOpenFilename method ... 243
A GetOpenFilename example ... 244
The GetSaveAsFilename Method ... 246
Getting a Folder Name ... 246
Displaying Excel’s Built-in Dialog Boxes ... 247
Chapter 16: UserForm Basics . . . .249
Knowing When to Use a UserForm ... 249
Creating UserForms: An Overview ... 250
Working with UserForms ... 251
Inserting a new UserForm ... 251
Adding controls to a UserForm ... 252
Changing properties for a UserForm control ... 253
Viewing the UserForm Code window ... 254
Displaying a UserForm ... 255
Using information from a UserForm ... 255
A UserForm Example ... 256
Creating the UserForm ... 256
Adding the CommandButtons ... 257
Adding the OptionButtons ... 258
Adding event-handler procedures ... 259
Creating a macro to display the dialog box... 261
Making the macro available ... 262
Testing the macro ... 263
Chapter 17: Using UserForm Controls. . . .265
Getting Started with Dialog Box Controls ... 265
Adding controls ... 265
Introducing control properties ... 266
Dialog Box Controls: The Details ... 269
CheckBox control ... 269
ComboBox control ... 270
CommandButton control ... 270
Frame control ... 271
Label control ... 272
Working with Dialog Box Controls ... 279
Moving and resizing controls ... 279
Aligning and spacing controls ... 280
Accommodating keyboard users ... 280
Testing a UserForm ... 282
Dialog Box Aesthetics ... 282
Chapter 18: UserForm Techniques and Tricks . . . .283
Using Dialog Boxes ... 283
A UserForm Example ... 284
Creating the dialog box ... 284
Writing code to display the dialog box ... 286
Making the macro available ... 286
Trying out your dialog box ... 287
Adding event-handler procedures ... 288
Validating the data ... 289
Now the dialog box works ... 290
More UserForm Examples ... 290
A ListBox example ... 290
Selecting a range ... 295
Using multiple sets of OptionButtons ... 297
Using a SpinButton and a TextBox ... 297
Using a UserForm as a progress indicator ... 299
Creating a modeless tabbed dialog box ... 303
Displaying a chart in a UserForm... 304
A Dialog Box Checklist ... 305
Chapter 19: Accessing Your Macros through the User Interface . . .307
Ribbon Customization ... 307
Customizing the Ribbon manually ... 307
Adding a macro to the Ribbon ... 310
Customizing the Ribbon with XML ... 310
Customizing Shortcut Menus ... 314
Commanding the CommandBars collection ... 315
Listing all shortcut menus ... 315
Referring to CommandBars ... 315
Referring to controls in a CommandBar ... 316
VBA Shortcut Menu Examples ... 319
Resetting all built-in, right-click menus ... 320
Adding a new item to the Cell shortcut menu ... 320
Disabling a shortcut menu ... 322
Creating a Custom Toolbar ... 323
Part V: Putting It All Together ... 327
Chapter 20: Creating Worksheet Functions —
and Living to Tell about It . . . .329
Why Create Custom Functions? ... 329
Understanding VBA Function Basics ... 330
Writing Functions ... 331
Working with Function Arguments ... 331
Function Examples ... 332
A function with no argument ... 332
A function with one argument ... 333
A function with two arguments ... 334
A function with a range argument ... 336
A function with an optional argument ... 337
Wrapper Functions ... 339
The NumberFormat function ... 339
The ExtractElement function... 340
The SayIt function ... 340
The IsLike function ... 341
Functions That Return an Array ... 341
Returning an array of month names ... 341
Returning a sorted list ... 342
Using the Insert Function Dialog Box ... 344
Displaying the function’s description ... 344
Argument descriptions ... 345
Chapter 21: Creating Excel Add-Ins . . . .347
Okay . . . So What’s an Add-In? ... 347
Why Create Add-Ins? ... 348
Working with Add-Ins ... 349
Add-In Basics ... 350
An Add-In Example ... 351
Setting up the workbook ... 351
Testing the workbook ... 353
Adding descriptive information ... 354
Protecting the VBA code ... 354
Creating the add-in ... 355
Opening the add-in ... 355
Distributing the add-in ... 356
Part VI: The Part of Tens ... 359
Chapter 22: Ten VBA Questions (and Answers) . . . .361
Chapter 23: (Almost) Ten Excel Resources . . . .365
The VBA Help System ... 365
Microsoft Product Support ... 365
Internet Websites ... 366
Excel Blogs ... 366
Google ... 367
Bing ... 367
Local User Groups ... 367
My Other Books ... 367
Chapter 24: Ten VBA Do’s and Don’ts . . . .369
Do Declare All Variables ... 369
Don’t Confuse Passwords with Security ... 370
Do Clean Up Your Code ... 370
Don’t Put Everything in One Procedure ... 371
Do Consider Other Software ... 371
Don’t Assume That Everyone Enables Macros ... 371
Do Get in the Habit of Experimenting ... 372
Don’t Assume That Your Code Will Work with Other Excel Versions .... 372
Do Keep Your Users in Mind ... 372
Don’t Forget About Backups ... 373
G
reetings, prospective Excel programmer. . . .Thanks for buying my book. I think you’ll find that it offers a fast, enjoy-able way to discover the ins and outs of Microsoft Excel programming. Even if you don’t have the foggiest idea of what programming is all about, this book can help you make Excel jump through hoops in no time (well, it will take some time).
Unlike most programming books, this one is written in plain English, and even normal people can understand it. Even better, it’s filled with information of the “just the facts, ma’am” variety — and not the drivel you might need once every third lifetime.
Is This the Right Book?
Go to any large bookstore (in-person or online), and you’ll find many Excel books (far too many, as far as I’m concerned). A quick overview can help you decide whether this book is really right for you. This book
✓ Is designed for intermediate to advanced Excel users who want to get up to speed with Visual Basic for Applications (VBA) programming.
✓ Requires no previous programming experience.
✓ Covers the most commonly used commands.
✓ Is appropriate for Excel 2010 or Excel 2013.
✓ Just might make you crack a smile occasionally — it even has cartoons.
If you’re using Excel 2000, XP, or 2003, this book is not for you. If you’re using Excel 2007, it might be okay, but some things have changed. You’d probably be better off with the previous edition.
Oh yeah, this is not an introductory Excel book. If you’re looking for a gen-eral-purpose Excel book, check out any of the following books, which are all published by Wiley:
✓ Excel 2013 For Dummies, by Greg Harvey
These books are also available in editions for earlier versions of Excel.
Notice that the title of this book isn’t The Complete Guide to Excel VBA Programming For Dummies. I don’t cover all aspects of Excel programming — but then again, you probably don’t want to know everything about this topic. If you consume this book and find that you’re hungry for a more compre-hensive Excel programming book, you might try Microsoft Excel 2013 Power Programming with VBA, by John Walkenbach, also published by Wiley. And, yes, editions for older versions of Excel are also available.
So You Want to Be a Programmer. . . .
Besides earning money to pay my bills, my main goal in writing this book is to show Excel users how to use the VBA language — a tool that helps you sig-nificantly enhance the power of the world’s most popular spreadsheet. Using VBA, however, involves programming. (Yikes! The p word.)
If you’re like most computer users, the word programmer conjures up an image of someone who looks and behaves nothing like you. Perhaps words such as nerd, geek, and dweeb come to mind.
Times have changed. Computer programming has become much easier, and even so-called normal people now engage in this activity — and even admit it to friends and family. Programming simply means developing instructions that the computer automatically carries out. Excel programming refers to the fact that you can instruct Excel to automatically do things that you normally do manually — saving you lots of time and (you hope) reducing errors. I could go on, but I need to save some good stuff for Chapter 1.
If you’ve read this far, it’s a safe bet that you need to become an Excel pro-grammer. This could be something you came up with yourself or (more likely) something your boss decided. In this book, I tell you enough about Excel programming so that you won’t feel like an idiot the next time you’re trapped in a conference room with a group of Excel aficionados. And by the time you finish this book, you can honestly say, “Yeah, I do some Excel pro-gramming.”
Why Bother?
✓ It will make you more marketable. Like it or not, Microsoft’s applica-tions are extremely popular. You may already know that all applicaapplica-tions in Microsoft Office support VBA. The more you know about VBA, the better your chances for advancement in your job.
✓ It lets you get the most out of your software investment (or, more likely, your employer’s software investment). Using Excel without knowing VBA is sort of like buying a TV set and watching only the odd-numbered channels.
✓ It will improve your productivity (eventually). Mastering VBA definitely takes some time, but you’ll more than make up for this in the amount of time you ultimately save because you’re more productive. Sort of like what they told you about going to college.
✓ It’s fun (well, sometimes). Some people really enjoy making Excel do things that are otherwise impossible. By the time you finish this book, you just might be one of those people.
Now are you convinced?
What I Assume about You
People who write books usually have a target reader in mind. For this book, my target reader is a conglomerate of dozens of Excel users I’ve met over the years (either in person or out in cyberspace). The following points more or less describe my hypothetical target reader:
✓ You have access to a PC at work — and probably at home. And those computers are connected to the Internet.
✓ You’re running Excel 2010 or Excel 2013.
✓ You’ve been using computers for several years.
✓ You use Excel frequently in your work, and you consider yourself to be more knowledgeable about Excel than the average bear.
✓ You need to make Excel do some things that you currently can’t make it do.
✓ You have little or no programming experience.
✓ You understand that the Help system in Excel can actually be useful. Face it, this book doesn’t cover everything. If you get on good speaking terms with the Help system, you’ll be able to fill in some of the missing pieces.
Obligatory Typographical
Conventions Section
All computer books have a section like this. (I think some federal law requires it.) Read it or skip it.
Sometimes, I refer to key combinations — which means you hold down one key while you press another. For example, Ctrl+Z means you hold down the Ctrl key while you press Z.
For menu commands, I use a distinctive character to separate items on the Ribbon or menu. For example, you use the following command to create a named range in a worksheet:
Formulas➪Defined Names➪Define Name
Formulas is the tab at the top of the Ribbon, Defined Names is the Ribbon group, and Define Name is the actual command.
The Visual Basic editor still uses old-fashioned menus and toolbars. So I might tell you to choose Tools➪Options. That means choose the Tools menu and then choose the Options menu item.
Any text you need to enter appears in bold. For example, I might say, enter
=SUM(B:B) in cell A1.
Excel programming involves developing code — that is, the instructions Excel follows. All code in this book appears in a monospace font, like this:
Range(“A1:A12”).Select
Some long lines of code don’t fit between the margins in this book. In such cases, I use the standard VBA line-continuation character sequence: a space followed by an underscore character. Here’s an example:
Selection.PasteSpecial Paste:=xlValues, _ Operation:=xlNone, SkipBlanks:=False, _ Transpose:=False
Check Your Security Settings
It’s a cruel world out there. It seems that some scam artist is always trying to take advantage of you or cause some type of problem. The world of com-puting is equally cruel. You probably know about computer viruses, which can cause some nasty things to happen to your system. But did you know that computer viruses can also reside in an Excel file? It’s true. In fact, it’s relatively easy to write a computer virus by using VBA. An unknowing user can open an Excel file and spread the virus to other Excel workbooks, and to other systems.
Over the years, Microsoft has become increasingly concerned about security issues. This is a good thing, but it also means that Excel users need to under-stand how things work. You can check Excel’s security settings by using the File➪Options➪Trust Center➪Trust Center Settings command. There is a plethora of options in there, and people have been known to open that dialog box and never be heard from again.
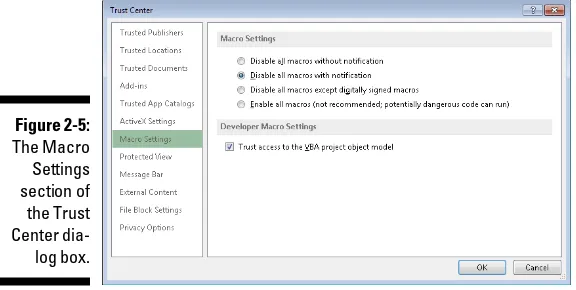
If you click the Macro Settings tab (on the left side of the Trust Center dialog box), your options are as follows:
✓ Disable all macros without notification: Macros will not work, regard-less of what you do.
✓ Disable all macros with notification: When you open a workbook with macros, you will either see the Message Bar open with an option you can click to enable macros, or (if the Visual Basic Editor window is open) you’ll get a message asking if you want to enable macros.
✓ Disable all macros except digitally signed macros: Only macros with a digital signature are allowed to run (but even for those signatures you haven’t marked as trusted, you still get the security warning).
✓ Enable all macros: Let all macros run with no warnings. This option is not recommended because potentially dangerous code can be executed.
Consider this scenario: You spend a week writing a killer VBA program that will revolutionize your company. You test it thoroughly and then send it to your boss. He calls you into his office and claims that your macro doesn’t do anything at all. What’s going on? Chances are, your boss’s security setting does not allow macros to run. Or maybe he chose to go along with Microsoft’s default suggestion and disable the macros when he opened the file.
In order to work with this book, you will need to enable macros for the files you work with. My advice is to use the second security level. Then when you open a file that you’ve created, you can simply enable the macros. If you open a file from someone you don’t know, you should disable the macros and check the VBA code to ensure that it doesn’t contain anything destructive or malicious. Usually, it’s pretty easy to identify suspicious VBA code.
Another option is to designate a trusted folder. Choose File➪Options➪Trust Center➪Trust Center Settings. Select the Trusted Locations option and then designate a particular folder to be a trusted location. Store your trusted workbooks there, and Excel won’t bug you about enabling macros. For example, if you download the sample files for this book, you can put them in a trusted location.
How This Book Is Organized
I divided this book into six major parts, each of which contains several chap-ters. Although I arranged the chapters in a fairly logical sequence, you can read them in any order you choose. Here’s a quick preview of what’s in store for you.
Part I: Getting Started with
Excel VBA Programming
Part I has but two chapters. I introduce the VBA language in the first chapter. In Chapter 2, I let you get your feet wet right away by taking you on a hands-on guided tour.
Part II: How VBA Works with Excel
In writing this book, I assume that you already know how to use Excel. The four chapters in Part II give you a better grasp on how VBA is implemented in Excel. These chapters are all important, so I don’t recommend skipping them, okay?
Part III: Programming Concepts
Part IV: Communicating with Your Users
One of the coolest parts of programming in Excel is designing custom dialog boxes (well, at least I like it). The five chapters in Part IV show you how to create dialog boxes that look like they came straight from the software lab at Microsoft.
Part V: Putting It All Together
The two chapters in Part V pull together information from the preceding chapters. You discover how to include your own custom buttons in the Excel user interface, and you find out how to develop custom worksheet functions, create add-ins, design user-oriented applications, and even work with other Office applications.
Part VI: The Part of Tens
Traditionally, books in the For Dummies series contain a final part that consists of short chapters with helpful or informative lists. Because I’m a sucker for tradi-tion, this book has three such chapters that you can peruse at your convenience.
Icons Used in This Book
Somewhere along the line, a market research company must have shown that publishers can sell more copies of their computer books if they add icons to the margins of those books. Icons are those little pictures that supposedly draw your attention to various features or help you decide whether some-thing is worth reading.
I don’t know if this research is valid, but I’m not taking any chances. So here are the icons you encounter in your travels from front cover to back cover:
When you see this icon, the code being discussed is available on the web. Download it to eliminate lots of typing. See “Getting the Sample Files” for more information.
This icon flags material that you might consider technical. You may find it interesting, but you can safely skip it if you’re in a hurry.
This icon tells you when you need to store information in the deep recesses of your brain for later use.
Read anything marked with this icon. Otherwise, you may lose your data, blow up your computer, cause a nuclear meltdown — or maybe even ruin your whole day.
Getting the Sample Files
This book has its very own website where you can download the example files. To get these files, point your web browser to
http://dummies.com/go/excelvbaprogrammingfd3e
Having the sample files will save you a lot of typing. Better yet, you can play around with them and experiment with various changes. In fact, I highly rec-ommend playing around with these files. Experimentation is the best way to master VBA.
Now What?
Reading this introduction was your first step. Now, it’s time to move on and become a programmer (there’s that p word again!).
If you’re a programming virgin, I strongly suggest that you start with Chapter 1 and progress through the book until you’ve discovered enough to do what you want to do. Chapter 2 gives you some immediate hands-on experience, so you have the illusion that you’re making quick progress.
But it’s a free country (at least it was when I wrote these words); I won’t sic the Computer Book Police on you if you opt to thumb through randomly and read whatever strikes your fancy.
I hope you have as much fun reading this book as I did writing it.
Occasionally, John Wiley & Sons has updates to its technology books. If this book does have technical updates, they will be posted at
✓ Meet Visual Basic for Applications
✓ See examples of some of the things you can do with VBA
✓ Travel back in time and see what Excel was like in the olden days
✓ Work through a real-live Excel programming session
✓ Get a handle on how Excel deals with macro security
What Is VBA?
In This Chapter
▶ Getting a conceptual overview of VBA
▶ Finding out what you can do with VBA
▶ Discovering the advantages and disadvantages of using VBA
▶ Taking a mini-lesson on the history of Excel
I
f you’re anxious to jump into VBA programming, hold your horses. This chapter is completely devoid of any hands-on training material. It does, however, contain some essential background information that assists you in becoming an Excel programmer. In other words, this chapter paves the way for everything else that follows and gives you a feel for how Excel program-ming fits into the overall scheme of the universe. It’s not as boring as you might think, so please try to resist the urge to jump to Chapter 2.Okay, So What Is VBA?
VBA, which stands for Visual Basic for Applications, is a programming lan-guage developed by Microsoft — you know, the company that tries to get you to buy a new version of Windows every few years. Excel, along with the other members of Microsoft Office, includes the VBA language (at no extra charge). In a nutshell, VBA is the tool that people like you and me use to develop pro-grams that control Excel.
What Can You Do with VBA?
You’re probably aware that people use Excel for thousands of different tasks. Here are just a few examples:
✓ Analyzing scientific data
✓ Budgeting and forecasting
✓ Creating invoices and other forms
✓ Developing charts from data
✓ Keeping lists of things such as customers’ names, students’ grades, or holiday gift ideas (a nice fruitcake would be lovely)
✓ Yadda, yadda, yadda
The list could go on and on, but I think you get the idea. My point is simply that Excel is used for a wide variety of tasks, and everyone reading this book has different needs and expectations regarding Excel. One thing virtually every reader has in common is the need to automate some aspect of Excel.
That, dear reader, is what VBA is all about.
For example, you might create a VBA program to import some numbers and then format and print your month-end sales report. After developing and testing the program, you can execute the macro with a single command, causing Excel to automatically perform many time-consuming procedures. Rather than struggle through a tedious sequence of commands, you can click a button and then hop on over to Facebook and kill some time while your macro does the work.
A few words about terminology
Excel programming terminology can be a bit confusing. For example, VBA is a programming language, but it also serves as a macro lan-guage. What do you call something written in VBA and executed in Excel? Is it a macro, or is it a program? Excel’s Help system often refers to VBA procedures as macros, so I use that ter-minology. But I also call this stuff a program.
I use the term automate throughout this book. This term means that a series of steps are
completed automatically. For example, if you write a macro that adds color to some cells, prints the worksheet, and then removes the color, you have automated those three steps. By the way, macro does not stand for Messy
In the following sections, I briefly describe some common uses for VBA macros. One or two of these may push your button.
Inserting a bunch of text
If you often need to enter your company name, address, and phone number in your worksheets, you can create a macro to do the typing for you. You can extend this concept as far as you like. For example, you might develop a macro that automatically types a list of all salespeople who work for your company.
Automating a task you perform frequently
Assume you’re a sales manager and you need to prepare a month-end sales report to keep your boss happy. If the task is straightforward, you can develop a VBA program to do it for you. Your boss will be impressed by the consistently high quality of your reports, and you’ll be promoted to a new job for which you are highly unqualified.
Automating repetitive operations
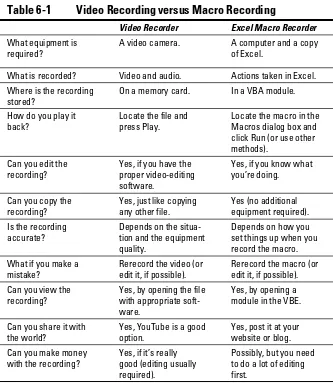
If you need to perform the same action on, say, 12 different Excel workbooks, you can record a macro while you perform the task on the first workbook and then let the macro repeat your action on the other workbooks. The nice thing about this is that Excel never complains about being bored. Excel’s macro recorder is similar to recording live action on a video recorder. But it doesn’t require a camera, and the battery never needs to be recharged.
Creating a custom command
Do you often issue the same sequence of Excel menu commands? If so, save yourself a few seconds by developing a macro that combines these commands into a single custom command, which you can execute with a single keystroke or button click. You probably won’t save that much time, but you’ll probably be more accurate. And the guy in the next cubicle will be really impressed.
Creating a custom button
Developing new worksheet functions
Although Excel includes hundreds of built-in functions (such as SUM and AVERAGE), you can create custom worksheet functions that can greatly simplify your formulas. I guarantee you’ll be surprised by how easy this is. (I show you how to do this in Chapter 20.) Even better, the Insert Function dialog box displays your custom functions, making them appear built-in. Very snazzy stuff.
Creating custom add-ins for Excel
You’re probably familiar with some of the add-ins that ship with Excel. For example, the Analysis ToolPak is a popular add-in. You can use VBA to develop your own special-purpose add-ins. I developed my Power Utility Pak add-in by using only VBA, and people all around the world pay me real money so they can use it.
Creating complete, macro-driven
applications
If you’re willing to spend some time, you can use VBA to create large-scale applications complete with a custom Ribbon tab, dialog boxes, on-screen help, and lots of other accoutrements. This book doesn’t go quite that far, but I’m just telling you this to impress you with how powerful VBA really is.
Advantages and Disadvantages of VBA
In this section, I briefly describe the good things about VBA — and I also explore its darker side.
VBA advantages
You can automate almost anything you do in Excel. To do so, you write instructions that Excel carries out. Automating a task by using VBA offers several advantages:
✓ Excel always executes the task in exactly the same way. (In most cases, consistency is a good thing.)
✓ If you’re a good macro programmer, Excel always performs the task without errors (which probably can’t be said about you or me).
✓ If you set things up properly, someone who doesn’t know anything about Excel can perform the task.
✓ You can do things in Excel that are otherwise impossible — which can make you a very popular person around the office.
✓ For long, time-consuming tasks, you don’t have to sit in front of your computer and get bored. Excel does the work, while you hang out at the water cooler.
VBA disadvantages
It’s only fair that I give equal time to listing the disadvantages (or potential
disadvantages) of VBA:
✓ You have to know how to write programs in VBA (but that’s why you bought this book, right?). Fortunately, it’s not as difficult as you might expect.
✓ Other people who need to use your VBA programs must have their own copies of Excel. It would be nice if you could press a button that trans-forms your Excel/VBA application into a stand-alone program, but that isn’t possible (and probably never will be).
✓ Sometimes, things go wrong. In other words, you can’t blindly assume that your VBA program will always work correctly under all circum-stances. Welcome to the world of debugging and, if others are using your macros, technical support.
✓ VBA is a moving target. As you know, Microsoft is continually upgrad-ing Excel. Even though Microsoft puts great effort into compatibility between versions, you may discover that the VBA code you’ve written doesn’t work properly with older versions or with a future version of Excel.
VBA in a Nutshell
Just to let you know what you’re in for, I’ve prepared a quick and dirty sum-mary of what VBA is all about. Of course, I describe all this stuff in semi-excruciating detail later in the book.
✓ A VBA module consists of Sub procedures. A Sub procedure has noth-ing to do with underwater vessels or tasty sandwiches. Rather, it’s a chunk of computer code that performs some action on or with objects (discussed in a moment). The following example shows a simple Sub procedure called AddEmUp. This amazing program displays the result of 1 plus 1:
Sub AddEmUp() Sum = 1 + 1
MsgBox “The answer is “ & Sum End Sub
A Sub procedure that doesn’t perform properly is said to be substan-dard.
✓ A VBA module can also have Function procedures. A Function proce-dure returns a single value. You can call it from another VBA proceproce-dure or even use it as a function in a worksheet formula. An example of a Function procedure (named AddTwo) follows. This Function accepts two numbers (called arguments) and returns the sum of those values:
Function AddTwo(arg1, arg2) AddTwo = arg1 + arg2 End Function
A Function procedure that doesn’t work correctly is said to be dysfunc-tional.
✓ VBA manipulates objects. Excel provides dozens and dozens of objects that you can manipulate. Examples of objects include a workbook, a worksheet, a cell range, a chart, and a shape. You have many more objects at your disposal, and you can manipulate them by using VBA code.
✓ Objects are arranged in a hierarchy. Objects can act as containers for other objects. At the top of the object hierarchy is Excel. Excel itself is an object called Application. The Application object contains other objects such as Workbook objects and Add-In objects. The Workbook object can contain other objects, such as Worksheet objects and Chart objects. A Worksheet object can contain objects such as Range objects and PivotTable objects. The term object model refers to the arrangement of these objects. (Object model mavens can find out more in Chapter 4.)
✓ You refer to an object by specifying its position in the object hierar-chy, using a dot (a.k.a., a period) as a separator. For example, you can refer to the workbook Book1.xlsx as
Application.Workbooks(“Book1.xlsx”)
This refers to the workbook Book1.xlsx in the Workbooks collection. The Workbooks collection is contained in the Application object (that is, Excel). Extending this to another level, you can refer to Sheet1 in Book1.xlsx as
Application.Workbooks(“Book1.xlsx”).Worksheets(“Sheet1”)
As shown in the following example, you can take this to still another level and refer to a specific cell (in this case, cell A1):
Application.Workbooks(“Book1.xlsx”).Worksheets(“Sheet1”).Range(“A1”)
✓ If you omit specific references, Excel uses the active objects. If Book1. xlsx is the active workbook, you can simplify the preceding reference as follows:
Worksheets(“Sheet1”).Range(“A1”)
If you know that Sheet1 is the active sheet, you can simplify the refer-ence even more:
Range(“A1”)
✓ Objects have properties. You can think of a property as a setting for an object. For example, a Range object has such properties as Value and Address. A Chart object has such properties as HasTitle and Type. You can use VBA to determine object properties and also to change properties.
✓ You refer to a property of an object by combining the object name with the property name, separated by a dot. For example, you can refer to the Value property in cell A1 on Sheet1 as follows:
Worksheets(“Sheet1”).Range(“A1”).Value
✓ You can assign values to variables. A variable is a named element that stores information. You can use variables in your VBA code to store such things as values, text, or property settings. To assign the value in cell A1 on Sheet1 to a variable called Interest, use the following VBA statement:
✓ Objects have methods. A method is an action Excel performs with an object. For example, one of the methods for a Range object is ClearContents. This aptly named method clears the contents of the range.
✓ You specify a method by combining the object with the method, sepa-rated by a dot. For example, the following statement clears the contents of cell A1:
Worksheets(“Sheet1”).Range(“A1”).ClearContents
✓ VBA includes all the constructs of modern programming languages, including variables, arrays, and looping. In other words, if you’re will-ing to spend a little time masterwill-ing the ropes, you can write code that does some incredible things.
Believe it or not, the preceding list pretty much describes VBA in a nutshell. Now you just have to find out the details. That’s why this book has more pages.
An Excursion into Versions
If you plan to develop VBA macros, you should have some understanding of Excel’s history. I know you weren’t expecting a history lesson when you picked up this book, but bear with me. This is important stuff that might make you a hit at the next nerd party.
Here are all the major Excel for Windows versions that have seen the light of day, along with a few words about how they handle macros:
✓ Excel 2: The original version of Excel for Windows was called Version 2 (rather than 1) so that it would correspond to the Macintosh version. Excel 2 first appeared in 1987, but nobody uses it anymore, so you can pretty much forget that it ever existed.
✓ Excel 3: Released in late 1990, this version features the XLM macro lan-guage. Nobody uses this version either.
✓ Excel 4: This version hit the streets in early 1992. It also uses the XLM macro language. Perhaps 10 to12 people still use this version. (They subscribe to the philosophy if it ain’t broke, don’t fix it.)
✓ Excel 95: Technically known as Excel 7 (there is no Excel 6), this version began shipping in the summer of 1995. It has a few VBA enhancements, and it supports the XLM language. It’s rarely used any more.
✓ Excel 97: This version (also known as Excel 8) was born in January 1997. It has many enhancements, and it features an entirely new interface for programming VBA macros. Excel 97 also uses a new file format (which previous Excel versions cannot open). Occasionally, I run into someone who still uses this version.
✓ Excel 2000: This version’s numbering scheme jumped to four digits. Excel 2000 (also known as Excel 9) made its public debut in June 1999. It includes only a few enhancements from a programmer’s perspective. Excel 2000 is also rarely used.
✓ Excel 2002: This version (also known as Excel 10 or Excel XP) appeared in late 2001. Perhaps this version’s most significant feature is the ability to recover your work when Excel crashes. People still use it.
✓ Excel 2003: Of all the Excel upgrades I’ve ever seen (and I’ve seen them all), Excel 2003 has the fewest new features. In other words, most hard-core Excel users (including yours truly) were very disappointed with Excel 2003. As I write this, Excel 2003 is still a commonly used version. It’s also the last “pre-Ribbon” version of Excel.
✓ Excel 2007: Excel 2007 signaled the beginning of a new era. Excel 2007 dumped the old menu and toolbar interface and introduced the Ribbon. I, for one, was disappointed to discover that you can’t modify the Ribbon by using VBA. But it had enough new features to satisfy me, such as a new file format and support for much larger worksheets — more than a million rows.
✓ Excel 2010: Microsoft outdid its corporate self with this version. This version has some slick new features (such as sparkline graphics), and it also performs quite a bit better in some areas. And if you need really, really huge workbooks, you can install the 64-bit version. But again, I was disappointed because there’s still no way to modify the Ribbon using VBA.
✓ Excel 2013: The latest version, and the one I used while I was writing this edition of the book. Excel 2013 is also available in an online version and for tablets. The Ribbon is still around, but it now has a flat look — and you still can’t modify it using VBA!
So what’s the point of this mini history lesson? If you plan to distribute your Excel/VBA files to other users, it’s vitally important that you understand which version of Excel they use. People using an older version won’t be able to take advantage of features introduced in later versions. For example, if you write VBA code that references cell XFD1048576 (the last cell in a workbook), those who use a version prior to Excel 2007 will get an error because those pre-Excel 2007 worksheets only had 65,536 rows and 255 columns (the last cell is IV65536).
Excel 2010 and later also have some new objects, methods, and properties. If you use these in your code, users with an older version of Excel will get an error when they run your macro — and you’ll get the blame.
Jumping Right In
In This Chapter
▶ Developing a useful VBA macro: A hands-on, step-by-step example
▶ Recording your actions by using Excel’s macro recorder
▶ Examining and testing recorded code
▶ Dealing with macro security issues
▶ Changing a recorded macro
I
’m not much of a swimmer, but I have found that the best way to get into a cold body of water is to jump right in — no sense prolonging the agony. By wading through this chapter, you can get your feet wet immediately but avoid getting in over your head.By the time you reach the end of this chapter, you may start feeling better about this Excel programming business, and you’ll be glad you took the plunge. This chapter provides a step-by-step demonstration of how to develop a simple but useful VBA macro.
First Things First
Before you can call yourself an Excel programmer, you must go through the initiation rites. That means you need to make a small change so Excel will display a new tab at the top of the screen: Developer. Getting Excel to display the Developer tab is easy (and you only have to do it one time). Just follow these steps:
1. Right-click any part of the Ribbon and choose Customize the Ribbon.
2. In the Customize Ribbon tab of the Excel Options dialog box, locate Developer in the second column.
3. Put a check mark next to Developer.
When you click the Developer tab, the Ribbon displays information that is of interest to programmers (that’s you!). Figure 2-1 shows how the Ribbon looks when the Developer tab is selected in Excel 2013.
Figure 2-1: The Developer tab is normally hidden, but it’s easy to unhide.
What You’ll Be Doing
In this section, I describe how to create your first macro. The macro that you’re about to create will do this.
✓ Type your name into a cell.
✓ Enter the current date and time into the cell below.
✓ Format both cells to display bold.
✓ Change the font size of both cells to 16 point.
This macro won’t be winning any prizes in the Annual VBA Programmer’s Competition, but everyone must start somewhere. The macro accomplishes all these steps in a single action. As I describe in the following sections, you start by recording your actions as you go through these steps. Then you test the macro to see whether it works. Finally, you edit the macro to add some finishing touches. Ready?
Taking the First Steps
This section describes the steps you take prior to recording the macro. In other words, you need to make a few preparations before the fun begins.
1. Start Excel if it’s not already running.
3. Click the Developer tab, and take a look at the Use Relative References button in the Code group.
If the color of that button is different than the other buttons, then you’re in good shape. If the Use Relative References button is the same color as the other buttons, then you need to click it.
I explain more about the Use Relative References button in Chapter 6. For now, just make sure that the option is turned on. When it’s turned on, it will be a different color.
Recording the Macro
Here comes the hands-on part. Follow these instructions carefully:
1. Select a cell — any cell will do.
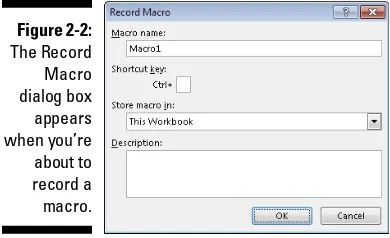
2. Choose Developer➪Code➪Record Macro or click the macro recording button on the status bar.
The Record Macro dialog box appears, as shown in Figure 2-2.
Figure 2-2:
The Record Macro dialog box appears when you’re about to record a macro.
3. Enter a name for the macro.
Excel provides a default name (something like Macro1), but it’s better to use a more descriptive name. NameAndTime (with no spaces) is a good name for this macro.
4. Click in the Shortcut Key box and enter Shift+N (for an uppercase N) as the shortcut key.
Specifying a shortcut key is optional. If you do specify one, then you can execute the macro by pressing a key combination — in this case, Ctrl+Shift+N.
6. You can enter some text in the Description box, if you like.
This step is optional. Some people like to describe what the macro does (or is supposed to do).
7. Click OK.
The Record Macro dialog box closes, and Excel’s macro recorder is turned on. From this point, Excel monitors everything you do and con-verts it to VBA code.
8. Type your name in the active cell.
9. Move the cell pointer to the cell below and enter this formula:
=NOW()
The formula displays the current date and time.
10. Select the formula cell and press Ctrl+C to copy that cell to the Clipboard.
11. Choose Home➪Clipboard➪Paste➪Values (V).
This command converts the formula to its value.
12. With the date cell selected, press Shift+up arrow to select that cell and the one above it (which contains your name).
13. Use the controls in the Home➪Font group to change the formatting to Bold and make the font size 16 point.
14. Choose Developer➪Code➪Stop Recording.
The macro recorder is turned off.
Congratulations! You just created your first Excel VBA macro. You may want to phone your mother and tell her the good news.
Testing the Macro
Now you can try out this macro and see whether it works properly. To test your macro, move to an empty cell and press Ctrl+Shift+N.
In a flash, Excel executes the macro. Your name and the current date and time are displayed in large, bold letters.
Examining the Macro
You’ve recorded a macro, and you’ve tested it. If you’re a curious type, you’re probably wondering what this macro looks like. And you might even wonder where it’s stored.
Remember when you started recording the macro? You indicated that Excel should store the macro in This Workbook. The macro is stored in the work-book, but you need to activate the Visual Basic Editor (VBE, for short) to see it.
Follow these steps to see the macro:
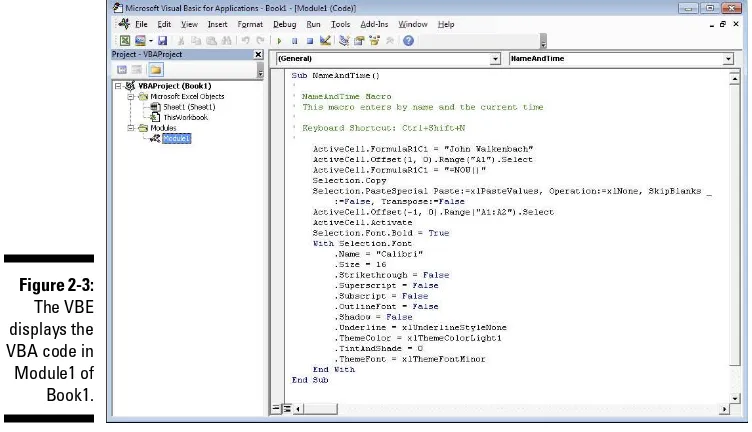
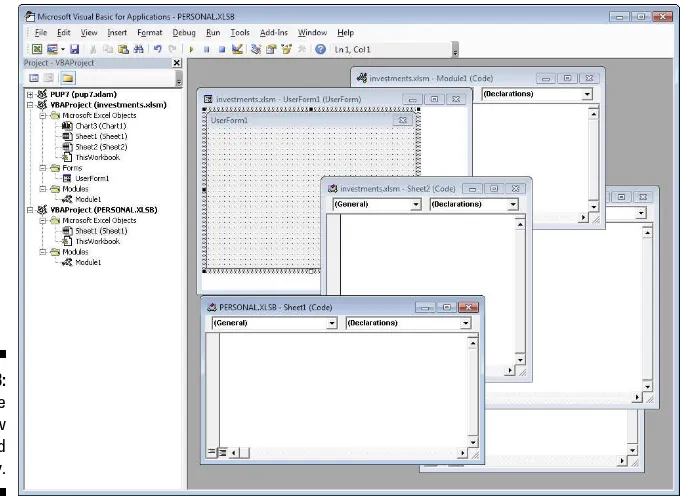
1. Choose Developer➪Code➪Visual Basic (or press Alt+F11).
The Visual Basic Editor program window appears, as shown in Figure 2-3. This window is highly customizable, so your VBE window may look a bit different. The VBE program window contains several other windows and is probably very intimidating. Don’t fret; you’ll get used to it.
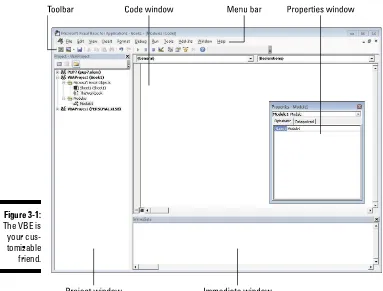
2. In the VBE window, locate the window called Project.
The Project window (also known as the Project Explorer window) con-tains a list of all workbooks and add-ins that are currently open. Each project is arranged as a tree and can be expanded (to show more infor-mation) or contracted (to show less inforinfor-mation).
The VBE uses quite a few different windows, any of which can be either open or closed. If a window isn’t immediately visible in the VBE, you can choose an option from the View menu to display the window. For instance, if the Project window is not visible, you can choose View➪Project Explorer (or press Ctrl+R) to display it. You can display any other VBE window in a similar manner. I explain more about the components of the Visual Basic Editor in Chapter 3.
3. Select the project that corresponds to the workbook in which you recorded the macro.
If you haven’t saved the workbook, the project is probably called VBAProject (Book1).
4. Click the plus sign (+) to the left of the folder named Modules.
The tree expands to show Module1, which is the only module in the project.
5. Double-click Module1.
Figure 2-3:
The VBE displays the VBA code in Module1 of Book1.
At this point, the macro probably looks like Greek to you. Don’t worry. Travel a few chapters down the road, and all will be as clear as the view from Olympus.
The NameAndTime macro consists of several statements. Excel executes the statements one by one, from top to bottom. A statement that’s preceded by an apostrophe (’) is a comment. Comments are included only for your infor-mation and are ignored. In other words, Excel skips right over comments.
Hey, I didn’t record that!
Earlier in this chapter, I mentioned that the macro recorder is like recording sound on a recorder. When you play back a recording and listen to your own voice, you invariably say, “I don’t sound like that.” And when you look at your recorded macro, you may see some actions that you didn’t think you recorded.
The first VBA statement (which begins with the word Sub) identifies the macro as a Sub procedure and gives its name — you provided this name before you started recording the macro. If you read through the code, you may be able to make sense of some of it. You see your name, the formula you entered, and lots of additional code that changes the font. The Sub procedure ends with the End Sub statement.
Modifying the Macro
As you might expect, not only can you view your macro in the VBE, you can also change it. Even though you probably have no idea what you’re doing at this point, I bet you can make these changes to the code:
✓ Change the name that’s entered into the active cell. If you have a dog, use your dog’s name.
✓ Change the font name or size.
✓ See if you can figure out the appropriate location for this new statement that makes the cells italic:
Selection.Font.Italic = True
Working in a VBA code module is much like working in a word-processing document (except there’s no word wrap, and you can’t format the text). On second thought, I guess it’s more like working in Windows Notepad. You can press Enter to start a new line, and the familiar editing keys work as expected.
After you’ve made your changes, jump back to Excel and try out the revised macro to see how it works. Just as you can press Alt+F11 in Excel to display the VBE, you can press Alt+F11 in the VBE to switch back to Excel.
Saving Workbooks That Contain Macros
If you store one or more macros in a workbook, the file must be saved as a “macro-enabled” file type. In other words, the file must be saved with an XLSM extension rather than the normal XLSX extension.
Figure 2-4:
If your workbook contains macros, and you attempt to save it in a non-macro file format, Excel warns you.
Understanding Macro Security
Macro security is a key feature in Excel. The reason is that VBA is a power-ful language — so powerpower-ful that it’s possible to create a macro that can do serious damage to your computer. A macro can delete files, send information to other computers, and even destroy Windows so that you can’t even start your system.
The macro security features introduced in Excel 2007 were created to help prevent these types of problems.
Figure 2-5 shows the Macro Settings section of the Trust Center dialog box. To display this dialog box, choose Developer➪Code➪Macro Security.
Figure 2-5:
The Macro Settings section of the Trust Center
By default, Excel uses the Disable All Macros with Notification option. With this setting in effect, if you open a workbook that contains macros (and the file is not digitally “signed” or stored in a trusted location), Excel displays a warning like the one in Figure 2-6. If you are certain that the workbook comes from a trusted source, click Enable Macros, and the macros will be enabled.
You see the pop-up box in Figure 2-6 only if the VBE is open. Otherwise, Excel displays an eye-catching Security Warning above the Formula bar, as shown in Figure 2-7. If you know the workbook is safe, click the Enable Content button to enable the macros. To use the workbook without macros, click the X to dis-miss the warning.
Figure 2-6:
Excel’s warning that the file to be opened contains macros.
Excel will remember if you’ve designated a workbook to be safe. So, the next time you open it, you won’t see the Security Warning. (That’s not the case with Excel 2007, though.)
Figure 2-7:
Perhaps the best way to handle macro security is to designate one or more folders as trusted locations. All the workbooks in a trusted location are opened without a macro warning. You designate trusted folders in the Trusted Locations section of the Trust Center dialog box.
If you want to find out what the other macro security settings imply, press F1 while the Macro Settings section of the Trust Center dialog box is in view. You’ll get a Help screen that describes the security settings.
More about the NameAndTime Macro
By the time you finish this book, you’ll completely understand how the NameAndTime macro works — and you’ll be able to develop more sophisti-cated macros. For now, I wrap up the example with a few additional points about the macro:
✓ For this macro to work, its workbook must be open. If you close the workbook, the macro doesn’t work (and the Ctrl+Shift+N shortcut has no effect).
✓ As long as the workbook containing the macro is open, you can run the macro while any workbook is active. In other words, the macro’s own workbook doesn’t have to be active.
✓ The macro isn’t “pro-quality” code. It will overwrite existing text with no warning — and its effects can’t be undone.
✓ Before you started recording the macro, you assigned it a new shortcut key. This is just one of several ways to execute the macro. (You discover other ways in Chapter 5.)
✓ You can create this macro manually rather than record it. To do so, you need a good understanding of VBA. (Be patient, you’ll get there.)
✓ You can store this macro in your Personal Macro Workbook. If you do so, the macro is available automatically whenever you start Excel. (See Chapter 6 for details about your Personal Macro Workbook.)
✓ You can also convert the workbook to an add-in file. (More about this in Chapter 21.)