A L L - I N - O N E
FOR
DUMmIES
‰by Joe Hutsko and Barbara Boyd
A L L - I N - O N E
FOR
DUMmIES
‰111 River Street Hoboken, NJ 07030-5774 www.wiley.com
Copyright © 2012 by John Wiley & Sons, Inc., Hoboken, New Jersey Published by John Wiley & Sons, Inc., Hoboken, New Jersey Published simultaneously in Canada
No part of this publication may be reproduced, stored in a retrieval system or transmitted in any form or by any means, electronic, mechanical, photocopying, recording, scanning or otherwise, except as permit-ted under Sections 107 or 108 of the 1976 Unipermit-ted States Copyright Act, without either the prior written permission of the Publisher, or authorization through payment of the appropriate per-copy fee to the Copyright Clearance Center, 222 Rosewood Drive, Danvers, MA 01923, (978) 750-8400, fax (978) 646-8600. Requests to the Publisher for permission should be addressed to the Permissions Department, John Wiley & Sons, Inc., 111 River Street, Hoboken, NJ 07030, (201) 748-6011, fax (201) 748-6008, or online at http:// www.wiley.com/go/permissions.
Trademarks: Wiley, the Wiley logo, For Dummies, the Dummies Man logo, A Reference for the Rest of Us!, The Dummies Way, Dummies Daily, The Fun and Easy Way, Dummies.com, Making Everything Easier, and related trade dress are trademarks or registered trademarks of John Wiley & Sons, Inc. and/or its affiliates in the United States and other countries, and may not be used without written permission. Macintosh is a registered trademark of Apple, Inc. All other trademarks are the property of their respective owners. John Wiley & Sons, Inc. is not associated with any product or vendor mentioned in this book.
LIMIT OF LIABILITY/DISCLAIMER OF WARRANTY: THE PUBLISHER AND THE AUTHOR MAKE NO REPRESENTATIONS OR WARRANTIES WITH RESPECT TO THE ACCURACY OR COMPLETENESS OF THE CONTENTS OF THIS WORK AND SPECIFICALLY DISCLAIM ALL WARRANTIES, INCLUDING WITH-OUT LIMITATION WARRANTIES OF FITNESS FOR A PARTICULAR PURPOSE. NO WARRANTY MAY BE CREATED OR EXTENDED BY SALES OR PROMOTIONAL MATERIALS. THE ADVICE AND STRATEGIES CONTAINED HEREIN MAY NOT BE SUITABLE FOR EVERY SITUATION. THIS WORK IS SOLD WITH THE UNDERSTANDING THAT THE PUBLISHER IS NOT ENGAGED IN RENDERING LEGAL, ACCOUNTING, OR OTHER PROFESSIONAL SERVICES. IF PROFESSIONAL ASSISTANCE IS REQUIRED, THE SERVICES OF A COMPETENT PROFESSIONAL PERSON SHOULD BE SOUGHT. NEITHER THE PUBLISHER NOR THE AUTHOR SHALL BE LIABLE FOR DAMAGES ARISING HEREFROM. THE FACT THAT AN ORGANIZA-TION OR WEBSITE IS REFERRED TO IN THIS WORK AS A CITAORGANIZA-TION AND/OR A POTENTIAL SOURCE OF FURTHER INFORMATION DOES NOT MEAN THAT THE AUTHOR OR THE PUBLISHER ENDORSES THE INFORMATION THE ORGANIZATION OR WEBSITE MAY PROVIDE OR RECOMMENDATIONS IT MAY MAKE. FURTHER, READERS SHOULD BE AWARE THAT INTERNET WEBSITES LISTED IN THIS WORK MAY HAVE CHANGED OR DISAPPEARED BETWEEN WHEN THIS WORK WAS WRITTEN AND WHEN IT IS READ. FULFILLMENT OF EACH COUPON OFFER IS THE SOLE RESPONSIBILITY OF THE OFFEROR.
For general information on our other products and services, please contact our Customer Care Department within the U.S. at 877-762-2974, outside the U.S. at 317-572-3993, or fax 317-572-4002. For technical support, please visit www.wiley.com/techsupport.
Wiley publishes in a variety of print and electronic formats and by print-on-demand. Some material included with standard print versions of this book may not be included in e-books or in print-on-demand. If this book refers to media such as a CD or DVD that is not included in the version you purchased, you may download this material at http://booksupport.wiley.com. For more information about Wiley products, visit www.wiley.com.
Library of Congress Control Number: 2012931839
ISBN 978-1-118-12961-6 (pbk); ISBN 978-1-118-22565-3 (ebk); ISBN 978-1-118-23843-1 (ebk); ISBN 978-1-118-26305-1 (ebk)
Joe Hutsko is the author of Green Gadgets For Dummies, Flip Video For Dummies (with Drew Davidson), and iPhone All-in-One For Dummies (with Barbara Boyd). For more than two decades, he has written about computers, gadgets, video games, trends, and high-tech movers and shakers for numer-ous publications and websites, including the New York Times, Macworld, PC World, Fortune, Newsweek, Popular Science, TV Guide, the Washington Post, Wired, Gamespot, MSNBC, Engadget, TechCrunch, and Salon. You can find links to Joe’s stories on his blog, JOEyGADGET.com.
As a kid, Joe built a shortwave radio, played with electronic project kits, and learned the basics of the BASIC programming language on his first computer, the Commodore Vic 20. In his teens, he picked strawberries to buy his first Apple II computer. Four years after that purchase (in 1984), he wound up working for Apple, where he became the personal technology guru for the company’s chairman and CEO. Joe left Apple in 1988 to become a writer and worked on and off for other high-tech companies, including Steve Jobs’ one-time NeXT. He authored a number of video game strategy guides, including the bestsellers Donkey Kong Country Game Secrets: The Unauthorized Edition, and Rebel Assault: The Official Insiders Guide.
Joe’s first novel, The Deal, was published in 1999, and he recently rereleased a trade paperback edition of it with a new foreword by the author (tinyurl. com/hutskodeal).
Barbara Boyd writes about food, gardens, travel, and technology. She’s writ-ten for Chile Pepper Magazine, Islands, and BeeCulture. With Joe, she just fin-ished iPhone All-in-One For Dummies.
Barbara worked at Apple from 1985 to 1990, beginning as Joe’s assistant and the first network administrator for the executive staff. She then took a position as an administrator in the Technical Product Support group. Barbara recalls working with people who went on to become top names in technology — it was an exciting time to be in Silicon Valley and at Apple in particular. That experi-ence instilled a lifelong fascination with technology and Apple products. Her interest and experience led to subsequent jobs in marketing and publishing at IDG (International Data Group) and later for a small San Francisco design firm. In 1998, she left the corporate world to study Italian, write, and teach.
Joe dedicates this book to: My fabulously thoughtful, kind, caring, smart, cre-ative, beautiful, and amazing co-author — and lifelong friend (and karmic life preserver) — Barbara Boyd.
Barbara dedicates this book to: My sweet, patient husband, Ugo de Paula, who appreciates my inner geek and keeps me on my toes by asking complicated and challenging technical questions. And to my talented, inspiring, since-childhood friend Joe Hutsko, without whom I wouldn’t be doing any of this techie stuff.
Authors’ Acknowledgments
You see the author’s names on the cover, but these books (like any book) are really a collaboration, an effort of a many-membered team. Thanks go to Bob Woerner at Wiley for trusting Joe’s judgment and taking a chance on an unknown author. We couldn’t have completed this book without our terrific project editor, Jean Nelson, who kept track of everything and kept everything on track. We truly appreciated our sharp-eyed, guitar-playing copy editor, Barry Childs-Helton, for polishing our book with his precise edits. A big hats off to Dennis R. Cohen for his insightful and accurate technical editing and witty comments that often made us laugh out loud during author review. Thanks, too, to the anonymous people at Wiley who contributed to this book — not just editorial, but tech support, legal, accounting, even the person who delivers the mail. We don’t know you, but we appreciate the job you do; it takes a lot of worker bees to keep the hive healthy, and each task is important to the whole.
We want to thank our literary agent, Carole Jelen, for her astute representa-tion and moral support. Carole plays a key role in our success, promoting us and keeping an eye out for new opportunities.
projects and matters; writing and making deadlines on both books would have been impossible without Barbara’s contribution. I mean it quite literally when I say both books are more Barbara’s than mine, from perspectives of total word count, attention to detail, and commitment. Lastly, I am pleased to see Barbara managed to slip in a reference to her beloved bees in our Acknowledgments.
outside the U.S. at 317-572-3993, or fax 317-572-4002.
Some of the people who helped bring this book to market include the following:
Acquisitions, Editorial Project Editor: Jean Nelson Executive Editor: Bob Woerner
Senior Copy Editor: Barry Childs-Helton Technical Editor: Dennis R. Cohen Editorial Manager: Jodi Jensen Editorial Assistant: Amanda Graham Sr. Editorial Assistant: Cherie Case Cover Photo: © iStockphoto.com / StockLib Cartoons: Rich Tennant (www.the5thwave.com)
Composition Services
Project Coordinator: Nikki Gee
Layout and Graphics: Carl Byers, Amy Hassos, Joyce Haughey, Laura Westhuis
Proofreaders: Melissa Cossell, Bonnie Mikkelson
Indexer: BIM Indexing & Proofreading Services
Publishing and Editorial for Technology Dummies
Richard Swadley, Vice President and Executive Group Publisher Andy Cummings, Vice President and Publisher
Mary Bednarek, Executive Acquisitions Director Mary C. Corder, Editorial Director
Publishing for Consumer Dummies
Kathleen Nebenhaus, Vice President and Executive Publisher Composition Services
Introduction ... 1
Book I: Mac Basics ... 7
Chapter 1: Starting to Use Your Mac ... 9
Chapter 2: Getting Acquainted with the Mac User Interface... 23
Chapter 3: Managing Applications on the Dock, Launchpad, and Desktop ... 59
Chapter 4: Working with Files and Folders... 95
Chapter 5: Customizing Your Mac and Adjusting Settings ... 131
Book II: Online Communications ... 159
Chapter 1: Connecting to the Internet and Browsing the Web ... 161
Chapter 2: Corresponding with Mail ... 209
Chapter 3: Instant Messaging and Video Chatting with iChat ... 253
Chapter 4: Protecting Your Mac against Local and Remote Threats ... 285
Book III: Beyond the Basics ... 317
Chapter 1: Backing Up and Restoring Your Data with Time Machine ... 319
Chapter 2: Syncing All Your Devices with iCloud ... 339
Chapter 3: Maintenance and Troubleshooting ... 347
Chapter 4: Running Windows on a Mac ... 365
Book IV: Your Mac as a Multimedia
Entertainment Center ... 377
Chapter 1: Listening, Watching, Reading, and Learning with iTunes... 379
Chapter 2: Watching Videos and Movies on Your Mac... 419
Chapter 3: Importing, Viewing, Organizing, and Sharing Photos ... 443
Chapter 4: Making Movies with iMovie ... 491
Chapter 5: Making Your Own Kind of Music with GarageBand ... 533
Chapter 2: Staying on Schedule with iCal ... 603
Chapter 3: Building Websites with iWeb ... 631
Chapter 4: Creating Documents with Pages ... 657
Chapter 5: Presenting with Keynote ... 691
Chapter 6: Crunching with Numbers ... 729
Chapter 7: Getting the Most Out of iWork ... 765
Book VI: Mac Networking ... 775
Chapter 1: Networking Your Mac and Other Peripherals ... 777
Chapter 2: Sharing Files and Resources on a Network ... 789
Chapter 3: Connecting to Bluetooth Wireless Devices and Networks ... 805
Introduction ... 1
About This Book ... 1
Foolish Assumptions ... 2
Conventions Used in This Book ... 2
What You Don’t Have to Read ... 3
How This Book Is Organized ... 3
Book I: Mac Basics ... 3
Book II: Online Communications... 3
Book III: Beyond the Basics ... 4
Book IV: Your Mac As a Multimedia Entertainment Center ... 4
Book V: Taking Care of Business ... 4
Book VI: Mac Networking ... 4
Icons Used in This Book ... 5
Where to Go from Here ... 5
Book I: Mac Basics ... 7
Chapter 1: Starting to Use Your Mac . . . .9
Starting Your Mac ... 9
Putting a Mac in Sleep Mode ... 11
Shutting Down Your Mac ... 14
Restarting a Mac ... 15
Different Macintosh Models ... 16
The Mac Mini and Mac Pro ... 16
The iMac... 17
The MacBook Air and MacBook Pro... 17
Understanding Mac Processors ... 18
Identifying the Parts of Your Mac ... 20
Chapter 2: Getting Acquainted with the Mac User Interface. . . .23
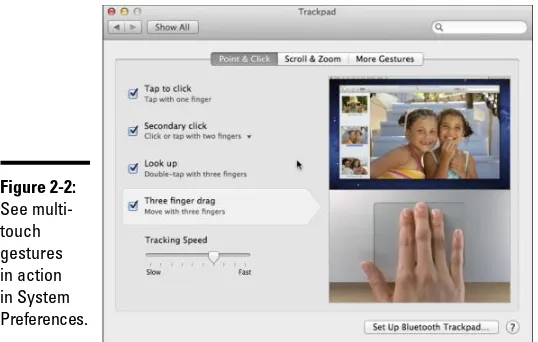
Mastering the Mouse, Trackpad, and Keyboard ... 24
Using the mouse ... 24
The trackpad ... 26
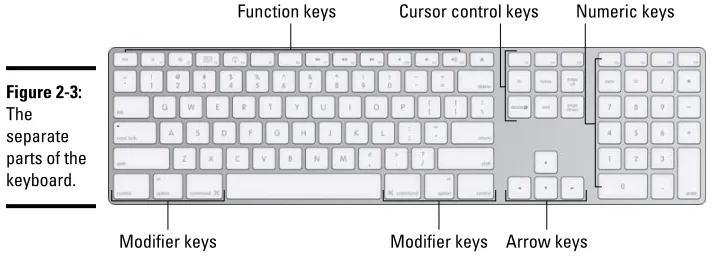
The parts of the keyboard ... 27
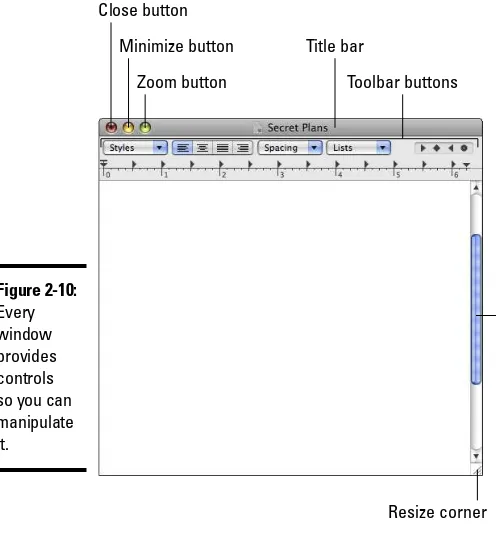
Looking At Menus and Windows ... 33
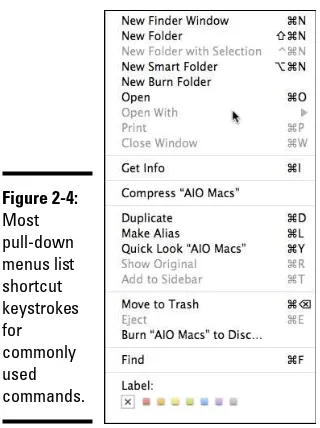
The menu bar ... 34
Understanding menu commands ... 35
Working with dialogs ... 35
Getting to Know the Parts of the Desktop ... 41
The Dock ... 42
The Finder ... 44
The Dashboard ... 45
Viewing Dashboard widgets ... 45
Customizing a widget ... 47
Adding and removing widgets ... 48
Finding new widgets ... 51
Disabling and deleting widgets from Dashboard ... 53
Getting Help ... 54
Pointing out commands to use ... 55
Reading Help topics ... 56
Chapter 3: Managing Applications on the Dock, Launchpad,
and Desktop. . . .59
Launching an Application ... 60
From the Dock ... 60
From the Launchpad ... 64
By double-clicking icons ... 65
From the Apple menu’s Recent Items ... 68
With Spotlight ... 68
Working with Alias Icons ... 69
Switching among Applications ... 70
Quitting Applications ... 73
Closing a document ... 73
Shutting down an application ... 73
Force-quitting an application ... 74
Organizing Multiple Desktops with Spaces ... 75
Creating Desktops ... 75
Switching Desktops ... 76
Moving application windows to different Desktops ... 77
Setting Mission Control preferences ... 77
Acquiring New Applications ... 78
Shopping in the App Store ... 80
Downloading apps ... 83
Installing Applications ... 84
Installing an application from a CD/DVD ... 84
Installing an application from the web... 86
Updating Applications and System Software ... 88
Uninstalling Applications ... 90
Uninstalling an application ... 91
Removing application alias icons from the Dock and Desktop ...92
Removing user setting files ... 92
Chapter 4: Working with Files and Folders . . . .95
Using the Finder ... 96
Understanding devices... 96
Understanding folders ... 98
Navigating through the Finder ... 101
Opening a folder ... 101
Exiting a folder ... 102
Jumping to a specific folder... 102
Jumping back and forth ... 102
Organizing and Viewing a Folder ... 103
Selecting items in the Finder ... 103
Using Icon view ... 104
Using List view ... 106
Using Column view ... 107
Using Cover Flow view ... 108
Changing your view options ... 109
Using Quick Look to view file contents ... 109
Creating Folders ... 111
Creating a folder by using the Finder menu ... 111
Creating a folder through the Save As dialog ... 112
Manipulating Files and Folders ... 114
Renaming a folder ... 114
Copying a file or folder ... 116
Moving a file or folder ... 118
Grouping files ... 118
Archiving Files and Folders ... 118
Creating a ZIP file ... 119
Creating a DMG file ... 120
Searching Files ... 122
Using Spotlight ... 122
Spotlight Preferences ... 124
Using Smart Folders... 124
Creating a Smart Folder with Spotlight ... 125
Storing Files and Folders in the Dock ... 126
Storing files in the Dock ... 127
Creating Stacks in the Dock ... 127
Opening files stored in a Stack ... 127
Deleting a File or Folder ... 128
Retrieving a file or folder from the Trash ... 129
Emptying the Trash ... 129
Chapter 5: Customizing Your Mac and Adjusting Settings. . . .131
Changing the Desktop ... 132
Choosing a bundled Desktop image ... 132
Choosing an iPhoto image for the Desktop ... 133
Choosing your own image for the Desktop ... 134
Customizing the Screen Saver ... 134
Changing the Display and Appearance ... 136
Changing the screen resolution ... 137
Changing the color of the user interface ... 138
Changing the Date and Time ... 139
Using Your Mac’s Accessibility Features ... 144
Mitigating vision limitations ... 145
Compensating for hearing limitations ... 146
Easing keyboard limitations ... 147
Dealing with mouse limitations ... 149
Using Voice Recognition and Speech ... 153
Setting up Speech Recognition... 153
Setting up speech capabilities ... 157
Book II: Online Communications ... 159
Chapter 1: Connecting to the Internet and Browsing the Web . . . . .161
Setting Up an Internet Connection ... 161
Ethernet connection ... 162
Wireless (Wi-Fi) access ... 162
Browsing Websites ... 166
Setting Safari’s home page ... 166
Visiting a website ... 168
Reading in Reader ... 171
Creating a Reading List ... 173
Tracking breaking news with RSS feeds ... 174
Searching for websites ... 177
Returning to website search results with SnapBack ... 179
Searching previously viewed websites ... 180
Protecting your web-browsing privacy ... 182
Searching within a web page ... 185
Using the Top Sites view to display favorite sites ... 186
Using bookmarks ... 189
Using tabbed browsing ... 197
Capturing Web Clips ... 198
Saving and Sharing Web Pages ... 200
Saving a web page as a file ... 200
Saving a photo from the web ... 201
Printing a web page ... 202
Sending a web page by e-mail ... 202
Viewing and Playing Multimedia Files ... 203
Watching video ... 203
Listening to streaming audio ... 203
Viewing PDF files ... 204
Downloading Files ... 204
Using Extensions ... 206
Chapter 2: Corresponding with Mail. . . .209
Setting Up an E-Mail Account ... 210
Gathering your e-mail account information ... 210
Looking at the Mail Window ... 216
Writing E-Mails ... 219
Creating a new e-mail ... 219
Replying to a message ... 220
Forwarding a message ... 221
Sending a file or photo attachment ... 222
Sending a message to multiple recipients ... 225
Using fonts, colors, and stationery ... 227
Spelling and grammar checking ... 229
Receiving and Reading E-Mail ... 232
Retrieving e-mail ... 232
Reading e-mail ... 233
Viewing and saving file attachments ... 234
Storing e-mail addresses ... 236
Deleting messages ... 237
Organizing E-Mail ... 239
Searching through e-mail ... 239
Organizing e-mail with mailbox folders ... 240
Deleting a mailbox folder ... 242
Automatically organizing e-mail with smart mailboxes ... 242
Automatically organizing e-mail with rules ... 244
Flagging your messages ... 246
Dealing with Junk E-Mail ... 247
Filtering junk e-mail ... 248
Using advanced filter rules ... 249
Other Mail Features ... 251
RSS Feeds ... 251
Notes... 252
Chapter 3: Instant Messaging and Video Chatting with iChat . . . .253
Setting Up an iChat Account ... 254
Storing names in a buddy list ... 257
Organizing a buddy list ... 259
Chatting with Others ... 262
Initiating a text chat ... 263
Initiating an audio chat ... 265
Initiating a video chat ... 266
Using iChat Theater to share files, photos, and screens ... 269
Saving or recording your chats ... 270
Interpreting status indicators ... 271
Making Yourself Available (Or Not) for Chatting ... 271
Changing your status... 272
Becoming invisible ... 273
Accepting (or blocking) chat invitations with privacy levels ... 274
Calling iPhones, iPods, iPads, and other Macs from Your Mac
with FaceTime ... 276
Signing in to FaceTime ... 276
Making a call with FaceTime ... 277
Receiving a FaceTime call ... 279
Managing your Apple ID settings ... 280
Adding contacts and favorites to FaceTime ... 280
Chapter 4: Protecting Your Mac against Local and
Remote Threats . . . .285
Locking Down Your Mac ... 285
Using Passwords ... 286
Changing your password ... 287
Applying password protection... 289
Encrypting Data with FileVault ... 291
Setting up FileVault ... 291
Turning off FileVault ... 294
Using Firewalls ... 294
Configuring a firewall ... 295
Buying a firewall ... 298
Selecting Privacy Settings ... 299
Creating Multiple Accounts ... 300
Creating a new user account ... 301
Creating a Sharing Only account ... 311
Switching between accounts ... 312
Deleting an account ... 314
A Few Final Security Tips ... 315
Book III: Beyond the Basics ... 317
Chapter 1: Backing Up and Restoring Your Data with
Time Machine . . . .319
Understanding Different Backup Options ... 319
Backing up with external hard drives ... 320
Storing backups off-site ... 321
Storing backups on USB flash drives ... 322
Backing up to CDs/DVDs ... 322
Blasting into the Past with Time Machine ... 323
Setting up Time Machine ... 324
Understanding Versions ... 327
Skipping files you don’t want to back up ... 327
Retrieving files and folders ... 329
Restoring your entire backup... 333
Moving Your Backup from an Old Mac to a New Mac ... 334
Chapter 2: Syncing All Your Devices with iCloud . . . .339
Keeping Your Data in the iCloud ... 339
Setting up an iCloud account ... 340
Using iCloud... 342
What about iTunes? ... 345
Other Online Storage and Syncing Services ... 346
Chapter 3: Maintenance and Troubleshooting . . . .347
Shutting Down Frozen or Hung-Up Programs ... 347
Handling Startup Troubles ... 349
Booting up in Safe Mode ... 349
Uninstalling applications ... 351
Repairing and Maintaining Hard Drives ... 352
Verifying a disk ... 352
Performing a Recovery Boot ... 354
Reinstalling the operating system ... 356
Wipe out! ... 357
Booting from another Mac through a FireWire cable ... 359
Verifying disk permissions ... 360
Removing Jammed CDs/DVDs ... 361
Automating Preventive Maintenance ... 362
Chapter 4: Running Windows on a Mac. . . .365
Giving Your Mac a Split Personality with Boot Camp ... 365
Making sure that you can run Boot Camp ... 367
Installing Windows... 368
Choosing an operating system with Boot Camp ... 372
Sharing Mac and Windows files ... 373
Removing Windows from your Mac ... 373
Using Virtual Machines ... 373
Using CrossOver Mac ... 375
Book IV: Your Mac as a Multimedia
Entertainment Center ... 377
Chapter 1: Listening, Watching, Reading, and Learning
with iTunes . . . .379
Understanding Audio File Compression Formats ... 380
Lossless audio files ... 380
Compressed lossless audio files ... 380
Compressed lossy audio files ... 381
Getting to Know the iTunes Window ... 382
Playing Audio with iTunes ... 390
Listening to CDs ... 390
Importing Music into iTunes ... 392
Importing a CD’s audio tracks into iTunes ... 392
Importing digital audio files ... 393
Searching your iTunes library ... 394
Playing digital audio files ... 395
Listening to the radio ... 396
Playing Around with Playlists ... 396
Creating an ordinary playlist ... 397
Creating a Smart Playlist ... 398
Letting iTunes create a Genius playlist ... 401
iTunes DJ ... 402
Deleting a playlist ... 404
Publishing your playlist ... 404
iTunes Store ... 404
When you know what you’re looking for ... 408
Other media ... 408
Ping ... 410
Downloading media from iTunes ... 412
Playing Digital Video Files ... 414
It’s Nice to Share ... 414
Sharing over a network ... 414
Home Sharing ... 415
Sharing from the iTunes Store ... 415
Burning an Audio CD ... 416
Chapter 2: Watching Videos and Movies on Your Mac . . . .419
Understanding Video Disc Formats ... 419
Understanding Digital Video Formats ... 420
Playing a Digital Video File ... 421
Using QuickTime Player ... 422
Playing a DVD ... 424
Understanding full-screen mode and window mode ... 425
Viewing the DVD and Title menus ... 427
Skipping through a video ... 427
Viewing frames in steps and slow motion ... 428
Skipping by chapters ... 428
Placing bookmarks in a video ... 429
Viewing closed captioning ... 431
Viewing different camera angles ... 431
Choosing different audio tracks ... 432
Enhancing your viewing experience ... 432
Using DVD Player’s Timer ... 434
Ejecting the DVD ... 435
Using Apple Remote ... 437
Pairing an Apple Remote with a Mac... 439
Controlling your Mac and applications... 440
Chapter 3: Importing, Viewing, Organizing, and Sharing Photos . . . .443
Understanding Digital Photography ... 443
Megapixels ... 444
Flash memory cards ... 444
Digital image file formats ... 446
Transferring Digital Images to the Mac ... 447
Defining a default application for retrieving photos ... 448
Retrieving photos by using Image Capture ... 449
Retrieving photos by using iPhoto ... 450
Moving photos from other folders into iPhoto ... 452
Retrieving photos by using the SDxD memory card reader ... 453
Capturing Photos from Other Sources ... 454
Capturing photos with Photo Booth ... 454
Capturing photos from websites ... 457
Organizing Photos with iPhoto ... 458
Organizing Events in the Library ... 459
Creating an Event ... 460
Browsing through an Event ... 460
Naming an Event ... 461
Merging Events ... 462
Splitting an Event ... 463
Moving photos from one Event to another ... 463
Sorting Events ... 464
Organizing Photos ... 465
Viewing photos stored in a single Event ... 465
Viewing photos stored in all Events ... 466
Naming photos ... 467
Rating photos ... 468
Adding keywords to a photo ... 469
Storing photos in albums and folders ... 471
Deleting photos, albums, and folders ... 473
Choosing and Organizing Photos with Faces and Places ... 473
Using Faces to organize photos ... 473
Organizing photos with Places... 475
Editing Photos ... 479
Sharing Photos ... 482
Printing photos ... 483
E-mailing photos ... 484
Other sharing options ... 485
Using Photo Stream ... 487
Using photos in iWeb and iDVD ... 488 Ordering books, calendars, and cards ... 488
Chapter 4: Making Movies with iMovie. . . .491
How iMovie Works ... 492 Working with the Event Library ... 492 Importing from a digital video device ... 493 Importing a digital video file ... 496 Organizing the Event Library ... 497 Working with the Project Library ... 498 Creating an iMovie project ... 498 Selecting video clips ... 500 Deleting video clips ... 504 Deleting a project ... 504 Printing a project ... 504 Organizing the Project Library ... 505 Editing Video Clips in a Project ... 505 Rearranging the order of video clips ... 506 Adjusting the size of a video clip ... 506 Adding titles ... 508 Adding transitions ... 511 Adding still images... 513 Adding maps and globes ... 514 Adding audio files ... 516 Using Special Effects ... 521 Applying special effects ... 521 Adjusting the quality of a clip ... 522 Cropping, rotating, panning, and zooming ... 524 Two-image video effects ... 525 Making a Trailer for Your Movie ... 525 Saving a Video ... 527 Finalizing a project ... 527 Saving a project to iDVD ... 527 Saving a project as a digital video file ... 528 Saving (and removing) a video for iTunes or Media Browser ... 529 Saving (and removing) a project for the Internet ... 529
Chapter 5: Making Your Own Kind of Music with GarageBand. . . .533
Editing Audio ... 545 Splitting a track ... 546 Joining a track ... 547 Moving tracks ... 547 Quantize the times of Real and Software Instruments ... 547 Groove matching ... 549 Modifying the key and tempo ... 550 Saving Music ... 551 Saving a song in iTunes ... 551 Saving a song as a ringtone ... 552 Saving a song to your hard drive ... 552 Burning a song to CD ... 553 Learning to Play the Guitar and Piano ... 553 Recording Podcasts ... 555 Recording speech ... 555 Adding jingles and audio effects ... 556 Adding pictures ... 557 Enhancing GarageBand ... 559
Chapter 6: Burning DVDs. . . .561
Using iDVD ... 561 Burning a Video Straight to DVD ... 562 Creating a DVD with the Magic iDVD Option ... 563 Working with iDVD Projects ... 567 Adding photos to the title menu ... 569 Adding options to the title menu ... 571 Moving and deleting buttons... 575 Defining opening content for your DVD ... 576 Saving your iDVD project ... 577
Book V: Taking Care of Business ... 579
Chapter 1: Managing Contacts with Address Book. . . .581
Creating Groups ... 592 Creating a group... 592 Creating a group from a selection of contacts ... 593 Editing the distribution list... 594 Adding contacts automatically with Smart Groups ... 594 Creating a Smart Group from search results... 596 Deleting a Group ... 596 Using Shortcut Menus ... 596 Managing Your Address Book Files ... 597 Archiving your Address Book ... 597 Sending updates ... 597 Printing your Address Book ... 598 Exporting your Address Book ... 600 Syncing with other devices... 600 Syncing with other address books ... 601
Chapter 2: Staying on Schedule with iCal . . . .603
Managing iCal Files ... 625 Importing iCal data ... 625 Exporting iCal data ... 625 Sharing your calendars ... 626 Backing up iCal data and restoring a backup file ... 627 Printing an iCal file ... 628 Syncing with other devices... 628
Chapter 3: Building Websites with iWeb . . . .631
The Parts of a Web Page ... 632 Content ... 632 HTML ... 633 Creating a Website with iWeb ... 634 Picking a theme ... 634 Adding new pages ... 637 Deleting web pages ... 637 Customizing Your Web Pages ... 637 Replacing placeholder text ... 638 Replacing placeholder media ... 639 Adding widgets ... 640 Modifying a Template ... 642 Working with existing objects ... 642 Working with text... 645 Working with graphics and media ... 647 Changing the web page’s theme ... 650 Publishing Your Web Pages ... 651 Types of website hosts ... 651 Publishing your web pages ... 654 Making changes to your uploaded web pages ... 655 Visiting your website ... 656
Chapter 4: Creating Documents with Pages . . . .657
Using Formatting Styles ... 675 Applying styles ... 676 Creating temporary styles ... 677 Creating and Placing Text Boxes ... 678 Creating a text box ... 679 Moving a text box ... 679 Resizing a text box ... 680 Creating linked text boxes ... 680 Wrapping text around a text box ... 682 Creating Charts and Tables ... 682 Adding a chart ... 683 Adding a table ... 684 Working with Digital Photographs ... 685 Adding a photo ... 685 Moving and resizing a picture ... 685 Polishing Your Document ... 686 Spell checking a document ... 686 Finding and replacing text ... 687 Printing and Sharing Your Documents ... 688 Exporting to a different file format ... 689 Sending files via Mail ... 690
Chapter 5: Presenting with Keynote . . . .691
Moving and Resizing Photos and Movies ... 715 Creating Transitions and Effects ... 716 Creating a slide transition... 716 Creating text and graphic effects ... 717 Making text and graphics move on a slide ... 718 Adding hyperlinks to your presentation ... 720 Polishing Your Presentation ... 721 Viewing a presentation... 721 Rehearsing a presentation ... 721 Giving your presentation ... 722 Using Keynote Remote on your iOS device ... 723 Sharing your presentation ... 724
Chapter 6: Crunching with Numbers. . . .729
Sharing Your Spreadsheet ... 760 Printing a spreadsheet ... 760 Exporting a spreadsheet ... 761 Sending files directly from Numbers ... 762
Chapter 7: Getting the Most Out of iWork . . . .765
Customizing the Toolbar ... 765 Opening More Than One Inspector Window ... 766 Modifying Photos ... 767 Masking a photo ... 767 Making a picture transparent with Instant Alpha ... 768 Using Adjust Image ... 769 Making Comments ... 770 Sharing via iWork.com ... 771 Finding More Templates ... 773
Book VI: Mac Networking ... 775
Chapter 1: Networking Your Mac and Other Peripherals. . . .777
Creating a Wired Network ... 777 Creating a Wireless Network ... 782 Setting up a computer-to-computer network ... 782 Setting up a wireless network with a router... 784 Connecting and Choosing a Printer ... 785
Chapter 2: Sharing Files and Resources on a Network . . . .789
AirDrop ... 789 Sharing Files ... 791 Turning on file sharing ... 792 Defining user access to shared folders ... 794 File sharing in Sleep mode ... 798 Accessing shared folders ... 798 Sharing Printers ... 800 Sharing an Internet Connection ... 802
Chapter 3: Connecting to Bluetooth Wireless Devices
and Networks . . . .805
Configuring Bluetooth ... 805 Pairing a Device ... 807 Pairing with your Mac ... 807 Removing a paired device from your Mac ... 809 Troubleshooting connections with Bluetooth-enabled devices ... 810 Sharing through Bluetooth ... 811 Sharing files ... 811 Sharing an Internet connection ... 813
W
hether you’re a beginner, an intermediate user, or a seasoned computer expert, you can find something in Macs All-in-One For Dummies, 3rd Edition, for you. This book is divided into six minibooks so you can focus on the topics that interest you and skip over the ones that don’t. We explored every menu and button of the Mac, its operating system, and Apple’s iLife and iWork applications and wrote about most of them, focusing on the functions and features we think you’ll use frequently or that will help you get the most out of your Mac and the applications. However, if you find that you want more detailed explanations on specific topics than this book provides, you should look into a more specialized book, such as iWork ’09 For Dummies by Jesse Feiler or iLife ’11 For Dummies by Tony Bove (both published by John Wiley & Sons, Inc.).About This Book
This book focuses on the basics for all the aspects of using a Mac, from turn-ing it on and usturn-ing the mouse and trackpad to connectturn-ing your Mac to the Internet and e-mail to organizing your digital pictures and videos to creating photo albums and home movies with fancy captivating special effects to . . . you get the idea.
This book also shows you how to use and take advantage of Apple’s iWork suite, which provides word processing, desktop publishing, a presentation program, and a spreadsheet program for calculating formulas and display-ing your data as 3D charts. Whether you use a Mac for work, school, or just for fun, you’ll find that with the right software applications, your Mac can meet all your computing needs.
If you’re migrating to a Mac from a Windows desktop or notebook PC, this book can show you how to install Windows on your Mac so you can run your favorite Windows programs. By running Windows on a Mac, you can turn your Mac into two computers for the price of one.
Foolish Assumptions
In writing this book, we made a few assumptions about you, dear reader. To make sure that we’re on the same page, we assume that
✦ You know something, but not necessarily a whole lot, about computers and you want to find out the basics of using a Mac or doing more with your Mac than you are already.
✦ You have at least a general concept of this wild and crazy thing called the Internet — or more precisely, the phenomenon known as the Web (or, more formally, the World Wide Web).
✦ You’ll turn to the introductory chapters if you find yourself scratch-ing your head at such terms as double-click,drag and drop,scroll, and Control-click — or any other terms that sound like things we think you should know but you don’t.
✦ You appreciate the speed at which technology-based products like the Mac (and the programs you can run on it) can change in as little as a few months, with newer, sleeker, faster models and application versions replacing previous versions.
✦ You acknowledge that it’s up to you to go on the Web to find updated information about the products described throughout this book.
✦ You know that keeping up with the topic of all things high-tech and Mac (even as a full-time job, as it is for us) still can’t make a guy or gal the be-all and end-all Mac Genius of the World. You will, therefore, alert us to cool stuff you discover in your Mac odyssey so that we can consider including it in the next edition of this book.
✦ You’re here to have fun, or at least try to have fun, as you dive into The Wonderful World of Mac.
Conventions Used in This Book
To help you navigate this book efficiently, we use a few style conventions:
✦ Terms or words that we truly want to emphasize are italicized (and defined). ✦ Website addresses, or URLs, are shown in a special monofont typeface,
like this. If you’re reading this book as an e-book, URLs will be active hyperlinks like this: www.dummies.com.
✦ Numbered steps that you need to follow and characters you need to type are set in bold.
What You Don’t Have to Read
You don’t have to read anything that doesn’t pertain to what you’re interested in. In fact, you can even skip one or more chapters entirely. We hope you don’t skip too many, though, because we bet some of the chapters you think you might not be interested in might surprise you and be interesting after all.
That said, if you’re absolutely, totally, 100 percent new to computers, we suggest that you read (or at least scan) Book I, and then move on to the minibooks you’re interested in reading in any order you want.
As for the occasional sidebar you encounter in this book, feel free to ignore them because they contain, for the most part, tangential thoughts, miniature essays, or otherwise forgettable blathering that you’re just as likely to forget anyway after you read them. Ditto for any of the text you see alongside the Technical Stuff icon.
How This Book Is Organized
Don’t be afraid of this book because of its hefty bulk. You won’t necessarily need (or want) to read this whole thing from cover to cover, and that’s fine. Think of this book more as a reference along the lines of an encyclopedia or a dictionary than as step-by-step operating instructions that require you to read every page in sequence.
To help you find just the information you need, this book is divided into six minibooks, where each minibook tackles a specific topic independent of the other minibooks. Any time you have questions, just flip to the minibook that covers that particular topic.
Each minibook introduces a specific topic and then explains the details and procedures for doing the focus of that particular minibook. Here’s a brief description of what you can find in each minibook.
Book I: Mac Basics
This minibook explains everything you need to know just to use your Mac, such as how to turn it on and off, how to use the mouse, trackpad, keyboard, and multi-touch gestures to interact with the Mac user interface. Even if you’re familiar with using a Mac, you might want to skim through this mini-book to pick up tidbits of information you might not know.
Book II: Online Communications
iChat and FaceTime to conduct video conferences and phone calls, and taking steps to protect your Mac from online security threats, such as junk e-mail and malicious software known as malware and viruses.
Book III: Beyond the Basics
This minibook is the one to read if you want to go beyond the basics and do more with your Mac. This minibook contains explanations for backing up your Mac with Time Machine so your important information and programs are always safe and sound, and using iCloud to sync your Mac with other devices such as your mobile phone or iPad. Look here for troubleshooting advice and how to run Windows on your Mac. Windows programs? Yes, you read right — your Mac is an Equal Opportunity Computer, and running Windows on your Mac is easy thanks to the Boot Camp application that turns your Mac into two computers in one.
Book IV: Your Mac As a Multimedia
Entertainment Center
This minibook takes entertainment to a new level. Here, entertaining topics are explained, such as organizing digital photographs, listening to audio files of your favorite songs, reading books, listening to podcasts, and watching movies, videos, and even university lectures. In this minibook, you also dis-cover how to make movies and music and save it all on CDs or DVDs.
Book V: Taking Care of Business
This minibook is about the business applications that came with your Mac. This minibook shows you how to store names and addresses with Address Book, track appointments with iCal, even build a website with iWeb. If you want to write reports, create presentations, or crunch numbers, this minibook has your name written all over it. From using Keynote to turn out crowd-pleasing presentations loaded with charts and videos to using Numbers to crunch numbers every which way to your heart’s delight (and your accountant’s) to writing the next Great American Dummies Book by using Pages, this minibook is all about getting down to business — and having a little fun along the way.
Book VI: Mac Networking
Icons Used in This Book
To help emphasize certain information, this book displays different icons in the page margins.
The Tip icon points out useful nuggets of information that can help you get things done more efficiently or direct you to something helpful that you might not know.
Watch out! This icon highlights something that can go terribly wrong if you’re not careful, such as wiping out your important files or messing up your Mac. Make sure that you read any Warning information before following any instructions.
This icon points out some useful information that isn’t quite as important as a Tip but not as threatening as a Warning. If you ignore this information, you can’t hurt your files or your Mac, but you might miss something useful.
This icon highlights interesting information that isn’t necessary to know but can help explain why certain things work the way they do on a Mac. Feel free to skip this information if you’re in a hurry, but browse through this informa-tion when you have time. You might find out something interesting that can help you use your Mac.
Where to Go from Here
If you already know what type of help you need, jump right to that particular minibook and start reading. If you just want to know more about your Mac, feel free to skip around and browse through any minibook that catches your eye.
For starters, you might want to begin with Book I and find out about the basics of using your Mac. This first minibook will likely show you new or dif-ferent ways to do something and help you fully take control of your Mac.
Chapter 1: Starting to Use Your Mac . . . .9
Starting Your Mac ... 9 Putting a Mac in Sleep Mode ... 11 Shutting Down Your Mac ... 14 Restarting a Mac ... 15 Different Macintosh Models ... 16 Understanding Mac Processors ... 18 Identifying the Parts of Your Mac ... 20
Chapter 2: Getting Acquainted with the Mac User Interface. . . .23
Mastering the Mouse, Trackpad, and Keyboard ... 24 Looking At Menus and Windows ... 33 Getting to Know the Parts of the Desktop ... 41 The Dashboard ... 45 Getting Help ... 54
Chapter 3: Managing Applications on the Dock, Launchpad,
and Desktop. . . .59
Launching an Application ... 60 Working with Alias Icons ... 69 Switching among Applications ... 70 Quitting Applications ... 73 Organizing Multiple Desktops with Spaces ... 75 Acquiring New Applications ... 78 Installing Applications ... 84 Updating Applications and System Software ... 88 Uninstalling Applications ... 90
Chapter 4: Working with Files and Folders . . . .95
Using the Finder ... 96 Navigating through the Finder ... 101 Organizing and Viewing a Folder ... 103 Creating Folders ... 111 Manipulating Files and Folders ... 114 Archiving Files and Folders ... 118 Searching Files ... 122 Storing Files and Folders in the Dock ... 126 Deleting a File or Folder ... 128
Chapter 5: Customizing Your Mac and Adjusting Settings. . . .131
In This Chapter
✓ Starting your Mac✓ Putting your Mac in Sleep mode
✓ Shutting down and restarting
✓ Identifying your Mac model
✓ Getting to know About This Mac
B
efore you can use your Mac, you have to start it up — which makes perfect sense. Now, get ready for the counterintuitive part. After you have your Mac up and running, you can just leave it on.In this chapter, we show you how to start and restart your Mac, and how to put it to sleep and shut it down completely. Sprinkled throughout this chap-ter is technical information about the various Mac models and what goes on inside that makes your Mac tick — we tried to make our explanations as clear and simple as possible. At the end of the chapter, we show you how to find out precisely which features your Mac has.
Starting Your Mac
Here’s the simple way to start your Mac — the way you’ll probably use 99 percent of the time: Press the Power button.
Depending on the type of Mac you have, the power button might be in back (Mac mini and some iMacs), front (Mac Pro and some iMacs), or above the keyboard (on notebook models, MacBook Air and MacBook Pro).
A few seconds after you press the power button, your Mac chimes to let you know that it’s starting. (Techie types say booting up, a term derived from the phrase “to lift yourself up by the bootstraps.”)
The firmware instructions tell the computer to make sure that all of its com-ponents are working. If some part of your computer (say a memory chip) is defective, your computer will stop. Unless you know something about repair-ing the physical parts of a Macintosh, this is the time to haul your Mac to the nearest Apple Store or authorized repair shop, or to call Apple Support to arrange shipping your bummed-out Mac directly to Apple for repair (800-275-2273 in the United States).
Sometimes a Mac might refuse to start correctly because of software prob-lems. To fix software problems, check out Book III, Chapter 3, which explains how to perform basic troubleshooting on a Mac.
After your computer determines that all components are working, the last set of instructions on the chip tells the computer, “Now that you know all your parts are working, load an operating system.”
When you unpack your Mac and turn it on for the very first time, it asks you to type your name and make up a password to create an account for using your Mac. To guide you through the process of setting up a Mac for the first time, a special application called the Setup Assistant runs, which asks for your time zone, the date, and whether you want to transfer files and applications from another Mac to your newer one. Normally, you need to run through this initial procedure only once, but you also have to perform this procedure if you rein-stall your operating system, which we refer to as OS throughout this book. We explain reinstalling the OS in Book III, Chapter 3, too. The most important part of this initial procedure is remembering the password you choose because you’ll need it to log in to your account, change some of the settings in System Preferences, or install new software.
An operating system is the program that controls your computer and is almost always stored on your computer’s built-in hard drive (rather than on an external drive). On the Mac, the operating system is named Mac OS X (for Macintosh Operating System number ten) and is followed by a version number, such as 10.7.
Apple code-names each version of OS X. The current version is OS X 10.7 Lion, which succeeds OS X 10.6 Snow Leopard, which succeeded 10.5 Leopard, which in turn succeeded 10.4 Tiger, which was preceded by 10.3 Panther, and so on.
Book I Chapter 1
Starting to Use
Your Mac
Putting a Mac in Sleep Mode
After you finish using your Mac, you don’t have to turn it off and then turn it on when you want to use it again. To save time (and do the “green” thing by conserving energy!), put your Mac into Sleep mode instead. When you put your Mac to sleep, it shuts down almost every power-draining component of your Mac, and draws only a teensy trickle of power so you can instantly wake it up with a touch of the keyboard or click of the mouse. Presto change-o: Your Mac immediately returns to the same state you left it in, without making you wait the minute or more it takes to power on when it’s completely shut down.
To put your Mac to sleep, you have a choice of doing it manually or automati-cally. When you need to be away from your Mac for a short period (such as pouring a second cup of joe), you might want to put your Mac to sleep manu-ally. If you suddenly bolt to the kitchen to tend to a smoking stovetop emer-gency without putting your Mac to sleep, your Mac can thoughtfully put itself to sleep for you, automatically.
To put your Mac to sleep manually, choose one of the following three actions:
✦ Choose Ú➪Sleep.
✦ Press the power button or Control+Eject and, when a dialog appears, shown in Figure 1-1, click the Sleep button (or press the S key on your Mac’s keyboard).
Figure 1-1: Put your computer in Sleep mode.
✦ Press Ô+Option+Eject. (If you have a MacBook Air, your Mac doesn’t have an eject key because it doesn’t have a disk drive.)
✦ If you have a MacBook, just close its lid. When a MacBook is sleeping, you can safely move it without worrying about jarring the built-in hard drive that spins most of the time your MacBook is “awake” and in use.
The Apple menu is located in the upper-left corner of the screen.
1.
Click the Apple (Ú) menu, choose System Preferences, and then clickthe Energy Saver icon in the Hardware section or right-click (control-click on a trackpad) the System Preferences icon on the Dock and choose Energy Saver from the menu that appears.
The Energy Saver window appears, as shown in Figure 1-2.
2.
On the timescale next to Computer Sleep, click and drag the slider to the amount of time you want your Mac to sit idle before it goes to sleep. The exact time is shown on the right, above the timescale, as you move the slider.This setting puts the hard drive to sleep. You may want to set a longer time interval for Computer Sleep than for Display Sleep because it will take your Mac slightly longer to wake from its Computer Sleep than its Display Sleep.
3.
On the timescale next to Display Sleep, click and drag the slider to the amount of time you want your Mac to sit idle before the screen saver plays on the display.This setting puts the display to sleep. A screen saver is an image that appears when your Mac is inactive after the time interval you set here. It hides whatever you were working on from peering eyes when you’re away from your Mac. You can find out how to choose a special image for your screen saver and set a password for it in Book I, Chapter 5.
If your computer is doing a task, such as downloading a sizeable file, set Computer Sleep to Never and set only Display Sleep with a time interval. This way your Mac continues to do the task at hand even though the dis-play is sleeping.
4.
(Optional) Select the check boxes next to the other options to choose other circumstances when your Mac goes to sleep or wakes.5.
(Optional) Click the Schedule button.A pane opens that lets you schedule the days and times you want your Mac to start or wake up and go to sleep. This is convenient if you don’t want to accidently leave your Mac on when you leave your home or office or want to find it awake and waiting for you when you arrive.
6.
Click the Lock icon at the bottom of the pane if you want your changes to be password protected.7.
Choose Systems Preferences➪Quit System Preferences or click the redBook I Chapter 1
Starting to Use
Your Mac
Figure 1-2: Use the Energy Saver System Preferences to put your Mac on a sleep schedule.
If you have a MacBook Air or MacBook Pro, click the Battery and Power Adapter tabs at the top of the pane to choose different settings for when your Mac is running on battery power and when it’s connected to a power adapter (refer to Figure 1-2). When powered by the battery, you may want your Mac to go to sleep after 5 minutes to make the battery charge last longer. When your Mac is connected to a power source, you could set it to go to sleep after 15 minutes. You can also select the Show Battery Status In Menu Bar check box to see an icon, at the top of your Mac’s screen, that indicates how much charge is left on your battery.
To wake a sleeping Mac, click the mouse button or tap any key. To keep from accidentally typing any characters into a currently running application, press a noncharacter key, such as Shift or an arrow key. Open the lid on your sleeping MacBook to wake it up.
Shutting Down Your Mac
When you shut your Mac down, all open applications are automatically closed, Internet and network connections are disconnected, and all logged-in users are logged out. It may take a few minutes for your Mac to shut down. You know your Mac is shut down completely when the screen is black, the hard drive and fan are silent, and there are no blinking lights anywhere. There are a few circumstances in which you want to shut down your Mac:
✦ When you won’t be using it for an extended length of time. Turning your Mac completely off can extend its useful life, waste less energy, and save you a few bucks on your yearly energy expense.
✦ When you’re traveling with your Mac and putting your MacBook Air, MacBook Pro, or Mac Mini in your wheeled carry-on trolley. (Sleep mode is fine if you’re carrying your Mac in a laptop bag or backpack.)
Make sure that your MacBook Air or MacBook Pro is completely shut down before closing the cover or it may not shut down properly.
✦ If you want to open your Mac to install a new battery, additional memory, or a video graphics card.
✦ To resolve weird situations, such as unresponsive or slow-running applications, because your Mac runs a number of behind-the-scenes file system housekeeping chores every time you start it.
You have three ways to shut down your Mac:
✦ Choose Ú➪Shut Down, as shown in Figure 1-3. A dialog appears, asking if you’re sure that you want to shut down. (Refer to Figure 1-1.) Click Cancel or Shut Down. (If you don’t click either option, your Mac will shut down automatically after one minute.)
Book I Chapter 1
Starting to Use
Your Mac
Holding the Option key and then choosing Ú➪Shut Down bypasses the prompt asking if you’re sure that you want to shut down. (Yes, Mr. Mac, I’m sure I’m sure, but thank you for your concern.)
✦ Press Control+Ejector press the power button and when a dialog appears, click the Shut Down button, or press the Return key.
Select the Reopen Windows When Logging Back In check box if you want everything you’re working on to be open when you turn your Mac on the next time.
✦ Press and hold the power button to force your Mac to shut down after a few seconds’ wait (or press and hold Ô+Control and then press the power button to force your Mac to shut down immediately).
The last option, a force shutdown, forces all running applications to shut down right away. A force shutdown is your last resort if your Mac appears to have frozen and is unresponsive. If only a single application is freezing or acting flaky, it’s better to force quit that single application instead of shutting down your entire computer. (See Book III, Chapter 3 for informa-tion about how to force quit a single applicainforma-tion.) Performing a force shut-down can cause you to lose any changes you’ve made to a letter or other file you’re working on since the last time you saved it before the lockup. That’s why you should use force shutdown only as a last resort.
Restarting a Mac
Sometimes the Mac can start acting sluggish, or applications might fail to run. When that happens, you can choose Ú➪Shut Down or Restart to prop-erly shut down or restart your Mac and then start it again, which essentially clears your computer’s memory and starts it fresh.
To restart your computer, you have three choices:
✦ Press the power button or Control+Eject and, when a dialog appears, click the Restart button (refer to Figure 1-1) or press the R key.
✦ Choose Ú➪Restart.
✦ Press Control+Ô+Eject.
Different Macintosh Models
Apple’s Macintosh computer — Mac for short — enjoys the reputation of being the easiest computer to use in the world. Additionally, Macs are dependable, durable, and so beautifully designed, they incite techno-lust in gadget geeks like us, and ordinary Joes alike. For those doubly good reasons, you probably won’t buy a new Mac to replace your old one because you have to, but because you want to.
The Macintosh has been around since 1984, and since that time, Apple has produced a wide variety of Mac models. Although you can still find and use older Macs (although many are not compatible with the latest and greatest OS or applications), chances are good that if you buy a newer Mac, it will fall into one of three categories:
✦ Desktop: Mac mini or Mac Pro, which require a separate display.
✦ All-in-one desktop: iMac, which houses the display and computer in one unit.
✦ Notebook: MacBook Air or MacBook Pro, which have built-in keyboards, trackpads that work like a mouse at the touch of your fingertip, and bright displays; a clamshell design lets you close and tote them in your backpack, messenger bag, or briefcase.
Like today’s iMac, the original Mac came with a built-in display, a keyboard, and a mouse. The Mac Pro also comes with a keyboard and mouse, but no display, whereas the Mac Mini has neither keyboard, mouse, nor display sold with it. When you buy a Mac desktop, you can connect a display you already own, or you can buy a new one, such as Apple’s LED Cinema Display. This LED display consumes 30 percent less power than conventional LCD displays, and it lights to full brightness when powered on (without need-ing time to warm up). What’s more, the same LED-type display is standard equipment on every MacBook model.
By understanding the particular type of Mac that you have and its capabili-ties, you’ll have a better idea of what your Mac can do. No matter what the capabilities of your Mac are, chances are good that it will work reliably for as long as you own it.
The Mac Mini and Mac Pro
Book I Chapter 1
Starting to Use
Your Mac
The Mac Mini is a lower-priced, consumer version designed for people who want an inexpensive Mac for ordinary uses, such as word processing and writing, sending e-mail, browsing the web, and playing video games. Alternatively, it can function as a terrific, cost-effective server for home or small business networks.
The Mac Pro is a higher-priced, professional version with multiple drive bays and lots of expandability, as well as greater graphics and processing capabilities because of its advanced graphics processor and use of multiple processors.
The iMac
The all-in-one design of the iMac is an evolutionary extension of the original — 1984-era — Mac design. The iMac combines the computer with a built-in display and speakers. On iMac models, it’s possible to connect external speakers and a second external display if you want.
The advantage of the all-in-one design of the iMac is that you have every-thing you need in a single unit. The disadvantage is that if one part of your iMac fails (such as the display, or the internal DVD drive), you can’t easily replace the failed part.
Mac Mini, Mac Pro, and iMac models use an external wireless or wired (usu-ally USB) keyboard and a mouse or trackpad (sold separately from the Mini). Apple’s Magic Trackpad lets you use all the new multi-touch gestures such as swipe, pinch, and flick to control the cursor and windows on whichever Mac desktop model you choose. If you use a trackpad, you don’t need a mouse but you can use both if you prefer.
The MacBook Air and MacBook Pro
MacBook Air and MacBook Pro are the notebook members of the Mac family. The MacBook Air comes with an 11-inch or 13-inch screen, and the MacBook Pro models come in three screen sizes: 13-inch, 15-inch, and 17-inch. All the MacBook models run on rechargeable battery packs or external power.
With a fast Internet connection, many data transfer functions such as down-loading applications or sharing photos and documents can take place online, making the DVD drive even more optional than before. Apple’s latest OS, Mac OS X 10.7 Lion was initially delivered via the Internet rather than on an installation disc, although you can also purchase it on a USB memory stick.
The main differences in the MacBook Air and MacBook Pro are weight and storage. The MacBook Air may not weigh much but it’s no lightweight when it comes to features. The latest models are fast and even the 11-inch model offers a display so crisp and brilliant you hardly notice the size. The down-side is that the maximum storage is 256 gigabytes on the high-end 13-inch model. MacBook Air uses SSD (solid state drive) storage, which is fast and stable. The MacBook Pro models use HDD (hard disk drive) storage, which holds between 320 and 750 gigabytes. Pro models also have built-in double-layer CD/DVD drives, and Ethernet, Firewire, and audio line in ports (in addi-tion to the USB, Thunderbolt, and audio line out ports and SDXC card slot that all MacBook models have). The downside of the MacBook Pro is that extra stuff adds weight. We didn’t realize quite how much weight until we switched from a Pro to an Air. Although both MacBook Air and MacBook Pro models have full-size keyboards, neither includes the extra numeric keypad found on most external keyboards or on larger Windows notebooks. Instead of the mouse that comes in the box with every desktop Mac (or Windows computer, for that matter), the MacBooks use a built-in trackpad, which responds to all the multi-touch gestures you can use to control the cursor and windows on your Mac.
If you find the keyboard or trackpad of your notebook Mac too clumsy to use, you can always plug an external keyboard and mouse into your notebook.
The Thunderbolt port is standard on all newer Macs. Thunderbolt is a data-transfer protocol used to connect peripheral devices such as displays or hard drives. Thunderbolt transfers data faster than either USB or FireWire protocols.
Understanding Mac Processors
The processor acts as the brain of your Mac. A computer is only as powerful as the processor inside. Generally, the newer your computer, the newer its processor and the faster it will run.
Book I Chapter 1
Starting to Use
Your Mac
The type of processor in your Mac can determine the applications (also known as software) your Mac can run. Before you buy any software, make sure that it can run on your computer.
To identify the type of processor used in your Mac, click the Apple menu in the upper-left corner of the screen and choose About This Mac. An About This Mac window appears, listing your processor as Intel Core 2 Duo, Core i3, Core i5, Core i7, or Xeon. If your Mac doesn’t have one of these proces-sors, you won’t be able to run Mac OS X 10.7 Lion. This means Core Solo and Core Duo models can’t run Lion. To use Lion, you also need at least 2GB RAM (Random Access Memory).
The Intel family of processors includes the Core Solo, Core Duo, Core 2 Duo, dual-core i3, dual-core i5, quad-core i7, and Xeon, where the Core Solo is the slowest and the Xeon is the fastest. Every processor runs at a specific speed, so a 2.0-gigahertz (GHz) Core 2 Duo processor will be slower than a 2.4 GHz Core 2 Duo processor. However, the type of storage your Mac has can skew this theory. The newest MacBook Air has a 1.7- or 1.8 GHz processor, but uses FlashMemory (the same kind of memory in your USB flash drive), so in bench-marking tests, the MacBook Air at 1.7 GHz is about as fast as the MacBook Pro at 2.2 GHz. If understanding processor types and gigahertz confuses you, just remember that the most expensive computer is usually the fastest.
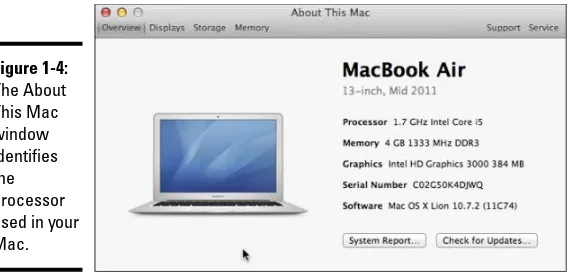
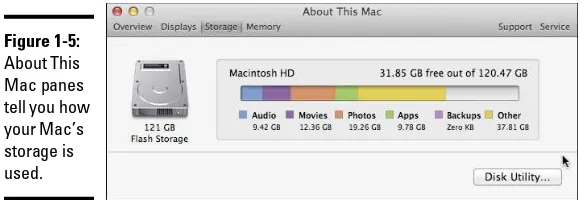
Move the cursor over the More Info button and click to see an expanded window of information about your Mac, as shown in Figure 1-4. Click each of the buttons at the top of the window to open panes that show more informa-tion about your Mac: Displays, Storage (shown in Figure 1-5), and Memory. Click the Support button at top right for links to the Help Center and user manuals. Click the Service button to access links to information about your Mac’s warranty and AppleCare Protection.
Figure 1-5: About This Mac panes tell you how your Mac’s storage is used.
Identifying the Parts of Your Mac
By looking at your Mac, you can tell whether it’s an all-in-one design (iMac), a notebook (MacBook Air or MacBook Pro), or a desktop unit that lacks a built-in screen (Mac mini or Mac Pro). However, looking at the outside of your Mac can’t tell you the parts used on the inside. To identify the parts and capabilities of your Mac, follow these steps:
1.
Click the Apple menu in the upper-left corner of the screen and choose About This Mac.An About This Mac window appears (refer to Figure 1-4).
2.
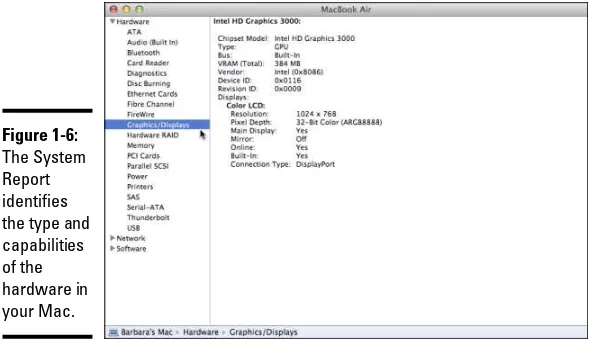
Click More Info, and then click System Report.A System Report window appears.
3.
Click the Hardware option in the category pane on the left to view a list of hardware items.If the list of hardware items (such as Bluetooth, Memory, and USB) already appears under the Hardware category, skip this step.
4.
Click a hardware item, such as Memory or Disc Burning.The right pane of the System Profiler window displays the capabilities of your chosen hardware, as shown in Figure 1-6.
5.
You can also click the disclosure triangle next to Network or Software in the category pane on the left to see information about networks you are connected to or software installed on your Mac.Don’t worry if the information displayed in the System Information window doesn’t make much sense to you right now. The main idea here is to figure out a quick way to find out about the capabilities of your Mac, which can be especially helpful if you have a problem in the future and a technician asks for information about your Mac.