OFC: 7.375” W x 9.25” H
Dan Gookin
Bestselling author of all editions of PCs
3rd Edition
OBC: 7.375” WFor all their incredible power and versatility, PCs can be trouble-prone and
may get temperamental over time. With Troubleshooting & Maintaining Your
PC All-in-One For Dummies, 3rd Edition, you can quickly diagnose and solve
your PC problems, while keeping your hardware and peripherals running
smoothly. Fully updated and revised, this third edition gives Windows
®10
users the hands-on ability to resolve most issues, boost PC security, and
optimize system performance.
•
Fix everything from startup issues to
network nonsense
•
Get tips and tricks on all the tools available
in the Windows
®10 toolbox
•
Keep everything safe and secure with appro
-priate security apps and vital system updates
Troubleshooting &
Maintaining Your PC
A L L - I N - O N E
3rd Edition
Troubleshooting & Maintaining Your PC All-in-One For Dummies
® Published by: John Wiley & Sons, Inc., 111 River Street, Hoboken, NJ 07030-5774, www.wiley.comCopyright © 2017 by John Wiley & Sons, Inc., Hoboken, New Jersey
Published simultaneously in Canada
No part of this publication may be reproduced, stored in a retrieval system or transmitted in any form or by any means, electronic, mechanical, photocopying, recording, scanning or otherwise, except as permitted under Sections 107 or 108 of the 1976 United States Copyright Act, without the prior written permission of the Publisher. Requests to the Publisher for permission should be addressed to the Permissions Department, John Wiley & Sons, Inc., 111 River Street, Hoboken, NJ 07030, (201) 748-6011, fax (201) 748-6008, or online at http://www.wiley.com/go/ permissions.
Trademarks: Wiley, For Dummies, the Dummies Man logo, Dummies.com, Making Everything Easier, and related trade dress are trademarks or registered trademarks of John Wiley & Sons, Inc. and may not be used without written permission. All other trademarks are the property of their respective owners. John Wiley & Sons, Inc. is not associated with any product or vendor mentioned in this book.
LIMIT OF LIABILITY/DISCLAIMER OF WARRANTY: THE PUBLISHER AND THE AUTHOR MAKE NO REPRESENTATIONS OR WARRANTIES WITH RESPECT TO THE ACCURACY OR COMPLETENESS OF THE CONTENTS OF THIS WORK AND SPECIFICALLY DISCLAIM ALL WARRANTIES, INCLUDING WITHOUT LIMITATION WARRANTIES OF FITNESS FOR A PARTICULAR PURPOSE. NO WARRANTY MAY BE CREATED OR EXTENDED BY SALES OR PROMOTIONAL MATERIALS. THE ADVICE AND STRATEGIES CONTAINED HEREIN MAY NOT BE SUITABLE FOR EVERY SITUATION. THIS WORK IS SOLD WITH THE UNDERSTANDING THAT THE PUBLISHER IS NOT ENGAGED IN RENDERING LEGAL, ACCOUNTING, OR OTHER PROFESSIONAL SERVICES. IF PROFESSIONAL ASSISTANCE IS REQUIRED, THE SERVICES OF A COMPETENT PROFESSIONAL PERSON SHOULD BE SOUGHT. NEITHER THE PUBLISHER NOR THE AUTHOR SHALL BE LIABLE FOR DAMAGES ARISING HEREFROM. THE FACT THAT AN ORGANIZATION OR WEBSITE IS REFERRED TO IN THIS WORK AS A CITATION AND/OR A POTENTIAL SOURCE OF FURTHER INFORMATION DOES NOT MEAN THAT THE AUTHOR OR THE PUBLISHER ENDORSES THE INFORMATION THE ORGANIZATION OR WEBSITE MAY PROVIDE OR RECOMMENDATIONS IT MAY MAKE. FURTHER, READERS SHOULD BE AWARE THAT INTERNET WEBSITES LISTED IN THIS WORK MAY HAVE CHANGED OR DISAPPEARED BETWEEN WHEN THIS WORK WAS WRITTEN AND WHEN IT IS READ.
For general information on our other products and services, please contact our Customer Care Department within the U.S. at 877-762-2974, outside the U.S. at 317-572-3993, or fax 317-572-4002. For technical support, please visit https://hub.wiley.com/community/support/dummies.
Wiley publishes in a variety of print and electronic formats and by print-on-demand. Some material included with standard print versions of this book may not be included in e-books or in print-on-demand. If this book refers to media such as a CD or DVD that is not included in the version you purchased, you may download this material at http://booksupport.wiley.com. For more information about Wiley products, visit www.wiley.com.
Library of Congress Control Number: 2017937988
ISBN: 978-1-119-37835-8; 978-1-119-37837-2 (ebk); 978-1-119-37836-5 (ebk)
Manufactured in the United States of America
Contents at a Glance
Introduction
. . . . 1Book 1: Solve My Problem Now!
. . . . 5CHAPTER 1: Trouble Comes Hither . . . .7
CHAPTER 2: Quick Fixes . . . . 15
Book 2: O, We Got Trouble!
. . . .29CHAPTER 1: Startup Problems . . . . 31
CHAPTER 2: Disk Disaster . . . .47
CHAPTER 3: Monitor Mayhem . . . .83
CHAPTER 4: Internal Issues . . . .107
CHAPTER 5: Printer Problems . . . . 135
CHAPTER 6: Peripheral Perils . . . .159
CHAPTER 7: Software Situations . . . .181
CHAPTER 8: Network Nonsense . . . .201
CHAPTER 9: Shutdown Issues . . . .229
Book 3: Tools to Use
. . . .241CHAPTER 1: Windows Recovery Environment . . . .243
CHAPTER 2: The Device Manager . . . .261
CHAPTER 3: MSCONFIG and the Task Manager . . . .271
CHAPTER 4: Safe Mode . . . .287
CHAPTER 5: System Restore . . . . 301
CHAPTER 6: The Task Manager . . . . 313
CHAPTER 7: The Windows Registry . . . .325
CHAPTER 8: Events and Diagnostics . . . . 335
Book 4: PC Security
. . . .347CHAPTER 1: Windows Update . . . .349
CHAPTER 2: Keep Mr. PC Safe . . . .357
CHAPTER 3: Backup and Restore . . . .371
Book 5: This Old PC
. . . .385CHAPTER 1: Performance and Resources . . . .387
Table of Contents
INTRODUCTION
. . . . 1About This Book . . . . 1
How This Book Works . . . .2
Icons Used in This Book . . . . 3
Beyond the Book . . . . 3
Where to Go from Here . . . . 4
BOOK 1: SOLVE MY PROBLEM NOW!
. . . . 5CHAPTER 1:
Trouble Comes Hither
. . . .7The Root of All PC Trouble . . . .7
What’s Changed? . . . .8
Installing software . . . .8
Adding or removing hardware . . . .9
Changing settings . . . .9
Hardware versus Software Problems . . . . 11
Dealing with software issues . . . . 11
Solving hardware issues . . . . 11
When to Give Up . . . .12
CHAPTER 2:
Quick Fixes
. . . . 15Things to Try First . . . . 15
Restarting the PC . . . .16
Restarting a stubborn PC or laptop . . . .17
Running a troubleshooter . . . .18
Repairing a program . . . .19
Fixing Windows . . . .21
Restoring the system . . . .21
Help! . . . .22
Locating Internet support . . . .22
Downloading drivers . . . .24
Perusing forums . . . .25
Contacting tech support . . . .26
Safe Mode Duties . . . .296
Speed Up Your PC . . . .413
Performing regular maintenance . . . .413
Upgrading the hard drive . . . .414
Adding more RAM . . . .415
Putting ReadyBoost to work . . . .415
Setting the number of processors . . . .417
Disabling background services . . . .418
Introduction
I
f trouble were predictable, it wouldn’t be a problem. That’s because the problem with trouble is that it’s unpredictable.You hold in your hands a big ol’ book that’s all about solving computer problems. The topic is troubleshooting. It needs to be covered in so many pages because there hasn’t yet been a computer invented that didn’t have trouble following it like a shadow on a sunny day.
The computing experience should be a pleasant one. And it can be — if you’re informed and able to deal with the troubles you encounter. This book helps you along that journey in an informative and entertaining way. Welcome to Trouble-shooting and Maintaining Your PC All-in-One For Dummies.
About This Book
A byte of prevention is worth a gigabyte of cure.
This book’s philosophy on troubleshooting is that it’s easier to do when you understand how the computer works. This philosophy is opposite of what most computer users expect, which is to look up a specific condition and find a specific cure for it. This approach has two glitches.
The first downfall with the look-it-up approach is that you don’t learn anything. Because there’s a method behind PC madness, often, the same solution can be applied to multiple problems. After you understand why things go wrong, it’s not only easier to fix them — it’s also possible to prevent them in the first place.
My approach is simple: Look up the problem, learn a bit about what might have caused it, and then arrive at a solution. The notion is that when trouble arises again later, you will have the experience to deal with it in a practical manner. Because most PC troubles have a common origin, this solution works.
Before moving on, please be aware that there’s a difference between trouble and an event that’s merely annoying. For example, if the text you print from an email message is tiny, it’s annoying, but it isn’t a bug. Though specific annoying prob-lems such as that one might not be covered in this book, you’ll still find a solu-tion here. That’s the beauty behind my philosophical approach to troubleshooting. After all, using Windows shouldn’t be a frustrating experience.
How This Book Works
This book is composed of five minibooks, each of which addresses a computer troubleshooting topic. The minibooks are split into traditional chapters, all geared to a specific subject within the minibook topic. Then the chapters are split into sections consisting of paragraphs, words, and then letters. So, if you understand the alphabet, you’ll understand this book.
To run the special troubleshooting tools and utilities, you take advantage of the Windows 10 Start menu. Tap the Windows key to pop up that menu, and then start typing the name of a tool or utility. The text explains what to type. You then choose the matching utility from the search results list. This method is much faster than hunting for tools on the Start menu’s programs list.
Because this book approaches troubleshooting in a philosophical way, lots of material is cross-referenced. For example, startup issues are also related to disk disaster recovery. So, in both chapters, you’ll find references to the other chapter’s material.
This book covers all varieties of computers, from a traditional desktop to an all- in-one model, a laptop, two-in-one, or even a tablet. As along as the computer runs Windows 10, you’re good.
When you’re supposed to type something, that text appears in bold type. In the context of a step, where the text is normally bold anyway, the stuff you type appears in regular roman text.
Do not press the Enter key until you’re directed to do so. And even then, I recom-mend that you review what you type before you press Enter, just to ensure that you got everything typed properly.
Do not press a period at the end of any text you type, unless I explain that the period is needed. Unlike sentences in English, computer commands don’t end with a period.
Icons Used in This Book
I’d like to think that everything in this book is a tip, but for those special, worthy items, you’ll find this icon lurking nearby.
A reminder of something not to do, something to avoid, or something that can cause serious trouble is flagged by the hazard icon.
This icon flags text that is important enough to remember or that reminds you of something you may have forgotten that bears repeating.
When the urge to blurt out something nerdy overwhelms me, I succumb and use this icon to supply a warning sign. You’re free not to read any technical text near this icon.
Beyond the Book
The publisher maintains a support page with updates or changes that have occurred since this book went to press. You’ll also find bonus content, in the form of an online Cheat Sheet, which isn’t really cheating and isn’t a sheet.
then open the Download tab on this book’s dedicated page. I’d offer more specific information, but I don’t have it. The publisher told me that the actual address of the online material is held in one of 20 briefcases and if I choose the right one, I get paid — something like that.
Where to Go from Here
Feel free to start reading this book in any minibook, chapter, or section. Every-thing is self-contained, so there isn’t really a reason to read one section before another. For those rare times when it helps to know information located else-where in the book, I provide a cross-reference. But it’s not necessary to read the book from front to back.
My email address is [email protected]. Yes, that’s my real address. I reply to all email I receive, and you’ll get a quick reply if you keep your question short and specific to this book. Although I enjoy saying "Hi," I cannot answer technical support questions or help you troubleshoot your computer. Thanks for understanding.
You can also visit my web page for more information or as a diversion:
wambooli.com
This book’s specific support page can be found at
wambooli.com/help/troubleshooting
I provide frequent updates and posts on that page, offering bonus information, supplements to this book, tips, tricks, trivia, and fun. And there’s only one little advertisement on the page and no pop-ups.
The publisher also maintains a support page, complete with a Cheat Sheet, supplemental material, and updates. You can visit the site here:
www.dummies.com/go/god-only-knows
Thank you for choosing my book,
1
Solve My
Contents at a Glance
CHAPTER 1:
Trouble Comes Hither
. . . . 7 The Root of All PC Trouble . . . . 7 What’s Changed? . . . . 8 Hardware versus Software Problems . . . . 11 When to Give Up . . . . 12Trouble Comes Hither
I
t’s sudden, unexpected, and unwelcome. It’s PC trouble, and it sneaks up on the horizon like the dawn. Unlike the sun, however, technology issues hardly warm up your day with welcome sunshine. No, the dread and foreboding that comes with computer woe is a splash of cold water, a pebble in your shoe, and a long-term visit from an unwelcome guest all rolled into one.You can’t avoid computer woe, but you can prepare for its arrival. You can also become familiar with the core cause of digital distress. The more you know about why things go wrong, the better you can prepare yourself for that eventuality.
The Root of All PC Trouble
Simply enough, the cause of nearly all PC trouble is rooted in one thing: change.
Most computers foul up because something has changed. It could be something you did, such as modify a setting, uncover a software bug, run a malicious pro-gram, or experience any of several items that all qualify as “change.” Even time is an agent of change, in that PC hardware gets old, eventually wears out, and fails.
The goal isn’t to avoid change, but rather to be aware of its consequences. The
Chapter
1
IN THIS CHAPTER
» Understanding PC problems
» Examining software changes
» Reviewing hardware issues
» Adjusting PC settings
» Determining the source
What’s Changed?
No, it’s not your fault that you changed something. Computers are designed to
be flexible. Rather than blame yourself when trouble arises, just recall what’s changed. When you do, you make it easier to troubleshoot and find the source of
what’s going wrong.
For example, you install a new keyboard and the mouse doesn’t work. Perhaps you unplugged the mouse instead of the old keyboard? You update a graphics driver, but now all your computer games are reset to low resolution. The point is to be aware of what you’ve just done, to see how it relates to the current problem.
To help you discover what’s changed, or what might have caused recent issues,
ask yourself, “What did I just do?” Specifically, did you recently or just now
»
Install new software?»
Add new hardware?»
Change a setting?Think hard! That’s because you do a lot with your computer and sometimes you do several things at once. For example, a dialog box may feature multiple settings but only one OK button. All the settings are applied instantly with a mouse-click. Undoing the change requires that you recall which change you just made.
Windows keeps track of all system activities, including those that cause woe. See
Book 3, Chapter 8 for information on the Event Viewer, which lets you peruse
system logs for signs of trouble.
Installing software
Software covers the gamut, from the PC’s operating system to programs you
install. It also includes the software that controls specific pieces of hardware,
which are referred to as drivers.
The best way to avoid issues caused by installing new software is to create a restore point. That way, should problems arise, you can uninstall the software and use the
restore point to recover the system’s previous configuration.
»
The good news: Windows automatically creates a restore point whenever you install new software.Trouble Comes Hither
»
Refer to Book 3, Chapter 5 for details on System Restore. That chapterexplains how to manually set a restore point and how to use the System Restore utility to recover from software installation boo-boos.
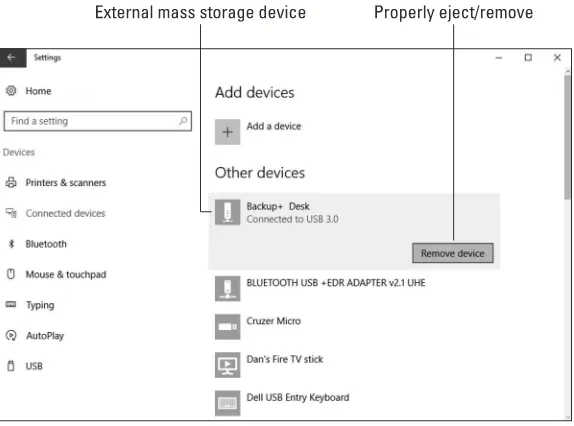
Adding or removing hardware
Major hardware changes most definitely affect a computer system, but keep
in mind that when you attach or remove a USB device, you’re also adding and removing hardware. This process may trigger an issue that could occur right away or surface later, but the hardware change is probably the source.
»
Create a restore point before you make hardware changes. Unlike with software installation, you must manually create a restore point before installing new hardware. Refer to Book 3, Chapter 5.»
The quick fix for bad hardware is to remove it. Sometimes, detaching the bum device fixes the problem, and sometimes not. If software (driver) was installed when you attached the hardware, the software must be uninstalled as well.»
Ensure that you read the hardware installation directions (or flimsy pamphlet)before you install the device. The directions describe whether you must first install special software. Sometimes, new hardware screws up because you omit that step.
»
If hardware is going to fail, it usually does so within 30 days of installation, which is why most hardware warranties are for 90 days or less. In my experience, hardware that fails generally does so within 72 hours.»
A power supply (hardware) might fail when overloaded, which goes against the “hardware fails quickly” rule. See Book 2, Chapter 4 for details on the power supply.»
Unlike software errors, which are consistent, hardware problems can be intermittent. See the later section “Hardware versus Software Problems.”Changing settings
As long as you are making the change, click the Yes button to proceed. If you’re not aware of why the UAC warning would appear, click No. And, if you have a standard-level user account, you must input an administrator password, as
shown in the figure.
Some settings that affect the entire system feature the UAC shield icon, shown
in the margin. Choosing this type of setting may not prompt a UAC warning, but the shield icon serves as a reminder that the option you’re changing can alter the PC’s behavior.
The point of the UAC is to pay attention! Changing settings can lead to PC trouble. For example, changing the text color to bright green and the text background color to bright green renders text unreadable. The solution is to undo the change.
»
A UAC warning appears whenever you change a system-wide setting. It’s your clue that proceeding might portend problems.»
The best way to undo settings is to run System Restore, though a restore point may not be handy enough to affect the change. See Book 3, Chapter 5 for details.»
By the way, green-on-green text is a horrid problem that’s difficult to fix. You can select text to view it; selecting highlights the text and makes it readable. For a long-term solution, reboot into safe mode to undo the text setting. See Book 3, Chapter 4 for details on safe mode.FIGURE 1-1:
Trouble Comes Hither
Hardware versus Software Problems
Because a computer system is a combination of hardware and software, any problems you’re going to have will be related to either hardware or software. Yet
determining the specific source is an art form. People who troubleshoot comput
-ers for a living follow three general rules to diagnose such errors:
»
If the problem is consistent, it’s probably software.»
If the problem is inconsistent, it’s probably hardware.»
If the problem is with the PC’s firmware — good luck!You’re probably used to such ambiguity when it comes to technology, though these three axioms are worthy to follow.
Dealing with software issues
Software problems are predictable. If the Backup program won’t run as scheduled, that’s a consistent issue and the program itself (or the task scheduler) is to blame. If Word always crashes when you try to print, that’s a software issue, not anything to do with the printer.
»
Software issues with a program — bugs — are fixed by the softwaredevel-oper. You can check the developer’s web page for updates and support information, but you cannot resolve the problem on your own, other than to avoid the feature that doesn’t work.
»
Software controls the hardware. Software drivers need updating from time to time, and even the update could be the problem. See Book 4, Chapter 1 for details.»
Also refer to Book 2, Chapter 7 for various software solutions.Solving hardware issues
For peripherals, you can troubleshoot by swapping out a suspect device with one that works. For example, if the keyboard is acting funky, attach another keyboard and see whether the problem persists. If not, the original keyboard is defective.
Replace it.
The only time hardware swapping doesn’t work is with a laptop. Because the lap-top’s hardware is integrated, you can’t readily swap out a keyboard or replace a power supply. That’s why I recommend a full warranty on a laptop, just in case the parts go bad.
»
Yes, you can replace any hardware on a PC, though at some point you must consider when to just get a new computer. See the next section.»
Even the hard drive can be replaced, though always ensure that you have a fresh backup handy and that you’ve created a System Recovery disk.»
Backup is covered in Book 4, Chapter 3.»
Creating a System Recovery disk is covered in Book 3, Chapter 1.When to Give Up
You’ve tried your best. You’ve written poems. You’ve showered her with gifts. The
local florist beams whenever you walk in the door. Yet she refuses your overtures of affection. At some point, you must give up and realize that Marie Lee will never
date you. Time to move on.
WHAT’S THE FIRMWARE?
The term firmware applies to an array of chips on the PC’s motherboard. These chips provide basic technology for the PC. In a way, the firmware is the PC’s personality, giving it features such as graphics, sound, networking, and basic input/output functions.
Because the firmware chips are integrated with the motherboard, you can’t readily replace them. Further, the firmware controls so many aspects of the PC’s basic hard-ware that a firmhard-ware bug would be near impossible to catch.
Trouble Comes Hither Yes, the same philosophy that applies to a teenage boy’s dating strategy also applies to technology troubleshooting.
On the upside, I believe that you’ll find your computer is far more attentive to your affections than your tenth-grade crush. The computer wants to be liked. So, before you toss in the towel, consider some quick fixes, such as restarting the PC or using the System Restore utility.
If your tool chest of quick fixes doesn’t work, turn to the Internet to pose ques -tions and search for solu-tions. You might not be the only one who’s ever had the same problem.
Computer repair places still exist in the real world. No, they’re not cheap, but
often they’ll fix your problem faster and with less frustration than you’d experi -ence working on your own.
And yes, this book offers plenty of suggestions and tips for fixing the most com
-mon PC problems, as well as advice on how to deal with just about any computer ailment.
Finally, at some point you must accept that you’ll get a new computer. The typical PC has a lifespan of anywhere from 4 to 6 years, and more if you treat it well. After that time, however, and given the advances in technology, buying a new computer is a worthy investment.
»
Refer to Chapter 2 for additional help on how to fix common PC problems.»
Also see Book 5, which presents techniques for breathing new life into anQuick Fixes
E
veryone knows some quick fi xes, and most folks are eager to share them.These are home remedies for everything from stopping the hiccups to clean-ing grout in the shower. Such solutions also exist for solvclean-ing technology issues. That’s because not everything needs to be diffi cult. And while the expert advice and specifi cs that you can fi nd throughout this book are valued, sometimes a good ol’ homespun trick fi xes the problem.
Things to Try First
The very fi rst thing you should do when something unexpected happens on your computer is to open both eyes and drop your mouth a bit. That’s right: Look sur-prised. After years of using a computer, I’ve mastered this expression.
After the initial shock, consider a few quick fi xes. In fact, add the items in this section to your list of ready-cures to remedy any digital distress.
Chapter
2
IN THIS CHAPTER
» Restarting the computer
» Using a troubleshooting wizard
» Fixing broken programs
» Addressing Windows glitches
» Finding support on the web
» Checking online forums
» Working with tech support
Restarting the PC
The old standby solution is to turn off the computer, wait a few seconds, and then turn it on again. This trick also applies to any technology, from cell phones to smart TVs to nuclear power plants.
A faster way to implement this solution is to sign out of Windows instead of restarting the PC. Signing out shuts down all running programs, which may solve the issue. Follow these steps in Windows 10:
1.
If you’re able, close all open programs and windows.The purpose of this step is to ensure that you don’t have any unsaved data lingering. If you do, the sign-out (or shutdown) process is interrupted.
2.
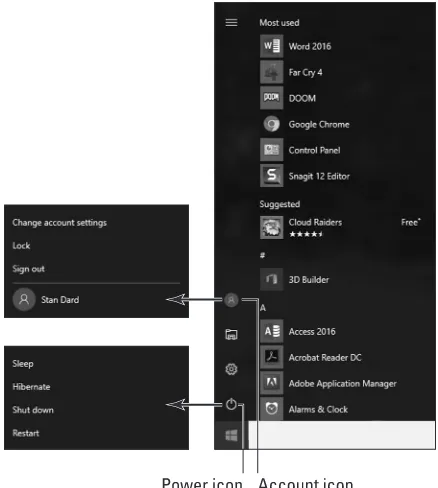
Tap the Windows key to summon the Start menu.3.
Click your Account icon on the left side of the menu. Use Figure 2-1 as your guide.FIGURE 2-1:
Quick Fixes
4.
Choose Sign Out. Windows signs you out.5.
If any stubborn programs remain open, click the Sign Out Anyway button.It’s okay to force-close the stubborn programs because, after all, that’s the point of signing out or, if this process fails, restarting the PC.
Eventually, the Windows 10 splash screen appears.
6.
Sign in to Windows.After you sign in again, check to ensure that the problem is gone.
If the problem persists, you must restart the PC as the next possible solution: From the Start menu, click the Power icon (refer to Figure 2-1) and choose Restart. And, if the problem persists after that, you can try choosing Shut Down instead of Restart, but at that point the solution most likely involves more troubleshooting than just restarting the system.
»
The reason you wait a few seconds after turning off a computer (or any piece of technology) is to avoid a rapid off–on cycle. Turning the power off and then back on again immediately can damage the electronics.»
The restart is also the most common solution to fix Internet issues: Restart the modem, the router (or gateway), or both. See Book 2, Chapter 8 for details.»
To restart a USB peripheral, unplug the USB cable and then reconnect it. For USB-powered peripherals, disconnect both the power supply and USB cable, and then reconnect them in any order.»
Restarting a computer to fix a problem has become such a common meta-phor that the technique frequently appears in media as a general solution to fix any problem. For example, “Turn off Congress and turn it on again.” This delightful development proves how worthy the simple trick can be.Restarting a stubborn PC or laptop
Follow these steps to turn off a stubborn computer, such as a laptop:
1.
Press and hold the power button.2.
Keep holding the button until the device turns itself off. You might have to wait several seconds. Be patient.These steps are reliable; I’ve yet to encounter a gizmo that didn’t obey my forced shutdown command. If so, you have a few choices.
If a desktop PC refuses to obey the press-and-hold technique, you can unplug the cord. Alternatively, you can use the secret power supply on–off switch, which is located behind most desktop model PCs.
For a stubborn laptop, you can try evicting the battery from the case, though not every laptop features a removable battery. In that instance, you can continue to press and hold the power button or simply set aside the laptop and wait for the battery to die.
»
You don’t need to press hard on the power button. The button isn’t touch-sensitive, so the electronics aren’t thinking, “Man! She’s pressing down hard. She must really want me to turn off now!”»
Normally, the press-and-hold technique fixes the problem. If not, you may want to check for an update to the computer’s firmware. Specifically, you’re looking for any issues with the power supply management driver, also called an Advanced Power Management (APM) driver.»
See Book 2, Chapter 4 for more information on power management issues; PC shutdown snags are covered in Book 2, Chapter 9.Running a troubleshooter
If Windows still has a pulse, you can get it to help you troubleshoot some common issues. And if Windows doesn’t have a pulse, you can keep reading the rest of this book, which covers specific pulse-less Windows issues.
Quick Fixes To view the gamut of troubleshooters offered by Windows, obey these steps:
1.
Tap the Windows key on the keyboard. The Start menu pops up.2.
Type troubleshootingYou need to type only the first part of the word. As you type, matching programs appear. The one you’re looking for is Troubleshooting, Control Panel.
3.
Choose the top item: Troubleshooting, Control Panel. The Control Panel opens, displaying a list of troubleshooters.To proceed with troubleshooting, chose an item on the screen. For example, if your PC is having audio input issues, choose the item Troubleshoot Audio Record-ing. Then work through the steps presented in the troubleshooting wizard.
»
If a troubleshooter fails, see Book 2 for information on troubleshooting specific hardware issues.»
I confess that the troubleshooters are effective only a small number of times. The most successful one I’ve used is the Connect to the Internet trouble-shooter, which can reset the network adapter and often resolve some local network connection issues.Repairing a program
Some programs, such as the applications in the Microsoft Office suite, can fix themselves. So, whenever you have issues specific to a program, you can follow these steps to see whether the program has self-repair capabilities:
1.
Press Win+I to bring up the Settings app.2.
Choose the System tile.3.
On the left side of the window, choose Apps & Features.4.
Select the app you want to repair.Scroll through the list, and then click on an app to select it.
5.
Click the Modify button.6.
If you see a User Account Control warning, click the Yes button to proceed.7.
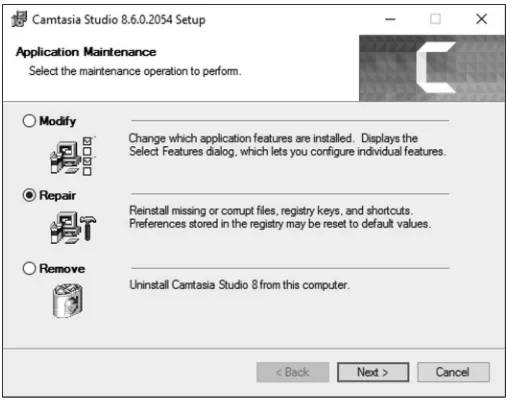
If prompted, choose the Repair option.Some programs display the Application Maintenance dialog box, like the one shown in Figure 2-2. If you see such a dialog box, click Repair, as illustrated in the figure.
At this point, you continue running a version of the application’s installation or setup program. What happens next depends on the program.
As an example, to repair Microsoft Office, you choose that item in the Settings app and click the Modify button, as described in this section’s steps. Choose Quick Repair and click the Repair button to proceed. Follow the steps on the screen as the repair utility does its job.
»
Not every program features a repair utility. If so, the Modify button (refer to Step 5) is disabled.»
To repair a Microsoft Office application, such as Word or Excel, you choose the Microsoft Office item in the Settings app.FIGURE 2-2:
Quick Fixes
»
If you cancel out of a program repair (modify) operation, you might see confusing messages about canceling program installation. These are default messages that appear when you cancel program installation. My guess is that the installation program uses the same messages even when you are attempting to repair the program. Bottom line: Nothing was uninstalled.»
See Book 2, Chapter 7 for more information on solving software problems.Fixing Windows
It’s much better to fix Windows, or at least try, than to reinstall the entire operat-ing system from scratch. That option is still available, but I strongly recommend fixing first.
Book 3 is stuffed with chapters that cover various tools you can use to address issues with the Windows operating system. Briefly, in order, I recommend the following fixes:
System Restore: For minor glitches, summon a restore point to address the problem. See Book 3, Chapter 5.
The System File Checker: This tool is the handiest utility for fixing Windows, yet it’s too often overlooked. See Book 3, Chapter 4.
Windows Recovery: The Windows Recovery Environment boasts plenty of tools for fixing Windows, including reinstalling the operating system, should that task become necessary. See Book 3, Chapter 1.
Other tools are available as well, each of which is covered in Chapter 3 of this minibook. Also, consider that the problem might not be with Windows; hardware issues can lead you to blame the operating system. Chapters in Book 2 cover vari-ous specific hardware problems.
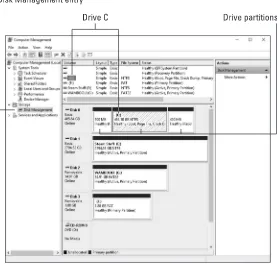
Restoring the system
For the most part, the system refers to software, or specifically, items stored on
the primary mass storage device. This list includes the operating system, installed programs, and all your files. Various utilities are available to restore some or all of these items:
Backup and Restore: You can store anything from a single file to everything stored on the hard drive if you archive (back up) that data. The restore operation is how you get back the information. See Book 4, Chapter 3 for details.
System Recovery Disk: Use the data stored on the recovery disk (which is usually a thumb drive) to help fix or completely rebuild Windows. Further recovery is possible when you access the Windows Recovery menu. Both topics are covered in Book 3, Chapter 1.
Restoring the system is most successful when you use tools and run utilities that help you prepare for impending disaster. If you’ve not yet created a System Recovery disk, do so now. Also, configure the Windows 10 File History (the backup feature) if you’ve not yet done so.
Help!
Nothing beats having a local computer guru. It could be a relative — perhaps someone living with you — or someone in your office who knows computers well enough to help you resolve meddlesome issues.
When your local computer guru is stumped or — worse — you are the computer
guru, you must turn elsewhere for help. Fortunately, you have plenty of resources on tap.
Locating Internet support
Back in the old days, support was provided by reading the product’s manual. That type of support was despised, however, because the manual was poorly written, incorrect, or both.
If you were lucky, the hardware manufacturer or software developer provided a toll-free number to call. If you were lucky.
Quick Fixes To determine that you’ve reached the proper support site, ensure that the web-site domain matches the manufacturer or software developer. A major hint is the Padlock icon found on the web browser’s address bar, similar to what’s illustrated in Figure 2-3.
The Padlock icon appears on secure websites, and most manufacturers and devel-opers have secure web pages. If not, it’s okay, though you should ensure that the web page name matches the developer’s name. That’s very important! You want to get support directly from the source, not from a third-party site.
Once you’ve found the proper website, support comes in several areas. Yes, you have to do some work to locate the answer you need; don’t expect anyone to pop up and instantly help you. Support is available from three sources:
Software: For example, you can download a new driver for the PC’s video card to help resolve compatibility issues. Or you can download a troubleshooter.
Forums: You’re probably not the only one to experience a problem. Look for forums to browse for similar problems and find a solution.
Tech Support: Most sites provide contact information, as either phone or email support.
More details on these resources are offered in the next several sections.
»
Find the official site for the support. Search for the manufacturer or software developer’s name, and find the matching website.»
The support site may be listed with the flimsy documentation that came with the product.FIGURE 2-3:
»
Sometimes, support information can be accessed from a Help menu within the program.»
I’m not trying to condemn all third-party support sites. Though many of them offer legitimate support and software, some of them are devious. They may require a paid subscription or for you to provide personal data to access the information you want. Worse, the software they provide features malware. You don’t want that.»
A while back, you had to pay to obtain software driver updates. Today, these updates are provided for free. If you visit a site that claims you need to pay for an update, you’re probably using the wrong site.Downloading drivers
Perhaps the best aspect of online support is that you can obtain updated software instantly and at no charge. The primary reason to get new software is to address hardware issues; software drives the hardware, which is why this particular type of software is referred to as a driver.
As an example, you may find your PC’s graphics incompatible with a new game. The game urges you to check for a driver update. To obtain the update, you need to discover the make and model of the display adapter and then visit the manu-facturer’s website for a new driver.
To download a driver, follow these general steps:
1.
Save all your work and close all program windows, save for the web browser.Installing a driver update often requires that you restart your computer. By closing windows now, you save yourself that step later.
2.
Ensure that you’ve arrived at the proper website.Refer to the preceding section for hints on how to determine whether you’re at the developer’s own website and not a bogus website.
3.
Locate the Software or Drivers link.Sometimes this link is found under a general Support category.
4.
Click on the appropriate link to download the driver update. Various links represent different hardware versions as well as different operating systems.Quick Fixes After the update is installed, observe whether the problem is fixed. If not, more troubleshooting is necessary; but on the positive side, you’ve ruled out the driver as a potential source.
»
Various chapters in Book 2 describe how to obtain the proper hardware specifications you need in order to download a driver update. To determine which version of Windows you have, press the Win+Break key combination. In the System window, you see the Windows version as well as the system type, which is either 32-bit or 64-bit.»
Don’t freak out if you get the wrong software. The installation program presents a warning if you don’t have the proper operating system or hard-ware version.»
For details on obtaining a new graphics driver, refer to Book 2, Chapter 3.»
Other chapters in Book 2 cover obtaining drivers for specific PC hardware.»
Sometimes, support software urges you to obtain a driver update or it obtains and installs the updates for you. The NVIDIA Control Panel program, installed with most NVIDIA display adapters, prompts automatically when a new driver is available.»
Driver updates might also be installed automatically when you run the Windows Update program. See Book 4, Chapter 1.»
You can also download diagnostics software from the Internet. For example, the Intel support page offers tools that can help address issues with the processor, firmware, and motherboard. The Crucial website provides a memory upgrade tool that analyzes which type of memory your PC uses and how best to install a memory upgrade. These tools are described in detail elsewhere in this book.Perusing forums
I’ve found great success in perusing the support forms on the web. Manufactur-ers and developManufactur-ers are smart to let usManufactur-ers post their own questions and puzzles and then let other users offer solutions. Tech support people also join the forums, which makes them a wonderful resource.
»
Use the forum’s Search box to type in your question. You may have to phrase it several different ways to locate potential solutions.»
Ensure that you check the date on various posts. The most recent dates are more likely to reflect your current problem.»
It helps to include the word solution or solved in your search, because many of the forum topics may list the same problem but not offer any solutions.Contacting tech support
The old toll-free phone numbers may still be around, but few manufacturers or developers cough up that information directly on their websites. No, you must hunt for the details.
Start looking under the Support category, though you may also find a separate Contact or Info category. The support that’s offered comes in one or more types, including
»
Live chat»
Phone»
Callback»
Email»
PaidI recommend trying live chat, if it’s available. A window pops up on the screen and you get to type at “Linda” or “Bill” and explain your situation. They can walk you through some solutions or perhaps even offer to fix the problem remotely. See the next section, “Be wary of remote desktop access!”
Phone support is nice, but often the wait times are intolerably long. So be prepared not only to wait but also to run the risk of chatting with someone who sports a heavy accent. This possibility is why I recommend live chat as your first choice.
If a callback option is offered, choose it. That way, the support people phone you up at a more convenient time to resolve the issue.
The email option works, but not quickly. It’s also time-consuming to write back and forth.
Quick Fixes services provide that you pay only when a solution is found. For example, you pro-vide credit card information and then together you work on the phone or remotely to fix the issue. If the issue is resolved, you pay the agreed-upon fee; otherwise, you’re not charged.
When dealing with any type of tech support, lower your expectations. Not every-thing that goes wrong with a PC can be fixed quickly or easily.
Be wary of remote desktop access!
When remote tech support gets serious, you may be asked to surrender your PC to remote desktop access. This is a marvelous way for the other person to see your computer and control things, which greatly aids in troubleshooting. It also opens your PC to a certain risk, so my advice is to be careful!
No one can access your PC remotely without your permission. (That is, unless your PC has already been compromised by malware.) Ensure that you trust whoever is accessing the computer, which is a tall order. Be cautious of any tech support person eager to use remote desktop access, especially if they haven’t yet directed you to perform a few basic tasks. That’s a big red flag.
To ensure that remote desktop access is disabled in Windows, heed these directions:
1.
Press Win+Break to view the System window.2.
Choose the link Advanced System Settings.The link is found on the left side of the window. Upon success, you see the System Properties dialog box.
3.
Click the Remote tab in the System Properties dialog box.4.
Ensure that the first item is unchecked: Allow Remote Assistance Connections to This Computer.5.
Choose the option Don’t Allow Remote Connections to This Computer. This item is located in the dialog box’s Remote Desktop area.6.
Click OK.You can also close the System window.
Startup Problems
I
f this book were about troubleshooting a computer that isn’t turned on, it would be a very short book. That’s because, when a PC is turned off , it performs quite reliably. After power is supplied, however, trouble looms like a fl atbed truck loaded with loosely packed logs on a bumpy road.To best understand PC startup problems, this chapter walks you through the power-on process, from electronic slumber to electron-invigorated operation. When you appreciate the computer’s power-on sequence, though it may be tech-nical, you can better pinpoint a problem and address specifi c issues.
The Onset of PC Heartbreak
Nothing beats that feeling when you arrive at your desk, set down a hot cup of delicious something, take your seat, and get ready to start a fresh, productive day. That feeling is destroyed when the PC decides to take a detour from your planned route.
Chapter
1
IN THIS CHAPTER
» Powering on the PC
» Diagnosing hardware
» Running startup tools
» Finding the operating system
» Loading the operating system
» Signing in
»
The change that causes computer startup trouble is most often due to time: Parts grow old and fail, most frequently when you turn on a computer. Even so, consider what you’ve changed or modified on your PC or added to it. Have you installed new hardware, modified a software setting, or updated Windows? One of these issues may have caused the problem.»
If the problem isn’t with the PC’s mass storage system (hard drive), your data is probably safe. Replacing bad hardware, such as a video card or power supply, fixes the problem without damaging your data. However:»
You risk losing your data by taking your PC into the shop for repair. That’s because sometimes the technicians replace or erase the hard drive or primary storage media. Of course, when the hard drive is the problem, it needs replacing anyway. That’s why I recommend backups; see Book 4, Chapter 3.Phase I: Power On
During the initial power-on phase, the computer transforms itself from a chunk of quite useless expensive electronics into a chunk of quite useful expensive electronics.
What happens
You press the Power button. When the PC is off, pressing the Power button turns on the PC. It works that way whether the computer was properly shut down, was put into hibernation, or has met an untimely or inopportune demise.
The computer’s power supply does its job: It starts converting alternating current
into direct current. Alternating current comes from the wall socket. Direct current is used inside the computer to power its circuitry and motors.
What could go wrong
Startup Problems
Troubleshooting steps
The loud sound of nothing when you turn on a PC means that it has a power sup-ply issue. Check the following items in this order:
1.
Does the PC have power?You cannot compute when the power is off. Likewise, you cannot compute during a dip, commonly called a brownout. In that situation, the power is on but running at a low voltage. Lights work, but motors don’t. If the lights are on (dimly) but your computer doesn’t work, you may be experiencing a dip. Wait it out or check with the power company.
To ensure that a wall socket is properly supplying juice, try this test: Plug a lamp into the socket. If the lamp works, the problem lies with the computer’s power supply. If the lamp doesn’t work, buy a copy of Troubleshooting Lamps For Dummies, available at fine bookstores everywhere.
If the PC is connected to a power strip or an uninterruptible power supply (UPS), ensure that the gizmo is plugged into the wall and turned on.
2.
Is the power supply on the computer operational?When the wall socket is operating properly, the problem lies with the PC’s power supply. Such issues are easy to detect. The power supply on every PC also contains a fan: If you can hear the fan spinning, the power supply is getting power. You may need to open the case to ensure that the power supply is properly connected to the computer’s main circuitry, the motherboard.
If you don’t hear the fan and the console lights are off, the PC’s power supply may need replacing.
3.
Is the monitor on?It’s an obvious question, and even I have fallen prey to this maddening problem.
4.
Is everything connected?Both internally and externally, cables must be plugged in. Especially if you’ve just moved the computer, a cable can become unplugged easily.
If you complete these steps and still cannot pinpoint the origin of the nothingness, the issue is most likely too large for you to resolve on your own. Before toting the computer into the shop, however, consider its age. Old computers die. They don’t start. (Dead computers have a habit of not starting.) If your PC is more than eight years old, it might just have expired. To fix that problem, buy a new computer.
»
One way to confirm a dip is to check to see whether the refrigerator or furnace fan is running.»
Some electrical circuits feature a residual-current device (RCD), also known as a ground fault interrupter (GFI) switch. This switch can trip for a variety of reasons, which cuts power to the circuit. Check for an RCD power receptacle and punch the Reset button to reactivate the circuit.»
If the RCD switch trips after you press the Reset button, call an electrician.»
Avoid the temptation to run your PC from an uninterruptible power supply(UPS) during a dip or power outage. Use the UPS power only to save your stuff and then properly shut down the computer.
»
Some UPSs beep during a dip. A few models feature digital displays that may graphically show that the incoming voltage level is subnormal.»
It’s possible to use a laptop when the power is off — well, if the laptop has a charge in its battery and nothing else is awry.“DID MY PC SECRETLY RESTART?”
If you leave your computer on all the time, you may show up one morning and discover that Windows has automatically restarted itself; rather than see the desktop, you see the logon screen.
The main reason the computer has restarted itself is that the Windows Update utility has installed a required update. That’s okay. You can direct Windows Update to prompt you, but it may still restart the computer. See Book 4, Chapter 1 for more information on Windows Update.
Startup Problems
Phase II: The POST
When abuzz with electricity, the computer’s internal components spring to life. It might be a chaotic ballet of confusion, but one thing is in charge: the processor.
What happens
The processor, also known as the central processing unit (CPU), is the computer’s main chip. It’s the boss. The main dude. El Comandante Supremo. After the power starts flowing in, the processor jumps (figuratively) to a specific code in memory, where it begins executing instructions. Those instructions place the computer in a diagnostic, or self-checking, mode. The computer inventories its various components.
A POST, or Power-On Self Test, is performed, in which the computer checks its own hardware. Memory is tested and its quantity determined. Control is passed to var -ious subsystems (network, video, audio, and power management, for example), which also perform their own inventories and tests.
Information may be displayed on the screen as feedback during this stage. Most PCs, however, display a startup, or splash, screen. The screen may or may not divulge what’s happening inside the computer. When it does, you may see a mem-ory count or seemingly random numbers or a copyright notice. That diagnostic information is intended for troubleshooting (very nerdy troubleshooting, as in oscilloscope troubleshooting).
»
One important message revealed at this point is which key or key combina-tion to press to enter the computer’s Setup program. See the seccombina-tion “Phase III: Startup Options,” later in this chapter.»
Just because hardware passes the POST doesn’t mean that everything is well. Computer hardware also needs software to control it. If the software isn’t working, a problem may still appear.What could go wrong
Video problems present themselves through a series of beeps. The beep pattern reveals the problem, though if you hear beeps but see nothing displayed, the PC’s power supply or display subsystem is at fault.
A common error you might see at this stage is a CMOS error, which means that the PC’s battery-backed-up memory has failed. This error manifests itself through a missing boot drive or another inventory problem. The computer’s time may also be off. Fortunately, this type of issue is limited to very old PCs.
Troubleshooting steps
Because hardware fails when the computer starts, the first solution is to replace the defective hardware. The message on the screen indicates what the problem child is, such as the video system or network or another subsystem. Make a note of whatever error message appears. Then deal with the issue by replacing the hard-ware. This step includes replacing the CMOS battery, should it fail.
»
If the motherboard or chipset is to blame for the problem, the best solution is to get a new PC. You can replace the motherboard, but it’s not cheap. Further, the motherboard may not be the problem.»
Failed network firmware is fixed by installing a USB network adapter.»
To discover which motherboard you use, pay close attention to your PC’ssplash screen. The motherboard (or chipset) manufacturer, as well as the version number, is often displayed. You can also run the UEFI program, as described in the next section.
»
Don’t think that every code you see on the splash screen is a POST error. Many computers display information during startup that is completely normal and expected.»
The computer may continue to start, even with defective hardware flagged by the POST. That’s not an excuse to avoid fixing it.»
A common POST error is a missing input device, such as the keyboard or mouse. In fact, one of the most comical error messages from the early days of the PC went something like this:Keyboard missing, press any key to continue
»
Another startup issue at the POST phase is the BIOS password. This isn’t as big of an issue as it was years back, but my advice remains the same: Do not use the BIOS password.Phase III: Startup Options
pre-Startup Problems
What happens
You see a menu displayed, listing keys and their functions. It may look like this:
F2 -- Enter Setup F7 -- Update BIOS
F10 -- Select Boot Device
The keys and their commands are different for each type of motherboard. Some -times, the keys aren’t displayed at all, but they may still be available.
The keys control several actions that can take place after the POST and before an operating system is loaded. Here are what the keys could do:
Enter Setup Program (UEFI): The UEFI is the successor to the old BIOS Setup pro
-gram. It provides a summary of installed features, basic hardware configuration, and other options.
Update the BIOS (Firmware): This option is available, though most BIOS updates
are performed from Windows.
Select Boot Device: If you desire to start the computer from an optical disc, a
thumb drive, or the network, you choose this option. It allows a one-time change of the boot device.
This part of the PC boot process isn’t prone to errors, but it’s because of errors that the startup options are presented. See the next section for details.
»
UEFI stands for Unified Extensible Firmware Interface.»
BIOS is the Basic Input/Output System, which provided configuration and settings on PCs from the olden days. Though they’re incorrect, people today still refer to the UEFI as the BIOS.»
The Del key is also a startup menu key, as are F1, Alt+F1, and others. My point is that the keys illustrated in this section may not be the same as any found on your PC. To know which are important, watch the splash screen as the PC starts. Write down the specific keys in the space provided in the nearby sidebar, “My PC’s startup keys.”What could go wrong
The only problem I’ve had is that the key prompt appears too quickly. Even when you’re certain that you stabbed the proper key, Windows begins loading. To avoid that timing issue, you can restart the computer and have the Windows Recovery Environment appear automatically. From this menu, you can access features avail -able from the startup options keys. See Book 3, Chapter 1.
Another issue is that the keys may not appear at all. In that case, enter the UEFI program and locate the option that determines whether the keys are displayed. See the next section.
Troubleshooting steps
At this point, troubleshooting involves fixing problems; rarely does an issue crop up regarding the startup options.
The troubleshooting you can perform varies based on the startup option you choose.
Run the UEFI
Most commonly, you run the UEFI to do the following:
»
Confirm the PC’s processor and motherboard names, model numbers, and so on. This process helps you gather information for additional troubleshooting, such as updating the BIOS.MY PC’S STARTUP KEYS
To help you keep track of the startup keys on your computer and what they do, consider jotting them down here:
Key Function
___ Setup program (UEFI)
___ Update BIOS/firmware
___ Enter safe mode
___ Start Windows Recovery Environment
___ Select boot device
Startup Problems
»
Reset the firmware — for example, to roll back a recent update or undo achange that you may have made.
»
Activate the option to display the startup keys.»
Update the BIOS, though this action is most likely initiated in Windows.»
Reconfigure default PC settings, such as identifying the boot drive, setting thedate and time, and performing other, more advanced configurations.
I’d like to be more specific with steps in the UEFI, but little consistency exists for the interface between the different manufacturers and even individual motherboard/ firmware releases. Using the UEFI isn’t complex, but locating the proper item can be tedious.
To exit the UEFI, you must inform the program whether you want to save changes. The commands are
Save Changes and Exit Exit Without Saving Changes Cancel
When you choose to exit without saving the changes, you may still be prompted to confirm whether you want to save. That’s okay: It’s perfectly all right to mess around in the UEFI and not change anything. Just remember to exit and not save, and then confirm that choice.
Update the BIOS
A BIOS update, more officially referred to as a firmware update, can fix various issues with the motherboard and certain basic PC components, such as the net-work adapter and onboard graphics. I don’t know of any manufacturer that sends out an update remotely; you must visit the website to download the update and install it yourself. Fortunately, this activity is rare.
To update the BIOS, follow these general steps:
1.
Obtain the make and model number of your PC’s motherboard.Sometimes this information appears when you start the PC, though the display is very brief. Otherwise, you can obtain the information from the UEFI: Start the PC and boot into the UEFI, where you can locate not only the motherboard make and model but also the current BIOS/firmware version.
3.
Download the update file.4.
Run the update.This process takes place in Windows, which is handy. Though the BIOS/ firmware update option is presented on most PC startup screens, running the update in Windows is the best way to accomplish the task.
5.
Obey the directions on the screen.The process ends when you restart your PC.
The update is installed, but it isn’t loaded. When the computer restarts, the update is prepared and the system may restart a second time to load. If everything goes well, you don’t notice the change — well, other than if the update fixed an issue, the issue will be gone.
»
Updating the BIOS/firmware isn’t something you want to do casually. Only if you have problems that you’ve narrowed down to the firmware should you attempt it.»
If you aren’t having any issues with the BIOS/firmware, do not update. That’s because updating introduces change. Refer to Book 1, Chapter 1.»
If you attempt to install an incorrect firmware update, you are warned. That’s not a guarantee that you can’t foul up the upgrade. In fact, if the upgrade doesn’t hold or causes other problems, what you’re witnessing is probably an error in the firmware that cannot be remedied.»
It’s possible to roll back an update in some UEFI programs. Look for the information page that lists the current BIOS/firmware version. You may find a rollback option or a Reset command. Use it whenever the update fails to hold or introduces additional problems.Choose another boot device
One of the details stored in the PC’s battery-backed-up CMOS is the PC’s primary boot device. For nearly all PCs, that device is the main mass storage device, a hard drive or solid-state drive (SSD), from which the Windows operating system is loaded. That consistency is necessary, but it can be overridden.
To temporarily start the PC from another boot device, choose the Change Boot Device or Boot Drive command from the startup options. You see a list, such as this one:
1. SATA : PORT 3: HL-DT-ST DVDRAM GH24NSBO
Startup Problems 3. USB : SanDisk Ultra 1.26 : PART 0 : Boot Drive
4. UEFI : USB : SanDisk Ultra 1.26 : PART 0 : OS Boot Loader 5. LAN : IBA GE Slot 00C8 v1403
Granted, the list of boot devices isn’t friendly. Devices are listed by their connec-tion and type as read by the PC’s firmware. A nerd could decipher the details, but what you’re looking for is the word boot, which appears three times in the preced-ing list.
For example, if you want to start the computer from a USB thumb drive, you might choose Option 3, which contains the words USB and SanDisk (a thumb drive manu-facturer) and boot drive. This choice assumes that you’ve connected the thumb drive and, further, that it’s configured with an operating system or other bootable software.
»
After you choose the drive, the computer starts using that media. The next time you restart the PC, however, the original boot drive takes over again — that is, unless you press the startup option key to choose another device.»
One reason to choose an alternative boot drive is to start a recovery disk for repair operations.»
You don’t need to use the boot device option to run the Windows Recovery Environment, though sometimes you must. See the next section.»
If you plan to use the alternative boot device frequently (for example to load Linux instead of Windows), alter the UEFI to choose that hard drive (or partition) as the PC’s primary boot device.»
The UEFI might also let you select the boot order. For example, first the optical drive is searched, and then the primary hard drive, in that order, for an operat-ing system. This process isn’t as popular as it once was. In fact, a better solution is to obtain boot loader software that presents a menu every time the PC starts. You can then choose a startup device from the menu, or, after a delay, a default device is used to load an operating system.Enter the Windows Recovery Environment
You might see a startup option to enter the Windows Recovery Environment. It’s a cen