• • Dive in — get started with the basics, including starting up,
putting the computer to sleep, navigating the interface, and understanding the Mac approach to files and folders
• Customize — find out how to change the desktop, customize the screen saver, adjust sounds, and much more
• Connect — browse the web, use e-mail, chat with Messages and FaceTime, and move around with Maps
• Beyond the basics — back up and restore data, protect against local and remote threats, network your Mac, and get tips on maintenance and troubleshooting
• That’s entertainment — listen to music, watch movies, play online games, read iBooks, make music with GarageBand, and much more
• Take care of business — manage contacts, stay on schedule with Calendar, and use the Mac productivity suite to get more done
Ta
Authors of
iPhone All-in-One For Dummies®
5
IN
• Taking Care of Business
Macs
A L L - I N - O N E
4th Edition
Making Everything E
asier!
™
Start with
FREE
Cheat Sheets
Cheat Sheets include
• Checklists
• Charts
• Common Instructions
• And Other Good Stuff!
Get Smart at Dummies.com
Dummies.com makes your life easier with 1,000s
of answers on everything from removing wallpaper
to using the latest version of Windows.
Check out our
• Videos
• Illustrated Articles
• Step-by-Step Instructions
Plus, each month you can win valuable prizes by entering
our Dummies.com sweepstakes. *
Want a weekly dose of Dummies? Sign up for Newsletters on
• Digital Photography
• Microsoft Windows & Office
• Personal Finance & Investing
• Health & Wellness
• Computing, iPods & Cell Phones
• eBay
• Internet
• Food, Home & Garden
Find out “HOW” at Dummies.com
*Sweepstakes not currently available in all countries; visit Dummies.com for official rules.
Get More and Do More at Dummies.com
®
by Joe Hutsko
and
Barbara Boyd
Macs
A L L - I N - O N E
Macs All-in-One For Dummies®, 4th Edition Published by
John Wiley & Sons, Inc. 111 River Street Hoboken, NJ 07030-5774 www.wiley.com
Copyright © 2014 by John Wiley & Sons, Inc., Hoboken, New Jersey Published simultaneously in Canada
No part of this publication may be reproduced, stored in a retrieval system or transmitted in any form or by any means, electronic, mechanical, photocopying, recording, scanning or otherwise, except as permitted under Sections 107 or 108 of the 1976 United States Copyright Act, without the prior written permission of the Publisher. Requests to the Publisher for permission should be addressed to the Permissions Department, John Wiley & Sons, Inc., 111 River Street, Hoboken, NJ 07030, (201) 748-6011, fax (201) 748-6008, or online at http://www.wiley.com/go/permissions.
Trademarks: Wiley, For Dummies, the Dummies Man logo, Dummies.com, Making Everything Easier, and related trade dress are trademarks or registered trademarks of John Wiley & Sons, Inc. and may not be used without written permission. All other trademarks are the property of their respective owners. John Wiley & Sons, Inc. is not associated with any product or vendor mentioned in this book.
LIMIT OF LIABILITY/DISCLAIMER OF WARRANTY: THE PUBLISHER AND THE AUTHOR MAKE NO REPRESENTATIONS OR WARRANTIES WITH RESPECT TO THE ACCURACY OR COMPLETENESS OF THE CONTENTS OF THIS WORK AND SPECIFICALLY DISCLAIM ALL WARRANTIES, INCLUDING WITHOUT LIMITATION WARRANTIES OF FITNESS FOR A PARTICULAR PURPOSE. NO WARRANTY MAY BE CREATED OR EXTENDED BY SALES OR PROMOTIONAL MATERIALS. THE ADVICE AND STRATEGIES CONTAINED HEREIN MAY NOT BE SUITABLE FOR EVERY SITUATION. THIS WORK IS SOLD WITH THE UNDERSTANDING THAT THE PUBLISHER IS NOT ENGAGED IN RENDERING LEGAL, ACCOUNTING, OR OTHER PROFESSIONAL SERVICES. IF PROFESSIONAL ASSISTANCE IS REQUIRED, THE SERVICES OF A COMPETENT PROFESSIONAL PERSON SHOULD BE SOUGHT. NEITHER THE PUBLISHER NOR THE AUTHOR SHALL BE LIABLE FOR DAMAGES ARISING HEREFROM. THE FACT THAT AN ORGANIZATION OR WEBSITE IS REFERRED TO IN THIS WORK AS A CITATION AND/OR A POTENTIAL SOURCE OF FURTHER INFORMATION DOES NOT MEAN THAT THE AUTHOR OR THE PUBLISHER ENDORSES THE INFORMATION THE ORGANIZATION OR WEBSITE MAY PROVIDE OR RECOMMENDATIONS IT MAY MAKE. FURTHER, READERS SHOULD BE AWARE THAT INTERNET WEBSITES LISTED IN THIS WORK MAY HAVE CHANGED OR DISAPPEARED BETWEEN WHEN THIS WORK WAS WRITTEN AND WHEN IT IS READ.
For general information on our other products and services, please contact our Customer Care Department within the U.S. at 877-762-2974, outside the U.S. at 317-572-3993, or fax 317-572-4002. For technical support, please visit www.wiley.com/techsupport.
Wiley publishes in a variety of print and electronic formats and by print-on-demand. Some material included with standard print versions of this book may not be included in e-books or in print-on-demand. If this book refers to media such as a CD or DVD that is not included in the version you purchased, you may download this material at http://booksupport.wiley.com. For more information about Wiley products, visit www.wiley.com.
Library of Congress Control Number: 2013954222
ISBN 978-1-118-82210-4 (pbk); ISBN 978-1-118-82586-0 (ebk); ISBN 978-1-118-82593-8 (ebk) Manufactured in the United States of America
Contents at a Glance
Introduction ... 1
Book I: Getting Started with Mac Basics ... 7
Chapter 1: Starting to Use Your Mac ... 9
Chapter 2: Getting Acquainted with the Mac User Interface... 25
Chapter 3: Making Your First Connections ... 59
Chapter 4: Working with Files and Folders... 81
Chapter 5: Managing Apps on the Dock, Launchpad, and Desktop ... 121
Chapter 6: Changing How Your Mac Looks, Sounds, and Feels ... 159
Book II: Online Communications ... 197
Chapter 1: Browsing the Web with Safari ... 199
Chapter 2: Corresponding with Mail ... 241
Chapter 3: Chatting with Messages and FaceTime ... 279
Chapter 4: Moving Around with Maps ... 309
Book III: Beyond the Basics ... 321
Chapter 1: Backing Up and Restoring Your Data ... 323
Chapter 2: Protecting Your Mac against Local and Remote Threats ... 343
Chapter 3: Networking Your Mac and Connecting Peripherals ... 377
Chapter 4: Sharing Files and Resources on a Network ... 395
Chapter 5: Running Windows on a Mac ... 413
Chapter 6: Maintenance and Troubleshooting ... 425
Book IV: Your Mac as Multimedia
Entertainment Center ... 441
Chapter 1: Tuning In and Listening with iTunes ... 443
Chapter 2: Watching Videos and Movies on Your Mac... 483
Chapter 3: Importing, Viewing, Organizing, and Sharing Photos ...505
Chapter 4: Making Movies with iMovie ... 551
Chapter 5: Making Your Own Kind of Music with GarageBand ... 585
Book V: Taking Care of Business ... 621
Chapter 1: Managing Contacts ... 623
Chapter 2: Staying on Schedule with Calendar ... 645
Chapter 3: Creating Documents with Pages ... 675
Chapter 4: Presenting with Keynote ... 713
Chapter 5: Crunching with Numbers ... 757
Chapter 6: Getting the Most Out of iWork ... 787
Table of Contents
Introduction ... 1
About This Book ... 1
Foolish Assumptions ... 2
Icons Used in This Book ... 3
Beyond the Book ... 4
Where to Go from Here ... 4
Book I: Getting Started with Mac Basics ... 7
Chapter 1: Starting to Use Your Mac . . . .9
Examining Different Macintosh Models ... 9
The Mac mini and Mac Pro ... 10
The iMac... 11
The MacBook Air and MacBook Pro... 11
Starting Your Mac ... 12
Turning Your Mac Off ... 14
Putting a Mac in Sleep mode ... 14
Shutting down your Mac ... 17
Restarting a Mac ... 19
Understanding Mac Processors ... 19
Exploring Your Mac’s Inner Workings ... 21
Chapter 2: Getting Acquainted with the Mac User Interface . . . .25
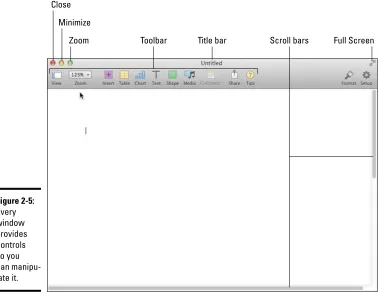
Looking at Menus, Dialogs, and Windows ... 26
Exploring the menu bar... 26
Understanding menu commands ... 27
Working with dialogs ... 28
Managing windows ... 29
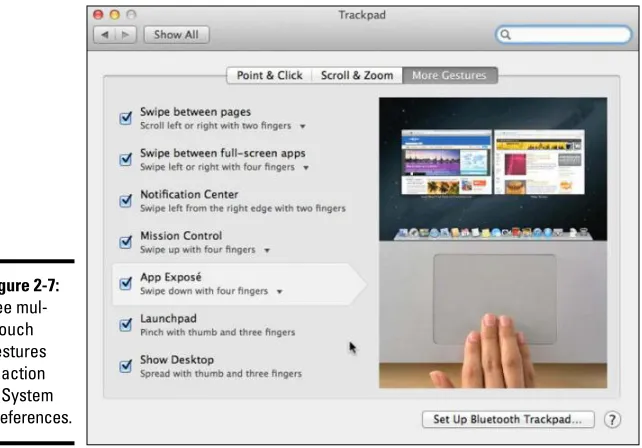
Mastering the Mouse, Trackpad, and Keyboard ... 34
Using the mouse ... 34
Operating the trackpad ... 36
Examining the parts of the keyboard ... 37
Getting to Know the Parts of the Desktop ... 44
The Dock ... 45
The Finder ... 47
Exploring the Dashboard ... 49
Viewing Dashboard widgets ... 50
Customizing a widget ... 51
Adding and removing widgets ... 52
Macs All-in-One For Dummies, 4th Edition
vi
Getting Help ... 56
Pointing out commands to use ... 57
Reading Help topics ... 58
Chapter 3: Making Your First Connections . . . .59
Setting Up an Internet Connection ... 59
Ethernet connection ... 60
Wireless (Wi-Fi) access ... 61
Establishing Your Apple Identity ... 64
Creating an Apple ID during Mac setup ... 65
Creating an Apple ID in iCloud ... 66
Keeping Your Data in iCloud ... 70
Selecting iCloud preferences ... 71
Syncing with your other devices ... 74
Using the iCloud website ... 74
Setting Up E-Mail and Social Network Accounts ... 76
Adding accounts ... 76
Gathering your account information ... 76
Configuring your account ... 77
Chapter 4: Working with Files and Folders . . . .81
Getting to Know the Finder ... 82
Handling devices ... 83
Understanding folders ... 84
Setting Finder preferences ... 85
Navigating the Finder ... 87
Opening a folder ... 87
Working with tabs ... 88
Jumping to a specific folder... 89
Jumping back and forth ... 89
Moving to a higher folder ... 90
Following the folder path ... 90
Organizing and Viewing Folders ... 90
Selecting items in the Finder ... 91
Using Icon view ... 91
Using List view ... 93
Using Column view ... 94
Using Cover Flow view ... 95
Changing your view options ... 96
Using Quick Look to view file contents ... 97
Creating Folders ... 99
Creating a folder from the Finder menu... 100
Creating a folder from Save or Save As ... 100
Playing Tag: Classify Files and Folders for Quick Access ... 102
Setting tag preferences ... 102
Tagging existing files and folders ... 103
Tagging new files ... 104
Table of Contents
vii
Manipulating Files and Folders ... 104
Renaming files and folders... 105
Copying a file or folder ... 107
Moving a file or folder ... 108
Grouping files ... 108
Archiving Files and Folders ... 109
Creating a ZIP file ... 109
Creating a DMG file ... 110
Deleting files and folders ... 112
Searching Files ... 113
Using Spotlight ... 113
Spotlight Preferences ... 116
Using Smart Folders... 117
Creating a Smart Folder with Spotlight ... 117
Deleting a File or Folder ... 118
Retrieving a file or folder from the Trash ... 119
Emptying the Trash ... 119
Chapter 5: Managing Apps on the Dock, Launchpad,
and Desktop . . . .121
Launching an App ... 121
From the Dock ... 122
From Launchpad ... 123
From the Apple menu’s Recent Items ... 125
From the Finder ... 125
With Spotlight ... 126
Opening documents ... 126
Switching among Applications ... 129
Quitting Apps ... 131
Closing a document ... 131
Shutting down an app... 132
Force-quitting an app ... 132
Creating Alias Icons ... 133
Working with Dock Aliases ... 135
Adding file and folder aliases to the Dock ... 136
Rearranging icons on the Dock ... 138
Removing icons from the Dock ... 138
Organizing Multiple Desktops with Spaces ... 138
Creating Desktops ... 139
Switching Desktops ... 140
Moving app windows to different Desktops ... 141
Setting Mission Control preferences ... 142
Acquiring New Apps ... 143
Shopping in the App Store ... 145
Downloading apps from the App Store ... 148
Installing Applications ... 150
Installing an app from the web ... 150
Macs All-in-One For Dummies, 4th Edition
viii
Updating Applications and System Software ... 153
Uninstalling Applications ... 155
Uninstalling an app ... 155
Removing app alias icons from the Dock and Desktop... 156
Removing user setting files ... 157
Chapter 6: Changing How Your Mac Looks, Sounds, and Feels . . . .159
Changing the Desktop and Screen Saver ... 160
Choosing a Desktop image... 160
Customizing the Screen Saver ... 163
Changing the Display and Appearance ... 166
Changing the screen resolution ... 166
Changing the color of the user interface ... 167
Changing the Date and Time ... 169
Adjusting Sounds ... 172
Noticing Notifications ... 175
Using Your Mac’s Accessibility Features ... 179
Mitigating vision limitations ... 179
Compensating for hearing limitations ... 182
Interacting with ease ... 183
Enabling Switch Control ... 187
Speaking with Your Mac ... 188
Setting up Speakable Items ... 188
Setting up Dictation & Speech ... 193
Book II: Online Communications ... 197
Chapter 1: Browsing the Web with Safari . . . .199
Browsing Websites ... 199
Visiting websites ... 200
Reading in Reader ... 207
Using tabbed browsing ... 209
Setting your Safari home page ... 213
Searching within a web page ... 214
Organizing Your Website Experience ... 215
Using bookmarks ... 215
Creating a Reading List ... 221
Seeing what your friends are reading... 223
Displaying favorites in Top Sites ... 224
Storing Personal Info and Keeping it Private ... 225
Using AutoFill to track passwords and more ... 226
Protecting your web-browsing privacy ... 227
Saving and Sharing Web Pages ... 231
Saving a web page as a file ... 231
Saving a photo from the web ... 233
Table of Contents
ix
Viewing and Playing Multimedia Files ... 235
Watching video ... 235
Listening to streaming audio ... 236
Viewing PDF files ... 236
Downloading Files ... 237
Using Extensions ... 238
Chapter 2: Corresponding with Mail . . . .241
Adding an E-Mail Account to Mail ... 242
Looking at the Mail Window ... 245
Writing E-Mails ... 247
Creating a new e-mail ... 248
Replying to or forwarding a message ... 250
Customizing your messages ... 251
Sending a file or photo attachment ... 256
Using stationery ... 260
Spelling and grammar checking ... 261
Receiving and Reading E-Mail ... 262
Retrieving e-mail ... 262
Reading e-mail ... 263
Viewing and saving file attachments ... 264
Adding an e-mail address to Contacts ... 265
Organizing E-Mail ... 266
Searching through e-mail ... 266
Organizing e-mail with mailbox folders ... 267
Deleting a mailbox folder ... 269
Automatically organizing e-mail with smart mailboxes ... 269
Automatically organizing e-mail with rules ... 271
Flagging your messages ... 272
Dealing with Junk E-Mail ... 273
Filtering junk e-mail ... 273
Using advanced filter rules ... 275
Deleting and Archiving Messages ... 277
Deleting messages ... 277
Retrieving messages from the Trash folder ... 277
Emptying the Trash folder ... 278
Archiving messages ... 278
Chapter 3: Chatting with Messages and FaceTime . . . .279
Getting Started in Messages ... 279
Choosing a chat service ... 280
Setting up a Messages account ... 281
Keeping up appearances ... 283
Adding buddies to your account ... 283
Chatting with Others ... 290
Initiating a text chat ... 290
Initiating an audio or a video chat ... 293
Macs All-in-One For Dummies, 4th Edition
x
Saving or deleting your conversations ... 295
Interpreting status indicators ... 296
Making Yourself Available (Or Not) for Chatting ... 296
Changing your status... 297
Blocking chat invitations ... 298
Making Calls with FaceTime ... 299
Signing in to FaceTime ... 300
Making a call with FaceTime ... 300
Receiving a FaceTime call ... 302
Managing your Apple ID settings ... 303
Adding contacts and favorites to FaceTime ... 305
Chapter 4: Moving Around with Maps . . . .309
Wherever You Go, There You Are ... 309
Finding your location ... 309
Navigating the Maps interface... 311
Asking For Directions ... 312
Finding what you seek ... 312
Sharing what you find ... 315
Accessing a saved location ... 316
Dropping a pin ... 317
Getting directions ... 318
Book III: Beyond the Basics ... 321
Chapter 1: Backing Up and Restoring Your Data . . . .323
Understanding Different Backup Options ... 323
Backing up with external hard drives ... 324
Storing backups on USB flash drives ... 325
Storing backups off-site ... 325
Backing up to CDs or DVDs ... 326
Blasting into the Past with Time Machine ... 327
Setting up Time Machine ... 327
Skipping files you don’t want to back up ... 330
Retrieving files and folders ... 333
Understanding Versions ... 336
Restoring your entire backup... 337
Moving Your Backup from an Old Mac to a New Mac ... 338
Working with Data-Recovery Programs ... 339
Chapter 2: Protecting Your Mac against Local and
Remote Threats . . . .343
Locking Down Your Mac ... 343
Using Passwords ... 344
Changing your password ... 345
Table of Contents
xi
Encrypting Data with FileVault ... 349
Setting up FileVault ... 349
Turning off FileVault ... 352
Using Firewalls ... 353
Configuring the Mac firewall ... 353
Buying a more robust firewall ... 355
Selecting Privacy Settings ... 357
Creating Multiple Accounts ... 358
Adding a new user account ... 359
Activating a Sharing Only account ... 370
Switching between accounts ... 372
Deleting an account ... 374
A Few Final Security Tips ... 376
Chapter 3: Networking Your Mac and Connecting Peripherals . . . .377
Creating a Wired Network ... 377
Creating a Wireless Network ... 381
Setting up a computer-to-computer network ... 382
Setting up a wireless network with a router... 384
Connecting and Choosing a Printer ... 386
Biting into Bluetooth ... 388
Configuring Bluetooth on your Mac ... 388
Pairing a Bluetooth device ... 390
Sharing through Bluetooth ... 392
Chapter 4: Sharing Files and Resources on a Network . . . .395
Sharing Files with People Near and Far ... 395
Using AirDrop ... 396
Using a network... 399
Sharing Printers ... 406
Sharing an Internet Connection ... 407
Seeing Your Screen from Afar ... 409
Sharing your screen ... 409
Accessing your Mac ... 411
Chapter 5: Running Windows on a Mac . . . .413
Giving Your Mac a Split Personality with Boot Camp ... 414
Choosing an operating system with Boot Camp ... 419
Sharing Mac and Windows files ... 420
Removing Windows from your Mac ... 420
Using Virtual Machines ... 421
Using CrossOver Mac ... 422
Chapter 6: Maintenance and Troubleshooting . . . .425
Shutting Down Frozen or Hung-Up Programs ... 426
Handling Startup Troubles ... 427
Booting up in Safe Mode ... 427
Macs All-in-One For Dummies, 4th Edition
xii
Repairing and Maintaining Storage Drives ... 430
Verifying disk permissions ... 430
Verifying a disk ... 431
Performing a Recovery Boot ... 433
Booting from another Mac through a Thunderbolt cable ... 435
Reinstalling the operating system ... 436
Wipe out! ... 437
Removing Jammed CDs or DVDs ... 438
Automating Preventive Maintenance ... 439
Book IV: Your Mac as Multimedia
Entertainment Center ... 441
Chapter 1: Tuning In and Listening with iTunes . . . .443
Getting to Know the iTunes Window ... 443
Adjusting iTunes Preferences ... 446
Playing Audio with iTunes ... 451
Listening to CDs ... 451
Importing a CD’s audio tracks into iTunes ... 453
Importing digital audio files ... 455
Searching your iTunes library ... 456
Playing digital audio files ... 456
Burning an audio CD ... 459
Playing Around with Playlists ... 461
Creating an ordinary playlist ... 461
Creating a Smart Playlist ... 463
Letting your Genius free... 467
Deleting a playlist ... 468
Listening to the Radio ... 468
Playing iTunes Radio ... 468
Streaming Internet radio ... 471
Playing Digital Video Files ... 472
Shopping at the iTunes Store ... 473
When you know what you’re looking for ... 476
Downloading media from iTunes ... 476
Sharing the Wealth ... 480
Sharing over a network ... 480
Enabling Home Sharing ... 481
Sharing from the iTunes Store ... 481
Chapter 2: Watching Videos and Movies on Your Mac . . . .483
Making Sense of Video Disc Formats ... 483
Understanding Digital Video Formats ... 484
Playing a Digital Video File ... 485
Table of Contents
xiii
Playing a DVD ... 489
Understanding full-screen mode and window mode ... 489
Viewing the DVD and Title menus ... 492
Skipping through a video ... 492
Viewing frames in steps and slow motion ... 493
Skipping by chapters ... 493
Placing bookmarks in a video ... 494
Viewing closed captioning ... 496
Viewing different camera angles ... 496
Choosing different audio tracks ... 496
Enhancing your viewing experience ... 497
Using the DVD Player Timer ... 499
Ejecting a DVD ... 500
Customizing DVD Player ... 500
Chapter 3: Importing, Viewing, Organizing, and Sharing Photos . . . . .505
Understanding Digital Photography ... 505
Flash memory cards ... 506
Digital image file formats ... 508
Transferring Digital Images to the Mac ... 509
Defining a default app for retrieving photos ... 510
Retrieving photos using Image Capture ... 511
Retrieving photos using iPhoto... 512
Moving photos from other folders into iPhoto ... 514
Retrieving photos by using the SDxD memory card reader ... 515
Capturing Photos from Other Sources ... 516
Capturing photos with Photo Booth ... 516
Capturing photos from websites ... 519
Organizing Photos with iPhoto ... 521
Organizing the Events library... 522
Tagging photos ... 527
Storing photos in albums and folders ... 531
Organizing photos with Faces and Places ... 533
Editing Photos with iPhoto ... 538
Sharing Photos ... 541
Printing photos ... 542
Sending photos in a message ... 543
Posting your photos ... 544
Using Photo Stream ... 546
Ordering books, calendars, and cards ... 547
Chapter 4: Making Movies with iMovie . . . .551
Seeing How iMovie Works ... 552
Working with the Event Library ... 552
Importing video from a device ... 553
Importing a digital video file ... 555
Macs All-in-One For Dummies, 4th Edition
xiv
Creating an iMovie Project ... 558
Selecting video clips ... 560
Editing video clips in a project ... 562
Using Special Effects ... 575
Applying special effects ... 575
Adjusting the quality of a clip ... 576
Two-image video effects ... 579
Deleting an iMovie Project ... 580
Making a Trailer for Your Movie ... 580
Sharing Your Movie ... 582
Chapter 5: Making Your Own Kind of Music with GarageBand . . . .585
Recording Audio ... 586
Creating music with software instruments ... 586
Interpreting the Control bar ... 590
Playing with a real instrument ... 593
Using Apple Loops ... 595
Editing Audio Tracks ... 597
Expanding track views ... 598
Splitting a track ... 599
Joining a track ... 600
Moving tracks ... 600
Quantize the times of real and Software Instruments ... 600
Groove matching ... 601
Saving Music ... 601
Saving a song in iTunes ... 602
Saving a song as a ringtone ... 602
Sharing your song on SoundCloud ... 603
Saving a song to your storage drive ... 603
Burning a song to CD ... 603
Learning to Play the Guitar and Piano ... 604
Chapter 6: Reading, Listening, and Learning on Your Mac . . . .607
Thumbing through iBooks ... 607
Finding something to read at the iBooks Store ... 608
Shopping for books at the iTunes Store ... 610
Adding books and files from other sources ... 611
Reading by screenlight ... 611
Sorting your books ... 613
Continuing Education at iTunes U ... 614
Choosing courses... 614
Attending class ... 616
Finding and Playing Podcasts ... 617
Managing your podcasts ... 618
Table of Contents
xv
Book V: Taking Care of Business ... 621
Chapter 1: Managing Contacts . . . .623
Setting Up Contacts ... 624
Viewing Contacts ... 624
Designing your Contacts template ... 625
Entering contacts ... 627
Working with Contacts ... 633
Searching contacts ... 633
Editing a card ... 633
Deleting a contact ... 634
Creating groups ... 634
Sharing Your Contacts ... 640
Sending one contact at a time ... 640
Exporting multiple cards ... 640
Printing your Contacts ... 641
Chapter 2: Staying on Schedule with Calendar . . . .645
Getting Acquainted with Calendar ... 645
Working with Multiple Calendars ... 648
Creating a new calendar... 649
Accessing calendars from other accounts ... 649
Subscribing to online calendars ... 651
Importing Calendar data ... 652
Creating a new calendar group ... 653
Moving a calendar or group ... 654
Renaming and deleting calendars and groups ... 655
Creating and Modifying Events ... 655
Viewing events ... 655
Creating an event ... 655
Editing an event ... 656
Moving an event ... 663
Deleting an event ... 663
Finding Events ... 663
Color-coding events ... 663
Selectively hiding events ... 663
Checking for today’s events ... 664
Checking events for a specific date ... 664
Searching for an event... 664
Exporting Calendar data ... 665
Sharing your calendars ... 666
Backing up Calendar data and restoring a backup file ... 667
Macs All-in-One For Dummies, 4th Edition
xvi
Organizing Tasks with Reminders ... 669
Creating new Reminders tasks ... 669
Making new lists ... 671
Adding Reminders from other accounts ... 672
Chapter 3: Creating Documents with Pages . . . .675
Working with Document Templates ... 676
Choosing a template ... 676
Replacing placeholder text ... 678
Replacing placeholder photos and graphics ... 679
Adding pages or sections to your document ... 681
Moving around your document ... 683
Working with Text ... 684
Editing text ... 684
Formatting text ... 685
Adjusting line spacing, justification, and margins ... 686
Creating and Placing Text Boxes ... 695
Creating a text box ... 695
Moving a text box ... 695
Resizing a text box ... 695
Uniting text boxes ... 696
Using Styles ... 696
Using a paragraph style ... 697
Using an image style ... 698
Using a text box style ... 699
Creating Charts and Tables ... 700
Adding and removing a chart ... 700
Adding a table ... 701
Adding shapes ... 703
Arranging objects... 704
Wrapping text around an object ... 705
Polishing Your Document ... 706
Spell-checking a document ... 706
Finding and replacing text ... 708
Saving Your Documents on Your Mac or iCloud ... 708
Printing Your Documents ... 709
Exporting to a Different File Format ... 710
Chapter 4: Presenting with Keynote . . . .713
Creating a Presentation ... 714
Choosing a theme and saving your presentation ... 715
Opening an existing file ... 717
Finding your way around Keynote... 718
Table of Contents
xvii
Manipulating Text ... 722
Entering text ... 722
Inserting text boxes ... 722
Editing text ... 722
Formatting text and text boxes ... 723
Adding Shapes, Charts, and Tables ... 730
Inserting predrawn shapes ... 730
Aligning and arranging objects ... 732
Adding a chart ... 733
Adding a table ... 735
Adding Media Files ... 736
Adding sound ... 737
Adding photos or movies... 739
Rearranging Slides ... 740
Creating groups of slides ... 741
Deleting a slide ... 742
Skipping a slide ... 743
Creating Transitions and Effects ... 743
Creating a slide transition... 743
Creating text and graphic effects ... 744
Adding hyperlinks to your presentation ... 747
Using Masters to Customize Themes ... 748
Polishing Your Presentation ... 749
Viewing a presentation... 750
Rehearsing a presentation ... 750
Preparing for your big event ... 751
Letting others run your presentation... 752
Chapter 5: Crunching with Numbers . . . .757
Understanding the Parts of a Numbers Spreadsheet ... 757
Creating a Numbers Spreadsheet ... 760
Creating a new spreadsheet with a template ... 761
Opening an existing file ... 762
Working with Sheets ... 762
Adding a sheet ... 763
Deleting a sheet ... 763
Adding or removing a table ... 764
Resizing a table ... 764
Changing the appearance of a table ... 765
Inserting headers and resizing rows and columns ... 765
Typing Data into Tables ... 767
Formatting numbers and text ... 767
Typing formulas ... 770
Formatting data entry cells ... 774
Sorting data ... 777
Deleting data in cells ... 778
Adding a chart ... 778
Macs All-in-One For Dummies, 4th Edition
xviii
Making Your Spreadsheets Pretty ... 780
Adding a text box ... 781
Adding media... 781
Sharing Your Spreadsheet ... 782
Printing a spreadsheet ... 782
Exporting a spreadsheet ... 783
Sharing files directly from Numbers... 784
Chapter 6: Getting the Most Out of iWork . . . .787
Inserting Media from Other Sources ... 787
Copying and Pasting ... 788
Finding and Replacing ... 789
Modifying Photos ... 790
Masking a photo ... 790
Making a picture transparent with Instant Alpha ... 791
Using Adjust Image ... 793
Adding Comments ... 793
Finding More Templates ... 795
Introduction
W
hether you’re a beginner, an intermediate user, or a seasoned computer expert, you can find something in Macs All-in-One For Dummies, 4th Edition. This book is divided into five minibooks so you can focus on the topics that interest you and skip over the ones that don’t. We explored every menu and button of the Mac, its operating system, and Apple’s iLife and iWork applications and wrote about most of them, focusing on the functions and features we think you’ll use frequently or that will help you get the most out of your Mac and the applications.About This Book
This book begins by focusing on the basics for all the aspects of using a Mac with the latest operating system, OS X 10.9 Mavericks. We start at the very beginning, from turning on your Mac, using the mouse and trackpad with multitouch gestures, and organizing your virtual desktop. We segue to creating your Apple ID and connecting your Mac to the Internet. In true For Dummies style, we show you step by step how to conduct all your online activities from setting up e-mail accounts to having video chats. We intro-duce you to more advanced but important tasks, such as protecting your Mac and your personal information; networking your Mac with other Macs, peripherals, and devices; and installing Windows on your Mac!
The fun begins when we explore Apple’s iLife apps to manage tasks, such as editing and organizing your digital photos and videos, adding music to your Mac, and even creating and recording your own sounds. Along the way, we tell you how to share your finds and creations with people you know. This book also shows you how to use and take advantage of Apple’s iWork suite, which provides word processing, desktop publishing, a presentation app, and a spreadsheet app for calculating formulas and displaying your data as 3D charts. Whether you use a Mac for work, school, or just for fun, you’ll find that with the right software apps, your Mac can meet all your computing needs.
Foolish Assumptions
2
If you’re new to the Mac, you’ll find that this book introduces you to all the main features of your Mac. If you’re already a Mac user, you’ll find informa-tion on topics you might not know much about. After reading this book, you’ll have the foundation and confidence to delve deeper into your Mac’s bundled apps as well as others you can find at the App Store.
To help you navigate this book efficiently, we use a few style conventions:
✦ Terms or words that we truly want to emphasize are italicized
(and defined).
✦ Website addresses, or URLs, are shown in a special monofont typeface,
like this. If you’re reading this book as an e-book, URLs are active hyperlinks like this: www.dummies.com.
✦ Numbered steps that you need to follow and characters you need to
type are set in bold.
✦ Control-click means to hold the Control key and click the mouse. If you’re
using a mouse that has a left and right button, you can right-click rather than Control-click. If you have one of Apple’s trackpads, tap with two fingers. You find complete explanations of the multitouch gestures in Book I, Chapter 2.
✦ When we refer to the Apple menu — the menu that appears when you click
the Apple icon in the very upper-left corner of your Mac’s screen — we use this apple symbol: . When we talk about menu commands, we use a com-mand arrow, like this: Choose ➪Recent Items➪Calendar. That just means
to click the Apple menu; then, when it appears, slide your pointer down to Recent Items and drag slightly to the right to open a submenu from which we want you to click Calendar.
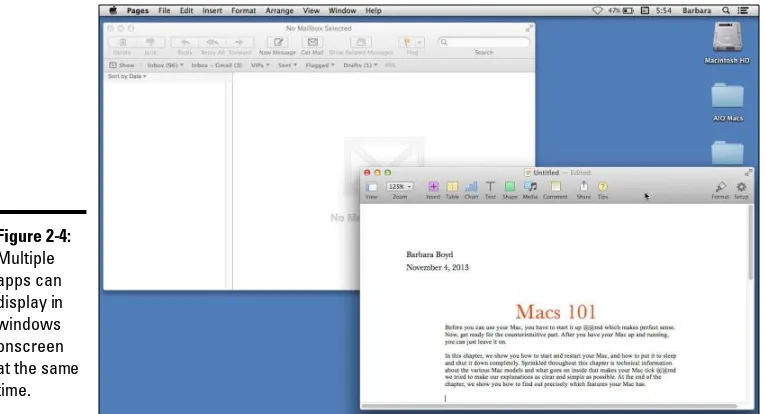
✦ We place figures where we think they help to explain the task at hand;
however, we encourage you to follow along with your Mac so you have a full-color, full-size image to refer to.
Foolish Assumptions
In writing this book, we made a few assumptions about you, dear reader. To make sure that we’re on the same page, we assume that
✦ You know something, but not necessarily a whole lot, about computers,
and you want to find out the basics of using a Mac or doing more with your Mac than you are already.
✦ You have at least a general concept of this wild and crazy thing called
the Internet — or more precisely, the phenomenon known as the web
Icons Used in This Book
3
✦ You’ll turn to the introductory chapters if you find yourself scratching
your head at such terms as double-click, drag and drop, scroll, and
Control-click — or any other terms that sound like things we assume that you know but you don’t.
✦ You appreciate the speed at which technology-based products like the
Mac (and the programs you can run on it) can change in as little as a few months, with newer, sleeker, faster models and app versions replacing previous versions.
✦ You can traverse the web to find updated information about the products
described throughout this book.
✦ You know that keeping up with the topic of all things high-tech and Mac
(even as a full-time job, as it is for us) still can’t make a guy or gal the be-all and end-all Mac Genius of the World. You will, therefore, alert us to cool stuff you discover in your Mac odyssey so that we can consider including it in the next edition of this book.
✦ You’re here to have fun, or at least try to have fun, as you dive into The
Wonderful World of Mac.
Icons Used in This Book
To help emphasize certain information, this book displays different icons in the page margins.
The Tip icon marks tips (duh!) and points out useful nuggets of information that can help you get things done more efficiently or direct you to something helpful that you might not know. Sometimes Tips give you a second, or even third, way of doing the task that was pointed out in the step.
Remember icons mark the information that’s been mentioned previously but is useful for the task at hand. This icon often points out useful information that isn’t quite as important as a Tip but not as threatening as a Warning. If you ignore this information, you can’t hurt your files or your Mac, but it may make the task at hand easier.
This icon highlights interesting information that isn’t necessary to know but can help explain why certain things work the way they do on a Mac. Feel free to skip this information if you’re in a hurry, but browse through this informa-tion when you have time. You might find out something interesting that can help you use your Mac.
Beyond the Book
4
Beyond the Book
Talk is cheap (so they say), but print is not, and we always have more infor-mation than we can squeeze into our page limits. The wonderful universe of the web comes to the rescue, so we put a bunch of cool stuff online to complement what you read here. Follow these links to find
✦ Cheat Sheet
www.dummies.com/cheatsheet/macsaio
Although the Mac uses menus for just about everything, the menu commands have key combination counterparts. We put together a table of the most common key commands that you can print and keep near your Mac. You also find a cheat sheet table that shows you how to type foreign letters and common symbols and one that summarizes the multi-touch gestures. To help you stay up to date with the latest Mac news, we provide a list of Mac websites with hot links, which you can simply click to go to the site.
✦ Dummies.com online articles
www.dummies.com/extras/macsaio
We posted four bonus articles — one each for minibooks II–V — to rein-force what you read about in each minibook. You can read suggestions for enhancing your online communications, advanced tips for working with Mac utilities, and specific examples of using Apple productivity apps in your daily Mac routine.
✦ Updates
www.dummies.com/extras/macsaio
When we write these books, the content is current, but sometimes products change the day after the book goes to press. So, we post updates online for you. If changes are important but minimal, you find an article online; if substantial changes happen, we post updates to the Downloads tab.
Where to Go from Here
Where to Go from Here
5
If you’re computer intuitive, you could start with Book I, Chapter 3 to get your Apple ID and Internet connection set up, and then move in the direction you want, whether it’s learning about more advanced system functions in Book III or editing your digital home movies with iMovie.
Visit www.dummies.com for more great Dummies content online.
Book I
Contents at a Glance
Contents at a Glance
Chapter 1: Starting to Use Your Mac . . . .9
Examining Different Macintosh Models ...9 Starting Your Mac ...12 Turning Your Mac Off ...14 Understanding Mac Processors ...19 Exploring Your Mac’s Inner Workings ...21
Chapter 2: Getting Acquainted with the Mac User Interface . . . .25
Looking at Menus, Dialogs, and Windows ...26 Mastering the Mouse, Trackpad, and Keyboard ...34 Getting to Know the Parts of the Desktop ...44 Exploring the Dashboard ...49 Getting Help ...56
Chapter 3: Making Your First Connections . . . .59
Setting Up an Internet Connection ...59 Establishing Your Apple Identity ...64 Keeping Your Data in iCloud ...70 Setting Up E-Mail and Social Network Accounts ...76
Chapter 4: Working with Files and Folders . . . .81
Getting to Know the Finder ...82 Navigating the Finder ...87 Organizing and Viewing Folders ...90 Creating Folders ...99 Playing Tag: Classify Files and Folders for Quick Access ...102 Manipulating Files and Folders ...104 Searching Files ...113
Chapter 5: Managing Apps on the Dock, Launchpad,
and Desktop . . . .121
Launching an App ...121 Switching among Applications ...129 Creating Alias Icons ...133 Working with Dock Aliases ...135 Organizing Multiple Desktops with Spaces ...138 Acquiring New Apps ...143 Updating Applications and System Software ...153 Uninstalling Applications ...155
Chapter 6: Changing How Your Mac Looks, Sounds, and Feels . . . .159
Chapter 1: Starting to Use
Your Mac
In This Chapter
✓ Identifying your Mac model
✓ Powering on
✓ Conserving time and energy with Sleep mode
✓ Shutting down and restarting
✓ Getting to know your Mac
A
pple offers several different kinds of Macs, and understanding how your Mac is different from the others can help you navigate this book more quickly, gathering the information you need and skipping the rest. Before you can use your Mac, you have to start it up — which makes perfect sense — so we tell you how to do that. Now, get ready for the counterintui-tive part. After you have your Mac up and running, you can just leave it on.In this chapter, we cover current Mac models and how they’re different and alike, show you how to start and restart your Mac (and give you an idea of what goes on behind the scenes), and then tell you how to put it to sleep and shut it down completely. Sprinkled throughout this chapter is techni-cal information about the various Mac models and what goes on inside that makes your Mac tick, but we make our explanations as clear and simple as possible. At the end of the chapter, we introduce you to Mac processors and show you how to find out precisely which features your Mac has.
Examining Different Macintosh Models
Apple’s Macintosh computer — Mac for short — enjoys the reputation of being the easiest computer to use in the world. Macs are so dependable, durable, and beautifully designed that they incite techno-lust in gadget geeks like us and ordinary Joes alike. For those doubly good reasons, you probably won’t buy a new Mac to replace your old one because you have to, but because you want to.
Examining Different Macintosh Models
10
older Macs (although many are not compatible with the latest and greatest OS or applications), chances are good that if you buy a newer Mac, it will fall into one of three categories:
✦ Desktop: Mac mini or Mac Pro, which require a separate display
(moni-tor), keyboard, and mouse or trackpad.
✦ All-in-one desktop: iMac, which houses the display and computer in one
unit and requires a keyboard and mouse or trackpad.
✦ Notebook: MacBook Air or MacBook Pro, which have built-in keyboards,
trackpads that work like a mouse at the touch of your fingertip, and bright displays. A clamshell design lets you close and tote them in your backpack, messenger bag, or briefcase.
All the newest Mac models have USB and Thunderbolt ports to connect peripheral hardware, such as external drives and displays. They are also engi-neered for Wi-Fi and Bluetooth connections, which are used for data transfer and peripheral connectivity. Because most data transfer and storage happens online or with flash drives, optical disc (CD and DVD) drives have become almost obsolete and have been removed from all but one of the Mac models sold today, although optional external DVD drives are available if you still use CDs, DVDs, or software apps on discs. You can also connect to another (ahem) older computer on a network and access its optical disc drive.
The Thunderbolt port, standard on all newer Macs, is a data-transfer proto-col used to connect peripheral devices, such as displays or hard drives. Thunderbolt transfers data faster than either USB or FireWire protocols. Mac mini, Mac Pro, and iMac models use an external wireless or wired (usually USB) keyboard and a mouse or trackpad (sold separately from the mini and Pro). Apple’s Magic Trackpad lets you use the multitouch gestures — such as swipe, pinch, and flick — to control the cursor and windows on whichever Mac desktop model you choose. If you use a trackpad, you don’t need a mouse, but you can use both if you prefer.
By understanding the particular type of Mac that you have and its capabilities, you’ll have a better idea of what your Mac can do. We highlight those capabili-ties in the sections that follow. No matter what the capabilicapabili-ties of your Mac are, chances are good that it will work reliably for as long as you own it.
The Mac mini and Mac Pro
Book I Chapter 1
Starting to Use
Your Mac
Examining Different Macintosh Models
11
The Mac mini is a lower-priced version designed for people who want an inexpensive Mac for ordinary uses, such as word processing and writing, sending e-mail, browsing the web, and playing video games. At the same time, it packs a fast Intel Core i5 or i7 processor, between 500 gigabytes (GB) and 1 terabyte ( TB) of storage, and an assortment of the latest ports and slots for audio, video, and USB connections — nothing to sneeze at. Alternatively, it can function as a terrific, cost-effective server for home or small business networks.
The Mac Pro was completely remodeled and released in December 2013. This higher-priced professional version Mac boasts ports to connect mul-tiple monitors and lots of expandability for up to 64GB of memory and up to 1TB of flash storage, as well as greater graphics and processing capabilities with the latest Intel Xeon processor and dual graphics processors.
The iMac
The all-in-one design of the iMac is an evolutionary result of the original — 1984-era — Mac design. The iMac combines the computer with a built-in LED-backlit display, speakers, and FaceTime camera. You can configure up to 3TB of storage or choose flash storage instead of a hard drive, depending on your need for speed or space. On iMac models, you can connect external speakers and a second external display.
The advantage of the iMac’s all-in-one design is that you have everything you need in a single unit. The disadvantage is that if one part of your iMac fails (such as the display or speaker), you can’t easily replace the failed part, although our experience has been that Apple responds quickly and profes-sionally to problems with their products.
The MacBook Air and MacBook Pro
MacBook Air and MacBook Pro are the notebook members of the Mac family. All the MacBook models run on rechargeable battery packs or external power. If you need to take your Mac everywhere you go, you can choose from the ultralight MacBook Air or one of the MacBook Pro models. Although both MacBook Air and MacBook Pro models have full-size key-boards, neither includes the extra numeric keypad found on most external keyboards (but not on Apple’s standard wireless keyboard) or on larger Windows notebooks. Also, instead of a mouse, MacBooks use a built-in track-pad, which responds to all the multitouch gestures you can use to control the cursor and windows on your Mac.
Starting Your Mac
12
The MacBook Air comes with an 11-inch or 13-inch LED-backlit screen, and the MacBook Pro models come in two screen sizes: 13-inch or 15-inch. The 13-inch LED-backlit MacBook Pro model comes with an internal optical disc (DVD) drive and an Ethernet port. The 13-inch and 15-inch LED-backlit Retina models don’t have an internal optical drive or an Ethernet port although they do have an HDMI port.
Apple’s Retina display uses an LCD ( liquid crystal display) with a pixel density of about 220 pixels per inch (PPI). At this density, the human eye doesn’t distin-guish the individual pixels at a normal distance. Different screen sizes have dif-ferent PPIs. For example, the iPhone 4 and later models have 326 PPI. Except for the LED MacBook Pro model (the one that still has a DVD drive), all MacBook Pros have the Retina display, as do some iPad, iPod, and iPhone models. The MacBook Air and other desktop models sport an LED-backlit screen.
Starting Your Mac
Here’s the simple way to start your Mac — the way you’ll probably use 99 percent of the time: Press the Power button.
Depending on the type of Mac you have, the Power button might be in back ( Mac mini and iMacs), front (Mac Pro), or above the keyboard (on notebook models MacBook Air and MacBook Pro). Some Apple displays have a Power button that commands the computer it’s connected to.
A few seconds after you press the Power button, your Mac chimes to let you know that it’s starting. (Techie types say booting up, a term derived from the phrase “to lift yourself up by the bootstraps.”)
The moment electricity courses through, your Mac’s electronic brain imme-diately looks for instructions embedded inside a special read-only memory (or ROM) chip. While your computer is reading these instructions (also known as firmware), it displays the Apple logo on the screen to let you know that the computer is working and hasn’t forgotten about you.
The firmware instructions tell the computer to make sure that all of its components are working; most often, they are. However, if some part of your computer (say, a memory chip) is defective, your computer will stop at this point.
Book I Chapter 1
Starting to Use
Your Mac
Starting Your Mac
13
Sometimes a Mac might refuse to start correctly because of software prob-lems. To fix software problems, check out Book III, Chapter 6, which explains how to perform basic troubleshooting on a Mac.
After your computer determines that all components are working, the last set of instructions on the chip tells the computer, “Now that you know all your parts are working, load an operating system.”
When you unpack your Mac and turn it on for the very first time, it asks you to type your name and make up a password to create an account for using your Mac. You use this name and password in the following situations:
✦ When you wake or restart your Mac, if you activate those types of
pri-vacy settings (see Book III, Chapter 2).
✦ When you install new apps or update the system software. ✦ When you change some settings in System Preferences.
✦ When you switch from one user to another, if you set up your Mac to
work with multiple users (see Book III, Chapter 2).
This username and password is different than your Apple ID, which you use for iCloud and making iTunes, App, and iBooks Store purchases. You can learn about creating an Apple ID in Book I, Chapter 3.
To guide you through the process of setting up a Mac for the first time, a special application called Setup Assistant runs, which asks for your time zone, the date, and whether you want to transfer files and applications from another Mac to your newer one.
Normally, you need to run through this initial procedure only once, but you also have to perform it if you reinstall your operating system, which we refer to as OS throughout this book. We explain reinstalling the OS in Book III, Chapter 6. The most important part of this initial procedure is remembering the password you choose because you’ll need it to log in to your account, change some of the settings in System Preferences, or install new software. An operating system is the program that controls your computer and is almost always stored on your computer’s built-in hard drive (rather than on an exter-nal drive). On the Mac, the operating system is named Mac OS X (pronounced as Mac O S ten) and is followed by a version number, such as 10.9.
Turning Your Mac Off
14
After the operating system loads and you log in, you can start using your computer to run other applications to do things: design a poster or send an e-mail, browse the web, calculate your yearly budget, or play a game — you know, all the cool things you bought your Mac for in the first place.
Turning Your Mac Off
You can choose one of three different ways — Sleep, Shut Down, or Restart — to turn your Mac off (or let it rest a bit). In this section, we explain when and why you would want to use each option and, of course, how.
Putting a Mac in Sleep mode
If you’re taking a short break from working on your Mac, you don’t have to always turn it off and back on again when you want to use it. To do the “green” thing by conserving energy, put your Mac into Sleep mode instead of leaving it running while you’re away. When you put your Mac to sleep, it shuts down almost every power-draining component of your Mac and draws only a teensy trickle of power. The great part, though, is that you can instantly wake it up with a touch of the keyboard, click of the mouse, or opening the lid if you use a MacBook Pro or MacBook Air. Presto change-o! Your Mac immediately returns to the same state you left it in, without making you wait to power on as if it were completely shut down.
To put your Mac to sleep, you can go manual or automatic.
✦ Manual: If someone walks into your office and you want to hide that
secret project you’re working on, you might want to put your Mac to sleep manually.
✦ Automatic: So you don’t have to remember to put your Mac to sleep
when you stop using it (to take a phone call or go out to lunch) you can adjust your Mac’s settings so that it automatically falls asleep after a cer-tain amount of time.
If your Mac is doing a task, such as sending an e-mail or downloading a file, let it finish the task before putting it to sleep.
To put your Mac to sleep manually, choose one of the following actions:
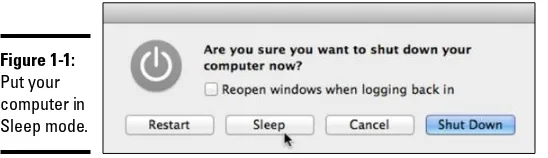
✦ Choose ➪Sleep. The menu is in the upper left of the screen.
✦ Press the Power button or press Control+Eject. (If you’re having
Book I Chapter 1
Starting to Use
Your Mac
Turning Your Mac Off
15
Figure 1-1:
Put your computer in Sleep mode.
✦ Press ⌘+Option+Eject. If you have a MacBook Air or Retina MacBook Pro,
your Mac doesn’t have an Eject key because it doesn’t have a disc drive.
✦ If you have a MacBook, just close its lid. When a MacBook is sleeping,
you can safely move it without worrying about jarring the built-in hard drive that spins most of the time your MacBook is “awake” and in use. To put your Mac to sleep automatically, you set the amount of time your Mac sits idle before it goes to sleep. Which Sleep mode options you see depend on what type of Mac you’re using.
✦ Desktops: On desktop Macs, you can adjust when your Mac puts the
display to sleep and when it puts the computer to sleep.
✦ Notebooks: Your Mac knows whether it’s using battery power or the
power adapter, and you can adjust when the display and computer sleep in both instances.
Follow these steps to adjust how your computer sleeps automatically:
1.
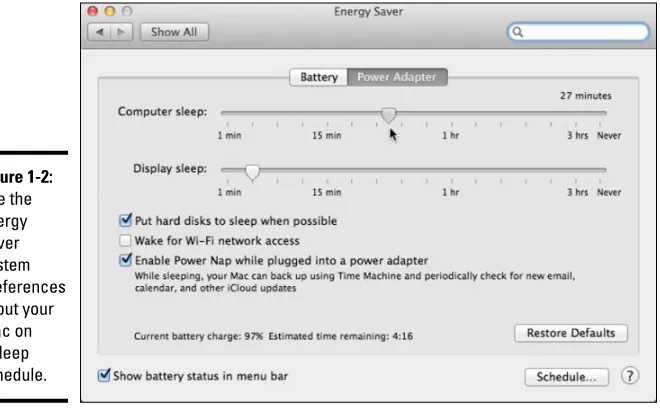
Choose ➪System Preferences, and then click the Energy Saver icon.The Energy Saver window appears, as shown in Figure 1-2. If you have an iMac, a Mac mini, or a Mac Pro, you won’t see the Battery and Power Adapter tabs, which appear on MacBook models.
If you’re using a notebook, notice which tab (Battery or Power Adapter) you’re on before you proceed with the next steps. When powered by the battery, you may want your Mac to go to sleep after a short time (say, 5 minutes) to make the battery charge last longer. Then when your Mac is connected to a power source, you could set it longer: say, after 15 minutes.
2.
Drag the Computer Sleep timer to the amount of time you want your Mac to sit idle before it goes to sleep.The exact time is shown above the timescale (on the right) as you move the slider.
Turning Your Mac Off
16
Figure 1-2:
Use the Energy Saver System Preferences to put your Mac on a sleep schedule.
3.
Drag the Display Sleep timer to the amount of time you want your Mac to sit idle before the screen saver plays.This setting puts the display to sleep. A screen saver is an image that appears when your Mac is inactive after the time interval you set here. It hides whatever you were working on from peering eyes when you’re away from your Mac. You can find out how to choose a special image for your screen saver and set a password for it in Book I, Chapter 6.
If your computer is doing a task, such as downloading a sizeable file, set Computer Sleep to Never and set only Display Sleep with a time interval. This way, your Mac continues to do the task at hand even though the display is sleeping.
4.
( For MacBook models) Select the Show Battery Status in Menu Bar check box (in the bottom-left corner).This displays an icon at the top of your Mac’s screen indicating how much charge is left on your battery.
5.
(Optional) Select the check boxes next to the other options to set when your Mac goes to sleep or wakes.For instance, if you access your Mac remotely, you want to select the Wake for Wi-Fi Network Access check box so your Mac will wake when you attempt to retrieve files and data from your Mac.
Book I Chapter 1
Starting to Use
Your Mac
Turning Your Mac Off
17
MacBooks have two Power Nap settings: one for Battery and one for Power Adapter. By default Power Nap is on when your Mac is connected to a power source but off when running on the battery. To change either, click the Battery or Power Adapter tab and select, or deselect, the Power Nap checkbox. When you use Power Nap in Battery mode, the activities are limited to receiving e-mail and updating shared data. To see if your Mac model supports Power Nap, visit http://support.
apple.com and search about power nap.
6.
(Optional) Click the Schedule button and adjust those settings as desired.A pane opens that lets you schedule the days and times you want your Mac to start or wake up and go to sleep. This is convenient if you don’t want to accidently leave your Mac on when you leave your home or office or you do want to find it awake and waiting for you when you arrive.
7.
Save your setting by choosing System Preferences➪Quit System Preferences or clicking the Close (red) button in the upper-left corner.To wake a sleeping desktop or all-in-one Mac or a MacBook with the lid open, click the mouse button or tap any key. To keep from accidentally typing any characters into a currently running application, press a noncharacter key, such as Shift or an arrow key. To wake your closed and sleeping MacBook, just open its lid.
Depending on which Mac model you own, you may notice a built-in combi-nation power/sleep indicator light that softly pulses like a firefly when your Mac is in Sleep mode. On the MacBook Pro, the power/sleep indicator light is on the front edge below the right wrist rest. On the Mac mini, the indica-tor light is in the lower-right corner. No such light is anywhere on the iMac or the latest MacBook Air, which appear to be totally in the dark when they’re asleep.
Shutting down your Mac
When you shut down your Mac, open applications are automatically closed, Internet and network connections are disconnected, and logged-in users are logged out. It may take a few minutes for your Mac to shut down. You know your Mac is shut down completely when the screen is black, the hard drive and fan are silent, and there are no blinking lights anywhere. Here are a few circumstances when you’d want to shut down your Mac:
✦ Taking an extended break: When you won’t be using it for an extended
Turning Your Mac Off
18
✦ Traveling: When you’re traveling with your Mac and putting your
MacBook Air, MacBook Pro, or Mac mini in your wheeled carry-on trol-ley. (Sleep mode is fine if you’re carrying your Mac in a laptop bag or backpack.)
✦ Repairing hardware: If you want to open your Mac to install a new
battery, additional memory, or a video graphics card.
✦ Rebooting: To resolve weird situations, such as unresponsive or
slow-running applications, because your Mac runs a number of behind-the-scenes file system housekeeping chores every time you start it. (See the next section for instructions.)
Here are the ways to shut down your Mac:
✦ Choose ➪Shut Down. A confirmation dialog appears (as shown in Figure 1-3) asking whether you’re sure you want to shut down.
Figure 1-3:
Use the menu to turn off your computer.
Select the Reopen Windows When Logging Back In check box if you want everything you’re working on to open when you turn your Mac on the next time.
Click the Shut Down button (or Cancel if you change your mind). If you don’t click either option, your Mac will shut down automatically after 1 minute.
✦ Press Control+Eject or press and hold the Power button. When a dialog
appears (refer to Figure 1-3), click the Shut Down button or press the Return key.
Make sure that your MacBook Air or MacBook Pro is completely shut down before closing the lid, or it may not shut down properly. Even more problem-atic, it may not start up properly when you next try to turn it on.
To shut down without seeing those bothersome dialogs, do this: Hold the Option key and then choose ➪Shut Down. This bypasses the confirmation
Book I Chapter 1
Starting to Use
Your Mac
Understanding Mac Processors
19
You have one more option for shutting down your Mac, but proceed with caution.
Press and hold ⌘+Control and then press the Power button to perform a
force shutdown, which forces all running applications to shut down right away. However, this route should never be your first choice when shutting down. Use a force shutdown as your last resort only if your Mac — your Mac,
not just a stubborn application —is unresponsive and appears to have frozen. If a single application is freezing or acting flaky, force-quit (close) that single application instead of shutting down your entire computer. (See Book III, Chapter 6 for information about how to force-quit a single application.) Performing a force shutdown can cause you to lose any changes you’ve made since the last time you saved them, so use force shutdown only as a last resort.
Restarting a Mac
Sometimes your Mac can act sluggish, or applications might fail to run. If that happens, you can shut down and immediately restart your Mac, which essentially clears your computer’s memory and starts it fresh.
To restart your computer, you have three choices:
✦ Press the Power button or press Control+Eject. Then, when a dialog
appears, click the Restart button (refer to Figure 1-1) or press the R key.
✦ Choose ➪Restart.
✦ Press Control+⌘+Eject.
When you restart your computer, your Mac closes all running applications; you will have the chance, though, to save any files you’re working on. After you choose to save any files, those applications are closed, and then your Mac will shut down and boot up again.
Understanding Mac Processors
The processor acts as the brain of your Mac. A computer is only as powerful as the processor inside. Generally, the newer your computer, the newer its processor and the faster it will run.
Understanding Mac Processors
20
To identify the type of processor used in your Mac, click the Apple menu in the upper-left corner of the screen and choose About This Mac. An About This Mac window appears, listing your processor as Intel Core 2 Duo, Core i3, Core i5, Core i7, or Xeon.
If your Mac doesn’t have one of the previously mentioned processors, you won’t be able to run Mac OS X Mavericks, version 10.9. This means that Core Solo and Core Duo models can’t run Mavericks. What’s more, to use
Mavericks, you also need at least 2GB RAM (random access memory). The Intel family of processors includes (from slowest to fastest) the Core Solo, Core Duo, Core 2 Duo, dual-core i3, dual-core i5, quad-core i7, and quad- and six-core Xeon. Every processor runs at a specific speed, so for example a 2.0 gigahertz (GHz) Core 2 Duo processor is slower than a 2.4 GHz Core 2 Duo processor. If understanding processor types and gigahertz con-fuses you, just remember that the most expensive computer within a prod-uct line is usually the fastest.
Talk to your friendly, neighborhood Apple reseller when deciding which Mac model is best for you. The tasks you plan to do with your Mac deter-mine the processor speed that will meet your needs. For example, if you plan to mostly write books, surf the Internet, and use productivity apps like Calendar and Contacts, a low-end processor is probably sufficient. If, instead, you’re a video editor or game developer, you want the fastest pro-cessor you can afford.
In the About This Mac window, move the cursor over the More Info button and click to open the System Information utility and see an expanded window of information about your Mac, as shown in Figure 1-4.
Figure 1-4:
Book I Chapter 1
Starting to Use
Your Mac
Exploring Your Mac’s Inner Workings
21
Click each tab at the top of the window to open panes that show more infor-mation about your Mac: Overview, Displays, Storage (shown in Figure 1-5), and Memory. Click Support (top right) for links to the Help Center and user manuals. Click Service (also top right) to access links to information about your Mac’s warranty and AppleCare Protection.
Figure 1-5:
About This Mac panes tell you how your Mac’s storage is used.
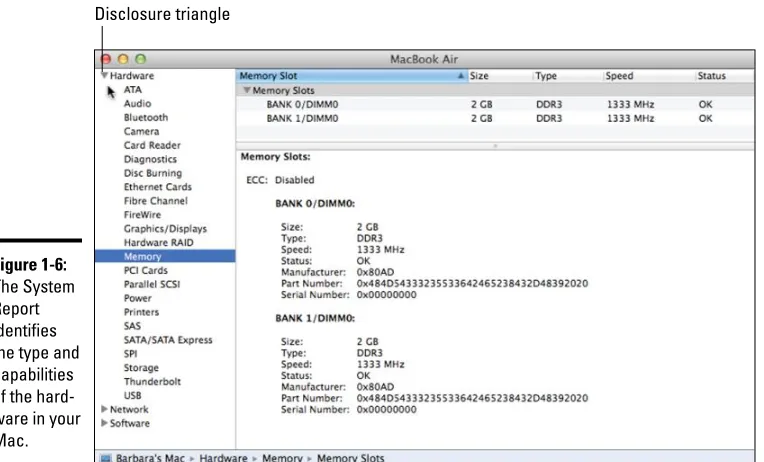
Exploring Your Mac’s Inner Workings
By looking at your Mac, you can tell whether it’s an all-in-one design (iMac), a notebook (MacBook Air or MacBook Pro), or a desktop unit that lacks a built-in screen (Mac mini or Mac Pro). However, looking at the outside of your Mac can’t tell you the parts used on the inside or the details regard-ing what your Mac is capable of. You might need to look at the hardware information in the System Report window when you want to know about the health of your MacBook’s battery or the type of graphics card in your Mac Pro. To identify the parts and capabilities of your Mac, follow these steps:
1.
Click the Apple menu ( ) in the upper-left corner of the screen and then choose About This Mac.An About This Mac window appears.
In Spring 2006, Macs started shipping with Intel processors, which are the same type of cessors used in many Windows PCs. Intel pro-cessors are less expensive than earlier Macs’ PowerPC processors and more powerful. Intel
processors also give the Mac the capability to run the Microsoft Windows operating system (although dyed-in-the-wool Mac loyalists would wryly consider that a drawback — if not outright blasphemy!).