OS X® Mavericks All-in-One For Dummies®
Published by: John Wiley & Sons, Inc., 111 River Street, Hoboken, NJ 07030-5774, www.wiley.com
Copyright © 2014 by John Wiley & Sons, Inc., Hoboken, New Jersey Published simultaneously in Canada
No part of this publication may be reproduced, stored in a retrieval system or transmitted in any form or by any means, electronic, mechanical, photocopying, recording, scanning or otherwise, except as permitted under Sections 107 or 108 of the 1976 United States Copyright Act, without the prior written permission of the Publisher. Requests to the Publisher for permission should be addressed to the Permissions Department, John Wiley & Sons, Inc., 111 River Street, Hoboken, NJ 07030, (201) 748-6011, fax (201) 748-6008, or online at
http://www.wiley.com/go/permissions.
Trademarks: Wiley, For Dummies, the Dummies Man logo, Dummies.com, Making Everything Easier, and related trade dress are trademarks or registered trademarks of John Wiley & Sons, Inc. and may not be used without written permission. OS X is a registered trademark of Apple, Inc. All other trademarks are the property of their respective owners. John Wiley & Sons, Inc. is not
associated with any product or vendor mentioned in this book.
Limit of Liability/Disclaimer of Warranty: The publisher and the author make no representations or warranties with respect to the accuracy or completeness of the contents of this work and specifically disclaim all warranties, including without limitation warranties of fitness for a particular purpose. No warranty may be created or extended by sales or promotional materials. The advice and strategies contained herein may not be suitable for every situation. This work is sold with the understanding that the publisher is not engaged in rendering legal, accounting, or other professional services. If professional assistance is required, the services of a competent professional person should be sought. Neither the publisher nor the author shall be liable for damages arising herefrom. The fact that an organization or Website is referred to in this work as a citation and/or a potential source of further information does not mean that the author or the
publisher endorses the information the organization or Website may provide or recommendations it may make. Further, readers should be aware that Internet Websites listed in this work may have changed or disappeared between when this work was written and when it is read.
For general information on our other products and services, please contact our Customer Care Department within the U.S. at 877-762-2974, outside the U.S. at 3993, or fax 317-572-4002. For technical support, please visit www.wiley.com/techsupport.
Wiley publishes in a variety of print and electronic formats and by print-on-demand. Some material included with standard print versions of this book may not be included in e-books or in print-on-demand. If this book refers to media such as a CD or DVD that is not included in the version you purchased, you may download this material at http://booksupport.wiley.com. For more information about Wiley products, visit www.wiley.com.
ISBN 978-1-118-69181-6 (pbk); ISBN 978-1-118-70756-2 (ebk); ISBN 978-1-118-70765-4 (ebk)
OS X
®
Mavericks All-in-One For Dummies
®
Visit
www.dummies.com/cheatsheet/osxmavericksaio
to view this book's cheat sheet.
Table of Contents
Introduction
About This Book
Foolish Assumptions
Icons Used in This Book
Beyond the Book
Where to Go from Here
Book I: Getting Started with OS X
Chapter 1: Shaking Hands with OS X
Convince Me: Why OS X?
Pretty to behold
Stable, stable, stable
Multitasking and multithreading for normal human beings
The definition of Internet savvy
Lots of free goodies
What Do I Really Need to Run the Big X?
Upgrading from Earlier Versions of Mac OS
Back up! — Please, back up!
Snuff out disk errors
Plug it, road warrior
Chapter 2: Navigating and Running Programs
Restarting, Sleeping, and Shutting Down
A Window Is Much More Than a Frame: Navigating Windows
Opening and closing windows
Keyboard Shortcuts for the True Power User
Houston, We’re Go to Launch Programs
Starting applications from your hard drive
Running applications from a CD-ROM or DVD-ROM
Switching ’Twixt Programs with Aplomb
Opening and Saving Your Stuff in an Application
Opening a document
Saving a document
Quitting Applications
Finder: The Wind beneath Your Wings
Copying and Moving Files and Folders
Cloning Your Items — It’s Happening Now!
Deleting That Which Should Not Be
Dragging unruly files against their will
Deleting with the menus and the keyboard
Emptying That Wastepaper Basket
Wait! I Need That After All!
Renaming Your Items
Adding a Dash of Color with Tags
Displaying the Facts on Files and Folders
Adding Spotlight comments
Displaying file extensions
Choosing the application with which to launch a file
Locking files against evildoers
Get Thee Hence: Using the Go Menu
Recording — nay, burning — a data CD
All You Really Need to Know about Printing
Chapter 4: Searching Everything with Spotlight
Doing a Basic Search
How Cool Is That!? Discovering What Spotlight Can Do
Expanding Your Search Horizons
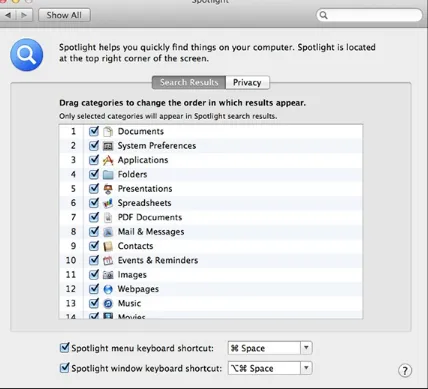
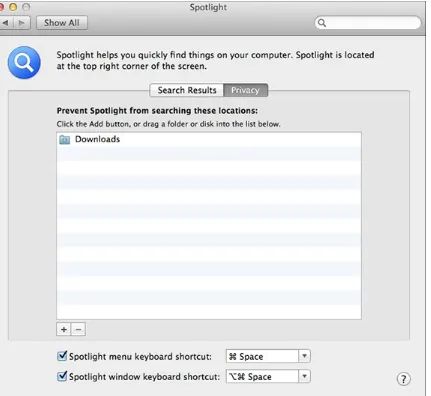
Customizing Spotlight to Your Taste
Chapter 5: Fun with Photo Booth
Capturing the Moment with FaceTime HD and Photo Booth
Producing Video on the Spot with iMovie
Chapter 6: Using Reminders, Notes, and Notifications
Remind Me to Use Reminders
Taking Notes the Mavericks Way
Staying Current with Notification Center
Chapter 7: Keeping Track with Contacts and Maps
Hey, Isn’t Contacts Just a Part of Mail?
Entering Contact Information
Using Contact Information
Arranging Your Contact Cards
Using Network Directories
Printing Contacts with Flair
Swapping Bytes with vCards
Introducing the Maps Window
Switching Views in Maps
Getting Directions Over Yonder
Chapter 8: Marking Time with Calendar
Shaking Hands with the Calendar Window
Editing Existing Events
Popping the Hood: Using the System Information Utility
Tracking Performance with Activity Monitor
RAID has nothing to do with insects
Updating OS X
I Demand That You Back Up Your Hard Drive
Hitching a ride on Time Machine
Using other backup solutions
I Further Demand That You Defragment
Special Start-Up Keys for Those Special Times
Crave the Newest Drivers
Chapter 10: Getting Help for the Big X
Displaying the Help Center Window
Searching for Specific Stuff
Prodding Apple for the Latest Gossip
Calling for Help Deep in the Heart of X
Other Resources to Chew On
Voice support
Mac publications and resource sites
Chapter 11: Troubleshooting the X
Don’t Panic!
The Troubleshooting Process
Step 1: Always try a simple shutdown
Step 2: Check all cable connections
Step 3: Retrace your steps
Step 4: Run Disk Utility
Step 5: Run antivirus software
Step 6: Check the Trash
Step 7: Check online connections
Step 8: Disable troublesome Login Items
Step 9: Turn off your screen saver
Step 10: Check for write protection
Step 11: Check your System Information
Step 12: Reboot with the OS X Recovery HD volume
Do I Need to Reinstall OS X?
It’s Still Not Moving: Troubleshooting Resources
OS X Help Center
The Apple OS X Support site
Your local Apple dealer
Book II: Customizing and Sharing
Chapter 1: Building the Finder of Your Dreams
Will That Be Icons or Lists or Columns . . . or Even a Flow?
Doing the Toolbar Dance
Hiding and showing the toolbar
Hiding and showing the status bar
Giving your toolbar big tires and a loud exhaust
Searching for Files from the Toolbar
Configuring the View Options
Chapter 2: Giving Your Desktop the Personal Touch
Changing the Background
Adding applications and extras to the Dock
Keeping track with Stacks
Resizing the Dock
Stick It on Dashboard
Getting Social with Game Center
Arranging Your Precious Desktop
Chapter 3: Delving under the Hood with System Preferences
The Preferred Way to Display the Preferences
Language & Region preferences
Chapter 4: You Mean Others Can Use My Mac, Too?
How Multiuser Works on OS X
Locking Down Your Mac
Starting Applications Automatically after Login
Chapter 5: Setting Up Multiuser Accounts
Adding, Editing, and Deleting Users
Adding a new user account
Editing an existing account
Deleting an existing account
Tightening Your Security Belt
Setting Parental Controls
Assigning the Simple Finder
Using Keychains — Not!
Chapter 6: Sharing Documents for Fun and Profit
Sharing over a Network versus Sharing on a Single Mac
No network is required
Relying on a guaranteed lock
Most places are off-limits
Permissions: Law Enforcement for Your Files
Permission and Sharing Do’s and Don’ts
Sharing Stuff in Office 2011
Document-sharing features
File-level sharing features
Book III: The Digital Hub
Chapter 1: The World According to Apple
First, Sliced Bread . . . and Now, the Digital Hub
What Can I Digitize?
Photographs
Music
Video
The Software That Drives the Hub
iPhoto
iTunes
iMovie
GarageBand
Can I Use All This Stuff at One Time?
Chapter 2: Browsing Your Library with iTunes and iBooks
What Can I Play on iTunes?
Keeping Slim Whitman and Slim Shady Apart: Organizing with Playlists
Know Your Songs
Setting the song information automatically
Setting or changing the song information manually
Buying Digital Media the Apple Way
Organize mode: Organizing and sorting your images
Edit mode: Removing and fixing stuff the right way
Producing Your Own Coffee-Table Masterpiece
Importing and adding audio from all sorts of places
Building the Cinematic Basics
Even Gone with the Wind had titles
Adding Maps and Backgrounds
Sharing Your Finished Classic with Others
Chapter 5: Becoming a Superstar with GarageBand
Shaking Hands with Your Band
Composing and Podcasting Made Easy
Adding tracks
Choosing loops
Resizing, repeating, and moving loops
Using the Arrange track
Tweaking the settings for a track
Automatic Composition with Magic GarageBand
Sharing Your Songs and Podcasts
Creating MP3 and AAC files and ringtones
Sending a podcast to iTunes
Burning an audio CD
Chapter 6: No, It’s Not Called iQuickTime
QuickTime Can Do That?
Playing Media with QuickTime
Opening QuickTime movies
Operating QuickTime Player
Chapter 7: Turning Your Mac into a DVD Theater
Getting the Right DVD Hardware
Watching Movies with DVD Player
Using the Controller
Keeping your eyes on the Viewer
Taking Advantage of Additional DVD Features
Controller extras
DVD Player preferences
Chapter 1: Desktop Publishing with Pages
The Three Amigos: Cut, Copy, and Paste
Cutting stuff
Before We Launch Numbers . . .
Creating a New Numbers Document
Opening an Existing Spreadsheet File
Save Those Spreadsheets!
Exploring the Numbers Window
Navigate and Select Cells in a Spreadsheet
Entering and Editing Data in a Spreadsheet
Selecting the Correct Number Format
Aligning Cell Text Just So
Format with Shading
The Formula Is Your Friend
Adding Visual Punch with a Chart
Chapter 3: Building Presentations with Keynote
Creating a New Keynote Project
Opening a Keynote Presentation
Saving Your Presentation
Putting Keynote to Work
Adding Slides
Working with Text and Graphics Boxes
Adding and Editing Slide Text
Formatting Slide Text for the Perfect Look
Using Presenter’s Notes in Your Project
Every Good Presentation Needs Media
Adding a Background Shape
Creating Your Keynote Slideshow
Printing Your Slides and Notes
Book V: Typical Internet Stuff
Chapter 1: Getting on the Internet
Shopping for an ISP
Investigating Various Types of Connections
Setting Up Your Internet Connection
Using an external modem
Using broadband or network hardware
Chapter 2: Using Apple Mail
Know Thy Mail Window
Setting Up Your Account
Add an account
Edit an existing account
Receiving and Reading E-Mail Wisdom
Chapter 3: Staying in Touch with Messages and FaceTime
Configuring Messages
Chapter 4: Expanding Your Horizons with iCloud
So How Does iCloud Work, Anyway?
Saving and Opening iCloud Documents
Configuring iCloud
Chapter 5: Going Places with Safari
Pretend You’ve Never Used This Thing
Visiting Websites
Navigating the Web
Setting Up Your Home Page
Adding and Using Bookmarks
Working with the Reading List and Shared Links
Saving pages for later with the Reading List
Visiting pages recommended by friends
Downloading Files
Using Subscriptions and History
Tabs Are Your Browsing Friends
Printing Web Pages
Protecting Your Privacy
Yes, there are such things as bad cookies
Cleaning your cache
Banishing pesky iCloud Keychain passwords
Handling ancient history
Setting notifications
Avoiding those @*!^%$ pop-up ads
Chapter 6: Staying Secure Online
What Can Happen if I Don’t Take Security Seriously?
“Shields Up, Chekov!”
Firewall basics
Antivirus basics
A Dose of Common Sense: Things Not to Do Online
Book VI: Networking in OS X
Chapter 1: Setting Up a Small Network
Something to network
Using DHCP for automatic IP address assignment
Manually choosing an IP address range
Figuring Out the Different Flavors of Wireless Ethernet
Let’s get Extreme: 802.11g
The current standard: 802.11n
Raising the bar to 802.11ac
The guy with the turquoise teeth
Keeping Your Wireless Network Secure
WPA and WPA2
WEP
The LEAP security standard
Setting Up Your Wireless Network
Setting up an Ad Hoc wireless network
Setting up wireless networks
Chapter 4: Sharing That Precious Internet Thing
Sharing the Internet
Using Network Address Translation
Ways to Share Your Internet Connection
Using hardware for sharing an Internet connection
Using software for sharing an Internet connection
Connecting Everything for Wired Sharing
Using the software method
Using the hardware method
Adding Wireless Support
If you already have a cable/DSL router or are using software Internet sharing
If you do not have a hardware-sharing device
Book VII: Expanding Your System
Chapter 1: Hardware That Will Make You Giddy
Parading Pixels: Digital Cameras, DV Camcorders, and Scanners
Digital cameras
DV camcorders
Incredible Input: Keyboards, Trackballs, Joysticks, and Drawing Tablets
Awesome Audio: Subwoofer Systems and MP3 Hardware
Subwoofer speaker systems
MP3 players (well, actually, just the iPod)
Chapter 2: Add RAM, Hard Drive Space, and Stir
Adding Memory: Reasons for More RAM
Shopping for a RAM Upgrade
Finding out the current memory in your Mac
Determining the exact model of your computer
The Tao of Adding Hard Drive Territory
Internal versus External Storage
Chapter 3: Port-o-Rama: Using Thunderbolt, USB, and FireWire
Appreciating the Advantage of a FireWire Connection
Travelling at Warp Speed with Thunderbolt
Understanding USB and the Tale of Two Point Oh
Hey, You Need a Hub!
Uh, My External Device Is Just Sitting There: Troubleshooting
Check those drivers
Chapter 4: I’m Okay, You’re a Printer
Meet Printer Browser
Adding a Funky Printer
Managing Your Printing Jobs
Sharing a Printer across That There Network
Chapter 5: Applications That You’ve (Probably) Gotta Have
The Trundling Microsoft Mammoth
Your OS X Toolbox: Drive Genius 3
Image Editing for the Masses
The Morass of Digital Video
Yes, It’s Really Called “Toast”
If You Positively Have to Run Windows . . .
All Hail FileMaker Pro
Utilities That Rock
StuffIt
BBEdit
Xojo Desktop
At Least One Game
OS X Chess
World of WarCraft
Chapter 6: Putting Bluetooth to Work
Bluetooth: What a Silly Name for Such Cool Technology
Mavericks and Bluetooth, together forever
Adding Wireless Keyboards and Mice to Your Mac
The Magic of Wireless Printing
Book VIII: Advanced OS X
Figuring Out How Boot Camp Works
Comparing Boot Camp to Windows Emulators
Configuring Boot Camp
Switching to Windows
Checking for Apple Updates
Chapter 2: . . . And Unix Lurks Beneath
Why Use the Keyboard?
Unix keyboarding is fast
The Unix keyboard is a powerful beast
Go where no mouse has gone before
Automate to elevate
Remote control
Uncovering the Terminal
Consider yourself prompted
A few commands to get started
Using the mouse skills you already have
Handy Unix Programs
Create a script without touching a key
Building your own scripts
One Step Beyond: AppleScript Programming
Grab the Dictionary
Anatomy of a simple script
I Summon Automator — the Silicon Programmer!
Help Is at Your Fingertips
Built-in AppleScript Help
AppleScript on the web
Chapter 4: Talking with and Writing to Your Macintosh
Setting Text to Speech options
The Date & Time pane
Configuring VoiceOver in the Accessibility pane
Speaking text through applications
About the Author
Cheat Sheet
Introduction
I remember the first moment I moved a mouse across an OS X Desktop. At that time, it was the beta of version 10.0 — and I very well remember the word elegant as my first impression. (My second impression was Unix done better.) That’s really saying something because I’m an old personal computer operating system curmudgeon: I cut my computing teeth on Atari and TRS-80 Model III machines, and I still feel at home in the character-based environment of DOS and Unix. Of course, I’ve also used every version of Windows that His Gatesness has produced (everything from Microsoft Bob and Windows/286 to the much-maligned Windows 8). And yes, I’ve used Mac OS since before the days of System 7, using a Macintosh SE with a 9" monitor (and a built-in handle).
But out of this host of operating systems, could you really call one elegant before now? OS X — now at version 10.9, affectionately called Mavericks — is something different: a fine-cut diamond amongst a handful of semiprecious stones. It’s the result of an unnatural marriage, I’ll admit . . . the intuitive, graphical world of Mac paired with the character-based stability and efficient
multitasking of Unix, along with the iOS operating system developed especially for Apple’s mobile devices. Who would have thought that they would work together so well?
Therefore, you can imagine how I immediately jumped at the chance to write a comprehensive guide to Apple’s masterpiece. (Although it’s been a full decade ago now, I’ve never regretted the decision.) The book that you hold in your hands uses the classic For Dummies design; it provides you with the step-by-step instruction (plenty of which my editors grudgingly agree is somewhat humorous) on every major feature of OS X. It also goes a step further from time to time, delving into why something works the way it does or what’s going on behind the scenes. You can chalk that up to my sincere admiration for everyone in Cupertino and what they’ve produced.
What you won’t find in this All-in-One is wasted space. All the new features of version 10.9 are here, including the arrival of the Dynamic Duo from the iOS world: Maps and iBooks. You’ll also find coverage of all the current iLife and iWork applications. Everything’s explained from the ground up, just in case you’ve never touched an Apple computer before. By the time you reach the final pages, you’ll have covered advanced topics, such as networking, AppleScript, Internet
security . . . and yes, even an introduction to the powerful world of Unix that exists underneath. I sincerely hope that you’ll enjoy this book and that it will act as your guide while you discover all the wonderful features of OS X Mavericks that I use every day. Remember, if a Windows-minded acquaintance still titters about your Mac mini, I’ll understand if you’re tempted to drop this
weighty tome on his foot. (Of course, you can also boot into Windows and watch him turn purple — truth is, he can’t boot into OS X on his PC.)
The official name of the latest version is (portentous pause here, please) OS X version 10.9
About This Book
No one expects a book in the For Dummies series to contain technojargon or ridiculous computer science semantics — especially a book about the Macintosh! Apple has always strived for
simplicity and user friendliness. I hereby promise that I’ve done my absolute best to avoid unnecessary techno-talk. For those who are interested in what’s happening under the hood, I provide sidebars that explain a little more about what’s doing what to whom. If you’d rather just have fun and ignore the digital dirty work, please feel free to disregard these additions (but don’t tear sidebars out of the book because there’s likely to be important stuff on the opposite side of the page).
However, even For Dummies books have to get technical from time to time, usually involving commands that you have to type and menu items that you have to click. If you’ve read any of my other For Dummies books, you’ll know that a helpful set of conventions is used to indicate what needs to be done or what you see onscreen:
Stuff you type: When I ask you to type a command or enter something in a text field (such as your name or phone number), the text appears like this: Type me. Press the Return key to process the command or enter the text.
Menu commands: When I give you a specific set of menu commands to use, they appear in the following format: Edit⇒Copy. In this example, you should click the Edit menu and then choose
the Copy menu item.
Links: URLs (web addresses) look like this: www.mlcbooks.com. I added plenty of them so
you can quickly find cool products or helpful info online.
Foolish Assumptions
If you have a Mac that’s either running OS X version 10.9 (Mavericks) or is ready to be upgraded to it, you’re set to go. Despite what you might have heard, you won’t require any of the following:
A degree in computer science: Apple designed OS X for regular people, and I designed this book for people of every experience level. Even if you’ve never used a Mac before, you’ll find no hostile waters here.
A fortune in hardware and software: I do describe additional hardware and software that you can buy to expand the functionality of your Mac; however, that coverage is only five chapter’s worth. Everything else covered in this book is included with OS X Mavericks — and by the size of this volume, you get a rough idea of just how complete OS X is! Heck, many folks buy Macs just because of the free software you get, such as iMovie and iPhoto.
Oh, and you need to buy and download Mavericks from the Apple App Store, unless Mavericks came pre-installed on your Mac. Go figure.
Icons Used in This Book
The icons in this book are more than just attractive — they’re also important visual cues for stuff that you don’t want to miss.
My unique Mark’s Maxims represent big-time-important stuff, so I call your attention to these nuggets in bold, like this:
Something Really Important Is Being Said that will likely affect your person in the near future.
Pay attention, commit these maxims to memory, and you’ll avoid the pitfalls that the rest of us have hit on the way.
The Tip icons flag short snippets of information that will save you time or trouble (and, in some cases, even cash).
This icon highlights optional technical information. If you also used to disassemble alarm clocks for fun when you were six years old, you’ll love this stuff.
Always read the information next to this icon first! Something looms ahead that could put your hardware or software at risk.
Look to the Remember icons for those tidbits that you need to file away in your mind. Just remember to remember.
Beyond the Book
I’ve written extra content that you won’t find in this book. Go online to find the following:
Online articles covering additional topics at
www.dummies.com/extras/osxmavericksaio
Mac’s screen.
The Cheat Sheet for this book is at
www.dummies.com/cheatsheet/osxmavericksaio
Here you’ll find a listing of common Mavericks keyboard shortcuts, a schedule to help you keep track of OS X maintenance, and an explanation of the special symbols on your Mac keyboard.
Updates to this book, if there are any, can be found at
www.dummies.com/go/osxmavericksaio
Where to Go from Here
The material in this book is divided into eight minibooks, each of which covers an entire area of OS X knowledge. For example, you’ll find minibooks on networking, the Apple Digital Hub suite of applications known as iLife, Apple’s iWork office productivity suite, customizing your
Desktop, and Internet-related applications. Each self-contained chapter discusses a specific feature, application, connection, or cool thing about OS X.
You could read this book in a linear fashion, straight through from cover to cover — probably not in one session, mind you. (Then again, Diet Coke is cheap, so it is possible.) However, feel free to begin reading anywhere or to skip chapters at will. For example, if you’re already using an
Book I
Getting Started with OS X
Contents at a Glance
Chapter 1: Shaking Hands with OS X
Chapter 2: Navigating and Running Programs
Chapter 3: Basic OS X Housekeeping
Chapter 4: Searching Everything with Spotlight
Chapter 5: Fun with Photo Booth
Chapter 6: Using Reminders, Notes, and Notifications
Chapter 7: Keeping Track with Contacts and Maps
Chapter 8: Marking Time with Calendar
Chapter 1: Shaking Hands with OS X
In This Chapter
Understanding the advantages of OS X Checking your system requirements
Upgrading from earlier versions of Mac OS Installing OS X
Running OS X for the first time
It’s human nature to require instant gratification from your software. I’ve seen it countless times: Someone runs a program, immediately feels comfortable with it, and then spends the rest of his days using that program religiously. Or another person plays with the same program for 120 seconds and dismisses it as too difficult or too confusing. It’s rather like watching a fashion show runway in Rome or Paris: There had better be eye appeal pretty quickly, or the bucks won’t flow. Ditto for modern computer operating systems. An operating system (OS) is the basic software that determines the look and feel of your entire computer and usually extends to the programs that you run as well. Microsoft felt the pinch of an old-fashioned OS when Windows 98 and Windows Me (Millennium Edition) were starting to appear rather plain. Then came Windows XP, where menus fade in and out like fireflies on a summer night, puppies help you find files, and other animation abounds. With Windows Vista 7, and now 8, Microsoft is attempting to match some of the
elegance and power of OS X Mavericks (and its predecessor, OS X Mountain Lion) in the PC world.
Sure, OS X looks doggone good. Forget the minimum requirement of shirt and shoes because this OS is wearing an Armani suit. What’s really exciting for Macintosh owners around the world, however, is the heart that beats beneath the pretty form. At its introduction, OS X was an OS revolution, and it still delivers some of the most advanced features available on a personal
computer while remaining easy to use. (And yes, I do own, use, and enjoy both PCs and Macs — in the end, what’s important to me is which computer does the best job the fastest and easiest.) Now, I’m not going to just haul off and proclaim that OS X can run rings around — well, you know, the W word — without solid proof. In this chapter, I introduce you to the advantages of OS X and why it’s such a step ahead for those running Windows. I also cover the hardware
requirements for running OS X version 10.9 (Mavericks) as well as guidelines on switching from Windows. Finally, I familiarize you with the steps you encounter the first time you fire up the Big X.
Convince Me: Why OS X?
Macintosh, so you’d expect OS X to be simple to use — and indeed it is. For many folks, that’s Job One. If you’re one of those people, you can happily skip this section without need of further evidence because OS X is undoubtedly the easiest OS on the planet to use. (And believe me, I’m
not knocking simplicity. Computers are supposed to be getting easier to use, and technonerds like me are supposed to be rendered unnecessary as computers advance.) Here is the mantra of the Mac — and the first of Mark’s Maxims for this volume:
Make it easy.
Still with me? Need more testimony? Or perhaps you’re just curious about the engine under the hood. Then read on — and if you’re a Macintosh owner, feel free to gloat! (If you’re a PC owner, there’s always eBay.)
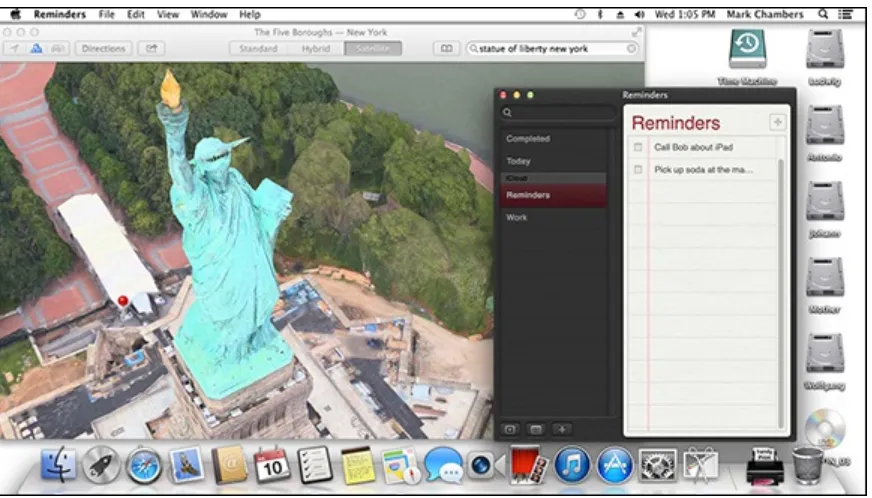
Pretty to behold
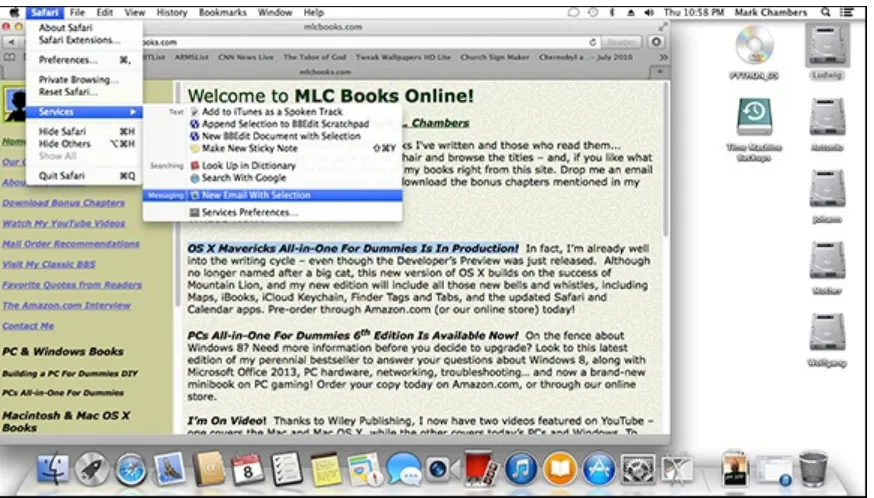
They say a picture is worth a thousand words, so let me illustrate just how good OS X looks by showing you a screenshot. Figure 1-1 offers you a view of the latest version of the Big X, hard at work. As you can see, everything’s streamlined in appearance, with maximum efficiency in mind. Tasteful 3-D abounds, from the drop-shadowed windows to the liquid-look toolbars. Icons look like miniature works of art. Macintosh owners appreciate outstanding design and recognize the value of a great computer, even if it’s lime green, or the size of a ham sandwich, or looks like a silver picture frame. After all, many Mac owners are professionals in the graphic arts, and Apple provides the hardware they need — like the top-of-the-line display used with the 27" flat-panel Intel iMac or the killer performance of the latest Mac Pro with 12-core processing power. Take a look at what’s going on behind the curtain — the Great Oz is actually pretty busy back there.
The allure of Aqua
The Apple software developers who introduced us to OS X designed the liquid look from the ground up. They call it Aqua, and it’s the standard user interface in Mavericks.
Whoops, I just realized that I slipped a ten-cent example of technobabble into the preceding paragraph. Let me explain: A user interface (UI) designdetermines how things look throughout both the OS itself and all applications written to run under it. The design includes the buttons you click, the controls you click or move, and the appearance of the windows and menus. For example, if you’ve already begun to use OS X, you’ve probably stopped right in the middle of a task and exclaimed to yourself, “Why, Self, look at the cool 3-D contour effect on the menu bar!” That shapely contour is a tiny part of the Aqua user interface design.
Aqua also extends to the placement of controls and how they’re shown to you. For example: OS X uses Aqua sheets (which are like dialogs, but are attached to their parent windows) to
prompt you for input, such as confirming when you’re about to close a document without saving it. A dialog, on the other hand, can be moved around like a window, but it requires that you take an action before you can continue. I prefer sheets to dialogs because multiple programs can have multiple sheets open, so you can continue to work in other applications without being rudely forced to answer the query immediately. Like other things OS X, sheets just make more sense, and they’re easier to use!
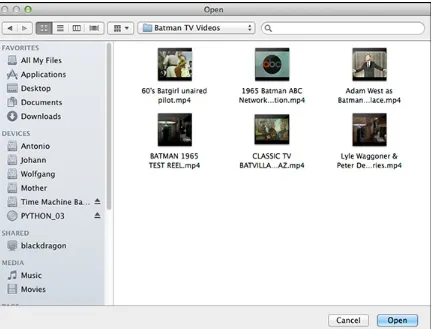
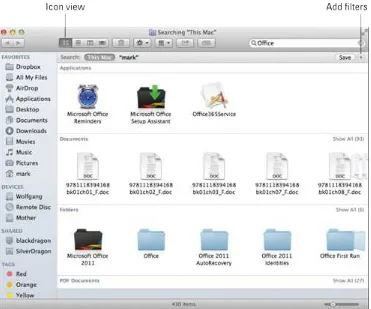
OS X file selection controls, such as the one in Figure 1-2, make it much easier to navigate quickly to a specific file or folder from in an application.
The Dock is another Aqua favorite. The Dock launches your favorite applications, indicates what’s running on your Mac, and allows you to switch between those programs — and all in a strip that you can relocate and customize at will. I talk about the Dock in greater detail in Book II, Chapter 2.
Consider Aqua as the look and feel of OS X and virtually all applications that it runs; you discover how to use these Aqua controls in the pages to come. Of course, Mac owners really don’t have to worry about Aqua itself; the Aqua guidelines are a road map for those software developers writing applications for OS X. Programs written to the common Aqua interface standard will be easier for you to use, and you’ll become a proficient power user of that program much faster because you’re already familiar with Aqua controls.
The quality of Quartz
The second ingredient in the visual feast that is OS X is Quartz Extreme. Again, I must ask your forgiveness, good reader, because I have to get a tad technical again. Quartz Extreme is a graphics engine: the portion of OS X that draws what you see onscreen (in the Aqua interface, natch).
Think of the engine in your car, which is responsible for making your car move. Whether your Mac is running Microsoft Word or simply idling at the Desktop waiting for you to finish your soda, Quartz Extreme is at work displaying icons, drawing shapes, exhibiting the windows you open, and animating things on the Dock.
What sets Quartz Extreme apart from the ho-hum graphics engine that Windows uses? It’s all about international programming standards — you know, those things that Microsoft would much rather you forget. To wit:
PDF: The Quartz Extreme engine is built around the Acrobat Portable Document Format (PDF) developed by Adobe. If you've spent any time at all on the Internet in the past 20 or so years, you know that PDF files have emerged as the standard for displaying and printing the highest-quality electronic documents. Plus, Adobe has released a version of the free Acrobat Reader (www.adobe.com) for just about every computer on this green Earth. As a result, text and
Figure 1-3: Yep, that’s a PDF document, not a scanned image!
OpenGL: Gamers will get really excited about the fact that Quartz Extreme also uses the OpenGL graphics acceleration standard, which delivers the fastest 3-D graphics on the planet. (Think photo-realistic, high-resolution graphics drawn in the blink of an eye.) This trick is a really cool — OpenGL is even used to produce the Desktop in OS X Mavericks.
In plain English? Today’s top-of-the-line, 3-D gaming and 3-D graphics acceleration can take care of drawing everything — forget about waiting for windows to close or menus to appear even when you’re creating the world’s biggest honking spreadsheet or building a presentation the size of Baltimore. As the chairman of the board would’ve said, “We’re talkin’ fast, baby, like a rocket ship to the moon!”
Core Animation: Mavericks includes functionality that Apple calls Core Animation, which makes it much easier for programmers to animate backgrounds and objects in their programs. Text, 3-D animation, and video now work seamlessly side by side, and eye-catching
animations in applications, such as Time Machine, are the norm for Mac owners.
“So it’s elegant in design. That’s great, Mark, but what if OS X crashes? Aqua and Quartz Extreme aren’t worth a plug nickel if my cursor doesn’t move and I lose my document!” Believe me, I
couldn’t agree more; I make my living from computers, and every time a misbehaving program locks up one of my machines, I throw a tantrum that would make Godzilla back off. Lockups shouldn’t be tolerated in this day and age.
Luckily, the folks who designed OS X were just as interested in producing a rock-solid OS as they were in designing an attractive look. (Think of Tom Cruise’s face on The Rock’s body.)
OS X is as hard to crash as the legendary Unix OS — that’s right, the same reliable workhorse that technowizards around the world use to power the Internet, where stability is all-important. OS X is built on top of a Unix base that’s well hidden, allowing you and me to focus on our programs and click with a mouse without knowing any of those obscure, arcane keyboard commands. You get the benefits of Unix without a pair of suspenders and a pocket protector, or the hassle of growing a beard. (Not to mention many, many years of computer programming experience.)
Apple has gone yet another step further in safeguarding your data in case of a power failure or misbehaving program: the Auto Save feature automatically saves all the changes you make to your document in the background while you work! You can revert to the
document as it was when you last opened it whenever you need to. (I know one technology author who is downright thankful for Auto Save.)
Apple calls the Unix foundation at the heart of OS X by another nifty title: Darwin. I could tell you that Darwin provides the latest in 64-bit memory support and CPU management, but if you’re a normal human being, your eyes would glaze over. Suffice it to say that Darwin makes the best use of your computer’s memory (RAM) and your computer’s brain (CPU) — Mavericks has been fine-tuned for processors with multiple cores, such as the Core i5, Core i7, and Xeon CPUs from Intel. Rest assured that your web server will stay up even if your misbehaving Virtual Birdcalling
simulation decides to run amok. (Emus running amok — how dreadful.)
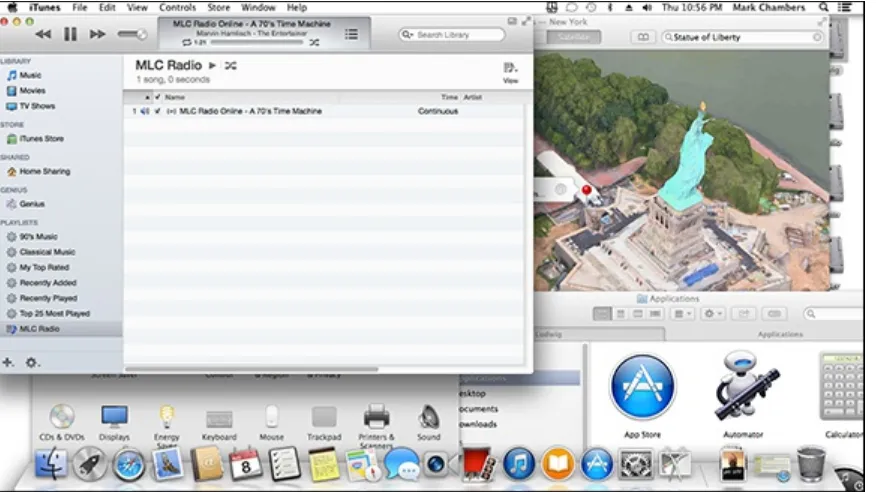
Don’t forget QuickTime X!
If you’ve recorded or edited digital video (DV), you’re probably already familiar with Apple’s QuickTime MOV format. QuickTime movies are typically high resolution, relatively small, and easily created with iMovie, which I discuss in Book III, Chapter 4. Although QuickTime X isn’t “on stage” all the time, as is Aqua or Quartz Extreme, it’s still an important part of OS X: Every time you display a video clip that you’ve recorded or watch a streaming TV broadcast from a website, you use QuickTime X. (Note, however, that you don’t use QuickTime X to watch DVD movies — that job is reserved for Apple DVD Player.) QuickTime X includes support for AVC (Advanced Video Coding) for the best possible display of the latest HD (high definition) video signals from the expensive hardware now appearing at your local electronics Maze o’ Wires chain store.
Yes, yet another standard is at work here — uh-oh, Overlord Gates is truly angry now! Those who do have a beard and are curious about such things will want to know that Darwin uses a FreeBSD kernel, so it also inherits all the protocol standards that have made Unix the foundation of today's Internet. You can find more about FreeBSD at www.freebsd.org.
Because much of the foundation code that underlies OS X is developed as an open source project, software engineers outside Apple can contribute ideas and code, just as Unix continues to evolve over time. (And yes, you'll even discover how to access the powerful Unix command prompt from OS X in Book VIII, Chapter 2!)
To get an idea of just how well armored OS X is, consider Figure 1-4. One program, which I call Titanic 1.0, has locked up like San Quentin. Under Mac OS 9 and older versions of Windows, your only chance at recovering anything would involve divine intervention. In OS X, however, my Pages application is unaffected because it plays in a protected area of system memory. (I show you how to force a misbehaving application to go away in Chapter 3 of this minibook.)
By the way, Darwin makes it easy for Unix software developers to quickly and easily port (or modify) all sorts of Unix applications to work under OS X. I think you’ll agree that a wider selection of applications is a good thing.
Figure 1-4: OS X keeps applications separate for a reason.
Multitasking and multithreading for normal human beings
And now, for your entertainment, a short one-act play. (Yes, really. You’d be amazed at how popular this stage production has become among my readers.)
A Shakespearean Moment of Multitasking and Multithreading
Our play opens with Julius Caesar shaking his head in disgust at his Mac OS 9 Desktop.
Caesar: Anon, I am only one mortal, yet my Desktop doth abound with portals to applications of all different miens. Tell me, foul beast, why thy spirit seems slow and sluggish, and my Excel spreadsheet doth crawl on its belly!
[Enter Romeo, a cocky and rather brash young Apple software developer.]
another — Excel has to cooperate with everything else that’s running in the background, like a good little corporate boy. It’s less efficient and very, very ’90s. Install OS X, and you get
preemptive multitasking — the app you’re using, like, gets the lion’s share of the processing time, and everything runs smoother when you need it. That’s the way Unix works.
Caesar: Verily, your strange tongue doth annoy me. Guards, behead him — then obtain for me this OS X.
Romeo: I’m outta here — I’ve got a hot surfing date — but don’t forget, like, OS X also uses
multithreaded processing, so your Mac can handle different operating system tasks at the same time. It’s kind of like your computer can both walk and chew gum at the same time: fast, fast, fast!
[Exit Romeo — rather swiftly — stage right.]
Fin
When the play closes, we can only hope that Romeo is fast as well. (I told you it was a short play.)
The definition of Internet savvy
Remember the classic iMac advertisements that touted the one-plug approach to the Internet? That entire campaign was centered on one idea: The Internet was supposed to be easy to use. The folks at Microsoft sat up and took notice when the iMac proved so incredibly successful and (starting with Windows Vista) reduced some of the overwhelming folderol that you had to encounter just to connect to the Internet — but OS X still wipes the floor with Windows 8 when it comes to easy and complete Internet connectivity. For example:
Easy configuration: OS X sets up your entire Internet connection with a simple assistant. As long as you have the right information handy, which your Internet service provider (ISP) should supply, configuration is a snap.
iCloud: Apple’s iCloud service provides you with a chunk of Internet-accessible space where you can automatically share documents, photos, and music with your other Apple devices and computers — from anywhere on Earth with an Internet connection! Absolutely, unbelievably, massively cool. I cover iCloud in detail in Book V, Chapter 4.
All the Internet behind-the-scenes stuff: The Internet is basically built on a number of
protocols (read that as rules for exchanging all sorts of data) — and, as I mention earlier, Unix machines dominate the Internet. Ergo, OS X on your Macintosh also provides you with support for just about every Internet protocol on the planet. Even if you don’t know these protocols by name or write your own software, the applications that you buy can use them.
Lots of free goodies
You don’t just get Internet applications when you latch your fingers onto OS X — you can start doing all sorts of neat stuff without investing one extra dollar in more software!
What you receive along with OS X depends on whether you’re upgrading from an older version of Mac OS or receiving the Big X already installed on a new Macintosh. With that in mind, check out these two “suite” possibilities (pun definitely intended):
This is the iLife: This suite of easy-to-use integrated programs is included with a new Mac, and it’s practically as well known as the computer itself these days: iPhoto, iTunes,
GarageBand, and iMovie. Each of these stellar programs is covered in Book III. If you have a digital camera, an MP3 player, a USB musical keyboard, or a DV camcorder, you’ll be a happy individual. I promise.
iWork to the rescue: If you bought a new Macintosh with OS X preinstalled, you may have received a test-drive version of iWork (Apple’s answer to Microsoft Office). Good stuff, indeed. If you don’t want to spend the bucks on Office 2011, and you don’t need the complex gewgaws and baroque architecture of Word, Excel, and PowerPoint, I can guarantee you that Pages, Numbers, and Keynote are powerful enough to satisfy your document and presentation yearnings.
What Do I Really Need to Run the Big X?
I’ve written well over a dozen other For Dummies books — I know, it’s getting to be a habit (and a career) — and I always find the “Hardware Requirements” section a hard one to write. Why? Well, I know what Apple claims as the minimum hardware requirements necessary to run OS X. But I also know what I would consider the minimum hardware requirements, and they’re
substantially different. Oh, well, let me list the bare bones, and then I’ll give you my take on what you really need. (Naturally, if OS X Mavericks is preinstalled on your computer, feel free to tear out this page and create a handful of celebratory confetti.)
From The World According to Apple, the minimum requirements are as follows:
Hardware: You’ll need any Mac with a 64-bit Intel Core 2 Duo, i3, i5, i7, or Xeon processor. This means that just about any recent desktop or laptop Mac is technically eligible to play (although you might find the performance of a Core 2 Duo Mac running Mavericks to be unacceptable). Note that no DVD drive is required for installation — you’ll download your Mavericks upgrade directly from the Apple App Store! However, your Mac must already be running OS X Mountain Lion (10.8).
RAM: You’ll need at least 2GB of memory (RAM). At today’s low prices, that purchase is like buying a pizza.
From The World According to Chambers, the minimum requirements are as follows:
Hardware: I recommend a Mac with at least an Intel i3 processor. Remember, this is my
opinion on what you’ll need to really take advantage of OS X Mavericks, and again, I have to say that I don’t think it performs well enough on Intel Core 2 Duo computers.
RAM: Don’t settle for anything less than 4GB. Again, with memory as cheap as it is these days, this purchase is like adding extra cheese to that pizza.
Time for a Mark’s Maxim:
Any technonerd worth the title will tell you that the single most important key to performance in today’s operating systems is RAM — yep, it’s more effective than a faster processor!
If you find some extra spending cash between your sofa cushions, spend it on RAM (up to an Earth-shaking 64GB of RAM on the latest Mac Pro racehorses).
Hard drive territory: I recommend having • 20GB free for just the OS
• A minimum of an additional 60–100GB for any applications, digital video clips, photographs, and songs you’ll be collecting
Upgrading from Earlier Versions of Mac OS
Because you install OS X Mavericks through the Apple App Store, everything about the upgrade process is practically automatic. The steps that you should take before you start the installation are important; I cover those in the next section. Pay heed, or pay later. I won’t go into detail about the actual installation because there aren’t any details to speak of — you’ll answer a question or two and then hop up to get another cup of coffee or another caffeine-laden soda while the installer does the rest. Would anyone expect anything different from Apple?
But before you strike up the band, read the following sections to protect yourself against some common pitfalls.
Back up! — Please, back up!
I know you’re anxious to join the In crowd, and Apple makes the upgrade process as noninvasive and as safe as possible, but snafus such as power loss and hard drive failures do happen. With a full backup of your system to an external hard drive (using Time Machine), you can rest assured that you’ll get your precious files and folders back in pristine shape if tragedy strikes. You need to back up your system on a regular basis, anyway. Promise me now that you’ll back up your system, won’t you?
Snuff out disk errors
upgrading a disk with directory errors takes longer. To give your drive a clean bill of health, use
Disk Utility, which I cover in Chapter 9 of this minibook. Ain’t technology grand?
Plug it, road warrior
You’re on the road with your MacBook Pro, and you’re thinking of buying your brand-spanking-new Mavericks OS upgrade — Stop! NOW.
Before you decide to upgrade your Mac notebook, consider what will happen if that magical vessel containing all your files should flicker and. . . . No, on second thought, don’t even visualize it. (Even if the battery is fully charged.) If you’re installing an OS X upgrade on a MacBook, MacBook Air, or MacBook Pro, make sure that it’s plugged in and receiving its share of good, clean AC power from a handy, nearby wall socket. The installation process could take an hour, and you can expect constant hard drive activity — think “Attack of the Energy-Draining Installation from Planet Lithium.” You don’t want to try this while your notebook is operating on battery power.
Heck, a technopurist would probably recommend that you attach your Macintosh to an
uninterruptible power supply (UPS) for the installation process, but I’m not quite that paranoid about power outages.
Keep one thing in mind while installing OS X: If you format the destination drive (the drive where you’ll install OS X), you’ll lose everything that it stored. No big surprise — and the installation program will warn you profusely beforehand. There’s no reason to format the destination drive unless you just crave a clean installation (an installation of a new OS on a newly formatted drive, compared with an upgrade of your existing OS X System files). Oh, and if you do decide to format the drive, don’t forget to use Mac OS Extended (Journaled) format when prompted by the OS X install application.
What’s that, you say? You’d like a comprehensive guide to your classy new Apple MacBook Air or MacBook Pro laptop? Look no farther than the fourth edition of my bestselling MacBook For Dummies, published in both print and electronic format by the good folks at Wiley. With a copy in hand, any road warrior will find the answers to those Persistent Laptop Questions!
Personalizing the Big X
you boot OS X Mavericks.
These assistant screens change periodically — and they’re completely self-explanatory — so I won’t march you through each one step by step. However, here are a few tips for a bit of
additional over-the-shoulder help while you’re setting things up:
Set the language. OS X defaults to U.S. formats and keyboard layouts. OS X does indeed provide full support for other languages and keyboard configurations, though. To display these options, click the Show All button at the bottom of the assistant screen.
Accounts are important. When OS X asks you to create your account, don’t forget to set your password. Your Mac password, by the way, is case sensitive, so THIS is different from this or
ThiS. I recommend entering a password hint; just don’t make that hint too easy to guess. For example, My first dog’s name is probably preferable to Plays Seinfeld on TV. OS X uses the name and password that you enter to create your account, which you use to log in if you set up a multiuser system for several people (more on this in Book II, Chapter 4).
Never write down your passwords. Such crib sheets work just as well for others as for you.
I need to fix that. You can click the Back button at any time to return to previous assistant screens. OS X, bright child that it is, automatically saves your choices, so when you click Continue to return, everything is as you left it.
Opt for extra stuff. Whether or not you accept the news, offers, and related-product
information from Apple is your decision. However, you can find this same information on the Apple website, so there’s no need to engorge your e-mail Inbox unless you so desire. (In other words, I turned off this option.)
Set local area network (LAN) connections. If you’re connecting your Mac to a Transmission Control Protocol/Internet Protocol (TCP/IP) network (or you’re using an Internet router that uses Dynamic Host Configuration Protocol [DHCP]), I recommend clicking Yes when you’re asked whether you should use the configuration supplied by the existing server.
DHCP automatically provides the computers on the network with all the settings that they need to connect. If that sounds like ancient Sumerian, find out more in Book VI, Chapter 1.
Create your iCloud account. Apple’s iCloud service just plain rocks — especially the syncing between your Mac and your iOS devices. Again, more on this in Book V, Chapter 4, but take my word for it: Join up, trooper, and create your Apple ID during setup. The standard iCloud service is free, and upgrading to additional space is a breeze if you decide you like the service benefits.
Have your Mail settings handy. If you set up your iCloud account, you can set up your
@icloud.com address without any bother — again, this feature is a good thing. Mavericks will
Chapter 2: Navigating and Running
Programs
In This Chapter
Restarting, sleeping, and shutting down OS X Using windows
As the folks in Cupertino will tell you, “It’s all about the graphics.” And they’re right, of course. OS X is a highly visual operating system, and using it without a mouse, trackball, or trackpad is like building Hoover Dam with a pocketknife. (And not a particularly sharp pocketknife, either.) Therefore, most of this chapter requires you to firmly grasp the little rodent, roll the ball, or finesse a trackpad. I introduce you to little graphical bits such as icons and menus, and you discover how to open windows that can display anything from the contents of a document to the contents of your hard drive.
On the other hand, any true Macintosh power user will tell you that the keyboard is still a useful piece of hardware. Because I want you to be a bona fide, well-rounded OS X power user, I also demonstrate the key combinations that can save you time, effort, and possible tennis elbow from all that mouse-wrangling.
Finally, I lead you through the basic training that you need to run your programs: how to start them, how to open and save documents, and how to quit an application as gracefully as Fred Astaire on his best day.
Restarting, Sleeping, and Shutting Down
First things first. As the guy on the rocket sled probably yelled, “This is neat, but how do you stop it?” Call ’em The Big Four — Sleep, Restart, Shut Down, and Log Out are the OS X commands that you use when you need to take care of business away from your computer. All four appear on the friendly Apple menu ( ) at the top-left corner of your Desktop (as shown in friendly Figure 2-1).
Sleep: You don’t need a glass of water or a bedtime story when you put OS X to Sleep, which is a power-saving mode that allows you to quickly return to your work later. (Waking your computer up from Sleep mode is much faster than booting or restarting it, and Sleep mode can conserve battery power on laptops.) Depending on the settings that you choose in System Preferences — which I discuss in Book II, Chapter 3 — your Mac can power-down the monitor and spin-down the hard drives to save wear and tear on your hardware. You can set OS X to automatically enter Sleep mode after a certain amount of mouse and keyboard
inactivity.
To awaken your slumbering supercomputer, just click the mouse or press any key on the
keyboard. MacBook owners can put their laptops to sleep by simply closing the computer; they can wake the beast by opening it back up again.
Figure 2-1: Choose your path from the Apple menu.
The Power Nap feature in Mavericks allows your Mac to take care of business, even while it’s in Sleep mode, because system updates are downloaded, iCloud data and documents are
synchronized, and Time Machine continues to back up your hard drive.
Restart: Use Restart if your Mac has suddenly decided to work “outside the box” and begins acting strangely — for instance, if your Universal Serial Bus (USB) ports suddenly lock up, or your Thunderbolt external hard drive no longer responds. First save any work that’s open (unless your computer has locked up altogether). You also elect to restart OS X when you switch startup volumes or switch your Mac to a Windows partition using Boot Camp. (Hint:
Some applications and Apple software updates require a restart after you install them.)
Shut Down: When you’re ready to return to the humdrum real world and you’re done with your Mac for the time being, use the Shut Down option. Many Mac applications automatically
prompt you to save any changes that you’ve made to open documents before the computer turns itself off. You can shut down OS X from the login screen as well.
you can press to display a dialog with Sleep, Restart, and Shut Down buttons. If you change your mind and decide to tie up loose ends before you leave, click the Cancel button to return to OS X.
The Resume feature comes into play when you log out, restart, or shut down your Mac. Select the Reopen Windows When Logging Back In check box (as shown in Figure 2-2), and Mavericks automatically restores the state of your Desktop the next time you turn on your Mac, including all your open windows and selections! Resume also works with individual applications. For example, when you quit Preview, Mavericks saves the current state of that application’s workspace. When you launch Preview again, it displays the windows you were viewing, documents and all. (Note that an application has to be written specifically for OS X Lion or later to support Resume.)
Figure 2-2: Mavericks can reopen your windows for you.
We’re not finished just yet
Don’t forget the Log Out command (which you can find under the Apple menu, ) and the Fast User Switching menu (at the right side of the Finder menu).
Choose Log Out when you’re running your Mac with multiple users and you want to completely pass control over to another person. All your programs will quit, and the other person can take over by logging in with his or her account. OS X then reconfigures with the other user’s preferences.
If you’ve enabled Fast User Switching, another user can log in from the Fast User Switching menu. However, your applications don’t quit, you don’t have to formally log out, and you can take control back when the other user is finished. (Hence the words Fast and Switching in the name.) To turn on this feature, log in with an administrator account, display the Users & Groups pane in System Preferences, click Login Options, and then select the Show Fast User Switching Menu As check box. (More on Fast User Switching appears in Book II, Chapter 4.)
A Window Is Much More Than a Frame:
Navigating Windows
“And in the beginning, there was the window.” Like with older Mac OSes, most of what you’ll do in OS X occurs within these fancy frames. And, as you might imagine, a number of controls are at your disposal, which you can use to control the size, shape, and appearance of these potent portals. In this section, I — well, to be blunt, I do windows. (No squeegee jokes, if you please.)
Opening and closing windows
Windows are generally opened automatically by an application when you first run it, or it needs to display a document, or by OS X itself, such as when Finder opens a window to display the
contents of your hard drive. Finder, by the way, is the application that OS X runs to display the OS X menus and windows.
Some programs even let you open new windows on the fly; for example, Figure 2-3 shows a window in its purest form: a new Finder window. To display this window on your own Mac, choose File⇒New Finder Window or press +N. From here, you can reach your files on your
Mac or even venture to the Internet.
The Command ( ) key usually has both an Apple ( ) and a rather strange-looking symbol on it that I often call the Spirograph. (I’m told others have called it rather Celtic, but it’s actually a Scandinavian character.)
When you’re finished with a document or you no longer need a window open, close it to free that space on your Desktop. To close a window in OS X, move your cursor over the Close button; it’s the red circular button at the top-left corner of the window (refer to Figure 2-3). An X appears on the button when you’re in the zone. When the X appears, just click.
Figure 2-3: You’re ready to navigate with this Finder window.
If your Mac is equipped with a Magic Trackpad, never use any object other than your finger on the trackpad! That means no pencils (no, not even the eraser end), pens, or
chopsticks; they can damage your trackpad in no time at all. And no, that doesn’t bode well for ladies with long fingernails.
Most Mac applications don’t want you closing a window willy-nilly if you’ve changed the contents without saving them. For example, try to close a document window in Word without saving the file first. The program asks you for confirmation before it closes the window containing your Great American Novel. Most programs also have a Close command on their File menu.
(Here’s another indicator: Most programs display a black dot in the center of the program’s Close button to indicate that there are unsaved changes.)
To close all windows displayed by a particular program, hold down the Option key while you click the Close button on one of the windows. Whoosh! They’re all gone.
Scrolling windows
Often, more stuff is in a document or more files are on your hard drive than you can see in the space available for a window. Guess that means it’s time to delete stuff. No, no, just joking! You don’t have to take such drastic measures to see more in a window.
box and drag it. For the uninitiated, that means clicking the darker portion of the bar and holding down the mouse button while you move the mouse in the desired direction. Alternatively, you can click in the empty area above or below the scroll box to scroll pages one at a time.
Depending on the type of application that you’re using, you might be able to scroll a window with your arrow keys as well — or perhaps use the Page Up and Page Down keys to move through a window.
Minimizing and restoring windows
The multitalented Figure 2-4 also displays another control that you can use with a window: the Minimize button. When you minimize a window, you eliminate it from your Desktop and store it safely on the Dock — that strip of icons that appears along the bottom (or the side) of your OS X Desktop. A minimized window appears as a miniature icon on the Dock by default, so you can keep an eye on it (so to speak). Figure 2-5 illustrates a minimized window from Safari, which is displaying my website at www.mlcbooks.com. To minimize a window, move your mouse pointer
over the yellow Minimize button at the top-left corner of the window — a minus sign appears on the button — and then click.
Figure 2-4: You can use the scroll bars to boldly go — well — anywhere in a window.
You’re gonna love this “Easter egg” hidden in OS X. If you hold down the Shift key whilst you minimize, the window shrinks in cool slow motion. (Who says operating systems have to be totally serious, anyway?)
When you’re ready to display the window again on your Desktop — restoring the window — simply click the thumbnail icon representing the window on the Dock, and OS X automagically returns it to its former size and location.
By the way, some — note that I said some — applications continue to run when minimized,
whereas others simply stop or pause until you return them to the Desktop. Such is the crazy world we live in.
Doing the full-screen dance
Mavericks provides system-wide support for full-screen operation — that’s where a single application fills the entire screen, without displaying a window frame or traditional Finder menu bar.
The method you use to switch to full-screen mode varies depending on the application, so there’s no One Menu Command or One Keyboard Shortcut that will always do the deed. Most of the applications included with OS X Mavericks use View⇒Enter Full Screen, and many applications have a button you can click in the window to switch back and forth. You may also see a button with a double-diagonal arrowhead icon in the upper-right corner of the window. Finder windows can also be switched to full-screen mode in Mavericks, and if you’re using multiple monitors they can each be set to a different full-screen app!
So how do you switch between applications if they’re all in full-screen mode?
Move your cursor to the bottom of the screen to display the Dock, where you can click another application to switch to it.
Invoke Mission Control and choose another application from there. (More about Mission Control in this chapter.) If you’re working with a MacBook with a trackpad, a Mac with a Magic Trackpad, or a Mac with a Magic Mouse, swipe
three fingers to the left or right across the surface of the pointing device.
From the keyboard, use the +Tab shortcut to cycle through the applications you have running.
Zooming windows
Zooming windows has a kind of Flash Gordon sound to it, don’t you think? It’s nothing quite that exciting — no red tights or laser guns — still, when you’re trying to view a larger portion of a document, zooming is a good thing because it expands the window to the maximum practical size for the application that you’re using (and the content being displayed). In some cases, zooming a window fills almost the entire screen; in others, the extra space would be wasted, so the
application zooms the window to the maximum size that shows as much content as possible (without any unnecessary white space). The Zoom button can even be disabled by an application that doesn’t want you to muck about with the window; for example, I own some games that don’t allow zooming.