•
including all the basic information you’ll want to know before you really dig in
• Shake hands with OS X — find out how to open and close windows, modify system preferences, use reminders and notes, and keep track of contacts
• Connect and communicate — use Safari to connect to the world, iCloud for personal storage, and discover tricks to become more efficient
• Live the iLife — dive into iTunes , iPhoto , iMovie , and GarageBand to express your creative side
• Get productive — explore desktop publishing, spreadsheets, presentations, and a whole lot more with the iWork productivity suite
• Under the hood — take care of housekeeping, troubleshooting, upgrading, and even find out how to run Windows on your iMac
iM
some fun with iLife
®•
Troubleshoot common issues
and keep your iMac happy
iMac
®
8th Edition
Making Everything E
asier!
Cheat Sheets include
• Checklists
• Charts
• Common Instructions
• And Other Good Stuff!
Get Smart at Dummies.com
Dummies.com makes your life easier with 1,000s
of answers on everything from removing wallpaper
to using the latest version of Windows.
Check out our
• Videos
• Illustrated Articles
• Step-by-Step Instructions
Plus, each month you can win valuable prizes by entering
our Dummies.com sweepstakes. *
Want a weekly dose of Dummies? Sign up for Newsletters on
• Digital Photography
• Microsoft Windows & Office
• Personal Finance & Investing
• Health & Wellness
• Computing, iPods & Cell Phones
• eBay
• Internet
• Food, Home & Garden
Find out “HOW” at Dummies.com
*Sweepstakes not currently available in all countries; visit Dummies.com for official rules.
To access the Cheat Sheet created specifically for this book, go to
www.dummies.com/cheatsheet/imac
iMac
®
8th Edition
No part of this publication may be reproduced, stored in a retrieval system or transmitted in any form or by any means, electronic, mechanical, photocopying, recording, scanning or otherwise, except as permitted under Sections 107 or 108 of the 1976 United States Copyright Act, without the prior written permission of the Publisher. Requests to the Publisher for permission should be addressed to the Permissions Department, John Wiley & Sons, Inc., 111 River Street, Hoboken, NJ 07030, (201) 748-6011, fax (201) 748-6008, or online at http://www.wiley.com/go/permissions.
Trademarks: Wiley, For Dummies, the Dummies Man logo, Dummies.com, Making Everything Easier, and related trade dress are trademarks or registered trademarks of John Wiley & Sons, Inc. and may not be used without written permission. iMac is a registered trademark of Apple, Inc. All other trademarks are the property of their respective owners. John Wiley & Sons, Inc. is not associated with any product or vendor mentioned in this book.
LIMIT OF LIABILITY/DISCLAIMER OF WARRANTY: THE PUBLISHER AND THE AUTHOR MAKE NO REPRESENTATIONS OR WARRANTIES WITH RESPECT TO THE ACCURACY OR COMPLETENESS OF THE CONTENTS OF THIS WORK AND SPECIFICALLY DISCLAIM ALL WARRANTIES, INCLUDING WITHOUT LIMITATION WARRANTIES OF FITNESS FOR A PARTICULAR PURPOSE. NO WARRANTY MAY BE CREATED OR EXTENDED BY SALES OR PROMOTIONAL MATERIALS. THE ADVICE AND STRATEGIES CONTAINED HEREIN MAY NOT BE SUITABLE FOR EVERY SITUATION. THIS WORK IS SOLD WITH THE UNDERSTANDING THAT THE PUBLISHER IS NOT ENGAGED IN RENDERING LEGAL, ACCOUNTING, OR OTHER PROFESSIONAL SERVICES. IF PROFESSIONAL ASSISTANCE IS REQUIRED, THE SERVICES OF A COMPETENT PROFESSIONAL PERSON SHOULD BE SOUGHT. NEITHER THE PUBLISHER NOR THE AUTHOR SHALL BE LIABLE FOR DAMAGES ARISING HEREFROM. THE FACT THAT AN ORGANIZATION OR WEBSITE IS REFERRED TO IN THIS WORK AS A CITATION AND/OR A POTENTIAL SOURCE OF FURTHER INFORMATION DOES NOT MEAN THAT THE AUTHOR OR THE PUBLISHER ENDORSES THE INFORMATION THE ORGANIZATION OR WEBSITE MAY PROVIDE OR RECOMMENDATIONS IT MAY MAKE. FURTHER, READERS SHOULD BE AWARE THAT INTERNET WEBSITES LISTED IN THIS WORK MAY HAVE CHANGED OR DISAPPEARED BETWEEN WHEN THIS WORK WAS WRITTEN AND WHEN IT IS READ.
For general information on our other products and services, please contact our Customer Care Department within the U.S. at 877-762-2974, outside the U.S. at 317-572-3993, or fax 317-572-4002. For technical support, please visit www.wiley.com/techsupport.
Wiley publishes in a variety of print and electronic formats and by print-on-demand. Some material included with standard print versions of this book may not be included in e-books or in print-on-demand. If this book refers to media such as a CD or DVD that is not included in the version you purchased, you may download this material at http://booksupport.wiley.com. For more information about Wiley products, visit www.wiley.com.
Library of Congress Control Number: 2013956847
ISBN 978-1-118-86237-7 (pbk); ISBN 978-1-118-86451-7 (ebk); ISBN 978-1-118-86452-4 (ebk) Manufactured in the United States of America
Table of Contents
Introduction ... 1
Foolish Assumptions ... 1
About This Book ... 2
Icons Used in This Book ... 3
Beyond the Book ... 4
Where to Go from Here ... 4
Part I: Know Your iMac ... 5
Chapter 1: Okay, This Machine Looks Really, Really Weird . . . . 7
An Introduction to the Beast ... 8
Major parts of your major appliance... 8
Important Hidden Stuff ... 12
Choosing a Home for Your New Pet ... 13
Picking the right location ... 14
Considering the convenience factor ... 15
Unpacking and Connecting ... 15
Unpacking your iMac For Dummies ... 15
Connecting cables like a true nerd ... 16
Discovering All the Cool Things You Can Do ... 18
What software do I get? ... 18
Looking forward to fun on the Internet ... 19
Applications that rock ... 19
Would you like to play a game?... 20
Stuff You Oughta Buy Right Now ... 21
Chapter 2: Life! Give My iMac Life! . . . . 23
Throwing the Big Leaf Switch ... 23
Mark’s Favorite Signs of a Healthy iMac ... 24
Harriet, It’s Already Asking Me Questions! ... 25
Setting up OS X Mavericks ... 25
Registering your iMac ... 27
Importing Documents and Data from Your Old Mac ... 27
Manually Importing Documents and Data from Windows ... 29
Chapter 3: Introducing the Apple of Your iMac . . . . 31
A Quick Tour of the Premises ... 31
The Mavericks built-in Help Center ... 38
The Apple web-based support center ... 38
Magazines ... 38
Mac support websites ... 39
Local Mac user groups ... 39
Part II: Shaking Hands with Mac OS X ... 41
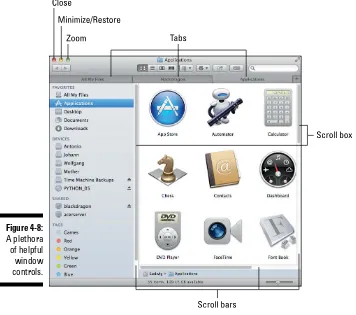
Chapter 4: Opening and Closing and Clicking and Such . . . . 43
Working within the Finder ... 43
Pointing in a Mac World ... 45
Launching and Quitting for the Lazy iMac Owner ... 48
Juggling Folders and Icons ... 51
A field observer’s guide to icons ... 51
Selecting items ... 53
Copying items ... 55
Moving things from place to place ... 56
Duplicating in a jiffy ... 56
Keys and Keyboard Shortcuts to Fame and Fortune ... 57
Special keys on the keyboard ... 57
Using Finder and application keyboard shortcuts ... 58
Performing Tricks with Finder Windows ... 59
Scrolling in and resizing windows ... 59
Minimizing and restoring windows ... 60
Moving and zooming windows ... 61
Closing windows ... 62
Using Finder Tabs ... 63
Chapter 5: A Plethora of Power ful Fun . . . . 65
Home, Sweet Home Folder ... 65
Arranging Your Desktop ... 68
Putting the Dock to the Test ... 69
Adding Dock icons ... 70
Removing Dock icons ... 71
Using Dock icon menus ... 71
What’s with the Trash? ... 72
Working Magic with Dashboard, Mission Control, and Spaces ... 73
Using Dashboard ... 73
Switching between apps with Mission Control ... 75
Switching between desktops with Spaces ... 76
Printing within OS X ... 77
Chapter 6: A Nerd’s Guide to System Preferences . . . . 81
A Not-So-Confusing Introduction ... 81
v
Table of Contents
Popular Preference Panes Explained ... 85
The Displays pane... 85
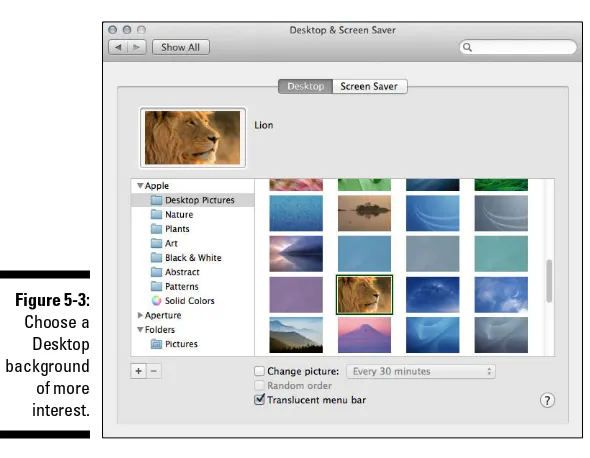
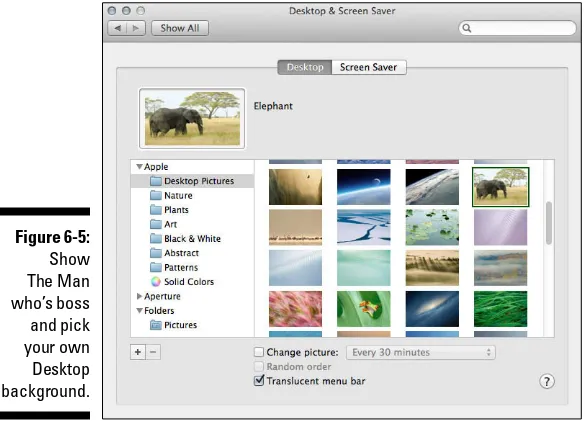
The Desktop & Screen Saver pane ... 86
The Mission Control pane... 88
The General pane ... 90
The Energy Saver pane... 91
The Dock pane... 92
The Sharing pane ... 93
The Time Machine pane ... 94
Chapter 7: Searching amidst iMac Chaos . . . . 97
Doing a Basic Search ... 97
How Cool Is That!? Discovering What Spotlight Can Do ... 100
Expanding Your Search Horizons ... 102
Customizing Spotlight to Your Taste ... 103
Chapter 8: Using Reminders, Notes, and Notifications . . . . 107
Remind Me to Use Reminders ... 107
Taking Notes the Mavericks Way ... 110
Staying Current with Notification Center ... 112
Chapter 9: Keeping Track with Contacts and Maps . . . . 115
Hey, Isn’t Contacts Just a Part of Mail? ... 116
Entering Contact Information ... 117
Using Contact Information ... 119
Arranging Your Contact Cards ... 121
Using Network Directories ... 123
Printing Contacts with Flair ... 124
Swapping Bytes with vCards ... 125
Introducing the Maps Window ... 125
Switching Views in Maps ... 128
Getting Directions over Yonder ... 129
Part III: Connecting and Communicating ... 131
Chapter 10: Going Places with Safari . . . . 133
Pretend You’ve Never Used This Thing ... 133
Visiting Websites ... 135
Navigating the Web ... 137
Setting Up Your Home Page ... 140
Adding and Using Bookmarks ... 141
Working with the Reading List and Shared Links ... 142
Protecting Your Privacy ... 147
Yes, there are such things as bad cookies ... 148
Cleaning your cache ... 149
Banishing pesky iCloud Keychain passwords ... 149
Handling ancient history ... 150
Setting notifications ... 150
Avoiding those @*!^%$ pop-up ads ... 151
Chapter 11: Expanding Your Horizons with iCloud . . . . 153
So How Does iCloud Work, Anyway? ... 153
Saving and Opening iCloud Documents ... 155
Configuring iCloud ... 156
Using Photo Booth ... 164
Conversing with FaceTime ... 166
Turning Your iMac into a TV — And More ... 168
Part IV: Living the iLife ... 171
Chapter 13: The Multimedia Joy of iTunes . . . . 173
What Can I Play on iTunes? ... 173
Playing an Audio CD ... 175
Playing Digital Audio and Video ... 177
Browsing the Library ... 179
Finding songs in your Music Library ... 180
Removing old music from the Library ... 181
Watching video ... 181
Keeping Slim Whitman and Slim Shady Apart: Organizing with Playlists ... 182
Know Your Songs ... 184
Setting the song information automatically ... 184
Setting or changing song information manually ... 185
Ripping Audio Files ... 186
Tweaking the Audio for Your Ears ... 187
A New Kind of Radio Station ... 188
Internet radio... 189
Tuning in your own stations ... 190
Radio stations in your playlists ... 191
Creating a custom iTunes Radio station ... 191
iTunes and iCloud Together ... 192
vii
Table of Contents
Sharing Media across a Network ... 194
Burning Music to Shiny Plastic Circles ... 195
Feasting on iTunes Visuals ... 196
Exercising Parental Authority ... 196
Buying Digital Media the Apple Way ... 198
Chapter 14: The Masterpiece That Is iPhoto . . . . 201
Delving into iPhoto ... 201
Working with Images in iPhoto ... 204
Import Images 101... 204
Organize mode: Organizing and sorting your images ... 206
Edit mode: Removing and fixing stuff the right way... 214
Producing Your Own Coffee-Table Masterpiece ... 218
Putting Photo Stream to Work ... 222
E-Mailing Photos to Aunt Mildred ... 223
Chapter 15: Making Film History with iMovie . . . . 225
Shaking Hands with the iMovie Window ... 226
A Bird’s-Eye View of Moviemaking ... 228
Importing the Building Blocks ... 229
Pulling in video clips ... 229
Making use of still images ... 231
Importing and adding audio from all sorts of places ... 232
Building the Cinematic Basics ... 235
Adding clips to your movie ... 235
Marking clips ... 236
Removing clips from your movie ... 236
Reordering clips in your movie ... 237
Editing clips in iMovie ... 237
Transitions for the masses ... 238
Even Gone with the Wind had titles ... 239
Adding maps and backgrounds ... 240
Creating an Honest-to-Goodness Movie Trailer ... 241
Sharing Your Finished Classic with Others ... 243
Chapter 16: Recording Your Hits with GarageBand . . . . 245
Shaking Hands with Your Band ... 246
Composing Made Easy ... 248
Adding tracks ... 249
Choosing loops ... 251
Resizing, repeating, and moving loops ... 254
Using the Arrangement track ... 256
Tweaking the settings for a track... 257
Sharing Your Songs ... 259
and Other Tools ... 263
Chapter 17: Desktop Publishing with Pages . . . . 265
Creating a New Pages Document ... 265
Open an Existing Pages Document ... 266
Saving Your Work ... 267
Touring the Pages Window ... 268
Entering and Editing Text ... 269
Using Text and Graphics Boxes ... 269
The Three Amigos: Cut, Copy, and Paste ... 270
Cutting stuff ... 270
Copying text and images ... 270
Pasting from the Clipboard ... 270
Formatting Text the Easy Way ... 271
Adding a Spiffy Table ... 271
Adding Alluring Photos ... 273
Adding a Background Shape ... 274
Are You Sure about That Spelling? ... 274
Printing Your Pages Documents ... 275
Sharing That Poster with Others ... 276
Chapter 18: Creating Spreadsheets with Numbers . . . . 277
Before You Launch Numbers . . . ... 277
Creating a New Numbers Document ... 278
Opening an Existing Spreadsheet File ... 279
Save Those Spreadsheets! ... 280
Exploring the Numbers Window ... 281
Navigating and Selecting Cells in a Spreadsheet ... 282
Entering and Editing Data in a Spreadsheet ... 283
Selecting the Correct Number Format ... 283
Aligning Cell Text Just So ... 284
Formatting with Shading ... 285
Inserting and Deleting Rows and Columns ... 286
The Formula Is Your Friend ... 287
Adding Visual Punch with a Chart ... 289
Chapter 19: Building Presentations with Keynote . . . . 291
Creating a New Keynote Project ... 292
Opening a Keynote Presentation ... 293
Saving Your Presentation ... 293
Putting Keynote to Work ... 294
Adding Slides ... 295
Working with Text and Graphics Boxes ... 296
Adding and Editing Slide Text ... 297
ix
Table of Contents
Using Presenter’s Notes in Your Project ... 298
Every Good Presentation Needs Media ... 298
Adding a Background Shape ... 299
Creating Your Keynote Slideshow ... 300
Printing Your Slides and Notes ... 301
Chapter 20: Creating a Multiuser iMac . . . . 303
Once Upon a Time (An Access Fairy Tale) ... 303
Big-Shot Administrator Stuff ... 304
Deciding who needs what access ... 305
Adding users ... 306
Modifying user accounts ... 309
I banish thee, Mischievous User! ... 310
Setting up Login Items and Parental Controls... 311
Multiuser Rules for Everyone ... 317
Logging on and off in Mavericks For Dummies ... 317
Interesting stuff about sharing stuff ... 320
Encrypting your hard drive can be fun ... 320
Chapter 21: Building (Or Joining) a Network . . . . 323
What, Exactly, Is the Network Advantage? ... 324
The Great Debate: Wired versus Wireless ... 325
Sharing Internet Access ... 326
Using your iMac as a sharing device ... 326
Using a dedicated Internet sharing device ... 327
What Do You Need to Connect? ... 328
Wireless connections ... 329
Wired connections ... 334
Connecting to the Network ... 337
Sharing stuff nicely with others ... 337
USE YOUR FIREWALL! ... 339
Part VI: The Necessary Evils: Troubleshooting,
Upgrading, Maintaining ... 343
Chapter 22: It Just . . . Sits . . . There . . . . 345
Can You Troubleshoot? Yes, You Can! ... 345
Basic Troubleshooting 101 ... 346
The Number One Rule: Reboot! ... 346
Special keys that can come in handy ... 348
All hail Disk Utility, the troubleshooter’s friend ... 349
Mark’s iMac Troubleshooting Tree ... 353
More Memory Will Help ... 360
Figuring out how much memory you have ... 360
Installing memory modules ... 362
Can I Upgrade My Hard Drive? ... 365
Consider your external options ... 366
Gotta have internal ... 368
Weighing Attractive Add-Ons ... 368
Game controllers ... 368
Hard drive arrays ... 369
Video controllers ... 369
Audio hardware... 369
Chapter 24: Tackling the Housekeeping . . . . 371
Cleaning Unseemly Data Deposits ... 371
Getting dirty (or, cleaning things the manual way) ... 372
Using a commercial cleanup tool... 374
Backing Up Your Treasure ... 374
Saving Files ... 375
Backing up to an external hard drive ... 375
Backing up to CD and DVD ... 375
Putting Things Right with Time Machine ... 376
Maintaining Hard Drive Health ... 378
Automating Those Mundane Chores ... 379
Creating an application in Automator ... 380
Running applications at startup... 382
Updating OS X Automatically ... 382
Part VII: The Part of Tens ... 385
Chapter 25: Ten Ways to Speed Up Your iMac . . . . 387
Nothing Works Like a Shot of Memory ... 387
Hold a Conversation with Your iMac ... 388
Vamoose, Unwanted Fragments! ... 388
Keep Your Desktop Background Simple ... 389
Column Mode Is for Power Users ... 389
Make the Dock Do Your Bidding ... 389
It All Started with Keyboard Shortcuts ... 390
Hey, You Tweaked Your Finder! ... 390
Keep in Touch with Your Recent Past ... 391
Go Where the Going Is Good ... 391
Chapter 26: Ten Things to Avoid Like the Plague . . . . 393
Keep Things Cool ... 394
Phishing Is No Phun ... 394
xi
Table of Contents
Do You Really Want a Submerged Keyboard? ... 395
Don’t Use Antiquated Utility Software ... 396
Don’t Endorse Software Piracy ... 396
Call It the Forbidden Account ... 396
Don’t Settle for a Surge Suppressor ... 397
Refurbished Hardware Is No Deal at All ... 397
iMacs Appreciate iCleanliness ... 398
Introduction
S
keptical about your new anodized aluminum iMac, with that super-charged Intel quad-core processor? Perhaps you’re thinking it’s too dog-gone thin, or you’re wondering where all the buttons are. Shouldn’t there be places to plug in cables?Ladies and gentlemen, I have great news for you: Not only did you make The Right Decision about which computer to buy — you shot a hole in one! The latest incarnation of the iMac has everything a computer power user could want: speed, the latest in hardware and standards, a top-of-the-line LED screen, and all the connectors you need to add just about any device meant for today’s computers.
I wrote this book especially for the proud Intel iMac owner who wants to make the most of this new stunning aluminum computer, so this book is a guide to both the iMac hardware and Mavericks, Apple’s superb OS X operat-ing system. I start by describoperat-ing the basics that every iMac owner should know. Then I move on to chapters devoted to the software that comes with your iMac. Along the way, you come across a generous sprinkling of power-user tips and tricks that save you time, effort, and money.
Foolish Assumptions
So who is the target audience for this book? As in past editions, I make no assumptions about your previous knowledge of computers and software. I figure you’ve either just bought a brand-new iMac or you’re considering buying one — perhaps you’ve found a great bargain on a gently-used older iMac model, and you’d like guidance as you learn the ropes. Those are the
owners of older iMac computers might not be able to follow along with every-thing I cover. However, if you’ve upgraded an older Intel iMac with OS X Mavericks (and the iLife and iWork application suites), you should be able to use most of the book with no problem.
About This Book
In writing about the iMac, I’ve kept one precept firmly in mind: OS X
Mavericks, the operating system you’ll run, is just as important as the actual iMac computer itself. Therefore, you’ll find that iMac For Dummies is just as much about familiarizing you with all the software you get as it is with intro-ducing you to hardware features like your keyboard and mouse. After all, it’s relatively easy to connect an entire forest of cables and turn on any new computer — what comes next is the challenging part!
As in my other For Dummies titles, I respect and use the same English lan-guage you do, avoiding jargon, ridiculous computer acronyms, and confusing techno-babble whenever possible.
If you’re upgrading from a PC running the Windows operating system, I’ve got tips, tricks, and entire sections devoted to those hardy pioneers called
Switchers! You’ll discover both the similarities and differences between the iMac running Mavericks and the PC running Windows. I also show you how to make the switch as easy and quick as possible.
A word about the conventions I use: Even with an absolute minimum of techno-speak, this book needs to cover the special keys that you have to press or menu commands that you have to choose to make things work. Therefore, please keep this short list of conventions in mind as you read:
✓ Stuff you type: If I ask you to type (or enter) something, such as in a text box or field, that text appears in bold, like this:
Type me.
If I ask you to type a command within an application, that text appears like this (and note that you usually have to press the Return key before anything happens):
Type me.
✓ Menu commands: I list menu paths and commands using another format. For example, this instruction indicates that you should click the Edit menu and then choose the Copy menu item:
3
Introduction
✓ Web addresses: No up-to-date book on a computer would be complete without a bag full of web addresses for you to check out. When you see these in the text, they look like this: www.mlcbooks.com.
✓ For the technically curious: Tangential techy stuff is presented in side-bars, and you don’t have to read them unless you want to know what makes things tick.
Icons Used in This Book
Like other technology authors, I firmly believe that important nuggets of wisdom should stand out on the page! With that in mind, this For Dummies
book includes a number of margin icons for certain situations:
This is the most popular icon in the book, and you find it parked next to sug-gestions that I make to save you time and effort (and even cash!).
You don’t have to know this stuff, but the technologically curious love high-tech details. (Of course, we’re great fun at parties, too.)
Alwaysread the information before you take action! I’m discussing some-thing that could actually harm your hardware or throw a plumber’s helper into your software.
Consider these nuggets to be highlighter stuff — not quite as universally accepted (or as important to the author) as a Mark’s Maxim (described next), but good reminders nonetheless. I use these icons to reinforce what you should remember.
Beyond the Book
Thanks to my good friends at Wiley, there’s a ton of extra content to accom-pany this book that you won’t find between the covers! Fire up your Safari browser and go online to find the following:
✓ Cheat Sheet: I’ve created a number of Cheat Sheet pages that cover things like common keystrokes and maintenance procedures that every iMac owner should follow on a regular basis, and you’ll find them on the web at www.dummies.com/cheatsheet/imac.
✓ Dummies.com online articles: At the beginning of each major section of the book, you’ll find links to Dummies.com and articles that extend the content covered in this book. This additional content includes all sorts of different topics: tips on network troubleshooting, a discussion of the Unix foundation that supports OS X, information on managing and expanding your iCloud storage, and even my history of Data Elves! (You’ll have to read online to learn more about the Elves.) These articles appear on the book’s Extras page (www.dummies.com/extras/imac).
✓ Bonus Chapters: If you’re dying to find out how to share data among wireless devices via Bluetooth technology, check out the handy Bluetooth bonus chapter at the Wiley website (www.dummies.com/ extras/imac) as well as at my website (www.mlcbooks.com). You’ll also find a spiffy bonus chapter dedicated to running Windows on your iMac using Boot Camp!
✓ Updates to this book, if we have any, are at
www.dummies.com/extras/imac
Where to Go from Here
Part I
✓ Unpack and set up your iMac The Right Way
✓ Check your iMac for shipping damage and proper operation
Chapter 1
Okay, This Machine Looks
Really, Really Weird
In This Chapter
▶ Identifying the important parts of your iMac ▶ Locating the right home for your computer ▶ Plugging stuff in and getting hooked up ▶ Playing with your bundled software ▶ Buying additional stuff that you might need
Y
ou bought a brand-new iMac, and there it sits, in the box. Waiting. Waiting for you.If you’re a little nervous about unpacking that shiny aluminum and glass rect-angle, I completely understand. Face it: The latest iMac follows in the footsteps of many revolutionary iMac designs that have come before it. In other words, it doesn’t look like a computer at all, and that can be a bit disconcerting. And if you’re switching from a Windows PC to the Apple universe, you might find yourself floating weightlessly in your office or your living room without a familiar bulky PC case to anchor yourself. Hence, the reluctance you might be feeling. However, dear reader, let me assure you that you’ve indeed made The Right Choice. I commend you! Today’s Intel iMac is the fastest, leanest, and easiest-to-use self-contained all-in-one computer ever built. Practically everything’s in one shining panel (except for your keyboard and mouse). You’ve got one of the best backlit LED screens on the planet, a super-fast processor, room for a ton of RAM (memory), and a regular laundry list of the latest technology. Best of all, you don’t have to be a techno-nerd to use all that power!
An Introduction to the Beast
The Intel iMac might look like a sculpture straight out of a museum of modern art, but it still sports everything that it needs to function as a com-puter. In this section, I identify the important stuff that you need to live your life — you know, write a term paper in Pages, hear the music you down-loaded, or manage the affairs of those lazy Sims.
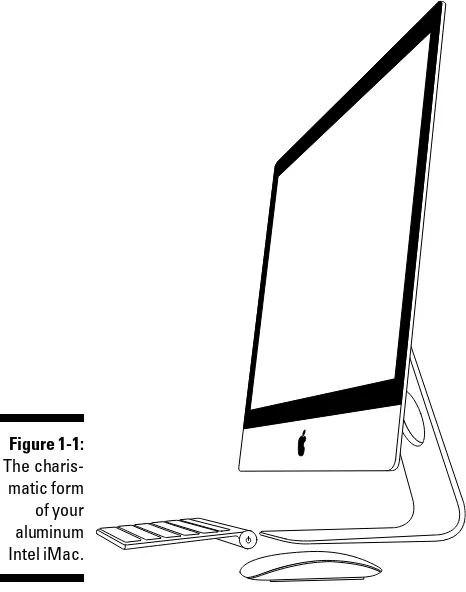
Major parts of your major appliance
Every computer requires some of the same gizmos. Figure 1-1 helps you track them down. Of course, as you’d expect, a computer has a “body” of sorts in which all the innards and brains are stored (the screen, in this case), a dis-play screen, a keyboard, a mouse/pointing device, and ports for powering and exchanging data with peripherals.
9
Chapter 1: Okay, This Machine Looks Really, Really Weird
That magnificent screen
What a view you’ve got! An aluminum iMac is graced with either a 21.5" or 27" LED display, complete with backlighting for outstanding color and brightness. LED screens use far less electricity than their antique CRT ancestors, and they emit practically no radiation (less, in fact, than even the LCD screens Apple once used).
Both sizes of iMac screens offer a widescreen aspect ratio (the screen is con-siderably wider than it is tall), which augurs well for those who enjoy watching movies. (A favorite editor of mine loves it when I use the antique word augur,
meaning to predict or foretell.) For example, the 27" screen boasts a whopping 2560 x 1440 resolution.
That reminds me: Throw away your printed dictionary! You won’t need it because OS X Mavericks includes both a handy Dictionary widget and a fan-tastic Dictionary application! (Each one uses the Internet to retrieve defini-tions.) More on launching applications in Chapter 4, and I describe widgets in Chapter 5 . . . and yes, both do contain the word augur.
The keyboard and mouse
Hey, here’s something novel for the Intel iMac — something external (outside the computer’s case). Gotta have a keyboard and mouse, right? And you gotta love the options with iMac: You’ll go nomadic . . . um, that is, wireless and free. The iMac comes standard with a truly 21st century combo of an Apple wire-less keyboard and either a Magic Mouse or a Magic Trackpad! This dynamic duo lets you sit back and relax with your keyboard in your lap, without being tied down by a cord. (Say it with me: “Death to cords, death to cords.”) Just stay within about 30 feet of your iMac screen, and sweet freedom is yours. You can also feel safe using these wireless peripherals because they offer secure 128-bit, over-the-air encryption, which helps keep sensitive information safe while you type and click away. One downside of the wireless keyboard, though: Unlike older wired keyboards, the wireless model doesn’t include any USB ports, and you will need a supply of batteries. (Go rechargeable!)
The keyboard layout is a particular favorite of mine because from here
✓ You can either control the sound volume (using the volume control buttons F11 and F12) or mute all that noise completely (using the Mute button F10).
these machines, don’t drive yourself batty looking for a disc slot!
Both the wireless Magic Mouse and Magic Trackpad need a flat surface, but that’s what TV trays are for, right?
Yes, your computer has a foot . . . just one
You and I — normal human beings — would say that the iMac is supported by a sturdy aluminum stand, but Apple calls it a foot. The foot lets you tilt the iMac panel up and down for the best viewing angle. Most important, though, the foot minimizes the computer’s desk space requirements (or its footprint). (Engineers . . . sheesh.) And yes, that foot is perfectly balanced and quite stable, so there’s no danger of your treasured iMac taking a dive.
If you decide to get really snazzy and mount your 27" iMac to the wall, you can remove the foot and install the VESA mounting adapter (available sepa-rately for about $40). You can use any VESA standard mounting bracket on your wall, too. You can be positioned within 30 feet or so of your wall-mounted iMac with a wireless Apple keyboard and mouse (or trackpad). Hey, Hewlett-Packard or Dell, can you mount one of those monolithic desktop PCs to the wall? I think not.
Food for your ears
A machine this nice had better have great sound, and the iMac doesn’t disap-point. You have a couple of options for iMac audio:
✓ The iMac sports built-in stereo speakers (and a microphone to boot).
✓ Built-in ports connect your iMac audio to either
• More powerful (and more expensive) external speaker systems • A set of headphones (including the Apple iPhone headset) • A home stereo system
The power cable
Sorry, but you can’t get a wireless power system . . . yet. (Apple’s working hard on that one.) With the wireless keyboard and mouse/trackpad setup, though, the power cable is actually the only required cable that you need to run your computer! Now that’s sassy.
The power button
11
Chapter 1: Okay, This Machine Looks Really, Really Weird
Those holes are called ports
Our next stop on your tour of Planet iMac is Port Central — that row of holes on the back of your computer (see Figure 1-2). Each port connects a different type of cable or device, allowing you to easily add all sorts of extra function-ality to your computer.
Figure 1-2: Only slightly less sexy — it’s the back end of an iMac.
One of the holes is an exception to the Rule of Ports: The iMac’s SDXC card slot accepts the same type of SD memory cards as most of today’s digital cameras and video cameras. (In other words, that hole is not for connecting a cable; you insert the card instead.) The SDXC slot appears as a tiny vertical slot.
Each of these stellar holes is identified by an icon. Here’s a list of what you’ll find as well as a quick rundown on what these ports do:
✓ USB: Short for Universal Serial Bus, the familiar USB port is the jack-of-all-trades in today’s world of computer add-ons. Most external devices (such as portable hard drives, scanners, or digital cameras) that you want to connect to your iMac use a USB port. The current iMac sports four USB 3.0 ports on its back. USB 3.0 connections are much faster than the old USB 2.0 standard, but you can still use your USB 2.0 devices with the faster ports (at the slower speed, of course).
upcom-it’s ready to join your existing wired Ethernet network. (Alternatively, you can go wireless for your network connection; find more on that in the next section and in Chapter 21.)
Apple doesn’t include a built-in modem on the iMac, so if you need a dialup connection to the Internet, you need an external 56K v.92 USB modem that’s compatible with OS X Mavericks (version 10.9).
✓ Thunderbolt: Yes, I know, it’s a dumb name, but it really is that fast. Thunderbolt ports offer the absolute speediest connection between external devices and your iMac, including the fastest (and most expen-sive) external hard drives and storage systems. Thunderbolt’s appeal doesn’t end there, though: In case that splendid screen isn’t quite big enough, you can add an adapter or cable to this port and send the video signal from your iMac to an Apple Thunderbolt monitor, a standard LCD/ LED monitor, or a flat-screen TV. (Apple also offers different adapters that can connect your iMac to standard VGA monitors and projectors.) All iMac models sport two Thunderbolt ports.
Connections for external audio
Your iMac comes equipped with two pretty powerful stereo speakers on the bottom of the case, but you’re certainly not limited to them. Apple provides an Audio Line Out jack, allowing you to send the high-quality audio from your rectangular beast to a set of standard headphones or to an optical digital audio device, such as a high-end home theater system. (Unlike older iMac models, note that the newest iMac has no audio Line In jack.)
You can also connect Mavericks-compatible USB speakers to your iMac.
Important Hidden Stuff
When you bought your new digital pride and joy, you probably noticed a number of subtle differences between the low-end iMac and the über-expen-sive top-end model. I call these differences the Important Hidden Stuff (or IHS, in case you’re addicted to acronyms), and they’re just as important as the parts and ports that you can see:
13
Chapter 1: Okay, This Machine Looks Really, Really Weird
As I type these words, the iMac product line offers a number of different storage capacities, depending on the processor speed and screen size you choose: anywhere from a standard 1TB SATA drive to an immense 3TB Fusion Drive. (Yes, friends and neighbors, TB means terabyte, or 1,000GB.) The bigger, the better. Alternatively, you can opt for anywhere from 256GB to 1TB of flash storage instead. (Remember, though, that the iMac has room for only one internal drive.)
✓ Wireless Ethernet: “Look, Ma, no wires!” As I mention earlier, your iMac can join an existing wireless Ethernet network with its built-in wireless hard-ware. With wireless connectivity, you can share documents with another computer in another room, share a single high-speed Internet connection amongst several computers, or enjoy wireless printing. Truly sassy!
Although Apple would want you to build your wireless wonderland with an Apple AirPort Extreme Base Station or a Time Capsule unit — go
figure — you can actually use your iMac with any standard 802.11g, 802.11n, or 802.11ac wireless network. And yes, PCs and Macs can intermingle on the same wireless network without a hitch. (Scandalous, ain’t it?)
✓ Bluetooth: Let’s get the old “digital pirate” joke out of the way: “Arrgg, matey, I needs me a wireless parrot.” (Engineers again . . . sheesh.) Although strangely named, Bluetooth is actually another form of wire-less connectivity. This time, however, the standard was designed for accessories like your keyboard and mouse, and devices like your tablet and smartphone. Bluetooth is built into every Intel iMac.
✓ SDXC card slot: As I mention earlier, this slot allows your iMac to read photos and video directly from standard SD memory cards — photo-graphers and video junkies, rejoice!
✓ FaceTime HD camera: The iMac built-in video and still camera appears as a tiny lens and activity light at the top of your computer.
✓ Video card: If your applications rely heavily on high-speed 3D graphics, you’ll be pleased as punch to find that your iMac comes equipped with either Intel Iris Pro or NVIDIA GeForce graphics hardware. The three high-end NVIDIA GeForce cards are well suited for 3D modeling, video editing, and, well, honestly, blasting the enemy into small, smoking pieces with aplomb.
Choosing a Home for Your New Pet
Picking the right location
You know the mantra: Location, location, location.
✓ There’s always the wall. Your iMac can disguise itself as a particularly interesting digital picture frame. With the right mounting adapter, you can hang your computer right on the wall and snub your desk altogether. This wall-mounted solution has three big problems:
• Your VESA mounting plate must be installed safely and correctly
(for example, using the studs within your walls).
The iMac is slim and trim, but it’s no lightweight, and it doesn’t bounce well. You don’t want it to take a high dive!
• You may have to remove your iMac from the wall mount to connect
or disconnect cables from the ports on the back.
• External peripherals aren’t happy campers, that includes any
Thunderbolt and USB devices, which must either camp out on the floor or on a nearby (and conspicuous) shelf. (Personally, I think the cables for external devices tend to spoil the appearance of a wall-mounted computer, so if you’re using a wall mount, I recom-mend using an AirPort Time Capsule device for your backups!) Your iMac must be mounted at the proper height on the wall. It’s not
good ergonomic practice to sit more than two feet away from your iMac screen, and the screen should be placed at (or slightly below) eye level. My solution? Don’t plan on using any external devices. Instead, opt for
a wireless network with a remote printer and remote backup storage space, like a Time Capsule unit on your network.
✓ Keep things cool. Your new iMac is nearly silent, but that super-fast Intel quad-core processor generates quite a bit of heat. Fans inside the case draw the heat away. (Nothing like an overheated processor to spoil an evening of BioShock Infinite.)
Follow these three rules to keep your cool. Make sure that
• The location you choose is far from heating vents. • The location you choose is shielded from direct sunlight.
• You allow plenty of room below the machine (where the air enters
the case) and above the machine (where heated air escapes from the slot at the top of the case).
15
Chapter 1: Okay, This Machine Looks Really, Really Weird
Considering the convenience factor
Technology is nothing if you can’t make it convenient:
✓ Outlets, outlets, outlets! Your computer needs a minimum of at least one nearby outlet, and perhaps as many as three or four:
• A standard AC outlet
I discuss surge protectors and uninterruptible power supplies (UPS) at the end of this chapter.
• A telephone jack (if you use a Mavericks-compatible external USB modem for connecting to the Internet or sending and receiving faxes)
• A nearby Ethernet jack (if you use the iMac’s built-in Ethernet port for connecting to a wired Ethernet network)
If you prefer to send your data over the airwaves, consider using wireless networking for your iMac. I discuss everything you need to know about wireless networking in Chapter 21.
✓ Don’t forget the lighting. Let me act as your mom. (I know that’s a stretch, but bear with me.) She’d say, “You can’t possibly expect to work without decent lighting! You’ll go blind!” She’s right, you know. At a mini-mum, you need a desk or floor lamp.
✓ Plan to expand. If your iMac hangs out on a desk, allow an additional foot of space on each side. That way, you have space for external periph-erals and more powerful speakers.
Unpacking and Connecting
You are going to love this section. It’s short and sweet because the installa-tion of an aluminum iMac on your desktop is a piece of cake. (Sorry about the cliché overload, but this really is easy.)
Unpacking your iMac For Dummies
Follow these guidelines when unpacking your system:
✓ Search for all the parts. When you’re removing those chunks o’ foam, make certain that you check all sides of each foam block for parts that are snuggled therein or taped for shipment.
✓ Keep all those packing materials. Do not head for the trash can with that box and those packing materials. Keep your box intact, complete with all the packing materials, for at least a year until your standard Apple warranty runs out. If you have to ship it to an Apple Service Center, the box with the original packing is the only way for your iMac to fly.
And now, a dramatic Mark’s Maxim about cardboard containers: Smart computer owners keep their boxes far longer than a year.
For example, if you sell your iMac or move across the country, you’ll want that box. Trust me on this one.
✓ Store the invoice for safekeeping. Your invoice is a valuable piece of paper indeed.
Save your original invoice in a plastic bag, along with your computer’s manuals and original software, manuals, and other assorted hoo-hah. Keep the bag on your shelf or stored safely in your desk, and enjoy a little peace of mind.
✓ Read the iMac manual. “Hey, wait a minute, Mark — why do I have to read the manual from Apple along with this tome?” Good question, and here’s the answer: There might be new and updated instructions in the documentation from Apple that override what I tell you in this book. (For example, “Never cut the red wire. Cut the blue wire instead.” Or something to that effect.)
Besides, Apple manuals are rarely thicker than a restaurant menu.
Connecting cables like a true nerd
The iMac makes all its connections really simple, but your computer depends on you to place the outside wires and thingamabobs where they go.
Absolutely essential connections
17
Chapter 1: Okay, This Machine Looks Really, Really Weird
Apple has already installed your batteries in your wireless keyboard and mouse (or trackpad). How thoughtful! If you ordered your iMac with a wired Apple keyboard, of course, you have no batteries to worry about at all.
Adding the Internet to the mix
If you have Internet access or a local computer network, you need to make at least one of the following connections.
If you don’t already have any Internet service, you may want to start with local dialup Internet access (assuming that you have an external USB modem for your iMac; see the next section). If you decide to investigate your high-speed options immediately, your local cable and telephone companies can provide you more information on cable or DSL Internet service.
Dialup Internet access
If you get on the Internet by dialing a standard phone number, you’ll need an external USB modem that’s compatible with OS X 10.9 to connect your iMac. Follow these steps:
1. Plug your external USB modem into one of the USB ports on the back of your iMac.
2. Plug one of the telephone cable’s connectors into your modem’s line port.
3. Plug the other telephone cable connector into your telephone line’s wall jack.
Networks and high-speed Internet access
If you have high-speed Internet service, or if you’re in an office or school with a local computer network, you can probably connect through the iMac’s built-in Ethernet port. You make two connections:
1. Plug one end of the Ethernet cable into the Ethernet port on the iMac. 2. Plug the other end of the Ethernet cable into the Ethernet port from
your network.
It’s probably one of the following:
• An Ethernet wall jack • An Ethernet switch
• A cable or DSL Internet router (or sharing device)
Discovering All the Cool
Things You Can Do
This section answers the most common of all novice computer questions: “What the heck will I do with this thing?” You find additional details and excit-ing factoids about the software that you get for free, software you’ll want to buy, and stuff you can do on the Internet.
What software do I get?
Currently, all iMac computers ship with these major software applications installed and ready to use:
✓ The iLife suite: You know you want these applications! They turn your iMac into a digital hub for practically every kind of high-tech device on the planet, including DV camcorders, digital cameras, portable music players, tablets, and even smartphones.
Chapters 13–16 of this book focus on the four major applications that make up iLife: iTunes, iPhoto, iMovie, and GarageBand.
✓ The iWork suite: Apple’s powerful office productivity suite can be down-loaded for free from the App Store. You can create documents, spread-sheets, and presentations within Pages, Numbers, and Keynote. It’s much like that Other Office Suite from those guys in Redmond. Figure 1-3 illustrates a flyer under construction in Pages.
19
Chapter 1: Okay, This Machine Looks Really, Really Weird
The installed software on your iMac might change as new programs become available.
Looking forward to fun on the Internet
What is a modern computer without the Internet? Apple gives you great tools to take full advantage of every road sign and off ramp on the Information Superhighway, right out of the box:
✓ Web surfing: I use the Safari web browser every single day. It’s faster and better designed than other browsers (although I might be biased). Safari includes tabbed browsing and offers shared bookmarks through iCloud. If tabbed browsing and shared bookmarks sound like ancient Aztec to
you, don’t worry. Chapter 10 is devoted entirely to Safari.
✓ Web searches: Your Dashboard widgets can search the entire Internet for stocks, movie listings, business locations, and dictionaries.
✓ FaceTime: You can videoconference with someone using another Mac, or even with those using iOS devices like the iPhone 4 (or later) and the iPad. You’ll find more on FaceTime in Chapter 12.
✓ Messages:Messages lets you use your iMac to chat with others around the world for free via the Internet — by keyboard, voice, or (with your iMac’s built-in FaceTime HD web camera) full-color video. This is awesome stuff straight out of Dick Tracy and Buck Rogers. If you’ve never seen a video chat, you’ll be surprised by just how good your friends and family look! Always wear a shirt when videoconferencing.
✓ E-mail: Soldier, Apple’s got you covered. The Mail application is a full-featured e-mail system, complete with defenses against the torrent of junk mail awaiting you. (Imagine a hungry digital saber-toothed tiger with an appetite for spam.) Send pictures and attached files to everyone else on the planet, and look doggone good doing it.
Applications that rock
Dozens of useful applications are included with OS X. I mention the most important of them in later chapters, but here are three good examples to whet your appetite:
Figure 1-4: Hey, isn’t that Calendar running on your iMac? You are iTogether!
✓ DVD Player: Got an external optical drive for your iMac? Put all that widescreen beauty to work and watch your favorite DVD movies with DVD Player! You have all the features of today’s most expensive stand-alone DVD players, too, including a spiffy onscreen control that looks like a remote.
✓ Contacts: Throw away that well-thumbed collection of fading addresses. The OS X Contacts application can store, search, and recall just about any piece of information on your friends, family, and acquaintances. You can use the data you store in your Contacts in other Apple
applica-tions that are included with Mavericks, such as Apple Mail and Messages.
Would you like to play a game?
21
Chapter 1: Okay, This Machine Looks Really, Really Weird
Stuff You Oughta Buy Right Now
No man is an island, and no computer is, either. I always recommend the same set of stuff for new PC and Mac owners. These extras help keep your new computer clean and healthy (and some make sure you’re happy as well):
✓ Surge suppressor or uninterruptible power supply (UPS): Even an all-in-one computer like your iMac can fall prey to a power surge. I recom-mend one of these:
• A basic surge suppressor with a fuse can help protect your iMac from an overload.
• A UPS costs a little more, but it does a better job of filtering your AC line voltage to prevent brownouts or line interference from reaching your computer.
A UPS also provides a few minutes of battery power during a black-out so that you can save your documents and safely shut down your iMac.
✓ Screen wipes: Invest in a box of premoistened screen wipes. Your iMac’s screen can pick up dirt, fingerprints, and other unmentionables faster than you think.
Make sure your wipes are especially meant for flat-panel monitors or laptop computer screens.
✓ Blank CDs and DVDs: Most folks still consider an optical drive impor-tant, so if you’ll miss watching DVD movies and importing/recording audio CDs, I’ll bet you’ve already bought one. Depending on the type of media you’re recording — like computer data CDs, DVD movies, or audio CDs — you’ll want blank discs for
• CD-R (record once)
• CD-RW (record multiple times) • DVD-R (record once)
• DVD-RW (record multiple times)
✓ Cables: Depending on the external devices and wired network connec-tivity you’ll be using, these are
• A standard Ethernet cable (for wired networks or high-speed
Internet)
with their products, but there are exceptions, especially USB printers.
Shame on those cheapskates!
Chapter 2
Life! Give My iMac Life!
In This Chapter
▶ Turning on your iMac
▶ Checking your iMac for proper operation ▶ Setting up OS X Mavericks
▶ Registering your iMac ▶ Using Migration Assistant
▶ Copying information from a Windows PC
I
f you’ve already been through Chapter 1, you got as far as unpacking your iMac and connecting at least one cable to it. And unless you bought this computer solely as a work of modern art, it’s time to actually turn on your iMac and begin living The Good iLife. (Plus you still get to admire that Apple design whilst using iTunes.) After you get your new beauty powered on, I help you here with an initial checkup on your iMac’s health.I also familiarize you with the initial chores that you need to complete — such as using OS X Setup as well as moving the data and settings from your existing computer to your iMac — before you settle in with your favorite applications. In this chapter, I assume that OS X Mavericks (version 10.9) was preinstalled on your iMac or that you just completed an upgrade to Mavericks. (If you’re upgrad-ing, your iMac is already turned on — and you can skip the next section!)
Throwing the Big Leaf Switch
imme-sometimes just doesn’t do it. Instead, you actually have to hold down the button for a count of two or so before the computer turns on.
While the Apple logo appears, you see a twirling, circular high-tech progress indicator appear that looks like something from a Star Wars movie. That’s the sign that your iMac is loading Mavericks. Sometimes the twirling circle can take a bit longer to disappear. As long as it’s twirling, though, something good is happening — after all, Mavericks has to load file sharing, networking, and printing components (and such).
At last, your patience of a whole 10 to 15 seconds is rewarded, and after a short (but neat) video, you see the Mavericks Setup Assistant appear.
Mark’s Favorite Signs of a Healthy iMac
Before you jump into the fun stuff, don’t forget an important step — a quick preliminary check to make sure that your iMac survived shipment intact and happy. Although the shipping box that Apple uses for the iMac series is one of the best I’ve ever encountered in 30 years of swapping computer hardware, your computer could still have met with foul play from its shipping travels. If you can answer Yes to each of these questions, your iMac likely made the trip without serious damage:
1. Does the computer’s chassis appear undamaged?
It’s pretty easy to spot damage to your iMac’s svelte metal and glass design. Look for scratches, puncture damage, and misalignment of the screen.
2. Does the LED screen work, and is it undamaged?
I’m talking about obvious scratches or puncture damage to your screen. Additionally, you should also check whether any individual dots (or pixels) on your LED monitor are obviously malfunctioning. Bad pixels either appear black or in a different color from everything surrounding them. Techs call these irritating anarchists dead pixels. Unfortunately, many
new LED screens include one or two. After all, a 21.5" iMac screen sports literally more than 1 million pixels.
3. Can you feel a flow of air from the vent on top?
25
Chapter 2: Life! Give My iMac Life!
4. Do the keyboard and mouse work?
Check your iMac’s Bluetooth connection by moving the mouse or running your finger across the trackpad; the cursor should move on your screen. To check the keyboard, press the Caps Lock key and observe whether the green Caps Lock light turns on and off. (Don’t forget to check for good bat-teries in all your wireless input devices and make sure they’re turned on.) If you do notice a problem with your iMac (and you can still use your Safari browser and reach the web), you can make the connection to an Apple sup-port technician at www.apple.com. If your iMac is lying on its back with its foot in the air and you can’t get to the Internet, you can check your phone book for a local Apple service center, or call the AppleCare toll-free number at 1-800-275-2273. Chapter 22 also offers troubleshooting information.
Harriet, It’s Already Asking
Me Questions!
After your iMac is running and you’ve given it the once-over for obvious ship-ping damage, your next chore is to set up your iMac. Unlike other tasks in this book, I don’t cover the setup process step by step. Apple “tweaks” the questions that you see during setup on a regular basis, and the questions are really very easy to answer. Everything is explained onscreen, complete with onscreen Help if you need it.
However, I do want you to know what to expect as well as what information you need to have at hand. I also want you to know about support opportu-nities, such as the AppleCare Protection Plan and Apple’s iCloud Internet services — hence, this section. Consider it a study guide for whatever your iMac’s setup procedure has to throw at you.
Setting up OS X Mavericks
After you start your iMac for the first time — or if you just upgraded from an earlier version of OS X — your iMac will likely automatically launch the Mavericks setup procedure. (Note that some custom install options, like the Archive and Install option, might not launch the Setup procedure.) The setup process takes care of a number of different tasks:
theft, I congratulate you. If you’re using your common sense, it should.
However, Apple doesn’t disseminate this information anywhere else, and the applications that use your personal data won’t send it anywhere, either. And the Safari web browser fills out forms on a web page auto-matically only if you give your permission.
✓ Setup configures your language and keyboard choices.
OS X Mavericks is a truly international operating system, so Setup offers you a chance to configure your iMac to use a specific language and keyboard layout.
✓ Setup configures your e-mail accounts within Apple Mail.
If you already have an e-mail account set up with your Internet service provider (ISP), keep that e-mail account information handy to answer these questions. (The list should include the incoming POP3/IMAP and outgoing SMTP mail servers you’ll be using, your e-mail address, and your login name and password. Don’t worry about those crazy acro-nyms, though, because your ISP will know exactly what you mean when you ask for this information.) Mavericks can even automatically config-ure many e-mail accounts for you — including web-based services such as Google Mail, Yahoo! Mail, and AOL Mail — if you supply your account ID and password. Sweet.
✓ Setup allows you to sign up for an Apple ID and Apple’s iCloud service.
iCloud makes it easy to share data automatically between your iMac and iOS 5 (or later) devices (like an iPhone, iPad, or iPod touch), along with Apple e-mail accounts (through both web mail and the Apple Mail appli-cation). I go into all these in detail in Chapter 9. For now, just create your Apple ID, sign up for iCloud, and take the opportunity to feel smug about owning an Apple computer.
✓ Setup sends your registration information to Apple.
As a proud owner of an iMac, take advantage of the year of hardware warranty support and the free 90 days of telephone support. You have to register to use ’em, but rest assured that all this info is confidential.
✓ Setup launches Migration Assistant.
27
Chapter 2: Life! Give My iMac Life!
Registering your iMac
I’ll be honest here: I know that many of us (myself included) don’t register every piece of computer hardware we buy. However, your iMac is a differ-ent kettle of fish altogether, and I strongly recommend that you register your purchase with Apple during the setup process. You spent a fair amount of moolah on your computer, and it’s an investment with a significant number of moving parts.
Even the hardiest of techno-wizards would agree with this important Mark’s Maxim:
If you don’t register your iMac, you can’t receive support.
Rest assured that Apple is not one of those companies that constantly pes-ters you with e-mail advertisements and near-spam. I’ve registered every Apple computer I’ve owned, and I’ve never felt pestered. (And I have an extremely low tolerance for pester.) However, just in case your tolerance is even lower than mine, Apple’s registration process allows you to disable this e-mail communication.
Importing Documents and
Data from Your Old Mac
If you’re upgrading from an older Mac computer running OS X to your new iMac, I have great news for you: Apple includes the Migration Assistant utility application that can help you copy (whoops, I mean, migrate) all sorts of data from your old Mac to your new machine. The list of stuff that gets copied over includes
✓ User accounts: If you set up multiple user accounts (so that more than one person can share the computer), the utility ports them all to your new iMac.
✓ Network settings: Boy, howdy, this is a real treat for those with manual network settings provided by an ISP or network administrator! Migration Assistant can re-create the entire network environment of your old Mac on your new iMac.
new iMac.
✓ Applications: Migration Assistant tries its best to copy over the third-party applications that you’ve installed in your Applications folder on the older Mac. I say tries its best because you might have to reinstall some applications, anyway. Some developers create applications that spread out all sorts of files across your hard drive, and Migration Assistant just can’t keep track of those nomadic files. Too, some other applications make the trek just fine, but you might have to re-enter their serial numbers.
Setup launches Migration Assistant automatically if you indicate that you need to transfer stuff during the setup process, but you can also launch Migration Assistant manually at any time. Click the Launchpad icon on the Dock (which bears a rocket ship icon); then click the Utilities icon (which, depending on your installation, can also be called Other). Click the Migration Assistant icon to launch the application.
To use Migration Assistant to copy your system from your older Mac, you need one of the following:
✓ FireWire cable (compatible with most Macs made within the last five years or so): If you don’t already have one, you can pick up a standard FireWire cable at your local Maze o’ Wires electronics store or at your computer store. Current iMac models do not have FireWire ports, so if you have the latest model — and you’re connecting to an older Mac with FireWire ports — you’ll need to use another method in this list or buy an Apple Thunderbolt to FireWire adapter for $30 at the Apple Store (http://store.apple.com).
Some recent iMac models included only a FireWire 800 port. If you’re upgrading from an older Mac that has only FireWire 400 ports to a more recent iMac with a FireWire 800 port, you’ll need a FireWire cable and a 400-to-800 adapter, which you can typically get at any large computer store (or through Amazon or eBay).
✓ Thunderbolt cable (compatible with the most recent iMac, Mac mini, and MacBook laptops): A Thunderbolt connection will transfer your data between the two computers at lightning speed! (Bad pun intended.) Apple sells a Thunderbolt cable that’s perfect for the job for $49 at the Apple Store.
29
Chapter 2: Life! Give My iMac Life!
✓ Time Machine external drive or an AirPort Time Capsule backup unit: If you’re using Time Machine on the older Mac with an external drive, you can migrate directly from your most recent backup. The same option applies if you’ve invested in Apple’s AirPort Time Capsule wire-less backup device.
If you’ll be using a FireWire or Thunderbolt cable, make sure that the two machines are connected with the cable first. If you’re using a network con-nection, both computers should be connected to the network. Typically, you’ll also have to load Migration Assistant on the source Mac (or a free Windows program downloaded from www.apple.com, if the source computer is a PC.)
After the two computers are connected, simply follow the onscreen instruc-tions displayed within the Migration Assistant window. The application will lead you through the process step by step. If you need to return to the previ-ous step at any time, click the Back button that appears at the bottom of the screen.
Manually Importing Documents
and Data from Windows
If you’re a classic Windows-to-Mac Switcher, you made a wise choice, espe-cially if you’re interested in the creative applications within the iLife suite! Although you can choose to start your Apple computing life anew, you prob-ably want to migrate some of your existing documents and files from that tired PC to your bright, shiny new iMac.
If you’re switching from a PC to a Mac, you can use the Windows Migration Assistant on your PC (available from Apple’s website) to automatically handle most of your migration tasks for you, and you should witness the miracle of your PC’s photos, video, music, and documents suddenly appear-ing on your iMac. Unfortunately, you’ll have some exceptions. Some stuff won’t make the move because the Windows Migration Assistant simply can’t recognize and transfer files and folders from some nonstandard locations. For example, folders you created yourself at the root of your PC’s hard drive likely won’t be recognized.
The OS X Help system contains an entire subsection on specific tricks that you can use when switching from Windows to Mac, including how to connect to a Windows network and how to directly connect the two computers.
In general, you can move documents, movies, photos, and music without a problem. Table 2-1 illustrates what can be moved between Windows and OS X as well as the application that you use in Mavericks to open those files and documents.
Table 2-1
Moving Media and Documents betwixt Computers
File Type Windows Location
OS X Location
Mac Application
Music files My Music folder Music folder iTunes
Video and movie files
My Videos folder Movies folder
QuickTime/DVD Player/iTunes Digital photos My Pictures
folder
With the Mavericks Boot Camp feature, you can actually create a full Windows XP, Vista, Windows 7, or Windows 8 system on your Intel iMac. Yup, Windows and Mavericks coexist peacefully on the same computer. However, you have to reboot your computer to use your iMac as a Windows system, and you can’t install Windows at all without retaining at least a basic OS X system. (All this is covered in detail in Bonus Chapter 2, which you can download at www.dummies.com/extras/imac.)
Chapter 3
Introducing the Apple of Your iMac
In This Chapter
▶ Introducing OS X Mavericks
▶ Appreciating the Unix core underneath Mavericks ▶ Recognizing similarities between Windows and Mavericks ▶ Getting help while exploring Mavericks
I
n the other books that I’ve written about OS X Mavericks, I use all sorts of somewhat understated phrases to describe my operating system of choice, such as elegantly reliable, purely powerful, and supremely user friendly.But why is Mavericks such a standout? To be specific, why do creative pro-fessionals and computer techno-wizards across the globe hunger for the very same OS X that runs your iMac? Why is Mavericks so far ahead of both Windows 7 and 8 in features and performance? Good questions, all!
In this chapter, I answer those queries and satisfy your curiosity about your new surfing spot. I introduce the main elements of the Mavericks Desktop, and I show you the fearless Unix heart that beats underneath the sleek exterior of OS X. I also point out the most important similarities between Mavericks and Windows 8, and I outline the resources available if you need help with OS X. Oh, and I promise to use honest-to-goodness English in my explanations, with a minimum of engineer-speak and indecipherable acronyms. (Hey, you’ve got to boast about Mavericks in turn to your family and friends. Aunt Harriet might not be as technologically savvy as we are.)
A Quick Tour of the Premises
Mavericks is a special type of software called an operating system. You know,