& Office 2013
by Andy Rathbone and Wallace Wang
Hoboken, NJ 07030-5774
www.wiley.com
Copyright © 2013 by John Wiley & Sons, Inc., Hoboken, New Jersey Published simultaneously in Canada
No part of this publication may be reproduced, stored in a retrieval system or transmitted in any form or by any means, electronic, mechanical, photocopying, recording, scanning or otherwise, except as permit-ted under Sections 107 or 108 of the 1976 Unipermit-ted States Copyright Act, without either the prior written permission of the Publisher, or authorization through payment of the appropriate per-copy fee to the Copyright Clearance Center, 222 Rosewood Drive, Danvers, MA 01923, (978) 750-8400, fax (978) 646-8600. Requests to the Publisher for permission should be addressed to the Permissions Department, John Wiley & Sons, Inc., 111 River Street, Hoboken, NJ 07030, (201) 748-6011, fax (201) 748-6008, or online at
http://www.wiley.com/go/permissions.
Trademarks: Wiley, For Dummies, the Dummies Man logo, A Reference for the Rest of Us!, The Dummies Way, Dummies Daily, The Fun and Easy Way, Dummies.com, Making Everything Easier, and related trade dress are trademarks or registered trademarks of John Wiley & Sons, Inc. and/or its affiliates in the United States and other countries, and may not be used without written permission. Microsoft and Windows are registered trademarks of Microsoft Corporation in the United States and/or other coun-tries. All other trademarks are the property of their respective owners. John Wiley & Sons, Inc., is not associated with any product or vendor mentioned in this book.
LIMIT OF LIABILITY/DISCLAIMER OF WARRANTY: THE PUBLISHER AND THE AUTHOR MAKE NO REPRESENTATIONS OR WARRANTIES WITH RESPECT TO THE ACCURACY OR COMPLETENESS OF THE CONTENTS OF THIS WORK AND SPECIFICALLY DISCLAIM ALL WARRANTIES, INCLUDING WITHOUT LIMITATION WARRANTIES OF FITNESS FOR A PARTICULAR PURPOSE. NO WARRANTY MAY BE CREATED OR EXTENDED BY SALES OR PROMOTIONAL MATERIALS. THE ADVICE AND STRATEGIES CONTAINED HEREIN MAY NOT BE SUITABLE FOR EVERY SITUATION. THIS WORK IS SOLD WITH THE UNDERSTANDING THAT THE PUBLISHER IS NOT ENGAGED IN RENDERING LEGAL, ACCOUNTING, OR OTHER PROFESSIONAL SERVICES. IF PROFESSIONAL ASSISTANCE IS REQUIRED, THE SERVICES OF A COMPETENT PROFESSIONAL PERSON SHOULD BE SOUGHT. NEITHER THE PUBLISHER NOR THE AUTHOR SHALL BE LIABLE FOR DAMAGES ARISING HEREFROM. THE FACT THAT AN ORGANIZATION OR WEBSITE IS REFERRED TO IN THIS WORK AS A CITATION AND/OR A POTENTIAL SOURCE OF FURTHER INFORMATION DOES NOT MEAN THAT THE AUTHOR OR THE PUBLISHER ENDORSES THE INFORMATION THE ORGANIZATION OR WEBSITE MAY PROVIDE OR RECOM-MENDATIONS IT MAY MAKE. FURTHER, READERS SHOULD BE AWARE THAT INTERNET WEBSITES LISTED IN THIS WORK MAY HAVE CHANGED OR DISAPPEARED BETWEEN WHEN THIS WORK WAS WRITTEN AND WHEN IT IS READ.
For general information on our other products and services, please contact our Customer Care Department within the U.S. at 877-762-2974, outside the U.S. at 317-572-3993, or fax 317-572-4002. For technical support, please visit www.wiley.com/techsupport.
Wiley also publishes its books in a variety of electronic formats. Some content that appears in print may not be available in electronic books.
Library of Congress Control Number: 2013935668
ISBN: 978-1-118-66953-2 (pbk), 978-1-118-73925-9 (ebk), 978-1-118-73926-6 (ebk), 978-1-118-73928-0 (ebk) Manufactured in the United States of America
Andy Rathbone started geeking around with computers in 1985 when he bought a 26-pound portable CP/M Kaypro 2X. Like other nerds of the day, he soon began playing with null-modem adapters, dialing computer bulletin boards, and working part-time at Radio Shack.
He wrote articles for various techie publications before moving to computer books in 1992. He’s written the
Windows For Dummies series, Upgrading and Fixing PCs For Dummies, TiVo For Dummies, PCs: The Missing Manual, and many other computer books.
Today, he has more than 15 million copies of his books in print, and they’ve been translated into more than 30 languages. You can reach Andy at his website, www. andyrathbone.com.
Special thanks to Dan Gookin, Matt Wagner, Tina Rathbone, Steve Hayes, Nicole Sholly, Virginia Sanders, and Russ Mullen. Thanks also to all the folks I never meet in editorial, sales, marketing, proofreading, layout, graph-ics, and manufacturing who work hard to bring you this book.
—Andy Rathbone
I’d like to thank all the friendly people who helped put this book together. Additional thanks go to my radio co-hosts (Wes Sample, Dane Henderson, Sherri Diaz, and Joe Shattuck) at My107.9FM in beautifully isolated Alpine, California, where we host a weekly radio show called Notes From the Underground. Thanks also go to Johannes Gutenberg for inventing the printing press, which is currently being defeated by armies of people dismissing the invention of mass printing by refusing to read any books at all.
within the U.S. at 877-762-2974, outside the U.S. at 317-572-3993, or fax 317-572-4002.
Some of the people who helped bring this book to market include the following:
Acquisitions and Editorial
Project Editor: Charlotte Kughen Executive Editor: Steve Hayes Editorial Manager: Jodi Jensen Editorial Assistant: Anne Sullivan Sr. Editorial Assistant: Cherie Case
Composition Services
Sr Project Coordinator: Kristie Rees
Layout and Graphics: Jennifer Creasey Proofreader: Christine Sabooni Indexer: BIM Indexing & Proofreading
Services
Publishing and Editorial for Technology Dummies
Richard Swadley, Vice President and Executive Group Publisher Andy Cummings, Vice President and Publisher
Mary Bednarek, Executive Acquisitions Director Mary C. Corder, Editorial Director
Publishing for Consumer Dummies
Kathleen Nebenhaus, Vice President and Publisher
Composition Services
Introduction ... 1
Part I: Windows 8 ... 5
Chapter 1: Revealing Windows 8 ...7
Chapter 2: The Mysterious New Start Screen ...17
Chapter 3: The Traditional Desktop...53
Chapter 4: Basic Desktop Window Mechanics ...79
Chapter 5: Storage: Internal, External, and in the Sky ...97
Chapter 6: Working with Apps ...123
Chapter 7: Engaging the Social Apps ...137
Chapter 8: Entertaining Yourself through the Start Screen ...163
Chapter 9: Customizing Windows 8 and Computing Safely ...187
Part II: Office 2013 ... 223
Chapter 10: Getting Started with Office 2013 ...225
Chapter 11: Working with Word ...249
Chapter 12: Playing the Numbers with Excel ...277
Chapter 13: Making Presentations with PowerPoint ...323
Chapter 14: Getting Organized with Outlook ...363
Chapter 15: Storing Stuff in Access ...387
Part III: The Part of Tens ... 415
Chapter 16: Ten Things You’ll Hate about Windows 8 ...417
Chapter 17: Ten Tips for Using Office 2013 ...431
Introduction ... 1
About This Book ...1
How This Book Is Organized ...1
Part I: Windows 8 ...2
Part II: Office 2013 ...2
Part III: The Part of Tens ...2
Icons Used in This Book ...3
Where to Go from Here ...4
Part I: Windows 8... 5
Chapter 1: Revealing Windows 8 . . . 7
What Is Windows 8, and Why Are You Using It? ...8
What’s New in Windows 8? ...10
Should I Bother Switching to Windows 8? ...12
Can My Current PC Still Run Windows 8? ...13
The Four Flavors of Windows 8 ...14
Chapter 2: The Mysterious New Start Screen . . . 17
Being Welcomed to the World of Windows 8 ...18
Understanding user accounts ...21
Keeping your account private with a password ...22
Signing up for a Microsoft account ...26
Figuring Out the New Start Screen in Windows 8 ...28
Launching a Start screen program or app...30
Viewing or closing your open apps ...32
Finding a Start screen app or program ...35
Adding or removing Start screen items ...36
The Charms bar and its hidden shortcuts ...37
Introducing your free apps ...40
Managing the Start screen ...43
Exiting from Windows ...49
Chapter 3: The Traditional Desktop . . . 53
Finding the Desktop and the Start Screen ...54
Working with the Desktop ...57
Summoning the Start screen and open apps ...59
Cleaning up a messy desktop ...60
Jazzing up the desktop’s background ...61
Snapping an app alongside the desktop ...63
Dumpster diving in the Recycle Bin ...66
Bellying Up to the Taskbar ...68
Shrinking windows to the taskbar and retrieving them ...70
Switching to different tasks from the taskbar’s Jump Lists ...70
Clicking the taskbar’s sensitive areas ...71
Customizing the taskbar ...74
The taskbar’s crazy toolbars ...75
Making Programs Easier to Find ...76
Add five helpful icons to your desktop...76
Creating taskbar shortcuts for your favorite programs ...77
Chapter 4: Basic Desktop Window Mechanics . . . 79
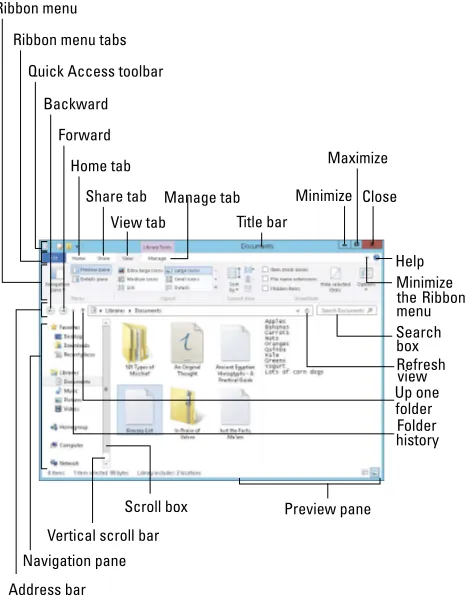
Dissecting a Typical Desktop Window ...80
Tugging on a window’s title bar...82
Navigating folders with a window’s Address Bar ...84
Finding commands on the Ribbon ...85
Quick shortcuts with the Navigation Pane ...87
Moving inside a window with its scroll bar ...88
Boring borders ...89
Maneuvering Windows Around the Desktop ...90
Moving a window to the top of the pile ...90
Moving a window from here to there ...91
Making a window fill the whole screen ...91
Closing a window ...92
Making a window bigger or smaller ...93
Placing two windows side by side ...93
Chapter 5: Storage: Internal, External, and in the Sky . . . 97
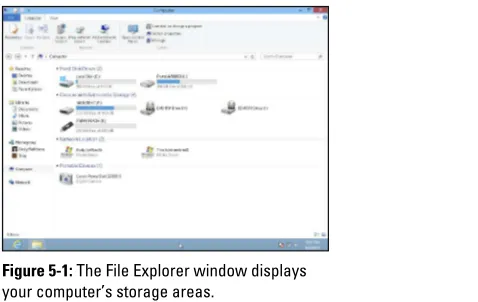
Browsing the File Explorer File Cabinets ...98
Getting the Lowdown on Folders and Libraries ...100
Peering into Your Drives, Folders, and Libraries ...101
Seeing the files on a disk drive ...101
Seeing what’s inside a folder ...103
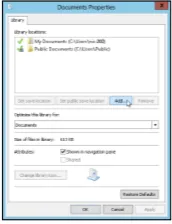
Managing a library’s folders ...104
Creating a New Folder ...106
Renaming a File or Folder ...108
Selecting Bunches of Files or Folders ...108
Getting Rid of a File or Folder ...109
Copying or Moving Files and Folders ...110
Writing to CDs and DVDs ...112
Buying the right kind of blank CDs and DVDs for burning ...113
Copying files to or from a CD or DVD ...114
Working with Flash Drives and Memory Cards ...116
SkyDrive: Your Cubbyhole in the Clouds ...118
Accessing files with the SkyDrive app ...119
Accessing SkyDrive from the desktop ...122
Chapter 6: Working with Apps . . . 123
Starting a Program or App ...124
Adding and Deleting Apps...127
Adding new apps from the Store app ...128
Uninstalling apps ...130
Updating Your Apps ...130
Finding Currently Running Start Screen Apps ...131
Locating a Missing App, Program, Setting, or File ...133
Chapter 7: Engaging the Social Apps . . . 137
Adding Your Social Accounts to Windows 8 ...138
Understanding the Mail App ...141
Navigating the Mail app’s views, menus, and accounts ...142
Composing and sending an e-mail ...146
Sending and Receiving Files through E-Mail ...150
Saving a received attachment ...150
Sending a file as an attachment ...152
Managing Your Contacts in the People App ...153
Adding contacts ...154
Deleting or editing contacts ...155
Managing Appointments in Calendar ...157
Chatting through Messaging ...159
Chapter 8: Entertaining Yourself through the Start Screen . . . 163
What’s an ISP, and Why Do I Need One? ...164
Connecting Wirelessly to the Internet ...166
Browsing Quickly from the Start Screen ...169
Moving among Web Pages ...173
Clicking links ...174
Typing web addresses in the Address Bar ...174
Using Internet Explorer’s toolbar ...176
Playing Music from the Start Screen ...176
Taking Photos with the Camera App ...179
Viewing Photos from the Start Screen...181
Chapter 9: Customizing Windows 8 and Computing Safely . . . .187
Finding the Right Switch ...188
The Start Screen’s PC Settings Screen...190
The Big Guns: The Desktop’s Control Panel ...192
System and Security ...194
Assessing your safety in the Action Center ...194
Avoiding viruses with Windows Defender ...195
Avoiding phishing scams ...197
User Accounts and Family Safety ...199
Network and Internet ...201
Changing the Windows 8 Appearance and Personalization ...201
Changing the desktop background ...202
Choosing a screen saver ...203
Changing the computer’s theme ...204
Changing the screen resolution ...205
Hardware and Sound ...207
Adjusting volume and sounds...207
Adding a Bluetooth gadget ...209
Adding an Xbox 360 game console ...212
Adding a printer ...213
Clock, Language, and Region ...214
Adding or Removing Programs ...215
Removing apps and programs ...216
Installing new programs ...217
Modifying Windows 8 for the Physically Challenged ...218
Part II: Office 2013... 223
Chapter 10: Getting Started with Office 2013 . . . 225
Starting an Office 2013 Program ...226
Introducing the Microsoft Office Ribbon ...227
The File tab ...228
Using the Ribbon ...233
Identifying Ribbon icons ...234
Displaying dialog boxes ...234
Minimizing the Ribbon ...235
Using the Quick Access Toolbar ...236
Adding icons...236
Removing icons ...238
Moving the Quick Access toolbar...238
Selecting Data ...238
Selecting data with the mouse ...239
Selecting data with the keyboard ...240
Selecting multiple chunks of data with the mouse and keyboard ...240
Editing Text with the Pop-up Toolbar ...241
Cutting and Pasting (Moving) Data ...242
Copying and Pasting Data ...243
Undo and Redo ...244
Adding (and Deleting) Pictures ...245
Searching in the Help Window ...245
Exiting Office 2013 ...247
Chapter 11: Working with Word . . . 249
Moving the Cursor with the Mouse ...250
Finding and Replacing Text ...252
Using the Find command ...253
Customizing text searching ...254
Searching by headings ...256
Browsing through pages ...256
Using the Find and Replace command...257
Checking Your Spelling ...258
Viewing a Document ...259
Switching between views ...260
Using Read Mode view ...260
Using Outline view ...261
Changing the Font ...266
Changing the Font Size ...267
Changing the Text Style...268
Changing Colors ...269
Changing the color of text ...269
Highlighting text with color...270
Using Text Effects ...271
Using Styles ...271
Using Templates ...272
Removing Formatting from Text ...273
Inserting New Pages ...274
Inserting Page Breaks ...275
Chapter 12: Playing the Numbers with Excel . . . 277
Understanding Spreadsheets ...278
Storing Stuff in a Spreadsheet ...279
Typing data into a single cell ...279
Typing data in multiple cells ...280
Typing in sequences with AutoFill ...281
Formatting Numbers and Labels ...282
Formatting numbers ...282
Formatting cells ...284
Navigating a Spreadsheet ...287
Using the mouse to move around a spreadsheet ...287
Using the keyboard to move around a spreadsheet ...288
Searching a Spreadsheet ...291
Searching for text ...291
Searching for formulas ...292
Editing a Spreadsheet ...293
Editing data in a cell ...294
Changing the size of rows and columns ...294
Adding and deleting rows and columns ...295
Adding sheets...296
Renaming sheets ...297
Rearranging sheets ...297
Deleting a sheet ...298
Printing Workbooks ...299
Using Page Layout view ...299
Adding a header (or footer) ...300
Printing gridlines ...301
Defining a print area ...301
Inserting (and removing) page breaks ...303
Printing row and column headings ...304
Defining printing margins ...305
Defining paper orientation and size ...306
Printing in Excel ...306
Creating a Formula ...307
Organizing formulas with parentheses ...310
Copying formulas...311
Using Functions ...312
Using the AutoSum command ...315
Using recently used functions ...316
Understanding the Parts of a Chart ...317
Creating a Chart ...319
Chapter 13: Making Presentations with PowerPoint . . . 323
Creating a PowerPoint Presentation...324
Designing a presentation with Slide view ...325
Designing a presentation with Outline view ...327
Working with Text ...330
Typing text in a text box ...331
Formatting text ...332
Aligning text ...332
Making numbered and bulleted lists ...333
Making columns ...335
Applying a Theme ...335
Adding Graphics to a Slide ...336
Placing picture files on a slide ...337
Placing clip art on a slide ...337
Creating WordArt ...338
Capturing screenshots ...339
Resizing, moving, and deleting graphic images ....340
Rotating graphics ...341
Layering objects ...342
Adding Movies to a Slide ...343
Searching for a video on the Internet ...343
Searching for video on your computer ...344
Trimming a video ...345
Coloring a video ...346
Formatting the shape of a video ...347
Adding Sound to a Slide ...348
Adding an audio file off the Internet ...348
Adding audio from a file ...349
Recording audio ...350
Organizing Slides in Sections ...351
Adding a section ...351
Expanding and collapsing a section ...352
Deleting a section ...353
Adding Transitions ...354
Adding slide transitions ...354
Text and graphic transitions ...356
Using the Animation Painter ...357
Viewing a Presentation ...357
Creating a custom slide show ...358
Hiding a slide ...360
Organizing with Slide Sorter view ...361
Chapter 14: Getting Organized with Outlook . . . 363
Configuring E-Mail Settings ...364
Creating E-Mail ...365
Creating a new e-mail message ...366
Replying to an e-mail message ...367
Using a stored e-mail address to create a new e-mail message ...368
Attaching Files to Messages...370
Reading and Organizing E-Mail ...372
Grouping messages into categories ...372
Changing the appearance of the Reading Pane ....373
Retrieving a file attachment from a message ...374
Deleting E-Mail Messages ...375
Setting Appointments ...375
Making an appointment ...375
Viewing appointments ...378
Deleting an appointment ...378
Storing Names and Addresses ...379
Adding a name ...379
Understanding the Basics of a Database ...388
Designing a Database ...390
Editing and Modifying a Database ...392
Naming a field ...393
Adding and deleting a field ...393
Defining the type and size of a field ...394
Typing Data into a Database ...395
Using Datasheet view ...396
Using Form view ...397
Creating a form ...397
Viewing and editing data in a form ...398
Searching a Database...402
Searching for a specific record ...402
Filtering a database ...404
Using the Report Wizard ...410
Part III: The Part of Tens ... 415
Chapter 16: Ten Things You’ll Hate about Windows 8 . . . . 417
I Want to Avoid the Start Screen! ...418
Bringing back the Start button...418
Knowing when the Start screen reappears unexpectedly ...419
I Want to Avoid the Desktop! ...420
I Can’t Copy Music to My iPod ...422
Windows Makes Me Sign In All the Time ...423
The Taskbar Keeps Disappearing ...424
I Can’t Keep Track of Open Windows ...425
I Can’t Line Up Two Windows on the Screen ...426
It Won’t Let Me Do Something Unless I’m an Administrator! ...427
I Don’t Know What Version of Windows I Have ...428
My Print Screen Key Doesn’t Work ...428
Chapter 17: Ten Tips for Using Office 2013 . . . 431
Saving Office 2013 Files ...431
Password-Protecting Your Files ...433
Guarding Against Macro Viruses ...434
Customize the Ribbon ...435
Save to SkyDrive ...437
When in Doubt, Right-Click the Mouse ...438
Freezing Row and Column Headings in Excel ...439
Displaying Slides Out of Order in PowerPoint ...440
Reduce Spam in Outlook ...440
Setting up Outlook’s junk e-mail filter ...441
Creating a Safe Senders list ...442
Creating a Blocked Senders list ...443
Using Office Web and Windows RT ...444
W
elcome to Windows 8 & Office 2013 For Dummies,your resource for Microsoft’s new operating system and office productivity software. You’re no dummy, that’s for sure. But when it comes to Windows 8 and Office 2013, the fascination just isn’t there. You want to get your work done, stop, and move on to something more important.
That’s where this book comes in handy. Instead of becoming a Windows 8 and Office 2013 expert, you’ll know just enough to get by quickly, cleanly, and with a minimum of pain so that you can move on to the more pleasant things in life.
About This Book
Don’t try to read this book in one sitting; there’s no need. Instead, treat this book like a dictionary or an encyclope-dia. Turn to the page with the information you need and say, “Ah, so that’s what they’re talking about.” Then put down the book and move on.
How This Book Is Organized
Part I: Windows 8
This part introduces you to Windows 8, including subjects like the following:
✓ Keeping your computer safe and secure
✓ Making sense of the new Start screen
✓ Finding, starting, and closing programs and apps
✓ Setting up a computer for the whole family to use
✓ Taking and viewing digital photos
✓ Interacting with others through social apps
✓ Fixing Windows 8 when it’s misbehaving
Part II: Office 2013
To use Microsoft Office 2013, you need to know how to find the commands you need. This part of the book focuses on showing you how to use the Ribbon user interface that appears in all Office 2013 programs. By the time you finish this part of the book, you’ll feel comfort-able using any program in Office 2013.
This part of the book explains the basics of using Word, Excel, Outlook, PowerPoint, and Access. You become familiar with using Office and read about different tech-niques you can use to work with Office even faster than before. By the time you finish this part of the book, you’ll be much more comfortable using Office 2013.
Part III: The Part of Tens
(and how to fix them) and ten tips you can use in Office 2013 to increase your productivity.
Icons Used in This Book
Icons highlight important or useful information.
This icon alerts you about juicy information that makes computing easier.
Don’t forget to remember these important points. (Or at least dog-ear the pages so that you can look them up again a few days later.)
The computer won’t explode while you’re performing the delicate operations associated with this icon. Still, wear-ing gloves and proceedwear-ing with caution is a good idea.
Are you moving to Windows 8 from Windows Vista or Windows 7? This icon alerts you to areas where 8 works significantly differently from its predecessors.
Watch out! This signpost warns you that pointless techni-cal information is coming around the bend. Swerve away from this icon to stay safe from awful technical drivel.
TO
UCH
SCREEN Controlled by fingertips rather than mice and keyboards,
Where to Go from Here
Windows 8
Visit www.dummies.com/go/Windows8 for great
✓ Get a refresher on Windows basics.
✓ Find out what’s new in Windows 8.
✓ Get the scoop on the new Start screen.
✓ Discover how to store files on your computer, on an external device, and in the cloud.
✓ Figure out how to work with apps.
Revealing Windows 8
In This Chapter
▶ Getting to know Windows 8
▶ Discovering the new features in Windows 8
▶ Deciding whether to switch to Windows 8
▶ Figuring out whether your PC is powerful enough to run Windows 8
▶ Knowing which version of Windows 8 you need
C
hances are good that you’ve heard about Windows:the boxes and windows that greet you whenever you turn on your computer. In fact, millions of people worldwide are puzzling over Windows as you read this book. Almost every new computer and laptop sold today comes with Windows preinstalled, ready to toss colorful boxes onto the screen.
What Is Windows 8, and
Why Are You Using It?
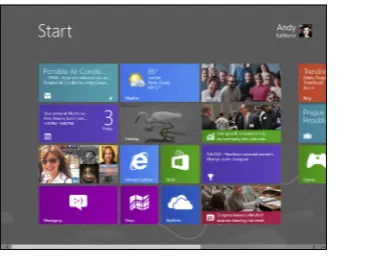
Created and sold by a company called Microsoft, Windows isn’t like your usual software that lets you cal-culate income taxes or send angry e-mails to mail-order companies. No, Windows is an operating system, meaning it controls the way you work with your computer. It’s been around for nearly 30 years, and the latest incarna-tion is called Windows 8, shown in Figure 1-1.
Figure 1-1: The newest version of Windows, Windows 8, comes preinstalled on most new PCs today.
When you turn on your computer, Windows jumps onto the screen and begins supervising any running programs. When everything goes well, you don’t really notice Windows; you simply see your programs or your work. When things don’t go well, though, Windows often leaves you scratch-ing your head over a perplexscratch-ing error message.
In addition to controlling your computer and bossing around your programs, Windows 8 comes with a bunch of free programs and apps — miniprograms. These pro-grams and apps let you do different things, such as write and print letters, browse the Internet, play music, and send your friends dimly lit photos of your latest meal.
And why are you using Windows 8? Well, you probably didn’t have much choice. Nearly every computer sold since late October 2012 comes with Windows 8 prein-stalled. A few people escaped Windows by buying Apple computers (those nicer-looking computers that cost a lot more). But chances are good that you, your neighbors, your boss, and millions of other people around the world are using Windows.
✓ Windows 8 introduces a radical new full-screen– sized Start menu that’s designed for touchscreens — displays controlled with your fingertips. Now called a Start screen, it also appears on desktop PCs, oddly enough. Be prepared for some initial mouse awk-wardness as you try to mimic a fingertip with your mouse pointer.
✓ The new automatic backup program in Windows 8,
What’s New in Windows 8?
You may have worked with earlier versions of Microsoft Windows. If so, toss away that hard-earned knowledge because Windows 8 starts from scratch. Why? Because Windows 8 tries to please two camps of computer owners.
See, some people are mostly consumers. They read e-mail, watch videos, listen to music, and browse the web, often while away from their desktop PC. Whether on the go or on the couch, they’re consuming media (and popcorn).
Other people are mostly creators. They write papers, prepare tax returns, update blogs, edit videos, or, quite often, tap whichever keys their boss requires that day.
To please both markets, Microsoft broke Windows 8 into two very different sections:
✓ Start screen: For the on-the-go information
grab-bers, the Windows 8 Start screen fills the entire screen with large, colorful tiles that constantly update to show the latest stock prices, weather, e-mail, Facebook updates, and other tidbits. Shown earlier in Figure 1-1, that information appears before you touch a button. And touch is a keyword: The Start screen works best with a touchscreen monitor or tablet.
✓ Desktop tile: When it’s time for work, head for the
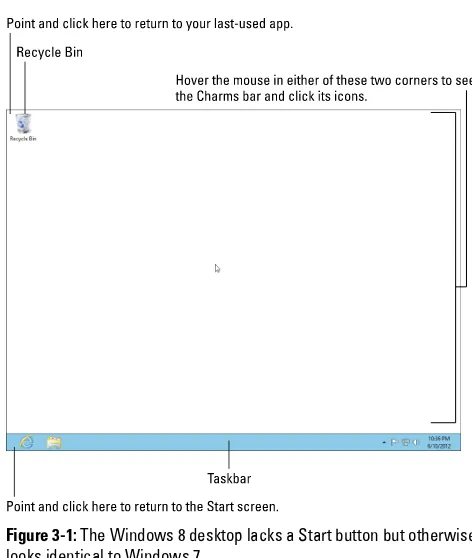
Figure 1-2: The Windows 8 desktop works much as it did in Windows 7, but without a Start button.
Some people like the convenience of having both types of computers built into one. Others find the two experi-ences to be oddly disjointed.
✓ In a way, Windows 8 offers the best of both worlds: You can stay on the Start screen for quick, on-the-go browsing. And when work beckons, you can head for the desktop, where your traditional Windows programs await.
✓ The catch is that the Windows desktop no longer contains the traditional Start button and the Start menu that sprouted from the corner. Instead, you must retreat to the new, Start screen. To open a program, click or tap a program’s tile from the Start screen, and Windows shuffles you back to the desk-top, where the newly opened program awaits.
Should I Bother Switching
to Windows 8?
In a word, no. Most people stick with the Windows ver-sion that came installed on their computers. That way they avoid the chore of figuring out a new version of Windows. Also, Windows 8 comes with a particularly steep learning curve because it’s quite different from ear-lier Windows versions.
Also, many of the biggest changes in Windows 8 work best with touchscreens — those fingertip-controlled screens found on expensive cellphones, tablets, and some of the latest laptops. No matter what device it runs on, Windows 8 looks and behaves the same, whether it’s controlled by fingers on a touchscreen tablet or by a mouse and keyboard on a desktop PC.
On the positive side, if you manage to figure out Windows 8 once, you’ll know how to run it on all your Windows devices: a tablet, Windows phone, a laptop, a desktop PC, and perhaps even a touchscreen television. On the negative side, being designed for so many different things makes Windows 8 behave a little awkwardly on all of them.
Instead of upgrading, stick with the masses and stay with your current computer. When you’re ready to buy a new computer, the latest version of Windows will be installed and waiting for you.
Can My Current PC Still
Run Windows 8?
If you want to upgrade to Windows 8, your computer probably won’t complain. Windows 8 should run with-out problem on any PC currently running Windows 7 or Windows Vista. In fact, Windows 8 may run faster on your old PC than Windows Vista did, especially on laptops.
If your PC runs Windows XP, it may still run Windows 8, but probably not at its best.
If you have a technogeek in your family, have him or her translate the following information, which describes the Windows 8 hardware requirements:
✓ Requirements for x86 (32-bit) architecture: 1 GHz
processor, 1GB of RAM, DirectX 9 graphics device with WDDM 1.0 or higher driver, 16GB HDD free space
✓ Requirements for x86 (64-bit) architecture: 1 GHz
processor, 2GB of RAM, DirectX 9 graphics device with WDDM 1.0 or higher driver, 20GB HDD free space
In common language, this information simply says that nearly any computer sold in the past five years can be upgraded to Windows 8 with little problem.
Shopping for a new PC to run Windows 8? To see how well a particular showroom PC can handle Windows 8, point your mouse at any screen’s bottom-left corner and click the right mouse button. When the menu appears, choose System. The Windows Experience Index appears. It has already tested the PC and given it a grade ranging from 1 (terrible) to 9.9 (extraordinary).
Don’t know what version of Windows runs on your cur-rent PC? Go to the Start menu, right-click Computer, and choose Properties. The screen that appears lists your Windows version. (If your Start menu fills the screen with a bunch of colorful tiles, you’re already running Windows 8. If so, right-click in the bottom-left corner, choose System from the pop-up menu, and the System window’s Windows Edition section says which version of Windows 8 is running.)
The Four Flavors of Windows 8
Microsoft offers four main versions of Windows 8, but you’ll probably want only one: the aptly titled “Windows 8” version.
Small businesses will choose Windows 8 Pro, and larger businesses will want Windows 8 Enterprise. Still, to clear up the confusion, here are descriptions of the versions:
✓ Windows RT: Designed for long battery life, this
version only comes preinstalled, mostly on tablets. It runs the Start screen and apps, but its limited desktop won’t run your own Windows programs. To compensate, Windows RT includes versions of Microsoft Word, Excel, PowerPoint, and OneNote.
✓ Windows 8: Aimed at consumers, this version
Windows desktop that can run most Windows programs.
✓ Windows 8 Pro: Aimed at the business market, this
version features everything from the Windows 8 version as well as tools used by small businesses: encryption, extra networking features, and simi-lar business tools. If you buy a Media Center Pack upgrade, Windows 8 Pro can record TV shows through a TV tuner with Windows Media Center, as well as play DVDs. (To upgrade Windows 8 to Media Center, buy a Windows 8 Pro Pack.)
✓ Windows 8 Enterprise: Microsoft sells this large
business version in bulk to large businesses.
Each version contains all the features of the versions preceding it. Windows 8 Pro contains everything found in Windows 8, for example.
Here are some guidelines for choosing the version you need:
✓ If you’re considering a tablet with Windows RT, make sure you realize that it can’t run regular Windows programs. You’re limited to its bundled Office programs and any apps you download from the Windows Store.
✓ If you’ll be using your PC at home, pick up Windows 8.
✓ If you need to connect to a domain through a work network — and you’ll know if you’re doing it — you want Windows 8 Pro.
with Windows Media Center, buy the Windows 8 Pro Pack.)
✓ If you’re a computer tech who works for businesses, go ahead and argue with your boss over whether you need Windows 8 Pro or Windows 8 Enterprise.
The boss will make the decision based on whether it’s a small company (Windows 8 Pro) or a large company (Windows Enterprise).
The Mysterious New
Start Screen
In This Chapter
▶ Starting Windows 8
▶ Signing in to Windows 8
▶ Understanding the Start screen
▶ Switching among apps
▶ Finding shortcuts on the Charms bar
▶ Seeing all your apps and programs
▶ Customizing the Start screen
▶ Turning off your computer
W
indows 8 comes with the traditional Windows desktop, but the new Start screen creates all the excitement. The Start screen’s large, colorful tiles offer quick stepping stones for checking e-mail, watching videos, and sampling Internet fare.On a desktop computer, however, armed with only a mouse and keyboard, you could spend all day trying to
avoid the Start screen and find the traditional Windows desktop.
But love it or hate it, the new Start screen plays an integral role in Windows 8. This chapter explains how to make the most of it, whether you want to enjoy it or avoid it as much as possible.
When you stare glumly at the confusing new Start screen, try these tricks: Right-click a blank spot, or point at any screen corner with your mouse. Those actions fetch hidden menus, bringing you a glimmer of navigational hope.
T OU
CHSCREEN If you’re using a touchscreen computer, substitute the word tap when you read the word click. Tapping twice works like double-clicking. And when you see the term
right-click, touch and hold your finger on the glass; lift your finger when the right-click menu appears.
Being Welcomed to the
World of Windows 8
Figure 2-1: To move past this lock screen, drag up on the screen with your mouse or finger, or press a key on the keyboard.
Previous versions of Windows let you sign in as soon as you turned on your computer. Windows 8, by contrast, makes you unlock a screen before moving to the sign in page, where you type in your name and password.
How do you unlock the lock screen? The answer depends on whether you’re using a mouse, keyboard, or
touchscreen:
✓ Mouse: On a desktop PC or laptop, click any mouse
button.
✓ Keyboard: Press any key, and the lock screen slides
away. Easy!
✓ Touch: Touch the screen with your finger and then
When you’re in the door, Windows wants you to sign in
by clicking your name and typing in a password.
If you don’t see an account listed for you on the Sign In screen, you have several options:
✓ If you see your name and e-mail address listed,
type your password. Windows 8 lets you in and dis-plays your Start screen, just as you last left it.
✓ If you don’t see your name, but you have an
account on the computer, click the left-pointing arrow. Windows 8 displays a list of all the account holders. You may see the computer owner’s name, as well as an account for Administrator and one for Guest.
✓ If you just bought the computer, use the account
named Administrator. Designed to give the owner
full power over the computer, the Administrator account user can set up new accounts for other people, install programs, start an Internet connec-tion, and access all the files on the computer — even those belonging to other people. Windows 8 needs at least one person to act as administrator.
✓ Use the Guest account. Designed for household
visitors, this account lets guests use the computer temporarily.
✓ No Guest account? Then find out who owns the
computer and beg that person to set up a username for you or to turn on the Guest account.
✓ The little wheelchair-shaped button in the screen’s bottom-left corner customizes Windows 8 for people with physical challenges in hearing, sight, or manual dexterity. If you choose this button by mis-take, click or touch on a different part of the screen to avoid changing any settings.
✓ The little button in the screen’s bottom-right
corner lets you shut down or restart your PC. (If you’ve accidentally clicked it and shut down your PC, don’t panic. Press your PC’s power button, and your PC will return to this screen.)
Even while locked, as shown in Figure 2-1, your comput-er’s screen displays current information in its bottom-left corner. Depending on how it’s configured, you can see the time and date; your wireless Internet signal strength (the more bars, the better); battery strength (the more colorful the icon, the better); your next scheduled appointment; a count of unread e-mail; and other items.
Understanding user accounts
Windows 8 allows several people to work on the same computer, yet it keeps everybody’s work separate. To do that, it needs to know who’s currently sitting in front of the keyboard. When you sign in by clicking your
username Windows 8 presents your personalized Start screen, ready for you to make your own personalized mess.
Although you may turn your desktop into a mess, it’s your own mess. When you return to the computer, your letters will be just as you saved them.
Until you customize your username picture, you’ll be represented by a silhouette. To add a photo to your user account, click your username in the screen’s corner and choose Change Account Picture. Click the Webcam button to take a quick shot with your computer’s built-in webcam. No webcam? Then choose Browse to peek through existing photos. Hint: Click the word Files and choose Pictures to see all the photos on your PC.
Keeping your account private
with a password
Because Windows 8 lets many people use the same com-puter, how do you stop Rob from reading Diane’s love letters to Jason Bieber? Using a password solves some of those problems.
In fact, a password is more important than ever in Windows 8 because some accounts can be tied to a credit card. By typing a secret password when signing in you enable your computer to recognize you and nobody else. If you protect your username with a password, nobody can access your files. And nobody can rack up charges for computer games while you’re away from home.
To set up or change your password, follow these steps:
I cover the Charms bar, a shortcut-filled strip of icons — sometimes called charms — that hug every screen’s right edge, later in this chapter. You fetch the Charms bar differently depending on whether you’re using a mouse, keyboard, or touchscreen:
• Mouse: Move the mouse pointer to the top-right or bottom-top-right corners of your screen.
• Keyboard: Hold down the ÿ key and press the letter C.
• Touchscreens: Slide your finger from the screen’s right edge inward.
When the Charms bar appears, click the Settings icon. The Settings screen appears.
2. Click the words Change PC Settings at the very bottom of the Settings screen.
The PC Settings screen appears.
3. Click the Users category on the left and then click the Change Your Password button. Or, to create a password, click the Create a Password button.
You may need to type your existing password to gain entrance.
4. Type a password that will be easy to remember.
Choose something like the name of your favorite vegetable, for example, or your dental floss brand. To beef up its security level, capitalize some letters and embed a number in the password, like Glide2
5. If asked, type that same password into the Retype Password box, so Windows knows you’re spelling it correctly.
6. In the Password Hint box, type a hint that reminds you — and only you — of your password.
Windows won’t let you type in your exact password as a hint. You have to be a bit more creative.
7. Click the Next button, and click Finish.
Suspect you’ve botched something during this process? Click Cancel to return to Step 3 and either start over or exit.
After you’ve created the password, Windows 8 begins asking for your password whenever you sign in.
✓ Passwords are case-sensitive. The words Caviar and
caviar are considered two different passwords.
✓ Afraid that you’ll forget your password someday? Protect yourself now: Make a Password Reset Disk,
which is a special way of resetting forgotten pass-words.
✓ Windows also offers to Create a Picture Password in Step 3, where you drag a finger or mouse over a photo in a certain sequence. Then, instead of entering a password, you redraw that sequence on the sign-in picture. (Picture passwords work much better on touchscreen tablets than desktop monitors.)
✓ Another new option in Step 3 is Create a PIN. A
✓ Forgotten your password already? When you type a password that doesn’t work, Windows 8 automati-cally displays your hint — if you created one — which should help to remind you of your password. Careful, though — anybody can read your hint, so make sure that it’s something that makes sense only to you. As a last resort, insert the Password Reset Disk you made.
Make Windows stop asking
me for a password!
Windows asks for your name and password only when it needs to know who’s tapping on its keys. And it needs that information for any of these four reasons:
✓ Your computer is part of a network, and your identity determines what goodies you can access.
✓ The computer’s owner wants to limit what you can do on the computer.
✓ You share your computer with other people and want to keep others from signing in with your name and changing your files and settings.
✓ You want a Microsoft account so you can access apps that run on the Start screen.
If these concerns don’t apply to you, purge the password by selecting Change My Password in Step 3 in the section “Keeping your account private with a password.” In the next step, leave the New Password box blank and click Next.
Signing up for a Microsoft account
Whether you’re signing in to Windows 8 for the first time, trying to access some Start screen apps, or just trying to change a setting, you’ll eventually see a screen similar to the one in Figure 2-2.
Figure 2-2: You need a Microsoft account to access many of the Windows 8 features.
That screen appears because Windows 8 introduces a new type of user account. You can sign in with either a
Microsoft account or a Local account. Each serves differ-ent needs:
✓ Local account: This account works fine for people
working with traditional Windows programs on the Windows desktop. Local account holders can’t run many of the Start screen apps bundled with Windows 8, including the Mail app. Nor can they download new apps from the Windows Store.
✓ Microsoft account: Consisting of an e-mail address
the Windows Store and run all the bundled apps in Windows 8. You can link a Microsoft account with your social media accounts, automatically stocking your address book with your friends from Facebook, Twitter, and other sites. (Plus, you can access both your own and your friends’ Facebook photos.)
You have two ways to sign in with a Microsoft account; they’re ranked here according to simplicity:
✓ Use an existing Microsoft account. If you already
use Hotmail, Outlook, Live, Xbox LIVE, or Windows Messenger, you already have a Microsoft account and password. Type in that e-mail address and password at the screen shown in Figure 2-2 and then click the Sign In button.
✓ Sign up for a new Microsoft account. Click the Sign
Up for a Microsoft Account link, shown in Figure 2-2, and Microsoft takes you to a website where you can turn your existing e-mail address into a Microsoft account. (Signing up for a new Microsoft e-mail address is a better option, however, because it lets you use Windows 8’s built-in Mail app.)
If you’re signing into Windows 8 for the first time, and you don’t want a Microsoft account, you see a Cancel button. Click Cancel, and the next screen shows a button that lets you sign in with a Local account instead.
Figuring Out the New Start
Screen in Windows 8
The new Start screen in Windows 8 whisks you away from traditional Windows desktop and drops you into a foreign land with no helpful translator at your side. That’s right: Windows 8 no longer has a Start button or a Start menu.
Instead, the new Windows 8 Start screen (refer to Figure 2-1) appears whenever you turn on your computer. Whereas older Windows versions had a small Start menu on a desktop, the Windows 8 Start screen fills the entire screen with large tiles stretching beyond the right edge. Each tile represents a program installed on your computer.
As you work, you’ll constantly switch between the filling Start screen and the traditional screen-filling desktop, covered in the next chapter.
Despite the drastic remodel, the Start screen still offers a way to start programs; adjust Windows settings; find help for sticky situations; or, thankfully, shut down Windows and get away from the computer for a while. Some Start screen tiles needn’t be opened to see their contents. For example, the Calendar tile constantly updates to show the current date and day, as well as your next few appointments.
Try the following tricks to make the Start screen feel a little more like home:
✓ Click the Desktop tile to fetch the familiar Windows desktop. Whew! If you prefer to avoid the Start screen, you can stay on the traditional Windows desktop as much as possible. (I explain the desktop in Chapter 3.)
✓ Spin the wheel on your mouse, and the Start screen moves to the left or right, accordingly. It’s a handy way to move quickly across the entire Start screen, from left to right.
✓ As you move your mouse pointer, the Start screen follows along. When the pointer reaches the screen’s right edge, for example, the Start screen brings the offscreen portions into view.
✓ See the little bar along the Start screen’s bottom edge? That’s a scroll bar. Drag the scroll bar’s light-colored portion to the left or right: As you move that portion, the Start screen moves along with it, letting you see items living off the screen’s right edge.
TO
UCH
SCREEN ✓ On a touchscreen, navigate the Start screen with
your finger: Pretend the Start screen is a piece of paper lying on a table. As you move your finger, the Start screen moves along with it.
Windows 8 contains hidden doorways tucked away in its corners, as well as secret passages enabled by pressing certain key combinations. Here are some unlabeled ways to fetch the Start screen and switch among your apps, whether you’re using a mouse, keyboard, or touchscreen.
✓ With the mouse: Fetch the Start screen by pointing
to the screen’s lower-left corner. When the Start screen icon appears, click the mouse. Switch to another currently running app by pointing to the screen’s upper-left corner and then slide the mouse pointer downward. When thumbnails of your run-ning apps appear, click the one you want to see full screen.
✓ With the keyboard: Fetch the Start screen by
press-ing the Windows key, ÿ, found near the spacebar on most keyboards. Switch to another currently run-ning app by holding down Alt and pressing Tab to switch between currently opened apps; let go of the Alt key when you highlight your desired app.
✓ With the touchscreen: Fetch the Start screen by
pressing the ÿ key below your tablet’s screen. Switch to another currently running app by sliding your finger inward from the screen’s left edge, then back. Then tap the thumbnail of your desired app.
Launching a Start screen
program or app
What’s an app?
Short for application, apps herald from the world of smartphones: cell-phones powerful enough to run small programs, as well as make phone calls. The Windows 8 apps differ from traditional windows programs in several ways:
✓ Windows apps come from only one place: the Windows Store. Available as its own app, the Store app lets you download apps from Microsoft; once downloaded, they’re automatically installed on your computer. Many apps are free, but others cost money.
✓ Only Windows apps can run on Windows. Apps found on iPhones and Android phones aren’t designed to run on your Windows 8 computer. Creators of some popular apps create versions for each platform, but they sometimes differ slightly. Have you bought apps for your Android or iPhone? You’ll have to pay again to buy the apps’ Windows versions.
✓ Apps, by nature, fill the entire screen when running, although Windows 8 does offer an awkward way to “snap” two apps together, covered later in this chapter.
✓ Apps are usually fairly simple to use, but simplicity brings limita-tions. Many apps don’t let you copy words, photos, or links. There’s often no way to share an app’s contents with a friend or to leave public comments. Most apps lack the power of traditional desktop programs.
Each tile on the Start screen is a button for starting an app or traditional Windows program. Click the button, and the program or app jumps into action. Windows 8 complicates matters, as it offers several ways to push a button:
✓ Mouse: Point at the tile and click the left mouse
button.
✓ Keyboard: Press the arrow keys until a box
sur-rounds the desired tile. Then press the Enter key.
✓ Touchscreens: Tap the tile with your finger.
No matter which item you’ve chosen, it fills the screen, ready to inform you, entertain you, or maybe even do both. I explain the Start screen’s built-in apps later in this chapter. If you feel like digging in, you can begin downloading and installing your own by clicking the Start screen’s Store tile. (I explain how to download apps in Chapter 6.)
Viewing or closing your open apps
Start screen apps, by nature, consume the entire screen, with no visible menus. That makes it difficult not only to control them but also to switch among them. The same holds true when you’re working in the separate world of the traditional Windows desktop.
1. Point the mouse pointer at the screen’s bottom-most-left corner.
A thumbnail of your last used app appears. You can click to bring that app to the screen. Or, if you want to revisit other apps running in the background, move to the next step.
2. When the desktop icon appears, raise your mouse pointer along the screen’s left edge.
As you move it up the screen, shown in Figure 2-3, a bar appears alongside the screen’s left edge, show-ing thumbnails of your open apps.
3. To return to an app, click its thumbnail.
4. To close an app, right-click its thumbnail and choose Close.
These tips can help you keep track of your running apps, as well as close down the ones you no longer want open:
✓ To cycle through your currently running apps, hold down the ÿ key and press Tab: The same bar you see in Figure 2-3 appears along the left edge. Each time you press Tab, you select another app. When you select the app you want, let go of the ÿ key, and the app fills the screen.
✓ You can view your most recently used apps whether you’re working on the Windows desktop or on the new Start screen. From the desktop, point your mouse at the screen’s bottom-left corner, slide the mouse up the screen’s left edge, and then click the app you want to revisit.
✓ After you close an app in Step 4, the bar listing your running apps stays onscreen. You can then close other apps by right-clicking them and choosing Close.
Finding a Start screen
app or program
You can scroll through the Start screen until your eagle-eyes spot the tile you need, and then you can pounce on it with a quick mouse click or finger tap. But when the thrill of the hunt wanes, Windows 8 offers several short-cuts for finding apps and programs hidden inside a tile-stuffed Start screen.
When searching for a particularly elusive app or program, try these tricks:
✓ Mouse users can right-click on a blank portion of the Start screen. A bar rises from the screen’s bottom showing an icon named All Apps. Click the All Apps icon to see an alphabetical listing of all your com-puter’s apps and programs. Click the desired app or program to open it.
✓ While looking at the Start screen, keyboard owners can simply begin typing the name of their desired app or program, like this: facebook. As you type, Windows 8 lists all the apps matching what you’ve typed so far, eventually narrowing down the search to the runaway.
Adding or removing
Start screen items
Removing something from the Start screen is easy, so you can begin there. To remove an unwanted or unused tile from the Start screen, right-click it and choose Unpin from Start from the pop-up menu along the screen’s bottom. The unloved tile slides away without fuss.
But you’ll probably want to spend more time adding
items to the Start screen, and here’s why: It’s easy to escape the Start screen by clicking the Desktop app. But once you’re safely on the desktop, how do you start a program without heading back to the Start screen? To escape this recursive conundrum, stock your Start screen with icons for your favorite desktop destinations, such as programs, folders, and settings. Then, instead of loading the desktop and looking lost, you can head to your final destination straight from the Start screen.
After you’ve stuffed your Start screen with your favorite desktop joints, head to this chapter’s “Managing the Start screen” section to place them in orderly groups. When you finish, you’re caught up with where you started with in previous Windows versions: a fully stocked Start screen.
To add programs or apps to the Start screen, follow these steps:
1. Press the Start screen’s All Apps button.
On a touchscreen, slide your finger upward from the screen’s bottom edge and then tap the All Apps icon.
No matter which route you take, the Start screen alphabetically lists all your installed apps and programs.
2. Right-click the item you want to appear on the Start screen and choose Pin to Start.
3. Repeat Step 2 for every item you want to add.
Unfortunately, you can’t select and add several items simultaneously.
4. Choose the Desktop app.
The desktop appears.
5. Right-click desired items and choose Pin to Start.
Right-click a library, folder, file, or other item you want added to the Start screen; when the pop-up menu appears, choose Pin to Start.
When you’re through, your Start screen will have grown considerably with all your newly added destinations.
The Charms bar and
its hidden shortcuts
The Charms bar is simply a menu, one of a million in Windows 8. But the Microsoft marketing department, eager to impart a little humanity to your computer, calls it a Charms bar.
TO
UCH
Shown in Figure 2-4, the Charms bar’s five icons, or
charms, list things you can do with your currently viewed screen. For example, when you’re gazing at a website you want a friend to see, fetch the Charms bar, choose Share, and choose the friend who should see it. Off it goes to your friend’s eyeballs.
Figure 2-4: The Charms bar in Windows 8 contains handy icons for performing common tasks.
The Charms bar can be summoned from anywhere within Windows 8 — from the Start screen, the Windows desk-top, and even from within apps and desktop programs.
But no matter what part of Windows 8 you’re working with, you can summon the Charms bar using a mouse, keyboard, or touchscreen by following these steps:
✓ Mouse: Point at the top- or bottom-right corners.
✓ Keyboard: Press ÿ+C.
✓ Touchscreen: Slide your finger inward from the
When the Charms bar appears, lingering along your screen’s right edge, it sports five icons, ready to be either clicked or touched. Here’s what each icon does:
✓ Search: Choose this, and Windows assumes you
want to search through what you’re currently seeing onscreen. To expand your search, choose one of the other search locations: Apps, Settings, or Files.
✓ Share: This fetches options for sharing what’s cur-rently on your screen. When viewing a web page, for example, a click of the Share button lets you choose Mail to e-mail the page’s link to a friend. (I cover e-mail in Chapter 7.)
✓ Start: This simply takes you back to the Start screen. The ÿ key on your keyboard or tablet also whisks you back there.
✓ Devices: Choose this to send your current screen’s information to another device, such as a printer, second monitor, or perhaps a phone. (The Devices option lists only devices that are currently con-nected with your computer and able to receive the screen’s information.)
✓ Settings: This lets you quickly tweak your com-puter’s six major settings: WiFi/Network, Volume, Screen, Notifications, Power, and Keyboard/ Language. Not enough? Then choose the words Change PC Settings along the bottom to open the Start screen’s mini-Control Panel.
Table 2-1 shows some keyboard shortcuts to bypass the Charms bar and head straight to one of its icons.
Table 2-1
The Charms Bar’s Keyboard
Shortcut Keys
To Do This . . . . . . Press This
Open the Charms bar ÿ+C Search for apps, files, or settings ÿ+Q Share what you see onscreen ÿ+H Return to the Start screen ÿ
Interact with attached devices ÿ+K Change settings ÿ+I
Introducing your free apps
The Windows 8 Start screen comes stocked with several free apps, each living on its own square or rectangular tile. Every tile is labeled, so you know what’s what. The tiles for some apps, known as live tiles, change con-stantly. The Finance app tile, for example, constantly updates with the stock market’s latest swings; the Weather tile always tells you what to expect when you walk outdoors.
You may spot some or all of the following apps on the list, ready to be launched at the click of a mouse or touch of a finger:
✓ Calendar: This lets you add your appointments or
grab them automatically from calendars already created through accounts with Google, Hotmail, or Microsoft’s new Outlook.com website.
✓ Camera: This lets you snap photos with your
com-puter’s built-in camera or webcam.
✓ Desktop: Choose this to fetch the traditional
Windows desktop, which runs the Windows pro-grams you’ve used for the past decade. I cover the desktop in Chapter 3.
✓ Finance: A live tile, this shows a 30-minute delay of
the Dow, NASDAQ, and S&P. Choose Finance to see the usual charts and graphs of fear and uncertainty.
✓ Games: Designed mostly for Xbox 360 owners, this
app lets you see your friends and gaming achieve-ments. You can explore new games, watch game trailers, and buy new games for your console.
✓ Internet Explorer: Covered in Chapter 8, this
mini-version of Internet Explorer browses the web full-screen, with nothing to get in the way: no menus, no tabs, just you and the current page. (When you’re through, press the ÿ key on your keyboard to return to the Start screen.)
✓ Mail: Covered in Chapter 7, this lets you send and
✓ Maps: Handy for trip planning, the Maps app brings up a version of Microsoft Bing Maps.
✓ Messaging: Covered in Chapter 7, this app lets you
send text messages to friends through Facebook, Microsoft’s Instant Messenger, and other systems.
✓ Music: This plays music stored on your PC. But
Microsoft hopes you’ll buy music from its store as well.
✓ News: Visit here to read the news of the day,
com-piled from news services.
✓ People: The beauty of the People app, covered in
Chapter 7, comes from its openness. Once you enter your accounts — Facebook, Twitter, Google, and others — the People app grabs all your contacts, as well as their information, and stocks itself automatically.
✓ Photos: Covered in Chapter 8, the Photos app
dis-plays photos stored in your computer, as well as on accounts you may have on Facebook, Flickr, or SkyDrive.
✓ Reader: This handy app reads documents stored
in the Adobe Portable Document Format (PDF). It jumps into action when you try to open any file stored in that document. (Most manuals available on websites come in PDF format; you can also find them attached to some e-mails.)
✓ SkyDrive: This term describes the Microsoft
✓ Sports: You can find sports news and scores here, as well as a way to add listings for your favorite sports teams.
✓ Store: Covered in Chapter 6, the Windows Store is
the only way to add more apps on your Start screen. (Programs you install through your Windows desk-top also add shortcuts to the Start screen.)
✓ Travel: Resembling a travel agent’s billboard, this
app lists travel hotspots, complete with maps, pan-oramic photos, reviews, and links for booking flights and hotels.
✓ Video: This works more like a video rental store,
with a small button that lets you watch videos stored on your computer.
✓ Weather: This weather station forecasts a week’s
worth of weather in your area, but only if you grant it permission to access your location informa-tion. (Unless your computer has a GPS — Global Positioning System — the app narrows down your location by closest city rather than street address.)
The bundled Windows 8 apps work well within the con-fines of the Start screen. Unfortunately, Microsoft config-ured the Windows 8 desktop to use some of these Start screen apps rather than standard desktop programs.
Managing the Start screen
Give yourself a fighting chance by organizing your Start screen. The following steps begin with a small dose of organization: purging unwanted tiles and adding tiles for your favorites.
Keep following these steps, and you’ll eventually reach organizational nirvana: a screen full of neatly labeled
groups — collections of related tiles — that match your
interests.
You can organize the tiles any way you want, into any number of groups with any names. For example, you may want to organize the Start screen tiles into four groups: Work, Play, Web, and People. (For a quick peek at what organized and labeled groups look like, page ahead to Figure 2-6.)
But no matter how organized you want to be, follow these steps to begin turning that haphazard Start screen into your own piles o’ tiles:
1. Remove tiles you don’t need.
Spot a tile you don’t need? Right-click it and choose Unpin from Start. Repeat until you’ve removed all the tiles you don’t use.
Choosing Unpin from Start doesn’t uninstall the app or program; removing the tile merely removes that item’s “start” button from the screen. In fact, if you accidentally remove the tile for a favorite app or program, you can easily put it back in Step 3.
2. Move related tiles next to each other.
to each other. To move an app to a new location, drag its tile to the desired spot. As you drag the tile, other tiles automatically move out of the way to make room for the newcomer.
When you’ve dragged an app’s tile to the desired spot, drop the tile to set the tile into its new place.
To conserve screen real estate, shrink a wide tile from a rectangle to a square: Right-click the wide tile and click the Smaller button.
3. Add tiles for apps, programs, folders, and files you need.
I explain how to add tiles for apps, programs, fold-ers, and files earlier, in this chapter’s “Adding or removing Start screen items” section.
After you’ve purged any unwanted tiles, rearranged the remaining tiles, and added new tiles for items you need, your Start screen may meet your needs. If so, stop. You’re done!
But if your Start screen still sprawls off the screen’s right edge and you can’t find important items, keep reading.
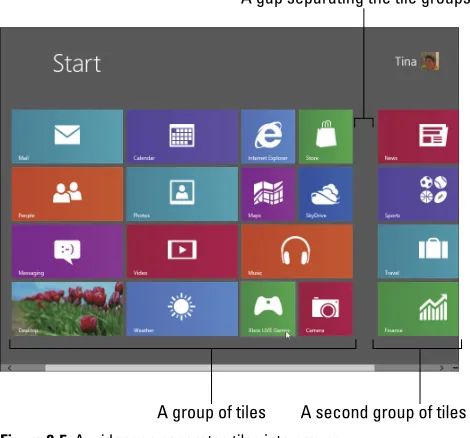
Still here? Okay. When first installed, the Windows 8 Start screen includes two unlabeled groups of tiles, with a narrow space between the two groups. Windows 8 didn’t even bother to name the two groups. And, if you’re like most people, you probably didn’t notice the slightly wider space that separates those two groups. And that brings you to the next step.
Keep scrolling to the Start screen’s right edge, and you’ll eventually notice a place where one group of tiles breaks away from the rest, leaving a slightly wider gap between the two groups. Shown in Figure 2-5, that wider gap separates each of your Start screen’s groups.
5. To create a new group, drag and drop a tile into the gap between two existing groups.
Drag and hold any tile in the blank space between two groups. A vertical bar will appear, widening the space to make room for your incoming tile. Drop the tile, and the tile forms a new group of one lonely tile, located between the two other groups.