ExcEl
®
VBA 24-Hour TrAinEr
inTroducTion . . . .xxvii
⊲ sEcTion i
undErsTAnding THE BAsics
lEsson 1 Introducing VBA . . . . 3lEsson 2 Getting Started with Macros . . . . 9
lEsson 3 Introducing the Visual Basic Editor . . . .19
lEsson 4 Working in the VBE . . . . 27
⊲ sEcTion ii
diVing dEEpEr inTo VBA
lEsson 5 Object-oriented Programming — An Overview . . . . 43lEsson 6 Variables, Data Types, and Constants . . . . 49
lEsson 7 Understanding Objects and Collections . . . .61
lEsson 8 Making Decisions with VBA . . . . 69
⊲ sEcTion iii BEyond THE MAcro rEcordEr: WriTing
your oWn codE
lEsson 9 Repeating Actions with Loops . . . . 85lEsson 10 Working with Arrays . . . . 99
lEsson 11 Automating Procedures with Worksheet Events . . . . 111
lEsson 12 Automating Procedures with Workbook Events . . . . 123
lEsson 13 Using Embedded Controls . . . . 135
lEsson 14 Programming Charts . . . . 151
lEsson 15 Programming PivotTables and PivotCharts . . . . 163
lEsson 16 User Defined Functions . . . . 183
lEsson 17 Debugging Your Code . . . . 195
lEsson 20 Advanced UserForms . . . . 249
lEsson 21 Class Modules . . . . 263
lEsson 22 Add-Ins . . . . 279
lEsson 23 Managing External Data . . . . 295
lEsson 24 Data Access with ActiveX Data Objects . . . . 307
lEsson 25 Not Gone, Not Forgotten . . . 315
⊲ sEcTion V
inTErAcTing WiTH oTHEr officE ApplicATions
lEsson 26 Overview of Office Automation from Excel . . . . 327lEsson 27 Working with Word from Excel . . . . 333
lEsson 28 Working with Outlook from Excel . . . . 343
lEsson 29 Working with Access from Excel . . . . 353
lEsson 30 Working with PowerPoint from Excel . . . . 363
AppEndix What’s on the DVD? . . . .371
Excel
®
VBA
24-Hour Trainer
Indianapolis, IN 46256 www.wiley.com
Copyright © 2011 by Wiley Publishing, Inc., Indianapolis, Indiana
Published by Wiley Publishing, Inc., Indianapolis, Indiana
Published simultaneously in Canada
ISBN: 978-0-470-89069-1 ISBN: 978-1-118-08764-0 ISBN: 978-1-118-08760-2 ISBN: 978-1-118-08755-8
Manufactured in the United States of America
10 9 8 7 6 5 4 3 2 1
No part of this publication may be reproduced, stored in a retrieval system or transmitted in any form or by any means, electronic, mechanical, photocopying, recording, scanning or otherwise, except as permitted under Sections 107 or 108 of the 1976 United States Copyright Act, without either the prior written permission of the Publisher, or authorization through payment of the appropriate per-copy fee to the Copyright Clearance Center, 222 Rosewood Drive, Danvers, MA 01923, (978) 750-8400, fax (978) 646-8600. Requests to the Publisher for permission should be addressed to the Permissions Department, John Wiley & Sons, Inc., 111 River Street, Hoboken, NJ 07030, (201) 748-6011, fax (201) 748-6008, or online at http://www.wiley.com/go/permissions.
Limit of Liability/Disclaimer of Warranty: The publisher and the author make no representations or warranties with respect to the accuracy or completeness of the contents of this work and specifically disclaim all warranties, including without limitation warranties of fitness for a particular purpose. No warranty may be created or extended by sales or pro-motional materials. The advice and strategies contained herein may not be suitable for every situation. This work is sold with the understanding that the publisher is not engaged in rendering legal, accounting, or other professional services. If professional assistance is required, the services of a competent professional person should be sought. Neither the pub-lisher nor the author shall be liable for damages arising herefrom. The fact that an organization or Web site is referred to in this work as a citation and/or a potential source of further information does not mean that the author or the publisher endorses the information the organization or website may provide or recommendations it may make. Further, readers should be aware that Internet websites listed in this work may have changed or disappeared between when this work was written and when it is read.
For general information on our other products and services please contact our Customer Care Department within the United States at (877) 762-2974, outside the United States at (317) 572-3993 or fax (317) 572-4002.
Wiley also publishes its books in a variety of electronic formats. Some content that appears in print may not be available in electronic books.
Library of Congress Control Number: 2011922792
ABouT THE AuTHor
ToM urTis is a Microsoft Office developer and programming expert with over 20 years of experience in developing customized Office programs with Visual Basic for Applications (VBA) and Application Programming Interface (API). In 2000 Tom founded Atlas Programming Management (www.atlaspm.com), an Office solutions company in Silicon Valley that specializes in Excel to pro-vide consulting, project development, training, and support for a diverse inter-national clientele. As an Excel trainer, Tom created the Excel Aptitude Test (XAT, www.xatcorp.com), which measures knowledge of Excel for a custom-ized training curriculum based on the test score.
Tom is co-author of Holy Macro! It’s 2,500 Excel VBA Examples, and he has served as a technical editor and consultant for other Excel books and training materials. Tom received the Most Valuable Professional award for Excel from Microsoft in 2008, and it has been renewed each year thereafter in recognition of his Excel skills and contributions to the Excel community. Tom is one of some 100 Excel experts worldwide who hold the Excel MVP award.
A native of New York state, Tom is a graduate of Michigan State University, and has lived and worked in the San Francisco Bay Area for 30 years. Tom is an avid sports fan and collector of rare sports memorabilia, and he enjoys the outdoor life that California offers. He can be reached by email, at [email protected].
ABouT THE TEcHnicAl EdiTor
crEdiTs
VicE prEsidEnT And ExEcuTiVE group puBlisHEr
Richard Swadley
AcknoWlEdgMEnTs
conTEnTs
INTRODUCTION xxvii
pArT i: undErsTAnding THE BAsics
cHApTEr 1: inTroducing VBA 3
What is VBa?
3
a Brief History of VBa
4
What VBa Can Do for You
5
Automating a Recurring Task 5
Automating a Repetitive Task 5
Running a Macro Automatically if Another Action Takes Place 5
Creating Your Own Worksheet Functions 5
Simplifying the Workbook’s Look and Feel for Other Users 5 Controlling Other Office Applications from Excel 6
Liabilities of VBa
7
Try it
8
cHApTEr 2: gETTing sTArTEd WiTH MAcros 9
Composing Your First Macro
9
Accessing the VBA Environment 9
Using the Macro Recorder 12
running a Macro
16
The Macro Dialog Box 16
Shortcut Key 17
Try it
17
Lesson Requirements 18
Step-by-Step 18
cHApTEr 3: inTroducing THE VisuAl BAsic EdiTor 19
What is the VBe?
19
understanding the VBe
20
The Project Explorer Window 21
The Code Window 21
The Properties Window 22
The Immediate Window 22
understanding Modules
22
using the object Browser
23
exiting the VBe
24
Try it
25
cHApTEr 4: Working in THE VBE 27
Toolbars in the VBe
27
Macros and Modules
28
Locating Your Macros 28
Understanding the Code 29
Editing a Macro with Comments and Improvements to the Code 30
Deleting a Macro 33
Inserting a Module 33
Renaming a Module 34
Deleting a Module 36
Locking and Protecting the VBe
36
Try it
37
Lesson Requirements 37
Step-by-Step 37
pArT ii: diVing dEEpEr inTo VBA
cHApTEr 5: oBjEcT-oriEnTEd progrAMMing — An oVErViEW 43
What “object-oriented Programming” Means
43
The object Model
44
Properties 45 Methods 46 Collections 46
Try it
47
cHApTEr 6: VAriABlEs, dATA TypEs, And consTAnTs 49
What is a Variable?
49
assigning Values to Variables
50
xvii
ConTenTS
Data Types
51
Understanding the Different Data Types 51 Declaring a Variable for Dates and Times 53 Declaring a Variable with the Proper Data Type 53
Forcing Variable Declaration
54
understanding a Variable’s Scope
56
Local Macro Level Only 56
Module Level 56
Application Level 57
Constants 57
Choosing the Scope and Lifetime of Your Constants 58
Try it
58
Lesson Requirements 58
Step-by-Step 58
cHApTEr 7: undErsTAnding oBjEcTs And collEcTions 61
Workbooks 61
Worksheets 62
Cells and ranges
63
SpecialCells 64
Try it
65
Lesson Requirements 65
Step-by-Step 65
cHApTEr 8: MAking dEcisions WiTH VBA 69
understanding Logical operators
69
AND 70 OR 70 NOT 71
Choosing Between This or That
72
If…Then 72 If…Then…Else 73 If…Then…ElseIf 74
Select Case 74
Getting users to Make Decisions
76
Message Boxes 76
Input Boxes 77
Try it
78
Lesson Requirements 78
pArT iii: BEyond THE MAcro rEcordEr:
WriTing your oWn codE
cHApTEr 9: rEpEATing AcTions WiTH loops 85
What is a Loop?
85
Types of Loops
86
For…Next 87 For…Each…Next 88
Exiting a For… Loop 89
Looping In Reverse with Step 90
Do…While 91 Do…Until 91 Do…Loop…While 93 Do…Loop…Until 94 While…Wend 94
nesting Loops
94
Try it
95
Lesson Requirements 96
Step-by-Step 96
cHApTEr 10: Working WiTH ArrAys 99
What is an array?
99
What Arrays Can Do for You 101
Declaring Arrays 102
The option Base Statement
103
Boundaries in arrays
104
Declaring arrays with Fixed elements
104
Declaring Dynamic arrays with reDim and Preserve
105
Try it
107
Lesson Requirements 107
Step-by-Step 107
cHApTEr 11: AuToMATing procEdurEs WiTH WorksHEET EVEnTs 111
What is an “event”?
111
Worksheet events — an overview
112
Where Does the Worksheet Event Code Go? 112
xix
ConTenTS
examples of Common Worksheet events
115
Worksheet_Change Event 115
Worksheet_SelectionChange Event 116
Worksheet_BeforeDoubleClick Event 116
Worksheet_BeforeRightClick Event 117
Worksheet_FollowHyperlink Event 117
Worksheet_Activate Event 117
Worksheet_Deactivate Event 118
Worksheet_Calculate Event 118
Worksheet_PivotTableUpdate Event 119
Try it
119
Lesson Requirements 119
Step-by-Step 119
cHApTEr 12: AuToMATing procEdurEs WiTH WorkBook EVEnTs 123
Workbook events — an overview
123
Where Does the Workbook Event Code Go? 123
Entering Workbook Event Code 125
examples of Common Workbook events
126
Workbook_Open Event 126
Workbook_BeforeClose Event 127
Workbook_Activate Event 127
Workbook_Deactivate Event 128
Workbook_SheetChange Event 128
Workbook_SheetSelectionChange Event 128
Workbook_SheetBeforeDoubleClick Event 129 Workbook_SheetBeforeRightClick Event 129 Workbook_SheetPivotTableUpdate Event 130
Workbook_NewSheet Event 130
Workbook_BeforePrint Event 130
Workbook_SheetActivate Event 131
Workbook_SheetDeactivate Event 131
Workbook_BeforeSave Event 131
Try it
132
Lesson Requirements 132
cHApTEr 13: using EMBEddEd conTrols 135
Working with Forms Controls and activeX Controls
135
The Forms Toolbar 136
The Control Toolbox 140
Try it
144
Lesson Requirements 144
Step-by-Step 144
cHApTEr 14: progrAMMing cHArTs 151
adding a Chart to a Chart Sheet
152
adding an embedded Chart to a Worksheet
154
Moving a Chart
155
Looping Through all embedded Charts
157
Deleting Charts
158
renaming a Chart
159
Try it
160
Lesson Requirements 160
Step-by-Step 160
cHApTEr 15: progrAMMing piVoTTABlEs And piVoTcHArTs 163
Creating a PivotTable report
163
Hiding the PivotTable Field List 167
Using the Report Filter Area 167
Formatting Numbers in the Values Area 168
Why it’s Called a PivotTable
170
Creating a PivotChart
171
understanding PivotCaches
173
Manipulating PivotFields in VBa
176
Manipulating Pivotitems with VBa
177
Creating a PivotTables Collection
177
Try it
178
Lesson Requirements 178
Step-by-Step 179
cHApTEr 16: usEr dEfinEd funcTions 183
What is a user Defined Function?
183
Characteristics of User Defined Functions 184
Anatomy of a UDF 184
xxi
ConTenTS
Volatile Functions
188
The Name of the Active Worksheet and Workbook 189
UDFs with Conditional Formatting 190
Calling Your Function from a Macro 190
Adding a Description to the Insert Function Dialog 191
Try it
193
Lesson Requirements 193
Step-by-Step 193
cHApTEr 17: dEBugging your codE 195
What is Debugging?
195
What Causes errors?
196
Weapons of Mass Debugging
198
The Debugging Toolbar 198
Trapping errors
207
Error Handler 207
Bypassing Errors 208
Try it
210
Lesson Requirements 210
Step-by-Step 210
pArT iV: AdVAncEd progrAMMing TEcHniquEs
cHApTEr 18: crEATing usErforMs 215
What is a userForm?
215
Creating a userForm
216
Designing a userForm
218
Showing a userForm
225
Where Does the userForm’s Code Go?
225
Closing a userForm
226
Unloading a UserForm 226
Hiding a UserForm 227
Try it
228
Lesson Requirements 228
cHApTEr 19: usErforM conTrols And THEir funcTions 231
understanding the Frequently used userForm Controls
231
CommandButtons 232 Labels 232 TextBoxes 234 ListBoxes 236 ComboBoxes 238 CheckBoxes 240 OptionButtons 241 Frames 243 MultiPages 245
Try it
246
Lesson Requirements 246
Step-by-Step 246
cHApTEr 20: AdVAncEd usErforMs 249
The userForm Toolbar
249
Modal versus Modeless
250
Disabling the userForm’s Close Button
250
Maximizing Your userForm’s Size
252
Selecting and Displaying Photographs on a userForm
252
unloading a userForm automatically
253
Pre-Sorting the ListBox and ComboBox items
253
Populating ListBoxes and ComboBoxes with unique items
255
Display a real-Time Chart in a userForm
258
Try it
259
Lesson Requirements 259
Step-by-Step 259
cHApTEr 21: clAss ModulEs 263
What is a Class?
263
What is a Class Module?
264
Creating Your own objects
265
an important Benefit of Class Modules
266
Creating Collections
268
Class Modules for embedded objects
269
Try it
272
Lesson Requirements 272
xxiii
ConTenTS
cHApTEr 22: Add-ins 279
What is an excel add-in?
279
Creating an add-in
280
Converting a File to an add-in
284
installing an add-in
286
Creating a user interface for Your add-in
288
Changing the add-in’s Code
290
Closing add-ins
290
removing an add-in from the add-ins List
291
Try it
291
Lesson Requirements 291
Step-by-Step 291
cHApTEr 23: MAnAging ExTErnAl dATA 295
Creating QueryTables from Web Queries
295
Creating a QueryTable for access
299
using Text Files to Store external Data
301
Try it
304
Lesson Requirements 304
Step-by-Step 304
cHApTEr 24: dATA AccEss WiTH AcTiVEx dATA oBjEcTs 307
introducing aDo
307
The Connection Object 309
The Recordset Object 309
The Command Object 310
an introduction to Structured Query Language (SQL)
310
The SELECT Statement 311
The INSERT Statement 311
The UPDATE Statement 312
The DELETE Statement 312
Try it
313
cHApTEr 25: noT gonE, noT forgoTTEn 315
using Dialog Sheets
315
What Does a Dialog Sheet Look Like? 316
using XLM Get.Cell Functions
321
using the SendKeys Method
322
Try it
323
Lesson Requirements 323
Step-by-Step 323
pArT V: inTErAcTing WiTH oTHEr officE ApplicATions
cHApTEr 26: oVErViEW of officE AuToMATion froM ExcEl 327
Why automate another application?
327
understanding office automation
328
Early Binding 328
Late Binding 329
Which One Is Better? 330
Try it
330
Lesson Requirements 330
Step-by-Step 330
cHApTEr 27: Working WiTH Word froM ExcEl 333
activating a Word Document
333
Activating the Word Application 334
Opening and Activating a Word Document 334
Creating a new Word Document
336
Copying an excel range to a Word Document
337
Printing a Word Document from excel
337
importing a Word Document to excel
338
Try it
339
Lesson Requirements 339
Step-by-Step 339
cHApTEr 28: Working WiTH ouTlook froM ExcEl 343
opening outlook
343
Composing an e-mail in outlook from excel
344
Creating a MailItem Object 344
Transferring an Excel Range to the Body of Your E-mail 345
Putting It All Together 346
e-mailing a Single Worksheet
348
Try it
348
Lesson Requirements 348
xxv
ConTenTS
cHApTEr 29: Working WiTH AccEss froM ExcEl 353
adding a record to an access Table
353
exporting an access Table to an excel Spreadsheet
356
Creating a new Table in access
358
Try it
359
Lesson Requirements 359
Step-by-Step 360
cHApTEr 30: Working WiTH poWErpoinT froM ExcEl 363
Creating a new PowerPoint Presentation
363
Copying a Worksheet range to a PowerPoint Slide
364
Copying Chart Sheets to PowerPoint Slides
365
running a PowerPoint Presentation from excel
367
Try it
368
Lesson Requirements 368
Step-by-Step 368
AppEndix: WHAT’s on THE dVd? 371
inTroducTion
congrATulATions on MAking TWo ExcEllEnT cHoicEs! You want to learn programming for Microsoft Excel with Visual Basic for Applications (VBA), and you’ve purchased this book to teach you. Excel is the most powerful and widely used spreadsheet application in the world. VBA enables you to become much more productive and efficient, while getting your everyday Excel tasks done more quickly and with fewer errors. You’ll gain a programming skill that is in high demand, which will improve your value in the workplace and your marketability when searching for employment.
This book covers VBA from the ground up, and assumes you have never programmed Excel before. If you’ve never recorded or written an Excel macro, this book will show you how. If you’ve worked with VBA before, this book has examples of programming techniques you might not have seen. The instruction and examples in this book teach VBA concepts that range in levels from fundamental to advanced. The techniques in this book will apply just as well to the Excel business power user as to the keeper of the family budget.
VBA is the programming language for Microsoft’s popular Office suite of applications, including Excel, Word, Access, PowerPoint, and Outlook. A full section of this book explains how to control each of those applications from Excel with VBA. By the time you complete this book, you will have learned how to record, write, and run your own macros. You’ll learn how to make VBA run itself by programming Excel to monitor and respond to users’ actions, and how to create friendly, custom-ized interfaces that the users of your workbooks will enjoy.
The future of VBA is solid. Microsoft has confirmed time and again that VBA will be supported in versions of Excel into the foreseeable future. The programming skills you learn in this book will serve you throughout your career. You’ll be able to apply the principles you learn in this book to other tasks that can be automated in Excel and Microsoft’s other Office applications. VBA is an enormous programming language, and combined with Excel, it’s an ongoing, rewarding process of learning something new every day. With this book as your entry into the world of VBA program-ming, you are well on your way.
WHo THis Book is for
WHAT THis Book coVErs
This book contains 30 lessons, which are broken into five sections.
➤ Section I: Understanding the BASICs — Section I includes Lessons 1 to 4, introducing you to VBA by providing a historical background and a discussion of what VBA is and what it can do for you. Section I familiarizes you with the Macro Recorder and the Visual Basic Editor, where VBA code is maintained.
➤ Section II: Diving Deeper into VBA — Section II includes Lessons 5 to 8, which discuss VBA topics including an overview of object-oriented programming, variable declaration, objects and collections, and arrays.
➤ Section III: Beyond the Macro Recorder: Writing Your Own Code — Section III includes Lessons 9 to 17. You learn how to write your own macros without help from the Macro Recorder. You become familiar with loops, event programming at the workbook and worksheet levels, charts, PivotTables, and User Defined Functions, and learn how to debug your VBA code.
➤ Section IV: Advanced Programming Techniques — Section IV includes Lessons 18 to 25, and deals with the more advanced topics of UserForms, class modules, add-ins, retrieving external data, and backwards-compatible features that have been all but forgotten but are still fully supported in all Excel versions.
➤ Section V: Interacting with Other Office Applications — Section V includes Lessons 26 to 30, dealing with how to control Access, Word, Outlook, and PowerPoint from Excel.
HoW THis Book is sTrucTurEd
My primary goal in this book is to teach you what you need to know in VBA. I tried to write this book as if you and I were sitting down in front of your computer, and I was explaining Excel and VBA’s technical concepts in an informal tutorial session. The book is structured such that each lesson teaches you the theory of a topic, followed by one or more coded examples, with plenty of screenshots and notes to help you follow along. To avoid redundancy of instruction, the lessons build on each other, so the later chapters assume you’ve read, or are already familiar with, the mate-rial discussed in earlier lessons. I strongly recommend that you watch the videos. You will get more out of them than you might imagine, because they include bonus information about Excel, such as tips and tricks, that will help you manage your workbooks with greater ease and efficiency.
WHAT you nEEd To usE THis Book
xxix
inTroducTion
programming tools you need, but make sure your installation has provided you with access to the VBE and Help files. It’s possible to exclude those items in the installation process. The version of Windows is not important. In many examples, different versions of Excel are represented, with Excel’s latest version at this writing, version 2010, shown most frequently. Almost everything dis-cussed in this book has VBA example code to go along with it, with notes in the code (lines of text in VBA code that start with an apostrophe) that explain what the code is doing, and why. There are plenty of screenshots to help you see beforehand what to expect, and help you after you’ve tested your code to confirm you followed the steps correctly.
There’s one other item you need, which only you are in control of, and that is arranging a quiet period of time for yourself on a regular basis, so you can read this book and view its video Try It lessons uninterrupted. Everyone studies and retains new material differently, and we all live in a busy world. But do what you can to carve out some “you time” as you make your way through the book. You’ll find a lot of useful material that will lead you to think of other situations you typically encounter in Excel that can be solved with the concepts you’ll be learning.
insTrucTionAl VidEos
Twenty-six of the 30 lessons in this book are brought to life through hours of instructional video that are available at the following website: www.wrox.com/go/excelvba. Those lessons with video conclude with a tutorial. Both the content of the lesson and the accompanying tutorial are covered in the video. You may want to watch the video before you read each lesson or vice versa. The choice is up to you.
conVEnTions
To help you get the most from the text and keep track of what’s happening, we’ve used a number of conventions throughout the book.
Boxes with a warning icon like this one hold important, not-to-be-forgotten information that is directly relevant to the surrounding text.
The pencil icon indicates notes, tips, hints, tricks, or asides to the current discussion.
As for styles in the text:
➤ We highlight new terms and important words when we introduce them.
➤ We show keyboard strokes like this: Ctrl+A.
➤ We show file names, URLs, and code within the text like so: persistence.properties.
We present code in two different ways:
We use a monofont type with no highlighting for most code examples.
We use bold to emphasize code that is particularly important in the present context or to show changes from a previous code snippet.
supporTing WEBsiTEs And codE
As you work through each lesson I recommend that you type in all of the code. However, depending on how you learn, you may prefer to download the code. The code is available at www.wrox.com. You can use the search box on the website to locate this title. After you have located this book, click the Download Code link to access the files that can be downloaded. You can download the files via HTTP or FTP. All of the files are stored as ZIP files.
The ISBN for this book is 978-0-470-89069-1. You may find it easier to search by the ISBN than by the title of the book.
You can also download the code from the main Wrox download page, www.wrox.com/dynamic/ books/download.aspx. Click the link to the Excel VBA 24-Hour Trainer to access the files that can be downloaded.
ErrATA
We make every effort to ensure that there are no errors in the text or in the code. However, no one is perfect, and mistakes do occur. If you find an error in one of our books, like a spelling mistake or faulty piece of code, we would be very grateful for your feedback. By sending in errata, you may save another reader hours of frustration, and at the same time, you will be helping us provide even higher quality information.
xxxi
inTroducTion
If you don’t spot “your” error on the Book Errata page, go to www.wrox.com/contact/techsupport .shtml and complete the form there to send us the error you have found. We’ll check the information and, if appropriate, post a message to the book’s errata page and fix the problem in subsequent editions of the book.
p2p .Wrox .coM
For author and peer discussion, join the P2P forums at p2p.wrox.com. The forums are a web-based system for you to post messages relating to Wrox books and related technologies and interact with other readers and technology users. The forums offer a subscription feature to e-mail you topics of interest of your choosing when new posts are made to the forums. Wrox authors, editors, other industry experts, and your fellow readers are present on these forums.
At p2p.wrox.com, you will find a number of different forums that will help you, not only as you read this book, but also as you develop your own applications. To join the forums, just follow these steps:
1 .
Go to p2p.wrox.com and click the Register link.2 .
Read the terms of use and click Agree.3 .
Complete the required information to join, as well as any optional information you wish to provide, and click Submit.4 .
You will receive an e-mail with information describing how to verify your account and com-plete the joining process.You can read messages in the forums without joining P2P, but in order to post your own messages, you must join.
Once you join, you can post new messages and respond to messages other users post. You can read messages at any time on the Web. If you would like to have new messages from a particular forum e-mailed to you, click the Subscribe to this Forum icon by the forum name in the forum listing.
SECTION I
understanding the BAsics
⊲
lEsson 1:
Introducing VBA
⊲
lEsson 2:
Getting Started with Macros
⊲
lEsson 3:
Introducing the Visual Basic Editor
introducing VBa
Welcome to your first lesson in Visual Basic for Applications! A good place to start is at the beginning, where you’ll find it useful to get an understanding of where VBA came from and what VBA is today. Once you get a feel for how VBA fits into the overall Excel universe, you’ll learn how to use VBA to manipulate Excel in ways you might never have thought possible.
WHAT is VBA?
Visual Basic for Applications (VBA) is a programming language created by Microsoft to auto-mate operations in applications that support it, such as Excel. VBA is an enormously powerful tool that enables you to control Excel in countless ways that you cannot do manually.
In fact, VBA is also the language that manipulates Microsoft Office applications in Access, Word, PowerPoint, and Outlook. For the purposes here, VBA is the tool you’ll use to develop macros and manipulate the kinds of objects you will learn about in this book to control Excel, and to control other Office applications from Excel.
You do not need to purchase anything more than the Office suite (or the individual applica-tion) to also own VBA. If you have Excel on your computer, you have VBA on your computer.
WHAT is A “MAcro,” AnyWAy?
Back in the day, a programming language was often called a “macro language” if its capabilities included the automation of a sequence of commands in spreadsheet or word processor applications. With Microsoft’s release of Office 5, VBA set a new bar for how robust a programming language can be, with capabilities extend-ing far beyond those of earlier programmextend-ing languages, such as the ability to create and control objects within Excel, or to have access to disk drives and networks.
continues
(continued)
So, VBA is a programming language and it is also a macro language. Confusion of terminology arises when referring to VBA code that is a series of commands written and executed in Excel. Is it a macro, a procedure, or a program? Since Microsoft commonly refers to its VBA procedures as macros, that’s good enough for me to call them macros as well. Outside of a few exceptions that’ll be discussed when the time comes, I’ll be referring to VBA procedures as macros.
A BriEf HisTory of VBA
VBA is a present-day dialect of the BASIC (Beginner’s All-purpose Symbolic Instruction Code) pro-gramming language that was developed in the 1960s. BASIC became widely used in many software applications throughout the next two decades, because it was easy to learn and understand.
Over the years, BASIC has evolved and improved in response to advancing technology and increased demands by its users for greater programming flexibility. In 1985, Microsoft released a much richer version of BASIC, named QuickBASIC, which boasted the most up-to-date features found in pro-gramming languages of the day. In 1992, Microsoft released Visual Basic for Windows, designed to work within the burgeoning Windows environment.
Meanwhile, various software publishers were making their own enhancements to BASIC for their products’ programming languages, resulting in a wide and confusing range of functionality and commands among software applications that were using BASIC. Microsoft recognized the need for developing a standardized programming language for its software products, and created Visual Basic for Applications.
VBA was first released by Microsoft with Excel 5 in the Office 1995 suite. Since then, VBA has become the programming language for Microsoft’s other popular Office applications, as well as for external software customers of Microsoft to whom VBA has been licensed for use.
don’T confusE VB WiTH VBA!
With all the acronyms bandied about in the world of computing, it’s easy to get some terms confused. “VB” stands for Visual Basic and it is not the same as VBA. Though both VB and VBA are programming languages derived from BASIC and created by Microsoft, they are otherwise very different.
What VBa Can Do for You
❘
5WHAT VBA cAn do for you
Everyone reading this book uses Excel for their own needs, such as financial budgeting, forecasting, analyzing scientific data, creating invoices, or charting the progress of their favorite basketball team. One thing all readers have in common is the need to automate some kind of frequently encountered task that is either too time-consuming or too cumbersome to continue doing manually. That’s where VBA comes in.
The good news is, utilizing VBA does not mandate that you first become a world-class professional programmer. Many VBA commands are at your disposal and, as this book will show you, are rela-tively easy to implement and customize for your everyday purposes.
Anything you can do manually you can do with VBA, but faster and with a minimized risk of human error. Many things that Excel does not allow you to do manually, you can do with VBA. The following sections describe a handful of examples of what VBA can do for you.
Automating a recurring Task
If you find yourself needing to produce weekly or monthly sales and expense reports, a macro can create them in no time flat, in a style and format you (and more importantly, your boss) will be thrilled with. And if the source data changes later that day and you need to produce the updated report again, no problem — just run the macro again!
Automating a repetitive Task
When faced with needing to perform the same task on every worksheet in your workbook, or in every workbook in a particular file folder, you can create a macro to “loop” through each object and do the deed. You learn how to repeat actions with various looping methods in Lesson 9.
running a Macro Automatically if Another Action Takes place
In some situations you’ll want a macro to run automatically, so you don’t have to worry about remembering to run it yourself. For example, to automatically refresh a pivot table the moment its source data changes, you can monitor those changes with VBA, assuring that your pivot table always displays real-time results. This is called “event” programming, which is cool stuff, and is discussed in Lessons 11 and 12.creating your own Worksheet functions
You can create your own worksheet functions, known as “User Defined Functions,” to handle custom calculations that Excel’s built-in functions do not provide for, or would be too complicated to use even if such functions were available. For example, you’ll see how to add up numbers in cells that are for-matted a certain color. UDFs, as these custom functions are called, are covered in Lesson 16.
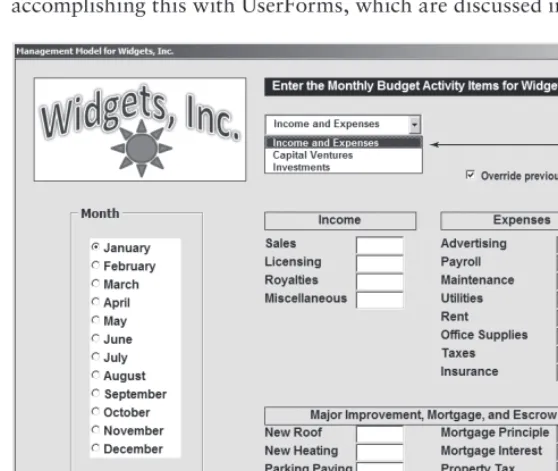
interface with user-friendly menus and informational pop-up boxes to guide your novice users throughout their activities in the workbook. You might be surprised at how un-Excel-looking an Excel workbook can be, with VBA providing a visually comfortable and interactive experience for users unfamiliar with Excel, enabling them to get their work done. Figure 1-1 shows an example of accomplishing this with UserForms, which are discussed in Lessons 18, 19, and 20.
figurE 1-1
controlling other office Applications from Excel
If you create narrative reports in Word that require an embedded list of data from Excel, or if you need to import a table from Access into an Excel worksheet, VBA can automate the process. VBA is the programming language for Microsoft’s other Office applications, enabling you to write macros in Excel to perform tasks in those other applications, with the users being none the wiser that they ever left Excel while the macro was running.
Liabilities of VBa
❘
7liABiliTiEs of VBA
Although VBA is a tremendously useful and versatile tool, alas, it is not an elevator to Excel nir-vana. The pros far outweigh the cons, but learning and using VBA comes with a few caveats that you need to be aware of:
➤ With each version release of Excel, Microsoft may add new VBA commands or stop support-ing existsupport-ing VBA commands, sometimes without advance warnsupport-ing. Surprises do happen, as was especially the case when Office 2007 was released with all its added features. Such is life in the world of Excel VBA; you will probably learn of coding errors from people who have upgraded to a newer version and are using the workbook you created in an earlier version.
➤ VBA does not run uniformly in all computer operating environments. Sometimes, no matter how extensively you test your code and how flawlessly the macros run on your computer, there will be users of your workbook who will report an error in your code. It won’t be your fault or VBA’s fault, it’s just the idiosyncrasies of how programming languages such as VBA mix with various operating systems, Office versions, and network configurations. Debugging your code is the subject of Lesson 17.
➤ Programming languages, including VBA, are not warmly received by all workplace IT depart-ments. Many companies have set internal policies that forbid employees from downloading malicious software onto workplace computers. This is an understandable concern, but the corporate safety nets are sometimes cast far and wide to include Excel workbooks with VBA code. The tug of war in companies between the security interests of IT, and the work effi-ciency needs of management, can determine whether the VBA code you install will actually be allowed for use in some company venues.
➤ Finally, VBA is a large program. It has thousands of keywords and the language library is only getting larger. Actually, I see this as a good thing, because the more VBA you learn, the more productivity and control you will have with Excel. Just as with any language, be it spoken or programming, there is a level of rolling-up-your-shirtsleeves commitment that’ll be needed to learn VBA. Even the longest journey starts with a first step, and this book will get you on your way.
Try iT
There’s nothing specific to try based on the material in this lesson. What you could do is make a list of some of your most frequent everyday Excel tasks. Chances are, those frequently recurring tasks will be good candidates for the first VBA macros you’ll be composing when you practice macro-writing on your own.
Getting Started with Macros
In Lesson 1, you read that VBA is the programming language of Microsoft Excel and that a macro is a sequence of VBA commands to run a task automatically instead of manually. In this lesson, you learn how to create a simple macro, what its code looks like, and a few options for how you can run the macro.
coMposing your firsT MAcro
This lesson leads you through the process of composing a macro to sort and format a range of data. But even before the first line of programming code is written, you’ll want to set up shop by giving yourself easy access to the VBA-related tools you’ll be using. The following house-keeping tips usually need to be done only once, and are worth taking the time to do now, if you haven’t already done so.
Accessing the VBA Environment
At the time of this writing, Excel is at a unique stage in its ongoing evolution, because three of its versions are being used with substantial popularity. Version 2003 (also known as version 11) was the final Excel version having the traditional menu bar interface of File, Edit, View, and so on. Then came version 2007 (also known as version 12) with Office’s new Ribbon interface, and most recently, version 2010 (also known as version 14) has taken its place among the commu-nity of Excel users.
As with other tasks you typically do in Excel, the actions you take to create, view, edit, or run VBA code usually start by clicking the on-screen icon relating to that task. Exactly what those VBA-related icons look like, and what you need to do to make them easily accessible to you, will depend on the particular version of Excel you are working with.
Start by making sure that the VBA-related icons you’ll be using most frequently are already displayed whenever you open Excel.
For versions of Excel up to and including 2003, from your worksheet menu, click View ➪
Toolbars ➪ Visual Basic as shown in Figure 2-1. This displays the Visual Basic toolbar, as shown in Figure 2-2, which you can dock just as you do with your other toolbars.
For versions of Excel after 2003 (that is, start-ing with Excel 2007), the Ribbon user interface has replaced the menu interface, resulting in a different look to the VBA-related icons and a different set of steps required to see them.
In versions 2007 and 2010, these VBA icons are located on the Developer tab. By default, the Developer tab is not automatically dis-played along with the other Ribbon tabs. You need to do a set of one-time mouse clicks to show the Developer tab, and to keep it visible whenever you open Excel. Although the steps to do this are easy, they are different between versions 2007 and 2010.
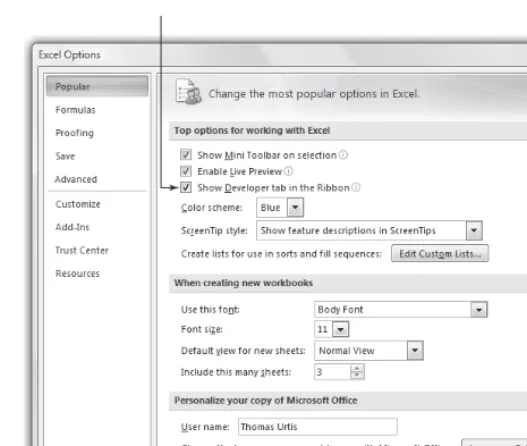
In Excel 2007, click the round Office button near the top-left corner of your screen. Then, click the Excel Options button located at the bottom of that menu, as shown in Figure 2-3.
In the Excel Options dialog box, click the Popular item at the upper left, and select the Show Developer tab in the Ribbon option, as shown in Figure 2-4.
For Excel version 2010, showing the Developer tab is a bit dif-ferent. A new Ribbon tab named File has supplanted the Office button. Click the File tab and then click the Options button as shown in Figure 2-5.
In the Excel Options dialog box for version 2010, click the Customize Ribbon item at the left, which displays two vertical lists as shown in Figure 2-6. Notice that the list on the right has
a drop-down menu above it called Customize the Ribbon. Select the Main Tabs item from that drop-down. In the list of Main Tabs, select Developer and click OK.
figurE 2-1
figurE 2-2
Composing Your First Macro
❘
11figurE 2-4
figurE 2-6
Figure 2-7 shows the Developer tab on the Ribbon with its related icons.
figurE 2-7
using the Macro recorder
The easiest way to create a macro is to record your worksheet actions using a valuable tool called the Macro Recorder. All you need to do is turn on the Macro Recorder, perform the actions that comprise the task you want to automate, and then turn off the Macro Recorder when you have fin-ished your task. While the Macro Recorder is turned on, every action you do — selecting a cell, entering a number, formatting a range, pretty much everything — is recorded and represented as VBA code in a new macro. As you’ll
see, when you run the macro created by the Macro Recorder, your task will be completed automatically, just as you did it manually.
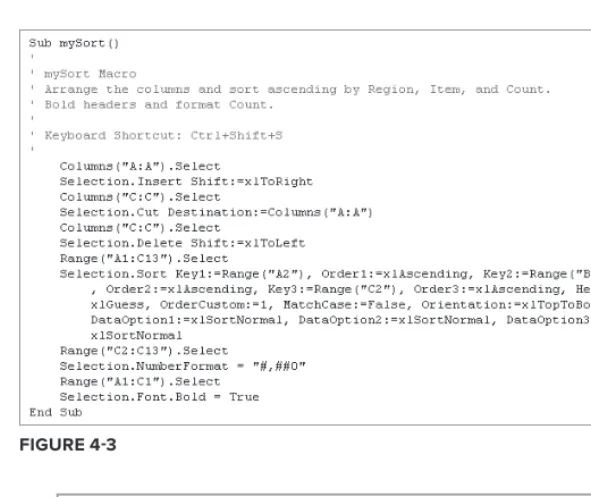
The Macro Recorder comes in handy for repetitive (and sometimes mundane) common tasks that you’d rather not have to keep manually doing over and over. For example, say you manage a table of data every day, such as shown in Figure 2-8, that shows how many items your company sold in its East, West, North, and South regions.
The everyday task at hand is to sort the table primarily by Region, then by Item, then by Count. Your boss wants the Item and Region columns to switch places, so that Region occupies column A and Item occupies column B. To improve read-ability, the numbers in the Count column must be formatted with the thousands comma separator, and the headers for Item, Region, and Count must be bolded. Figure 2-9 shows the finished table, the way your boss wants it.
figurE 2-8
Composing Your First Macro
❘
13This is normally a six-step process, which is quite boring, but it’s part of your job responsibilities. To complete the task you might:
1 .
Insert a new column at column A.2 .
Select the Region column, cut it, and paste it to empty column A, to the left of the Item column.3 .
Delete the now-empty column from where the Region column was cut.4 .
Select range A1:C13 and sort in ascending order by Region, Item, and Count.5 .
Select range C2:C13 and format the numbers with the thousands comma separator.6 .
Select range A1:C1 and format those cells as Bold.Not only are these steps monotonous, but also an invitation to honest mistakes due to even-tual human error. The good news is, if you perform the necessary steps perfectly for the Macro Recorder, the task can be reduced to a simple mouse click or keyboard shortcut, with VBA doing the grunt work for you.
Any time you create a macro, it’s wise to plan ahead about why you are creat-ing the macro, and what you want the macro to do. This is especially important with complex macros, because you will want your macros to operate efficiently and accurately, with just the code that’s necessary to get the job done properly. By avoiding excessive code, your macros will run faster and be easier to edit or troubleshoot. For example, get your workbook ready beforehand to avoid unnecessary coded actions. Have the worksheet that you’ll be working on active, with the range of interest already visible. Mistakes are recorded too! Practice the steps first, so your macro is not longer than it needs to be.
Because you know what manual steps are required for this daily task, you are ready to create your macro. The first thing to do is turn on the Macro Recorder. In Excel versions 2003 or before, click the Record Macro button on
the Visual Basic toolbar as shown in Figure 2-10. For later Excel versions, click the Record Macro button in the Code section of the Developer tab on the Ribbon, as shown in Figure 2-11.
What you see next will look much like Figure 2-12. A small dialog box titled Record Macro will appear, with default information that only needs your approval by clicking OK to start recording your macro. Resist the temptation to accept the defaults because now’s the time to get into a few good habits.
figurE 2-12
The Macro Recorder is an excellent teaching tool, and hardly a day goes by when I do not use it in some way. VBA is just too voluminous a programming language to memorize its every keyword and nuance. Often as not, I’ll record a macro just to look at the code it produces to learn the proper syntax of a task dealing with some larger macro I am working on. You will find yourself using the Macro Recorder in the same way; it’s a terrific source for learning VBA code, as Excel developers of any skill level will attest.
For this example, the macro you are creating is one you will want to keep and use often. A little cus-tomization is strongly recommended to help you down the road, when you’ll want to remember what the macro does, why you created it, and what optional keyboard shortcut you assigned to run it.
In the Record Macro dialog box, give the macro a meaningful name. Macro names cannot contain spaces and they cannot begin with a numeral. Because you are the person doing the sorting, and you don’t want to make the macro name too long, naming it mySort gives the macro more meaning than the default name of Macro1.
Composing Your First Macro
❘
15A shortcut key is not mandatory; in fact, most of your macros will not have one or need one. But if you do want to assign a shortcut key, get into the good habit of assigning it with the Ctrl+Shift combination rather than with just the Ctrl key. Excel has assigned almost all 26 letters of the alphabet to serve as shortcuts with the Ctrl key for various tasks, and you will do well to avoid overriding that built-in functionality. For example, Ctrl+C is typically the key combination you use to copy text. However, if you assign the shortcut key Ctrl+C to your macro, you will override the default for that key combination and will not be able to use Ctrl+C to copy text.
To take advantage of the Shortcut Key option, click in the Shortcut Key field, press the Shift key, and also press a key such as the letter S. You will have created the keyboard shortcut Ctrl+Shift+S, which will not interfere with any of Excel’s significant built-in keyboard shortcuts.
Most macros you record will be stored in the workbook you are working with. For now, you can keep the default selection of This Workbook in the Store Macro In field.
Finally, in the Description field, enter a brief but meaningful explanation of what the macro does. When you are finished making these minor changes to the Record Macro dialog box, it will look similar to Figure 2-13. Go ahead and click OK, which will turn on the Macro Recorder, and you can proceed to manually perform the steps you want to automate.
figurE 2-13
In versions 2003 and before, you will see a tiny floating toolbar while the Macro Recorder is on. That is the Stop Recording toolbar, with a Stop Recording button you will click when you are finished recording your actions. When you have completed the steps to your task, turn off the Macro Recorder in version
If you are working in a later version of Excel, click the Stop Recording button from the Developer tab in the Ribbon, as shown in Figure 2-15. Clicking the Stop Recording button ends the recording session, and you will have created your macro.
figurE 2-15
HEy, My sTop rEcording BuTTon disAppEArEd!
If you are using Excel version 2003 or before, the Stop Recording toolbar might seem to suddenly disappear on you from time to time. This is almost always due to unwittingly closing that toolbar by clicking the “X” close button on its title bar instead of the Stop Recording button. It happens to the best of us. To show the Stop Recording toolbar again, start to record a new macro, then from the worksheet menu click View ➪ Toolbars ➪ Stop Recording. Click the Stop Recording button to end the macro, and the next time you record a macro, the Stop Recording toolbar will be its normal visible self.
running A MAcro
You have many ways to run a macro, most of which are demonstrated in later lessons. As you will see, the method(s) you choose for running your macros may depend on complex reasons such as the workbook design, or may be based on a simpler factor such as what feels most intuitive and conve-nient for you. To wrap up this lesson, following are a couple of commonly used options for running your macros.
The Macro dialog Box
When you create recorded macros, their names will appear listed in a dialog box called, appropriately enough, the Macro dialog box. To show the Macro dialog box in version 2003 or before, click the Run Macro button on the Visual Basic toolbar as shown in Figure 2-16. The title of
running a Macro
❘
17it, you are not actually running a macro yet. All you’ll be doing is displaying the Macro dialog box, from which you can run a macro but also edit and examine macros.
In versions later than 2003, the button to click is more logically labeled Macros, as shown in Figure 2-17.
figurE 2-17
Regardless of the Excel version, pressing Alt+F8 displays the Macro dialog box — no mouse clicks needed.
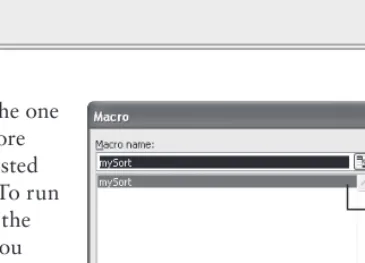
Figure 2-18 shows the Macro dialog box with the one and only mySort macro listed. As you create more macros in this workbook, their names will be listed in the Macro dialog box in alphabetical order. To run your macro, select its name in the list and click the Run button as indicated by the black arrows. You could also run the macro by double-clicking its name in the list.
shortcut key
Recall that you assigned the shortcut key
Ctrl+Shift+S to this macro at the start of the macro recording process. Because you did that, you do not need to bother with the Macro dialog box if you don’t want to; you can run the mySort macro simply by pressing Ctrl+Shift+S.
Try iT
In this lesson, you practice creating a recorded macro.
lesson requirements
For this lesson, you create a macro by turning on the Macro Recorder, copying a range of formula-containing cells, and using Paste Special to convert the formulas in that range to values.
step-by-step
Start by establishing a situation where you have dynamic formulas in cells where you prefer to show static values. In a fresh worksheet, select cell A1:D10, and type the formula =INT(RAND()*1000). Press Ctrl+Enter, which will insert formulas in A1:D10 that return a random number between 0 and 199. Select any single cell to deselect range A1:D10.
Create a macro that copies the range of dynamic RAND numbers, and paste the numbers over the range as values to obtain static numbers:
1 .
Turn on the Macro Recorder by clicking the Record Macro button.2 .
In the Record Macro dialog box, name the macro ValuesOnly and assign it the shortcut Ctrl+Shift+C.3 .
Click OK to start recording your ValuesOnly macro.4 .
Select range A1:D10.5 .
Press Ctrl+C to copy the selected range.6 .
Right-click within the selected range.7 .
Left-click Paste Special, select Values, and click OK.8 .
Press the Esc key to exit copy mode.9 .
Click cell A1 to deselect all cells except A1.10 .
Turn off the Macro Recorder by clicking the Stop Recording button.11 .
Re-enter formulas in range A1:D10 and test your macro with the shortcut Ctrl+Shift+C, or by displaying the Macro dialog box, selecting the ValuesOnly macro name in the list, and clicking the Run button.Once you run your macro, the formulas you entered will now be hard numbers.
To get the sample database files, you can download Lesson 2 from the book’s website at www.wrox.com.
introducing the
Visual Basic editor
In Lesson 2, you learned how to create a macro, and you saw a couple of easy ways to run the macro you created. Now it’s time to view your macro and have a look at the environment called the Visual Basic Editor (VBE), within which all macros and VBA procedures are stored. Seeing where macros live and breathe will improve your understanding of the VBA program-ming process, especially when you start to edit existing macros or create new macros without the Macro Recorder.
WHAT is THE VBE?
It’s fair to say that for many users of Excel, the worksheets, pivot tables, charts, and hundreds of functions are all the tools they need to satisfactorily handle their spreadsheet activities. For them, the familiar workbook environment is the only side of Excel they see, and understand-ably the only side of Excel they are probunderstand-ably aware of.
But Excel has a separate, less visible environment working behind the scenes — the Visual Basic Editor — which is interconnected with the workbook environment even if no program-ming code exists in the workbook. Both environments are constantly but quietly working together, sharing information back and forth about the entire workbook. The Visual Basic Editor is a user-friendly development environment where programmed instructions are main-tained in order to make your spreadsheet applications work.
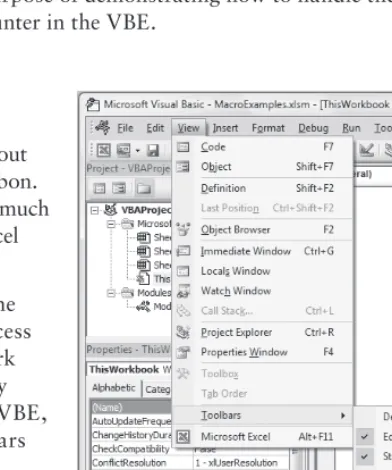
HoW To gET inTo THE VBE
With Excel open, a fast and easy way to get into the Visual Basic Editor is to press Alt+F11 on your keyboard. You can do this from any work-sheet. It’s just as quick with your mouse too, by clicking the Visual Basic Editor icon on the Visual Basic toolbar in versions up to 2003, as shown in Figure 3-1, or the Visual Basic button from the Developer tab on the Ribbon in later versions, as shown in Figure 3-2.
figurE 3-2
cArEful, THAT WAs *AlT*+f11!
The Ctrl key is commonly used in conjunction with other keys for keyboard short-cuts. By force of habit, you might mistakenly press Ctrl+F11 instead of Alt+F11 when attempting to go to the VBE. However, pressing Ctrl+F11 has a curious result: you won’t be taken to the VBE, but instead you will have created and find yourself on an outdated type of sheet called a macro sheet, with the strange tab name of Macro1. Prior to Excel version 97, macros were stored on macro sheets, which can still be created, though they have no practical use with today’s Excel, and they no longer hold any programming code. It’s OK to just delete the macro sheet if you cre-ate one, and take another stab at the Alt key with F11 to get into the VBE.
undErsTAnding THE VBE
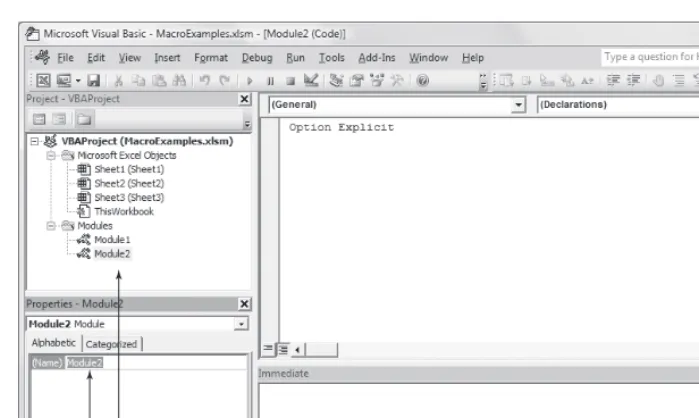
The Visual Basic Editor can show a number of different windows depending on what you want to see or do. For the majority of work you’ll be doing with the help of this book, you’ll want to even-tually become familiar with four windows: the Project Explorer window, the Code window, the Properties window, and the Immediate window. Figure 3-3 shows what the VBE looks like with these four windows.
understanding the VBe
❘
21Project Explorer window
Immediate window
Code window
Properties window figurE 3-3
The project Explorer Window
The Project Explorer is a vertical pane on the left side of the VBE. It behaves similarly to
Windows Explorer, with folder icons that expand and collapse when clicked. If you do not see the Project Explorer window in your VBE, press Ctrl+R, or from the VBE menu bar, click View ➪
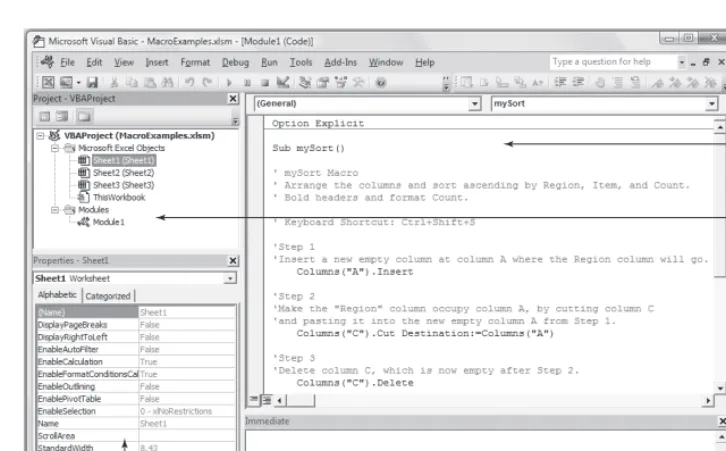
Project Explorer. As the first item showing at the top of the Project Explorer window in Figure 3-3, the name of the workbook I am using (in Excel terms, the VBAProject) is MacroExamples.xlsm.
VBA code is kept in objects known as modules, which are discussed later in further detail. Figure 3-3 shows one module called Module1. Double-clicking a module name in the Project Explorer displays that module’s VBA code contents in the Code window, as you see in Figure 3-3.
The code Window
The properties Window
The Properties window is located in the left vertical pane near the bottom of the VBE. If you do not see the Properties window in your VBE, press F4, or from the VBE menu bar click View
➪ Properties Window. This window displays a list of the properties and their assigned values of whatever object is selected in the Project Explorer window. For example, in Figure 3-3, Sheet1 has been selected and the Properties window shows you, among other details, that the Name property for the selected object is Sheet1.
The immediate Window
The Immediate window is located at the bottom of the VBE, usually below the Code window as depicted in Figure 3-3. If you do not see the Immediate window in your VBE, press Ctrl+G, or from the VBE menu bar, click View ➪ Immediate Window. The name “Immediate” has nothing to do with urgency, but rather with the notion that you can query a line of code and immediately obtain its returned result, without having to run a macro to see what that code line does. This comes in handy for code debugging tactics you will see in Lesson 17, but for now I just wanted to point out the Immediate window to familiarize you with its name and location.
undErsTAnding ModulEs
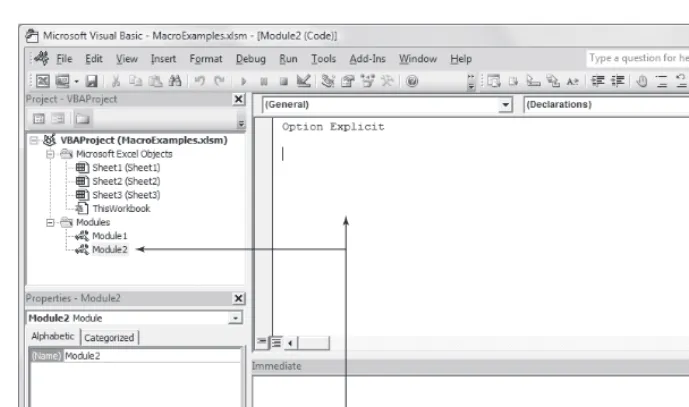
I touched on modules earlier but they are worth another mention. A module is a container for your code. A single module may hold one or many macros, depending on the workbook and your prefer-ence for how you manage your code. For smaller projects with maybe two or three macros, just one module is sufficient. If you develop larger projects with dozens of macros, you will want to organize them among several modules by theme or purpose.
Several types of modules exist:
➤ Standard Modules — These are the kind you have seen already, which hold macros you cre-ate from scratch on your own or from the Macro Recorder.
➤ UserForm Modules — These belong to a custom user interface object called a userform, which is covered in Lessons 18, 19, and 20.
➤ Class Modules — These contain the kind of VBA code that allows you to create your own objects programmatically. Creating your own classes is very cool, and you learn about that in Lesson 21.
➤ Worksheet Modules — These hold VBA code that looks and acts like macros, but to make things interesting Microsoft refers to that code as a procedure instead of as a macro. Worksheet-level procedures are tied to various actions called “events,” such as selecting a range or entering a value in a cell.
➤ Workbook Module — Not to be outdone, the workbook itself has its own module, named by default as ThisWorkbook, where code is maintained for handling workbook-level events.
using the object Browser
❘
23using THE oBjEcT BroWsEr
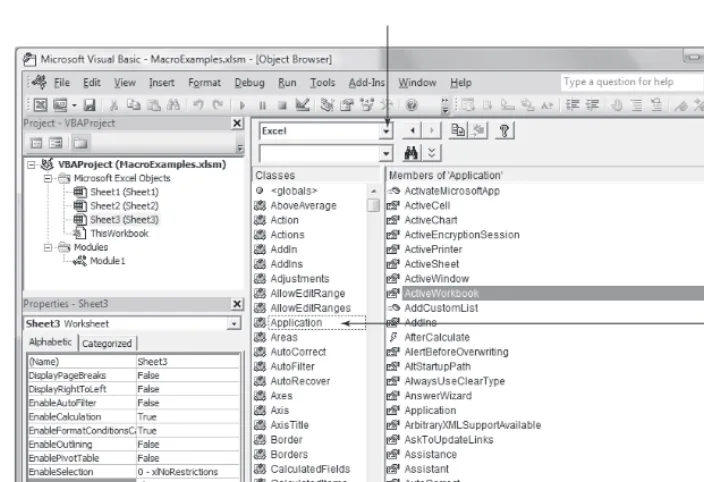
The VBE offers a useful tool you should know about, called the Object Browser. This section gives some background on the Object Browser and how you can use it to familiarize yourself with locat-ing objects and their associated properties and methods.
The ability to program Excel is based on tapping into any of several libraries of objects in the Microsoft Office objects model. For example, there is an Office library, a VBA library, and of course, an Excel library. Some libraries have hundreds of objects, and each object has many prop-erties, methods, and in some cases, associated events. The interwoven collection of object libraries and their keyword kin is enormous. Fortunately, there is the Object Browser to guide your search for information about objects and their properties for whatever library you are interested in.
To see the Object Browser in the VBE, press the F2 key or click View ➪ Object Browser. It will look similar to Figure 3-4 — it covers the area normally occupied by the Code window.
List of all Classes available for Excel that you can select to browse.
This pane lists all Properties and Methods that apply to whichever Class item you select.
figurE 3-4
Following those steps, the Object Browser will look like Figure 3-5, with the black arrows pointing to what you clicked. If you click the green Workbook link at the bottom, the Object Browser will take you to the Workbook class, and display the properties and methods for Workbook.
figurE 3-5
With a class or member item selected, you can click the yellow Question Mark icon at the top of the Object Browser to be taken to the Help file for that selected item.
The Object Browser has a Search feature in the drop-down field to the left of the Binoculars icon. If you type a term you are interested in and click the Binoculars icon, the associated members of that term will be displayed for the selected library.
To exit the Object Browser, click the lower of the two “X” close buttons near the top-right corner of the VBE.