Creative Suite
®
3
Bible
Ted Padova
Creative Suite
®Creative Suite
®
3
Bible
Ted Padova
Indianapolis, IN 46256 www.wiley.com
Copyright © 2007 by Wiley Publishing, Inc., Indianapolis, Indiana
Published simultaneously in Canada
ISBN: 978-0-470-13067-4
Manufactured in the United States of America
10 9 8 7 6 5 4 3 2 1
No part of this publication may be reproduced, stored in a retrieval system or transmitted in any form or by any means, electronic, mechanical, photocopying, recording, scanning or otherwise, except as permitted under Sections 107 or 108 of the 1976 United States Copyright Act, without either the prior written permission of the Publisher, or authorization through payment of the appropriate per-copy fee to the Copyright Clearance Center, 222 Rosewood Drive, Danvers, MA 01923, (978) 750-8400, fax (978) 646-8600. Requests to the Publisher for permission should be addressed to the Legal Department, Wiley Publishing, Inc., 10475 Crosspoint Blvd., Indianapolis, IN 46256, (317) 572-3447, fax (317) 572-4355, or online at http://www.wiley.com/go/permissions.
LIMIT OF LIABILITY/DISCLAIMER OF WARRANTY: THE PUBLISHER AND THE AUTHOR MAKE NO REPRESENTATIONS OR WARRANTIES WITH RESPECT TO THE ACCURACY OR COMPLETENESS OF THE CONTENTS OF THIS WORK AND SPECIFICALLY DISCLAIM ALL WARRANTIES, INCLUDING WITHOUT LIMITATION WARRANTIES OF FITNESS FOR A PARTICULAR PURPOSE. NO WARRANTY MAY BE CREATED OR EXTENDED BY SALES OR PROMOTIONAL MATERIALS. THE ADVICE AND STRATEGIES CONTAINED HEREIN MAY NOT BE SUITABLE FOR EVERY SITUATION. THIS WORK IS SOLD WITH THE UNDERSTANDING THAT THE PUBLISHER IS NOT ENGAGED IN RENDERING LEGAL, ACCOUNTING, OR OTHER PROFESSIONAL SERVICES. IF PROFESSIONAL ASSISTANCE IS REQUIRED, THE SERVICES OF A COMPETENT PROFESSIONAL PERSON SHOULD BE SOUGHT. NEITHER THE PUBLISHER NOR THE AUTHOR SHALL BE LIABLE FOR DAMAGES ARISING HEREFROM. THE FACT THAT AN ORGANIZATION OR WEBSITE IS REFERRED TO IN THIS WORK AS A CITATION AND/OR A POTENTIAL SOURCE OF FURTHER INFORMATION DOES NOT MEAN THAT THE AUTHOR OR THE PUBLISHER ENDORSES THE INFORMATION THE ORGANIZATION OR WEBSITE MAY PROVIDE OR RECOMMENDATIONS IT MAY MAKE. FURTHER, READERS SHOULD BE AWARE THAT INTERNET WEBSITES LISTED IN THIS WORK MAY HAVE CHANGED OR DISAPPEARED BETWEEN WHEN THIS WORK WAS WRITTEN AND WHEN IT IS READ.
For general information on our other products and services or to obtain technical support, please contact our Customer Care Department within the U.S. at (800) 762-2974, outside the U.S. at (317) 572-3993 or fax (317) 572-4002.
Library of Congress Control Number: 2007935020
From Kelly Murdock:
It’s hard to smile when trials abound,
It’s tough to be happy when there’s danger around,
It’s difficult to laugh when fear gets you down,
It’s rough to be positive when your friends wear a frown.
But if you can smile, then trials melt away,
And if you can be happy, then dangers become clay,
If you can laugh, your fears will disperse.
And if you can be positive, then you don’t need this verse.
In our crazy, hustle-bustle world, life favors the optimist.
Digital Photographers For Dummies; Photoshop Elements 5 For Dummies; PowerPoint 2007 Just the Steps For Dummies; Illustrator Illuminated; and Adobe Reader 7 Revealed.
Ted has been involved in PostScript imaging for more than a decade and started a computer service bureau in 1990 in Ventura, California. He retired as CEO and managing partner of The Image Source Digital Imaging and Photo Finishing Centers of Thousand Oaks and Ventura, California, in 2004 and now spends his time writing and speaking nationally and internationally on digital imaging, Adobe Acrobat, and PDF.
Kelly Murdockhas been authoring computer books for several years now and still gets immense enjoy-ment from the completed work. His book credits include various Web, graphics, and multimedia titles, including seven editions of the book, 3ds Max Bible. Other major accomplishments include Master VISU-ALLY HTML and XHTML, Maya Revealed(two editions), Poser Revealed(two editions), Edgeloop Character Modeling, JavaScript Visual Blueprint, Adobe Atmosphere Bible, 3d Game Animation for Dummies, and co-authoring duties on two editions of the Illustrator Bible (versions 9 and 10).
Part I: Getting to Know the Creative Suite . . . 1
Chapter 1: Introducing the Creative Suite...3
Chapter 2: Taking a Tour of the Creative Suite ...25
Chapter 3: Setting Preferences ...75
Chapter 4: Understanding User Interfaces ...129
Part II: Getting Started with Design Workflows . . . 175
Chapter 5: Creating Production Workflows ...177
Chapter 6: Creating Color-Managed Workflows ...187
Chapter 7: Using Adobe Bridge ...201
Chapter 8: Using Version Cue...271
Chapter 9: Managing Adobe PDF Files ...293
Part III: Working with Objects and Images . . . 301
Chapter 10: Creating, Selecting, and Editing Objects ...303
Chapter 11: Acquiring and Correcting Images ...385
Chapter 12: Transforming Objects and Images ...419
Chapter 13: Applying Effects to Objects and Layers ...459
Chapter 14: Working with Layers ...517
Chapter 15: Automating Tasks ...593
Part IV: Working with Type . . . 617
Chapter 16: Working with Fonts ...619
Chapter 17: Working with Styles ...639
Chapter 18: Working with Text Frames ...697
Chapter 23: Creating Charts and Graphs ...809
Chapter 24: Microsoft Office and Professional Printing...835
Part VI: Working in Creative Design Workflows . . . 857
Chapter 25: Creating Review Sessions ...859
Chapter 26: Designing Layouts...881
Chapter 27: Modifying Layouts ...907
Part VII: Document Repurposing . . . 919
Chapter 28: Exporting Designs for Web and Screen Viewing ...921
Chapter 29: Preparing Documents for Distribution...943
Chapter 30: Redacting Documents ...973
Part VIII: Creative Suite Document Delivery Workflows . . . 983
Chapter 31: Understanding Digital Rights Management ...985
Chapter 32: Creating Interactive Documents ...1005
Chapter 33: Hosting Documents on the Web ...1049
Chapter 34: Working with PDF Forms ...1059
Chapter 35: Creating SWF Files ...1103
Chapter 36: Creating Slide Presentations ...1135
Part IX: Printing and Digital Prepress . . . 1161
Chapter 37: Choosing Print Setups...1163
Chapter 38: Commercial Printing ...1201
Introduction. . . xxxiii
Part I: Getting to Know the Creative Suite
1
Chapter 1: Introducing the Creative Suite . . . 3
Dynamic object and image editing ...5
Visual file exchanges ...5
Starting with a Sketch in Acrobat ...25
Scanning a sketch into Acrobat ...26
Submitting a sketch for e-mail review ...28
Adding comments to the PDF ...30
Collecting review comments ...31
Editing Images in Photoshop ...32
Adjusting image properties ...33
Correcting distortions ...35
Editing images ...36
Versioning Files in Version Cue CS3...47
Using Adobe Bridge ...50
Creating a Layout in InDesign ...52
Setting layout properties ...53
Importing content into InDesign ...54
Creating Master pages in InDesign ...56
Threading text ...57
Preparing a Layout for Print ...60
Previewing separations...60
Exporting to PDF for printing ...62
Soft-Proofing in Adobe Acrobat ...62
Checking color in Acrobat ...63
Flattening transparency ...63
Creating a PDF/X file ...63
Repurposing a Document for Web Hosting ...67
Using PDF Optimizer...67
Exporting to Dreamweaver...69
Enhancing Web pages with Flash ...71
Summary ...73
Chapter 3: Setting Preferences . . . 75
Getting to Know Common Preference Attributes ...75
Setting application-specific preferences ...76
Dreamweaver CS3 and Flash CS3 Professional preferences ...126
Summary ...128
Chapter 4: Understanding User Interfaces . . . 129
Accessing Tools ...129
Common tools for Illustrator, InDesign, Photoshop, and Flash ...132
Common tools for Illustrator and InDesign ...133
Adobe Bridge tools...134
Acrobat and Dreamweaver tool options ...148
Using Palettes and Workspaces...148
Customizing keyboard shortcuts in Illustrator ...164
Customizing keyboard shortcuts in Photoshop ...166
Customizing keyboard shortcuts in InDesign ...168
Customizing keyboard shortcuts in Flash and Dreamweaver ...171
Working with keyboard shortcuts in Acrobat ...172
Summary ...173
Part II: Getting Started with Design Workflows
175
Chapter 5: Creating Production Workflows . . . 177
Understanding Workflows ...177
Workflows for Independent Artists...178
Modifying designs ...180
Extending the workflow...180
Workflows for Studios and Production Houses...181
Document Repurposing ...182
Setting Workflow Standards ...184
Set standards for the tools used in your workflow ...184
Use vendors who support the tools you use ...184
Devote time to ongoing training...184
Develop a paradigm for managing your projects ...185
Color Management in the CS3 Applications ...193
Adjusting color settings ...194
Printing with Profiles ...198
Summary ...199
Chapter 7: Using Adobe Bridge . . . 201
Getting Familiar with the Bridge Workspace ...201
Using the Bridge interface ...203
Working with Keywords and Metadata ...223
Using Keywords ...223
Getting an overview of ASP ...239
Downloading comps ...242
Opening Camera Raw Files ...245
Setting camera raw preferences ...245
Using the Camera Raw plug-In ...247
Applying settings in Bridge ...253
Saving camera raw files ...254
Synchronizing Color Across the CS3 Programs...255
Enabling Application Commands from the Bridge ...256
Photoshop support ...257
Illustrator support ...262
InDesign support ...262
Exploring Options in the Bridge Home ...263
Chapter 8: Using Version Cue . . . 271
Setting Up the Version Cue Workspace...271
Enabling Version Cue and setting preferences ...272
Specifying workspace folders ...272
Updating Version Cue ...273
Enabling Version Cue within a CS3 application ...275
Working with Adobe Dialog ...276
Accessing Version Cue Files ...281
Starting the Version Cue server ...281
Creating a Version Cue project ...281
Accessing remote Version Cue projects...282
Opening Version Cue files ...282
Saving Version Cue files ...282
Understanding states ...283
Adding files to a Version Cue project ...284
Working with versions ...284
Deleting Version Cue files ...285
Accessing Version Cue files in Bridge ...286
Using the Version Cue CS3 Administration Utility ...287
Adding and editing users ...288
Part III: Working with Objects and Images
301
Chapter 10: Creating, Selecting, and Editing Objects . . . 303
Creating Objects in Illustrator ...303
Using the Pen tool ...304
Using the Type tool ...307
Creating lines and shapes...307
Using the Paintbrush and Pencil tools ...308
Creating and Editing Objects in Acrobat...314
Adding document-enhancement objects ...314
Adding commenting objects...315
Creating Objects in Dreamweaver ...316
Selecting Objects ...317
Using Illustrator and InDesign’s Toolbox selection tools ...317
Selecting objects with Illustrator’s Layers palette ...319
Using Illustrator’s Select menu ...320
Applying fill and stroke colors to objects in Illustrator and InDesign ...322
Applying other stroke attributes...324
Using Illustrator’s Live Paint ...328
Filling and stroking a pixel selection ...333
Filling and stroking a Photoshop path ...334
Assigning Color ...335
Learning the various color modes ...335
Using the Color palette ...339
Using the Color Picker ...340
Using the Eyedropper tool ...342
Using Live Color ...344
Using the Color Guide palette ...346
Managing color profiles and settings ...346
Working with Gradients ...347
Applying transparency to objects and images ...357
Using blending modes ...358
Creating an opacity mask ...360
Using Symbols, Graphic Styles, and Swatches ...362
Working with symbols in Illustrator...362
Working with object styles in InDesign ...365
Working with graphic styles in Illustrator and Photoshop ...367
Creating compound paths and shapes in Illustrator ...377
Blending objects in Illustrator ...379
Creating a clipping mask in Illustrator ...380
Distorting objects in Illustrator ...380
Using the Lens Correction filter ...389
Correcting Images ...391
Using Levels...391
Using Curves ...392
Using Auto adjustments ...393
Editing 32-bit high Dynamic Range Images ...394
Painting Images ...397
Painting images in Photoshop ...397
Working with images in the other CS3 applications ...400
Selecting Pixels in Photoshop ...408
Using the Selection tools ...409
Using the Selection menu...412
Converting drawn paths into selections ...413
Editing Images ...414
Cropping images in Photoshop ...414
Retouching images in Photoshop ...415
Using the Spot Healing Brush ...416
Arranging Stacking Order...450
Controlling stacking order using layers ...450
Changing stacking order with the Arrange menu ...451
Changing stacking order with the Clipboard ...451
Changing stacking order within a group ...452
Stacking order in Photoshop and Flash ...452
Changing Z-Index in Dreamweaver ...452
Aligning and Distributing Objects ...452
Aligning objects ...453
Distributing objects ...453
Distributing spacing...453
Aligning and Distributing Image Layers in Photoshop ...455
Aligning image layers ...456
Using Photoshop filters in Illustrator ...497
Using Smart Filters ...497
Using the Convert to Shapes effects ...508
Applying standard Illustrator features as effects ...508
Using the Stylize effects ...509
Using the Warp effects ...510
Using Photoshop’s Layer Effects and Styles ...512
Chapter 15: Automating Tasks . . . 593
Using the Actions Palette in Photoshop and Illustrator ...594 Playing an action ...595 Creating and saving a new action set ...595 Creating new actions ...596 Editing existing actions ...598 Batch-processing actions ...599 Creating a droplet ...601 Using Scripts ...603 Using Photoshop’s Script Events Manager ...604 Using scripts in InDesign ...604 Using Photoshop’s Additional Automation Features ...605 Working with Data-Driven Graphics ...605 Creating batch sequences using JavaScript ...613 Summary ...616
Part IV: Working with Type
617
Chapter 16: Working with Fonts. . . 619
Installing fonts in Mac OS X...622 Installing fonts in Windows ...623 Organizing your fonts ...623 Using font-management tools ...624 Creating Type Outlines and Special Effects ...627 Converting type to outlines in Illustrator ...628 Converting type to outlines in Photoshop ...631 Converting type to outlines in InDesign ...634 Summary ...638Chapter 17: Working with Styles . . . 639
Setting type in InDesign ...655 Creating type on paths ...665 Creating Character Styles ...668 Using character styles in Illustrator ...668 Using styles in Photoshop ...670 Using character styles in InDesign ...670 Creating Paragraph Styles ...671 Using paragraph styles in Illustrator...672 Using paragraph styles in InDesign ...674 Creating Nested Styles ...675 Creating Cell and Table Styles ...680 Creating a table style ...680 Creating cell styles ...681 Applying table styles ...682 Using Graphic and Object Styles ...684 Using graphic styles in Illustrator...685 Using graphic styles in Photoshop ...689 Using object styles in InDesign ...690 Summary ...696
Chapter 18: Working with Text Frames . . . 697
Chapter 22: Working with Tables . . . 781
Importing Tables ...781 Importing Microsoft Word tables ...781 Importing Microsoft Excel tables ...786 Working with Tables in InDesign ...787 Creating tables ...788 Editing tables ...791 Formatting tables ...793 Formatting cells ...794 Exporting tagged tables from InDesign...798 Using Excel Spreadsheets in InDesign ...798 Working with Tables in Dreamweaver ...803 Creating Dreamweaver tables ...803 Populating cells ...803 Importing tables...804 Selecting cells...805 Moving, adding, and deleting rows and columns ...805 Resizing cells ...806
Knowing the Various Chart and Graph Types ...809 Using Illustrator Graphs ...813 Using the Graph tool ...813 Entering data in the Graph Data window ...814 Formatting graphs ...818 Importing Excel and Word Charts ...832 Creating Excel charts ...832 Transporting Excel charts via the Clipboard ...832 Creating Word charts and diagrams ...833 Transporting Word diagrams via the Clipboard ...834 Summary ...834
Chapter 24: Microsoft Office and Professional Printing . . . 835
Preparing Excel Files ...854 Summary ...856
Part VI: Working in Creative Design Workflows
857
Chapter 25: Creating Review Sessions . . . 859
Importing Adobe Flash files ...902
Exporting InDesign Documents to Dreamweaver ...921 Exporting an InDesign document...922 Export incompatibilities...923 Preparing an InDesign document for export to Dreamweaver ...924 Opening an exported InDesign document in Dreamweaver ...924 Copying and pasting content ...925 Setting Up a Site Window with the Site Wizard ...926 Using the New dialog box ...926 Creating a new site...927 Adding pages to a site ...927 Updating pages ...929 Creating Web Pages in Dreamweaver ...929 Building Web pages and using views ...929 Using the Web page tools...931 Changing object properties ...932 Adding Web page text ...932 Linking Web pages...933 Working with Basic Objects and images ...933 Cascading Style Sheets ...937 Using the CSS Editor ...938 Defining styles ...939 Applying styles...939 Creating an external style sheet ...939 Designing for Mobile Devices ...940 Creating new Dreamweaver documents for Mobile Devices ...940 Previewing mobile pages in Device Central ...940 Converting existing documents to XHTML Mobile ...941 Summary ...942
Chapter 29: Preparing Documents for Distribution . . . 943
Setting Document Open Preferences ...948 Setting initial views ...949 Saving the initial view ...952 Using Acrobat Catalog ...953 Creating a new index file ...953 Saving index definitions ...956
Part VIII: Creative Suite Document Delivery Workflows
983
Using Multimedia in Designs ...1023
Digital Signature fields properties...1084 Creating a Submit Form button ...1093 Enabling forms with Adobe Reader usage rights...1094 Distributing a single form ...1095 Creating an SWF file in Flash...1113 Creating SWF Files in Illustrator ...1117 Saving SWF files ...1117 Illustrator and SWF differences ...1122 Creating SWF animations with layers...1122 Using symbols ...1123 Using SWF Files in Dreamweaver...1126 Adding SWF objects to a Web page in Dreamweaver ...1126 Using SWF Files in Acrobat ...1129 Converting Web pages to PDF ...1129 Importing SWF files in PDF documents ...1131 Summary ...1134
Chapter 36: Creating Slide Presentations . . . 1135
Using Layers with Presentations ...1151 Creating interactivity in Full Screen mode ...1157 Summary ...1158
Part IX: Printing and Digital Prepress
1161
Chapter 37: Choosing Print Setups. . . 1163
Selecting Desktop Printers ...1163 Printer selection on the Mac...1163 Printer selection on Windows ...1166 Setting Print Options ...1169 Setting print options in Illustrator ...1169 Setting print options in Photoshop...1180 Managing color at print time ...1184 Setting print options in InDesign ...1184 Setting print options in Acrobat ...1193 Printing PDF files to PostScript devices ...1198 Summary ...1199
Chapter 38: Commercial Printing . . . 1201
Soft-Proofing Documents in the CS Programs...1201 Soft-proofing files in InDesign ...1202 Soft-proofing files in Illustrator ...1206 Proofing and printing in Acrobat Professional...1208 Soft-proofing menu commands ...1208 Packaging Documents for Commercial Printing ...1224 PDF creation in Illustrator ...1224 PDF creation in InDesign ...1225 Printing PDF/X Files...1226 Summary ...1227
thank the many individuals at Adobe Systems, far too numerous to mention, who have worked passion-ately on a terrific suite of programs to bring all of us the most advanced software applications developed to date for the creative professional.
From Ted Padova:
I’d like to thank my coauthor Kelly Murdock for his hard work and dedication to this project. This is the third edition Kelly and I have worked on together, and it’s continually a pleasure to work with him. From Kelly Murdock:
create and publish content for print, Web hosting, and CD-ROM replication.
Much has changed from the Creative Suite 2 programs to the newest incarnation of the Creative Suite. Adobe GoLive has been replaced by Adobe Dreamweaver, Adobe Flash has been included in the suite, Device Central is a new application introduced in this release, and you’ll find some major upgrades to the remaining programs that were introduced in Adobe Creative Suite 2.
So why would we spend time covering subjects that are individually treated in other Wiley Bible publi-cations? This is a good question, and the answer should be clear to you before you walk out of your local bookstore with this sizeable volume. It’s true that there is a Wiley Bible covering each of the indi-vidual programs mentioned in this book. These other works are comprehensive and teach you just about every tool and feature related to the specific programs.
This book is much different from the other Bibles. Our primary focus is to cover workflow solutions for independent designers and members of design teams working in agencies, publication houses, and any firm related to publishing for screen, print, or Web. Therefore, we don’t go into minute detail on each program, and often we point you to one of the other fine Wiley publications to amplify your learning. We assume you have some experience in at least one of the programs covered in this book. You may be a designer who works religiously with Adobe Photoshop, QuarkXPress, and the former Macromedia FreeHand. Or you may work with Adobe Illustrator and Adobe Photoshop, but know little about page-layout programs. What you need to know are essential methods for integrating application documents among the CS3 programs. Perhaps you don’t need to know every aspect of Adobe InDesign, but you want to create sophisticated layouts using many outstanding type features and want to know how to import images in your designs.
If you’re switching from another program or you want to add one of the CS3 applications to your design toolbox, this book helps you understand the relationships among programs and how to seamlessly inte-grate files among the most sophisticated suite of software applications ever developed for creative profes-sionals.
How to Read This Book
The Adobe Creative Suite 3 Bibleis made up of 38 chapters in nine parts. Unlike other comprehensive com-puter publications that target beginning users, this volume assumes you have some basic knowledge of at least one imaging program like Photoshop, an illustration program, or a layout program. We further assume you know something about user interfaces common to imaging programs that use palettes, menus, and tools. And, we make the assumption that you know some aspects of the professional printing market for commercial prepress and printing.
Because you have some knowledge of computer programs similar to those found in the Creative Suite, you can jump in anywhere and learn about any feature set. In most chapters, we include a discussion concern-ing the integration of the CS3 programs. Therefore, a chapter dealconcern-ing with text includes text handlconcern-ing not only in InDesign, but Illustrator, Photoshop, Dreamweaver, and Acrobat. Rather than think of the programs you want to learn about, search more for the techniques and features you want to learn.
To give you a broad idea of how the programs work together, we recommend you look over Chapter 2, where we provide steps you can replicate to produce a design piece using the CS3 programs. Chapter 3 helps you understand the interoperability of the CS3 programs.
Apart from Chapter 2 and the specific features you want to learn, keep in mind that this book, like other Wiley Bible publications, is a reference work. Keep it handy as you work in the CS3 applications, and refer to the index and contents when you need help working on a task or trying to further understand one of the programs.
Icons
What would a Bible be without icons? The use of icons throughout the book offers you an at-a-glance hint of what content is being addressed. You can jump to the text adjacent to these symbols to help you get a lit-tle more information, warn you of a potential problem, or amplify the concept being addressed in the text. In this book you’ll find the following icons:
A caution icon alerts you to a potential problem in using one of the CS applications, any tools or menus, or any issues related to exchanging files between programs. Pay close attention to these caution messages to avoid some problems.
A note icon signifies a message that may add more clarity or help you deal with a feature more effectively.
Tips help you find shortcuts to produce results or work through a series of steps to complete a task. Some tips provide you with information that may not be documented in the Help files accompanying each of the CS programs.
Walking you through steps and techniques in a linear fashion is almost impossible for a suite of programs. The applications have so many interrelated features that covering all aspects of a single feature in one part of a book just doesn’t work. Therefore, some common features for commands, tools, actions, or tasks may be spread out and discussed in different chapters. When the information is divided among different parts of the book, you’ll find a Cross-Ref icon that refers you to another part of the book covering related information.
We marked new CS3 features with a special icon so you can easily see a new program feature not available in earlier editions of each application.
The Book’s Contents
To simplify your journey through the Creative Suite applications, the book is broken up into nine separate parts. There are a total of 38 chapters that address features common to creative production workflows. These parts are covered in the following sections.
Part I: Getting to Know the Creative Suite
To start off, we offer some basic information related to the Creative Suite Premium Edition. You’re given a tour of the programs in the form of steps to produce design pieces and learn how these applications work together to help you publish your content. You learn how to set up the work environments in all the pro-grams and set preference options for standardizing workflows.
Part II: Getting Started with Design Workflows
Design workflowis a broad term and may mean different things to different people. This part clarifies the meaning of workflow solutions as they apply to creative professionals and the CS applications, as well as introduces you to new tools for versioning documents and creating consistent color across the CS programs.
Part III: Working with Objects and Images
You have basically three elements used to communicate messages in artwork. Images, objects, and type con-stitute the content of your products. In this part, we focus on objects you might create in Illustrator, InDesign, and Photoshop, as well as images that are edited in Photoshop and imported into other CS3 programs.
Part IV: Working with Type
Setting type and working with type as text and objects are standard design practices everyone uses. With many features for setting type in the CS3 applications, this part offers you a glimpse into how you can use the programs to implement these impressive features.
Part V: Using the Creative Suite and Microsoft Office
Whether Microsoft Office is part of your design toolbox or you acquire files from clients who provide you with Office documents, it’s hard to talk about layout and design without introducing Office files. This part covers working with files that originate in Office programs and end up in one or more of the CS3 applications.
Part VI: Working in Creative Design Workflows
Part VII: Document Repurposing
When you create documents for one output purpose and need to modify files for other output results, you’re engaged in document repurposing. Rather than start anew each time a modification needs to be made for delivering files for alternative content, you can save time by reworking existing documents suited for a variety of purposes. This part covers various aspects of document repurposing.
Part VIII: Creative Suite Document Delivery Workflows
Issues related to Digital Rights Management, archiving documents, delivering files for Web hosting, and replicating CD-ROMs are but some of the delivery workflows you’re likely to experience. This part covers preparing files for delivery in various forms.
Part IX: Printing and Digital Prepress
Printing files is still a major function of every creative professional’s workflow. This part covers printing to composite printers and preparing files for commercial printing.
Staying Connected
About every five minutes, new products and new upgrades are distributed. If you purchase a software prod-uct, you can often find an updated revision not too long after release. Manufacturers are relying more and more on Internet distribution and less on postal delivery. You should plan on making routine visits to Adobe’s Web site as well as the Web sites of manufacturers of third-party products. Anyone who has a Web site will offer a product revision for downloading or offer you details on acquiring the update.
Internet connection
With newer releases of computer software, it’s essential that you have an Internet connection. The CS3 pro-grams routinely prompt you to check for updates over the Internet. To optimize your performance with all the programs, you should run the software on a computer that has an Internet connection.
Contact Adobe Systems
Adobe Systems maintains a comprehensive Web site where you can find information on product upgrades, conferences and seminars, aftermarket books, help and technical support, as well as tips and techniques. Visit Adobe’s Web site at www.adobe.comfor the latest news related to all the CS3 applications. Be certain to look over Chapter 7 where you can find easy access to Adobe’s Web pages carrying tips and techniques from within Adobe Bridge.
Registration
Contacting Us
If, after reviewing this publication, you feel some important information was overlooked or you have any questions concerning the Creative Suite programs, you can contact us and let us know your views, opin-ions, hoorahs, complaints, or provide information that might get included in the next revision. If it’s good enough, you might even get a credit line in the acknowledgments. By all means, send a note. E-mail inquiries can be sent to:
Ted at [email protected]
Kelly at [email protected]
Creative Suite
IN THIS PART
Chapter 1Introducing the Creative Suite
Chapter 2
Taking a Tour of the Creative Suite
Chapter 3
Setting Preferences
Chapter 4
T
he Adobe Creative Suite 3 Design Premium package is composed of sev-eral programs designed to work together to accomplish all your publish-ing needs for output to print, screen viewpublish-ing, and Web hostpublish-ing. Instead of marketing the individual program components of the Creative Suite, Adobe Systems has spent much of its marketing effort targeting the entire Creative Suite to design professionals.This chapter offers a description of the Creative Suite programs and gives you an idea of how they work together. In this chapter, you learn about the purpose of each program and the relationship each program has with other members of the Creative Suite team. In addition, you receive a brief summary of new features contained in the latest releases of the individual programs.
Why Creative Suite?
Each program in the Creative Suite version 3 is an upgrade from the CS2 applica-tions, and each is available for upgrades individually. So why is Adobe Systems spending so much marketing effort informing users about the benefits of the Creative Suite? And why talk about the Creative Suite as a single entity when users are likely to upgrade the individual software programs in their design stu-dios? These may be the first questions on your mind as you see the advertising for Adobe imaging product upgrades.
The answer is that Creative Suite is a single design solution where the whole is greater than its parts. For years, Adobe Systems built several different applica-tions like Adobe Illustrator and Adobe InDesign with similar core technologies like PDF. These programs evolved with common elements so that you, the cre-ative professional, could easily exchange files among Adobe programs.
Rather than rely on a single program to perform tasks such as illustration, layout, and printing, Adobe offers you several applications, each a tool designed for a spe-cific purpose to help you become more efficient in your creative process. These
tools seamlessly integrate into the greater toolbox called Adobe Creative Suite. After working in individual programs, you can collect the creative elements together using Adobe Bridge and Adobe InDesign CS3 as the tool to perform layout assembly. You can then travel to output by exporting files to PDF documents in Adobe Acrobat, or you can host parts of your layout on a Web site using Adobe Dreamweaver CS3.
Adobe Bridge is a separate executable application introduced in the Creative Suite version 2. Adobe Bridge is included when you purchase any of the CS3 standalone products but is not available for purchase as a separate product. For more information on Adobe Bridge, see the section “Adobe Bridge” later in this chapter.
As standalone programs, Adobe Creative Suite 3 offers many new marvelous tools with enhanced features to create, design, and express your ideas. Collectively, these tools build upon the integration and interoperabil-ity introduced in the first version of the Creative Suite.
Native file support
The strongest argument for using Adobe Photoshop CS3, Adobe Illustrator CS3, Adobe InDesign CS3, and Adobe Flash CS3 together is that native file formats are easily transported between the various CS3 pro-grams. You no longer need to decide about saving Photoshop files as TIFF, EPS, GIF, PNG, or JPEG. Rather, you can import a native Photoshop PSD or Illustrator AI file into Adobe InDesign CS3 complete with layers and transparency. You also can import native Illustrator and Photoshop files directly in Adobe Flash CS. The native file format import feature alone can save you space on your hard drive, because you need to save only a single file. Additionally, you save time in importing the correct file because only a single file is saved from the host application and used in your page layout. You also can directly open native Illustrator CS3 files in any Adobe Acrobat viewer, and you can open PDF documents in Illustrator and import them into InDesign.
For information on importing native file formats across programs, see Part III.
Consistent user interface
Programs that creative professionals use today are sophisticated and complicated. One of the major prob-lems facing many designers is the long learning curve necessary to become productive in a computer pro-gram. When you use several programs from several different computer-software manufacturers, your learning curve increases. Application-software companies develop software according to standards each company sets forth in the design of the user interface. One company may make extensive use of context-sensitive menus, while another company may avoid them. One company may use palettes and panes liber-ally, while another company relies on menu commands and dialog boxes. Add to these differences the extended use of keyboard shortcuts; program differences require you to spend lots of time learning short-cuts. Additionally, the key sequence in one program may invoke a different command than the same key sequence in another program, and that can cause you lots of confusion.
In workflow environments, consistency is crucial. Time is money, and the time required to train your staff cuts into your productivity and your profits. When you use tools all developed by a single software manu-facturer, you become more consistent in the design of the user interface and the keyboard shortcuts that access menus, tools, and commands. Adobe has taken the user interface design one step further by offering customizable keyboard shortcuts and custom workspaces in all CS3 programs.
Having a consistent look and feel in the user interface enables you to develop an intuitive sense for how to use a particular program to create a design project. The more you learn about a manufacturer’s products, the
CRO
SS
-REF
CRO
SS
-REF
NOTE
For information on customizing workspaces and keyboard shortcuts, see Chapter 4.
Versioning tools
How many times have you created a tight comp and had a client tell you that he or she likes another ver-sion of the layout? You may create duotone images in Photoshop, offer a proof print to your client, and have the client tell you he wants another spot color in the Photoshop images. You offer a second proof, and the client informs you the first proof print is really the one that best fits his or her campaign. You’re back at your design studio scrambling through your hard drive looking for the first versions, locating the files, and importing or relinking them back into the layout.
The Creative Suite lets you easily revisit earlier versions of illustrations, photo images, and layouts. Along with the standalone programs in the Creative Suite, you also receive Version Cue, a marvelous utility that permits you to save multiple versions of a design in the same file. You decide what version to promote to the current look, and the linked file in your InDesign CS3 document dynamically updates. In workflow environments, nothing more easily tracks the current version of a design and quickly gets you to final out-put with the correct version.
For more information on installing and using Version Cue and working with versions and alter-nates, see Chapter 8.
Consistent color management
Have you ever created an illustration, dropped it into a layout program, and seen a completely different color rendered in the layout? How about scanned images appearing with one color in Adobe Photoshop and different color values in the layout program? With the Adobe Creative Suite, you can access the same color engine and color-management policies among the design programs and Adobe Acrobat. In Creative Suite 3, you can manage color across all the print-oriented programs including Photoshop, Illustrator, InDesign, and Acrobat using Adobe Bridge. You assign color profiles in Photoshop, Illustrator, or InDesign, and these applications all can conform to the same color management settings.
There is no support for color management or policies in Flash CS3, Dreamweaver CS3, or Device Central CS3.
For more information on managing color across the Creative Suite programs, see Chapter 6. For more information on using Adobe Bridge, see Chapter 7.
Dynamic object and image editing
Ever have last-minute changes that you need to make before the last FedEx pickup of the day? A layout is complete, but you must quickly change an illustration or a photo image. In programs like Adobe InDesign CS3, a double-click of the mouse button or the selection of a menu command launches the editing program that created the object or image and opens the file in a document window. You make your edits and save the file, and the edited version is dynamically updated. This kind of quick editing saves a number of steps and streamlines your workflow.
For more information on dynamic object and image editing, see Chapter 26.
Visual file exchanges
Let’s face it; creative people are more visual and often work best in situations where they can first see a document before importing it into another program. More than ever before, Adobe has created a visually
friendly workplace for you. You can easily drag and drop objects and images between document windows from one program to another, drag files from the desktop to open document windows, and copy and paste objects and images between documents.
With Adobe Bridge, you can see all your files with thumbnail previews and drag and drop files into different application documents. You also can drag and drop Microsoft Word and Excel files into Adobe InDesign CS3 directly from the Bridge window.
For more information on importing and exchanging documents among programs, see Part III. For information on using Adobe Bridge, see Chapter 7.
Support for PDF
With InDesign CS3 as the central core of your Creative Suite programs for design purposes, PDF is the cen-tral file format for file exchanges and printing. All the Adobe CS3 programs, except for Flash and
Dreamweaver, support PDF imports and exports, and these CS3 applications use the same Adobe PDF set-tings. In Creative Suite 3, PDF exports and imports are easier. InDesign CS3, as well as Photoshop CS3 and Illustrator CS3, supports exports to PDF/X format, which is a reliable document format used for commercial printing. Photoshop CS3 supports the creation of PDF slide shows; Illustrator CS3 and InDesign CS3 sup-port PDF creation with Adobe PDF layers. InDesign CS3 now supsup-ports imsup-porting layered PDF documents and toggling layered views directly from within InDesign. You also can apply the same layer views to lay-ered Photoshop and Illustrator CS3 documents. InDesign CS3 also supports multipage PDF file imports. Additionally, you can import media such as movie clips and sound files in InDesign CS3 and export them to PDF. Because PDF is the reliable standard for onscreen document viewing and output to professional print-ing devices, the CS3 programs take advantage of core PDF architecture.
For more information on PDF/X and commercial printing, see Chapter 38. For more informa-tion on PDFs and multimedia, see Chapter 32.
Understanding the Creative Suite
There are two design-oriented versions of the Adobe Creative Suite 3:
n Adobe Creative Suite 3 Design Standard:This includes Adobe Bridge CS3, Adobe Photoshop CS3, Adobe Illustrator CS3, Adobe InDesign CS3, Adobe Acrobat 8 Professional, Device Central CS3, and Version Cue CS3.
n Adobe Creative Suite 3 Design Premium:This includes the same programs with the addition of Adobe Flash CS3 Professional and Adobe Dreamweaver CS3. Also, Adobe Photoshop CS3 is replaced with Adobe Photoshop CS3 Extended.
Both design suites also include the common additional features of Adobe Bridge CS3, Adobe Version Cue CS3, and Device Central CS3.
Adobe also has Creative Suite versions for Web and video professionals. For Web professionals, the suite options include:
n Adobe Creative Suite 3 Web Standard:This includes Adobe Dreamweaver CS3, Adobe Flash CS3 Professional, Adobe Fireworks CS3, and Adobe Contribute CS3.
n Adobe Creative Suite 3 Web Premium:This includes the same programs with the addition of several of the design packages including Adobe Photoshop CS3 Extended, Adobe Illustrator CS3,
For video professionals, the available suite includes:
n Adobe Creative Suite 3 Production Premium:This includes Adobe After Effects CS3 Professional, Adobe Premiere Pro CS3, Adobe Soundbooth CS3, and Adobe Encore CS3, along with the other design packages.
The Adobe Creative Suite 3 Master Collection includes just about everything, except the kitchen sink. We cover all the programs found in the Design Premium version throughout this book, but although we get a little into Web development, we don’t cover the video products at all. In addition to the programs, you also get more than 100 OpenType faces with the Creative Suite editions.
Each of the programs is an upgrade from previous CS2 versions of the software along with the new version of Adobe Bridge, and Adobe Systems intends to upgrade the products in tandem for future versions. Therefore, you can be confident that the next upgrade of a program like Photoshop CS3 will also include upgrades to Illustrator CS3, InDesign CS3, and DreamweaverCS3.
Adobe Bridge
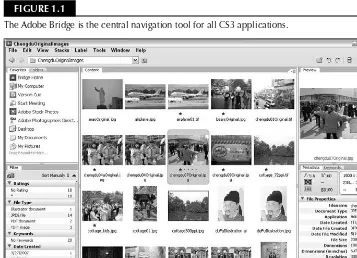
Adobe Bridge, shown in Figure 1.1, is an updated executable application introduced in the Creative Suite version 2. If you launch Photoshop CS3 and become alarmed when you no longer find Photoshop’s File Browser, worry not. The Photoshop File Browser has been eliminated and replaced by a new more powerful type of file browser called Adobe Bridge. With Adobe Bridge, you can view document thumbnail previews for all Adobe applications as well as many non-Adobe applications.
FIGURE 1.1
For information on using Adobe Bridge, see Chapter 7.
You can use Adobe Bridge, which is your central navigation tool, to manage document assets and attributes. For example, using Adobe Bridge, you can assign common color management settings to all the print-oriented CS3 applications, as well as add metadata to all your documents and run keyword searches on that metadata. These features are available with Adobe Bridge:
n Bridge Home:Adobe Bridge contains Bridge Home when used with the Creative Suite. The Bridge Home is the dashboard of the Creative Suite where you can view news feeds for each of the individual CS3 products, view your most recent activities, read about tips and techniques for using Adobe software, and much more.
n Camera Raw:You can open and edit camera raw images from Adobe Bridge and save them in Photoshop CS3–compatible file formats. (Note that opening camera raw images in Adobe Bridge requires you to have Photoshop CS3 installed on your computer.) You can edit camera raw set-tings in Adobe Bridge before opening files in Adobe Photoshop CS3.
n Color Management:Using Adobe Bridge you can synchronize color management settings across the print-oriented applications to ensure consistent color in all your CS3 application documents. You can import and export color settings for sharing among service providers and workgroups.
n File Browsing:As a file browser, Adobe Bridge is similar to the File Browser contained in earlier versions of Adobe Photoshop. Using Adobe Bridge as a file browser enables you to view thumb-nail images of all Adobe application files and many other files created in other authoring pro-grams. You can view page thumbnails from InDesign and Acrobat PDF documents. You also can view hidden files that your operating system uses on your computer. You can organize, sort files, create new folders, and move and delete files. You can edit metadata, rotate images, and run batch commands and automation scripts.
n Launching Adobe Bridge:You can launch Adobe Bridge as a separate executable program. You also can launch the Bridge directly from within Adobe Photoshop CS3, Adobe Illustrator CS3, Adobe InDesign CS3, Adobe Flash CS3 Professional, and Adobe Dreamweaver CS3.
n Stock Photos:From the Favorites pane in Adobe Bridge, a button links you to leading Web sites that host the leading royalty-free stock photo libraries. You can download low-resolution images to use as FPO (for position only) images when creating designs. When you decide which images to use in final comps, you can purchase high-resolution images via links from Adobe Bridge.
n Version Cue:In addition to launching all the CS3 applications from within Adobe Bridge, you also can access Adobe Version Cue CS3. You can create versions of documents, create alternates, apply document security, organize files into Version Cue private and shared project folders, and many other Version Cue-related tasks.
Adobe Photoshop CS3
If you’re a creative professional, chances are good that you’re no stranger to Adobe Photoshop. Adobe’s flag-ship image-editing program is now in version 10 with the CS3 upgrade. As a standalone product,
Photoshop has some very nice additions to an already feature-rich program. New enhancements to
Photoshop add tools and options specific to interests by graphic designers, photographers, and Web design-ers. Adobe Photoshop CS3 offers you more integration with the other CS applications and some unique new editing tools. This version of Photoshop adds more polish to the program and enhancements that are likely to become favorites for creative professionals.
CRO
SS
-REF
For information related to new features in Adobe Photoshop, see Part III.
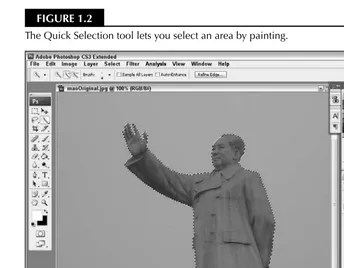
n Quick Selection tool:The Quick Selection tool lets you select an area by simply painting in details to select. Photoshop automatically detects the edge of the area you are paint selecting, as shown in Figure 1.2. This tool provides better results and more control than the Magic Wand tool.
FIGURE 1.2
The Quick Selection tool lets you select an area by painting.
n Smart Filters:Smart Filters let you experiment with different techniques without running a risk of destroying your image. These filters can be added and removed easily in a non-destructive manner to preserve image integrity.
n Zoomify export:The Zoomify export option lets you save full-resolution images to a format that is small and simple to be displayed on the Internet or sent via an e-mail.
n Camera Raw improvements:Photoshop CS3 includes the ability to process raw data for more than 150 different digital cameras. You also can process TIFF and JPEG images using Camera Raw.
n Clone and Heal Preview Overlay: Improvements to the Cloning and Healing brushes let you work with multiple sources, you also can rotate and scale the source area and preview the results using an overlay.
CRO
SS
-REF
n DNG support: The DNG format is a publicly-open format with broad support for storing raw camera data. Photoshop can now open and save to this file format.
n Vanishing Point data export:The Vanishing Point feature isn’t new, but it can now work across multiple planes from any angle. The 3D information can be exported using the DXF format for use in other 3D packages.
n Photomerge: With images on different layers, Photoshop can create panoramic images by analyz-ing and combinanalyz-ing the layers that overlap. It also includes features for alignanalyz-ing and blendanalyz-ing the layers.
In addition to the new features included in Photoshop CS3, Photoshop CS3 Extended adds several more goodies:
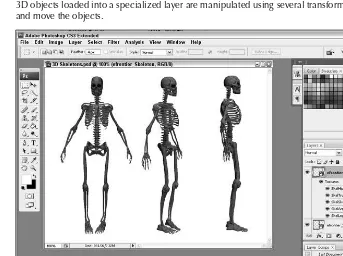
n Working with 3D Models:Photoshop CS3 Extended includes the ability to import 3D models using the .U3D, .3ds, .obj, .kmz, and the Collada file formats. Once loaded, you can use Photoshop to manipulate the 3D object, as shown in Figure 1.3, and any surface textures also are loaded onto a separate layer where they also can be edited.
FIGURE 1.3
3D objects loaded into a specialized layer are manipulated using several transform tools to rotate and move the objects.
n Measurement palette and the Count tool:The new Measurement Log palette keeps track of critical measurements for the current image and/or selection, including distance, size, selection perimeter, and density. These results are saved in a log and can even be exported to a spreadsheet. The Count tool lets you count specific image features.
n Tweening: By setting a beginning and ending attribute value over a range of frames, Photoshop automatically interpolates between these set values to create a simple animation effect.
n Medical and Mathematical support:Photoshop CS3 Extended includes support for the DICOM medical file format and for MATLAB mathematical file format using the JavaScript interface.
Adobe Illustrator CS3
Tried and true Adobe Illustrator is the premier illustration program for designers and artists. Many people still use Macromedia FreeHand because they know the program well and because they enjoy having multi-ple pages with different page sizes together in the same document. However, the advantages for using illus-tration programs together with other applications in the Creative Suite are significantly in favor of Adobe Illustrator. With Adobe’s acquisition of Macromedia, FreeHand may be discontinued.
New impressive tools have been added to Illustrator as well as some polish on editing features.
For more information on using Adobe Illustrator CS3 and some of its new features, see Part III.
You’ll also find these new features in Illustrator CS3:
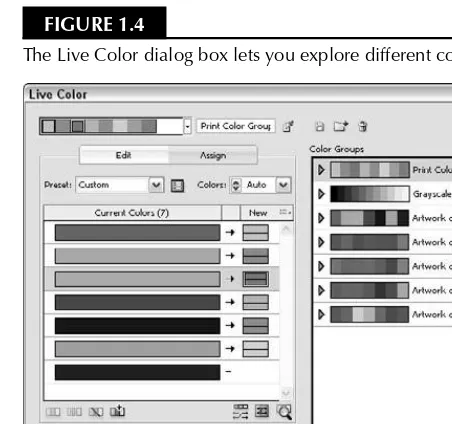
n Live Color:Illustrator’s new Live Color palette, shown in Figure 1.4, lets you explore different color combinations. You can select specific harmonic color schemes like complementary, analo-gous, triad, tetrad, and high contrast. Color groups can be defined and saved, and all selected col-ors can easily be shifted in hue.
FIGURE 1.4
The Live Color dialog box lets you explore different color schemes.
CRO
SS
-REF
n Isolation Mode:As your images get large, focusing on a specific area without affecting the rest of the drawing can be hard. With Isolation mode, Illustrator automatically locks all the other objects that aren’t being worked on.
n Integration with Flash:Rather than supplanting Flash, Illustrator has been integrated with fea-tures that let content move easily between Illustrator and Flash. Illustrator files that are exported to Flash retain their type, layers, and symbols.
n DeviceN support:Illustrator includes DeviceN support that helps ensure that color separations will print correctly.
n Document Profiles:To get started quicker with fewer headaches, Illustrator lets you create and use Document Profiles optimized for different projects including mobile, print, Web, and even video.
n Icon Panels:To save screen space, all docked tool palettes can be collapsed into icon panels located along the right edge of the window. They can even be set to self-collapse when not in use. This feature is also available in Photoshop CS3, InDesign CS3, and Flash CS3.
n Improved Control Panel:A Control Panel, much like the one found in Photoshop, has been improved in Illustrator. This panel, located at the top of the screen, displays the options and con-trols based on the selected tool and provides quick and easier access to the most needed options and controls.
n Point Selection:When working with the Direct Selection tool, anchor points are increased in size when the mouse cursor moves over the top of them, making them easier to select.
n Point Alignment and Distribution:Multiple selected points can be aligned and distributed just like objects.
n Eraser tool:The Eraser tool lets you quickly erase path portions by dragging over them with the Eraser tool.
n Crop Area tool:The Crop Area tool lets you define and create multiple crop areas.
Adobe InDesign CS3
InDesign is the central hub of your creative workflow. You bring together the images and objects that you create in Adobe Photoshop CS3 and Adobe Illustrator CS3. You can import type created in a word-processing program, import from Adobe’s InCopy, or set type in the InDesign Story Editor or in other ways. With InDesign’s free-form ease of page layout, you can lay out a design for publication. You can then export the InDesign document as a PDF file suited for print, Web hosting, electronic file exchanges, or CD/DVD-ROM replication. If you want to include your design as an HTML file for Web hosting, you can export the docu-ment for Dreamweaver CS3. As you can see, InDesign’s role among the Creative Suite programs is the anchor where files are imported to assemble a design and ultimately export for final output.
InDesign CS3 builds on the major upgrade that appeared in the first release of InDesign CS3 and its follow-up InDesign CS2. All the wonderful features you had available in the previous versions are still there along with some new enhancements introduced in InDesign CS3 (version 5 of Adobe InDesign). Among the more significant new additions are these gems:
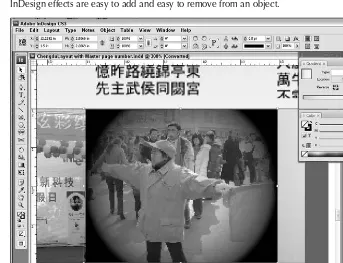
n Effects: A major inclusion in InDesign CS3 is the addition of effects. These effects work just like effects in Photoshop and Illustrator and can be added or removed as needed. Among the new effects are the following:
FIGURE 1.5
InDesign effects are easy to add and easy to remove from an object.
n Directional Feather Effect: Gradient feathering also may be controlled by adjusting the direc-tional angle, so an object fades stronger along a specific direction.
n Bevel and Emboss Effects: Create a relief effect of the object rising off the page with the bevel and emboss effects.
n Satin Effect: The Satin effect gives the object a sheen like it was made out of satin.
n Inner Shadow Effect:Drop shadowing has been available in previous versions of InDesign, but now you can add an inner shadow to make the objects appear recessed.
n Inner and Outer Glow Effect:Inner and outer glows allow you to highlight specific objects with a number of options.
n Glyphs:The Glyphs palette has been improved to help you easily find recently used glyphs. You also can sort glyphs and save glyph sets.
n Place multiple objects:If you need to place multiple objects in the document at a single time, InDesign CS3 now supports this feature. It also allows you to cycle through the content to the place using thumbnails.
n Quick Apply:The Quick Apply palette works using search letters and provides a quick way to access commands, scripts, and styles.
n Agate measurements:InDesign now supports measuring document layouts in agates.
n Improved bullet and number lists:Bullet and numbered lists can be made into an outline-type style and can span across multiple pages.
n Customized color-coded menus:Customized menus let you hide unused menus and highlight a specific menu choice by changing its color.
For more information on using new features in InDesign CS3, look over the chapters in Parts III and IV.
Adobe Flash CS3 Professional
Adobe Flash CS3 Professional is a new product to Creative Suite. Recently acquired from Macromedia, Flash works with vectors much like Illustrator, but unlike Illustrator, Flash is key at creating animated and interactive elements that are common on the Web.
It is great to see the inclusion of Flash into Creative Suite bringing with it the ability to add motion graphics to Web and online projects. Many of Flash’s tools work in a similar manner to Illustrator’s, and much work has been done to make the two products work well together. Files in Illustrator can be moved to Flash and back without losing any work.
Although the entire package is new to Creative Suite, Flash CS3 Professional also includes a number of new features, including the following:
For more information on using new features in Flash CS3 Professional, look over into Chapter 35.
n Integrated CS interface: One of the biggest changes to Flash was an attempt to make it fit in well with its new siblings. The Flash interface has been modified to look and feel like a CS applications while trying to maintain the interface that its existing users are comfortable with. Many of the keyboard shortcuts have been added to be similar to the other CS apps while keeping its existing keyboard shortcuts.
n Version Cue and Bridge integration: Flash integrates nicely with Bridge and Version Cue so you can benefit from the Version Cue workflow and access Flash files and their thumbnails from within Adobe Bridge.
Adobe Bridge and Version Cue do not show thumbnails for .FLA files, but you can see thumb-nails or the published .SWF files.
n Larger Symbol library preview: Symbols in the Symbol library are now larger, making them eas-ier to select and use.
n Device Central integration:Flash files can take advantage of Device Central to see how their files look on various mobile and PDA devices.
n Flash content detection templates:Many Flash templates are pre-built to include code that automatically detects a Flash player needed to view the file. Using these templates saves lots of time and makes for a better experience for the user.
n Copy and paste graphic filters: Graphic filters can be copied and pasted between instances.
n Copy and paste motion:Motion tweens can be copied and pasted between frames. You can select to paste all properties or only specific tween properties.
n Pen tool improvements:The functionality of the Pen tool has been improved to act more like Illustrator’s Pen tool. The results are more accurate and conversion results in fewer points.
n PSD and AI import:Photoshop PSD and Illustrator AI files can be loaded directly into Flash documents.
n Rectangle Primitive and Oval Primitive tools:The new Rectangle Primitive and Oval Primitive tools make drawing these shapes easy with multiple parameters.
n ActionScript improvements:Flash includes ActionScript 3.0 with many new enhancements for interacting with objects.
Although Adobe Flash CS3 Professional is an important application in the suite, our coverage of Flash is fairly light. You can find the basics of using Flash in Chapter 35, but you need to look to other more in-depth books to go beyond the basics.
Adobe Dreamweaver CS3
Adobe Dreamweaver CS3 is a Web-authoring and site-management program. The popular application was acquired recently along with Flash as part of the Macromedia acquisition. Because of its popularity and advanced feature set, it has supplanted Adobe’s GoLive as the Web-authoring tool to be included in Creative Suite. It has been tightly integrated with the CS3 apps and works well with them for the most part. Over time, we can assume that this integration will get even stronger.
For more information on using new features in Dreamweaver CS3, see Chapter 28.
These are some of the new feature highlights:
n Spry widgets and effects:Dreamweaver CS3 includes a library of pre-built JavaScript compo-nents that are easily added to a Web page. These compocompo-nents include several widgets such as XML-driven lists and tables, tabbed interfaces, and self-validating forms. The library also includes a number of effects such as methods to enlarge, fade, and highlight objects.
n Photoshop integration:Of all the CS3 apps, Dreamweaver will probably work the closest with Photoshop to create its images. Dreamweaver CS3 includes tight integration with Photoshop. Photoshop images with layers can be pasted directly into Dreamweaver, and double-clicking the image allows it to be edited again in Photoshop.
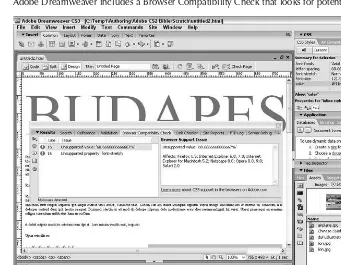
n Browser compatibility check:Using Dreamweaver’s browser compatibility check feature, shown in Figure 1.6, generates a report that searches through your Web pages looking for potential prob-lems with different Web browsers. This can save a ton of time for Web developers and eliminate potential problems.
CRO
SS
-REF
CRO
SS
-REF
CRO
SS
-REF
FIGURE 1.6
Adobe Dreamweaver includes a Browser Compatibility Check that looks for potential problems.
n CSS Advisor and templates:The CSS Advisor ties you into the CSS community with informa-tion and tips on using CSS within your Web pages. Dreamweaver CS3 also includes a number of pre-built CSS layout templates that are ready to use.
n Adobe Bridge integration:Dreamweaver CS3 is integrated with Adobe Bridge allowing Web page thumbnails to be viewed and accessed from within Bridge. Bridge also can be used to access Adobe Stock Photos for direct use in Web pages.
n Device Central integration:Web pages built for different devices can be viewed and tested in Device Central, shown in Figure 1.7.
In this book, we offer you a starting point in Chapter 28 where you can glean some knowledge for using Dreamweaver to create a Web site. In other chapters, we cover the integration of Dreamweaver with the other CS3 programs. However, our treatment of Dreamweaver is light, and you’ll need to acquire some other guides and publications in order to become proficient in using the program.
CRO
SS
-REF
FIGURE 1.7
Device Central lets you see how a Web page looks on a mobile device.
Adobe Acrobat Professional 8
Whereas Adobe InDesign CS3 is the hub of your creative satellite, PDF is at the center of the file-format universe. All of the print-oriented CS3 programs export and import PDF documents, and the expansion for PDF support is found in the new product upgrades. For design workflows, Adobe Acrobat Professional in version 8 offers you many tools to facilitate collaboration with colleagues, clients, and prepress technicians. You can do these things:
n Set up e-mail–based reviews for markup and approval of design concepts and proofs
n Enable PDF documents with special usage rights so users of the free Adobe Reader program can participate in comment and review sessions
n Export comments and corrections directly to Microsoft Word text documents (on Windows XP with Office XP only)
n Prepare files for electronic exchange, Web hosting, and screen viewing complete with embedded graphics and fonts
n Prepare files for digital prepress and printing
n Authenticate and secure documents
n Develop media shows and slide presentations for kiosks, meetings, and presentations
n Organize your design environment and catalog design campaigns embedding native files in PDFs for an organized storage system
n Search for content contained on CDs, DVDs, network servers, and Web sites
n Create accessible documents for clients needing compliance with U.S. law governing document accessibility
All in all, Acrobat Professional has a significant place in your design workflow.
As of this writing, Adobe Acrobat Professional and Adobe Reader are in version 8.0.
Acrobat Professional was released several months earlier than the other CS3 programs and is not on the same development cycle as the other CS3 programs. Part of the reason for the early release of Acrobat was the necessity to develop the PDF 1.7 specifications used by all the other CS3 programs. With PDF version 1.7 and Acrobat 8 compatibility, you can enjoy features like enabling PDF documents for Adobe Reader users. Adobe Acrobat is unlike the other CS3 programs in that the application is designed to serve many different office professionals. Acrobat might be used by engineers, legal professionals, business office workers, gov-ernment workers, school districts, and just about anyone in any industry working on a computer today. Therefore, there are a number of tools that you, as a creative professional, may not use in Acrobat just because those tools may not serve your needs. The following are the additions to the new version of Acrobat that are most suited for design and publishing workflows:
n Getting Started window:When Acrobat 8 is first started, a helpful window, shown in Figure 1.8, appears with links to the most likely tasks. This springboard makes it easy to get started with spe-cific tasks without having to search for exact commands.
FIGURE 1.8
The Getting Started window provides a springboard to the common tasks in Acrobat.