by Dan Gookin
PCs
FOR
DUMmIES
‰Q U I C K R E F E R E N C E
PCs For Dummies®Quick Reference, 3rd Edition
Published by Wiley Publishing, Inc. 111 River Street Hoboken, NJ 07030-5774
Copyright © 2005 by Wiley Publishing, Inc., Indianapolis, Indiana
Published by Wiley Publishing, Inc., Indianapolis, Indiana
Published simultaneously in Canada
No part of this publication may be reproduced, stored in a retrieval system or transmitted in any form or by any means, electronic, mechanical, photocopying, recording, scanning or otherwise, except as permitted under Sections 107 or 108 of the 1976 United States Copyright Act, without either the prior written permission of the Publisher, or authorization through payment of the appro-priate per-copy fee to the Copyright Clearance Center, 222 Rosewood Drive, Danvers, MA 01923, (978) 750-8400, fax (978) 646-8600. Requests to the Publisher for permission should be addressed to the Legal Department, Wiley Publishing, Inc., 10475 Crosspoint Blvd., Indianapolis, IN 46256, (317) 572-3447, fax (317) 572-4355, or online at http://www.wiley.com/go/permissions.
Trademarks:Wiley, the Wiley Publishing logo, For Dummies, the Dummies Man logo, A Reference for the Rest of Us!, The Dummies Way, Dummies Daily, The Fun and Easy Way, Dummies.com, and related trade dress are trademarks or registered trademarks of John Wiley & Sons, Inc., and/or its affiliates in the United States and other countries, and may not be used without written permission. All other trademarks are the property of their respective owners. Wiley Publishing, Inc., is not associated with any product or vendor mentioned in this book.
LIMIT OF LIABILITY/DISCLAIMER OF WARRANTY: THE PUBLISHER AND THE AUTHOR MAKE NO REPRESENTATIONS OR WARRANTIES WITH RESPECT TO THE ACCURACY OR COMPLETE-NESS OF THE CONTENTS OF THIS WORK AND SPECIFICALLY DISCLAIM ALL WARRANTIES, INCLUDING WITHOUT LIMITATION WARRANTIES OF FITNESS FOR A PARTICULAR PURPOSE. NO WARRANTY MAY BE CREATED OR EXTENDED BY SALES OR PROMOTIONAL MATERIALS. THE ADVICE AND STRATEGIES CONTAINED HEREIN MAY NOT BE SUITABLE FOR EVERY SITUA-TION. THIS WORK IS SOLD WITH THE UNDERSTANDING THAT THE PUBLISHER IS NOT ENGAGED IN RENDERING LEGAL, ACCOUNTING, OR OTHER PROFESSIONAL SERVICES. IF PRO-FESSIONAL ASSISTANCE IS REQUIRED, THE SERVICES OF A COMPETENT PROPRO-FESSIONAL PERSON SHOULD BE SOUGHT. NEITHER THE PUBLISHER NOR THE AUTHOR SHALL BE LIABLE FOR DAMAGES ARISING HEREFROM. THE FACT THAT AN ORGANIZATION OR WEBSITE IS REFERRED TO IN THIS WORK AS A CITATION AND/OR A POTENTIAL SOURCE OF FURTHER INFORMATION DOES NOT MEAN THAT THE AUTHOR OR THE PUBLISHER ENDORSES THE INFORMATION THE ORGANIZATION OR WEBSITE MAY PROVIDE OR RECOMMENDATIONS IT MAY MAKE. FURTHER, READERS SHOULD BE AWARE THAT INTERNET WEBSITES LISTED IN THIS WORK MAY HAVE CHANGED OR DISAPPEARED BETWEEN WHEN THIS WORK WAS WRIT-TEN AND WHEN IT IS READ.
For general information on our other products and services, please contact our Customer Care Department within the U.S. at 800-762-2974, outside the U.S. at 317-572-3993, or fax 317-572-4002.
For technical support, please visit www.wiley.com/techsupport.
Wiley also publishes its books in a variety of electronic formats. Some content that appears in print may not be available in electronic books.
Library of Congress Control Number: 2005923221
ISBN-13: 978-0-7645-8960-7
ISBN-10: 0-7645-8960-1
Manufactured in the United States of America
10 9 8 7 6 5 4 3 2 1
About the Author
Dan Gookinhas been writing about technology for 20 years. He has contributed articles to numerous high-tech magazines and written more than 100 books about personal computing technol-ogy, many of them accurate.
He combines his love of writing with his interest in technology to create books that are informative and entertaining, but not boring. Having sold more than 14 million copies translated into more than 30 languages, Dan can attest that his method of crafting computer tomes does seem to work.
Perhaps Dan’s most famous title is the original DOS For Dummies,
published in 1991. It became the world’s fastest-selling computer book, at one time moving more copies per week than the New York Timesnumber-one best seller (although, because it’s a reference book, it could not be listed on theNYT best seller list). That book spawned the entire line of For Dummiesbooks, which remains a publishing phenomenon to this day.
Dan’s most recent titles include Troubleshooting Your PC For Dummies,2nd Edition;C All-in-One Desk Reference For Dummies; PCs For Dummies,9th Edition; Buying a Computer For Dummies,
Publisher’s Acknowledgments
We’re proud of this book; please send us your comments through our online registration form located at www.dummies.com/register/.
Some of the people who helped bring this book to market include the following:
Acquisitions, Editorial, and Media Development
Project Editor: Rebecca Whitney
Acquisitions Editor: Greg Croy
Technical Editor: James F. Kelly
Editorial Manager: Carol Sheehan
Media Development Supervisor:
Richard Graves
Editorial Assistant: Amanda Foxworth
Production
Project Coordinator: Adrienne Martinez
Layout and Graphics: Brian Drumm, Lauren Goddard, Stephanie D. Jumper, Lynsey Osborn, Mary Gillot Virgin
Proofreaders: Laura Albert, Laura L. Bowman, Leeann Harney
Indexer: TECHBOOKS Production Services
Publishing and Editorial for Technology Dummies
Richard Swadley,Vice President and Executive Group Publisher
Andy Cummings,Vice President and Publisher
Mary Bednarek,Executive Acquisitions Director
Mary C. Corder,Editorial Director
Publishing for Consumer Dummies
Diane Graves Steele,Vice President and Publisher
Joyce Pepple,Acquisitions Director
Composition Services
Gerry Fahey,Vice President of Production Services
Contents at a Glance
Big Picture: The Personal Computer ...BP-1
Part I: Connecting Stuff ...1
Part II: Installing Hardware and Software ...11
Part III: The On–Off Thing ...29
Part IV: Popular Places in Windows ...41
Part V: Disk Drives ...65
Part VI: The Stuff You Create ...83
Part VII: Organizing Your Stuff ...101
Part VIII: Printing ...113
Part IX: Networking ...131
Part X: Creating Your Own CDs ...145
Part XI: The Keyboard ...153
Part XII: The Mouse...165
Glossary: Tech Talk...175
Table of Contents
Big Picture: The Personal Computer ...BP-1
What You See: Basic Hardware ...BP-2 What You See: Console — the Front ...BP-4 What You See: Console — the Back ...BP-6 What You See: Console — the I/O Panel ...BP-7 I/O Symbol Table...BP-10 The Basics: What Is a PC? ...BP-12 Hardware ...BP-12 Software ...BP-13 You ...BP-13 The Basics: Types and Models of PCs ...BP-14 The Basics: Inside the Console ...BP-14 The Basics: Adding Hardware...BP-17 Internal expansion...BP-17 External expansion ...BP-18 The Basics: Windows ...BP-19 The Basics: The Internet ...BP-20 The Basics: Your Stuff ...BP-21
Part I: Connecting Stuff ...1
About Computer Cables ...2
Audio ...2
Digital Camera...3
IEEE...3
Joystick ...4
Keyboard ...4
Microphone ...5
Modem ...5
Monitor ...5
Mouse ...6
Network ...6
Optical Audio ...6
Power ...7
Printer ...7
S-Video ...7
Scanner ...8
Serial...8
Speakers...8
USB Port...9
Part II: Installing Hardware
and Software...11
The Add Hardware Icon...12
The Add or Remove Programs Icon...13
Adding New Hardware ...14
Adding Windows Components ...15
Removing a game ...16
Adding Fax Services ...17
Inserting an Expansion Card ...17
Installing Memory...20
Removing Memory ...24
Removing USB Storage Devices ...25
Software Installation and Removal...25
Installing software you downloaded from the Internet ...26
Uninstalling software ...27
Part III: The On–Off Thing...29
Changing the Power Button’s Function...30
Forcing the Computer Off ...30
Hibernation ...31
Logging On and Off...32
Logging in ...32
Logging off ...33
Quitting Windows ...34
Restarting Windows ...35
Stand By Mode ...35
Putting your PC into Stand By mode ...36
Automatically going into Stand By mode...36
Waking up from Stand By mode ...37
Turning the Computer System Off ...37
Turning the Computer System On ...38
The Uninterruptible Power Supply ...39
Part IV: Popular Places in Windows...41
All Programs Menu ...42
Starting a program ...43
Popular menus on the All Programs menu ...43
The Startup submenu ...44
Creating a desktop shortcut to a program ...44
Organizing the All Programs menu ...44
Control Panel...45
Desktop ...47
My Network Places...51
Recycle Bin ...52
Start Button ...53
Start button menu ...54
Changing the Start menu’s look ...54
Adding or removing items from the Start button menu ....55
System Tray...57
Displaying the time on the system tray ...57
Displaying the volume icon on the system tray ...58
Controlling the visibility of system tray icons ...58
Taskbar...60
Moving the taskbar ...60
Resizing the taskbar ...61
Automatically hiding the taskbar ...61
Locking the taskbar...62
Other toolbars ...62
Quick Launch bar ...63
Moving a toolbar ...64
Removing a toolbar...64
Part V: Disk Drives ...65
About Disk Drives...66
Types of storage ...66
Saving and loading ...66
Bits and Bytes ...66
CD-ROM and DVD Drives ...67
Inserting a CD or DVD...68
Ejecting a CD or DVD ...69
Playing a music CD or movie DVD ...70
AutoPlay programs ...70
Controlling the AutoPlay notice ...70
Types of shiny discs ...71
Turning on recording ...72
Drive Icons...73
Drive Letters ...73
Flash Memory Drives ...74
The Floppy Drive ...75
Inserting a floppy disk ...76
Ejecting a floppy disk ...76
Formatting floppies...76
Copying a file to Drive A...77
Floppy do’s and don’ts ...78
Hard Disks and Drives ...79
Putting a Drive’s Shortcut Icon on the Desktop...79
Types of Drives ...80
Part VI: The Stuff You Create ...83
About a File ...84
Describing a file ...84
Common file icons...85
Viewing file details in Windows Explorer...86
A file’s Properties dialog box...87
Creating Files...88
Finding Lost Files ...89
Summoning the Search Companion ...89
Finding a file when you know its name ...89
Finding a file when you just created it recently ...90
Finding a file when you know what type of file it is ...90
Finding a file when you know that it contains a specific word ...90
Managing Files...91
Copying files...91
Duplicating files ...91
Moving files ...92
Making file shortcuts ...92
Deleting files...93
Permanently deleting files ...93
Undeleting files ...93
Naming and Renaming Files ...94
The filename extension ...94
Renaming a file...94
Filename wildcards ...95
Opening Files...95
Pathnames ...96
Saving Files ...97
Saving for the first time ...97
Saving after the first time ...98
Closing a document ...98
Selecting Icons ...98
Selecting a single icon...99
Selecting all icons in a window ...99
Selecting two or more individual icons ...99
Lassoing a group of icons...99
Selecting all but one icon ...99
Selecting all but a few icons...100
Selecting icons in a range...100
Selecting two ranges of icons ...100
Part VII: Organizing Your Stuff ...101
About Folders ...102
About Windows Explorer ...102
The left side of the window thing ...102
The tree structure ...103
The Search Companion ...103
The task pane...103
The Address bar ...104
Compressed (ZIP) Folders...104
Making a compressed folder ...105
Adding files to a compressed folder...105
Extracting files ...105
Applying a password ...105
Directories ...106
Folder Options ...106
Choosing a folder template ...107
Adding an image to a folder...107
Changing a folder icon ...107
Managing Folders ...108
Making a new folder ...108
Removing a folder ...108
Renaming a folder ...109
Copying or moving a folder ...109
My Downloads Folder ...109
The “My” Folders ...110
The Root Folder ...110
Subfolders ...111
Part VIII: Printing ...113
Adding a Printer ...114
Setting up a printer ...114
Attaching the printer hardware ...114
Printer software setup ...114
Adding a printer elsewhere on the network ...116
Using a second printer ...116
The Default Printer...116
Envelopes ...116
Configuring your document as an envelope ...117
Printing on an envelope on the printer ...117
Ink and Toner ...119
Ink cartridges ...119
Toner ...119
Ink and toner tips ...120
Paper ...120
Buying paper ...120
Adding paper to the printer...121
Paper tips ...121
The Printer’s Control Panel...123
Printing...123
The Print command ...124
Choosing a printer ...124
Selecting paper size ...124
Printing in color or grayscale ...125
Printing one page from many ...125
Printing sideways ...125
Print Preview ...126
Printing the Screen ...126
Printing a Test Page ...127
Stopping the Printer...127
Turning the Printer On and Off...128
Types of Printers ...128
Inkjet printers ...128
Laser printers ...129
Uninstalling a Printer ...129
Part IX: Networking ...131
About Networking ...132
Accessing Another Computer...132
Accessing a Shared Folder ...133
Adding a Shared Folder to Your Disk System ...133
Mapping a folder to a disk drive ...133
Unmapping a folder...134
Checking the Network Connection ...134
Checking the My Network Places window...135
Checking the Network Connections window ...135
Using the little networking guys ...135
Displaying the little networking guys ...135
Connecting to the Network ...136
The NIC ...136
The network cable...136
Configuring the network...136
Connecting to a Wireless Network...137
Getting Your PC’s IP Address ...137
Getting Your PC’s MAC Address ...138
The My Network Places Window ...139
The Network Connections Window ...139
Sharing a Folder ...140
Sharing an Internet Connection ...141
Sharing a Printer ...142
Unsharing a Folder ...142
Unsharing a Printer ...143
Using a Network Printer ...143
Workgroups ...143
Creating and joining a workgroup...144
Viewing the workgroup computers ...144
Part X: Creating Your Own CDs ...145
CD Types ...146
The CD-R ...146
The CD-RW ...146
Checking to See Whether You Have a CD-R/RW Drive ...147
Creating a Musical CD ...147
Building a playlist ...147
Burning a playlist ...148
Destroying a CD ...148
Enabling a CD-R/RW Drive...149
Erasing a CD-RW ...149
Importing Music ...150
Using a CD-R/RW in Windows ...150
Mounting a CD-R or CD-RW ...151
Using a writeable folder ...151
Burning a CD-R/RW ...152
Writing to a CD-R/RW a Second (Or Third) Time...152
Part XI: The Keyboard...153
Accessing Menus with the Keyboard ...154
The Any Key ...154
Controlling a Window with the Keyboard...154
Dead Keys ...155
The Help Key ...156
Keyboard Basics ...156
Keyboard layout ...156
Shift keys ...157
Lock keys ...157
Keyboard Shortcuts ...158
In a dialog box ...158
Window shortcuts ...159
Windows desktop shortcuts ...159
Windows Explorer shortcuts...160
Common application shortcuts ...160
Keyboard Types ...161
Keys for Editing Text ...161
Names for Funky Keys ...162
Setting the Repeat Delay and Repeat Rate ...163
Special Keys...163
Part XII: The Mouse ...165
Basic Mouse Actions ...166
Changing the Double-Click Rate ...167
Connecting a Mouse...168
Extra Mouse Buttons ...168
Increasing the Mouse Pointer Visibility ...168
Left-Handed Mouse ...169
The Mouse Pad ...170
Mouse Pointers ...170
Making the pointer go faster or slower ...170
Choosing a new pointer ...171
Using an animated pointer...171
Loading a set of pointers ...171
Saving your own set of pointers ...172
Mouse Types ...172
Air mouse ...172
Mechanical, or ball, mouse ...172
Optical mouse ...172
Trackball mouse ...172
Wheel button ...173
Wireless mouse ...173
Glossary: Tech Talk...175
Part II
The Big Picture
The Personal
Computer
I
n the 1960s, you could stun guests in your home with a color television set, but they would experience apoplexy at the sight of a computer there. Even in the 1980s, the appearance of a home computer was often met with a head-shaking “Whatever” by anyone you tried to impress. Yes, at one time, it was easy to pluck the PC out of the big picture. It was unusual. It was unexpected.Today, the PC is as much a part of the big picture as a paper shredder in a law office. Yet, despite its ubiquity, the PC main-tains an air of mystery and the scent of fear.
In this part, I pull together the pieces parts of a PC and give you a visual tour, some basic understanding, and some examples of what a computer can do. It’s your preview of coming attractions to a device that’s useful, fun, and even (dare I say?) friendly.
In this part . . .
⻬
What You See
What You See: Basic Hardware
A computer isn’t really a single thing. It’s a collection of things all clustered together and connected by various ugly cables. Each of these separate compo-nents makes up your computer system.
The central item in the computer system is the console, which is the main box that just about everything else plugs into. Other items surrounding the con-sole are referred to as peripherals. Some are required, some are optional. There’s enough variety and potential so that just about every computer system can be unique, customized for the needs of each computer owner. Though the computer system you have, or may be looking at, is unique to you, all computer systems have a basic set of peripherals and options attached, as illustrated in the nearby figures. Here are the basic components you should recognize and know by their official names:
Console: See Part I
Keyboard: See Part XI
Monitor
Mouse: See Part XII
Speakers (2)
BP-3
The Big Picture: The PC
⻬ Console: The centerpiece of any computer system, which houses the main circuitry board, microprocessor, memory (RAM), disk drives, plus lots of connectors for everything else. It’s the box-o-guts! Also called the
system unitand often mistakenly referred to as the CPU. See alsoPart I.
⻬ Monitor:The computer’s display. It can sit on top of or to the side of the console. This part of the basic computer system is necessary because it’s how you see the information the computer displays.
⻬ Keyboard:The thing you type on, and one method for you to send infor-mation to the computer. Despite all its graphics, most of the time you spend using the computer involves typing. See alsoPart XI.
⻬ Mouse:The gizmo that helps you work with graphical images that the computer displays on the screen. It’s the second method you use for entering information (next to the keyboard). See alsoPart XII.
⻬ Speakers:The PC speaks! And squawks, and plays music, and often talks. To hear that stuff, you need speakers. These can be either external or part of the monitor. See alsoPart I.
⻬ Printer:The device that puts your work down on paper — documents, copies of e-mail messages, charts, graphics, photos, or anything else your creative heart desires. See alsoPart VIII.
⻬ Lots of ugly cables:Rarely seen in the showroom and never in ads, although they exist! Cables! Lots of ugly cables keep everything con-nected. They’re usually found ’round back of the console and other components. Yes, even on wireless systems, there are still lots of cables. See alsoPart I.
A computer system can include a variety of other devices and gizmos beyond the basic items mentioned here. These peripheralsinclude scanners, digital cameras, external disk drives, modems, and a host of other gadgets various and sundry.
What You See: Console — the Front
The console is the star in your computer’s solar system, the central hub of activity. Every other device, gizmo, or gadget in the computer system plugs into the console in one way or another. The console is also home to many of your PC’s most important parts.
The illustration shows important items on the front side of the console. These are things you should be able to locate and identify on your own computer, though their specific locations may be different from what you see here.
CD-ROM/DVD drive:
See Part X
Floppy drive A:
See Part V
Power button:
See Part III
Fancy lights
Air vents
Secret door/
connectors
Future
expansion:
See Part II
IEEE port
USB port
Headphones
BP-5
The Big Picture: The PC
⻬ CD-ROM or DVD drive:This is one of your computer’s disk drives, designed for CD or DVD disks. Note that you may have more than one of these drives, such as both a CD and DVD drive. The drive may also be hidden behind a panel or door.
⻬ Future expansion:You can add additional disk drives or devices to the console. They may be obvious or well-hidden by using the console’s design.
⻬ Floppy drive:Not every PC sold today has a floppy drive, but if yours does, it appears somewhere on the front of the console. This drive is designed to accept floppy disks.
⻬ Air vents:The thing’s gotta breathe!
⻬ Secret door/connectors:Many consoles have special connectors on the front for USB devices, digital video (IEEE 1394), and audio connectors. These may be obvious on the front of the console or hidden behind a door or panel, or they may not exist at all.
⻬ Buttons and lights: The console has at least one button and some lights. Additional buttons may appear on some consoles, as with additional lights. The following list highlights some of the more common buttons and lights:
•Power button:This button is used to start up the computer, turn the computer off, or do any of a number of other things. See alsoPart III.
•Reset button:This button lets you take control during times of woe, by essentially forcing the computer to stop and start in one swift punch. It’s a powerful button, though not every console has one.
•Sleep button:This button appears mostly on laptop PCs and is used to put the system into a special sleep, or Stand By, mode. Few consoles have such a button, yet the sleep icon may appear as a light on the console, to indicate that the computer is not off, but, rather, “asleep.”
•Hard drive light:This light flashes as the hard drive is being accessed. Because hard drives are often buried internally, the light provides a visual clue to whether the drive is alive or dead.
This list doesn’t cover everything you could possibly find on the front of your computer. For example, your console may also have an Infrared port for com-municating with a laptop or handheld computer. Even so, become familiar with those few items mentioned in the list. Many computer manuals and soft-ware instructions assume that you know where everything is and what it’s called.
What You See: Console — the Back
When it comes to the computer console, the back is definitely more important than the front, and also far uglier. That’s where most of the computer’s compo-nents connect to the console. But other things are worth noting as well:
Power:
See Part III
Fan
Voltage switch
Expansion slots:
See Part II
Vents
I/O panel, ports,
connectors,
expansion:
See Part I
Video
connectors
BP-7
The Big Picture: The PC
⻬ Power connector:The power cord that plugs into the wall gazinta here.
⻬ Fan:Air gets sucked into here, to keep the insides of the console cool.
⻬ Voltage switch:Some power supplies have two operating frequencies. This switch needs to be set only once to match the proper voltage for your country.
⻬ Expansion slots:These are where add-on components and options are installed inside the console. You cannot see them directly, though the slot covers are visible on the back of the console, as shown nearby.
⻬ Expansion cards:These items plug into the expansion slots and reveal a part of themselves on the console’s rump, such as the DVD expansion card shown in the illustration.
⻬ Vents:That breathing thing again.
⻬ I/O Panel:Modern PCs put all their connectors in one central location, called the I/O panel. It contains holes for plugging in a variety of good-ies. See alsoPart I to find out what the holes are called and what plugs into them.
The I/O panel may be in one location, as shown in the illustration, or it may be split up into separate areas. For example, you may have one location for the mouse and keyboard connectors, plus another location for other items that attach to the console.
Note that the video connector (for the monitor) is found on either the I/O panel or an expansion card. If it’s found in both places, use the connector on the expansion card.
What You See: Console — the I/O Panel
I/Ois computer-talk for input and output. The computer’s world is all about input and output, and because the console is the center of your computer’s world, it plays a major role in that input/output thing. Primarily, the other devices that communicate with the console, to provide it with input or offer it a spot for output, connect to the console, on the console’s rear, in a location referred to as the I/O panel.
⻬ Keyboard connector:Where the keyboard plugs into the console. USB keyboards can plug into the USB port as well.
⻬ Mouse connector:Where the mouse plugs into the console, though USB mice can plug directly into the USB port.
⻬ USB port:The ever-versatile USB port for the multitude of USB devices to connect to your computer. See alsoPart II.
⻬ COM (or serial) port:This once highly versatile connector is now used primarily for external modems and some computer mice. Some consoles may have two COM ports, labeled COM1 and COM2. In the olden days, it was called the RS-232C port. This port’s connector has nine pins.
⻬ Video connector:This is where the monitor connects to the console. It’s the same size as the COM port, but sports up to 15 holes. Note that a secondary video connector may be on the back of an expansion card. If so, use that one instead.
⻬ S-Video out:This connector is used for video output, primarily on PCs with DVD drives or high-end video. You would use the S-View out port to connect the PC to a TV set. (This port isn’t shown in the illustration.)
Microphone
Headphones/
speakers
IEEE 1394
“FireWire”
SPDIF
Out
Video/
VGA
COM/
serial
Mini 1394
(video)
SPDIF
In
Line
In
USB (2x)
Mouse
Printer
Keyboard
Ethernet
BP-9
The Big Picture: The PC
⻬ SPDIF In/Out:These ports are used to connect the console to high-end audio devices, such as an external sound processor or a stereo system. The connectors use fiber optics to carry the sound signal, which is less susceptible to outside noise than traditional wire connectors. SPDIF stands for Sony/Philips Digital Interconnect Format.
⻬ Microphone jack:You can plug an optional microphone into this jack for recording your voice or using voice control software.
⻬ Line In jack:This audio input is used for connecting the PC’s sound system to your stereo or VCR, for capturing audio and other sounds.
⻬ Headphones/speaker jack:This is where you plug in a set of head-phones, to listen privately to your computer, or plug in a set of speakers, for more public listening.
⻬ Modem:This hole is where you plug a standard phone cord, to connect your computer to the phone jack in the wall. That way, the computer’s internal modem can use the telephone to contact the Internet. Modem holes can also be found on expansion cards in some PCs.
⻬ Phone:This hole is usually found next to the modem jack. It’s where you can connect a standard telephone so that you can use a real phone on the same line as the computer. This jack isn’t available on every console. Consider it a bonus.
⻬ Ethernet:This is where the computer connects to a network, or where you connect the computer to a cable or DSL modem. (Networking and the Internet are very similar things.) This hole for this port, also known as an RJ-45, may also appear on the back of an expansion card. See also Part IX.
⻬ Printer port:The printer plugs in here. This port is also called an LPT, or Centronics, port. That’s for the old-timers.
⻬ IEEE 1394 ports:These ports are similar to USB ports in that they accept a variety of high-speed add-ons, such as external disk drives, scanners, and videocameras. The smaller of the IEEE 1394 ports, called a 1394 “mini,” is used primarily to connect digital video. These ports may also be known as FireWire.
⻬ Joystick port:This port can be found on some older PCs, used primarily to connect the old-style joysticks or MIDI musical devices. Today, most of those gizmos are connected by using USB ports.
I/O Symbol Table
Connectors, connectors everywhere! They can look similar, or they can be confusing as all get-out. Fortunately, the computer industry understands how confusing connectors can be. To make things easier, many connectors on a PC console not only have unique shapes, but are color coded and often flagged with a specific icon, as shown in the handy nearby table.
Note that the colors aren’t an established standard, so some PCs may sport a different color scheme than what’s indicated. Also, not every connector is color coded.
Also note that different icons or symbols may be used on different PCs. Connector Symbol Name Color
COM/Serial Cyan
Digital video White
Ethernet/RJ-45 None
IEEE 1394 None
IEEE 1394 mini None
Infrared None
Joystick Mustard
Keyboard Purple
BP-11
The Big Picture: The PC
Connector Symbol Name Color
Microphone Pink
Modem None
Monitor Blue
Mouse Green
Power Yellow
Printer Violet
SPDIF In Pink/white
SPDIF Out Black
Speakers/Headphones Lime
S-Video Yellow
The Basics: What Is a PC?
PC is an acronym for Personal Computer,so any type of personal computer, from a handheld or palm computer to a laptop to a desktop and, yes, even the Apple Macintosh, is a personal computer. As long as one person is using the computer, it’s a personal computer, or PC.
Specifically, the type of computer now labeled a PC is the direct ancestor of the original IBM PC, introduced back in the early 1980s. Though there were other personal computers at that time, they were referred to as microcomput-ersand were used mostly by computer enthusiasts and home hobbyists. When IBM introduced its own microcomputer, it legitimized the microcom-puter and made it “safe” for use in a business environment. Because of the IBM PC’s tremendous popularity, it became the standard for all microcomput-ers. Eventually, any computer that was compatiblewith the original IBM PC (the computer could use the same hardware and run the same software) also was dubbed a PC.
The PC is now the standard computer platform around the world, so much so that being PC or IBM compatible is no longer an issue. Unless the computer says Macintosh or Sun on its case, it’s a PC.
Internally, the computer is really nothing more than a very fast, expensive cal-culator with a larger display and far more buttons. The computer system is composed of two main parts: hardware and software.
Hardware
Hardwareis the physical part of the computer. If you can touch it, it’s hardware.
The main piece of hardware is the computer’s microprocessor, also called the
central processing unit, or CPU. All other hardware inside the computer (the
console) is designed to support and serve the microprocessor.
The current type of microprocessor used in the typical PC is the Pentium. There are other variations of this chip as well, given other names depending on the manufacturers and the chips’ ability, but Pentium is the big name. Supporting the Pentium is more hardware. For storage, there’s computer memory, or RAM, as well as disk drives. There’s also a chipset, which consists of various support hardware that helps control the computer’s monitor, networking, power management, and other hardware. All this stuff exists inside the console and lives on a large sheet of green fiberglass called the
BP-13
The Big Picture: The PC
Software
Hardware by itself is dumb. That’s because computer hardware must be con-trolled by software. Contrary to popular myth, the computer’s microprocessor (hardware) isn’t the computer’s “brain.” The computer’s brain (if any) is the software that controls and runs the hardware.
The main piece of software in a computer is its operating system.That’s the main control program. For most PCs, the operating system is Windows, pro-duced by Microsoft Corporation. Other operating systems can also be used on a PC, such as Linux and others, but Windows is by far the most popular PC operating system.
Other software comes in the form of applications or programs that carry out specific tasks. By using various programs, you can direct the computer to per-form a variety of services. Indeed, it’s this versatility that has kept the PC pop-ular and useful over the past 25 years or so.
⻬ Computer software is nothing more than instructions that tell the hard-ware what to do, how to act, or when to lose your data.
⻬ Although computer software comes on disks (CDs or floppy disks), the
disksaren’t software. Software is stored on disks just as music is stored on cassettes and CDs.
⻬ You never have to learn about programming to use a computer. Someone else does the programming; then, you buy the program (the software) to get your work done.
You
That last part of your computer system is you, the computer operator. Though software controls the hardware, it’s you who controls the software, by telling it what you want done.
The Basics: Types and Models of PCs
There’s no such thing as the typicalPC. Not only does each manufacturer add its own touches of design and style, but different and various configurations are available. They’re all PCs, but how they look and — most importantly — how they sit on your desk divides them into various subclasses. Here’s the rundown:
⻬ Desktop:The original IBM PC sat flat and square on top of a desk, which is why that and similar modes are referred to as desktop computers. Typically, the monitor is set right on top of the slablike console.
⻬ Desktop (small footprint):This is basically the same arrangement as the traditional desktop, though the console is considerably smaller — often, too small to set the monitor atop the console. The footprint refers to how much desk space the console occupies.
⻬ Minitower:This is the most popular PC configuration, which is essen-tially a small-footprint desktop on its side, though the PC isn’t really sideways. The console is small enough to sit on top of your desk, with the monitor sitting right next to it.
⻬ Notebook or laptop:This is a portable version of the PC, usually the size of a typical three-ring binder or coffee-table book. Yes, they manage to squeeze everything in a desktop PC into a portable, battery-powered, convenient unit. Despite their heftier price tags, laptops are very popu-lar and often outsell desktop PCs.
⻬ Towers:An older style of PC that can still be found is the tower unit, which is like the minitower, but considerably taller and with more room inside the console. These boxes are mostly found in the “back office” of businesses, where they control the network or are used to prop up one end of a wobbly table.
The Basics: Inside the Console
You find nestled inside the console the core elements of a computer. These are the basic elements of the computer system, the electronic orchestra through which the PC plays its tune. The location of these gizmos varies from com-puter to comcom-puter, but, if you’re curious, the following list details some of the more important elements:
BP-15
The Big Picture: The PC
⻬ Motherboard:This is the main circuitry board inside the console, the home base for the PC’s microprocessor, memory, chipset, and other vital components.
⻬ Disk drive cage:This metal structure is used to hold the various disk drives installed in the console as well as provide space for more disk drives.
⻬ CD-ROM/DVD drive:The drive is installed in the disk drive cage, but in one of the places where the drive can be accessed from outside the console (so that you can insert and remove CDs or DVDs). The drive also connects to the power supply and to a special connector on the motherboard.
Disk drive “cage”
Electronic
goobers
Expansion
slots
CD/DVD drive
Motherboard
Microprocessor
Front I/O
Memory
(RAM banks)
Fan/power
connector
Hard
drive
Floppy
drive
Power supply
⻬ Hard drive:This drive lives inside the console’s drive cage, but doesn’t need to have access to outside the case. The hard drive is connected to the power supply and the motherboard.
⻬ Floppy drive:Like the CD-ROM/DVD drive, this drive is installed in the console’s drive cage with outside access. The floppy drive is connected to the power supply and the motherboard.
⻬ Memory:The computer’s memory, or RAM, is installed into a series of banks on the motherboard. Memory comes in tiny expansion card modules, called DIMMs. These plug into corresponding slots on the motherboard.
⻬ Microprocessor:This is the main chip. The boss. The CPU. All the other electronics inside the console are designed to work well with and serve the microprocessor. Today’s PCs come with high-speed, high-power microprocessors that require extra cooling; the microprocessor wears a special little fan like a hat, which helps keep it cool.
⻬ Chipset:One or more computer chips on the motherboard supply the computer’s basic personality (so to speak). These chips control input/output (I/O) as well as the basic configuration of the computer’s monitor, keyboard, mouse, networking, and other main components.
⻬ Expansion slots:Designed for internal expansion of the computer, expansion slots aren’t as plentiful as in years past. This is because most of the features previously added via expansion cards(networking, modem, more memory) are now part of the chipset on the motherboard. Even so, expansion slots remain inside the console and allow you to fur-ther add to or configure your PC. Expansion cards plug into expansion slots, like adding new shelves inside a cupboard.
There are three types of expansion slots:
• ISA:The traditional type of expansion slot of ancient design (avail-able on the first IBM PC, 25 years ago), and still used today for many simple hardware add-ons. ISA stands for Industry Standard
Architecture. A typical PC has at least one of these slots available. • PCI:A more advanced type of expansion slot than ISA. PCI stands
for Peripheral Component Interconnect. Most PCs have at least one of these slots, if not more. (It depends on the size of the console.) • AGP:An expansion slot designed specifically for advanced, high-end
BP-17
The Big Picture: The PC
⻬ I/O:The motherboard’s reach extends beyond the console’s physical space, thanks to a host of I/O ports and connectors, located on the back and often the front of the console. These connectors are plugged into the motherboard via special cables.
There are many more technical details about your console’s innards and the motherboard specifically, most of which aren’t really necessary to know for the casual computer operator.
Be aware of your computer’s microprocessor and its name and horsepower. Often, this information is displayed when the computer first starts — though you have to be quick to catch it.
It also helps to know the quantity of RAM installed in the console. Computers crave RAM, especially when they’re running high-end graphics programs or complex computer games.
The expansion slots provide a way to add more internal components to your PC, though for starting out, the motherboard contains just about everything you need. Still, be aware that it’s possible to add more features and abilities by simply purchasing and installing a new expansion card. See also“The Basics: Adding Hardware.”
It isn’t necessary to open your PC. Please do not do so unless directed to by tech support or when you’re installing or upgrading your computer. When doing so, be sure to turn off and unplug the console before opening it up and looking inside.
The Basics: Adding Hardware
The beauty of the computer is that it can be endlessly expanded or upgraded. The computer you own today probably won’t look the same a month or a year down the road. It’s the PC’s ability to be expanded and improved on that has made it one of the most successful computer hardware designs ever.
There are two ways to add new hardware to your computer system: internally or externally.
Internal expansion
Popular expansion cards let you add video support for a second monitor, a more advanced video adapter, a secondary network adapter, a satellite modem card, custom sound cards, cards to support more disk drives, cards to add more ports (USB/IEEE) — the variety is almost endless.
Beyond expansion cards, your console may have extra room for more memory or disk drives inside its drive cage. It may even be possible to replace the microprocessor with a better, faster version (though such an upgrade is often financially impractical).
Before going nuts, however, ensure that your PC has ample internal expansion options. The drive cage must have room for an extra hard drive, for example. And, you need to ensure that you have open expansion slots — and slots of the right type — for whatever expansion card options you crave.
If expansion is your goal, get a minitower or full-size tower PC. Those models often come with more expansion slots and drive cage “bays” than the smaller-format PCs.
External expansion
Everything that plugs into the console can be considered external expansion, though certain key parts of the PC aren’t really expansion “options.” The key-board, mouse, and monitor are necessary to the PC’s basic operations. Even the printer and modem can arguably be considered basic PC components and not expansion options.
Generally speaking, true expansion options plug into the PC via one of the ports — usually, the USB port. The IEEE port is also popular. Once upon a time, the COM, or serial, port was popular as well, but these days external expansion of your PC system is most likely done by adding a device, or a number of devices, to the USB or IEEE ports.
The most popular external expansion options are as follows:
⻬ Scanners:The scanner lets you create a graphical image for the com-puter by using anything that’s flat. You can scan old photographs or your kid’s artwork or even use the scanner with special software to read text.
⻬ Digital cameras:You can connect a digital camera to your computer for copying, or downloading,images. After they’re in the computer, you can photo-edit those images, e-mail them, create a slideshow, print them, or do a number of miraculous things.
⻬ Videocameras:You can connect a videocamera to your PC directly for use in online chats or for online meetings, by creating your own
BP-19
The Big Picture: The PC
⻬ External hard drives:This is possibly the most popular external expan-sion item to add to a PC, because adding the extra storage doesn’t involve opening the console’s case. By using the USB or IEEE port, you can add one or several external hard drives to your PC, to make more storage available for your videos, music, photographs, or anything you create with your PC.
⻬ External CD and DVD drives:Another popular item to add is another CD or DVD drive, especially one that can record CDs or DVDs. Adding these drives externally is much easier than adding one internally, espe-cially for the beginner.
Numerous other expansion options exist. In fact, the list is long enough that it would make quite a thick book by itself. For the variety, simply check a com-puter catalog, online store, or retail comcom-puter store near you. See alsoPart I for information on connecting things to the console.
The Basics: Windows
The computer’s operating system, Windows, is in charge of the entire com-puter. It does things you would never imagine, menial tasks and duties that are obscure yet necessary. Fortunately, Windows has been honed over the years, and, despite the complexity of the PC, with Windows in charge, your duties as a computer operator aren’t really that complex or involved.
Basically, Windows has four duties:
⻬ Present an interface for you, the human, to use the computer.This interface is the desktop,used to display information and graphically rep-resent things inside the computer.
⻬ Manage the computer’s hardware.This is pretty much an automatic chore, though Windows lets you manipulate certain hardware settings, such as the monitor’s resolution or whether your stuff is printed long-ways or talllong-ways on the printer. But most of the mundane things — keep-ing the time, fetchkeep-ing information from disk, performkeep-ing minor
maintenance — are done in the background automatically.
⻬ Manage software.The applications you install rely on Windows as a bridge between what they do and the hardware inside the PC that makes all that stuff possible. Windows also prevents programs from running amok and, when they do, keeps them contained as best it can so that the system doesn’t come crashing down.
Most of the time you use Windows, you work in your applications programs and process words, work a database, send e-mail, and do other typical puter tasks. You use Windows occasionally to set up or reconfigure your com-puter’s hardware, add new software, or work with the files you create. Beyond that, Windows is simply the program in charge. See alsoPart IV, which tells you where important things are located in Windows.
The Basics: The Internet
Once upon a time, the Internet was considered a minor part of the PC’s exis-tence. Today, PCs and the Internet walk hand-in-hand. Using the Internet, par-ticularly e-mail, is the number-one reason that most people buy a new PC. Because of this, all new PCs come equipped with all the hardware you need to access the Internet. All the software (or most of the important programs) also comes with the operating system, Windows.
The Internet itself isn’t a computer. The Internet is not a program or any soft-ware you can own. Instead, the Internet is hundreds of thousands of comput-ers all over the world. They’re connected together and they share, store, and swap information.
You can use your PC to access the Internet, where your computer joins the thousands of others already on the Internet. After it’s connected, you use vari-ous software programs to access information on the Internet. These are the most common programs or things accessed on the Internet:
⻬ The World Wide Web:This is a convenient way to view information stored on computers all over the world. The Web displays information the same as you would read text in a newspaper or magazine: very friendly with pictures. The various Web pagesalso contain links to other, related information or similar Web pages. Visiting those pages is as easy as clicking the links.
⻬ E-mail:Everyone using the Internet can send or receive messages by using electronic mail, or e-mail.Accounts are available all over, and many at no charge. By using e-mail, you can send messages to other Internet users as well as send files, photos, music, videos, and just about any type of information imaginable.
⻬ File transfer:The Internet is a vast library of stored files and informa-tion. You can access those files by transferring them from the Internet into your computer. Some of the files are free programs you can use to further expand the abilities of your PC.
BP-21
The Big Picture: The PC
For most individuals and home users, you need to sign up for Internet service with an ISP.These are local or national companies whose purpose is to con-nect folks to the Internet — like a cable company offers you cable TV. (In fact, most cable TV companies also offer Internet access.) ISPs are listed in the Yellow Pages.
The only other thing you need to access the Internet is money; ISPs, like the cable company, require a monthly fee. (It’s possible to use the Internet for free at a public library, but that’s not this book’s subject.)
The Basics: Your Stuff
Having a PC is about Windows, the Internet, and software, but all that really boils down to you and the stuff you create or collect. That information is stored on the computer in the form of files.
A file can contain any type of information. For example, a file can be a simple text document. It can be a list of folks you want to invite to a party. A file can also be a graphical image, a song, a movie. Programs are files. This chapter is a file on my computer. Files are chunks of information stored in a computer. Files are created in the computer’s memory. (They can also be retrieved from the Internet or copied from other computers, but even then the files origi-nated in some computer’s memory bank somewhere.) From memory, files are saved on a computer’s hard drive, which is the most reliable location for the safe, long-term storage of computer information.
Windows helps you keep track of your files in several ways. First, you give a file a name when it’s saved to disk. Windows also gives the file an icon,or tiny picture, that helps you associate the type of file you created. Special icons exist for documents, music files, videos, and other types.
The date and time the file was saved to disk are also included with the file information, along with how much disk space the file occupies. Windows keeps all this information, but you can use it as well.
Connecting Stuff
I
f your life’s technical experience includes only plugging some-thing into the wall, boy, are you in for a surprise!Yes, computers do plug into the wall — several times and in several ways. More than that, computer gadgets and gizmos plug into each other. Unlike your stereo system, where most of the cables look alike, on the computer just about every cable is different: different shape, different color, different way to plug it in. This chapter covers the basics of plugging stuff in.
In this part . . .
About Computer Cables . . . 2
Audio . . . 2
Digital Camera . . . 3
IEEE . . . 3
Joystick . . . 4
Keyboard . . . 4
Microphone . . . 5
Modem . . . 5
Monitor . . . 5
Mouse . . . 6
Network . . . 6
Optical Audio . . . 6
Power . . . 7
Printer . . . 7
S-Video . . . 7
Scanner . . . 8
Serial . . . 8
Speakers . . . 8
USB Port . . . 9
Wireless Gizmos . . . 9
About Computer Cables
A computer cable is described by which port it plugs into and its length.
For example, to connect a printer to the console, you use a printer cable. A USB device (including printers) connects by using a USB cable. A monitor uses a monitor cable.
One exception is networking, which is done by using Cat-5 cable, though you can say “networking cable” and the guy in the com-puter store won’t mock you. The connector on the console is called an RJ-45, but networking cable isn’t “RJ-45 cable.” It’s Cat-5.
Some cables are permanently attached to their devices: The mouse and keyboard have such cables, for example. Other cables are sep-arate. That just means that you must remember to plug in both ends.
Cable length is measured in feet or meters. USB, IEEE, networking, printer, and serial cables all come in varying lengths.
Good news: Nearly all computer cables are what they call idiot-proof.That means you can plug them in only one way. You cannot plug in a computer cable backward or incorrectly or in any manner that may damage your computer or the device being plugged in. But, unless the hardware documentation says so otherwise, it’s okay to plug in most computer gizmos while the computer is on. There are some exceptions to this rule, so carefully read through the other sections in this part of the book!
Some computer devices plug right into the wall. Some don’t plug into the wall at all. And some devices use what’s called a power brick,or transformer,which is either part of the plug itself or living on the cable between the device and the wall socket.
Audio
PCs have built-in sound, and the console has a teensy, crappy speaker. What you really need are external speakers. Plus, you can use a microphone or headphones or attach an audio cable to any sound-producing device and record that sound on your PC. This is all done thanks to the PC’s audio connectors.
⻬ PC speakers connect to the Line Out, speaker, or headphone jack on the console.
⻬ Microphones connect to the microphone connector.
⻬ The Line In connector is used to connect any nonamplified sound source, such as your stereo, VCR, phonograph, Victrola, or other sound-generating device.
Yes, the difference between the Line In and microphone jack is that Line In devices aren’t amplified.
Your console may have multiple sets of audio connectors: three on the front, three on the back, three on the DVD adapter card. If so, use the sound connectors on the DVD card first because they’re the best. Otherwise, when audio connectors are on the front and back of the PC, the front set is simply a copy or spare (designed for easy hookup of the mic or headphones).
To record sound, you need software that lets you convert audio input into digital storage inside the computer.
Digital Camera
Your digital camera may connect to the console in one of three ways:
⻬ Through the USB port
⻬ Through the mini-IEEE port
⻬ Through its own, special cable
The connection used by your camera depends on the camera’s manufacturer, not on the PC.
Note that it’s also possible to use a media card reader on your PC to directly read the camera’s digital “film.” For example, you can get a CompactFlash memory reader, which you connect to your PC by using the USB port (see also“USB Port”).
See also“Optical Audio,” for information on using that specialized connector.
IEEE
The IEEE port allows you to use high-speed external devices with your PC. This port isn’t as common as the USB port, though the IEEE port behaves in much the same way, and for some devices (external disk drives, digital video, high-end scanners), it’s better than USB.
IEEE devices require an IEEE cable, which may or may not come with the device.
The cable’s ends are identical. It matters not which end of the cable goes into the device or which end plugs into the console.
As with USB, it’s possible to daisy-chainIEEE devices, by plugging one into another, into another, and finally into the console. Note that certain IEEE gadgets prefer to be connected to the console directly.
Also like USB is the IEEE hub, which allows you to expand the number of IEEE ports.
Some devices, particularly digital videocameras, use the mini-IEEE connector. This connector requires a unique cable. (It uses only four wires, whereas the standard IEEE cable has six.)
IEEE is also known as 1394. The two names are often used together, as in IEEE 1394. On Apple computers, the IEEE inter-face is referred to as FireWire.No matter what the name, the standard symbol is shown in the margin.
Most PCs don’t come with IEEE ports, though they can be added easily by installing inexpensive expansion cards.
Joystick
An older PC may sport a unique joystick port. It’s a 25-pin, D-shell connector, found on the rumps of older-model computers. The joy-stick port can also be used to connect the MIDI adapter for playing musical instruments with your PC.
Today’s joysticks plug into the USB port (see also“USB Port”). The joystick port may also be referred to as the A/D port, where A/D stands for analog-to-digital.
Keyboard
The PC keyboard plugs into the keyboard port on the back of the console.
Note that the keyboard port looks amazingly similar to the mouse port. Despite their visual similarity, they’re two different ports. Your keyboard (or mouse) doesn’t work when it’s plugged into the wrong port.
Some USB keyboards come with lime green adapters, designed to convert the USB ports into keyboard port connectors. Using this type of adapter is optional.
Don’t plug the keyboard into the keyboard port while the computer is on. It’s okay to plug in a USB keyboard, but don’t plug anything into the keyboard port when the computer is on. It may damage the keyboard, the computer, or both.
Microphone
To use a microphone with your PC, plug it into the microphone port. See also“Audio.”
Modem
Most PCs are sold with internal modems. In that case, all you see on the back of the console is a standard phone jack. Take a phone cord, plug it into the modem’s phone jack, and then plug the other end of the phone cord into the telephone company’s jack on the wall. The modem is connected.
If the modem has a second phone jack, one designed for a tele-phone, you can plug a telephone’s cord into that jack as well. You can use the phone any time the computer isn’t using the modem to make a call.
External modems also have phone jacks and need to be plugged in the same way as internal modems. Additionally, the external modem needs to plug into the console. This is done by either using a serial cable and plugging the modem into the console’s COM port or using a USB cable. External modems must also be plugged into the wall for power.
Don’t plug the modem into the network’s RJ-45 jack. Although that hole looks the same, it’s slightly larger and the phone jack doesn’t stay put.
Monitor
The monitor plugs into the VGA, or graphics adapter, jack on the back of the console. It goes in only one way.
If the console has two VGA connectors, you probably want to use the one on an expansion card rather than the one on the console’s I/O panel. (See alsothe “Big Picture.”)
Mouse
Your computer’s mouse plugs into the mouse port on the back of the console. This port looks exactly like the keyboard port, but be sure that you plug the mouse into the right port. The mouse doesn’t work otherwise.
USB mice need to connect to the USB port, though many mouse manufacturers also include an adapter that lets you convert the USB connector to a PC mouse port connector. Either way works. Turn your computer off before you connect or disconnect the mouse to the mouse port.
Network
To connect your PC to a network, or to a networklike device, such as a cable or DSL modem, plug the cable’s plastic connector into the console’s RJ-45 jack.
The RJ-45 jack looks exactly like a telephone connector, though it’s more squat (wider and shorter).
When the network cable is fully inserted, you feel or hear it snap into place.
To remove the network cable, press the tab on the narrow end, and then slide the cable out of the hole — just like you disconnect a phone cord.
Optical Audio
If you’re a high-end audio snob, you can use optical audio to con-nect the PC to your high-end optical audio sound equipment. Both devices, input and output, must have optical audio. And, you must obtain special (and not cheap) fiber-optic cable to connect the toys.
Optical audio isn’t a must.
Power
Cinchy: The plug goes into the wall socket.
Some power cables are affixed to the device they power. Others must be plugged in at both ends. Oftentimes, it’s that second end disconnecting that’s the source of endless computer angst and woe.
You may want to use a power strip or UPS. See alsoPart III for infor-mation on turning on your PC.
Printer
The printer plugs into the console’s printer port. Nothing could be more “duh.”
The standard PC printer cable has two different ends. One is designed to plug into the printer; the other, into the console. It’s impossible to confuse the two.
USB printers plug in by using a USB cable. For printers with both printer and USB options, use the USB option.
Printers don’t come with cables! You must buy the cable — USB or standard printer cable — separately.
Another name for the printer port is LPT1. Another name for the printer cable is Centronics. Anothername for the port is parallel port,with the corresponding parallel cable.
Avoid inexpensive printer cables because they aren’t bidirectional. You should ensure that you get a printer cable that talks both ways. That way, you can use all your printer’s features.
It’s trivial, but printer cables should be no more than about 10 feet long. The signal may degrade over longer distances. Well, and you get tired of walking over to a printer set far away.
Printers can also be connected to computers over the network, in which case the printer is connected by using a networking cable only.
S-Video
S-Video connectors allow you to send your computer’s video output to a standard television set, or to any video gizmo that has S-Video input.
S-Video output provides higher-quality images than other types of video output. You typically find this type of connector only on the rumps of PCs with high-end video adapters.
S-Video is typically output only. To read video input on your PC, you need a special video adapter that accepts input.
The final thing to remember about S-Video is that it’s video only; it doesn’t transmit any audio. To get the sound over to your televi-sion, you have to string some wires from the Line Out, speaker, or headphone jacks or use the optical audio connections (if your tele-vision supports that).
Scanner
Most scanners connect to the console by using the USB port. In fact, they don’t even require a power cable; the scanner draws its power from the USB port itself. Amazing.
High-end scanners use the IEEE port rather than, or in addition to, USB.
Serial
Today, the most common device to plug into the console’s serial, or COM, port is an external dial-up modem. There are also serial mice as well as a few serial printers.
At one time, a serial port was the most versatile type of connector on your PC. Today, however, it’s kept around mostly for compatibil-ity with older devices.
On consoles with more than one serial port, they’re named COM1, COM2, and so on.
COM is short for communications. Another term for the serial port is RS-232.
Speakers
Speakers plug into the speaker or headphone jack (see also “Audio”).
USB Port
USB devices plug into the USB port — any USB port, though some devices specifically want to be connected to the console or to a powered USB port.
Newer USB devices are generally faster and better than the original USB standard. These newer devices are referred to as high-speed or USB 2.0 devices, and they require a USB 2.0 port. Most PCs come with this port, though older PCs can add the port by adding an internal expansion card.
USB cables have two different ends, dubbed A and B. The A end is flat and exists on the console or the back of any USB hub. The B end is trapezoidal in shape and plugs into the USB device. USB extension cables are available, but be sure that the extension cable’s ends match what you’re plugging into: A to A or B to B. USB hubs allow you to further expand the number of USB devices your computer can use. The hub connects to the console (or to another hub) by using a standard A-B USB cable. The hub itself contains more USB ports, from two to four, on up to a dozen or more.
Some hubs must be plugged in to help supply external USB devices with power. These are known as powered hubs.
Many USB devices act as hubs and provide even more USB connec-tors for even more gizmos.
USB cables come in a variety of lengths, but the cables are never longer than 3 or 4 feet. Any longer and the signal may be compro-mised.
USB devices can be connected or disconnected whether the power is on or off. If the power is on, the computer instantly recognizes the device and makes it available. But note that some USB devices, particularly external disk drives and other storage devices, cannot be removed unless you first use the PC’s operating system to dis-connect, or unmount,the device.
Wireless Gizmos
Yes, even wireless devices require some type of wired connection. For example, a wireless keyboard and mouse require you to con-nect the transmitter to the keyboard and mouse ports or to a USB connector on the console. Beyond that point, however, the key-board and mouse aren’t tethered to the console by wires.
Installing
Hardware
and Software
B
elieve it or not, you are the master of your PC’s domain. You control what goes into the computer system, whether it’s hard-ware or softhard-ware. You get to not only choose which hardhard-ware or software to add, but also install it all by yourself. This isn’t as crazy as fixing your toaster or as delicate as brain surgery. In fact, it’s deceptively easy — but don’t tell that to the overpriced computer consultants and fix-it shops!In this part . . .
The Add Hardware Icon . . . 12
The Add or Remove Programs Icon . . . 13
Adding New Hardware . . . 14
Adding Windows Components . . . 15
Inserting an Expansion Card . . . 17
Installing Memory . . . 20
Removing Memory . . . 24
Removing USB Storage Devices . . . 25
Software Installation and Removal . . . 25
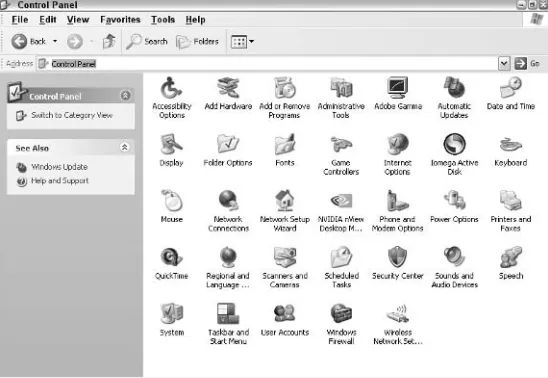
The Add Hardware Icon
The Control Panel’s Add Hardware icon seems like it should be used to help add new hardware to your computer. That’s only half true. You need to use the Add Hardware icon only when the com-puter poops out and fails to recognize newly installed hardware. As PCs become more sophisticated, those instances are fewer. To access the Add Hardware icon, heed these steps:
1. Click the Start button to display its menu.
2. Choose Control Panel from the menu.
3. If Category view is being used, click the text labeled Switch to Classic View.
Classic view displays all the Control Panels’ icons, which may be confusing, but it’s more useful than Category view. This figure shows an example of Classic view.
4. Double-click the Add Hardware icon.
Opening the Add Hardware icon runs the Add Hardware Wizard.
5. Read the wizard’s instructions and click the Next button to continue.
Heed the instructions that are offered, and make selections and click the Next button as required.
7. Click the Finish button when you’re done. See also“Adding New Hardware.”
The Add or Remove Programs Icon
Most software comes with its own install or uninstall programs. When those don’t work, or they aren’t obvious, you can use the Windows Control Panel and its Add or Remove Programs icon for your software installation and removal chores.
Here’s how to access the Add or Remove Programs icon:
1. Open a Windows Explorer window; from the desktop, open the My Computer icon.
Or, you can press Win+E.
2. From the Address bar drop-down list, choose Control Panel.
3. Ensure that Classic view is chosen. Refer to the preceding section.
4. Open the Add or Remove Programs icon.
Opening the icon displays the Add or Remove Programs window, which can be used in several ways, depending on which of the buttons on the window’s left side are selected.
There can be as many as four buttons, depending on your version of Windows XP:
⻬ Change or Remove Programs:This option lists all installed software in your computer and allows you to select one to remove. Options to change installed programs are also avail-able, depending on the program. See also“Software Installation and Removal” and “Uninstalling software.”
⻬ Add New Programs:This is the item to choose when you need extra help in finding and installing new software.
⻬ Add/Remove Windows Components:Choose this item to