Blue Manager 5.2
User’s Guide for PC
Atheros SST™, Signal-Sustain Technology™, the Air is Cleaner at 5-GHz™, XSPAN™, Wireless Future. Unleashed Now.™, and 5-UP™ are trademarks of Atheros Communications, Inc. The Atheros logo is a registered trademark of Atheros Communications, Inc. All other trademarks are the property of their respective holders. This information is subject to change without notice.
Notice
The information in this document has been carefully reviewed and is believed to be accurate. Nonetheless, this document is subject to change without notice, and Atheros Communications, Inc. (Atheros) assumes no responsibility for any inaccuracies that may be contained in this document, and makes no commitment to update or to keep current the contained information, or to notify a person or organization of any updates. Atheros reserves the right to make changes, at any time, in order to improve reliability, function or design and to attempt to supply the best product possible. Atheros does not represent that products described herein are free from patent infringement or from any other third party right.
No part of this document may be reproduced, adapted or transmitted in any form or by any means, electronic or mechanical, for any purpose, except as expressly set forth in a written agreement signed by Atheros. Atheros or its affiliates may have patents or pending patent applications, trademarks, copyrights, maskwork rights or other intellectual property rights that apply to the ideas, material and information expressed herein. No license to such rights is provided except as expressly set forth in a written agreement signed by Atheros.
ATHEROS MAKES NO WARRANTIES OF ANY KIND WITH REGARD TO THE CONTENT OF THIS DOCUMENT. IN NO EVENT SHALL ATHEROS BE LIABLE FOR DIRECT, INDIRECT, SPECIAL, INCIDENTAL SPECULATORY OR CONSEQUENTIAL DAMAGES ARISING FROM THE USE OR INABILITY TO USE THIS PRODUCT OR DOCUMENTATION, EVEN IF ADVISED OF THE POSSIBLITY OF SUCH DAMAGES. IN PARTICULAR, ATHEROS SHALL NOT HAVE LIABILITY FOR ANY
HARDWARE, SOFTWARE, OR DATA TRANSMITTED OR OTHERWISE USED WITH THE PRODUCT, INCLUDING THE COSTS OF REPAIRING, REPLACING, INTEGRATING, INSTALLING OR
RECOVERING SUCH HARDWARE, SOFTWARE OR DATA. ATHEROS SPECIFICALLY DISCLAIMS THE IMPLIED WARRANTIES OF MERCHANTIBILITY AND FITNESS FOR A PARTICULAR PURPOSE AS THEY MIGHT OTHERWISE APPLY TO THIS DOCUMENT AND TO THE IDEAS, MATERIAL AND INFORMATION EXPRESSED HEREIN.
Text Conventions
Notices
bold Bold type within paragraph text indicates commands, file names, directory names, paths, output, or returned values.
Example: The DK_Client package will not function unless you use the wdreg_install batchfile.
italic Within commands, italics indicate a variable that the user must
specify.
Example: mem_alloc size_in_bytes
Titles of manuals or other published documents are also set in italics.
Courier The Courier font indicates output or display.
Example:
Error:Unable to allocate memory for transfer!
[ ] Within commands, items enclosed in square brackets are optional parameters or values that the user can choose to specify or omit.
{ } Within commands, items enclosed in braces are options from which the user must choose.
| Within commands, the vertical bar separates options.
… An ellipsis indicates a repetition of the preceding parameter.
> The right angle bracket separates successive menu selections.
Example: Start > Programs > DK > wdreg_install.
Revision Description of Changes
October 2007 Initial release for Blue Manager 3.0
January 2008 Updated release for Blue Manager 4.0
May 2008 Updated release for Blue Manager 5.1
Human Interface Devices (HIDs) . . . 3-5
Launching the Blue Manager. . . 6-1
File Transfer and Advanced Operations
. . . 7-1Setup Requirements . . . 7-1
Transferring Files From Cell Phone to Your Laptop . . . 7-2
Transferring a File From Your Laptop to Cell Phone . . . 7-3
Pushing an Object . . . 7-4
Using the Audio Feature . . . 7-6 Using the Handsfree Profile . . . 7-6 Using the A2DP Settings Profile. . . 7-7
Using the Dial-up Networking Feature . . . 7-8
Basic Imaging . . . 7-12
Using Personal Area Networking . . . 7-12 PAN User (PANU) . . . 7-12 Group Networking (GN). . . 7-12 Network Access Point (NAP) . . . 7-13
This document describes the installation, configuration, and usage of the Blue Manager. Blue Manager is a PC-based software package that provides the upper-layer Bluetooth stack functionality in support of the Atheros AR3011 Bluetooth solution which is based on the AR3011 chip. Blue Manager requires an AR3011 device to be connected via USB to the PC for proper operation.
Blue Manager, through its simple Graphical User Interface, allows you to quickly find, connect, and communicate with other Bluetooth devices.
This document is intended for ODMs (Original Design Manufacturers) and OEMs (Original Equipment Manufacturers) that are evaluating or developing BT solutions based on Atheros' AR3011 USB SRAM Bluetooth solution.
About this Document
The document consists of the following chapters and appendices:
Chapter 1 Introduction—Provides an introduction to the Blue Manager software.
Chapter 2 Getting Started—Explains the basic features of Blue Manager and provides step-by-steps procedures for installing the Blue Manager software and drivers. In
addition, it describes how to perform various administrative functions associated with the Blue Manager.
Chapter 3 Bluetooth Device Configuration—describes how to configure Bluetooth devices using the Blue Manager. The configuration tool allows you to control the way the application handles devices inquiries.
Chapter 4 Connecting to an HID Device—describes how to connect the Bluetooth laptop to a Bluetooth HID (Human Interface Device) such as a mouse.
Reference Documentation
The following documents provides additional reference material related to this product:
■ AR3011 Data Sheet
■ AR3011 Hardware Design Guide
■ AR3011 Quick Start Guide
1
Introduction
This chapter provides a user’s overview of the Blue Manager Software. This software tool allows users to find, link, and communicate with other
Bluetooth Devices.
Blue Manager is a Bluetooth communication application that helps you easily manage and interact with your wireless personal area network (WPAN) and remote Bluetooth devices. Among others, these devices include mobile phones, headsets, pointing devices, modems, and access points. Use Blue Manager to do the following:
■ Find and connect to remote devices, and see the services they can provide
■ Browse folders and files on remote devices, and exchange files with them
■ Use wireless dial-up networking and serial-based functions
The Blue Manager is used with the Atheros AR3011 Bluetooth USB device. This device is provided in the form of a HCI USB Adapter that plugs into a PC USB port.
Blue Manager's main screen provides easy-to-use controls for the application and its user-friendly graphical user interface allows you work with various Bluetooth devices such as:
■ Palm-sized PCs/PDAs
■ Laptops
■ Cellular phones
■ Pointing devices such as a mouse
■ Keyboard
■ Desktop workstations
Setup Requirements
1. PC running Windows XP or Vista
2. Atheros Bluetooth USB Adapter
3. Bluetooth mouse
4. Bluetooth cellular phone
5. Bluetooth headset
6. Any other Bluetooth devices that you wish to use
NOTE: Microsoft Windows XP Professional Version 2002, Service Pack 2 was used for the installation of Bluetooth hardware and software.
Figure 1-1 shows the Atheros Bluetooth USB Adapter.
2
Getting Started
This chapter describes how to install, uninstall, launch, and use the Blue Manager.
The following major topics are covered in this chapter:
■ ”Installing the Blue Manager”
■ ”Launching the Blue Manager”
■ ”Introduction to the Blue Manager”
■ “Uninstalling the Blue Manager”
Installing the Blue Manager
You either received a password from Atheros to download the Blue Manager software from the Atheros web site or received the Blue Manager on a CD.
NOTE: If you are installing Blue Manager on a machine that already has an existing Blue Manager, you need not uninstall it because Blue Manager supports the upgrade feature. If you need to uninstall Blue Manager, refer to “Uninstalling the Blue Manager” on page 2-14 on how to uninstall Blue Manager.
Software installation is a three-step process and it is important to perform these steps before you can use the Blue Manager:
1. Installing the Blue Manager
2. Installing the radio (profile) drivers
3. Updating the drivers
Downloading the Blue Manager
1. Got to the Atheros Support web site:
https://support.atheros.com/
2. Login to the web site using your user name and password provided by Atheros Support.
3. Go to the Blue Manager download section of the Atheros web site.
4. Download the Blue Manager, extract the files, and save them on your system.
5. Install the Blue Manager by double-clicking on the Blue Manager
setup.exe file.
Follow the rest of the installation procedure described in “Copying Blue Manager from the CD” on page 2-2.
Copying Blue Manager from the CD
1. Insert the CD containing the Blue Manager into the CD drive.
2. Double Click on the Blue Manager setup.exe file.
3. Choose the language from the Choose Setup Language dialog.
English (United States) is used in this case. See Figure 2-1.
4. Click OK.
Figure 2-1. Choosing Setup Language
Figure 2-2. Blue Manager - Welcome Screen
5. Click Next.
You will see the Blue Manager Suite End-User License Agreement
6. Read the agreement and click on the “I accept the terms of the license agreement” button and click Next. You will see the Customer
Information screen. See Figure 2-4.
Figure 2-4. Blue Manager Customer Information Screen
7. Enter the user name and company name and choose the intended user of this application - “Anyone who uses this computer (all users)” or “Only for me”. Then click Next.
Figure 2-5. Blue Manager - Start Copying Screen
8. Click Next.
Blue Manager Suite begins to configure and copy the new software. It also removes any backup files. When the Blue Manager installation is
Figure 2-6. Blue Manager - Installation Setup Status
Figure 2-7. Blue Manager - Finishing the Installation
10. To add the Blue Manager Suite to the Windows Startup folder, check
“Add the Blue Manager Suite to the Windows Startup folder” button. If this box is checked, the Blue Manager Suite will start automatically when Windows operating systems is launched. (This is an optional step.)
11. Click Finish.
The installation is complete. This process creates a ‘Launch Blue Manager’ shortcut on your desktop.
Now you are ready to run Blue Manager.
Launching the Blue Manager
1. Insert the Blue Manager USB device into one of the USB ports of your system.
2. Double click on the Launch Blue Manager icon on your desktop or choose start > All Programs > Blue Manager Suite > Launch Blue Manager Suite.
If no bluetooth devices are found within range, it is normal for new installation. Blue Manager screen does not display such devices when launched for the first time. See Figure 2-8.
Introduction to the Blue Manager
Now that you have successfully launched the Blue Manager, spend few minutes in getting to know your Blue Manager. The following few pages explain various features and components associated with the Blue Manager GUI.
The Blue Manager main screen consists of four major parts:
■ Menu bar
■ Toolbar
■ Bluetooth Neighborhood displayed on the left pane
■ Bluetooth devices and services displayed on the right pane
Menu Bar
The main menus associated with Blue Manager are:
■ Application
■ View
■ Help
NOTE: Most functions are available from the menus as well as the toolbar.
Application Menu
There are three options associated with this menu which are described below.
Bluetooth Inbox
Clicking this button displays a Window and opens the folder configured as “Object Push Inbox” folder. If no such folder is configred by the user, the system folder “C” is opened. Any files which are sent from a mobile device such as business card or audio file, are stored here. This folder is a container for any messages associated with Blue Manager. This feature is also available through the toolbar.
Configuration
Clicking on the Configuration menu option displays the Blue Manager Configuration screen which allows you to specify Blue Manager tasks and settings associated with Bluetooth device recovery and device filters. This function is also available through the toolbar. Nine configuration screens are associated with Blue Manager. Those screens are:
■ Blue Manager Settings
■ Local Device
■ Bluetooth Security
■ Shared Folders
■ Object Push
■ Audio
■ Basic Imaging
■ Personal Area Networking
These options are described in detail in Chapter 3.
Exit
Clicking this button exits the Blue Manager immediately, without any prompt or further interaction by the user.
CAUTION: Do not click the Exit button unless you really want to exit the program. Failure to comply may result in loss of any unsaved data.
View Menu
This menu works like standard Windows View menu that allows you to view Toolbar, Status bar, and view items as small or large icons, list, or detail. It allows you to view by Device Discovery or by using the Device Filter option that displays and filters various devices. You have the option to show only discovered devices, show my devices, or show all known devices.
Help
This menu has two options: Help Topics and About BMExplorer. Choose Help Topics to get help on various topics. Choose About BM Explorer to learn which version of Blue Manager you are using.
Toolbar
The toolbar displays various tools that are available for a particular function or device. See Figure 2-10 for the location of each toolbar button.
If the toolbar is not visible, select the View menu and make sure the Toolbar is checked.
The toolbar icons present on the toolbar are:
■ Bluetooth Inbox—Opens your Bluetooth Inbox folder. (Also available through the Application menu.)
■ Configuration—Opens the Blue Manager Configuration screen which displays all the configuration options and allows do to specify the Blue Manager Settings which enables you to control many application functions. (Also available through the Application menu.)
■ Device Discovery—Discovers Bluetooth devices within range. (Also available through the View menu.)
■ Select View—Selects how items are displayed (as icons or list) in the main screen's right-hand pane. (Also available through the View menu.) All views include an icon for each discovered device, and display colored dots to indicate the status of the device:
– Green: The device is connected.
– Blue: The device is in range.
■ About—Click this to view on-line help and information about the software version, etc.
■ Device Filter—Filters the set of devices to be displayed. There are three options:
– Show Only In-Range Devices - These are the devices which are found in the most recent discovery. No other devices are displayed.
– Show My Devices - Shows your recently discovered and connected devices, and all paired devices.
– Show All Known Devices - Shows all devices ever discovered or connected in the current session.
■ Name Discovery—Discovers the name of the selected device (in case this was not found when the device was discovered).
■ Service Discovery—Discovers the services available through the selected remote device. Also displays the remote device name (if any).
■ Cancel Service Discovery—Cancels the attempt to discover device services.
■ Trust Device—Trusts the selected device.
■ Disconnect—Ends the connection to the remote device.
■ Device Properties—Displays the properties of a selected device.
■ Delete Device—Deletes a device from the main screen. This also removes it from use by the local device.
NOTE: Deleting a device does not remove its trusted status.
Bluetooth Neighborhood Pane
When you launch the Blue Manager, various bluetooth devices in the
Clicking on the Bluetooth Neighborhood icon (in the left window pane) displays all the devices within range in the device discovery area (right window pane).
Bluetooth Devices Discovery Pane
Any discovered devices are listed on the right pane. This part of the screen typically shows the service type, service name, and service status. For
example, if a Bluetooth mouse is discovered in the Bluetooth neighborhood, it is shown as Human Interface Device (HID), the brand name of that device and its service status (connected or disconnected). If a device is disconnected, but in discovered mode, select the device and click the right mouse button and choose Connect. If you want to disconnect a device, right click on that device and choose Disconnect. See Figure 2-9 for details.
Figure 2-9. Blue Manager Initial Screen
NOTE: Hold the mouse over various buttons to see their functions in pop-ups and in the status bar. Some toolbar buttons will not appear until a device is selected. In order to display all the Toolbar icons, select a device in the right pane. The extended Toolbar icons disappear if you click on the left pane.
Figure 2-10. Toolbar Buttons - Extended
If any existing Bluetooth devices are within range, you will see a list of such devices in the right pane as shown in Figure 2-11.
Name
Profile Manager
Blue Manager supports a wide range of Bluetooth profiles, and automatically assigns profiles according to the device type in these situations:
■ When the application is run for the first time (assigns profiles to the local device and devices connected to it)
■ When devices are installed
■ When devices are discovered
Use the Profile Manager window to view the available profiles and the devices/services assigned to each.
You can also right-click on a device to do the following:
■ Enable or disable the service
■ Uninstall the device
■ Scan for changes in discovered devices
View properties for device services:
■ Service type and name
■ Bluetooth device address
■ Service status (enabled or disabled)
■ Connection status
Do the following to launch the Profile Manager:
1. On the Blue Manager, choose Application > Configuration.
It displays the Blue Manager Configuration screen. See Figure 2-12.
Uninstalling the Blue Manager
Anytime you install a new version of Blue Manager, you need to uninstall any exisiting version of the Blue Manager. Follow this procedure to uninstall the Blue Manager.
1. Choose start > All Programs > Blue Manager Suite > Uninstall Blue Manager Suite.
A screen is displayed (see Figure 2-13) that allows you to modify, repair, or Remove.
2. Select the Remove button.
Figure 2-13. Removing the Existing Blue Manager Software
3. Click Next.
You will be prompted to confirm that you wish to completely remove the selected application. See Figure 2-14.
4. Click OK.
After few seconds, you will see another screen that indicates that the uninstall is complete. See Figure 2-15.
Figure 2-15. Uninstall Complete
5. Click Finish.
DO
N
This chapter describes how to configure Bluetooth devices using the Blue Manager. The configuration tool allows you to control the way the application handles device inquiries.
Clicking on the Configuration menu option displays the Blue Manager Configuration screen which allows you to specify Blue Manager tasks and settings associated with Bluetooth device recovery and device filters. This function is also available through the Toolbar.
Nine configuration screens are associated with Blue Manager. These screens are:
Specifying the Blue Manager Settings
1. From the Blue Manager menu, select Application > Configuration or click on the Configuration icon on the Toolbar.
It displays the Blue Manager Settings screen shown in Figure 3-1.
Figure 3-1. Blue Manager Settings
2. Under the Bluetooth Device Discovery label, specify the appropriate Bluetooth Device Inquiry method.
a. Check Bluetooth Device Inquiry On Startup box to specify that the device inquiry should be held upon start-up.
b. Check DiscoverBluetooth Device Names after Inquiry box to specify that the Bluetooth device should be discovered after inquiry.
c. Check Perform Bluetooth Device Inquiry Every box to specify the interval (in minutes) at which the device inquiry should take place. Enter a value between 1 and 10 in the Minutes box.
3. Click the appropriate “Show” dialog or application messages boxes. This determines the kind of messages that will be displayed when using the application. This is optional. You can uncheck or check all the boxes depending on your needs.
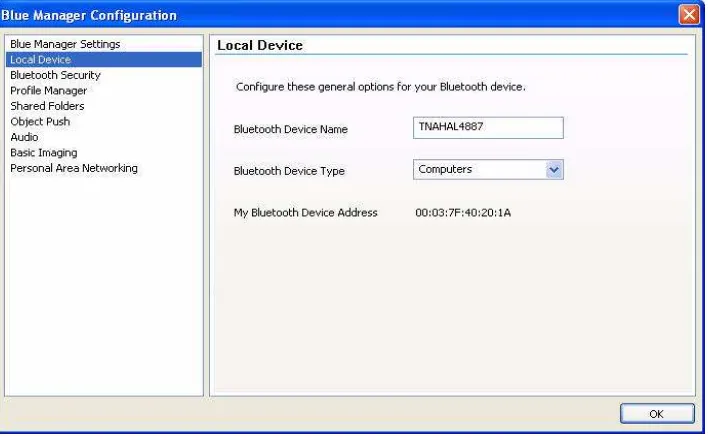
Specifying a Local Device
1. From the Blue Manager, select Application > Configuration or click on the Configuration icon on the Toolbar.
It displays the Blue Manager Configuration screen.
2. Click on the Local Device option on this screen.
It displays the Blue Manager Local Device configuration screen shown in Figure 3-2.
Figure 3-2. Blue Manager Configuration - Local Device
3. Enter the name of the Bluetooth device. You can enter any name here.
4. Select the Bluetooth device type from the pull-down list.
5. Click OK.
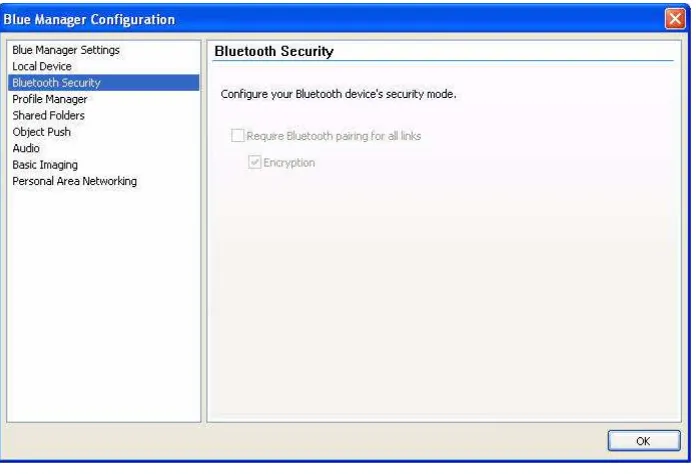
Specifying Bluetooth Security
Use the Bluetooth Security settings window to set the security level of Bluetooth connections.
Require Bluetooth pairing for all links
Encryption
When checked, the radio will be instructed to encrypt all communications. This option is only available when "Require Bluetooth pairing for all links" is checked.
Atheros BTUSB adapter radio supports the secure simple pairing feature of the Bluetooth version 2.1 specification. Therefore, no security configuration is required.
If you are not using Atheros radio which does not support Bluetooth version 2.1, only then these features shown in Figure 3-3 will be enabled.
Figure 3-3. Blue Manager Configuration - Bluetooth Security
Using the Profile Manager
A Bluetooth "profile" is a collection of settings that defines standard
communication methods and applications for a particular type of Bluetooth device.
Use the Profile Manager window to view the available profiles and the devices/services assigned to them. Blue Manager supports a wide range of Bluetooth profiles and automatically assigns profiles according to device type in these situations.
Profile Manager Options
1. From the Blue Manager, select Application > Configuration or click on the Configuration icon on the Toolbar.
It displays the Blue Manager Configuration screen.
2. Click on the Profile Manager option on this screen.
It displays the Profile Manager screen shown in Figure 3-4.
Figure 3-4. Blue Manager Configuration - Profile Manager
Blue Manager supports the following profiles:
Human Interface Devices (HIDs)
The HID profile supports input devices such as keyboards, mouse, and game controllers. Blue Manager can support multiple mouse and keyboard
connections. The application's main screen includes several status indicators for connected HID devices:
■ Battery level
■ Num Lock and Caps Lock keys
Serial Port (Clients and Servers)
The Serial Port Client and Serial Port Server profiles (sometimes called "cable replacement") enable you to use a Bluetooth connection in place of a serial cable.
and one for dial-up networking (client). You can use these ports just as you would ordinary serial ports.
You can view the Bluetooth serial ports in the Profile Manager under Serial Port Servers, or in the Windows Device Manager under Ports.
To use a client port, use Blue Manager to select a remote device, and connect to its serial port. After connecting, your applications can open and use the client port just like any other.
To use a server port, open the server port from any application that uses serial ports. Remote devices with a serial port client can connect to the local device and communicate through this port.
Dial-up Networking Devices
The Dial-up Networking Devices profile enables you to make dial-up connections to the Internet or a dial-up service through virtual Bluetooth modems. Blue Manager automatically creates a Bluetooth modem whenever you connect a Bluetooth-compliant DUN (Dial Up Networking) gateway device.
You can view the Bluetooth dial-up devices in the Profile Manager under Dial-up Networking Devices, or in the Windows Device Manager under Modems.
Audio Source Devices
The Audio Sink Device and Audio Source Device profiles make it possible to transfer high-quality stereo audio streams between the local and remote devices. This can be used with Bluetooth stereo headphones, mobile phones, and other audio devices such as speakers.
Audio Sink Devices
The Audio Sink Device and Audio Source Device profiles make it possible to transfer high-quality stereo audio streams between the local and remote devices. This can be used with Bluetooth headphones, mobile phones, and other audio devices such as speakers.
SCO Audio Devices
SCO audio devices are used for voice applications, such as Skype. These devices transfer mono voice information between a Bluetooth headset and the BME application. They use an SCO connection, which is an acronym for Synchronous Connection Oriented (SCO) link.
Audio/Video Remote Control Devices
The Audio/Video Remote Control Device profile enables a single Bluetooth remote control device to control these supported applications on audiovisual devices:
■ Windows Media Player 11
■ Windows Media Player 9
■ Winamp 5.33
■ RealPlayer 10.5
■ RealPlayer 10
Blue Manager accepts the following commands:
■ Play
NOTE: If multiple media applications are running, only one application receives commands. The aforementioned applications are listed in order of precedence.
Group Network (GN) Devices
A GN device offers "group networking" services, allowing Bluetooth users to establish a private network of Bluetooth nodes. This includes Bluetooth PAN (Personal Area Network).
Network Access Point (NAP) Devices
A NAP device acts as a gateway for other PAN devices, allowing them to access the rest of the internet.
Personal Area Network User (PANU) Devices
A PANU device can access PAN services offered by other devices.
HCRP Client Devices
The Hardcopy Cable Replacement Profile (HCRP) allows Bluetooth-enabled printing devices to be accessed by PCs and other devices, just as if they were connected by a physical printer port.
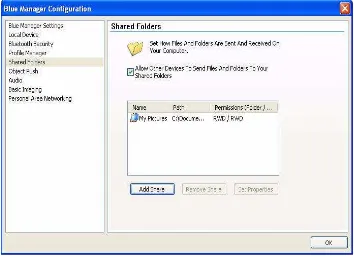
Shared Folders
Use the Shared Folders settings window to set up folders to be accessed by remote users.
Allow Other Devices To Send Files And Folders To Your Shared Folders.
Add Share
Shares folders for access by remote users. Browse to select the folder. When prompted, rename the folder (if needed) and select read/write permissions for files and folders.
CAUTION: Use caution when making an entire drive available for sharing. Unless you really need to share the entire drive, share only a specified folder. Otherwise, it will make all files and subfolders available for sharing.
This feature determines how files and folders are sent and received on your computer. By using this feature, you can allows other devices to send files and folders to your shared folders.
1. From the Blue Manager, select Application > Configuration or click on the Configuration icon on the Toolbar.
It displays the Blue Manager Configuration screen.
2. Click on the Shared Folders option on this screen.
It displays the Profile Manager screen shown in Figure 3-5.
Figure 3-5. Blue Manager Configuration - Shared Folders
3. To remove a shared folder, highlight that folder and click on the Remove Share button.
Figure 3-6. Blue Manager Configuration - Adding a Shared Folder
5. Navigate to the folder that you wish to share with other devices and click
OK.
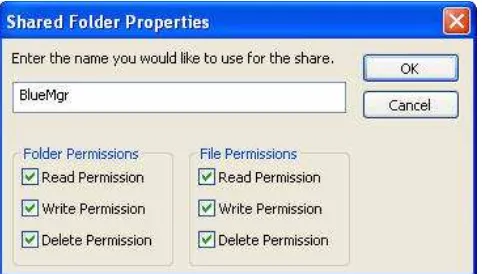
Setting Properties of a Shared Folder
1. To set properties of a shared folder, click on the Set Properties button on the screen shown in Figure 3-5 which displays another screen shown in Figure 3-7.
Figure 3-7. Blue Manager Configuration - Shared Folder Properties
2. Enter the name that you would like for this share folder.
3. Check or uncheck the appropriate folder and file permission boxes.
Object Push
The Object Push profile enables Blue Manager to exchange files such as graphics and business cards (vCards) between local and remote devices.
To receive files or business cards, you must configure Blue Manager's Object Push settings.
You can use contact information from the following PIM applications for business card exchanges and push operations:
■ Outlook 2007
■ Outlook 2003
■ Outlook 2002
■ Outlook Express 6.0
■ Outlook Express 5.0
The options associated with these settings are:
Inbox
Click on the navigation button in the right side to specify the folder as the inbox.
Allow other devices to send objects to this computer
Check this option if you wish other devices to send object to this computer. This option is available only after you have specified the Inbox pathname.
Prompt before accepting incoming objects
Check this option if you want to system to prompt you before accepting incoming options.
Include Outlook Contacts
Check this option if you would like to include Outlook Contacts while pushing an object.
Include Outlook Express Address Book
Check this option if you would like to include Outlook Express Address Book while pushing an object.
NOTE: You can include either Outlook Contacts or Outlook Express Address Book option, but not both.
Figure 3-8. Object Push Screen
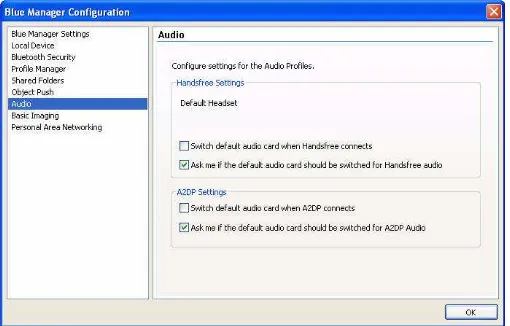
Audio
The Audio settings window is used to control handsfree and A2DP settings.
Handsfree Settings
Review the current default headset service (if any), and select options for automatically switching the windows audio card when a handsfree connection is made. The options associated with these settings are:
■ Switch default audio card when Handsfree connects
■ Ask me if the default audio card should be switched for Handsfree audio
A2DP Settings
Select options for automatically switching the windows audio card when an A2DP (stereo headset) connection is made.
1. Select one of these options:
– Switch default audio card when A2DP connects
– Ask me if the default audio card should be switched for A2DP audio
2. Click OK.
Figure 3-9. Audio Setting
Basic Imaging
The Basic Imaging Profile (BIP) allows cameras, printers, and other devices (that support images) to browse available images by thumbnail, and to exchange images as necessary. The Blue Manager supports the Basic Imaging "Responder" role and works with other devices that support the Basic
Imaging "Initiator" role. This feature allows you to configure settings for the basic imaging profile and allow other devices to exchange images with this computer at the specified location. Figure 3-10 shows the basic imaging screen.
The options associated with this screen are:
■ Allow other devices to exchange images with this computer
■ Image folder
1. Click on the Allow other devices to exchange images with this computer.
2. Click on the browse button to specify the image folder.
3. Click OK.
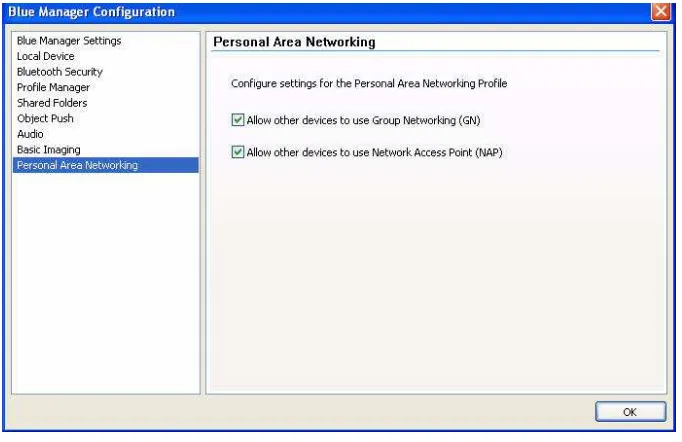
Personal Area Network
The Personal Area Networking (PAN) profile allows devices to use ordinary TCP/IP network services over Bluetooth links. The PAN profiles define three roles:
■ PAN User (PANU)
■ A PANU device can access PAN services offered by other devices.
■ Group Networking (GN)
A GN device offers "group networking" services, allowing Bluetooth users to establish a private network of Bluetooth nodes
A NAP device acts as a gateway for other PAN devices, allowing them to access the rest of the internet. Blue Manager supports all three PAN roles.
Do the following to configure settings for the Personal Area Networking (PAN) profile:
1. Click on Allow other devices to use Group Networking (GN)
2. Click on Allow other devices to use Network Access Point (NAP).
3. Click OK.
DO
N
OT
CO
PY
4
Connecting to an HID Device
This chapter describes how to connect the Bluetooth laptop to a Bluetooth HID (Human Interface Device) such as a mouse.
Setup Requirements
You need the following devices and equipment in order to accomplish this task:
■ A PC system running Windows with Blue Manager
■ Atheros Bluetooth USB Adapter
■ Bluetooth mouse with batteries or keyboard
Launching the Blue Manager Suite
1. Double click on the Launch Blue Manager Suite icon on your desktop or launch it from start > All Programs > Blue Manager Suite > Launch Blue Manager Suite.
It displays the Blue Manager start-up screen. See Figure 4-1.
2. Put your mouse in searchable (pairing mode) by doing the following:
a. Turn On the mouse by pressing down its power On/Off button. Refer to the mouse documentation on how to do it.
b. Press the connect button on the mouse to put it in pairing (discoverable) mode. Refer to the mouse documentation for additional information.
It displays all the peripheral devices in the right pane of the screen indicating that these devices are in range and available to be connected. It also shows the device name, address, type and status (in range).
Figure 4-1. Blue Manager Start-up Screen
4. Right click on the device and choose Pair Device.
It displays the Bluetooth Pairing Passcode screen. See Figure 4-2.
Figure 4-2. Entering Bluetooth Pairing Passcode
5. Enter a passcode to pair with the remote device and click OK.
NOTE: The default code shown is 0000. Refer to the documentation of your mouse to find out the passcode of your device and how to change it.
It shows the service type (Human Interface Device), service name (name of the mouse), and service status (connected or disconnected) in the right pane.
7. Highlight the device. Using your laptop pointing device, right click on the Human Interface Device service and choose the Connect option to connect to the mouse.
Its service status will change from Disconnected to Connected, Ok. Your mouse is now connected. You can perform normal mouse functions using this mouse.
Figure 4-3 shows the wireless connection between your laptop and mouse.
Figure 4-3. Connecting a Bluetooth Mouse to a Laptop
Laptop
DO
N
This chapter describes how to connect the Bluetooth PC to a Bluetooth headset.
Setup Requirements
You need the following devices and equipment in order to accomplish this task:
■ A PC system running Windows with Atheros Blue Manager
■ Atheros Bluetooth USB Adapter
■ Bluetooth headset with fully charged batteries
Launching the Atheros Blue Manager Suite
1. Double click on the Launch Atheros Blue ManagerSuite icon on your desktop or launch it from start > All Programs > Blue Manager Suite > Launch Blue Manager Suite.
It displays the Atheros Blue Manager start-up screen. See Figure 5-1.
2. Put your headset in searchable (pairing mode) by turning On the headset by pressing down its Call Button until the indicator light flashes and turns solid (about 6 seconds). Then release the button.
3. On the left pane of the screen, click on the Audio Devices icon.
It displays any audio devices in the right pane of the screen indicating that these devices are in range and available to be connected. It also shows the device name, address, type and status. See Figure 5-1.
Figure 5-1. Blue Manager Start-up Screen
4. Expand the Audio Devices icon on the left page and highlight the headset device under it and click on the Device Discovery icon.
5. Right click on the device and choose Display Services.
It displays both Audio Sink and Handsfree devices on the right pane. See Figure 5-2.
If these devices are displayed for the first time, you might also see the Bluetooth Pairing Passcode screen. See Figure 5-3.
Figure 5-3. Entering Bluetooth Pairing Passcode for the Headset
6. Enter a passcode to pair with the remote device and click OK.
NOTE: The default code shown is 0000. Refer to the documentation of your headset to find out the passcode of your device and how to change it.
7. Highlight the headset device under Audio Devices in the left pane.
It shows the service type, service name (name of the headset), and service status (connected or disconnected) in the right pane.
NOTE: The headset consists of two types of services: Audio Sink and Handsfree. Both of these services are displayed in the right window pane. Both these devices need to be connected individually to the laptop for the headset to function properly.
8. Right click on the Audio Sink service and choose the Connect option to connect to the headset.
9. Right click on the Handsfree service and choose the Connect option to connect to the headset.
The service status of both these devices will change from Disconnected to Connected. Your headset is now connected. You can perform normal headset functions using this headset.
Figure 5-4. Connecting a Bluetooth Headset to a Laptop
Laptop
DO
N
OT
CO
PY
6
Connecting to a Cell Phone
This chapter describes how to connect the Bluetooth laptop to a Bluetooth cell phone.
Setup Requirements
You need the following devices and equipment in order to accomplish this task:
■ A laptop system running Windows with Blue Manager
■ Atheros Bluetooth USB Adapter
■ Bluetooth cell phone with active service
On your cell phone go to the settings menu and enable the Bluetooth and make it discoverable. Refer to the documentation that came with your cell phone on how to enable its Bluetooth function.
After you enable it, search for this phone from the Blue Manager on your laptop.
Launching the Blue Manager
1. Double click on the Launch Blue Manager Suite icon on your desktop or launch it from start > All Programs > Blue Manager Suite > Launch Blue Manager Suite.
It displays the Blue Manager start-up screen. See Figure 6-1.
2. Turn On the cell phone and put it in discoverable (pairing mode) mode.
the documentation that came with your cell phone on how to put it in discoverable mode.
3. On the left pane of the screen, click on the Phones icon.
It displays any phone devices in the right pane of the screen indicating that these devices are in range and available to be connected. It also shows the device name, address, type and status.
Figure 6-1. Blue Manager Start-up Screen
4. Expand the Phones icon on the left page and highlight the cell phone device of interest.
5. Right click on the cell phone device and choose Display Services.
It displays various objects on the right pane, for example, Audio Source, File Transfer, Object Push, and Dial-Up Networking. It also displays the files that can be transferred if FTP service is connected. The cell phone is now connected to the Blue Manager.
Figure 6-2. Entering Bluetooth Pairing Passcode for the Cell Phone
6. Enter a passcode to pair with the remote device and click Ok.
7. Enter the passcode and click Ok.
8. Right click on a service of the Cell phone device and choose the Connect
option to connect to the cell phone.
Figure 6-3. Connecting a Bluetooth Cell Phone to a Laptop
Laptop
DO
N
This chapter describes how to perform advanced operations using the Bluetooth laptop, Bluetooth cell phone, and other Bluetooth devices.
The following topics are covered in this chapter:
■ “Setup Requirements”
■ “Transferring Files From Cell Phone to Your Laptop”
■ “Transferring a File From Your Laptop to Cell Phone”
■ “Pushing an Object”
■ “Using the Audio Feature”
■ “Using the Dial-up Networking Feature”
■ “Basic Imaging”
■ “Using Personal Area Networking”
NOTE: Some of the procedures require that you monitor and use both the computer screen and cell phone screen and take appropriate actions. For example, you will be asked to enter a code, grant permissions and make certain selections for various operations on your cell phone and computer screen.
Setup Requirements
You need the following devices and equipment in order to accomplish this task:
■ Atheros Bluetooth USB Adapter
■ Bluetooth cell phone with active service
■ Files that need to be transferred on your cell phone and laptop
NOTE: It is assumed you know how to make your bluetooth cell phone and other devices discoverable and have a basic knowledge of cell phone and its operations. You might be asked to provide a passcode for pairing. Refer to the user
documentation that came with your cell phone on how to use various features.
Transferring Files From Cell Phone to Your Laptop
The following procedure describes how to download files from the cell phone to your laptop. Refer to “Transferring a File From Your Laptop to Cell Phone” on page 7-3 on how to upload files to your cell phone as well.
It is assumed that the Blue Manager is running, the cell phone is already connected to your laptop and the cell phone file transfer screen is active.
Figure 7-1. Bluetooth Cell Phone File Transfer Screen
1. Highlight the file that you wish to transfer from your cell phone to your laptop.
2. Click FTP Get File button on the toolbar.
FTP Get File FTP Send File
FTP Up Folder
The file will be transferred to the specified location.
Transferring a File From Your Laptop to Cell Phone
The following procedure describes how to transfer a file from the laptop to the Bluetooth cell phone.
It is assumed that the Blue Manager is running, the cell phone is already and discovered by your laptop and the cell phone file transfer screen is active.
1. Make your cell phone is in discoverable mode.
2. Highlight and right click on the File Transfer icon on the screen and select
Send File.
See Figure 7-2.
This displays the Open screen that allows you to browse to the file that you wish to send. See Figure 7-3.
Figure 7-3. Selecting a File to Send to the Cell Phone
3. Open the desired folder, highlight the file that you wish to send and click
Open.
The file is sent to the cell phone.
NOTE: A Motorola K1 cell phone was used in this procedure. Your cell phone might have a different user interface and prompts. However, the basic procedure should be the same.
Pushing an Object
Blue Manager uses the OBEX Object Push service to transfer files between two devices when no folder information is available. The local device sends files to the remote device to be placed in that device’s inbox. If a remote device sends the local device a file, it is placed in the inbox on the local device.
The Object Push profile enables the Atheros Blue Manager to exchange files such as graphics and business cards (vCards) between local and remote devices using the OBEX Object Push Service. These transfers are always initiated by the sender. Therefore, these are called "push" operations.
■ Outlook 2007
■ Outlook 2003
■ Outlook 2002
■ Outlook Express 6.0
■ Outlook Express 5.0
The following procedure describes how to push an object to your cell phone:
1. Make sure the cell phone is in searchable mode.
2. On the Blue Manager screen, right click on the phone device under the Phones icon on the left pane and select Display Services. See Figure 7-4.
Figure 7-4. Object Push
3. Right click on the Object Push service type in the right window pane and select Put Business Card.
It displays the Select Contact screen that allows you to select a Business Card from the available list of contacts present in your e-mail tool.
Figure 7-5. Selecting a Business Card Contact
5. Look at your cell phone screen. You will be prompted to receive data from the sender.
6. Click Accept or use an equivalent key to grant permission.
The business card is sent from the laptop to the cell phone. You will see “Business card received” or equivalent message on the cell phone screen (depending on your cell phone).
7. View and save the business card.
Using the Audio Feature
The Audio feature consists of two profiles: handsfree settings and A2DP settings.
Using the Handsfree Profile
The Handsfree profile enables you to connect a handsfree headset to a mobile phone, such as in an automobile.
1. From the Atheros Blue Manager, select Application > Configuration or click on the Configuration icon on the Toolbar.
It displays the Atheros Blue Manager Configuration screen.
2. Click on the Audio option on this screen.
Figure 7-6. Blue Manager Audio Profiles-Handsfree
3. Select the Handfree Settings.
4. Click OK.
Using the A2DP Settings Profile
This feature allows you to specify a default audio card when A2DP connects. It also allows you to specify if the default audio card should be switched for A2DP audio. See Figure 7-7 for details.
Figure 7-7. Blue Manager Audio Profiles-A2DP
Using the Dial-up Networking Feature
This section describes how to use your Bluetooth cell phone to connect to a web browser on your PC using the dial-up feature. See Figure 7-8.
Figure 7-8. Dialing-up Networking
1. Make sure your cellular phone is in discoverable mode. This device should be displayed in the right portion of the screen.
2. Highlight the Dial-up Networking service type, click the right mouse button and select Connect.
You might see a screen reminding you to make sure the device is in connectable mode.
NOTE: Depending on the device you are using, you might be asked to enter a passcode. Enter the same passcode on both sides.
3. Check or uncheck the Show this message in the future button and Click
Figure 7-9. Connectable Mode Reminder
At this time your cell phone will prompt you to accept an invitation to connect with the sender’s PC.
4. Click Accept or Yes (or other button to perform this function, depending on your cell phone) to connect with the remote PC.
The connection is established.
5. Open a Network Connection by going to start > Connect To > Show all connections.
It displays the networking connections screen that shows the dial-up connection. See Figure 7-10.
6. Right click on the dial-up connection icon (in this case, Atheros) and choose Connect.
This shows a connection screen prompting for a user name and password. See Figure 7-11.
Figure 7-11. Dial-up Connection User Name and Password
7. Enter the user name and password. You can save the user name and password for Me Only or for Anyone who uses this computer by clicking the appropriate button.
8. Click Dial.
You will be prompted to confirm if you want to change the phone number permanently.
9. Click No.
Figure 7-12. Checking Networking Status
10. Launch the internet browser.
Figure 7-13. Web Page Displayed Using your Cell Phone and PC
Basic Imaging
The Basic Imaging Profile (BIP) allows cameras, printers, and other devices that support images to browse available images by thumbnail, and to
exchange images as necessary. The Blue Manager supports the Basic Imaging "Responder" role and will work with other devices that support the Basic Imaging "Initiator" role.
Using Personal Area Networking
The Personal Area Networking Profile (PAN) allows devices to use ordinary TCP/IP network services over Bluetooth links. The PAN profiles defines three roles:
PAN User (PANU)
A PANU device can access PAN services offered by other devices.
Group Networking (GN)
Network Access Point (NAP)
A NAP device acts as a gateway for other PAN devices, allowing them to access the rest of the internet.
Blue Manager supports all three PAN roles. See Figure 7-14 for details.
A
cellular phone connection 1-x, 6-1, 7-1 configuration menu 3-1