David C. Mason
Copyright © 1999 by Red Hat Software and David A. Wheeler
This document can be freely redistributed according to the terms of the GNU General Public License.
Revision History
What is GNOME...9
4. Using the GNOME Panel ...17
Introduction...17
The Basics...17
Using the Main Menu ...17
Hiding the Panel...18
Moving and Adding Panels...18
Adding Applications and Applets to the Panel ...19
Adding Application Launchers ...19
6. The GNOME File Manager ...30
Introduction...30
Moving Around the GNOME File Manager...31
Selecting Files...32
Changing Your Preferences in The File Manager...40
Menu Guide to the GNOME File Manager ...45
A Drag and Drop Tour of GNOME ...48
7. Configuring the Panel...51
8. Editing the Main Menu ...59
Introduction...59
Configuring the Main Menu...59
Using the Menu Editor...60
Adding a New Menu Item...62
Drag and Drop in the Main Menu...62
9. The GNOME Control Center ...63
Introduction...63
Desktop Capplets ...64
GNOME Edit Properties ...70
10. A Word About Session Management ...84
Utility ...93
Clock Applet ...93
Printer Applet...94
Drive Mount Applet ...94
GNOME Pager...96
Quicklaunch Applet ...98
12. GNOME CD Player...100
Introduction...100
Using the GNOME CD Player...100
13. The GNOME Calendar ...104
Introduction...104
Setting Up the GNOME Calendar ...105
Using the GNOME Calendar ...107
The Day View ...107
The Week View ...109
The Month View ...110
The Year View...111
Making a New Appointment...113
What is GNOME
GNOME is a user-friendly desktop environment that enables users to easily use and configure their computers. GNOME includes a panel (for starting applications and displaying status), a desktop (where data and applications can be placed), a set of standard desktop tools and applications, and a set of conventions that make it easy for applications to cooperate and be consistent with each other. Users of other operating systems or environments should feel right at home using the powerful graphics-driven environment GNOME provides.
GNOME is completely open source (free software), with freely available source code developed by hundreds of programmers around the world. If you would like to learn more about the GNOME project please visit the GNOME web site at
http://www.gnome.org.
GNOME has a number of advantages for users. GNOME makes it easy to use and configure applications without using text-only interfaces.
GNOME is highly configurable, enabling you to set your desktop the way you want it to look and feel. GNOME’s session manager remembers previous settings, so once you’ve set things the way you like they’ll stay that way. GNOME supports many human languages, and you can add more without changing the software. GNOME even supports several Drag and Drop protocols for maximum interoperability with
applications that aren’t GNOME-compliant.
to interoperate seamlessly, regardless of the computer language in which they are implemented, or even what machine they are running on. Finally, GNOME runs on a number of Unix-like operating systems, including Linux.
GNOME is an acronym for the GNU Network Object Model Environment, so GNOME is a part of the larger GNU project. The GNU Project started in 1984 to develop a completely free Unix-like operating system. If you’d like to learn more about the GNU project you can read about it at http://www.gnu.org.
About This Guide
This users guide is designed to help you find your way around GNOME with ease. Both new and experienced computer users can benefit from this guide. If you’re new to GNOME, or even computers, you’ll gain an idea of how to use your desktop. If you’re an advanced user, you can work with expert tips which will help you to become familiar with GNOME.
GNOME Quick Start
Figure 2-1 shows an example of GNOME running. GNOME is very configurable, so your screen may look quite different.
Figure 2-1. Sample GNOME Display.
The long bar at the bottom of Figure 2-1 is a GNOME Panel, which contains a
to be placed in a panel, for example, the clock applet on the far right shows the current time. The arrows on each side of the panel hide (and unhide) the panel.
The button in the panel containing a stylized foot is the Main Menu Button. Just click on the Main Menu Button and you’ll see a menu of pre-loaded applications and actions, including a logout command.
The rest of the screen space is called the "Desktop." Just place on your desktop the items you use most often and you can double-click on an item (with the left mouse button) to use it:
• If the item is a program, that program will start.
• If it’s data, the appropriate program will be start up with that data loaded.
• If it’s a directory, the file manager application will start and show the contents of that directory. Your desktop will probably have a folder icon labelled "Home directory". Double-clicking on it will start a file manager at your home directory.
The file manager application lets you manipulate your files. The left side of its window shows directories, and the right side shows the selected directory’s contents:
• To move the file or directory, just drag and drop it.
• To copy a file, hold down the CTRL key while dragging.
• To run a program or edit a data file, double-click it.
• To perform other operations on a file (such as rename or delete), select it using the right mouse button.
• To select more than one item at a time, click on the items after the first one while holding down the SHIFT key.
GNOME is very configurable; for example, you can have multiple panels (horizontal and vertical), choose what goes in them, and have them hide automatically. There are many panel applets you can include in your panel. You can also change how the screen looks; later portions of this document tell you how.
GNOME follows several UNIX conventions you should be aware of. The left mouse button is used to select and drag items. The right mouse button brings up a menu for the selected object (if a menu applies). Most UNIX mice have 3 buttons, and the middle button is used to paste text (if in a text area) or to move things. If you only have two buttons, press the left and right buttons simultaneously to simulate the middle button. To copy text, use the left button to drag across the text you want to copy, move to the place you want the text to be, and press the middle button.
When an application window is displayed, there will be some buttons in its borders for controlling the window. These include buttons to minimize, maximize, and close the window. Their appearance can be configured and is controlled by a component called a "window manager."
Two examples of border styles are the Clean style (Figure 2-2) and the ICE style (Figure 2-3):
• In the Clean border style, the underscore means minimize, the square means maximize (use the whole screen), and the X button means close the window.
• In the ICE style, the X button will close the window. Clicking the arrow with the left mouse button minimizes the window, while clicking with the right mouse button shows a menu of other options.
Figure 2-3. ICE Border Style
If you are using a default installation of GNOME you may notice that minimizing a window actually causes that window to disappear from your desktop. To regain that window you may use the GNOME Pager which is located on the Panel. The Pager will show you which tasks are running and where they are on your desktops. You will find the application you minimized in the task list on the right side of the GNOME Pager. Press the button for that application and it will return to your desktop.
Figure 2-4. The GNOME Pager
You may read more about the GNOME Pager in the section called GNOME Pager in Chapter 11.
GNOME
About Window Managers
The window manager is the piece of software that controls the windows in the X window environment. The placement, borders, and decorations of any window is managed by the window manager. This is very different from many other operating systems, and the way GNOME deals with window managers is different from other desktop environments.
As stated earlier in this guide, GNOME is not dependent on any one window manager. This means that major parts of your desktop environment will not change when you decide to switch window managers. GNOME works with the window manager to give you the easiest work environment you can have. GNOME does not worry about window placement but gets information from the window manager about their placement. The GNOME Pager will only work with a GNOME compliant window manager as will drag and drop on the desktop.
At the time of this version of the GNOME User’s Guide the Enlightenment Window Manager is the only window manager that is 100% compliant. There are many other window managers that are partially compliant or are being worked to meet compliance.
Some of the window managers that have partial to full compliance at the time of this version of the GNOME User’s Guide are:
• Enlightenment - http://www.enlightenment.org
• Icewm - http://www.kiss.uni-lj.si/~k4fr0235/icewm/
• Window Maker - http://www.windowmaker.org
Changing Window Managers
At any time you may change the window manager you are using by utilizing the Window Manager Capplet in the GNOME Control Center. You may read more about this Capplet in the section called Window Manager Capplet in Chapter 9
Introduction
The Panel is the heart of the GNOME interface and acts as a repository for all of your system applications, applets, and the Main Menu. The Panel is also designed to be highly configurable. The Panel gives you a place that always contains menus and applications as you want them to be.
The Basics
Using the GNOME Panel is very simple and will come easily to anyone who has used a graphical based operating system. You may add new panels, add applications to the panel, and add various applets. All of these functions and more will be described in this section.
Using the Main Menu
To start using any pre-loaded application press the Main Menu Button. The Main Menu has the picture of the stylized foot and on first use is on the bottom left of the screen. You should release the mouse button after pressing the Main Menu button so that you can take advantage of other features in the Main Menu such as right mouse clicks and drag and drop from the menu.
The Main Menu is the starting point for all of the applications on your system. Later in this manual you will learn how to customize the Main Menu to suit your work
environment, but for now you can use the menu that is established when you install GNOME. The Main Menu works like any other menu you might have used in other graphical desktop environments. Simply press the Main Menu Button and select from the menu that pops up from the button.
Hiding the Panel
At any time you may hide the GNOME Panel by pressing the Hide Button
Figure 4-2. The Hide Button
This will hide the GNOME Panel in the direction of the arrow on the Hide Button. There are hide buttons on both sides of a Panel so you can hide it in either direction.
You may decide that you want the Panel to hide on its own when you are not using it. This can be a helpful function if you are unable to run your system in a high resolution. You can find out how to autohide the Panel in Chapter 7.
Moving and Adding Panels
desired edge of your screen. If you do not have a middle mouse button or did not configure your mouse to emulate a middle button you may also move a Panel by
changing its location in the Panel Configuration dialog. You can read more in Chapter 7 of this documentation.
You may also add a new Panel to your desktop by selecting the Add New Panel from the Main Menu | Panel menu. You will be given a choice of Edge or Corner Panels. Both of these Panel types are described below.
• Edge Panel - An Edge Panel is exactly like the main Panel that starts up with GNOME. By selecting this type of panel you may add a new Panel to another edge of your screen to give yourself more functionality.
• Corner Panel - The Corner Panel is a small Panel that will not stretch to the extent of the edge of the screen it is on. The Corner Panel will, however, stretch to the extent of icons and applets it contains. The hide buttons work just a bit differently with Corner Panels. The hide button closest to the edge of your screen will hide the Panel as usual but the other hide button will send the whole panel to the opposite edge. When the latter move is made it will not hide the Panel since it is changing the side of the screen it resides on. If you want to hide it you will have to press the hide button once again.
At any time you can change the current panel to the opposite type by selecting either the Convert to edge panel or the Convert to corner panel from the pop-up menu. The selection that is available depends on which type of panel you right mouse click on. The selection displayed will be the opposite of the current panel.
Adding Applications and Applets to the Panel
Adding Application Launchers
from the pop-up
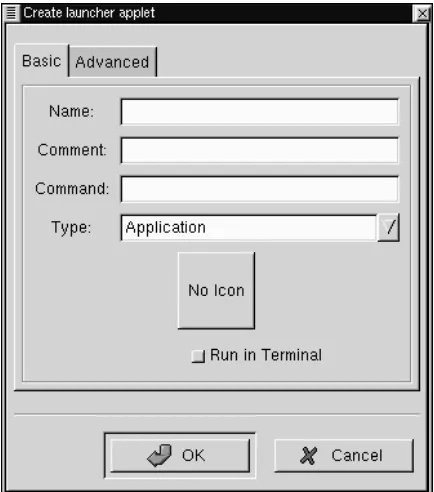
After selecting the Add New Launcher menu item you will see a dialog which will allow you to set the properties for the application launcher you wish to add.
Figure 4-3. The Create Launcher Dialog
In the Create launcher applet dialog you may add a name for your launcher, a comment, the command line to launch the application, and define the application type. You may also press the icon button and choose an icon to represent the application from the icon picker. If no icon is chosen a default icon will be used.
menu item it will automatically add a launcher for that application to the Panel in which you invoked the Main Menu. At this point you may right mouse click on the launcher and select the Properties menu item to change any options for that launcher.
Grouping Items with Drawers
If you would like to group a subset of applications together you may use a Drawer. A Drawer is simply a small menu-like button that sits on your panel that groups
application launchers together is one place. Once you have placed a Drawer on the Panel you may click on it to raise the menu of applications and click again to lower them.
Figure 4-4. A Drawer Running on the Panel
You can add menus to your panel in the same way you add Drawers. Menus are very similar to Drawers except that they do not use large icons to represent application launchers, instead they use a style similar to the Main Menu, i.e. small icons and the application name. You may add a menu by right mouse clicking on the title bar of a menu and select the Add this as menu to panel from the pop-up menu. You may also add system directories to the Panel as menus by dragging a directory out of the
GNOME File Manager and dropping it on the Panel.
Adding Applets
There are many applets which you can add to the Panel as well. Applets are small applications which can perform tasks within the Panel itself. There are many applets you can add to the Panel and these are covered in more detail in Chapter 11 of this manual. As an example of how to add an applet you can add another clock applet to your Panel. To add the clock applet to your Panel:
• Right mouse click on the Panel
• From the pop-up menu choose the Add new applet menu item.
• This will bring up more levels of pop-up menus.
• Choose the Utility | Clock menu item.
• The Clock will be added to your Panel.
To remove the clock applet you added you can right mouse click on the clock and select
Remove from panel from the pop-up menu.
Running Applications
There are many ways to launch applications within GNOME. Remember that one of GNOME’s strong points is that it allows you to start and control applications using only an easy-to-use graphical interface. There are many ways to start the applications you wish to use:
As you saw in the previous section you may use the Main Menu to find applications which have been pre-loaded or you provided using the Menu Editor. You can read more about the Menu Editor in the Chapter 8.
You may also add application launchers from the Panel which was covered in the section called Adding Application Launchers.
If you are using the GNOME File Manager you may double click on any executable file and it will run.
You may use the GNOME Run program to launch any application. To use it select the
Run program menu item from the Main Menu. This will launch a simple dialog
which allows you to type in the command for launching the application. For example, if you wish to start theEmacseditor and it is not in a menu or on your panel you may start the GNOME Run Program and type emacs in the text box on the dialog.
Logging Out of GNOME
GNOME has a couple of helpful methods for Logging out. You may either use the
Logout menu item or the Logout button.
log out or not. Select Yes and your GNOME session will end.
If you would like, you may add the Logout button to the Panel. This is just another method for logging out, it does not provide you any other functionality than the Logout menu item other than a pretty button. To add the Logout button to the Panel right mouse click on the Panel and select the Add logout button menu item from the
pop-up menu. Once the button is there you may press it to log out.
NOTE: If you are running a window manager that is GNOME compliant the logout feature will quit the window manager as well as GNOME. If you are not running such a window manager you will have to end that window manager yourself.
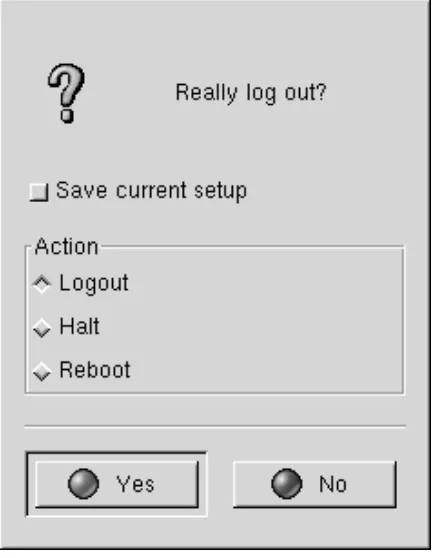
The Logout dialog will display when you log out of GNOME. This dialog will ask you whether or not you really want to log out. It also provides you with different methods of quitting GNOME.
You have three choices on how to quit GNOME. You may Logout which will simply take you to a terminal, Halt which will shut down the whole system, or Reboot which will reboot the whole system.
Figure 4-6. The Logout Dialog
Within the Logout Dialog there is one option you may choose before you leave GNOME.
Introduction
The GNOME Desktop provides you with all the functionality of any traditional operating system desktop. You can drag files, programs and directory folders to the desktop; you can also drag those items back into GNOME-compliant applications.
IMPORTANT: The GNOME Desktop is actually provided by a backend process in the GNOME File Manager. If, for any reason, that backend process has stopped running you may start the GNOME File Manager again and your desktop will be restored. If you do have to do this you will not need to keep the GNOME File Manager window open to enable the desktop.
Using the Desktop
Using the Desktop is as simple as dragging items you wish to use routinely to the desktop. The default desktop will include a folder of your home directory (/home/[user name]). By default the GNOME File Manager window will also appear for you to access other areas of your system.
To utilize drag and drop you need to be using either a GNOME compliant application or a Motif application. GNOME is compliant with Motif drag and drop so you will find it works with many applications you already have installed.
All items that are stored on your desktop are located in the following directory:
$/home/[user name]/.gnome-desktop/
can not utilize drag and drop with.
Once you have started GNOME you will notice that any drives you have connected to your system will be shown on your desktop with the appropriate icons. You may mount and access these drives utilizing these icons.
IMPORTANT: You must have permission to mount the device shown on your desktop before you can utilize these icons. You must have the root password to accomplish this. If you do not have this password you should consult your system administrator.
Gaining mount access can be done quite easily if you havelinuxconf installed on your machine. Just select the drive you want to access in theAccess local drive section. In the Options tab select the User Mountable option. Your drive will now be mountable by users.
If you do not havelinuxconf you must edit your/etc/fstab to include user access. This is done by adding user access to the drive. For Example:
If your fstab file looks like this:
/dev/cdrom /mnt/cdrom iso9660 exec,dev,ro,noauto 0 0
Add "user" to the fourth column:
/dev/cdrom /mnt/cdrom iso9660 user,exec,dev,ro,noauto 0 0
There could be some security risks involved with this depending on your system and work environment. Please consult your system administrator before making any drive user mountable.
Once you have permission to mount a drive you may right mouse click on the drive icon on your desktop. This will bring up a small pop-up menu.
If you are missing any drives that you might have added to your machine you may right mouse click on an empty space on the desktop and choose the Rescan Mountable
Devices menu item from the pop-up menu.
Desktop Areas
Desktop areas allow you to keep a well organized system when you have many tasks to perform at one time. Just like adding a new desk when you have too much for one, desktop areas allow you to move to another area to launch more programs.
GNOME is aware of desktop areas even though they are controlled by another software program called the ’window manager’. You can set the number of desktop areas within the configuration of the window manager you are using. If you are using the default window manager or your window manager has a graphical configuration tool you may be able to launch it from the Window Manager Capplet. You may read more about this Capplet in the section called Window Manager Capplet in Chapter 9
IMPORTANT: Most window managers will give you the option of having multiple desktops which are different from desktop areas. Desktop areas are virtual extensions of one desktop whereas multiple desktops are actually separate.
The default setup of GNOME is to use desktop areas with only one desktop. The reason for this is because in older applications, such as those which use Motif, users can experience problems with some drag and drop functionality across desktops.
Other Desktop Menus
• New | Terminal - This will launch a new GNOME Terminal window that will automatically navigate to the ~/.gnome-desktop directory.
• New | Directory - This allows you to create a new directory on your desktop. This
can be a convenient tool to use if you wish to clean up your desktop by placing files in a new directory.
• New | Launcher - This allows you to place a new application launcher on the
desktop. When you select this menu item it will launch an Application Launcher dialog that allows you to specify which application and its properties.
• New | [application] - Some applications may put items for you in the New menu. For example, the Gnumeric spreadsheet will put a New Gnumeric Spreadsheet menu item in the New menu so you can start up a new spreadsheet easily.
• Arrange Icons - This will automatically arrange your desktop icons.
• Create New Window - This will launch a new GNOME File Manager window
displaying your Home directory.
• Rescan Mountable Devices - This will rescan the mountable devices on your machine and display an icon for any new device it might find.
Introduction
GNOME includes a file manager that allows you to manipulate the files on your system in a comfortable, powerful, graphical environment. This File Manager is known as GMC for GNU Midnight Commander. GMC is based on the Midnight Commander file manager which can be run in a terminal.
Midnight Commander has long been known for its power and ease of use. GMC has taken the power and ease of use from MC and added the GNOME graphical frontend.
As mentioned in the previous chapter, the GNOME File Manager provides the desktop functionality for GNOME. The GNOME File Manager also provides a place to
manipulate files on your system by using the GNOME File Manager window.
There are two main windows within the GNOME File Manager. On the left is the tree view which represents all of the directories on your system by their hierarchical position. On the right is the directory window which will show you the contents of the directory which you have selected in the tree view.
To select a directory in the tree view simply use a single mouse click. This will change the main directory view, showing the files in the directory you have chosen. If there are directories contained within the directory, you may click on the plus sign in the tree view to expand the directory.
The main file view has a few viewing options you may wish to take advantage of: the icon view and detailed views.
The icon view is the default view and will display large icons for each file. The Brief view shows the files and directories in a list but without any extra information
shown.The Detailed view will display a list view of the files in the directory and information about the files. The Custom view is a list view which allows you to select the information you want to view about files.
In the Brief, Detailed, and Custom views if you click on one of the information titles on the top of the window it will sort the files according to that information. For example, if you want to find the largest files in the directory you can click on the Size title and the files will be sorted by size from largest to smallest. One more click on the Size title will change the sorting from smallest to largest.
Moving Around the GNOME File Manager
Above the tree and main file windows in the GNOME File Manager there is a Location text box.
Within this text box you can type the path location of the file in which you would like to view in the main window.
network. Type the FTP address in Location text box using and the GNOME File Manager will attempt to connect to the site.
Make sure you type in FTP addresses in the following manner:
ftp://[site address]
Next to the Location text box are navigation buttons you might wish to use. These buttons with the arrow icons allow you to move within the directories adjacent to the one you are in. The left button will take you to the previous directory you were in, the middle button will take you up one level in the directory hierarchy, and the right button will take you to the next directory if you have just moved backwards.
TIP: You can open a secondary window by using your middle mouse button on any directory. Press the middle mouse button (or both left and right mouse buttons if you have emulation) on a directory in the main window and a new window will open showing the contents of the directory you clicked on.
Selecting Files
Selecting files is done with your mouse by clicking on the file or files in the GNOME File Manager. The file that is selected will then highlight to show you that it has been selected.
Figure 6-2. "Rubber Band Select"
If you wish to be more selective about the files you are choosing, or the files you need do not reside next to one another, you may use the CTRL key to keep the files you have selected while you are selecting more. This works by selecting a file, pressing and holding the CTRL key and selecting another file. While the CTRL key is pressed you will be able to add to the "list" of files that are selected. Once you have selected multiple files by either method you may copy or move the files.
You may also select all files in a directory by selecting the Select All menu item from the Edit menu.
Copying and Moving Files
The default action for drag and drop in the GNOME File Manager is to move files. But you can also use drag and drop to copy a file by pressing the SHIFT key while
dragging the file(s). This will work the same for any files you drag to the desktop.
You may also toggle a menu which lets you decide what action to perform with a drag by using the middle mouse button to drag a file or pressing the ALT Key while
dragging a file. Once you release the drag you will get a pop-up menu which contains the options Copy, Move, Link, and Cancel Drag.
Another way to copy or move files is to take advantage of the right mouse click pop-up menu. Right mouse click on the file you want to copy or move and select
Move/rename or Copy from the pop-up menu. This will bring up a dialog in which to
perform these tasks.
Figure 6-3. The Move Dialog
If the file you are moving has a symbolic link associated with it – that is, a virtual link to where the file actually resides – you may select the Advanced Options tab and select
Preserve symlinks. Selecting this will make sure the link is preserved despite the move.
It is recommended that you use this method of moving a file if it has a symbolic link associated to it.
Renaming Files
Renaming files in the GNOME File Manager window or on the desktop can be achieved in two ways.
One method of renaming a file is to right mouse click on the file and choose the
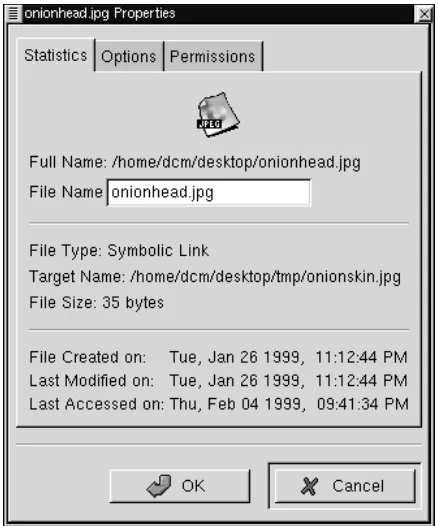
Properties menu item from the pop-up menu. In the Filename text box you may type
Figure 6-4. File Properties
A shortcut method to rename a file is to slowly double click on the file. Make sure this is slow so you do not launch the file but you simply highlight and then click again. At this point the name of the file will enter into the editing mode, your mouse cursor will change to an editing line, and you can type in the new name.
Launching Applications From the GNOME File
Manager
with it. You can change the way file types are handled by reading the section called
GNOME Mime Types in Chapter 9
If the file does not have an associated application you can right mouse click on the file and select Open with from the pop-up menu. This will bring up a dialog which allows you to define the application which will launch the file. For example, if you want to edit my file names test.txt withEmacs(a popular text editor) you can right mouse click on test.txt and choose Open with. When you get the Open with dialog box simply type in emacs in front of the test.txt file name. When you press OKEmacswill open the file.
Figure 6-5. The Open With Dialog
File Properties and Actions
For any file in the main file display you may right mouse click on it and choose a variety of properties and actions for it from the pop-up menu:
• Open - This will open the file with the proper application associated with it. You
may read more about editing these associations in the section called GNOME Mime
Types in Chapter 9.
• Open With - You may open a file with any application using this menu item. You
may read more about this in the section called Launching Applications From the
• View - This will view the file with a basic text viewer.
• Edit - This will launch an editor to edit the file. The editor launched is determined by the application associated with that file type. You may read more about editing this association in the section called GNOME Mime Types in Chapter 9.
• Copy - This will copy the file to the clipboard so that it can be pasted elsewhere.
• Delete - This will delete the file.
• Move - This will bring up the Move dialog which will allow you to move the file.
You can read more about this dialog and moving files in the section called Copying
and Moving Files.
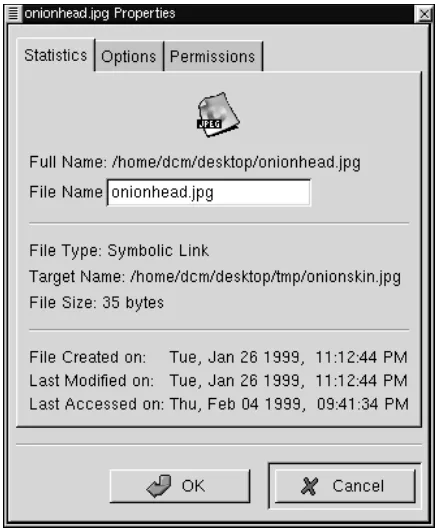
• Properties - The Properties menu item will launch the properties dialog. The
Properties dialog allows you to edit and view the properties for the selected file.
Figure 6-6. File Properties
• Statistics - This tab will show you the file information including the name, type, size, and history. You may change the name of the file in the File Name text box.
• Options - This tab will allow you to change the action options for the file. You can define how to open, view, and edit the file. If you need to open it in a terminal window you may select the Needs terminal to run checkbox.
• Permissions - This tab allows you to change the permissions and ownership of a file if you have access to do so. You may select Read, Write, and Exec
permissions for the User, Group, and Others. You may also set the UID, GID and Sticky as well as define who owns the file.
Changing Your Preferences in The File Manager
There are many settings you can configure for the GNOME File Manager.
These settings may be accessed from the GMC Preferences dialog. You may launch this dialog by selecting the Preferences menu item from the Edit menu.
The GMC Preferences dialog is divided into Five major sections: File Display,
Confirmation, Custom View, Caching Optimizations, and VFS.
File Display
Figure 6-7. File Display Preferences
• Show backup files - This will show any backup file which might be on your system.
• Show hidden files - This will show all "dot files" or files that begin with a dot. This files typically include configuration files and directories.
• Mix files and directories - This option will display files and directories in the order you sort them instead of always having directories shown above files.
• Use shell patterns instead of regular expressions - This option is for advanced users only. If you are unfamiliar with Regular Expressions you should not use this option. If you are familiar with how to create regular expressions you may select this option to use them in your sorts and filters.
Confirmation
Figure 6-8. Confirmation Preferences
• This tab allows you to change which functions ask for your confirmation before continuing.
deleting a file.
• Confirm when overwriting files - This will bring up a confirmation screen before overwriting a file.
• Confirm when executing files - This will bring up a confirmation screen before executing a file.
• Show progress while operations are being performed - This will bring up a progress bar while certain operations are being performed such as copying, moving, deleting, etc.
VFS
Figure 6-9. VFS Preferences
• This tab allows you to configure the options for your Virtual File System.
NOTE: The .tar file is the standard UNIX archive format
• VFS Timeout - This will determine how long you will be connected to any VFS without activity. The timeout is measured in seconds.
• Anonymous FTP password - This allows you to set a password for logging into anonymous FTP sites. Usually you will want to make this your email address.
• Always use FTP proxy - If you need to use a proxy to connect to FTP sites you will want to enable this.
Caching
Figure 6-10. Caching Preferences
• This tab allows you to configure items that will enhance the speed of GMC by using caching.
IMPORTANT: If you enable theFast directory reload you may experience problems with not seeing new files that have been added to directories.
• Compute totals before copying files - This will make GMC determine the number of files you are copying before it performs the task so that it can give you
information about the process as its happening.
• FTP directory cache timeout - This option will keep recently visited FTP site information in cache for the amount of time you specify. The time is measured in seconds.
• Allow customization of icons in icon view - This will allow you to change the icons in the icon view by right mouse clicking on them and selecting the
Properties menu item. You can always change the icons of items that are on your
desktop but you can only change the icons in the icon view with this option turned on.
IMPORTANT: Turning on theAllow customization of icons in icon view function may result in a slower system.
Custom View
Figure 6-11. The Custom View Dialog
There are two main columns in the Custom View, the Possible Columns and the
Displayed Columns.
The Possible Columns list includes all of the information types that can be displayed. If you would like to include on you may press the Add button and it will be added to the
Displayed Columns list.
The Displayed Columns list shows you the current information types that will be included in your Custom View. If you wish to remove any you may press the Remove button.
If you would like to re-arrange the items in the Displayed Columns list you may drag them to the desired location with your mouse.
Menu Guide to the GNOME File Manager
Tip: All menus in the GNOME File Manager are enabled with the tear-away feature. If you would like any menu to "float" on the desktop in its own window simply select the perforation line at the top of the menu.
• File - The File Menu contains items associated with files and higher level activity.
• New Window - This will open a new File Manager Window.
• Open - This will open the file you have selected with your mouse cursor.
• Copy - This will launch the Copy dialog to enable you to copy the selected file to a destination you choose.
• Move - This will launch the Move/rename dialog to enable you to move or rename the selected file to a destination you choose.
• Delete - This will delete the file you have selected.
• Close - This will close the GNOME File Manager
• Edit - The Edit menu contains items that are associated with editing and selecting files.
• Select All - This will select all of the files in the directory you are currently in in the GNOME File Manager.
• Select Files - This will launch a simple dialog box which will allow you to specify a file selection range. For Example, if you wish to select all files beginning with the letter D you can simple type d* and press OK.
• Invert Selection - This will invert the current selection. For example, if you have 7 files selected in a directory with 10 files, selecting Invert Selection will select the three remaining files and unselect the 7 files that were previously selected.
• Preferences - This will launch the Preferences dialog so that you can customize the GNOME File Manager.
• Layout - This menu contains items that are associated with the layout in GNOME
File Manager.
• Sort By - This will launch a dialog box which will allow you to select how you wish the files to be sorted in the current directory. You may sort by one of the following:
• Filter View - This will bring up a simple dialog which allows you to only view files with certain attributes. For example, if you wish to only view files in the directory that start with the letter D you can type d* into the dialog and press OK. If you wish to see all files again you will need to launch the Filter View dialog again and clear the dialog or type in a *.
• Icon View - Selecting this will display the files in the main view as large icons.
• Partial View - Selecting this will display the files in the main view as a list with only file names.
• Full View - Selecting this will display the files in the main view as a list with all file information.
Editor in the Preferences dialog. You may read more about the Preferences dialog
in the section called Changing Your Preferences in The File Manager.
• Commands - The Command menu contains items that are commands to run on files
in the GNOME File Manager.
• Find File - Find File brings up a dialog which allows you to search for particular files on your system.
• Edit mime types - This option will launch the GNOME Control Center Capplet that allows you to edit Mime Types for GNOME. Mime types determine, among other things, what application will handle particular file types. You can read more about mime types in the section called GNOME Mime Types in Chapter 9
• Run Command - This menu item allows you to run a command from GMC.
• Run Command in panel - This menu item lets you run preloaded commands or commands you specify within the directory that you are currently in. Such commands might be to find SUID or SGID programs, etc.
• Exit - This will allow you to exit out of the GNOME File Manager.
IMPORTANT: This will exit all GNOME File Manager processes which include the GNOME Desktop. If you exit you will lose all functionality on your desktop. This option is not recommended.
A Drag and Drop Tour of GNOME
• Drag a Color onto the Panel - Whenever you have a color selector displayed you may drag a color from the selected color bar to the Panel and it will change the Panel to that color.
• Drag a Pixmap to the Background Selector - If you would like to change the background to an image, you can drag that image from your GNOME File Manager to the Monitor Image in the Background Capplet of the Control Center and it will change to that image.
• Drag to an Application - Many GNOME compliant applications will accept drag and drop. If you would like to open a file in Gnumeric, a GNOME compliant spreadsheet application, you may simply drag the file from the GNOME File Manager onto Gnumeric and it will open the file. The same is true for applications built using Motif. You may drag a saved URL onto Netscape 4x and it will open the URL. This can be very useful if you are working within the GNOME File Manager and wish to quickly open a file.
• Adding an Application Launcher to the Panel - If you would like to add an
application launcher to the Panel you may drag and drop any executable file from the GNOME File Manager, or the Desktop, onto the Panel. This will display the Create Launcher applet dialog box which will allow you to select a name and an icon for that launcher.
• Dragging Files - There are many ways to use drag and drop to help you manage your system. You can open two GNOME File Manager windows to two different directories then drag files between the two windows to copy, move, or link files. You can drag files from the File Manager to the desktop to make it more accessible. Use the middle mouse button or the right and left mouse buttons together and Drag a directory folder to the desktop. Choose the link option from the pop-up menu to make a link to the desktop. This will give you a quick way to launch the File Manager to that directory.
• Dragging Directories - You can drag a directory out of the GNOME File Manger and place it on the Panel. This will create a new menu which allows you easy access to the files in that directory.
Introduction
The GNOME Panel is highly configurable and comes equipped with many graphical tools to help you do the configuration. In this section you will learn how to configure any GNOME Panel the way you would like it.
Global Panel Properties
To start configuring the GNOME panel right click on the panel and select the Global
Properties menu item. You may also press the Main Menu button and select the Panel
| Global Properties menu item.
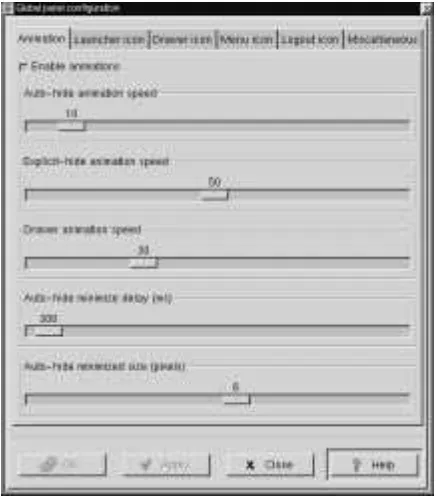
Figure 7-1. The Global Panel Configuration Dialog
The Global Panel Configuration Dialog contains six tabs which help you configure the global properties of the GNOME Panel: Animation, Launcher Icon, Drawer Icon, Menu Icon, and Miscellaneous. Each of these tabs is explained below.
Animation Tab
• Enable animations - This allows the animations configurable on this tab to be
visible. The animations must be enabled to use the other features of this tab. The default position is on.
control how fast it occurs.
• Explicit-Hide Animation Speed - This controls the hide speed when you press the Panel’s Hide Button.
• Drawer Animation Speed - If you use a Drawer panel this will control how fast the
drawer menu will raise.
• Auto-Hide Minimize Delay(ms) - If you have the Panel set to minimize
automatically this will allow you to control how much time passes before it
minimizes. The Panel will start the time count once the mouse is no longer over it. It will appear again when the mouse is passed to the area it occupies when up. This time is measured in milliseconds.
• Auto-Hide Minimized Size(pixels) - If you have the Panel hiding automatically this determines the number of pixels that will show while the Panel is minimized.
Launcher icon Tab
• Tiles enabled - This checkbox will enable background tiles for all icons on the Panel. • Tile filename (up) - This is the name and path of the image file you wish to use for
the tile in the up position(inactive, not pressed) You may press the Browse button to search for the file. Tiles must be enabled to access this option.
• Tile filename (down) - This is the name and path of the image file you wish to use
for the tile in the down position(active, pressed). You may press the Browse button to search for the file. Tiles must be enabled to access this option.
• Border width (tile only) - This determines the width of the border around an icon. This is very useful if you have an icon that would normally cover up a tile. You can set the border to a smaller size and still be able to see your tile.
Drawer icon Tab
• Tiles enabled - This checkbox will enable background tiles for all drawers on the Panel.
• Tile filename (up) - This is the name and path of the image file you wish to use for
the tile in the up position(inactive, not pressed) You may press the Browse button to search for the file. Drawer tiles must be enabled to access this option.
• Tile filename (down) - This is the name and path of the image file you wish to use
for the tile in the down position(active, pressed) You may press the Browse button to search for the file. Drawer tiles must be enabled to access this option.
• Border width (tile only) - This determines the width of the border around a tile.
Drawer tiles must be enabled to access this option.
• Depth (displacement when pressed) - This determines the depth a tile will displace when pressed. Drawer tiles must be enabled to access this option.
Menu icon Tab
• Tiles enabled - This checkbox will enable background tiles for the Main Menu button on the Panel.
• Tile filename (up) - This is the name and path of the image file you wish to use for
the tile in the up position(inactive, not pressed) You may press the Browse button to search for the file. Menu tiles must be enabled to access this option.
• Tile filename (down) - This is the name and path of the image file you wish to use
for the tile in the down position(active, pressed) You may press the Browse button to search for the file. Menu tiles must be enabled to access this option.
• Border width (tile only) - This determines the width of the border around a tile.
• Depth (displacement when pressed) - This determines the depth a tile will displace when pressed. Menu tiles must be enabled to access this option.
Logout Icon Tab
• Tiles enabled - This checkbox will enable background tiles for all Logout buttons on the Panel.
• Tile filename (up) - This is the name and path of the image file you wish to use for
the tile in the up position(inactive, not pressed) You may press the Browse button to search for the file. Logout button tiles must be enabled to access this option.
• Tile filename (down) - This is the name and path of the image file you wish to use
for the tile in the down position(active, pressed) You may press the Browse button to search for the file. Logout button tiles must be enabled to access this option.
• Border width (tile only) - This determines the width of the border around a tile.
Logout button tiles must be enabled to access this option.
• Depth (displacement when pressed) - This determines the depth a tile will displace when pressed. Logout button tiles must be enabled to access this option.
Miscellaneous Tab
• Tooltips enabled - This enables tooltips for items on the panel. Tooltips are pop-up
help dialogs that appear when you mouse is over an element on the panel.
• Show Small Icons - This will enable small icons in the Main Menu.
• Show ... buttons - This will enable three small dots to appear on Main Menu items that launch dialogs.
• Show popup menus outside of panels - This allows popup menus to appear away
This can be useful on smaller screens or cluttered desktops.
• Keep menus in memory - This will keep your menus in memory so that they do not rescan for added items. This can increase the speed of GNOME but may also result in you missing new items in your menu that are GNOME compliant.
• Switched movement - This allows launcher buttons on the panel to switch places with other icons when being moved.
• Free Movement (doesn’t disturb other applets) - This feature locks the arrangement
of your icons on the Panel. This is a good feature to use if you like the way your icons are arranged.
• Prompt before logout - This will bring up a yes/no dialog which asks you if you
would really like to log out.
• Raise panels on mouse-over - If you are using a window manager that is not
GNOME compliant it will not understand its relationship with the Panel. This can cause your Panel to be covered by applications. If you enable this feature you can have the Panel automatically raise when your mouse is over it.
• Keep panel below windows - If you are using a GNOME compliant window
manager the window manager will understand its relationship with the Panel. If you choose this feature the window manager and GNOME will allow applications to appear over the Panel. This can be useful on smaller screens.
• Close drawer if a launcher inside it is pressed - By default drawers will remain open
when you select an item within one. This can be annoying as the drawer will remain open until you close it with a mouse click. With this option selected drawers will close automatically when you select any item within one.
• Applet padding - This changes the amount of space (padding) between icons and
applets.
Each Panel’s properties can be configured individually. To change the configuration of the active Panel, right mouse click on the Panel and select the This panel properties menu item from the pop-up menu. You may also press the Main Menu button and select the Panel | This panel properties menu item.
This will bring up the Panel properties dialog box. In this box you can change the properties for the active Panel.
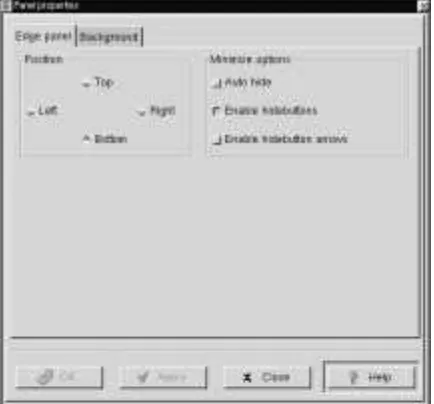
Figure 7-2. This Panel Properties Dialog
The Panel properties dialog contains two tabs to help you set the active Panel properties: Edge Panel and Background. Both of these tabs are explained below.
Edge Panel Tab
either Top, Right, Left or Bottom. The Panel will change position once you have pressed the Apply button.
• Minimize Options - The options here will enable you to either Explicitly hide the
Panel yourself using the hide buttons or Auto Hide when the mouse is not over the Panel. If you choose to Auto Hide you might want to Disable the hide buttons here as well. You may also disable the hide button arrows graphics on the Panel as well.
Background Tab
• Background - These options allow you to change the background of the Panel itself.
You may choose, if you wish, to have the standard, Pixmap, or Color background. The standard look for the Panel is determined by the GTK theme you are running at the time. The Pixmap option allows you to choose an image to tile or scale to the Panel. The Color option allows you to specify a particular color for the Panel.
IMPORTANT: An easier way to change the background of your panel is to drag and drop an image file from the GNOME File Manager onto the Panel. This will automatically change the background of the panel to that image.
• Image file - If you choose to have a Pixmap for the background of your Panel this
will allow you to choose which image to use. If you press the Browse button you can search for the file you want to use.
• Scale image to fit panel - This allows a background image to scale to the size of the
panel. If not checked images will tile to the panel.
Introduction
The Main Menu is a repository for your applications and can be found on the Panel. The Main Menu is preloaded with GNOME but is can be configured to fit your work habits. The Main Menu is broken up into two main subdirectories: the System menus and the User menus. The Menu Editor is available for you to add new applications to the Main Menu but you can not add applications to the System menus if you are not the system administrator (root). In this section you will learn how to configure the Main Menu with applications you wish to use everyday.
Configuring the Main Menu
Figure 8-1. Menu Properties Dialog
The first selection item in the Menu properties dialog is the Menu type. This will allow you to change the menu from a Main Menu to a Normal Menu.
The other choices in the Menu properties dialog are sub-menu selections for Main Menus. These selections allow you to choose what is in your Main Menu which you can have in the Main Menu, in a submenu, or off:
• System Menus - This is the menu items that are the default applications that come with GNOME.
• User Menu - This contains any menu items you added using the Menu Editor for your user account.
• Another Level Menu - If you are using the Red Hat Linux build this is the set of applications that ship with it by default.
• KDE Menu - If you are a user of the Kool Desktop Environment you may choose to include the applications included in the KDE menus.
Using the Menu Editor
The Menu Editor is a configuration tool for the Main Menu. It is very useful in setting up your system to your requirements. The Menu Editor is started by clicking on the Main Menu Launcher and selecting Settings | Menu editor from the Main Menu.
This will launch the Menu Editor.
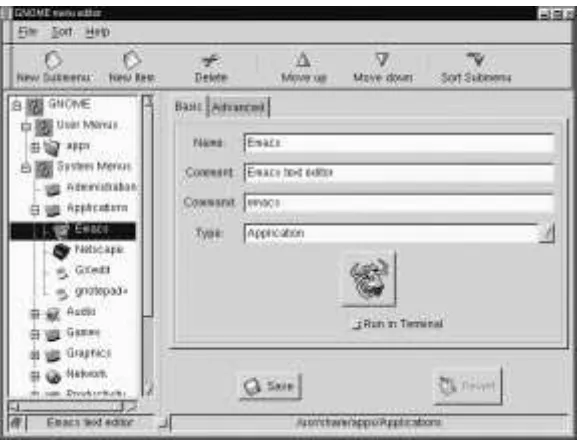
Figure 8-2. The Menu Editor
The Menu Editor is divided into two main panels. The left side contains the menu in its default state. The right side contains a tabbed dialog that allows you to add new
applications to the menu.
Within the menu list on the left side you may open and close folders and see what is in your current menu by clicking on the small plus signs beside the menus.
Adding a New Menu Item
If you want to add a new menu item press the New Item button on the toolbar. A new menu item will be placed where the highlighted menu is. If you do not have a menu highlighted it will be placed at the top of the menu tree. Select the new item and type in the information for the item in the dialog on the right. Once the information is
complete press the Save button and the new menu item will be inserted where your cursor is on the right side menu tree. You may then move the menu item by pressing the up or down buttons on the toolbar. You may also move the menu item by dragging it with your left mouse button.
IMPORTANT: Keep in mind that you can not change the System menus unless you are logged in as root. If not, you can only add to, and edit, the User Menus.
Drag and Drop in the Main Menu
In the Menu Editor - The Menu Editor supports drag and drop functionality which will make your work easier. You may drag applications to the folders you wish them to reside in or re-arrange you folders completely.
To the Panel - If you would like to place a menu item onto the Panel you can drag and drop from the menu to the Panel and it will place a launcher there with all the
appropriate properties set for you. If you prefer not to use drag and drop you may also right click on the menu item and choose the Add this launcher to panel from the
Introduction
The GNOME Control Center allows you to configure various parts of your system using a collection of tools called "capplets". These capplets may be associated with the core set of GNOME applications or other applications for which the developers have written capplets.
Your Control Center may contain more capplets than are documented here depending on the applications installed on your system.
The Control Center is divided into two main sections, the menu of configurable capplets and the main work space.
Working with the Control Center simply requires you to select a capplet from the menu on the left and double click on it. Once this is done, the workspace will change,
allowing you to configure the item.
You may start the Control Center one of two ways. To launch the Control Center without any particular active capplet select the Control Center menu item from the
System menu.
If you know which capplet you would like to edit you may start that capplet by selecting the correct menu item in the Control Center menu.
Desktop Capplets
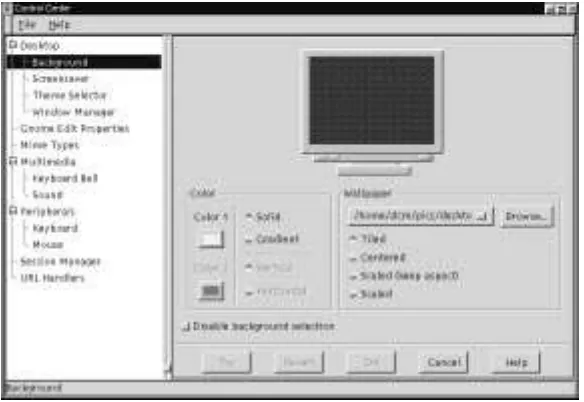
The Background Properties Capplet
The properties for your background image can be set here by either selecting a color or an image. If you select a color you have the option of having Solid or Gradient colors. If you choose to have Gradient colors you may choose between a Vertical or Horizontal gradient and choose the second color for the gradient to end on.
If you decide to have an image as wallpaper you may browse for the image you wish to use. Once you have found your image you need to decide whether you would like to have the image tiled, centered, scaled keeping aspect, or simply scaled. Once you have changed your background properties you may press the Try button at the bottom of the Control Center to make the change.
Figure 9-2. The Background Properties Capplet
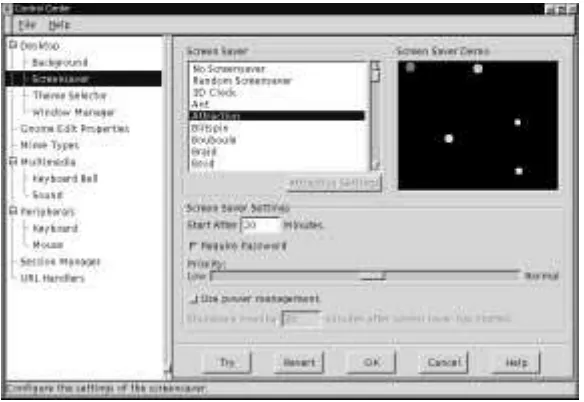
The Screensaver Capplet
In this capplet you can change your xscreensaver properties. This capplet contains a list of available screen savers you may choose and a demo screen. Below these two dialogs you will see a set of tools that allow you to change the settings for the global screen saver properties. If the screen saver you choose has particular settings you can change those by pressing the Settings button that appears below the Screen Saver list.
Global Screen Saver settings - In this section of the capplet you can change the time, password, and power management properties. You can decide how long you would like the screen saver to wait before starting by typing the number of minutes in the Start
After text box. If you would like a password to return to your desktop click the Require
Password button. Your account login password is the password set for the screen saver.
of it. You may set the time to wait before the monitor is shut off by typing the time in the Shutdown monitor text box.
Figure 9-3. The Screensaver Properties Capplet
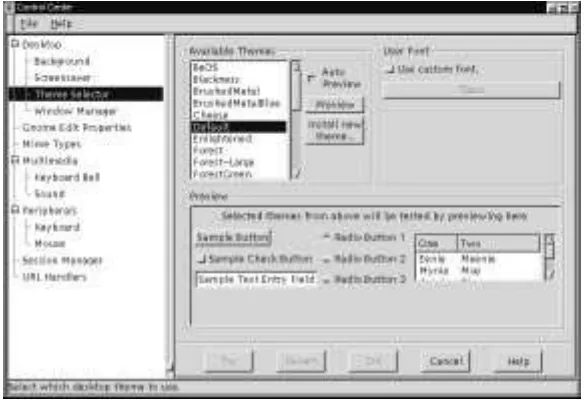
Theme Selector
The Appearances capplets contains the Theme Selector which allows you to select which GTK theme you would like to run.
GTK themes are themes which allow the GTK widget set to change look and feel. The widget set is the set of tools that provide buttons, scrollbars, checkboxes, etc. to applications. GNOME compliant applications use the GTK tool set so most of your GNOME applications will change look and feel if you change the GTK theme.
what the theme looks like in the preview window below. If you like the theme press the
Try button on the bottom of the GNOME Control Center to install it.
There are a few GTK themes that come loaded with GNOME when you install it. If you would like more themes you can check resources on the Internet like
http://gtk.themes.org. Once you have found and downloaded a theme you like, press the Install new theme button. This will launch a file browser that allows you to find the theme you have just downloaded. The theme files should be in a tar.gz or .tgz format(otherwise known as a "tarball"). Once you have found the file press the OK and it will install the theme for you automatically. Now you can look in the Available Themes list for the theme you have installed.
Once the theme has been unpacked into the .themes directory it will be listed in the available themes window the next time you start the GNOME Control Center.
Figure 9-4. The Theme Selector Capplet
below it. This will bring up a font selection dialog which allows you to specify the font, its style, and size.
Window Manager Capplet
Because GNOME is not dependent on any one window manager this capplet allows you to select which window manager you wish to use. The Window Manager capplet does not determine which window managers you have available but allows you to define what, and where they are.
Figure 9-5. Window Manager Capplet
The Window Manager capplet has a main list of the window managers that you can currently select from. Whichever window manager is active is notated by the word "Current".
button. This will launch the Add New Window Manager dialog.
Figure 9-6. Add New Window Manager
In the Add New Window Manager you may specify the name you wish to give the window manager, the command to launch that window manager, and the command to launch any configuration tool that might be available for that window manager.
If you know that the window manager is fully GNOME compliant and can be session managed you may select the Window manager is session managed button. If you are unsure you should check the documentation of your window manager.
Press OK when you are done.
Once you have finished adding your new window manager you will see it appear in the main list of window managers. If you need to change any of the properties you set in the Add New Window Manager dialog you may select the window manager from the main list with your mouse and press the Edit button.
You may also delete any window manager in the main list by selecting it with your mouse and pressing the Delete button.
If you are ready to switch the current window manager you may select the manager you wish to run from the main list and press the Try button. If you would like to run the configuration tool before or after you switch, make sure the manager you want to configure is selected and press the Run Configuration Tool for [window manager
GNOME Edit Properties
The GNOME Edit Properties Capplet allows you to select which editor will be your default editor while using GNOME. This will allow applications like the GNOME File Manager to launch the correct editor when you try to open files associated with editing. All popular editors available are included in the selection list. This Capplet is very similar to the Mime Type Capplet but is used in association with certain applications.
Figure 9-7. The GNOME Edit Properties
GNOME Mime Types
The GNOME Mime Types Capplet allows you to determine how you wish to handle certain file types, or Mime types. Mime stands for Multipurpose Internet Mail
For example, if you use .sgml files frequently and you wish to always use Emacs to edit them you can configure the .sgml Mime type to always be handled by Emacs. This means that any program that wishes to launch the mime type for you will bring up Emacs. This includes double clicking on the file type in the GNOME File Manager.
Figure 9-8. The GNOME Mime Types
To add a new mime type press the Add button. This will display the Add New Mime
Type dialog in which you may define the new Mime type.
Multimedia Capplets
Keyboard Bell
The Keyboard Bell capplet allows you to change the bell sound which is produced by your CPU speaker when a keyboard error or message is sent.
Volume changes the actual volume of the bell.
The pitch slider will change the pitch of the note that is played. By default it is set to 440Hz, or the A above middle C.
Duration changes the length of time the tone is played.
The Test button will allow you to hear the current settings of your keyboard bell.
The Sound Capplet
The Sound capplet allows you to set the system sounds for your GNOME session. There are two tabs to select in the sound capplet: General and Sound Events.
General Tab - At this point you have two options to choose from in the General tab,
enabling sound for GNOME and for events. If you select Enable Sound for GNOME you will make sure that GNOME’s sound engine (ESD) will be launched every session of GNOME you run. Enable sound for events will launch any sound files you have set in the Sound Events tab when those events occur. With these two items enabled you will utilize GNOME’s session management which will remember your sound settings whenever you log in or out.
Sound Events Tab - This tab allows you to navigate through the sound events in
GNOME and change their sounds.
To change a sound associated with a GNOME event select the event in the hierarchical list on the left and press the Browse button to find a sound file on your system that you wish to associate with that event. Once you have found a sound file you may press the
Play button to test the sound and see if you like it enough to hear it every time the event
Figure 9-10. The Sound Properties Capplet
Peripherals
The capplets in this section of the Control Center will help you configure hardware input devices including keyboard, and mouse properties.
The Keyboard Properties Capplet
There are currently two settings for the keyboard in this capplet. You may change the properties of Auto-repeat and the Keyboard Click.
Auto-repeat enables you to hold a key down and have it repeat the character at the rate
Figure 9-11. The Keyboard Properties Capplet
The Mouse Properties Capplet
The Mouse Properties capplet allows you to change between left and right handed mouse buttons and define the Accelerations and Threshold properties.
Figure 9-12. The Mouse Properties Capplet
Session Manager
The Session Manager Capplet allows you to control the GNOME Session
Management. This includes which programs start up, how you save your GNOME configuration, and how you log out. You can find out more information about Session Management in Chapter 10.
• Prompt on logout - This first option allows you to disable the prompt when logging out.
• Automatically save changes to session - This will make the Session Management
always save changes made to your GNOME session when you log out.