LightWave 3D
8 Lighting
Nicholas Boughen
Library of Congress Cataloging-in-Publication Data Boughen, Nicholas.
LightWave 3D 8 lighting / by Nicholas Boughen. p. cm.
Includes index.
ISBN 1-55622-094-4 (pbk., companion cd-rom)
1. Computer animation. 2. Computer graphics. 3. LightWave 3D. I. Title. TR897.7.B675 2004
006.6'96—dc22 2004000201
CIP
© 2003, Wordware Publishing, Inc. All Rights Reserved
2320 Los Rios Boulevard Plano, Texas 75074
No part of this book may be reproduced in any form or by any means without permission in writing from Wordware Publishing, Inc.
Printed in the United States of America
ISBN 1-55622-094-4
10 9 8 7 6 5 4 3 2 1 0402
LightWave and LightWave 3D are registered trademarks and HyperVoxels, Particle FX, and Skelegons are trademarks of NewTek, Inc., registered in the United States and other countries.
All brand names and product names mentioned in this book are trademarks or service marks of their respective compa-nies. Any omission or misuse (of any kind) of service marks or trademarks should not be regarded as intent to infringe on the property of others. The publisher recognizes and respects all marks used by companies, manufacturers, and develop-ers as a means to distinguish their products.
All inquiries for volume purchases of this book should be addressed to Wordware Publishing, Inc., at the above address. Telephone inquiries may be made by calling:
This work is dedicated
To my wife, Victoria, And my son, Michael,
And to my beautiful new daughter, Princess Katherine
And also to every artist who wishes to learn; Who, for some reason or another, Has discovered that we will never be the best
Cloudy Day. . . 55 Chapter 7 Light Types, Their Properties, and Typical Uses. . . 79
Light Properties . . . 80
Basic Sub-Tab . . . 83
Lens Flare/Lens Flare Options . . . 84
Volumetric Lighting/Volumetric Light Options. . . 84
LightWave’s Light Types . . . 92
Using a LightWave Procedural Texture as a Projection Image . . . 126
Using a LightWave Procedural Texture as a Clip Map . . . 130
Chapter 13 HDRI and Caustics. . . 163
Part III
Creating Lighting
Chapter 18 Intent and Purpose . . . 231
Understanding Artistic and Emotional Intent . . . 232
What Is Your Light’s Motivation? (Justifying Choices) . . . 233
Chiaroscuro: The Use of Light and Shadow . . . 234
Analogous Color Harmony, aka Related Tints . . . 259
Implementation . . . 300
Putting It All Together (Making a Pleasing Picture). . . 306
Saving and Reusing Lighting Rigs . . . 307
Global Illumination (Backdrop Only Radiosity). . . 372
Creating Your Own HDRI Images Using HDRShop. . . . 400
Exterior Cloudy Day (Soft Shadows Only) . . . 445
Spotlight . . . 446
Area Light . . . 447
Global Illumination . . . 448
GI, Radiosity. . . 449
Exterior Night . . . 450
Distant Key, Ambient Fill . . . 450
Adding Some Interior Light . . . 452
Adding a Streetlight . . . 452
Interior, Incandescent . . . 453
Interior, Fluorescent, Night . . . 458
Interior, Radiosity . . . 459
Exterior, Radiosity . . . 462
Chapter 27 Anatomy of a Production Lighting Rig . . . 463
Appendix LightWave’s “Full Precision” Renderer and You . . . . 477
Index . . . 493
Foreword
Education is not the filling of a pail, but the lighting of a fire. — W. B. Yeats
Years ago when I was in college preparing for My Future — is it the Future already? — I learned some valuable information that has been the foundation on which I have built my skill set. I learned about design, layout, and other visual communication skills. Oh yeah, and lighting. I learned lighting by accident.
My last year in school I had a few credits to burn, so I signed up for a photography class thinking it would be a great way to capture images and create my own reference material from which to paint. I thought I would spend most of my time learning about developing film and operat-ing the camera. Instead, we spent the entire semester learnoperat-ing about lighting for photography. Little did I know that I was about to learn the most valuable information about working in 3D. I was convinced that all I needed to do was point and click the camera, and I would have a per-fect picture. If there is one thing that I took away from that class, is to always pay attention to lighting conditions when creating a photo — lighting plays a key role in getting a quality shot.
Unfortunately, most young 3D artists approach lighting the same way I approached photography before that class. Many artists spend days working on a model and countless hours texturing it — only to spend just a few minutes lighting it. For many, lighting is a second thought. The three steps of 3D for most people are Model, Animate, Render. What many people forget is that without great lighting, even the best models and textures won’t give you a great final product.
As a member of the 3D community, I spend many hours of my free time in community forums talking about LightWave®, sharing tips and
tricks, and visiting the many online image galleries. Common replys to gallery posts are “great model,” “awesome textures,” “killer animation,” and other praise for every area of 3D, but very few replies mention light-ing. What would those “killer” images be without “killer” lighting?
who not only has the ability and knowledge to apply it in a real-world production environment but also has the unique talents required to pass that knowledge on to others.
Get ready to attend lighting school.
LightWave 3D 8 Lightingwill teach you how to work with lights inside of LightWave and how to break down real-world lighting so that you can recreate it in your virtual world. This book will take your light-ing to a whole new level and give your work that edge you’ve been looking for. I’m sure you will be left with the same impression I had when I finished this book — “Priceless.”
— William Vaughan
Freedom is just chaos, with better lighting.
— Alan Dean Foster,To the Vanishing Point
. . .
William “Proton” Vaughan is a seasoned LightWave veteran who cur-rently is NewTek’s LightWave 3D evangelist. Not only does he love working in LightWave and promoting it around the globe for NewTek, he is also the recipient of several New Media Addy awards.
William Vaughan brings broad-based experience to his position at NewTek, having done 3D work for print, web, multimedia, games, and broadcast. Over the past ten years, Vaughan has established a strong reputation for his award-winning work for clients such as Compaq, New Line Cinema, Halliburton, and many others. He has also worked in the LightWave community as an instructor at North Harris Community College.
Vaughan’s other activities in LightWave user education include training entire companies to use LightWave, such as NASA, Fulbright & Jaworski, and KHOU Channel 11, the CBS affiliate in Houston.
Acknowledgments
First and foremost, I must offer my gratitude to the readers ofLightWave 3D 7.5 Lightingwho provided generous praise of that first book as well as encouragement and suggestions to update the work and keep it current.
Secondly, I wish to thank my publisher, Wes Beckwith, for his end-less encouragement, support, and enthusiasm for both the writing project and for LightWave. I am grateful for the confidence he placed in me to complete this project to a high standard and on schedule. Thanks to all the Wordware folks for their contributions and efforts on this book, especially the ever-vigilant Beth Kohler who sifts through the text to find and squash the smallest errors.
I’d also like to acknowledge the contributions of William “Proton” Vaughan, NewTek’s LightWave evangelist, who served as technical edi-tor on this book, scanning through all the hundreds of pages of text seeking technical imperfection or unclarity in the work. His effort also served to bring you a better, more informative final product. A few of his models have been included in this edition — both in the images on the pages and also on the companion CD.
I wish to mention the tireless support from the rest of the NewTek family. Specifically I wish to acknowledge Chuck Baker, Deuce Bennett, Andrew Cross, and Art Howe who provided me with everything I needed to complete the book.
Thanks to Erkki Halkka and Steve Worley for their respective con-tributions to the plug-ins section of this book, as well as their great lighting tools, Overcaster and G2, respectively.
I’d like to acknowledge the contributions of Jessica Chambers, Tech-nical Director at the Shadbolt Centre for the Arts in Burnaby, British Columbia, Canada. Thanks to Jessica for the use of her head in Chapter 1 and the use of her theatre facilities to photograph some of the lighting concepts I attempt to describe herein.
Thanks to Rainmaker’s Brian Moylan, Director of Digital Imaging and Jason Dowdeswell, VFX Supervisor, for endless support and enthu-siasm for the job, for keeping it real, and for encouraging personal projects such as this that sometimes take time and focus away from the pressure cooker of daily production work.
Visual Effects in Vancouver, who got me started down this road in the first place way back in the olden days.
There are numerous others who have contributed in some part to this book. From some hyper-talented lighting designers and college pro-fessors back in the mists of time to the LightWave artists of the world, some with whom I work every day, some who I know only by reputation. All from whom I constantly learn new tricks and techniques. Every step down the path has lead to this book and so here it is. I hope you enjoy it. I hope, especially though, that this book brings you some new skill or understanding and helps improve your lighting in some small way.
Introduction
This book is divided into three main parts: theory, tools, and practice. Part I covers the fundamentals of what light is, how it acts and reacts in our world, and what those reactions look like. Part II covers the virtual lighting equipment available to achieve your LightWave lighting goals. Part III deals with how to use those tools to create the lighting we desire. Theory is first in this book because it is fundamental to using the tools. In fact, any artist using any toolkit can make good use of the theo-retical section of this book. The qualities of light do not change,
regardless of what software you are using.
While reading this book you will find many areas where overlapping and repetition occurs. Lighting a scene involves the application of numerous tools, methods, and properties that are all interlinked. Although I have endeavored to separate each element into chapters for easy comprehension, they nonetheless overlap here and there. I found that a small measure of repetition is preferable to constantly referring the reader to other chapters.
Why Write This Book?
I have had the privilege of working with some incredibly talented artists, yet some of them have not grasped the simplest lighting principles. The final scene is beautiful to be sure, but many artists run into two main problems lighting those scenes. One is that even though the lighting is perfect and beautiful, it may have taken hours to accomplish through a system of trial and error. The other problem is that the lighting is imper-fect, perhaps disobeying the laws of physics. It just looks wrong. The artist and viewer may not be able to put their finger exactly on the prob-lem, but even an untrained eye has spent a lifetime experiencing the properties and qualities of light. You can’t fool the audience. Understand-ing a few principles can solve this problem for the artist.
Good lighting can make the difference between a good shot and a great one. I would like to see more artists equipped with a strong enough understanding of lighting to make them masters of their art. To that end, I wish to share the knowledge and experience I have acquired over the years.
Why Read This Book?
If you have ever looked at a photograph and been unable to decipher the light sources, direction, and color, or if you have been unable to replicate this lighting within LightWave 3D, then this book will help you. If you have ever thought your lighting looked flat, boring, meaningless, inane, incomprehensible, stale, cliché (stop me any time), overused, cheesy, CG, fake, or derivative, then reading this book might be a good move. If you have ever wondered how to make objects stand out from the back-ground, how to demonstrate all the minute detail you have spent weeks modeling, or want to make a shot feel sad, angry, or joyous, then you might take some time to look through these pages. If you have seen the work of some great 3D artists and marveled at how photo-real every-thing looks and wished you could add that sense of realism to your work, then read on.
Good lighting is crucial to the final look of your shot. Even a poorly designed, marginally textured object can still look as if it really exists in the scene if the lighting is good. On the other hand, a beautifully
designed, painstakingly modeled and textured object, if lit poorly, will be easily identified as computer generated.
Screw Physics!
Physics nitpickers, beware. This section may offend some readers. Lighting can be a very contentious issue. That is not to say that it is very complex or difficult to learn. It is not. But it can be difficult to talk about. This is mainly because there is a certain breed of people who just can’t let reality go. I teach that a shadow may have a certain color based on a number of different environmental factors. Someone nitpicks that shadows don’t actually have any color, being, themselves, the simple absence of light. (This is technically true, but quite unimportant to CG lighting.) I teach that certain light types behave a particular way. Some physics snob claims it’s all wrong and lectures me about angstroms, electromagnetic wavelengths, photons, and wave theory.
It comes down to a few simple arguments. First, computer-generated imagery is fake. It is therefore not real and subsequently is not obliged to live by real laws of physics.
Second, it is unimportant what hacks and tricks you had to pull, what physics you had to ignore, as long as things turned out the way you intended and the final render looks great.
Third, did you really purchase this book for a lecture on angstroms, electromagnetism, and the behavior of up quarks and down quarks? Or is it the art of computer-generated lighting we’re talking about?
Hopefully by the time you have reached this paragraph, you have either tossed this book in the bin because you are a nit-picking physics snob and I have deeply offended your sense of reality (yay!), or you have come to the conclusion that there will be some “bending” of the laws of physics here. As a matter of fact, I plan to outright break, smash, and stomp some physics simply to amuse myself. Does it matter so long as the final render looks photo-real? Well, does it?
Physics is important to lighting for a number of reasons, not least of which is that it explains why light and shadow behave the way they do, but it is not there to fetter our artistic endeavors, our tastes, or even our baser need to get a render done quickly. Let’s face it: If we were con-strained to using lighting tools that only obeyed the laws of physics, frames would take days, weeks, or months to render instead of minutes.
Physics helps us understand how real things work so that we know how to build tools and techniques that approximate those realities. Of course, the goal is to approximate them so well that they look com-pletely photo-real. This approximation is likely to be a big compromise that is made up of completely impossible tools and techniques, cheats, fakes, hidden truths, and some seriously great compositing work post-render consisting of motion blur, film grain, smoke, dust, nasty edge-work, rotoscoping, and probably shaking a live chicken over the tablet about five minutes before delivery deadline.
Take lights, for example. In the real world, there is only one basic light type. All light sources fall into this one category and can be described using one set of rules. (Argue if you will; I’m not listening.) LightWave, on the other hand, is equipped with five different light types. Each different light is characterized by specific light properties which may or may not exist in real lighting but have been designed to make your frames render much, much more quickly. None of the lights avail-able in LightWave behave exactly as real light does. Those brainiacs who have coded our lighting tools have split up various light properties into separate lighting instruments and controls, giving us the ability to create
lighting looks without having to go through all the hassle of using real physics to render.
For example, in the real world, if you turn up the intensity of a light, the specular highlight and reflection on a surface will also increase. That is because they are all part of the same property. In the virtual world, however, these properties can all be manipulated individually, com-pletely disobeying the law. Shame!
So to begin with, we are going to ignore physics except in our obser-vations of real-world light. When it comes to lighting in the virtual world, we need to understand the laws so we can make something that
appearsto work like them, but we do not need to obey them. In this way, we are gods and make our own physical laws. Light behaves the way we desire it to in our virtual worlds because we wish it.
There, now don’t you feel like tossing a lightning bolt or something?
Some Notes about Observation
Observation of the real world is the backbone upon which all of your art-work, including lighting, rests. You will never, ever learn good lighting, animation, texturing, or much of anything else by simply sitting in front of a computer monitor, clicking keys and scrolling your mouse wheel. If it is your desire to become a truly world-class artist, it is your obligation to yourself to get out there and study the world that you are striving to copy.
Painters perform many painting and drawing studies before attempt-ing a large work. If they need to work out just how a human hand lies or just how cotton fabric crumples, they will draw hands in many different positions and they will get cotton and lay it out, drawing it over and over until they fully understand its properties and behaviors. Lighting is just like this.
If you expect to create realistic lighting, you absolutely must get out there and observe lighting conditions. See the properties of light and shadow under as many different environmental conditions as possible. Analyze and study both lighting and shadow. Understand how different textures react to specific lighting conditions. Know what a reflection is before you attempt to alter the reflectivity, specularity, and glossiness of a texture at the workstation. As a lighting artist, it is your duty to reach a Zen understanding of lighting. Be one with the light, young pixel samu-rai, and you shall reap the rewards.
Rules of the Road
The first rule any artist learns is that there are no rules. This book dem-onstrates how light works, how to look at it, and and how certain tools in LightWave’s toolkit can be used to approximate or replicate it. There are also a number of lighting techniques covered, including some that are commonly used in film and television. These are not rules. They are principles and techniques. Once you understand lighting, you will dis-cover that you do not need rules or techniques described for you, that you can create your own techniques, and that you can make up your own rules. Simply put, you can light a scene any way you wish, if it pleases you. Your best bet for learning how to gain complete control over your lights is to experiment, ignore standard practices, and investigate exactly how your lighting instruments perform and react. Anyone who tries to tell you about rules is mistaken.
What is “good lighting”? That’s a loaded question. If I had to define it I would say good lighting is what occurs when the results are what the artists set out to create. I have met directors who believe that good lighting means everything in the scene is brightly lit so you can see every detail. What if the scene is in a dark alley at night with a couple of small overhead street lamps, just barely bright enough to create two dim pools on the asphalt? Should I throw in a nice bright distant light at 100% so everything is brightly lit? Of course I shouldn’t. This is a pretty obvious example, but it demonstrates the point. Good lighting looks and feels right. Believe it or not, you are already an expert on what light should look like. You’ve been observing the effects and qualities of light since you first opened your eyes. Trust what your eyes tell you. My job is to dissect and define all those things you already know and present them to you in a way that will allow you to manipulate them like old, familiar hand tools.
Not e: A note about art: There is little that can replace a tradi-tional art background. You have probably heard or read this a hundred times and rolled your eyes, but it remains fundamentally true. It is not about whether you can draw, paint, or sculpt; it is about learning how to look at your subject and dissect it into forms, colors, and intersections so they can be recreated on your own canvas, or in this case your computer. If you do not have any art training, do not dismay; this book will still help you improve your lighting. I would be remiss, however, if I did not recommend that you take a couple of evenings a week to attend a class at your
local arts institute. Most community centers have art classes of some sort. If your desire is to become a world-class artist, you really should study art.
All right, enough of that soapbox.
Lighting, Both Beautiful and Accurate
Pleasing lighting is not mutually exclusive from accurate lighting. This may seem to be an obvious statement, but you would be sur-prised how many artists throw lights into a scene to highlight an item when there is no lighting source to justify the illumination. Accuracy is key to good-looking lighting. If you really need to highlight something and there are no light sources to justify it, there are other steps you can take to achieve a good look. Altering the background to create contrast is one such solution, although it’s not always possible. Find a way to add a light source to justify the light you need. If nothing else works, at least try to make the offending effect subtle enough to pass notice. You might even get away with making alterations to the subject or its textures.
Creativity is not just about building, painting, and lighting. It is also about finding creative solutions to problems just like this. They pop up every day and part of your job is to fix them. And speaking of finding solutions to problems, the final chapter in this book, Chapter 27, is called “Anatomy of a Production Lighting Rig,” where I spend some time describing the problems and requirements that led to the creation of a special feature film lighting rig. There were a number of unique prob-lems, and this rig solved most of them, while maintaining flexibility, accuracy, and beauty of light.
In your career as a lighting artist, you will probably encounter situa-tions where you are ordered to highlight something and denied
permission to make any alterations that would justify that highlight. This does happen, especially when the budget is tight, time is short, and/or the director or VFX supervisor may be inexperienced. This is where the VFX supervisor has a job trying to coordinate between director, gaffer, and CG department to try to make the final composition seamless and real. You should try to argue your point, but sometimes they don’t want to hear it. Just smile, nod, do the work, and don’t put it on your reel. Sometimes you just have to walk away.
Not e: Some filmmakers are euphemistically referred to as “guerilla filmmakers.” This evokes a mental image of hurried, hit-and-miss operations that spawn marginal results. If you are very lucky, you will never end up trying to light shots for these “guerilla” filmmakers whose favorite expression at the end of a long day seems to be “They’ll fix it in post.” That means it is up to you and the rest of the VFX team to fix whatever mistakes they can’t be bothered to fix themselves. I have seen some pretty incredible expectations come from set regarding post fixes: • A chair is accidentally left in frame for a shot. Instead of
reshooting, the crew wraps for the day and requires a composi-tor to paint out the chair.
• A scene is in the can. Later the production team decides it doesn’t like the round neckline on a dress. A compositor is ordered to make it square.
• Green-screen shots come back with completely improper light-ing angles for the CG environment that is to be added by the VFX team. Green light spills all over the talent. Many hours of rotoscoping are required; lighting must be altered to accommo-date the plate.
All these are due to lack of planning and laziness. Unfortunately it adds a massive workload to the VFX department, which would like to be spending its time making the shots world class but instead spend time cleaning up other people’s messes and do not then have enough time to properly finish its own shots.
Don’t despair. There are also many filmmakers who plan care-fully and who care about the results.
If you are lucky, the shots are carefully planned, the CG department is included in the planning process, and the shots come back as expected. What is more likely is that one or all of these events will not occur. This is where your creativity is really going to come into play — where you will really need to know your lighting to pull off a miracle.
You will discover that there are many ways to skin a cat. Regardless of whether the shots you receive are manna from heaven or guerilla crap, you will find that stunning results can be achieved with the slight-est planning.
About Trial and Error
Many CG artists rely on trial and error as a prime lighting technique. This is not the same as experimentation. Since rendering a frame is hardly real-time feedback, there will be some amount of tweaking and rendering to achieve the right levels, colors, and balance; however, most aspects of lighting do not, and should not, require trial and error. Prop-erties such as instrument choice, position and direction, basic intensity, and color should require marginal adjustment, especially in visual effects shots where these properties have already been established by the film crew or where visual references are available in the plate and your job is simply to recreate the lighting environment. The VFX artist should be able to look at a plate, identify exactly how many light sources there are, roughly what their position and direction are, roughly what the colors are, what light types are required, then plan out a lighting kit and pro-ceed with placement.
Designing your own lighting is a slightly different matter and may require more experimentation, especially considering this may be part of the creative process for some artists. This process, however, should not be mistaken for “trial and error.” Trial and error is best illustrated by the artist who does not know what he wants and does not know exactly how to achieve it, and adds lights, colors, direction, and intensity, hoping that sooner or later he will accidentally hit on a pleasing combination. Once again, the artist should be able to look at the scenic requirements, plan out lighting type, placement, angle, and color, and then proceed with placement.
Visual Effects vs. CG Lighting Design
There are two main reasons to light a scene or an element in LightWave. One reason is that you are adding a CG element to a background plate that has come from set. You usually have few options but to replicate the on-set lighting so that your element will blend into the plate. This is visual effects (VFX) lighting. The other reason is that you are working on an all-CG shot and you must create the entire lighting environment. This is CG lighting design.
The skill set required to produce competent visual effects lighting is primarily technical, requiring an understanding of the real light sources and techniques used in the plate and how to replicate those sources and techniques using specific tools available in LightWave. Lighting design requires these technical skills and also calls on the artist’s knowledge of such qualities as intensity, direction, color, shadow, and contrast. The
artist is now making an artistic interpretation and converting that inter-pretation into a lighting environment. Do you want to know how to do this? All these things are covered in the pages that follow.
Not e: As this is a book about lighting, it helps to see the results of applying different effects that aren’t as apparent in the black and white illustrations. Dozens of these figures are also printed in a color insert. Additionally, all the figures in the book are included on the CD.
What’s New in LightWave [8]
•
The first thing you will notice when you fire up Layout (after you get over the tonal changes in the interface) is that the camera and lights have all been redesigned, sporting more detail and more graphical hints as to their actual use and properties. Kudos to NewTek for braving the territory ofchange. Check out Chapter 7 for images of the new light graphics if you don’t have a workstation in front of you.•
Light quality is now envelopable. This only applies to linear and area lights, but that’s enough, since these two are the render hogs. This is a great new feature because it means that with the application of a simple expression, you can alter the quality of the light based on the distance from camera. If the camera is far away, why bother with the high-quality render settings anyway? But if the camera getsextremely close, you’ll want the light quality as high as possible. With the envelope, you can either keyframe the quality change as the camera gets closer or you can make it automatic based on distance to camera. Cool! Anything that saves render time is a good thing in my book. More on this in Chapter 7.
•
Light exclusion in the Object Properties panel Lights tab (and object exclusion in the Light Properties panel Objects tab) can now be right-clicked at the top to get the options Select All, Clear All, and Invert Selection. If you have ever needed to select every light except one or two in a list of 75 lights, you will really appreciate this simple new addition.•
Projection images are now visible in the Light View of the light that is projecting the images. This great new feature enables you to more quickly line up the projection image so you can have it fall precisely where you want it to. This may seem like a little tool, but anything that improves your work flow is very good.•
OpenGL now displays the eight brightest lights first instead of the first eight lights in scene order. In past versions, the Layout OpenGL display showed up to eight lights but only the first eight in the scene. This didn’t make sense, especially if you wanted specific lights visible in OpenGL, but they were numbers 32 and 33. Now you can turn on and off whichever lights you want to display, or LightWave will automatically display the eight brightest.•
The ability to change the properties of multiple selected lights has been added. The following properties can be changed on multiple selected lights:These are a few of the things awaiting you in the latest, greatest version of our favorite 3D software. Go forth and illuminate!
Part I
Lighting
Theory
This first section will lay all the groundwork you will need to become a successful lighting artist. Anyone who has studied drawing, painting, photography, or other visual arts designed to capture or replicate life will know that a solid understanding of the qualities and properties of real-world light is essential to the success of the artistic reproduc-tion. This is as true in computer imaging as it was when Rembrandt began painting portraits in the 17th century. Lighting cannot be learned at a computer terminal. It can only be learned by observing and understanding real light in a real environment. Expect to spend time outdoors examining the quality of a shadow from a nearby tree. Look not only at the color of the sunlight, but the hue of the shadow. Note how the colored light from one source mixes with the colored light from another source to pro-duce an entirely new effect.
Chapter 1
Properties of
Light
This chapter deals with the properties of light in the real world, specifi-cally intensity, color, direction, diffuseness, shadow, shape, contrast, movement, and size. By the time you finish this chapter you should be able to identify and explain each of these properties in a lighting environment
Understanding light is not difficult. Just as an automobile mechanic understands how to build, repair, and operate a vehicle — not by seeing the vehicle as a single system but as a complex interaction of individual systems — understanding light is as simple as understanding each of the individual properties that are part of the whole. Once the following con-cepts are grasped, you will be able to look at any lighting situation and clearly identify the direction of the source, its intensity or luminosity, the light color, the diffuseness of the light, the movement (if any), the shadow qualities, the shape, and the contrast. Actually, you are already an expert in observing light. These terms and definitions will simply allow you to manipulate them effectively.
Intensity/Luminosity
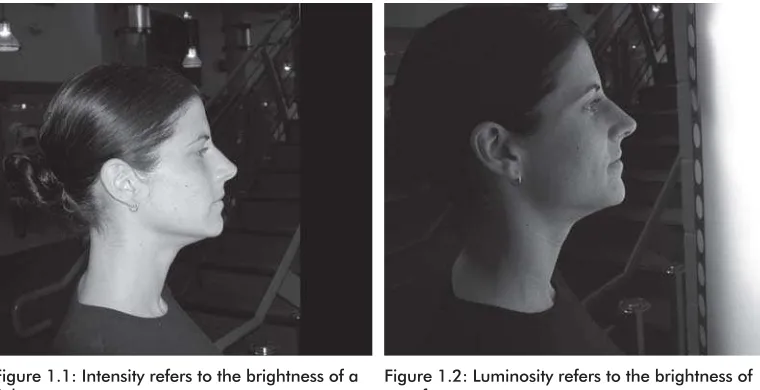
The difference is this: In CG art, we useintensityto refer to the bright-ness of a light source — an actual lighting instrument within the CG environment such as a spotlight or point light. In other words, when we say intensity, we are talking aboutdirectlighting from a hot lightbulb fila-ment or a candle flame. When we sayluminosity, we are talking about
indirectlighting such as when direct light is diffused through a frosted glass bulb or the colored glass in a neon sign. LightWave’s Global Illumi-nation (radiosity) allows us to make polygonal objects luminous. So if we model a frosted white lightbulb, we can have the actual polygons of the object emitting light without adding any lights to the scene. When object surfaces have a luminosity setting higher than 0%, they contribute light to the scene if radiosity is enabled. The higher the luminosity, the more light is emitted. So in the case of radiosity, luminosity means the same as intensity but refers to the light emission from surfaces as opposed to lights.
Take our lightbulb example. In the old days of CG, we would have to create the effect in LightWave by putting a point light in or near the lightbulb object and letting it shine its rays out into the scene. Nowa-days, we have another option. Instead of adding a point light, we can turn up the luminosity value on the actual lightbulb surface and enable radiosity. The render will take considerably longer, but the resulting light will be far more accurate. Most of the time, the easy method of adding a point light will work fine, but sometimes detail is everything and nothing else will look as good.
Chapter 1 · · · ·
Figure 1.1: Intensity refers to the brightness of a light source.
Not e: Either Monte Carlo or Interpolated Global Illumination must be enabled for this to work. Luminous surfaces will not emit light into the scene if you have Backdrop Only Global Illumination selected.
Intensity or luminosity is one of the first things you may notice about a light source’s quality. Is it very bright or very dim? Is it somewhere in the middle? Is it so blindingly bright that it can only be the sun or a nuclear blast? Or is it so gentle that it must be a candle? The intensity of a light source will often signal to the viewer what the light source is, even if the source itself is not visible in frame.
Not e: It is easy to let the audience know what and where your light source is without being obtrusive or obvious. As you read through these light properties, imagine how you might use each one to let your audience know just how the scene is illuminated.
Color
Perhaps the second quality you may notice in a light source is the color. Take the sun, for example. On a midsummer’s day, the sun can be very close to white and on the yellowish side. On an autumn afternoon, it can be a fiery orange. Look in the shadows on a clear, bright sunny day. Don’t they look blue? What about the living room with the fireplace burning? Here you see orange, red, and yellow all spilling across the room. Or check out those mercury vapor lamps used for street lights. These are sort of a light orange.
Take a look at the photograph on the following page.
There are three main light sources in this shot, resulting in three distinct color ranges. In a few places, you can see direct sunlight, mainly along the top of the image and at the bottom right. The sun is the key light. It is nearly white, on the amber side of the spectrum. But the most obvious light sources and colors are the fill sources. On the left of the image, rock faces that angle upward are a deep blue. This is because they are facing the blue sky on a bright, sunny day. The sky is highly luminous and is emitting a blue-tinted diffuse light. On the right half of the image, the cliff face is undercut, making it face downward toward the road where sunlight is reflecting off the dirt and creating an amber fill.
Not e: This image is a great example not only of contrasting color in a lighting environment, but also of fill lighting and of dif-fuse lighting sources.
Not e: After the LightWave 7.5 version of this book was
released, there was heated debate over the color of shadows on a sunny, clear, blue-skied day. Some argue that shadows have no color, being by nature the absence of light. On the other hand, it can be argued that on earth shadows are never completely devoid of light. I suppose for the picky physicists in the room, the question should be “What color of illumination fills the shadowed area?” I won’t address the doubt, incredulity, debates, insults, or downright crying that was involved, and I stand by my analysis of the lighting conditions. I urge you, the incredulous reader, to simply go outside and do some careful, thoughtful observation. Come to your own conclusions.
There are as many colors for lights as there are colors in the visible spectrum. In fact, you can divide up the visible spectrum of light into many more wavelengths than can be discerned by the human eye. Your computer monitor is probably capable of displaying about 16 million col-ors, and that’s only some of the available ones!
Chapter 1 · · · ·
Color can be a visual key to what is going on in your scene. If you see a back alley scene, and there’s a pink light source out of frame that’s blinking on and off, you will subconsciously know that this probably rep-resents a neon sign flashing “Tattoos” or something. If you want to create a somber, depressing mood, you might choose cool colors — steels and blues, colors that seem cold and dead. If you wish to make the viewer ill at ease, you may choose eerie, unnatural colors in the green portion of the spectrum. Or perhaps pinks and ambers may be your choice for a bright, happy setting. Keep in mind that these examples are merely the most common uses for these color ranges. Why are they common? Most people have specific emotional reactions to certain col-ors. You can use this knowledge to get your audience into a specific frame of mind.
Not e: My experience has shown that people are most comfort-able with colors and brightness values that are most often found in nature. If I wish to create tension, I will use strange colors and unusual intensities. People know instinctively what lighting envi-ronment is natural. That is why most room lights are on the ceiling or above people’s heads and are roughly the color of the sun. It is what humans have been accustomed to for millions of years.
Direction
Light direction is another powerful tool in establishing light source and setting. If the shot is outdoors and the angle is very steep, very bright, and amber-white, we might assume that the light source is the sun. If the shot is outdoors and the light is very bright, amber-white, and com-ing from below, we are certain that it cannot be the sun. It must be something else. Everything is the same except for the angle.
In a living room, all the lights are out, but there is a light source out of frame. It is coming from floor level and is colored red, orange, and yel-low. We guess this is a fireplace. If we look again and see by the angle of the shadows that the source is above us rather than below, we will prob-ably think that the house is on fire.
Take the classic example of the spooky story told on a camping trip. The storyteller places a flashlight below the chin causing deep, strange shadows that make the face appear frightening and unnatural. This is referred to as “dramatic lighting.” The same flashlight pointed straight at the face or from above will elicit no such reaction.
Chapter 1 · · · ·
From the earliest days when theater moved indoors, footlights were used to illuminate the stage. Why footlights? Well, the earliest lights were candles floating in a moat of water in front of the stage. These were followed by gas lights. The nature of these lights required them to be within easy access of the operators, especially considering how many theaters burned down during the phases of these technologies. When electric lights were introduced, they were placed in footlight positions mainly due to tradition. The villains of the old melodramas made use of the footlights by leaning close over them, producing the same frighten-ing and unnatural shadows of the campers tellfrighten-ing the ghost story. Footlights can still be found in theatrical productions where a lighting designer seeks that melodramatic feeling of the old theater, or where strange, unnatural lighting effects are desired.
The following three images illustrate the use of direction in lighting a subject. Figure 1.4 uses a natural lighting angle high and to the sub-ject’s left. The lighting angle is similar to one that may be found on a sunny day. The subject appears normal and familiar. Figure 1.5 uses a low-angular direction. We still recognize the subject as familiar, but the lighting is obviously strange, especially considering the lack of a fill source. Figure 1.6 uses the “spooky flashlight” dramatic lighting effect. It makes the viewer ill at ease because of the subject’s unnatural appearance.
Figure 1.4: A normal lighting angle like the sun or a ceiling light.
Figure 1.6: A low lighting angle. Very unnatural and strange. Figure 1.5: A side lighting
Not e: In the days of candles, sailors were hired to run the rig-ging and lighting in the theater. The man taking care of the candles often needed to remove one of the floating candles from the moat to repair its guttering or to relight a candle that had blown out. The sailor used a tool known as a “gaff” (a long metal hook used to retrieve wayward ropes on sailing ships) to pull the candles to the edge of the moat and to push them back out. Thereafter, the man taking care of the lighting came to be known as the gaffer. Strangely, as the technology in the theater advanced, the gaff was cast aside, except for those occasions when an actor needed to be violently removed from the stage with a hook, and the term “gaffer” fell into disuse. But somehow, the term survived in the film industry and today the head of the lighting department is known as the gaffer.
Diffuseness
In general,diffuse lightis any light that has been scattered after leaving the light source, or any light source that has a varying area of luminosity or intensity. Scattering can be caused by atmospheric gases or by reflec-tion, or bounce, off an uneven or rough surface. Any material that causes parallel light rays to be scattered, bent, or reflected into non-parallel paths is creating diffuseness in the light.
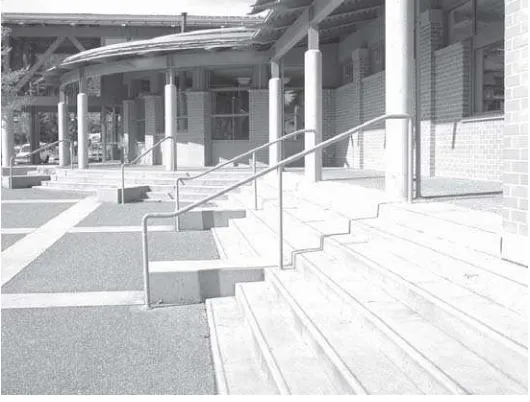
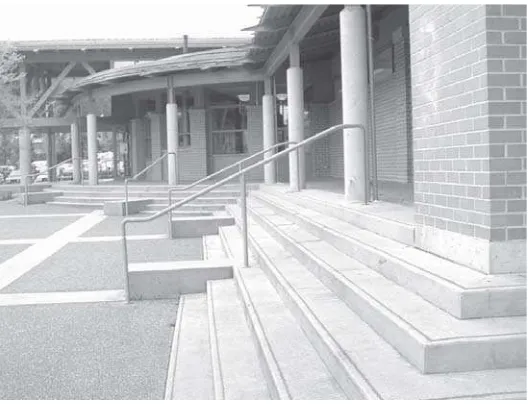
Figure 1.3 is an example of an image that is lit primarily by two dif-fuse light sources.
Here on earth, all light has some measure of diffuseness. This is because the light rays (or particles or waves if you wish to be picky) pass through atmospheric gases, colliding with the gas molecules and shoot-ing in all directions. The most obvious example of this is the sky. Blue light is scattered in the atmosphere much more than light at the red end of the spectrum. This is because blue light has a much shorter wave-length than red light and is, therefore, scattered throughout the
atmosphere about ten times as much as red light. This scattering is what makes the sky appear blue. Subsequently, the scattered blue light con-tinues omnidirectionally, some of which reaches the ground as diffuse light. This bluish, diffused light can be seen in shadows on clear days. Direct sunlight can also be diffused through clouds, colliding with water droplets and continuing omnidirectionally. Cloudy days provide an excel-lent example of white diffused light. All the shadows on cloudy days are
soft and diffused. Only the deepest crevices are likely to be very dark since light is approaching from most directions but may not reach into them.
Diffuseness can tell us much about the light source and the environ-ment. Direct light sources such as the sun, a candle flame, or a bare, clear lightbulb produce parallel light rays and hard shadows. But put a curtain, a lampshade, or frosted glass in front of the source and the light becomes diffuse, making shadows softer. Fluorescent sources are all dif-fuse sources. They all have a wide area of luminosity that creates soft shadows because the light appears to “wrap around” objects, creating an area of shadow “falloff.”
The following two images are the same except that one is directly lit and the other is diffusely lit. There is diffuse lighting in both images but direct lighting in only one of them.
Chapter 1 · · · ·
Shadow
Shadows are not technically a quality of light. While some may teach that lights cast shadows, in fact it is objects that cast shadows. A shadow is the absence of light and therefore cannot generally be considered a light quality. Rather we think of it as a “lighting” quality. In other words, shad-ows are one of the things we think about when creating our lighting, although it is not actually a part of light.
The images shown in Figures 1.4, 1.5, and 1.6 demonstrate that shadow is linked to the direction of the light source. They help us see the subtleties of form in the subject, and can be used to evoke an emo-tional response from the viewer.
Shadows are as crucial to lighting as beer is to pizza. Without one, the other is rather plain. It is shadows that give all objects their form and shape. Shadows play a large part in helping us define what plane we are looking at when we see a wall or the ground. Look at a wall near you and notice the shadow gradient that occurs as the wall recedes farther from the light source. Notice the intersection with the floor and see where the deepest shadows lie. Imagine if there were no shadows. In a white room with a white door frame and a white door, you would never be able to find the door. All that really defines the door and frame is the
shadows.
· · · Properties of Light
We are all experts at seeing shadows. We have grown up our entire lives honing our expertise in this area. It is because of this expertise that each of us can look at a visual effects or other computer-generated shot in a movie and know instantly that it is not real if the lighting is not quite right. We may not be able to verbalize exactly what the problem is or even that it is with the lighting, but nonetheless it will look wrong.
This is why shadow is one of the most subtle and most crucial of lighting qualities. As lighting artists, we must understand exactly what happens to create shadows of all types in all situations. Chapter 5 deals with shadows in detail. For now, suffice it to say that there are two main types of shadows: hard and soft.Hard shadowsare the sort you see from small light sources like the sun or a clear, bare lightbulb. (I know the sun is very large, but it acts small most of the time as far as lighting is con-cerned, mainly because it is extremely far away and only a small amount of the sun’s light reaches us. See Chapter 5.)Soft shadowsare the kind you usually see in the absence of hard shadows. That is not to say that they cannot exist together; they usually do, but hard shadows are scene stealers. People tend not to notice the gentler soft shadows when the bully hard shadows are around — this is an important point. Because we live on a planet with a gaseous atmosphere, soft shadows are every-where, under every lighting condition. Failing to add them to your scene is like forgetting the cheese on your pizza. Soft shadows exist in situa-tions where there is a diffuse lighting source such as the sky, clouds, a computer monitor, or sunlight reflecting off a wall. In reality, there is always a diffuse lighting source.
Shape
The shape of a light can tell you a great deal about the light source. Shape is very similar to shadow in some ways. For example, the shadow cast by palm leaves may actually be palm leaves, or in the case of LightWave, it may actually be geometry casting a shadow. Lighting designers long ago invented a device for changing the shape of the light before it leaves a lighting instrument so that you don’t actually have to place a palm tree in front of the light in order to get the effect. Earlier, I mentioned that you don’t always need to see the light source to know what it is. This is true of shadows as well. You don’t need to see a palm tree to know it is casting the shadow. This shaping device is called agobo
orlighting template. Simply put, it is a small sheet of metal with a shape cut out. The sheet is placed at the focal point of the light, and the cut-out shape is projected. So if that shape were to be some palm leaves, it
might appear that the light source is the sun and that it is shining down through some palm leaves. Technically, the gobo is casting a shadow inside the lighting instrument, only allowing some of the light to shine through. That is what alters the shape of the light. There are also mov-ing gobos, which can be as simple as a disc rotating in front of the light or as complex as a movie projector. Lighting designers also use shutters and barn doors to alter the shape of their lights.Shuttersare metal plates, also at the focal point, that can be slid inward to create straight edges on the normally round beam of a spotlight.Barn doorsare placed at the lens end of the light some distance past the focal point and are usually used to cut down onspill(undesirable light diffusing out of the lens housing in all directions), although they can also shape a light some-what or assist in sharpening the gobo image. All of these tools and more are available in the LightWave toolset, as we will discover in later chapters.
So you see that shape and shadow are very similar. For the purposes of CG lighting, we will consider shadow to be cast by geometry in the scene and shape to be the light that is coming from the light source before touching any geometry.
· · · Properties of Light
Contrast
Contrastrefers to the range of difference between the lightest parts of the image and the darkest parts. An image in which the lightest parts are much lighter than the darkest parts is considered to have high contrast. On the other hand, a frame in which the lightest parts and the darkest parts are similar is considered to have low contrast. For example, on a bright sunny day, the sunlight shines on a white table. It is nearly blind-ing to look at and the shadows below it seem to be pitch black. There is a great difference between the table and the shadow below. This is high contrast. If, on the other hand, it is a cloudy day and you look at the table, you will notice that the white of the table and the light gray of the concrete below do not seem to be so different. This is low contrast.
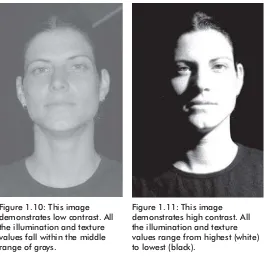
The following images demonstrate the difference between low-contrast and high-contrast imagery.
Some of this effect is caused by the dilation of your pupils. When it is very bright outside, your pupils get smaller, blocking out much of the light and protecting the retina. When this happens, only the brightest light gets through. The concrete under the table is lit even more than it is on a cloudy, low-contrast day, but your eye is not registering the light. It has been filtered out by the pupil. This creates a high-contrast situa-tion. When the sun is obscured by clouds, there is much less light
Chapter 1 · · · ·
Figure 1.10: This image demonstrates low contrast. All the illumination and texture values fall within the middle range of grays.
available. The pupils dilate, allowing more light in. The concrete beneath the table becomes more easily visible and more similar in contrast to the table. Essentially what is happening is that as the pupil opens and closes, the eye’s lightrangeis changing. It is that light range that determines high or low contrast.
Why the anatomy lesson? It is important to understand not how the eye works, but what light is actually there and what situations create the lighting quality known as contrast so that these can be accurately recre-ated (or at least butchered, cherecre-ated, and faked) in a CG environment.
Movement
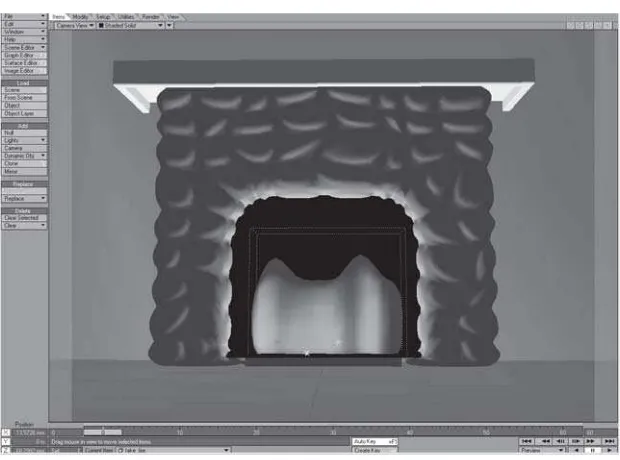
Movement may not be the first thing you consider when you think about light, but it is a powerful tool. Movement refers to the qualities of light that change over time. Take a fireplace, for example. Each bit of flame is a light source. As the fuel is spent, the flame rises and flickers, changing color and intensity. This is a moving light source. So often I have seen artists attempting to create realistic light from a flame by applying varia-tions in intensity but not in motion or color. Motion, especially, is crucial to this look.
Check out the scene “Fireplace” on the companion CD. This gives a quick-and-dirty example of how you might set up fireplace lighting.
· · · Properties of Light
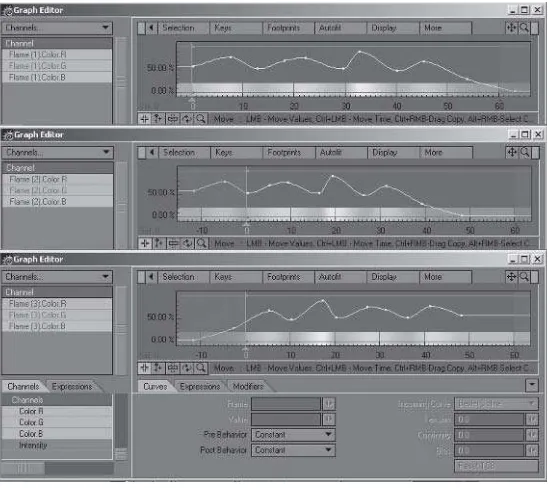
Similarly, the motion paths for intensity and color create great variation.
Chapter 1 · · · ·
Figure 1.13: You can see in the Scene Editor how the keyframes are irregularly spaced to create unique behaviors for each point light. Each point light is behaving as a spark or a lick of flame. You can also repeat the motion of each light to “regenerate” them if you have a long scene, but if you do this, vary the length of each light’s motion path so that the repeats don’t happen together. You’ll get a more interesting mix of motions that way and your viewer will be less likely to spot a repeating motion.
There are many other examples of light in motion, such as a mirror ball in a club, headlights on a car, someone carrying a flashlight, or even the sun passing overhead. Movement can also apply to changes in the beam angle of a spotlight or changes in intensity or color. One could argue that a change over time of any of the other light qualities constitutes move-ment. Just imagine how you could use some of these moving qualities to help convey your intentions. Moving intensity might mean an explosion has occurred or someone has turned down a gas lamp. Moving color might mean the sun is rising or a neon sign is flashing outside. Moving direction might mean a car headlight flashing by in the night or a spin-ning orange beacon on top of a construction vehicle. Moving diffuseness could show that a light source is getting closer or the sun is coming out from behind the clouds. Moving shadow might be palm leaves swaying in the breeze or it could be your shadow sweeping across the ground as car headlights flash past. Moving shape could be a film projection on a screen or window shutters being closed. Moving contrast could mean a supernova is occurring or a nearby rocket is blasting off. These exam-ples came to mind in a moment. There are infinite other combinations
· · · Properties of Light
that you can use to create a lighting environment that is true to the set-ting, conveys the mood you wish, and carries the desired emotional impact.
Size
Size matters.
The size of a light source, like most of the other properties, often will not matter in shots, but can occasionally be crucial to lending reality to your lighting environment. What difference does size make? Mainly the difference is in the shadows. Shadow shape and behavior will vary depending on the size of the light source. A very large source like the sun will result in hard shadows near the object and softer shadows far-ther away. A very small light source such as a light-emitting diode will result in very hard shadows that only become soft very far away, if the light transmits that far. The net effect is that tiny light sources appear to result exclusively in hard shadows.
On the other hand, a very small light source is more likely to result in areas of highlight on specular surfaces, while very large lights are more diffused and are therefore less likely to result in bright specular
highlights.
. . .
Chapter 1 · · · ·
This chapter has demonstrated the basic properties of light. The physi-cists among you will, no doubt, care to argue the physical accuracy of several points; however, this is not a physics handbook. The understand-ing of the properties as described will enable you to light your scenes so they appear to obey the laws of physics (which is very important) with-out actually having to obey every principle and law (which is not very important).
The final render matters. Whether or not you obeyed the letter of physical law does not.
You should now be able to examine any lighting environment and define the properties of intensity, color, direction, diffuseness, shadow, shape, contrast, movement, and size.
Chapter 2
What, Where,
When?
This chapter covers temporal and spatial issues that will hopefully pro-vide clues as to what lighting setup to start with. By the time you have finished this chapter, you should be able to observe a lighting environ-ment and define the time of day (if relevant), time of year (if relevant), atmospheric conditions (if relevant), and whether the environment is interior or exterior. You should be able to analyze a photograph’s lighting (or the lighting outside your window, under your desk, or anywhere). You should also be able to start planning your own basic lighting setup based on the scenic information you observe about place, time, and atmospheric conditions.
It is always good to have a defined starting point for your lighting. Where do you begin? I begin lighting a scene by considering a number of questions that help me decide what lights to use, where to place them, how to color them, and what sort of intensity mixtures (or ratios) I will use. We begin with the largest, most obvious questions and move on to finer points. As in any analysis, “Start big, go small.”
Interior or Exterior
properly might make the difference between a shot that is believable to the audience and one that is not. The question is whether the camera is inside a building or out on the street. Interior and exterior light sources may both play a part in the shot, but the location of the camera dramati-cally changes how the sources will be handled and what the relative light intensities will be between interior and exterior.
Interior and exterior light react and complement each other all the time, everywhere. Knowing how to create these complex interactions is as simple as identifying and simulating each individual source.
Interior light sources, for example, are usually incandescent or fluo-rescent. Exterior light sources are usually the sun, the sky, clouds, the moon, reflected sources, and reflected diffuse sources (technically, all these sources are the sun, but let’s not wear our picky hats today). The sun’s light, diffused through the air molecules in the sky, creates a global, diffused source. Or the sun may be occluded by clouds that block the direct rays from the sun, in which case the light is diffused among the water droplets in the clouds, creating yet another diffuse source. Direct sunlight may strike a wall or the ground, picking up the color of that wall or ground and reflecting it onto another surface. (Don’t get all nitpicky about the actual physics of light reflection and radiosity yet. We’ll discuss all that later.) Sunlight may reflect off the surface of a swimming pool, creating a hard reflection against the pool house. In each circumstance, the sun is the light source. All the other lighting events,
· · · What, Where, When?
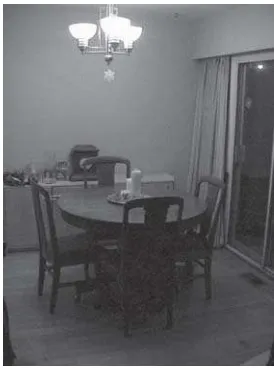
Figure 2.1: An interior image. Note lighting sources and intensity.
with the exception of artificial light, are diffusions or reflections of that primary source.
While it is theoretically possible to create a global lighting environ-ment with only one source and to provide diffusion and reflection events consistent with the real world, render times would probably be mea-sured in weeks or months per frame. Instead of that, we have decided to make each diffusion and reflection event into a separate light source. NewTek, maker of LightWave, has provided us with the tools to create these sources, and years of experimentation and research among the LightWave community, and indeed the whole CG community, have pro-vided us with innumerable methods for accurately capturing the correct look with the available tools. The lighting tools are not physically accu-rate but are close approximations. Some of the lighting tools reflect only a portion of the real properties of a light source. This makes render times manageable. In general, the closer a lighting tool is to physical accuracy, the exponentially longer it takes to render.
Not e: Bear in mind that it is the look, not the physical accuracy of the lighting model, that matters to producers, directors, and supervisors. The production reality is that any method you can use to create great lighting is valuable. If it is quicker to render and still looks as good, it is more valuable. There are many “tricks” to creating great lighting without the monstrous rendering times. Many of them are covered later in this book. But the main purpose here is to provide you with enough knowledge to create your own tricks that are most relevant to the job you are working on right now. Remember that not all techniques or methods are relevant to all lighting challenges.
Imagine a living room with a fireplace crackling brightly at one end. There is a soft, indirect incandescent source illuminating the pale yellow ceiling and casting a reflected diffuse light throughout the room. Halogen track lighting in the kitchen is spilling a crisp, sharp light from the pass-through into the dining area where it reflects off and refracts through the glass tabletop. The large glass windows reveal a wide cityscape many floors below and a moonlit sky twinkles above. In the distance, moonlight reflects off the Pacific Ocean.
Sound complex? This scene could be lit with as few as three lights. Why? That is how many light sources that have been described are act-ing on the foreground of the shot. Addact-ing a few more lights to mimic some of the diffusion and reflection events, rather than calculating real
reflections and diffusions, can dramatically improve render times. LightWave is equipped with a robust and full-featured lighting toolkit to help you mimic all the lighting events in the scene without having to create a physically accurate lighting model which, while it may look mar-ginally superior, will likely send render times through the roof.
One last note about interior and exterior lighting: When we talk about exterior sources, we are usually referring to “natural” sources such as the sun. When discussing interior sources, we are usually refer-ring to “artificial” sources such as lightbulbs. Of course, sunlight can pass through a window into a room, and tiki lamps or neon signs are usu-ally found outdoors, but don’t be confused. By the time you are finished with this book, you’ll know how to create a neon source whether indoors or outdoors and how to create a sunny day whether on the beach or viewed through a tiny basement window. Just remember to think about whether your camera is interior or exterior, and the sources will fall into place.
Time of Day
What time of day is it? Is it midday or sunset? Is it midnight or early morning? Each of these situations requires a completely different light-ing solution. Midday might require a bright, hard-shadowed light source at a high angle to represent direct sunlight, while sunset might also require a hard-shadowed light source, but with less intensity, more color saturation, and a much more obtuse angle or direction. Early morning could mean the sun has not yet risen, so all the light in the scene is indi-rect, diffused, and colored according to atmospheric conditions.
Midnight, on the other hand, might be lit by the moon, which acts as a direct lighting source although it is in fact a diffuse, reflected source, and displays the properties of both. Finally, starlight may be the only source of illumination, or it could be light from a nearby window, a distant street lamp, or a neon sign. How do we deal with these? How do we balance the dim starlight with the bright neon sign and still tell our audience that it is nighttime?
So much depends on the time of day. Go out and look at lighting con-ditions around you at different times of the day. You will find infinite combinations of light sources and situations.
Time of Year
Time of year, while more subtle, is also valuable in establishing lighting conditions, mood, and setting in your scene, especially if the scene is outdoors. Imagine, for example, the kind of light you might see at 3 p.m. on a clear day in the summer. Contrast that with what the lighting might be like at 3 p.m. in the autumn or in the winter. The difference is the direction, intensity, and color of our light source (the sun). In the sum-mer, the source is high, very bright, and very white, reaching a color temperature of about 5800 Kelvin degrees, while autumn light is warmer and less intense, with a color temperature perhaps closer to 4500 Kelvin degrees.
Not e: See the discussion on color temperature in Chapter 8.
This change in color from summer to autumn occurs because of the ever-changing angle of the earth relative to the sun and what happens to the light rays as they diffuse through the atmosphere at a more obtuse angle. In the winter, the sunlight must actually pass through more atmo-sphere to reach the ground than it does in the summer. This is because the hemisphere (Northern in June and Southern in December) is tilted toward the sun in summer, making the light rays reach the earth at an acute angle, making the sun appear higher in the sky, and letting the sunlight take the most direct route through the atmosphere. In winter,
Chapter 2 · · · ·
Figure 2.3: A daytime image. Note lighting sources and intensity.
the hemisphere is tilted away from the sun, making the sun appear lower in the sky and causing the light rays to reach the hemisphere at a lower, more obtuse angle. In this case, sunlight takes a longer path through the atmosphere.
Regardless of the calendar month or hemisphere, winter sunlight is always closer to the horizon than summer sunlight, resulting in a lower average angle in winter and a higher average angle in summer. Spring and autumn light are phases between summer and winter, so the light source will be somewhere in between the extremes of summer sunlight and winter sunlight. If you plan on lighting a scene within one of the polar regions, perhaps it’s best to go to the library and start studying geography!
Not e: Lest we confuse any readers, be it known that summer starts in June in the Northern Hemisphere and in December in the Southern Hemisphere.
Time of year may be a subtle consideration. It may not matter at all in many cases, but in some cases, illustrating the season can make the dif-ference, giving the shot a temporal anchor.
Atmospheric Conditions
Not every day is sunny and clear. Changes in the weather make a dra-matic difference in the way your scene is lit.
· · · What, Where, When?
Take, for example, a clear sunny day and contrast that with a cloudy or rainy day. Sunny days have a hard, bright, warm main orkeysource (the sun), complemented by a diffuse, cool secondary orfillsource (the sky). On rainy days, however, the key source is usually the clouds — most likely a grayscale diffuse source.
Not e: For more discussion on what constitutes key and fill sources, please see Chapter 6, “Principles of Lighting.”
The eye can tell instantly, without seeing either the light source or the sky, what the atmospheric conditions are by seeing the color and diffuse qualities of the light. When you wake up in the morning and look out the window, you don’t need to look into the sky to see if the sun is out or if it is raining. The signals are in the buildings and environment around you and in the shadows and the quality of the light.
Knowing how to identify and replicate atmospheric conditions is a powerful tool in visual effects situations where the artist is required to match lighting to a background plate. In design, it is crucial to delivering not only the environmental message you wish but also the emotional message.
How does a rainy, cloudy day make you feel? What about a bright, sunny day with a few puffy clouds? How about a dry, hot afternoon with dark, foreboding clouds hanging overhead? What about a foggy day, or a deep red sunset where the red is not from clouds but from the massive
Chapter 2 · · · ·


![HUBUIIGAI{ AIITARA KUATITA KEMIMPII{Ail DAl{ GAYA MAilAJEME}I DEilGAiI KEPUASA]I KERJA PERAWAT DI RUMAH SAKIT UMUM DAERA}I TUGUREJO SEMARAIIG](data:image/gif;base64,R0lGODlhAQABAIAAAP///wAAACH5BAEAAAAALAAAAAABAAEAAAICRAEAOw==)