PayPal APIs: Up and Running
D
o
w
n
lo
a
d
f
ro
m
W
o
w
!
e
B
o
o
k
<
w
w
w
.w
o
w
e
b
o
o
k
.c
o
m
PayPal APIs: Up and Running
PayPal APIs: Up and Running
by Michael Balderas
Copyright © 2011 O’Reilly Media, Inc. All rights reserved. Printed in the United States of America.
Published by O’Reilly Media, Inc., 1005 Gravenstein Highway North, Sebastopol, CA 95472.
O’Reilly books may be purchased for educational, business, or sales promotional use. Online editions are also available for most titles (http://my.safaribooksonline.com). For more information, contact our corporate/institutional sales department: (800) 998-9938 or [email protected].
Editor:
Mary TreselerProduction Editor:
Kristen BorgCopyeditor:
Genevieve d’EntremontProofreader:
Kristen BorgIndexer:
Angela HowardCover Designer:
Karen MontgomeryInterior Designer:
David FutatoIllustrator:
Robert RomanoPrinting History:
February 2011: First Edition.
Nutshell Handbook, the Nutshell Handbook logo, and the O’Reilly logo are registered trademarks of O’Reilly Media, Inc. PayPal APIs: Up and Running, the image of an African wildcat, and related trade dress are trademarks of O’Reilly Media, Inc.
Many of the designations used by manufacturers and sellers to distinguish their products are claimed as trademarks. Where those designations appear in this book, and O’Reilly Media, Inc., was aware of a trademark claim, the designations have been printed in caps or initial caps.
While every precaution has been taken in the preparation of this book, the publisher and author assume no responsibility for errors or omissions, or for damages resulting from the use of the information con-tained herein.
ISBN: 978-1-449-39612-1
[LSI]
Table of Contents
Preface . . . vii
1. The PayPal API . . . 1
Overview of the PayPal API
1
Getting Started
3
Direct Versus SDK Integration
3
Testing Versus Live Implementation
4
Obtaining API Credentials
4
Creating an API Signature
4
Creating a Name-Value Pair (NVP) Request
6
Parsing an NVP Response
8
2. PayPal Express Checkout . . . 11
Checkout Process Workflows
11
Generic Checkout Workflow
11
Express Checkout Workflow
12
Generic Versus Express Checkout Workflow
12
Express Checkout Flow
13
PayPal Express Checkout API Operations
15
SetExpressCheckout
16
GetExpressCheckoutDetails
17
DoExpressCheckoutPayment
18
Callback
22
Simple Express Checkout Integration
24
Setting Up the Transaction
24
Express Checkout Integration
25
3. PayPal Website Payments Pro . . . 49
Overview of Direct Payment
49
Direct Payment Workflow
49
PayPal Direct Payment API Operations
50
Simple Direct Payment Integration
54
Direct Payment Integrations
55
4. PayPal Adaptive Payments . . . 59
Overview of Adaptive Payments
59
PayPal Adaptive Payments API Operations Overview
59
Adaptive Payments Permission Levels
60
Adaptive Payments Application Workflows
61
Payment Approval and Payment Flows
63
Explicit Payments
63
Preapproved Payments
64
Implicit Payments
66
Guest Payments
66
Adaptive Payments API Operations in Depth
66
Pay API Operation
67
SetPaymentOptions API Operation
68
ExecutePayment API Operation
70
Adaptive Payments Integration
71
5. PayPal Mobile Express Checkout . . . 99
Mobile Express Checkout Flow
100
Mobile Express Checkout Best Practices
100
Mobile Express Checkout Library for iOS
101
MEC Mobile Application Integration
101
MEC Mobile Website Integration
102
MEC Library Methods
102
MEC Localization Support
104
Sample MEC Code
105
Summary
106
Preface
Virtually every application delivery model is experiencing a surging demand for
trans-action convenience. In this book, I introduce PayPal APIs, along with instructions and
resources for their integration in different environments, including websites and mobile
applications.
Goals of This Book
The goal of this book is to help you understand what PayPal has to offer. Let’s face it,
you want to get money from your customers into your bank account as quickly as
possible, and I want to help you accomplish this. By the end of this book, you will have
a better understanding of what PayPal is, how PayPal can streamline your payments,
and how to get the most out of PayPal for your particular payment situation.
Who Should Read This Book
How This Book Is Organized
Here is a brief summary of the chapters in the book and what you can expect from each:
Chapter 1, The PayPal API
Covers the PayPal API and how to start using it to accept payments, with an
em-phasis on choosing an integration method for your project as well as obtaining the
necessary credentials to get started. I also cover how to use the sandbox to test your
application.
Chapter 2, PayPal Express Checkout
Covers Express Checkout and how to use the API to execute Express Checkout
Payments. This chapter contrasts the Generic (or Traditional) checkout workflow
with the Express Checkout workflow. All four of the Express Checkout operations
(
SetExpressCheckout
,
GetExpressCheckoutDetails
,
DoExpressCheckoutPayment
, and
Callback
) are covered.
Chapter 3, PayPal Website Payments Pro
Covers Website Payments Pro, with an emphasis on Direct Payments. I
demon-strate the Direct Payment workflow in a sample transaction. A simple Direct
Pay-ment Integration sample is also included.
Chapter 4, PayPal Adaptive Payments
Covers Adaptive Payments, including an overview of Adaptive Payments as well
as a breakdown of the Permission Levels provided via Adaptive Payments.
Appli-cation workflows, Payment Approval, and Payment flows are also included.
Chapter 5, PayPal Mobile Express Checkout
Covers Mobile Checkout, with an emphasis on the newly released Mobile Express
Checkout and the Mobile Payment Libraries for iOS- and Droid-based
smartphones.
Conventions Used in This Book
The following typographical conventions are used in this book:
Italic
Indicates new terms, URLs, email addresses, filenames, and file extensions.
Constant width
Used for program listings, as well as within paragraphs to refer to program elements
such as variable or function names, databases, data types, environment variables,
statements, and keywords.
Constant width bold
Constant width italic
Shows text that should be replaced with user-supplied values or by values
deter-mined by context.
This icon signifies a tip, suggestion, or general note.
This icon indicates a warning or caution.
Using Code Examples
This book is here to help you get your job done. In general, you may use the code in
this book in your programs and documentation. You do not need to contact us for
permission unless you’re reproducing a significant portion of the code. For example,
writing a program that uses several chunks of code from this book does not require
permission. Selling or distributing a CD-ROM of examples from O’Reilly books does
require permission. Answering a question by citing this book and quoting example
code does not require permission. Incorporating a significant amount of example code
from this book into your product’s documentation does require permission.
We appreciate, but do not require, attribution. An attribution usually includes the title,
author, publisher, and ISBN. For example: “PayPal APIs: Up and Running by Michael
Balderas. Copyright 2011 O’Reilly Media, Inc., 978-1-449-39612-1.”
If you feel your use of code examples falls outside fair use or the permission given here,
feel free to contact us at
[email protected]
.
Safari® Books Online
Safari Books Online is an on-demand digital library that lets you easily
search over 7,500 technology and creative reference books and videos to
find the answers you need quickly.
O’Reilly Media has uploaded this book to the Safari Books Online service. To have full
digital access to this book and others on similar topics from O’Reilly and other
pub-lishers, sign up for free at
http://my.safaribooksonline.com
.
How to Contact Us
Please address comments and questions concerning this book to the publisher:
O’Reilly Media, Inc.
1005 Gravenstein Highway North
Sebastopol, CA 95472
800-998-9938 (in the United States or Canada)
707-829-0515 (international or local)
707 829-0104 (fax)
We have a web page for this book, where we list errata, examples, and any additional
information. You can access this page at:
http://oreilly.com/catalog/0636920014386
To comment or ask technical questions about this book, send email to:
[email protected]
For more information about our books, courses, conferences, and news, see our website
at
http://www.oreilly.com
.
Find us on Facebook:
http://facebook.com/oreilly
Follow us on Twitter:
http://twitter.com/oreillymedia
CHAPTER 1
The PayPal API
Overview of the PayPal API
PayPal provides developer access to its payments system via its Name-Value Pair API,
referred to as NVP API for the remainder of this book. The NVP API allows a merchant
to access PayPal and accomplish the following tasks:
• Accept PayPal during your checkout process via Express Checkout
• Charge a credit card during a Direct Payment session
• Capture previously authorized Express Checkout and Direct Payment payments
• Reauthorize or void previous authorizations
• Pay single or multiple recipients via Mass Payment
• Issue full refunds or multiple partial refunds
• Search transactions using a specified search criteria
• Retrieve details of a specific transaction
• Accept PayPal for multiparty payments
• Accept PayPal for subscriptions or freemium models. (Freemium models offer a
basic product or service free of charge, while charging a premium for advanced
features. A good example is something like CCleaner: you can download it and use
it free, and pay for a license if you want support. You can also make donations to
future development—and they accept PayPal for both.)
PayPal’s NVP API makes it simple to integrate PayPal payments into your specific web
application. You, the merchant, construct an NVP string and post it via HTTPS (HTTP
Secure, aka TLS/SSL) to the PayPal authorization server. PayPal posts back an
NVP-formatted response that you then parse in your web application for the information
The request identifies:
• The name or method of the API operation to be performed and its version
• PayPal API credentials
• Operation-specific parameters formatted as name/value pairs
Adaptive APIs also require an
APP IDduring the request.
The PayPal API server executes the operation and returns a response containing:
• Acknowledgment of success or failure (including any warnings returned in case of
failure)
• PayPal tracking information specific to the API operation
• Response-specific information required to fulfill the request
Some features of the NVP API, such as Express Checkout, require calls to multiple API
operations. Other APIs like Direct Pay only require one call. But typically, you are
required to:
1. Call an API operation—for example,
SetExpressCheckout
—that sets up the return
URL PayPal uses to redirect your buyer’s browser after the buyer finishes on PayPal.
Other setup routines can be performed by this same API operation.
2. Call additional API operations after receiving the buyer’s permission on PayPal,
such as
GetExpressCheckoutDetails
or
DoExpressCheckoutPayment
.
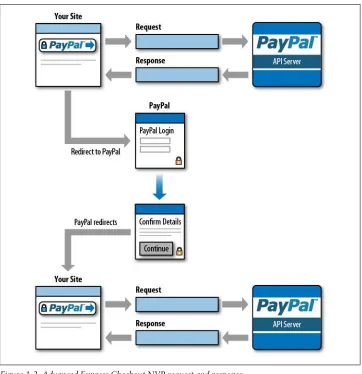
Figure 1-2
shows the execution workflow between your application and PayPal.
Figure 1-1. Basic NVP request and response
Getting Started
There are two methods for integrating PayPal’s NVP API into your application: direct
integration and integration through a Software Development Kit (referred to as SDK).
I focus on direct integration into your website and applications.
Direct Versus SDK Integration
for integration using the NVP API. There are SDKs are provided for Java, ASP.NET,
PHP, Coldfusion, and Ruby. This type of integration typically wraps the HTTPS
in-terfaces in the respective language, making the operations more natural for the
devel-oper to work with, because they are formatted in a familiar language and require just
a few simple function calls to access.
Testing Versus Live Implementation
PayPal provides a sandbox environment to use while developing your application. The
environment replicates the live environment, but true payment processing doesn’t
oc-cur when using the sandbox. Once you have fully developed and debugged your
ap-plication, you can then switch to the live environment and start taking payments.
Switching between the two is as simple as changing the target server and the API
cre-dentials used to access the server. The rest of your application will remain unchanged.
I recommend setting up your API credentials in separate files within
your application. This way, you can have your sandbox credentials in
one file and your production credentials in another file, referenced
ac-cordingly. For added security, I would locate these files on your server
outside the default webroot, so that they cannot be called directly from
the web browser.
Obtaining API Credentials
To access the NVP API, you first need to establish credentials. These identify who you
are and ensure payments get to where they need to go. You establish credentials through
either an API signature or an API certificate. You will need two sets of API credentials:
one for development and one for production.
Creating an API Signature
Developing your application only requires access to the PayPal API sandbox. You can
sign up for access to the sandbox at
http://developer.paypal.com
or
http://x.com
. Once
your account is established, you can create your test accounts and obtain your API
credentials. Sandbox accounts and live accounts require different processes to obtain
credentials. Use the following steps for a sandbox account:
1. Go to
https://developer.paypal.com
and click “Sign Up Now.”
2. Enter the requested information and click “Agree and Submit.”
3. PayPal will send you an email to complete the sign-up process.
5. Log into your sandbox account (after the initial login, this can be accessed directly
by going to
https://www.sandbox.paypal.com
).
6. Click the “Test Accounts” link.
7. Click the “Create Test Account” link.
8. Choose Seller for the account type and select the other appropriate options (going
with the defaults is highly recommended).
9. When using the defaults, API credentials are created automatically.
10. Click the API credentials link to access your API credentials.
PayPal recommends you use a different login and password for your
developer account than those for your live PayPal account. This will
allow other people on your development team to access the sandbox
and test your application without giving them access to your regular
PayPal account.
For a live account, use the following steps:
1. Log into your PayPal Account. Under “My Account”, click the “Profile” option.
2. Click “API Access.”
3. Click “Request API Credentials.”
4. Check the “Request API signature” option, and then click “Agree and Submit.”
We will use the API Signature method of specifying credentials throughout this book.
An API Signature is composed of three elements, as shown in
Table 1-1
.
Table 1-1. NVP API Signature components
API Signature component
Example value
API username sdk-three_api1.sdk.com API password QFZCWN5HZM8VBG7Q
API signature A-IzJhZZjhg29XQ2qnhapuwxIDzyAZQ92FRP5dqBzVesOkzbdUONzmOU
When you are ready to go live, you will need to activate either the Website Payments
Standard or Website Payments Pro Product on your account and establish your
cre-dentials for that account. You can sign up for your account at
http://www.paypal.com.
Creating a Name-Value Pair (NVP) Request
There are three key steps that your application must accomplish to post to the NVP
API: URL encoding, constructing the request in a format the NVP API can interpret,
and posting the request via HTTPS to the server.
URL encoding
Both the request to the PayPal server and the response from the server are URL encoded.
This method ensures that you can transmit special characters, characters not typically
allowed in a URL, and characters that have reserved meanings in a URL. For example:
NAME=John Doe&COMPANY= Acme Goods & Services
is URL encoded as follows:
NAME=John+Doe&Company=Acme+Goods+%26+Services
Each application language typically has a specific built-in URL encode method. Refer
to the list in
Table 1-2
.
Table 1-2. URL encoding methods
Application language
Function
Method name
ASP.NET
Encode
System.Web.HttpUtility.UrlEncode(buffer, Encoding.Default)Classic ASP
Encode
Server.URLEncodeJava
Encode
java.net.URLEncoder.encodePHP
Encode
urlencode()ColdFusion
Encode
URLEncodedFormatstring [, charset ]Request format
Each NVP API request is composed of required and optional parameters and their
corresponding values. Parameters are not case-sensitive, but certain values such as the
API Password, (
PWD
), are case-sensitive. The required parameters for all NVP API
trans-actions are
USER
,
PWD
,
METHOD
, and
VERSION
. The
METHOD
, or type of transaction you are
calling the NVP API to process, has an associated
VERSION
. Together the
METHOD
and
VERSION
define the exact behavior of the API operation you want performed. This will
be followed by the information posted from your application, including things such as
Item, Quantity, and Cost.
Figure 1-3
outlines the API operation of an NVP request, and
Figure 1-4
shows the
same transaction with credentials provided.
Figure 1-3. NVP request
Figure 1-4. NVP request with credentials
Putting it together
Now that we have the basic elements laid out, let’s put together a sample URL encoded
NVP request via PHP, shown in Examples
1-1
and
1-2
.
Example 1-1. developercredentials.php
<?php
//PayPal NVP API Test Developer Credentials// $paypalusername = sdk-three_api1.sdk.com; $paypalpassword = QFZCWN5HZM8VBG7Q;
$paypalsignature = A-IzJhZZjhg29XQ2qnhapuwxIDzyAZQ92FRP5dqBzVesOkzbdUONzmOU; $paypalserver = api-3t.sandbox.paypal.com/nvp
?>
Example 1-2. simpletransactionrequestprocessor.php
<?php
// PayPal NVP API Simple Transaction Request Processor//
// Include the developercredentials.php file for relevant information include("../path/outside/webroot/developercredentials.php");
// Build the credentials format of the Request String
// Designate the API Method we are calling to have handled $method = api_method_to_use;
$version = method_version_to_use; // Build Initial Request string
$request = $method."&".$version."&".$credentials;
// Walk the posted form elements to gather additional information // to pass URLEncoded to API via the request string
foreach ($_POST as $key => $value){ $value = urlencode(stripslashes($value)); $request. = "&$key=$value";
};
//Build transaction and execute via curl $ch = curl_init();
// Ensure communication is done via SSL and over a fully verified // SSL key and certificate
curl_setopt($ch, CURLOPT_SSL_VERIFYPEER, TRUE); curl_setopt($ch, CURLOPT_SSL_VERIFYHOST, TRUE); // Return response as a string from server curl_setopt($ch, CURL_RETURNTRANSFER, 1); // Post values to server via URLEncoded string curl_setopt($ch, CURLOPT_POST, 1);
curl_setopt($ch, CURLOPT_POSTFIELDS, $request); //Execute Request
$response = curl_exec($ch); ?>
Notice that in
Example 1-2
, we reference the
developercredentials.php
file from a path outside the webroot. As stated earlier, this will ensure
that no one can access your credentials file directly from their web
browser and ensures that this information stays secure. If we were
sat-isfied with this code and wanted to go to production, we would then
change this path to the location of our production credentials file.
Parsing an NVP Response
When it comes to parsing an NVP response, your application really has to accomplish
only one major step: URL decoding.
URL decoding
URL decoding the response from PayPal is basically just the reverse of URL encoding
the values to pass to PayPal. For example:
NAME=John+Doe&Company=Acme+Goods+%26+Services
is decoded as follows:
NAME=John Doe&COMPANY= Acme Goods & Services
As with URL encoding, each application language typically has a URL decode method
built into the language. Refer to the list in
Table 1-3
.
Table 1-3. URL decoding methods
Application language
Function
Method name
ASP.NET
Decode
System.Web.HttpUtility.UrlDecode(buffer, Encoding.Default)Classic ASP
Decode
No built-in function; several implementation examples are available on the Internet
Java
Decode
java.net.URLDecoder.decodePHP
Decode
urldecode()ColdFusion
Decode
URLDecodeurlEncodedString[, charset])Response format
Each NVP API response is composed of an acknowledgment (or ACK), a timestamp,
a CorrelationID unique to the transaction, and a build number stating the API version
used to process the transaction. This basic response is then followed by a series of name/
value pairs holding the transaction data, which you can parse and handle accordingly
in your application. For example, you might want to display the response information
to your customer. The acknowledgment will be one of the responses outlined in
Table 1-4
.
Table 1-4. ACK parameter values
Type of response
Value
Successful response
Success,
SuccessWithWarningPartially successful response (relevant only for parallel payments; some of
the payments were successful and others were not)
PartialSuccess
Error response code
Failure,
FailureWithWarning,
WarningPutting it together
Now that we know how the response is formatted, we can extend the
simpletrans
actionrequestprocessor.php file to handle the information returned in the
$response
string (see
Example 1-3
).
Example 1-3. simpletransactionrequestprocessor.php
//Parse $Response and handle values $decoderesponse = explode ('&', $response);
foreach($decoderesponse as $key => $value){
switch ($key){ case "ACK":
$ack = htmlspecialchars(urldecode($value)); break;
case "var1":
default: break; } }
//Your code to display or handle values returned...
CHAPTER 2
PayPal Express Checkout
Express Checkout is PayPal’s premier checkout solution. It allows a customer to check
out on your site, log into his PayPal account, and purchase your goods or services.
Express Checkout puts PayPal in charge of data security with regard to the customer’s
billing and credit card information and removes that liability from the merchant. In
this chapter, we will look at generic versus Express Checkout workflows, Express
Checkout API operations, a simple Express Checkout integration, as well as an in-depth
integration method.
Checkout Process Workflows
Let’s start by looking at the process flow of a typical checkout and an Express Checkout.
Generic Checkout Workflow
Figure 2-1
shows the typical checkout flow a user experiences when buying goods or
services online, which includes the following steps:
1. Customer clicks the checkout button on your shopping cart page.
2. Customer enters all shipping information.
3. Customer chooses her payment method and provides all the relevant billing and
payment information.
4. Customer reviews order and pays.
5. Customer receives her order confirmation.
Figure 2-1. Generic checkout workflow
Express Checkout Workflow
Figure 2-2
shows the checkout workflow a user experiences when using PayPal’s
Express Checkout:
1. Customer chooses Express Checkout by clicking the “Check out with PayPal”
button on your site.
2. Customer logs into PayPal.
3. Customer reviews the transaction on PayPal.
4. Customer confirms the order and pays from your site.
5. Customer receives an order confirmation.
Figure 2-2. PayPal Express Checkout workflow
With Express Checkout, the customer does not need to enter his billing and shipping
information each time. Consequently, customers can make purchases and move on to
other tasks much more quickly.
Generic Versus Express Checkout Workflow
Table 2-1. Generic checkout versus Express Checkout
Checkout step
Generic checkout
Express Checkout
Select the checkout button
✓
✓
Enter shipping info
✓
-Select payment method
✓
-Enter payment information
✓
-Review order
✓
✓
Confirm order
✓
✓
Express Checkout Flow
To fully implement Express Checkout, you must allow your customers two entry points
into the Express Checkout payment process.
Figure 2-3
outlines the complete checkout
flow for Express Checkout.
Figure 2-3. Complete Express Checkout flow
Figure 2-4
outlines the Checkout Entry Point, which requires the following steps:
1. Customer clicks the “Check out with PayPal” button.
2. Customer logs into PayPal.
3. Customer confirms shipping and billing information on PayPal’s site.
4. Customer is returned to your application for final review and clicks the Purchase
button.
5. Customer is returned to a confirmation screen related to the purchase.
Figure 2-4. Checkout Entry Point
Figure 2-5
outlines the Payment Method Entry Point, which requires the following
steps:
1. Customer clicks the checkout button on your application.
2. Customer inputs shipping information into your application.
3. Customer chooses PayPal from the list of payment methods.
4. Customer logs into PayPal.
5. Customer reviews payment information on PayPal’s site.
6. Customer is returned to your application for final review and clicks the Purchase
button.
7. Customer is returned to a confirmation screen related to the purchase.
A token is a value assigned by PayPal that associates the execution of API operations
and commands with a specific instance of a user experience flow. Tokens are not shown
Figure 2-5. Payment Method Entry Point
PayPal Express Checkout API Operations
The PayPal NVP API provides four key methods related to Express Checkout. These
operations initialize the transaction, obtain the buyer information and handle the
pay-ment, and then complete the transaction.
Table 2-2
outlines these methods.
Table 2-2. Express Checkout API operations
API operation
Description
SetExpressCheckout
Sets up the Express Checkout transaction. You can specify information to customize the look and
feel of the PayPal site and the information it displays. You must include the following information:
•
URL to the page on your website to which PayPal redirects after the buyer logs into PayPal
and approves the payment successfully
•
URL to the page on your website to which PayPal redirects if the buyer cancels the
transaction
•
Total amount of the order or your best estimate of the total (this should be as accurate
as possible)
GetExpressCheckout Details
Obtains information about the buyer from PayPal, including shipping information.
DoExpressCheckout Payment
Completes the Express Checkout transaction, including the actual total amount of the order.
Callback
Updates the PayPal Review page with the relevant shipping options, insurance, and tax
information.
SetExpressCheckout
SetExpressCheckout
initializes the Express Checkout session. It allows you to pass
var-iables that format how the PayPal pages look and specify where to redirect the buyer’s
browser based upon success of the payment transaction.
Table 2-3
outlines the fields
required for
SetExpressCheckout
requests, and
Table 2-4
outlines the field required for
SetExpressCheckout
responses.
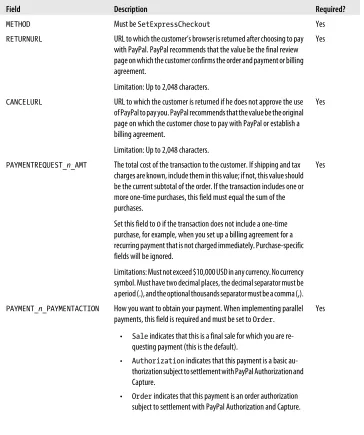
Table 2-3. SetExpressCheckout request fields
Field
Description
Required?
METHOD
Must be
SetExpressCheckoutYes
RETURNURL
URL to which the customer’s browser is returned after choosing to pay
with PayPal. PayPal recommends that the value be the final review
page on which the customer confirms the order and payment or billing
agreement.
Limitation: Up to 2,048 characters.
Yes
CANCELURL
URL to which the customer is returned if he does not approve the use
of PayPal to pay you. PayPal recommends that the value be the original
page on which the customer chose to pay with PayPal or establish a
billing agreement.
Limitation: Up to 2,048 characters.
Yes
PAYMENTREQUEST_n_AMT
The total cost of the transaction to the customer. If shipping and tax
charges are known, include them in this value; if not, this value should
be the current subtotal of the order. If the transaction includes one or
more one-time purchases, this field must equal the sum of the
purchases.
Set this field to
0if the transaction does not include a one-time
purchase, for example, when you set up a billing agreement for a
recurring payment that is not charged immediately. Purchase-specific
fields will be ignored.
Limitations: Must not exceed $10,000 USD in any currency. No currency
symbol. Must have two decimal places, the decimal separator must be
a period (.), and the optional thousands separator must be a comma (,).
Yes
PAYMENT_n_PAYMENTACTION
How you want to obtain your payment. When implementing parallel
payments, this field is required and must be set to
Order.
•
Saleindicates that this is a final sale for which you are
re-questing payment (this is the default).
•
Authorizationindicates that this payment is a basic
au-thorization subject to settlement with PayPal Auau-thorization and
Capture.
•
Orderindicates that this payment is an order authorization
subject to settlement with PayPal Authorization and Capture.
Field
Description
Required?
If the transaction does not include a one-time purchase, this field is
ignored. You cannot set this value to
Salein
SetExpressCheck outrequest and then change this value to
Authorizationor
Order
on the final API
DoExpressCheckoutPaymentrequest. If
the value is set to
Authorizationor
Orderin
SetExpressCheckout
, the value may be set to
Saleor the same
value (either
Authorizationor
Order) in
DoExpressCheck outPayment.
Limitation: Up to 13 single-byte alphabetic characters.
A complete list of all fields allowed for the
SetExpressCheckout
request method can
be found in the online documentation located at
http://www.x.com/community/ppx/
documentation
.
Table 2-4. SetExpressCheckout response fields
Field
Description
TOKEN
A time-stamped token by which you identify to PayPal that you are processing this payment with Express Checkout.
The token expires after three hours. If you set the token in the
SetExpressCheckoutrequest, the value of the
token in the response is identical to the value in the request.
Limitation: Up to 20 single-byte characters.
A complete list of all fields allowed for the
SetExpressCheckout
response method can
be found in the online documentation located at
http://www.x.com/community/ppx/
documentation
.
GetExpressCheckoutDetails
GetExpressCheckoutDetails
obtains information about an Express Checkout
transac-tion. Only the request has required fields, as the response just echoes back the
infor-mation and values enabled in
SetExpressCheckout
.
Table 2-5
describes the required
GetExpressCheckoutDetails
fields.
Table 2-5. GetExpressCheckoutDetails request fields
Field
Description
METHOD
Must be
GetExpressCheckoutDetailsTOKEN
A time-stamped token, limited to 20 single-byte characters, the value of which was returned by the
SetExpressCheckout
response
A full listing of the
GetExpressCheckoutDetails
response fields can be found in the
DoExpressCheckoutPayment
DoExpressCheckoutPayment
completes the Express Checkout transaction and returns the
payment response. If you set up a billing agreement in your
SetExpressCheckout
API
call, the billing agreement is created when you call the
DoExpressCheckoutPayment
API
operation.
Table 2-6
lists the
DoExpressCheckoutPayment
request fields, and
Table 2-7
describes the response fields.
Table 2-6. DoExpressCheckoutPayment request fields
Field
Description
METHOD
Must be
DoExpressCheckoutPayment.
TOKEN
A time-stamped token, the value of which was returned by the
SetExpressCheckout
response and passed on to the
GetExpressCheckoutDetails
request.
Limitation: Up to 20 single-byte characters.
PAYERID
Unique PayPal customer account identification number as returned by
the
GetExpressCheckoutDetailsresponse.
Limitation: Up to 13 single-byte alphanumeric characters.
PAYMENTREQUEST_n_AMT
The total cost of the transaction to the customer (required). If shipping
and tax charges are known, include them in this value; if not, this value
should be the current subtotal of the order.
If the transaction includes one or more one-time purchases, this field must
equal the sum of the purchases.
Set this field to
0if the transaction does not include a one-time purchase,
for example, when you set up a billing agreement for a recurring payment
that is not charged immediately. Purchase-specific fields will be ignored.
Limitations: Must not exceed $10,000 USD in any currency. No currency
symbol. Must have two decimal places, the decimal separator must be a
period (.), and the optional thousands separator must be a comma (,).
PAYMENTREQUEST_n_PAYMENTACTION
How you want to obtain your payment. When implementing parallel
payments, this field is required and must be set to
Order.
•
Saleindicates that this is a final sale for which you are requesting
payment (this is the default).
•
Authorizationindicates that this payment is a basic
authori-zation subject to settlement with PayPal Authoriauthori-zation and
Cap-ture.
•
Orderindicates that this payment is an order authorization
sub-ject to settlement with PayPal Authorization and Capture.
If the transaction does not include a one-time purchase, this field is
ignored.
Field
Description
Authorization
or
Orderin
SetExpressCheckout, the value
may be set to
Saleor the same value (either
Authorizationor
Order
) in
DoExpressCheckoutPayment.
Limitation: Up to 13 single-byte alphabetic characters.
PAYMENTREQUEST_n_PAYMENTREQUESTID
A unique identifier of the specific payment request, which is required for
parallel payments.
Limitation: Up to 127 single-byte character limit.
A full listing of the
DoExpressCheckoutPayment
request fields can be found in the online
documentation located at
http://www.x.com/community/ppx/documentation
.
Table 2-7. DoExpressCheckoutPayment response fields
Field
Description
TOKEN
A time-stamped token, the value of which was returned by the
SetExpressCheckout
response and passed on to the
GetExpressCheckoutDetails
request.
Limitation: Up to 20 single-byte characters.
PAYMENTTYPE
Information about the payment.
SUCCESSPAGEREDIRECTREQUESTED
Flag that indicates whether you need to redirect the customer to back to
PayPal after completing the transaction.
PAYMENTINFO_n_TRANSACTIONID
Unique transaction ID of the payment. If the
PaymentActionof the
request was
Authorizationor
Order, this value is your
Authori zationIDfor use with the Authorization and Capture APIs.
Limitation: Up to 19 single-byte characters.
PAYMENTINFO_n_TRANSACTIONTYPE
The type of transaction. Valid values are
cartand
express-checkout.
Limitation: Up to 15 single-byte characters.
PAYMENTINFO_n_PAYMENTTYPE
Indicates whether the payment is instant or delayed. Valid values are
none
,
echeck, and
instant.
Limitation: Up to 7 single-byte characters.
PAYMENTINFO_n_ORDERTIME
The time/date stamp of the payment.
PAYMENTINFO_n_AMT
The final amount charged, including any shipping and taxes from your
Merchant Profile.
Limitations: Does not exceed $10,000 USD in any currency. No currency
symbol. Regardless of currency, the decimal separator is a period (.), and
the optional thousands separator is a comma (,). Equivalent to nine
char-acters maximum for USD.
PAYMENTINFO_n_FEEAMT
PayPal fee amount charged for the transaction.
Field
Description
PAYMENTINFO_n_TAXAMT
Tax charged on the transaction.
Limitations: Does not exceed $10,000 USD in any currency. No currency
symbol. Regardless of currency, the decimal separator is a period (.), and
the optional thousands separator is a comma (,). Equivalent to nine
char-acters maximum for USD.
PAYMENTINFO_n_EXCHANGERATE
Exchange rate if a currency conversion occurred. Relevant only if you are
billing in the customer’s nonprimary currency. If the customer chooses to
pay with a currency other than the primary currency, the conversion occurs
in the customer’s account.
Limitations: A decimal value that does not exceed 17 characters, including
decimal points.
PAYMENTINFO_n_PAYMENTSTATUS
The status of the payment, which will be one of the following:
•
None: No status.
•
Canceled-Reversal: A reversal has been canceled, for
exam-ple, when you win a dispute and the funds for the reversal are
returned to you.
•
Completed: The payment has been completed and the funds
have transferred successfully to your account.
•
Denied: You denied the payment. This will occur only if the
pay-ment was previously pending because of reasons described in the
PendingReason
field.
•
Expired: The authorization period for the payment has expired.
•
Failed: The payment failed. This occurs only when the payment
was made from your customer’s bank draft account.
•
In-Progress: Transaction has not terminated, most likely due
to an authorization awaiting completion.
•
Partially-Refunded: Payment has been partially refunded.
•
Pending: Payment is still pending for reasons described in the
PendingReason
field.
•
Refunded: You refunded the payment.
•
Reversed: Payment was reversed due to a charge back or other
reversal. The funds have been removed from your account balance
and returned to the buyer. The reason will be described in the
ReasonCode
field.
•
Processed: Payment has been accepted.
•
Voided: Authorization for the transaction has been voided.
PAYMENTINFO_n_PROTECTION ELIGIBILITY
The type of seller protection in force for the transaction, which is one of
the following values:
•
Eligible: Seller is protected by PayPal’s Seller protection policy
for Unauthorized Payments and Item Not Received.
•
PartiallyEligible: Seller is protected by PayPal’s Seller
Protection Policy for Item Not Received.
Field
Description
•
Ineligible: Seller is not protected under the Seller Protection
Policy.
PAYMENTREQUEST_n_PAYMENTREQUESTID
The unique identifier of the specific payment request. The value should
match the one passed in the
DoExpressCheckoutrequest.
Limitation: Up to 127 single-byte characters.
L_PAYMENTINFO_n_FMFfilterIDn
Filter ID, including the filter type (
PENDING,
REPORT, or
DENY), the
filter ID, and the entry number,
n, starting from 0. Filter ID is one of the
following values:
•
1= AVS No Match
•
2= AVS Partial Match
•
3= AVS Unavailable/Unsupported
•
4= Card Security Code (CSC) Mismatch
•
5= Maximum Transaction Amount
•
6= Unconfirmed Address
•
7= Country Monitor
•
8= Large Order Number
•
9= Billing/Shipping Address Mismatch
•
10= Risky Zip Code
•
11= Suspected Freight Forwarder Check
•
12= Total Purchase Price Minimum
•
13= IP Address Velocity
•
14= Risky Email Address Domain Check
•
15= Risky Bank Identification Number (BIN) Check
•
16= Risky IP Address Range
•
17= PayPal Fraud Model
L_PAYMENTINFO_n_FMFfilterNAMEn
Filter name, including the filter type (
PENDING,
REPORT, or
DENY), the
filter
NAME, and the entry number,
n, starting from 0.
PAYMENTREQUEST_n_SHORTMESSAGE
Payment error short message.
PAYMEMNTREQUEST_n_LONGMESSAGE
Payment error long message.
PAYMENTREQUEST_n_ERRORCODE
Payment error code.
PAYMENTREQUEST_n_SEVERITYCODE
Payment error severity code.
PAYMENTREQUEST_n_ACK
Application-specific error values indicating more about the error
condition.
SHIPPINGCALCULATIONMODE
Describes how the options that were presented to the user were
deter-mined, and is one of the following values:
•
API - Callback•
API - FlatrateField
Description
SHIPPINGOPTIONISDEFAULT
Is true if the buyer chose the default shipping option. Value will be either
TRUE
or
FALSE.
SHIPPINGOPTIONAMOUNT
The shipping amount that was chosen by the buyer. Limitations: Must
not exceed $10,000 USD in any currency. No currency symbol. Must have
two decimal places, the decimal separator must be a period (.), and the
optional thousands separator must be a comma (,).
SHIPPINGOPTIONNAME
This is true if the buyer chose the default shipping option.
PAYMENTREQUEST_n_SELLERPAYPAL ACCOUNTID
Unique identifier for the merchant. For parallel payments, this field
con-tains either the Payer ID or the email address of the merchant.
Callback
Callback
allows you to return any relevant shipping information to the PayPal review
page.
Table 2-8
outlines the required Fields for
Callback
requests and
Table 2-9
outlines
the required fields for
Callback
responses.
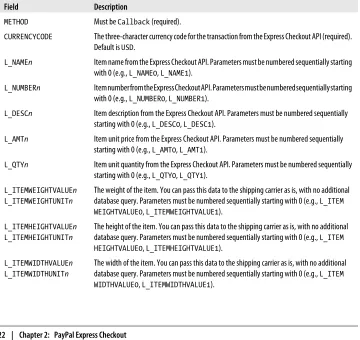
Table 2-8. Callback request fields
Field
Description
METHOD
Must be
Callback(required).
CURRENCYCODE
The three-character currency code for the transaction from the Express Checkout API (required).
Default is
USD.
L_NAMEn
Item name from the Express Checkout API. Parameters must be numbered sequentially starting
with 0 (e.g.,
L_NAME0,
L_NAME1).
L_NUMBERn
Item number from the Express Checkout API. Parameters must be numbered sequentially starting
with 0 (e.g.,
L_NUMBER0,
L_NUMBER1).
L_DESCn
Item description from the Express Checkout API. Parameters must be numbered sequentially
starting with 0 (e.g.,
L_DESC0,
L_DESC1).
L_AMTn
Item unit price from the Express Checkout API. Parameters must be numbered sequentially
starting with 0 (e.g.,
L_AMT0,
L_AMT1).
L_QTYn
Item unit quantity from the Express Checkout API. Parameters must be numbered sequentially
starting with 0 (e.g.,
L_QTY0,
L_QTY1).
L_ITEMWEIGHTVALUEn
L_ITEMWEIGHTUNITn
The weight of the item. You can pass this data to the shipping carrier as is, with no additional
database query. Parameters must be numbered sequentially starting with 0 (e.g.,
L_ITEM WEIGHTVALUE0,
L_ITEMWEIGHTVALUE1).
L_ITEMHEIGHTVALUEn
L_ITEMHEIGHTUNITn
The height of the item. You can pass this data to the shipping carrier as is, with no additional
database query. Parameters must be numbered sequentially starting with 0 (e.g.,
L_ITEM HEIGHTVALUE0,
L_ITEMHEIGHTVALUE1).
L_ITEMWIDTHVALUEn
L_ITEMWIDTHUNITn
Field
Description
L_ITEMLENGTHVALUEn
L_ITEMLENGTHUNITn
The length of the item. You can pass this data to the shipping carrier as is, with no additional
database query. Parameters must be numbered sequentially starting with 0 (e.g.,
L_ITEM LENGTHVALUE0,
L_ITEMLENGTHVALUE1).
SHIPTOSTREET
The first street address. This is required if using a shipping address. Limitation: Up to 100
single-byte characters.
SHIPTOSTREET2
The second street address. Limitation: Up to 100 single-byte characters.
SHIPTOCITY
The name of the city. This is required if using a shipping address. Limitation: Up to 40
single-byte characters.
SHIPTOSTATE
The state or province. Required if using a shipping address. Limitation: Up to 40 single-byte
characters.
SHIPTOZIP
U.S. postal zip code or other country-specific postal code. Required if using a U.S. shipping
address; may be required for other countries. Limitation: Up to 20 single-byte characters.
SHIPTOCOUNTRY
Country code. Required if using a shipping address. Limitation: Up to two single-byte characters.
A complete list of all fields allowed for the Callback request method and response
method can be found in the online documentation at
http://www.x.com/community/
ppx/documentation
.
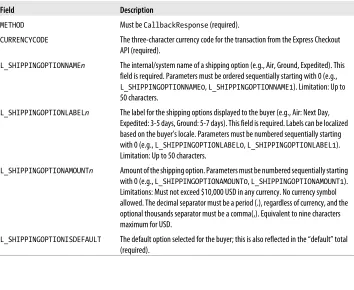
Table 2-9. Callback response fields
Field
Description
METHOD
Must be
CallbackResponse(required).
CURRENCYCODE
The three-character currency code for the transaction from the Express Checkout
API (required).
L_SHIPPINGOPTIONNAMEn
The internal/system name of a shipping option (e.g., Air, Ground, Expedited). This
field is required. Parameters must be ordered sequentially starting with 0 (e.g.,
L_SHIPPINGOPTIONNAME0
,
L_SHIPPINGOPTIONNAME1). Limitation: Up to
50 characters.
L_SHIPPINGOPTIONLABELn
The label for the shipping options displayed to the buyer (e.g., Air: Next Day,
Expedited: 3-5 days, Ground: 5-7 days). This field is required. Labels can be localized
based on the buyer’s locale. Parameters must be numbered sequentially starting
with 0 (e.g.,
L_SHIPPINGOPTIONLABEL0,
L_SHIPPINGOPTIONLABEL1).
Limitation: Up to 50 characters.
L_SHIPPINGOPTIONAMOUNTn
Amount of the shipping option. Parameters must be numbered sequentially starting
with 0 (e.g.,
L_SHIPPINGOPTIONAMOUNT0,
L_SHIPPINGOPTIONAMOUNT1).
Limitations: Must not exceed $10,000 USD in any currency. No currency symbol
allowed. The decimal separator must be a period (.), regardless of currency, and the
optional thousands separator must be a comma(,). Equivalent to nine characters
maximum for USD.
Simple Express Checkout Integration
The simplest Express Checkout integration requires execution of only two PayPal API
operations:
SetExpressCheckout
and
DoExpressCheckoutPayment
. For example,
option-ally, you can call
GetExpressCheckoutDetails
to error check the information provided
to
SetExpressCheckout
against the form values and provide the customer a Confirm
Transaction screen before finalizing the payment.
Setting Up the Transaction
To set up an Express Checkout transaction, you must first invoke the
SetExpressCheck
out
API to provide sufficient information to initiate the payment flow and redirect your
customer to PayPal if the operation is successful.
When you initiate the Express Checkout transaction, you specify values in the
Set
ExpressCheckout
request, and then call the API. The values you specify control the
PayPal page flow and options available to your customers.
Let’s look at setting up a simple Express Checkout transaction.
1. First we need to specify the total dollar amount of the transaction, if known;
oth-erwise, specify the subtotal. Refer to
Table 2-3
’s
PAYMENTREQUEST_
n
_AMT
field
description for requirements and restrictions.
AMT=
amount
CURRENCYCODE=
currencyID
2. Specify the return URL. This is the page on your site that you want PayPal to
redirect the customer to after the customer logs into PayPal and approves the
pay-ment. Typically, the customer is redirected to a secure page on your site via SSL
(https://).
RETURNURL=
return_url
3. Specify the cancel URL. This is the page on your site you want PayPal to redirect
the customer to if the buyer does not approve the payment. Typically, the customer
is redirected to a secure page on your site via SSL (https://).
CANCELURL=
cancel_url
4. Specify the payment action. Even though the action is a
Sale
, it is best to explicitly
set the payment action. Refer to
Table 2-3
’s
PAYMENT_
n
_PAYMENTACTION
field
de-scription for allowed values.
5. Execute the
SetExpressCheckoutAPI
operation and test that the response was
suc-cessful. To test for success, check to see whether the API returns a
TOKEN
and other
You can piggyback parameters between pages on your site in the return
URL call as well as the cancel URL call. For example, you can set your
return URL to specify additional parameters using something like
https://your.domain.ext/returnpage.php?param1=val1¶m2=val2,
etc. This allows you to pass parameters from the transaction without
making a
GetExpressCheckoutDetailsAPI call, or pass custom
parame-ters not provided by the
SetExpressCheckoutAPI.
To execute the transaction, you must invoke the
DoExpressCheckoutPayment
operation.
This is accomplished through the following steps:
1. Specify the TOKEN value returned by PayPal when it redirects the buyer’s browser
to your site.
TOKEN=
tokenValue
2. Specify the payer ID returned by PayPal when it redirects the customer’s browser
to your site.
PAYERID=
id
3. Specify the total amount of the payment, including shipping, handling, and tax,
and include the currency if not in U.S. dollars.
AMT=
amount
CURRENCYCODE=
currencyID
4. Specify the payment action. Even though the action is a
Sale
, it is best to explicitly
set the payment action. Refer to
Table 2-3
’s
PAYMENT_
n
_PAYMENTACTION
field
de-scription for allowed values.
5. Execute the
DoExpressCheckoutAPI
operation, and test that the response was
successful.
Express Checkout Integration
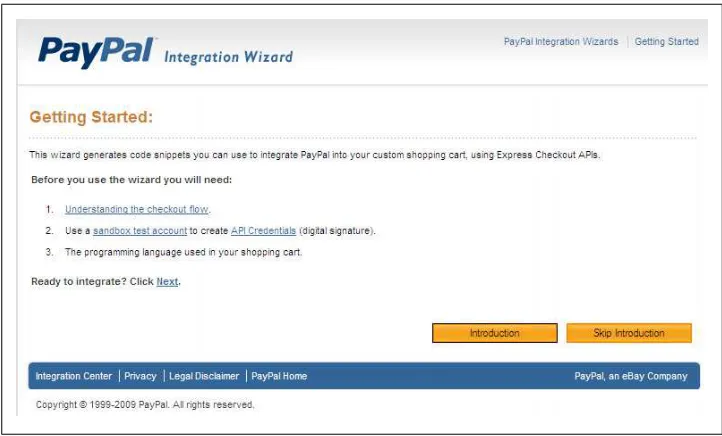
PayPal Express Checkout is the quickest and best solution for straight-out shopping
cart checkouts. PayPal’s Integration Wizard, found at
https://www.paypal-labs.com/
integrationwizard/ecpaypal/main.php
, helps you implement Express Checkout on your
site. The wizard takes you through five configuration steps, described next.
The Integration Wizard starts by presenting a basic overview of what the tool will do.
Figure 2-6. Express Checkout Integration Wizard opening screen
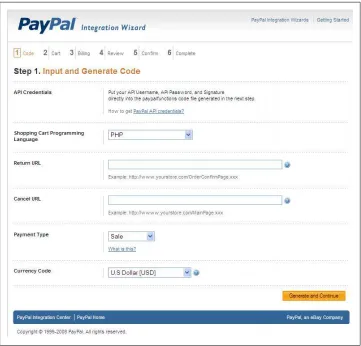
Step 1 allows you to choose the programming language you want to use for the
inte-gration (see
Figure 2-7
). For the purposes of this example we are going to use PHP, but
you can choose any of the following options:
• Active Server Pages (ASP)
• ASP.NET-C#(ASPX)
• ASP.NET-VB.NET(ASPX)
• Java Server Pages (JSP)
• Java SDK
• PHP
You also are asked to specify the return and cancel URLs. The return URL is where the
purchaser will be returned to once the transaction is completed. The cancel URL is
where the purchaser is sent to if she cancels the checkout, typically back to your site’s
shopping cart. The payment type will be one of the following:
•
Sale
•
Authorization
Figure 2-7. Express Checkout Integration Wizard step 1
The Currency Code section contains a list of currencies, both foreign and domestic,
from which to choose. For this example, we will choose U.S. Dollar [USD].
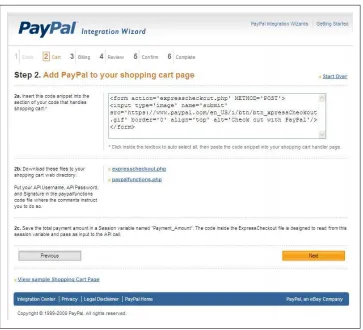
The form element generated in step 2 (see
Figure 2-8
) wraps around your shopping cart
order form, and allows you to submit the payment via PayPal (see
Example 2-6
). It will
also generate a button on-screen. You must be sure to enable a PHP
$_SESSION
and set
the variable
$_SESSION
['Payment_Amount'] that contains the amount of the purchase;
Figure 2-8. Express Checkout Integration Wizard step 2
You now have the option to download expresscheckout.php (see
Example 2-1
), and
paypalfunctions.php (see
Example 2-2
). You will need to modify the
paypalfunc-tion.php file with your API credentials. For instructions on creating those credentials,
refer to
“Creating an API Signature” on page 4
. Additionally, after you have completed
testing and are ready to go live, change
$SandboxFlag='true'
to
$SandboxFlag=
'false'
. This will change the endpoints to the live PayPal endpoint.
For security reasons, I recommend putting your paypalfunctions.php file
in a location accessible to expresscheckout.php and the other generated
files, but outside your main webroot. This will help to prevent anyone
from potentially obtaining your API credentials.
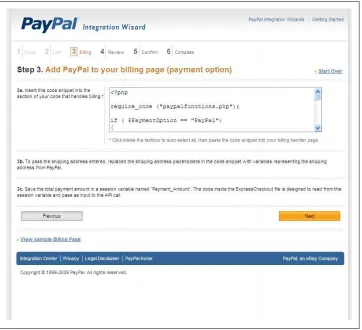
Step 3 generates code for your billing page that will be used if someone chooses PayPal
from the billing options page instead of the main shopping cart page (see
Figure 2-9
).
Figure 2-9. Express Checkout Integration Wizard step 3
You must be sure to enable a PHP
$_SESSION
and set the variable
$_SESSION
['Pay
ment_Amount']that contains the amount of the purchase; otherwise, the generated code
will not work properly. You can copy the code from the box generated by the Wizard,
and paste it into your billing handler (see
Example 2-3
).
Step 4 (
Figure 2-10
) generates code to add to your shipping page. You can copy the
code from the box generated by the Wizard and paste it into your shipping handler (see
Example 2-4
). Step 5 (
Figure 2-11
) generates code for your order confirmation page.
You can copy the code from the box generated by the Wizard and paste it into your
order confirmation handler (see
Example 2-5
). Step 6 completes the Integration
Figure 2-10. Express Checkout Integration Wizard step 4
Figure 2-12. Express Checkout Integration Wizard step 6
Example 2-1. paypalfunctions.php
<?php
/******************************************** PayPal API Module
Defines all the global variables and the wrapper functions ********************************************/
$PROXY_HOST = '127.0.0.1'; $PROXY_PORT = '808';
$SandboxFlag = true;
//' PayPal API Credentials
//' Replace <API_USERNAME> with your API Username //' Replace <API_PASSWORD> with your API Password //' Replace <API_SIGNATURE> with your Signature
$API_UserName="mdbald_1287976381_biz_api1.michaelbalderas.com"; $API_Password="1287976406";
// BN Code is only applicable for partners $sBNCode = "PP-ECWizard";
/*
' Define the PayPal Redirect URLs.
' This is the URL where the buyer is first sent to authorize payment with their ' PayPal account. Change the URL depending on whether you are testing on the sandbox ' or the live PayPal site.
$API_Endpoint = "https://api-3t.sandbox.paypal.com/nvp";
$PAYPAL_URL = "https://www.sandbox.paypal.com/webscr?cmd=_express-checkout&token="; }
else {
$API_Endpoint = "https://api-3t.paypal.com/nvp";
$PAYPAL_URL = "https://www.paypal.com/cgi-bin/webscr?cmd=_express-checkout&token="; }
$USE_PROXY = false; $version="64";
if (session_id() == "") session_start();
/* An express checkout transaction starts with a token that identifies to PayPal your transaction. In this example, when the script sees a token, the script knows that the buyer has already authorized payment through PayPal. If no token was found, the action is to send the buyer to PayPal to first authorize payment. */
/*
' Purpose: Prepares the parameters for the SetExpressCheckout API Call.
' Inputs:
' paymentAmount: Total value of the shopping cart ' currencyCodeType: Currency code value the PayPal API