IMPLEMENTATION AND TESTING
5.1 Implementation of ALBP algorithm
The Advanced Local Binary Pattern had several important method, such
as rumusALBP, prosesALBP, hitHistogram. To identify the image, used chi square
to compare the histogram. And these are the code:
1.public void rumusALBP(String namaGambar,String asal) 2. {
7. for(int j=1;j<image.getWidth()-1;j++){ 8. ambilNilaiTengah=ambilColor(i,j);
rumusALBP() is the first method that called when doing ALBP feature
extraction. In this method, there’s hasilALBP[][] that would record the result
ALBP value of each pixel. Line 6-20 there’s double loop, that used to move a
pointer into each pixel in the image, then it should find all the neighbors and
record the pixel value into nilaiTetangga[]. After get all the value of the neighbors,
it should process in prosesALBP() and safe the result from prosesALBP() into
hasilALBP[][].
1. public int prosesALBP (int ambilNilaiTengah ,int[]
prosesALBP() method would calculate and find the minimum value of
ALBP. So the center pixel (ambilNilaiTengah) should be compare to each of that
it would get value 1 in binary, 0 if the neighbor is smaller. Than the binary value
should be convert into decimal. There is variable called shift, to give shiting effect
that would help to find the minimum value, by shifting the binary. Than the
minimum value should be return into rumusALBP().
1.public void hitHistogram(String asal) 2. {
9. for(int j=0;j<hasilALBP[0].length;j++) 10. {
After rumusALBP() is finished, the hitHistogram() should be execute. In
this method there is array of int named histogram[], the length is 256 because the
histogram of LBP consist of value 0 until 255. line 3-6 is to set histogram[x] value
to 0. line 7-13 is to count the histogram, if the value of hasilALBP[][] same with
histogram index, so it would count++. Then it should call saveHistogram() to save
the result.
1.public void chiSquare() 2. {
3. float chi[]= new float[perIndexTrain.length]; 4. float atas,bawah;
5. int indexChiMin;
6. for(int i=0;i<perIndexTrain.length;i++) 7. {
8. chi[i]=0;
9. for(int j=0;j<indexTest.length;j++) 10. {
11. atas=perIndexTrain[i][j]-indexTest[j]; 12. bawah=perIndexTrain[i][j]+indexTest[j]; 13. if(bawah>0)
14. {
15. chi[i]=chi[i]+((atas*atas)/bawah); 16. }
18. }
19. indexChiMin=cariChiMin(chi); 20. if(chi[indexChiMin]<1200) 21. {
22. System.out.println("nilai chi square = "+chi[indexChiMin] +" \ngambar test ini adalah " + trainImage[indexChiMin][1]); 23. }
chiSquare() is the method to calculate the Testing Histogram and Training
Histogram. Line 6-18 is double loop, index i is a pointer for histogram training, j
is a pointer for histogram index. Chi[] is a array of float to record each chi value
of training histograms. After the calculate all the chi[] value, it should call
cariChiMin() to find the minimum chi square.
1. public int cariChiMin(float chi[]) 2. {
3. float min=chi[0]; 4. int index=0;
5. for(int i=0; i<chi.length;i++) 6. {
7. if(min>chi[i])
8. {
cariChiMin() should compare each chi[] value, and find the smallest value,
and record the index, then return the index to chiSquare().
5.2 Implementation of Chain Code Algorithm
In Chain Code algorithm there are some several important method that
used, those are inisialisasi, cariStartPoint, prosesChain. And after record the chain
code direction, compare the direction of testing result and training result with
compareChainCode method. And these are the code.
1.public void inisialisasi() 2. {
5. for(int x=0;x<imageAsli.getWidth();x++) 6. {
7. Color ambil=new Color(imageAsli.getRGB(x,y));
8. int warnanya = ambil.getRed(); 9. node2d[y][x]=new Node();
10. node2d[y][x].setPixel(warnanya); 11. node2d[y][x].setVisited(false); 12. }
13. } 14. }
Method inisialisasi() used in Chain Code algorithm, this method would get
and record the value of each pixel, and safe it to node2d[][]. Node2d contain int
pixel, and boolean visited.
1.public void cariStartPoint() 2. {
3. for(int y=0; y<node2d.length;y++) 4. {
5. for(int x=0;x<node2d[0].length;x++) 6. {
After inisialisasi(), method cariStartPoint() should be execute, this method
is would check each pixel from the top left, until the bottom right, to find the first
black pixel. The first black pixel would be recorded its coordinat x,y. Then the
looping would be end.
1. public void prosesChain() 2. {
prosesChain() would be execute after cariStartPoint(), this method would
call recurChain() and parsing the coordinate x , y start point.
2. {
3. if(x+1<node2d[0].length) 4. {
5. if(node2d[y][x+1].getPixel()==0 && !node2d[y] [x+1].getVisited())
11. if(tempX!=startPointX || tempY != startPointY)
12. {
26. if(x+1<node2d[0].length && y+1<node2d.length) 27. {
28. if(node2d[y+1][x+1].getPixel()==0 && !node2d[y+1] [x+1].getVisited())
34. if(tempX!=startPointX || tempY != startPointY)
35. {
51. if(node2d[y+1][x].getPixel()==0 && !node2d[y+1] [x].getVisited())
53. tempX=x;
54. tempY=y+1;
55. node2d[y+1][x].setVisited(true); 56. tempChainCode=tempChainCode+"6 ";
57. if(tempX!=startPointX || tempY != startPointY)
58. {
72. if(x-1>=0 && y+1<node2d.length) 73. {
74. if(node2d[y+1][x-1].getPixel()==0 && !node2d[y+1][x-1].getVisited())
80. if(tempX!=startPointX || tempY != startPointY)
81. {
97. if(node2d[y][x-1].getPixel()==0 && !node2d[y][x-1].getVisited())
103. if(tempX!=startPointX || tempY != startPointY)
105. if(bisaGerak(tempX,tempY))
118. if(x-1>=0 && y-1>=0)
119. {
120. if(node2d[y-1][x-1].getPixel()==0 && !node2d[y-1][x-1].getVisited())
126. if(tempX!=startPointX|| tempY != startPointY)
127. {
143. if(node2d[y-1][x].getPixel()==0 && !node2d[y-1] [x].getVisited())
149. if(tempX!=startPointX || tempY != startPointY)
157. else
165. if(y-1>=0 && x+1<node2d[0].length)
166. {
167. if(node2d[y-1][x+1].getPixel()==0 && !node2d[y-1] [x+1].getVisited())
173. if(tempX!=startPointX || tempY != startPointY)
174. {
neighbors, and before move to the next connected pixel, it should call bisaGerak()
method to check if the pointer move to that pixel could the pointer find another
posible move or not. If bisaGerak() return true, so the pointer should move to the
next pixel and record the direction in tempChainCode, but before move, the
boolean visited should be update to true. The pixel that already visited, could not
be visited again. Do the recursion until there are no move avaible. Then the chain
1.public void compareChainCode()
8. if(chainCodeTest.length >= chainCodeTrain[i].length) 9. {
10. for(int z=0;z<8;z++) 11. {
12. for(int shift=0;shift<chainCodeTrain[i].length;shift++) 13. {
14. count=0;
15. for(int j=0;j<chainCodeTest.length;j++) 16. {
17. if(j>=chainCodeTrain[i].length){} 18. else
19. {
20. if((chainCodeTrain[i][(j+shift)% chainCodeTrain[i]. length] +z)%8 == chainCodeTest[j])
21. { count++; } 22. }
23. }
24. if(maxCount<count) 25. {
32. if(chainCodeTest.length < chainCodeTrain[i].length) 33. {
34. for(int z=0;z<8;z++) 35. {
36. for(int shift=0;shift<chainCodeTrain[i].length;shift++) 37. {
38. count=0;
39. for(int j=0;j<chainCodeTrain[i].length;j++) 40. {
53. } 54. } 55. } 56. }
57. count=0; 58. }
59. float persentase=maxCount*100/chainCodeTest.length; 60.}
compareChainCode() would compare each Chain code direction index of
training image and testing image. There are 2 main loop, the first one is would
execute if the length of direction testing image is bigger than the dirction of
training image. There is z and shift variables to minimize the effect of changed
direction chain code and rotation effect. If the value is same, so it would be count.
After the counting is done, it should find the highest count index. The highest
5.3 Graphical User Interface
This is the main user interface, there are 3 coloums, Training coloum, Testing
coloum, Result coloum. Training coloum consist of ‘Add Training Image’ button
that had a function to add any image and preprocessing it and then save it to
training database, ‘List Training Image’ to show all of the list of Training image,
‘Training Process’ to training all image from database. Testing coloum consist of
‘Choose Testing Image’ that`s for choosing any image that wants to be test,
ComboBox that had Original, Noise and salt, and blur option, ‘Process’ could be
clicked if the user already choose an image and choose the combobox option, then
the process button would execute the testing function.
This is the User Interface when ‘Add Training Image’ clicked, after the
user choose an image file. Then it would request the user to input the category.
This is the inerface when click ‘List Training Image’. It would display the list of
training image and the category.
This is the user interface after choose a picture for testing, it would display
in the Result panel. Then the user could choose the effect in the combo box, the
option is original, blur, noise salt n papper. Then click the Process button to test
it.
Illustration 5.3: List Training Image
Illustration 5.5: Result Display
The result panel would display the image from training image which
identic with the testing image, and it would show the category result from ALBP
and Chain Code. And there’s a button ‘Correct?’, if it clicked, it would show a pop
up.
‘is it correct?’, and then it would ask, if the user want to add the testing
image to be a training image, so in the future, the progam could learn.
Illustration 5.6: Pop Up Correct
And if the user choose ‘Yes’, it would need a input from user, to input the
category of that image.
5.4 Testing
This is the sample of training image. Training image is the original alphabet
images, that did not get manipulated by any effect
This is the sample of rotating image. The rotation that used in this research is
from 0’ - 360’.
The sheared image created using shear tools in GIMPP. the given shear values
do not have any specific rules. The shear effect changes the skewness of the
image.
Illustration 5.13: Sheared Image 'G'
The perspectived image created using perspective tools in GIMPP, and how to
change the perspective of the image is freely without any limitations. The
perspective effect changes the shape of the image as it is viewed with different
angles of perspective.
Illustration 5.10: Training Image 'A'
Illustration 5.9: Training Image 'B'
Illustration 5.11:
Rotated Image 'C' Rotated Image 'A'Illustration 5.12:
And for blured image, used a Box filter algorithm that would execute after
choosen image get image preprocessing, here is the result.
Noise Salt and Pepper would be applied to the testing image after it get image
preprocessing, this is the sample.
The testing was done with by comparing one of the images with all of 26
images in the database.
Below is the result of the testing.
Illustration 5.16: Perspectived Image 'L' Illustration 5.15:
Perspectived Image 'I'
Illustration 5.18: Blurred Image 'Q' Illustration 5.17:
Blurred Image 'P'
Illustration 5.19: Noised Image 'A'
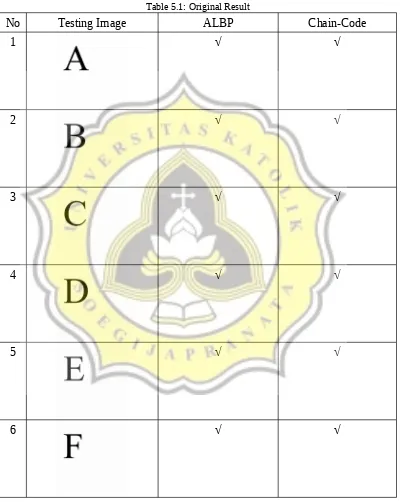
1. Testing between image original and 26 image in the databases
Original image mean the alphabets image did not manipulate
Table 5.1: Original Result
No Testing Image ALBP Chain-Code
1 √ √
2 √ √
3 √ √
4 √ √
5 √ √
No Testing Image ALBP Chain-Code
7 √ √
8 √ √
9 √ √
10 √ √
11 √ √
12 √ √
No Testing Image ALBP Chain-Code
14 √ √
15 √ √
16 √ √
17 √ √
18 √ √
19 √ √
No Testing Image ALBP Chain-Code
21 √ √
22 √ √
23 √ √
24 √ √
25 √ √
26 √ √
Sum of True 26 26
Both of ALBP and Chain-Code algorithm could identify the shape of
2. Testing between rotating image and 26 images in the databases
Table 5.2: Rotate Result
No Testing Image ALBP ChainCode
1 √ √
2 √ √
3 √ √
4 √ √
5 √ √
6 √ Χ
No Testing Image ALBP ChainCode
8 Χ Χ
9 √ √
10 Χ √
11 √ √
12 √ Χ
13 Χ √
No Testing Image ALBP ChainCode
15 √ √
16 √ Χ
17 √ √
18 √ √
19 Χ √
20 √ √
No Testing Image ALBP ChainCode
22 √ √
23 √ Χ
24 √ √
25 Χ √
26 Χ Χ
Sum of True 17 20
When the alphabet images are exposed to rotation effects, the ALBP
algorithm is could identify the shape of the alphabet correctly if the rotation is
equal to 90,180,270 degree, because when the rotation is not equal to 90,180,270,
the pixel arrangement becomes changed and it affects the histogram calculation.
As for the Chain Code, when the image is rotated it still could recognize well, but
if the image is fliped, chain code could not identify it because the directions result
3. Testing between sheared image and 26 images in the databases
Table 5.3: Shear Result
No Testing Image ALBP ChainCode
1 Χ √
2 √ √
3 √ √
4 √ √
5 Χ √
6 Χ √
No Testing Image ALBP ChainCode
8 Χ √
9 Χ √
10 √ √
11 Χ √
12 Χ √
13 √ √
No Testing Image ALBP ChainCode
15 √ √
16 Χ √
17 √ √
18 √ √
19 √ √
20 Χ √
No Testing Image ALBP ChainCode
22 √ √
23 √ Χ
24 √ √
25 Χ √
26 √ √
Sum of True 13 25
The ALBP algorithm is unable to identify the shape of the alphabet correctly
when the image got manipulated by shear effect, the accuracy is drop until 50%
because the pixel arrangements is very different. Chain code could still detect
well while when the image got manipulated by shear effect, because not all side of
the alphabet are affected by the shear effect, so there are still some side that can be
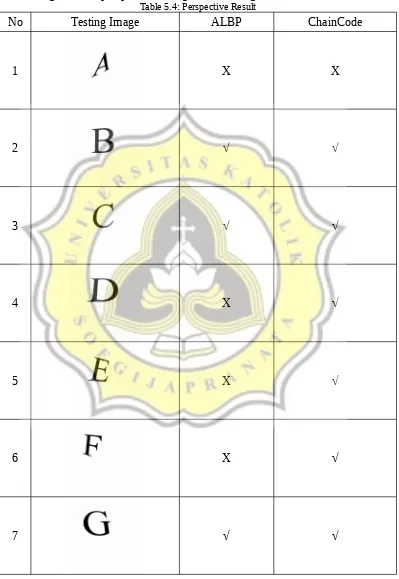
4. Testing between perspectived image and 26 images in the databases
Table 5.4: Perspective Result
No Testing Image ALBP ChainCode
1 Χ Χ
2 √ √
3 √ √
4 Χ √
5 Χ √
6 Χ √
No Testing Image ALBP ChainCode
8 Χ Χ
9 √ Χ
10 √ √
11 √ √
12 Χ √
13 √ √
No Testing Image ALBP ChainCode
15 Χ √
16 √ Χ
17 √ Χ
18 √ √
19 √ √
20 Χ √
No Testing Image ALBP ChainCode
22 √ Χ
23 √ Χ
24 √ √
25 Χ √
26 √ √
Sum of True 16 19
For the image that applied the perspective effect, ALBP and Chain code could
recognize the shape of alphabets if the perspective effect does not change the
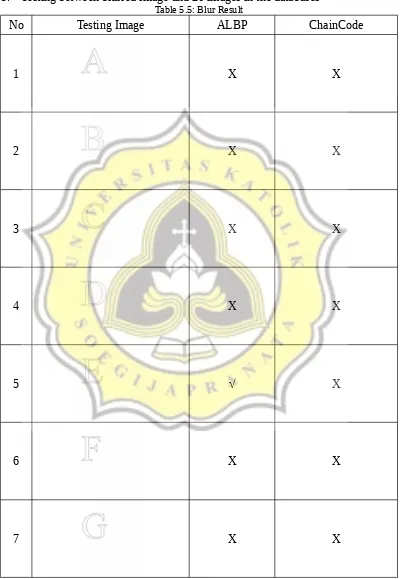
5. Testing between blurred image and 26 images in the databases
Table 5.5: Blur Result
No Testing Image ALBP ChainCode
1 Χ Χ
2 Χ Χ
3 Χ Χ
4 Χ Χ
5 √ Χ
6 Χ Χ
No Testing Image ALBP ChainCode
8 √ Χ
9 √ Χ
10 Χ Χ
11 Χ Χ
12 Χ Χ
13 Χ Χ
No Testing Image ALBP ChainCode
15 Χ Χ
16 √ Χ
17 Χ Χ
18 Χ Χ
19 Χ Χ
20 Χ Χ
No Testing Image ALBP ChainCode
22 Χ Χ
23 Χ Χ
24 Χ Χ
25 Χ Χ
26 Χ Χ
Sum of True 5 0
When exposed to blur, the white pixel value near the black line turns into
grayish, and it also makes a significant change in the frequency of the histogram,
so ALBP accuracy is very bad. While the Chain Code can not detect anything
because the Chain Code only detects black pixels, but after the image being hit by
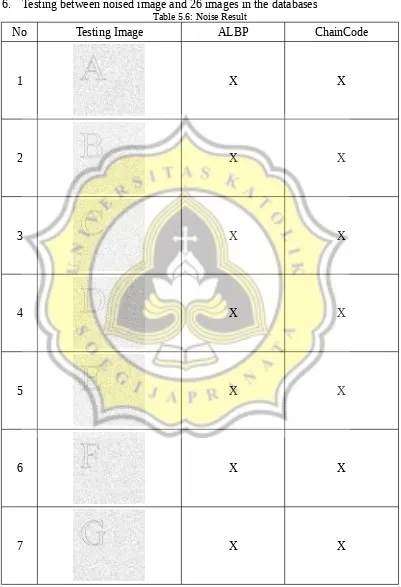
6. Testing between noised image and 26 images in the databases
Table 5.6: Noise Result
No Testing Image ALBP ChainCode
1 Χ Χ
2 Χ Χ
3 Χ Χ
4 Χ Χ
5 Χ Χ
6 Χ Χ
No Testing Image ALBP ChainCode
8 Χ Χ
9 Χ Χ
10 Χ Χ
11 Χ Χ
12 Χ Χ
13 Χ Χ
No Testing Image ALBP ChainCode
15 Χ Χ
16 Χ Χ
17 Χ Χ
18 Χ Χ
19 Χ Χ
20 Χ Χ
No Testing Image ALBP ChainCode
22 Χ Χ
23 Χ Χ
24 Χ Χ
25 Χ Χ
26 Χ Χ
Total Benar 0 0
ALBP and Chain Code can not detect alphabet shape when the image is
affected by noise effect. ALBP can not detect because any noise point affects the
calculation result of ALBP value, the frequency of value on histogram also differ
drastically. While ChainCode will start the movement at the first black spot
detected, so when exposed to the black noise point, that pixel will be regarded as
the starting point, and if no more black pixel are connected to the starting point,
From that research result, to detect alphabet ALBP feature Extraction with
Chi-Square comparation has an accuracy rate of 100% on the original image,
65.38% against rotation, 50% true detection to image whose tilt is changed,
61.53% for image that already changed the perspective, 19.23% for detects the
shape when the tested image is affected by the blur effect, 0% when the image
quality is poor because of the noise effect. So the total accuracy is 49.35%.
For the accuracy of the Chain Code when detecting the shape of the
alphabet are as follows, 100% on the original image, 76.92% when the testing
image are subject to rotation, 96.15% true when the shape tilt is changed, 73.07%
true though the image perspective is changed, 0% true when the image is affected
by the blur effect, 0% when image quality is ugly due to noise. Total Chain Code