Operating System
User Manual
Linpus Lite
Copyright © 2008. Linpus Technologies, Inc. All Rights Reserved.
Linpus Linux Lite User’s Guide Original Issue: 03/2008
Changes may be made periodically to the information in this publication without obligation to notify any person of such revisions or changes. Such changes will be incorporated in new editions of this manual or supplementary documents and publications. This company makes no representations or warranties, either expressed or implied, with respect to
the contents hereof and specifi cally disclaims the implied warranties of merchantability or fi tness for a particular purpose.
Distribution of modifi ed versions of this document is prohibited without
the explicit permission of the copyright holder.
Distribution of the work or derivative of the work in any form for commercial purposes is prohibited unless prior permission is obtained from the copyright holder.
Linpus is a registered trademark of Linpus Technologies, Inc. Linux is a registered trademark of Linus Torvalds.
Other companies’ product names or trademarks are used herein for
identifi cation purposes only and belong to their respective companies.
Linpus Technologies, Inc.
4F-3, 3-2 Yuanqu Street, Nangang District, Taipei 115, Taiwan. TEL: 02-26533368
FAX: 02-26558368
Question Answer
System and device basics Chapter One: Device basics Chapter Six: Setting
Internet, connectivity and browsing
2-1 Getting connected to a LAN 2-2 Getting connected to a WLAN 2-3 Browsing
Offi ce applications Chapter Three: Offi ce applications
Editing and printing 3-1 OpenOffi ce.org 6-3 Printer setting
System recovery Appendix A
Symbols
Attention
Linpus Lite
INDEX
Chapter 1 Getting to Know Your System
6
1.1 Turn on your computer 6
1.2 Turn off your computer 7
1.3 Desktop Modes 8
1.4 Tool Bar 9
1.5 Windows 11
1.6 File Manager 12
1.7 Using Removable Devices 13
1.8 Using the Keyboard 15
Chapter 2 Using the Internet
16
2-1 Wired Network Setup 16
2-2 Wireless Network Setup 17
2-3 Web Browsing 19
2-4 Email 24
2-5 Instant Messaging 28
2-6 Skype Internet Phone 29
Chapter 3
Offi ce Application
s
30
3-1 Word Processor (OpenOffi ce.org Writer) 30
3-2 Spreadsheet ( OpenOffi ce.org Calc ) 34
3-3 Slide Presentation (OpenOffi ce.org Impress) 38
Chapter 4 Useful Tools
41
4-1 PDF Reader 41
4-2 Dictionary – StarDict 42
4-3 Ebook 43
4-4 Calculator 44
Chapter 5 Multimedia, Games
45
5-1 Multimedia Play 45
5-2 Image Viewer 47
6-3 Printer Setup 51 6-4 Power Management Preferences 53
6-5 Modem Dial-up Tool 54
GPL Copyright Notice
5
5
Trademark Statements
56
Linpus Lite
Chapter 1
Getting to Know Your System
Linpus Linux Lite has brought you a brand new super-intuitive user interface with a simple and easy-to-use system menu and more of your favorite applications.
1.1 Turn on your computer
1. Switch on you PC monitor and press the power button to turn on your PC.
2. The system will then auto-login to the Simple Mode.
1.2 Turn off your computer
To safely turn off your computer and protect your data integrity, please follow the steps below:
1. Click on the Exit icon on the right-hand side of the Tool Bar.
2. Then click on Turn Off on the pop-up dialog to safely shutdown your computer.
Picture 1-1 Turn off your computer
Linpus Lite
1.3 Desktop Modes
Linpus Linux Lite offers a super-intuitive icon desktop mode. After the system is started, you will see this Simple Mode user interface as shown in Picture 1-2. All software applications are categorized into 5 tabs –
Internet, Work, Learn, Play and Setting. To open a tab or an application simply click on it.
1.4 Tool Bar
The Tool Bar is located at the bottom of the desktop. There are some application shortcuts, system notification, and permanent system utility
icons within (see picture below).
Picture 1-3 The Tool Bar
Application Shortcuts
Located on the left-hand side of the Tool Bar, there are 2 application shortcuts. They are shortcuts for “Display Desktop” and “File Manager” . You can minimize all running applications at once using the “Display
Desktop” - and browse through fi les using the “File Manager”.
System Notifi cation Area
When an application program is started, it will remain running in the system until you close it. At the middle of the Tool Bar is the system
notifi cation area. All running applications will reside in this area.
Linpus Lite
Permanent System Utilities
There are several permanent system utilities located at the right-hand side of the Tool Bar. Details about these utilities will be introduced in later chapters.
Utility Icon Description
Language input methods
System power supply status
System network connection status
System sound volume
System Date/Time
1.5 Windows
When you open a program, it should fit to your screen. If a running
application window does not fi t just right to your screen, you can make adjustments using the steps below:
1. Hold down the [Alt] button, then move the mouse cursor over the targeting window and hold down the left mouse key at the same time. The mouse cursor will then become a palm like icon as illustrated in Picture 1-5.
2. Move the mouse to adjust the windows to an appropriate position.
Linpus Lite
1.6 File Manager
Click on the File Manager icon located under the Settings feature group tab to start the File Manager program. Alternatively, you can click on the File Manager shortcut located at the left-hand side of the Tool Bar.
1.7 Using Removable Devices
When you plug-in removable storage devices such as USB Disks, the system will automatically detect the device and, using the File Manager,
display its contents ( As shown in Picture 1-7). You can use the File
Manager to view, copy, modify, move and delete any files and folders stored on that device.
Linpus Lite
After you have fi nished your tasks, please fi rstly close all fi les saved to
the USB device. To remove the USB device safely, right click on the USB storage device icon and select the Unmount option in the quick
menu, fi nally physically remove the USB storage device.
Picture 1-8 Safely unmount and remove a USB Disk.
Please DO NOT physically remove the USB storage device
while fi les saved on it are open, it may corrupt the fi les and result
1.8 Using the Keyboard
[Fn] [F8][Fn] [F8] Volume Up Brightness Down
[Fn] [Num Lk][Fn] [F9] Built-in Number Keypad On/Off Brightness Up
[Fn] [Scr Lk] Scroll Lock/Unlock
[Fn] [Prt Sc][Fn] [F10] Start Screen Capture Software and Capture ScreenshotVolume Down
Linpus Lite
Chapter 2
Using the Internet
Linpus Linux Lite supports both wired and wireless network. Before you
start surfi ng on the Internet, please follow the steps below to setup your
Internet connection.
2-1 Wired Network Setup
Before proceeding with the setup, please make sure the following:
1. One end of the network cable is properly plugged into your computer’s network adapter port;
2. Plug the other end of the cable into a Switch or Hub which is already part of a LAN connected to the Internet.
LAN Network with Dynamic IP Allocation (DHCP)
Linpus Linux Lite wired network is automatically set to on. If you are
connected to a LAN confi gured with dynamic IP allocation (DHCP), the
Internet will connect as soon as you have plugged in the cable.
If you are connected to a wireless network and wish to switch to a wired network, firstly plug the network cable into the computer. Right click on the network adapter icon as shown in Picture 2-1 then uncheck the Wireless Network option.
2-2 Wireless Network Setup
The wireless network adapter is turned on by default at startup. If no
wireless network is detected, please fi rstly check if your wireless network
access point is turned on. To get a list of all the wireless networks your device has detected left click on the wireless icon in the Tool Bar (see
picture 2-2). Simply then click on the network you wish to connect to.
Linpus Lite
When a wireless access point is selected, the system might prompt you for the password of that access point. Before entering the correct password into the dialogue box - as illustrated in Picture 2-3 - please select the correct option from the drop down menus next to Wireless Security and Type. If you are not sure about that, please consult your network administrator. Then click the Login to Network button to continue.
Picture 2-3 Input password of a wireless access point
When you are successfully connected, you can see an icon indicating the connection signal strength at the Tool Bar.
2-3 Web Browsing
When you have fi nished setting up your network you can start browsing
the Internet. Linpus Linux Lite is equipped with the popular Firefox
Internet browser to bring you the best Internet surfi ng experience. In the
following sections, you can learn the basics of the Firefox user interface.
ProCon Latte
Firefox. When you receive your device Firefox will be set to use ProCondefault settings. The fi rst thing you need to do is set the password so that
your child cannot set or change the setting.
Linpus Lite
To change any of the setting open Firefox and then click Tools, Procon and then select the Main Filter tab and click the Edit List button to see the default Blocked Words and Blocked Sites lists.
Below is a list of the general settings and functions you may wish to change:
General Settings:
* Hide from Tools Menu - Removes the ProCon shortcut from Firefox’s Tools menu drop-down
* Show in Status bar - Shows an icon regarding to ProCon’s current state
of fi ltering including: Filter On, Filter Off, and Trusted
* Lock the Add-ons list - Locks the Add-ons window, to prevent ProCon
(or any other extension) from being altered
* Lock ‘about:confi g’ - Locks the confi guration page, to prevent ProCon’s
settings from being altered
Shortcut:
* Ctrl+Alt+*User-defi ned key* - Makes it easier to call ProCon’s settings
using the keyboard
Main Filter:
* Enable Explicit Material Filter - Enables ProCon’s main fi lter (and feature)
* Block All Traffi c - Prevents anyone (without permission) to access any site except for whitelisted site (only if the whitelist feature is enabled)
* Add reason of blockage to warning - Informs the user what is the pattern that caused a page to be blocked
Presets:
* Secure - Blocks all traffi c except for whitelist items
* Moderate - The user’s default settings
Tabbed Browsing
Tabbed Browsing is a page management feature for enhancing your browsing experience. When you are browsing several web pages at the same time, you can load these pages into “tabs” under the same browser; by doing so you can open many web pages in one browser and quickly switch between them. You may go to File, New Tab to add an extra tab or alternatively use the shortcut key [Ctrl] + [t].
Linpus Lite
Using an Internet Search Engine
The Firefox Internet browser includes Google as shown in Picture 2-6. To use this feature, simply input the search keyword into box and press the Return/Enter key to start searching.
Picture 2-6 Keyword search using Google.
Other than Google, Firefox also has many other popular search engine interfaces built-in like Yahoo, Amazon, eBay, Dictionary.com etc. You can select your favourite search engine from the textbox located at the top right-hand corner of Firefox browser. Input your search keyword then hit Return/Enter to start searching.
Font Size Adjustment
You may adjust the web page font size by using the Increase and
Decrease options under the View, Text Size setting in Firefox.
Bookmark Management
Popular Internet Website Services
Linpus Linux Lite desktop is preloaded with several popular website shortcuts for your convenience. You may access these shortcuts in the Internet group tab.
Linpus Lite
2-4 Email
Linpus Linux Lite uses Thunderbird as the main email client software. You may start Thunderbird by clicking the Email icon in the Internet tab. When Thunderbird is started for the first time, you will see an Account Wizard guiding you to setup your e-mail account
confi gurations as illustrated below.
Picture 2-8 Thunderbird -- Email account management wizard
Setup Email Accounts
If you would like to add an email account into Thunderbird, the targeting email server should support SMTP and POP3 protocols for sending and receiving emails respectively. After you start Thunderbird, please following the steps below to complete your email account setup.
1. As illustrated in Picture 2-8, select Email account then click Next; 2. Following by inserting Your Name and Email Address;
3. Choose POP as the server type for retrieving your e-mails then input your email server address. Input your email SMTP server address as your email sending agent as illustrated in Picture 2-9;
4. Follow the Account Wizard to input the receiving user name and the account name in the next two pages;
5. At last, check all the account details are correct and click on the Finish
button.
Linpus Lite
Composing Emails
A f t e r y o u h a v e p r o p e r l y c o n f i g u r e d y o u r e m a i l a c c o u n t w i t h Thunderbird, you can then start sending and receiving emails. All emails can be accessed from the email folders in the left panel. You can use the [<] and [>] controls to switch between email folders. If you would like to write an email, simply click on the Compose button and you will see a
mail composer as illustrated below. To send your email, just click on the
Send button.
Picture 2-10 Composing an email
While composing your email you can use the Attach button to
attach fi les to the email and use the Contacts button to add your
Receiving Email
At the main control page in Thunderbird, click on the Get Mail button to download your emails to Inbox.
Linpus Lite
2-5 Instant Messaging
Under the Internet tab, there is an instant messaging software that allows you use popular instant messaging services like MSN, ICQ, Yahoo, AIM etc. You can click on the Messenger icon to start the Pidgin instant messaging application. Click the Add icon to add accounts from various instant messaging services as illustrated in Picture 2-12.
2-6 Skype Internet Phone
Linpus Linux Lite offers the popular Skype Internet phone application. You can access the Skype phone on the Internet tab. When you start
Skype for the fi rst time, you will be prompted to accept the Skype End
User License Agreement. Skype will start up immediately after you click on the Accept button as shown in Picture 2-13.
Picture 2-13 Skype End User License Agreement
Skype user interface window is oversized for Linpus Linux Lite’s
desktop. You can follow the steps below to adjust it window
position as needed.
1. Hold down the [Alt] button, then move the mouse cursor over the targeting window and hold down the left mouse key at the same time. The mouse cursor will then become a palm like icon as illustrated in Picture 1-5.
Linpus Lite
Chapter 3
Offi ce Applications
The Office tab provides some common office applications from the OpenOffice.org product family: word processor, spreadsheet, presentation and others tools.
There is good compatibility between OpenOffice.org and MS
Offi ce.
3-1 Word Processor (OpenOffi ce.org Writer)
Create a New File
Select File and then New from the top tool bar to create a new Writer Text document, like Diagram 3-2.
Diagram 3-2: Open a new Write text document
Open an Old File
Select File and then Open. Use the fi le system to fi nd the fi le you want
to open.
Save File
Select File and then Save, when the Save As dialog window appears,
Linpus Lite
Change Font Type
In Writer, you can use a lot of different ways to define the character appearance, such as font type, size, color and so on. The simple way is to highlight and select the words that you want to change, select Format
and then Character.
Diagram 3-3 Object Tool Bar
To edit a character, you can also use the right-click button of the mouse, and then select Font, Size, and Style from the pop-up menu.
Insert Table
To insert a table into the document, select a location with your cursor, click on Insert and then Table on the top tool bar; fi nally input the table
name, and number of columns and rows etc.
Point to the top frame boundary of the table and press the left button of the mouse, move left/right and up/down to set the height and width of the table.
Insert a Picture
On the top toolbar click on Insert, Picture and then From File; at the
Insert Picture dialog window, select a fi le.
You can also set the picture size; first select and click on the picture, then use the mouse to hold the tiny Green box on the picture boundary and move to resize. While resizing, press the “Shift” key to keep the picture size aligned in an even ratio.
Linpus Lite
3-2 Spreadsheet ( OpenOffi ce.org Calc )
Calc Introduction
Diagram 3-5 Calc Introduction
Cell
Many cells form a sheet; each cell is able to hold data. If you want to
select a whole row or column, just click the column name ( e.g. C ) or row name ( e.g. 10 ). If you want to select non-sequential columns or
rows, you can hold down “Ctrl” and then click a row or column.
Edit a sheet
Use the left button of the mouse to click on a Cell. For example, if you want to create a sheet for a top 10 ranking, you can create columns named “Rank”, “Candidate”, “Score A” and “Score B” . At the
Candidate column, input “1” and “2” for the fi rst 2 Cells. Select these
Diagram 3-6 The selected Cells are numbered “1,2,3,...”
If you want to change the background color, just select the Cells you
Linpus Lite
Insert a Column/Row
If you want to add a column or a row move the cursor to the last column or row; right-click on the mouse and select Insert. At the Insert Cells
window dialog, you then select Entire Row or Entire Column.
Automatic Summation
Diagram 3-8 Formula of Summing up
You can use “Sum(C1:C3)” in the formula, or use “Computation symbol”
and “number” to do the calculation. First, at the input line, type an “=”
sign and then type the equation ( e.g. C1+C2+C3 or Sum(C1:C3) ). The
Create a Chart
First Highlight and select the Cells, then select Insert and Chart on the top tool bar. A “Chart Wizard” will be shown and you can select and input the Chart Type, Data Range, Data Series and Chart Element. However, the most important information needed is the “Title”, “X-axis” and “Y-axis” under “Chart Element”. Press Finish when you are done and the chart will be inserted.
Linpus Lite
3-3 Slide Presentation (OpenOffi ce.org Impress)
Diagram 3-10 Impress Introduction
Insert a New page
Select Insert and then Slide from the top tool bar; in the right window, you can select a slide layout.
View Slide
Impress provides 5 different viewing modes. Use the right-hand side windows to switch viewing modes.
Insert Text Editor Frame
Directly press the “T” icon on the bottom tool bar, and use the left button to insert a text editor frame.
Insert Picture
Select Insert and then Picture from the top tool bar, in From File dialog windows, select and open the needed picture.
Linpus Lite
Insert a chart
Select Insert and then Chart to insert a chart. Use “Chart information”
to defi ne the columns and data, or to add/remove columns/rows. You can
also select the Chart icon on the top tool bar to defi ne different types of
chart.
Chapter 4
Useful Tools
Linpus Lite provides many useful tools, for example: PDF reader, dictionary, ebook, calculator etc. In this chapter, we will introduce them.
4-1 PDF Reader
Click on the Learn tab, then click PDF Reader. You can open PDF and
PostScript format fi les.
Linpus Lite
4-2 Dictionary – StarDict
On the Learn tab, click Dictionary to open StarDict. StarDict by default is a pure English dictionary. You can update or download other translation dictionaries through Linpus Lite’s on-line update.
4-3 Ebook
On the Learn tab, click eBook to open the FBReader ebook software. Through it you can open fb2, HTML, CHM and RTF etc format files.
FBReader can also open document fi les in the zip tar formats.
Linpus Lite
4-4 Calculator
On the Learn tab, click Calculator to open Gcalctool. By default, Gcalctool starts in “Basic” mode. To change the mode, click View,
Advanced, Financial or Scientifi c.
Chapter 5
Multimedia, Games
Linpus Lite has a number of multimedia tools and games, for example: gThumb, LTris, Lpairs etc. In this chapter, we have some brief introductions.
5-1 Multimedia Play
On the “Play” tab, click “Media Player” to open the SMPlayer (shown
below in Picture 5-1).
Linpus Lite
Playing Disks
Please use the following steps to play a disk:
1. Connect the USB DVD or CD-ROM player to your device;
2. Insert a disk into the player – After the system detects the disk, the File Manager will display the CD icon at the left side.
3. Click on the disk icon to play it.
4. On the “Play” tab, click “Media Player” to run the SMPlayer. Then click “Open Disk” to play it.
5-2 Image Viewer
On the Play tab, click Picture to open gThumb, the included picture software. You can open BMP, JPEG, GIF, PNG files. You can view images in Folders, Catalogs, Image, Fullscreen and Slide Show modes. Use the following steps to edit an image:
1. Choose an image.
2. Select the function that you want in the gThumb menu bar.
3. After confi gure click File, Save or File or Save As.
Linpus Lite
5-3 Games
On the Play tab, Linpus Lite provides some fun games as shown in Picture 5-2.
Chapter 6
System Confi guration
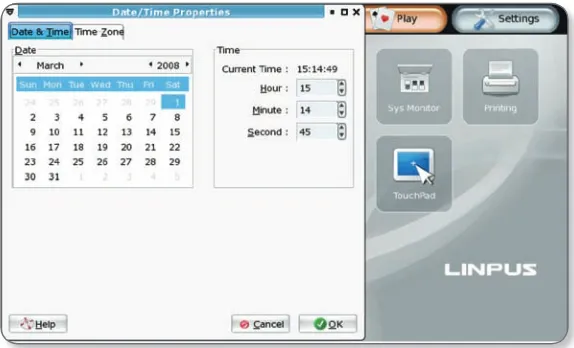
6-1 Date and Time
Click on the icon named Date and Time located on the Settings page
to launch the “Date and Time” application. Once there you can adjust
system time and date. Additionally, you can view and change the time zone info by clicking into the Time Zone sub-tag.
Linpus Lite
6-2 System Monitoring
Click on the System Monitor icon to view the status of all running
programs (processes). If a process is found to be behaving abnormally,
you may opt to terminate it by clicking the Processes sub-tag, selecting the process and then clicking on the End Process button. In addition, you can get an overview of the system load - CPU, memory and network usage, by clicking on the Resources sub-tag.
setting up a printer.
Linpus Lite
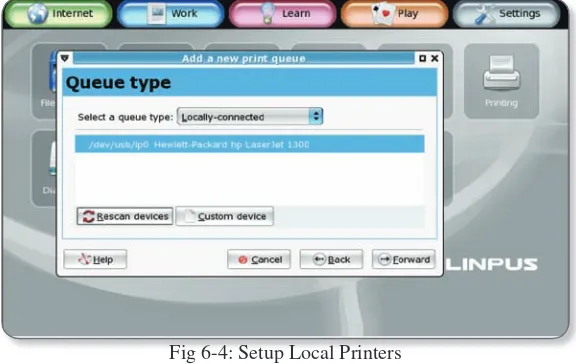
Add a local printer
As you follow the instructions in the printer setup wizard, you will be prompted to enter a printer name and an optional description. Clicking on the Forward button, a screen like Fig. 6-4 will show up. Here you can select Locally-connected on the pull-down list and then select /dev/ usb/lp0. Click on the Forward button to continue.
Fig 6-4: Setup Local Printers
Next, you will be asked to select the make and model of the printer you wish to set up. Press the Forward button to continue and you will see the summary of the printer configuration. Please review it and press
Complete if the information looks correct to you. A dialogue box will then pop up asking if you want to print a test page. Select Yes to print a test page and review the printed page to see if the printer works properly
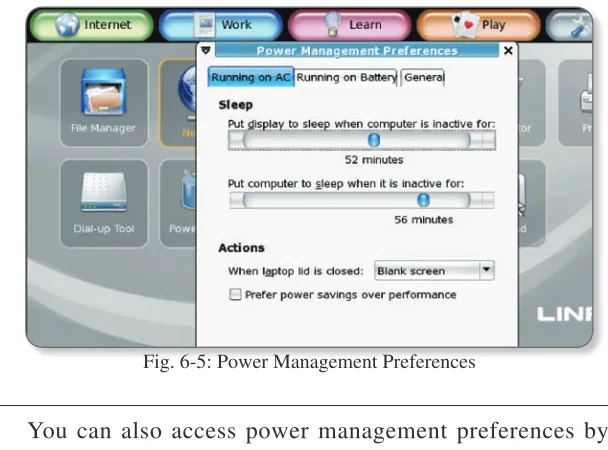
can confi gure how your system behaves both on AC power and battery
power.
Fig. 6-5: Power Management Preferences
Linpus Lite
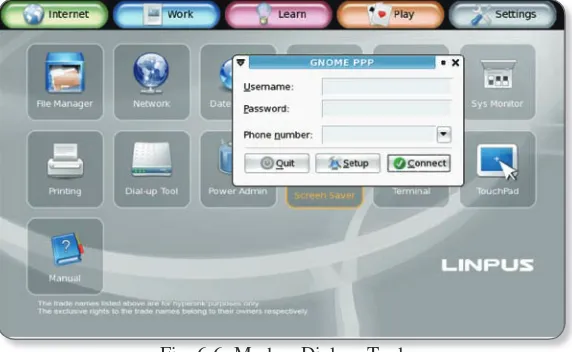
6-5 Modem Dial-up Tool
Click on the Dial-up Tool icon in the Settings sub-page to launch Gnome PPP, the Modem Dial-up application. You can then enter your username, password and phone number directly in the dialog window. If you do not have this information, you may consult the local Telecom to get it. After that the application will begin to connect, and you will hear the dialing tone. Wait about half a minute for the connection to complete.
This product includes copyrighted third-party software licensed under the terms of the GNU General Public License. Please see The GNU General Public License for the exact terms and conditions of this license.
All included GNU General Public License software packages are copyright by their respective authors. Refer to the source code for detailed information.
Linpus Technologies, Inc. has exposed the full source code of the GPL licensed software, including any scripts to control compilation and
installation of the object code. All future fi rmware updates will also be
accompanied with their respective source code. For more information on how to obtain our open source code, visit our website (www.linpus.com).
Linpus Lite
Trademark Statements
Google, Google Maps, and Google Docs service and its logos are trademarks of Google Inc..
Skype service and its logos are trademarks of Skype Inc.. Yahoo! Service and its logos are trademarks of Yahoo! Inc..
All other services and logos are either trademarks or registered trademarks of their respective owners. Linpus Technologies, Inc. is not
affi liated with any of these companies or their partners.
The trade names used are for hyperlink purposes only. The exclusive rights to the trade names belong to their owners respectively.