eBay Auction Templates Starter Kit By Michael Miller
... Publisher: Que
Pub Date: May 22, 2006
Print ISBN-10: 0-7897-3563-6
Print ISBN-13: 978-0-7897-3563-8 Pages: 336
Table of Contents | Index
Looking for "it"? That something different that will increase your eBay auction sale rates and selling prices? One of the most effective ways to generate more sales at high price-points is to create a more attractive, attention-getting auction listing. The easiest way to do this is through the use of templates that you can quickly populate with minimal effort and will maintain a style consistency across all of your auctions.
eBay Auction Templates Starter Kit By Michael Miller
... Publisher: Que
Pub Date: May 22, 2006
Print ISBN-10: 0-7897-3563-6
Print ISBN-13: 978-0-7897-3563-8 Pages: 336
Table of Contents | Index
Copyright
About the Author
Acknowledgments
We Want to Hear from You!
Reader Services
Introduction
Part I: Creating More Effective Auction Listings
Auction ListingsChapter 1. The Good, the Bad, and the Ugly: Do's and Don'ts for Effective Essential Elements of an Effective eBay Auction Listing
Employing Good Listing Design
Ten Ways to Create a More Effective Auction Listing
Ten Things Not to Do in Your Auction Listings
Different Ways to Create Better-Looking eBay Listings
Part II: Using Predesigned Auction Templates
Chapter 2. Using Standard Text Formatting and eBay's Listing Designer
Formatting a Normal Auction Listing with the Text Editor
Enhancing Your Listing with Listing Designer
Using Listing Designer Themes in eBay Turbo Lister
Use Other Programs to Create Fancy eBay Listings
Chapter 3. Using Auction Listing Services and Software
Using Auction Listing Services
Using Auction Listing Software
Chapter 4. Using Third-Party Auction Templates
How to Use Auction Templates
Using Create-Your-Own Template Websites
Using Downloadable Auction Templates
Using the Auction Templates on the CD
Part III: Creating Your Own Auction Templates
Chapter 5. Learning How to Code with HTML
Understanding Basic HTML
Working with HTML Tables
HTML Codes You Can't Use in Your eBay Listings
Applying Advanced Formatting with Cascading Style Sheets
How to Create Your HTML Code
Testing Your HTML Code
Chapter 6. Creating Text-Based HTML Auction Templates
Creating Simple Text Descriptions
Working with Titles and Subtitles
Adding Images Within Your Item Description
Adding Borders to Your Photos
Applying Special Picture Effects
Protecting Your Pictures from Image Theft
Chapter 8. Working with Tables, Borders, and Backgrounds
Creating Listings with Multiple Sections
Creating Multiple-Column Listings
Arranging Images on the Page
Adding Color Borders
Adding Color Backgrounds
Adding Image Borders, Backgrounds, and Banners
Chapter 9. Adding Other Page Elements and Special Effects
Adding Web Page and Email Links
Adding Special Elements
Cross-Promoting Your Other Auctions
Adding Audio and Video to Your Listing
Chapter 10. Putting It All Together: Ten Ready-to-Use Auction Templates
Where to Go from Here
Appendixes
Appendix A. HTML for About Me and eBay Stores Pages
HTML for Your About Me Page
HTML for Your eBay Stores Pages
Appendix B. Contents of the eBay Auction Templates Starter Kit CD
Software Programs
Third-Party Auction Templates
Templates and Special Effects from This Book
There's More in the Readme File
Copyright
eBay Auction Templates Starter Kit
Copyright © 2006 by Que Publishing
All rights reserved. No part of this book shall be reproduced, stored in a retrieval system, or transmitted by any means, electronic, mechanical, photocopying, recording, or otherwise, without written permission from the publisher. No patent
liability is assumed with respect to the use of the information contained herein. Although every precaution has been taken in the preparation of this book, the publisher and author assume no responsibility for errors or omissions. Nor is any liability assumed for damages resulting from the use of the information contained herein.
Library of Congress Catalog Card Number: 2006920310
Printed in the United States of America
First Printing: June 2006
09 08 07 06 4 3 2 1
Trademarks
All terms mentioned in this book that are known to be trademarks or service marks have been appropriately
capitalized. Que Publishing cannot attest to the accuracy of this information. Use of a term in this book should not be regarded as affecting the validity of any trademark or service mark.
Warning and Disclaimer
Every effort has been made to make this book as complete and as accurate as possible, but no warranty or fitness is implied. The information provided is on an "as is" basis. The author and the publisher shall have neither liability nor responsibility to any person or entity with respect to any loss or damages arising from the information contained in this book or from the use of the CD or programs accompanying it.
Bulk Sales
Que Publishing offers excellent discounts on this book when ordered in quantity for bulk purchases or special sales. For more information, please contact
U.S. Corporate and Government Sales
1-800-382-3419
For sales outside of the United States, please contact
International Sales
Associate Publisher Greg Wiegand
Acquisitions Editor Michelle Newcomb
Senior Development Editor Rick Kughen
Managing Editor Charlotte Clapp
Project Editor Dan Knott
Indexer Chris Barrick
Proofreader Kathy Bidwell
Publishing Coordinator Sharry Lee Gregory
Multimedia Developer Dan Scherf
Book Designer Ann Jones
Page Layout Nonie Ratcliff
Dedication
About the Author
Michael Miller is a top eBay seller and a successful and prolific author. He has a reputation for practical, real-world advice and an unerring empathy for the needs of his readers.
Mr. Miller has written more than 75 nonfiction books since 1989, for Que and other major publishers. His books for Que include
Easy eBay, Absolute Beginner's Guide to eBay, Making a Living with Your eBay Business, and Tricks of the eBay Masters. He is known for his casual, easy-to-read writing style and his ability to explain a wide variety of complex topics to an everyday audience.
You can email Mr. Miller directly at
[email protected]. His website is located at www.molehillgroup.com, and his eBay user ID is
Acknowledgments
Thanks to the usual suspects at Que, including but not limited to Greg Wiegand, Michelle Newcomb, and Rick Kughen.
Additional thanks go to the book's technical editor, Michelle Brantner, who verified the technical accuracy of all that lies within. Thanks as well to Dan Scherf for wrangling all the
We Want to Hear from You!
As the reader of this book, you are our most important critic and commentator. We value your opinion and want to know what we're doing right, what we could do better, what areas you'd like to see us publish in, and any other words of wisdom you're willing to pass our way.
As an associate publisher for Que Publishing, I welcome your comments. You can email or write me directly to let me know what you did or didn't like about this book[md]as well as what we can do to make our books better.
Please note that I cannot help you with technical problems related to the topic of this book. We do have a User Services group, however, where I will forward specific technical
questions related to the book.
When you write, please be sure to include this book's title and author as well as your name, email address, and phone number. I will carefully review your comments and share them with the author and editors who worked on the book.
Email: [email protected]
Mail: Greg Wiegand Associate Publisher Que Publishing 800 East 96th Street
Reader Services
Visit our website and register this book at
Introduction
Have you ever wondered how some sellers create those
colorful, well-designed, professional-looking auction listings? Especially when your standard-issue eBay listings look so...well, so boring?
It's all about auction templates. A template is a building block you can use for all your auction listings. A good template
includes a combination of fonts, colors, pictures, and page layout that does a good job of presenting the items you're selling in a visually interesting fashion. Once you have a
template you like, you can apply it to any new eBay auction by inserting specific item information and photos. You can use the same template for all your listings, or use different templates for different types of productsor different seasons of the year.
There are many different ways to obtain great-looking auction templates. You can use eBay's own Listing Designer feature; you can use third-party websites to create your own templates online; you can download pre-designed auction templates from a variety of different websites; or you can create your own custom templates using HTML code.
If any of the above sounds too complicated, then you've turned to the right place. eBay Auction Templates Starter Kit is your guide to all the different types of eBay auction templatesfrom easy-to-use pre-designed templates to the kinds of HTML-based templates you create on your own. Whichever way you want to go, this book will help you get there.
What's in This Book
We'll start out in Part I, "Creating More Effective Auction Listings," by examining some design guidelines that should apply to all eBay auction listings.
Then, in Part II, "Using Predesigned Auction Templates," we'll take a look at various types of template-creation services, as well as a variety of predesigned downloadable templates.
In Part III, "Creating Your Own Auction Templates," we'll work through a crash course in HTML coding, complete with ready-to-use code you can use for your own eBay templates and special effects.
Finally, the book's two appendixes detail special HTML code you can use in your About Me and eBay Stores pages, as well as describe the contents of the CD that accompanies this book.
And the good thing is, what you read in this book is
supplemented by the materials on the accompanying CD-ROM. The CD includes ready-to-use HTML code for all the templates and special effects presented in this book, as well as hundreds of other predesigned auction templates from a variety of third parties. There's even a selection of HTML and photo editing software you can use to help create your own auction
templates. Like the title says, this truly is a "starter kit" for creating all different types of eBay auction templates!
Who Can Use This Book
adventurous, read the third section and learn how to create your own auction templates using simple HTML code. This is a lot easier than it sounds, thanks to the ready-to-run HTML code included on the accompanying CD. You don't have to be an
experienced HTML programmer to get startedalthough there are plenty of tips and tricks that even veteran HTML coders will find useful. There's something for everyone!
How to Use This Book
I hope that this book is easy enough to read that you don't
need instructions. That said, there are a few elements that bear explaining.
First, there are several special elements in this book, presented in what we in the publishing business call "margin notes." There are different types of margin notes for different types of
information, as you see here.
Note
This is a note that presents information of interest, even if it isn't wholly relevant to the discussion in the main text.
Tip
Caution
This is a caution that something you might accidentally do might have undesirable results.
You'll also find several icons scattered throughout the margins of the text. These icons alert you to special information, as follows:
This icon tells you that the template, special effect, or software program under discussion can be found on the CD-ROM that accompanies this book.
This icon tells you that the program or template under discussion is available free of charge.
There are also lots of web page addresses in the book, like this one: www.molehillgroup.com. When you see one of these
addresses (also known as a URL), you can go to that web page by entering the URL into the address box in your web browser. I've made every effort to ensure the accuracy of the web
addresses presented here, but given the ever-changing nature of the web, don't be surprised if you run across an address or two that's changed. I apologize in advance.
The other thing you'll find a lot of in this book is HTML code. A snippet of code might look like this:
<p>
This is a line of text. </p>
<img src="URL">
You should be able to enter this code, exactly as written, into eBay's HTML editor on the Describe Your Item form (when you're creating a new auction listing). You can also enter this code into any text editor or HTML editor program, for further editing.
When part of the code is italic (such as the URL in the previous example), this means that you need to replace the italicized code with your own individual information. In the previous
example, you would replace URL with the full URL and filename of an image file you want to include in your auction template.
And if you don't want to enter all the code by hand, the HTML code for all the templates and special effects included in this book can be found on the accompanying CD-ROM. See
Ready, Get Set, Go!
With all these preliminaries out of the way, it's now time to get started. While I recommend reading the book in consecutive order, feel free to skip around, especially if you're a more
experienced seller. And definitely feel free to visit my website at www.molehillgroup.com, for more information on this book and other books I've written. You'll even find an errata page for this book, in the inevitable event that an error or two creeps into this text. (Hey, nobody's perfect!)
So get ready to turn the page and learn more about creating better-looking eBay listings with auction templates. Not only will your auction listings look better, they'll also be more
Part I: Creating More Effective Auction Listings
Chapter 1. The Good, the Bad, and the
Ugly: Do's and Don'ts for Effective
Auction Listings
This book is all about creating better-looking eBay auction listings. Looks are important, because the better-looking your listings, the more effective they'll beyou'll attract more potential buyers and get them to bid more aggressively. It's not that you can't sell items with plain-looking listings, it's that you'll have better luck if your listings look more attractive and more
professional.
Have you ever been online shopping and visited a new website that looked garish and unprofessional? How did you feel about purchasing something from that site? Not too confident, I bet.
And have you ever been online shopping and visited a new website that was well-designed and very professional-looking? How did you feel about purchasing something from that site? Fairly confident, I'd wager.
You see, a well-designed website or web page tells you
something, at least on an unconscious level, about the person or store doing the selling. A cheap-looking site makes you wonder about the reliability of the merchant. A professionally designed, easy-to-navigate site makes you more confident about placing your order. Maybe both merchants are equally solid, but the one that looks more solid will get your order, all other things being equal.
buyers. Since you never want to turn away any potential
business, you want your listings to do as effective a sales job as possible.
Essential Elements of an Effective eBay Auction
Listing
It doesn't matter if you're selling $10 trinkets or $1,000 antiques, an effective eBay auction listing contains the same essential elements. You must incorporate these elements in your listings, or you risk losing potential buyers.
What are these elements? Let's take a quick lookgoing pretty much from top to bottom in your listings.
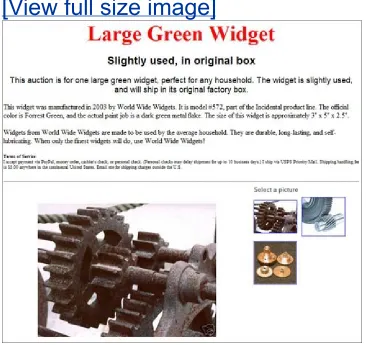
Title
Every auction listing starts with a title. Actually, two titlesthe official 55-character title that eBay uses to index your auction (and is included at the top of the listing page), and the title that you place above the text description in the body of your auction listing. These two titles can be the same, although they don't have to be. That's because the title you include within the body of your listing doesn't have a character limit; it can be as long and descriptive as you want it to be.
Since you want the title to stand out from the body of your description, you probably want to format it somewhat
differently. That means using a larger type size, boldface type, a different type face, or a different color. (Figure 1.1 shows a typical title, using larger, boldface type.)
Figure 1.1. A typical listing titlethe type is larger
and bolder than the rest of the listing.
The key thing is to treat the title as you would the headline in a newspaper. It needs to attract the attention of potential buyers, and include all the keywords that touch the buyers' hot buttons.
That said, the titlewhile theoretically of unlimited
lengthshouldn't be too long. There's no need to limit yourself to just 55 characters, but you shouldn't let the title stretch more than two lines. Titles are for grazing, not for prolonged reading. If the title can't be absorbed in a single glance, it's too long.
Tip
Including all essential keywords is even more important in eBay's official listing title. That's
because most buyers use eBay's search function to find items to buy, so the title has to include the keywords that they're likely to search for.
If you need to go to a third (or fourth) line of type, consider breaking the title into a title and a subtitle, with the subtitle in slightly smaller, perhaps different-colored type. (Figure 1.2 shows a listing with both title and subtitle; note the type size difference.)
main title.
[View full size image]
General Description
Below the title, we get to what I like to think of as the introduction to your listingthe first paragraph of your item listing. This first paragraph serves as the introduction to the detailed item description.
Note
Many laypeople unknowingly misspell the
newspaper's lede as lead (both pronounced as
"leed"). The misspelling makes sense since the lede is the "lead paragraph" of the story, but it's still incorrect. Interestingly, the word lede was originally spelled this way to prevent confusion with the metal
Note that I treat the first paragraph separate from all
subsequent paragraphs. That's because many people only read so far before they lose interest. You see this in the construction of newspaper articles, where the main topic is overviewed in the initial paragraph. Newspaper people call this first paragraph the lede, and it always contains the most important information about the story that follows. If the reader reads nothing but that first paragraph, he gets a general overview of what the story is about. It's obviously not as detailed as the rest of the story, but it does the job of keeping the reader informed at a glance.
For our purposes, the overview paragraph needs to tell the potential buyer just enough about the item you're selling to keep him or her reading. This paragraph should be relatively short (no more than 3 to 4 sentences), and use short
sentences. It should tell the equivalent of the newspaperman's "who, what, why, when, and where"the basics of what you're selling, and perhaps why. Not a lot of detail, just the gist of the story.
Design-wise, this overview paragraph can be in the same font and type face as the rest of the description, or you can use a
slightly larger typeface, as shown in Figure 1.3. The advantage of using slightly larger type is to make the initial paragraph easier to read. If you go this route, don't go more than 2 points larger. For example, if the main description text is in 12-point type, make the initial paragraph 14 point.
Figure 1.3. The overview paragraph of the item
description, formatted 2 points larger than the
[View full size image]
Detailed Description
Now we come to the meat of your auction listingthe detailed description of the item you're selling. This is where you tell potential buyers all they want to know about what you want to sell. There's no need to scrimp on the description; take all the space you need to provide an appropriate amount of accurate and detailed information.
When you write your description, it helps to think like a
copywriter for one of the big catalog or direct mail firms. Take a look at how L.L. Bean and Lands End do it, and emulate that style and level of detail. You should not only describe the item, you should sell the item. That means listing not only the item's features, but also its benefits. It's not enough to say that this widget includes a 1/4" blowhole; you need to tell the buyer what that blowhole will do for him.
The details to provide should include any and all of the following:
Manufacturer name
Model number
Product line
Year manufactured or sold
Approximate age of the item
Conditionnew, used, like-new, mint, fair, in original box, and so on
Color
Size
Dimensions
Included accessories
Now stop for a minute and take a look at how I presented the previous information. Instead of listing all those details about the details in a long, hard-to-read text paragraph, I broke them out into a bulleted list. This is a good technique to apply in your auction listings, too. When you have a lot of details to include, turn them into a list. Bulleted lists are easier for the reader to absorb than are long paragraphs, which is why you see them used quite often in catalog copy.
buyer work for it; use good page design to make your listing as easy to read as possible.
Figure 1.4. Item details presented in a table.
[View full size image]
Figure 1.5. Item details presented in a separate
column.
[View full size image]
A text description is important, but a photograph is, in almost all cases, mandatory. Potential buyers need to know what an item looks like before they make a bid, and the only way to do that is to show them a picture. Or two. Or three. Or as many as it takes to accurately present the item.
The pictures you include should be large enough to show off the appropriate level of detail, but not so large that they're slow to download. (Something in the 400 x 400 pixel range is good, give or take a hundred pixels either direction.) The pictures should be well-lit, well-focused, and well-framed. You should include at least one large photo of the entire item, plus
additional photos of important details or alternate sides or
angles. And it's okay to make a scan instead of take a photo, if you're dealing with a flat item (like a book or CD).
Where should you place the photos(s) in your listings? That's a matter of taste and some debate. Some sellers like the pictures on top, either before or just after the title, as shown in Figure 1.6. Other sellers like the pictures after the description, as shown in Figure 1.7. Still other sellers are savvy enough to
create a multiple-column layout that places the photos on either the left or right side of the description, as shown in Figure 1.8. There's no absolute right or wrong when it comes to picture placement.
Figure 1.6. A photo placed at the very top of a
listing.
Figure 1.7. The same photo, placed at the bottom
of the listing.
Figure 1.8. An alternate approach, with the photo
to the left of the item description.
[View full size image]
Terms of Service
Now we come to the end of your item description, after which it's appropriate to talk a little bit about how you conduct your business. What I'm talking about here is your terms of service
(sometimes called the terms of sale, or just TOS), or what some folks refer to as the "fine print." It's important to include your TOS in your item listing, but not so important that it draws attention to itself. Hence the position at the bottom of the
listing instead of the top; it's there for potential buyers to read, but not positioned as a key selling point for your auction.
Your TOS can also be formatted in a way that separates it from the item description (which is a good thing), without making it appear too important. Different tricks including using a smaller or different-colored type face, as shown in Figure 1.9; placing a different-colored background behind the TOS, as shown in
approaches has the desired effect.
Figure 1.9. A TOS with smaller type than the
preceding description.
[View full size image]
Figure 1.10. The same TOS, separated out with a
different colored background.
[View full size image]
Figure 1.11. Another way to segregate the TOS,
using a border.
And just what should you include in your terms of service? Here's a short list:
What payment methods you accept, and which you prefer
Any restrictions for different payment methods (such as waiting 10 days for personal checks to clear)
Which shipping services you use
Your shipping/handling charge
Whether or not you offer insurance or delivery confirmation, and if so, how much you charge
Your returns policy, if any
Which countries you do or don't ship to
Any other bidder restrictions
After-the-auction checkout instructions
Cross-Promotions
If you're a heavy seller, you want to use any particular auction listing to cross-promote other items you have for sale, either in other auctions or in an eBay Store. This can be accomplished with simple text links, or with pictures of some of the other items, as shown in Figure 1.12. This type of cross-promotion section is typically placed at the very bottom of your listing, after your TOS.
Figure 1.12. Cross-promoting other items you
have for sale.
Employing Good Listing Design
Now that we've covered what elements you need to include in your auction listings, let's take a quick look at the best ways to present those elements. It all boils down to effective and
tasteful web page designand employing that design to your eBay auction listings.
Subtle design First, know that an effective web page (or auction listing) uses subtle design elements. The design itself shouldn't knock you over the head; it should be
noticeable without calling attention to itself. That means not using design elements for design's sake. The layout should be practical without being showy, and the font and color choices should be understated.
Logical page structure The structure of the page should work to draw the reader's eyes to the most important elements on the page. That might be the item's title or photo, or (ultimately) to the "Bid Now" button. There shouldn't be any speed bumps in the way from top to bottom. Subsidiary elements should be sectioned off, accessible but not mandatory in the reading scheme.
Columns and tables Multiple columns and tables should be used when necessary, but not overused. It's okay to place bulleted lists or photos in a separate column, but don't put the main description in a two- or three-column layout.
Flush left or justified text Text reads best when it's flush left or justified. Right-justified text is darned-near
High contrast color scheme The whole design should work toward readability. That typically means dark text on a light background, like the black text against white pages of this book. Some reverse text can be used, for effect, but know that it's difficult to read large blocks of light text against a dark background.
Understatement Nothing in the listing should scream at the potential bidder. That means no over-large fonts, no overly-bright colors, no flashing graphics or animations. Pictures should be large enough without dominating the page. Fonts should be large enough to be readable, but not so large that body text looks like a headline.
Ten Ways to Create a More Effective Auction
Listing
With the principles of good web page design now lodged in your head, let's get down to brass tacksand go through a short list of ways to improve your auction listings.
1. Prioritize your information. It's always good to assume that potential bidders are in a hurry. Make it easy for people to graze your listing without having to read every single word. Put the most important information at the beginning, and the least important at the end. Don't make the bidder read through to the end of the listing before placing a bid. Grab their attention and convince them to bid now!
2. Organize your content on the pagebreak it into sections. Organization is different from prioritization, although it has the same goalto make your listing easy to read. Not only should the most important information be the first thing on the page, it should also be the most dominant thing. Use various page design techniques to separate out different types of information and put them in different sections on the page. Make it easy for potential bidders to find the item overview, detailed description, and your terms of service.
3. Present complete information, in a logical order. Your item description should say more than "Here's a green widget." It should fully describe what you're sellingwhich means including manufacturer information, model number, production year, size or dimensions, and a full list of
finish.
4. Use text formatting to emphasize important words or phrases. Not every part of your item listing is of equal importance. Don't hide the most important stuff; put key words and phrases in boldface or in a different color. Force the reader's eyes to focus on what's important.
5. Identify important keywords and use them in your title and item description. Remember, most eBay users search for what they want to buy. Make sure you include the most likely search keywords in the formal listing title, as well as the title in your item descriptionand in the
description itself. And don't forget alternate phrasing and spelling; not every buyer will search in the "correct" way.
6. Include at least one product photoand put the most informative photo first. Item listings with photos sell much better than those without. Potential buyers need visual reinforcement in order to bid with confidence; since they can't see the item in person, your photos have to substitute for the "in-person" experience. Make sure your photos are well-focused, properly framed and cropped, and present the subject in appropriate detail. If the buyer needs to see more than the front of the item, use multiple
photosbut always lead with the most informative photo.
7. Include a detailed terms of serviceafter your product description. It's important to include the fine print of how you conduct businesswhat methods of payment you accept, which shipping services you use, your shipping/handling charges, whether you offer a returns policy, and so on. But don't place undue emphasis on this section; place it at the bottom of your listing, after the main description.
Remember, your TOS doesn't entice people to buy; it's necessary, but not the most important part of your listing.
your listing. There's nothing wrong with a plain-text listingassuming you include photos, of course. But there's also nothing wrong with including a little eye candy, in the form of background color or graphics, a variety of fonts, and an attractive page organization. This is where it pays to
know a little HTMLor to use an attractive listing template.
9. Cross-promote other items you have for sale. If you're an active seller, there's not reason not to promote your other auctions (or eBay Store) in all your auction listings. Yeah, eBay includes that little "View my other auctions" link, but some pretty pictures of your other auction items will do a much better job of cross-selling.
10. Spell check your listings. Successful online selling is all about establishing buyer confidence. When your auction listing includes gross misspellings, that confidence is
Ten Things Not to Do in Your Auction Listings
Okay, it's only fair. We just discussed ten things you should do in your auction listings. Now let's look at ten things you
shouldn't doat the risk of decreasing your sales!
1. Don't make your listing too long. Yeah, I know I said that you need to include all the necessary details in your item description. But the important word is "necessary," not "all." Don't force potential buyers to scroll through multiple screens of unnecessary information. Put the important stuff up-front and get to the end as quickly as you can. Two
screens worth of info is more than enough for most listings. Anything longer will cause potential buyers to click away to another auction.
2. Don't use large, slow-loading graphics. Not every buyer is on an ultra-fast broadband Internet connection. A good 40% of your potential customers still use old-fashioned dial-up connectionsand these connections, in case you forgot, are slow. If you pack your pages with a half-dozen extra-large photos, it might take a minute or more for your entire page to load on a dial-up connection. Many potential buyers simply won't wait that long, which means they click away before the page is done loading. Make sure you resize your graphics to minimize download times, and use just enough photos to enhance the sale.
4. Don't use too many different font, type size, and color combinations. I remember back in the early 1990s when desktop publishing programs first hit the mainstream. All of a sudden everyone thought they were expert page
designersbut they weren't. The upshot of PageMaker and similar programs was a profusion of poorly designed
newsletters and reports, most of which used too many
different fonts. Unfortunately, this same type of poor design is all too common in eBay auction listings, and too many fonts and type sizes make your listings hard to read. You should limit yourself to no more than two type faces, one for the title and one for the descriptive textalthough it's more than okay to use the same font for both. You should also limit yourself to no more than five type sizesfor the title (largest), subtitle largest), first paragraph (next-largest), main description (regular), and terms of sale
(smallest). And limit yourself to no more than two or three different type colors throughout the entire listingone for your title/subtitle, another for your body text, and a third for emphasized text within the listing body.
5. Don't use color combinations that are hard to read. Along the same lines, keep the color combinations down to a reasonable number, and make sure the colors are easy for anyone to read. That probably means dark type on a light background; reverse type (light text on a dark background) is much, much harder to read. You should also avoid garish color combinations, like orange and green, or purple and red. And remember that your eye automatically goes to the brightest colorso don't use the brightest color for the least important information!
6. Don't confuse the buyer with an overly-busy layout. Back to the PageMaker example, it's way too easy to create a page layout that is overly busy and oftentimes confusing. Try to lead the user's eye down the page in a natural
means going light on the random text boxes, graphics, and tables, all of which can serve as speed bumps for anyone trying to read from top to bottom.
7. Don't overuse animations and other flashy special effects. Most users hate, hate, hate flashy graphics and animations on a web page. Yeah, they attract attentionbut not in a good way. Unless you have a really good reason for including these types of special effects, avoid animations and flashing graphics like the plague. Just because you can
do something (using HTML), doesn't mean you should do it.
8. Don't subject the buyer to automatically playing
background music. Equally annoying is background music that plays as soon as the listing page is loaded. Not only is background music normally unwanted, it'll drive some
potential customers awayparticularly those who are browsing on their work computers. If you must include sound in your auctions, make the sound play only after the customer clicks a button. Optional sound is okay; forcing users to listen isn't.
9. Don't overwhelm the buyer with too many details and restrictions. Some sellers focus too much on the negative. There is nothing that turns off potential buyers faster than reading line after line of what the seller won't do. No
personal checks; no foreign bidders; no bidders with
negative feedback; no returns allowed; no this and no that. All that negativity drives customers away. It's okay to have a reasonable terms of sale (more than okay, actually; it's a good idea), but don't let the details get in the way of selling your item. Along the same lines, don't put your TOS at the top of your listing; keep it at the bottom, in the fine print, where it belongs.
Different Ways to Create Better-Looking eBay
Listings
The essentials of good design and effective listings apply no matter what tools you use to create your eBay auction listings. Throughout this book we'll discuss several different ways to create your eBay listings; each approach has its own pros and cons, which often revolve around ease-of-use and desired effect. Here's what we'll discuss:
For the ultimate in ease of use, you can create simple text listings (with basic formatting) by using eBay's standard text editor. We'll discuss this approach in Chapter 2, "Using Standard Text Formatting and eBay's Listing Designer."
Also high on the ease-of-use scale is eBay's Listing
Designer, which offers some very basic auction templates (which eBay calls "themes") for 10 cents a pop. We'll discuss this approach in Chapter 2, as well.
Many third-party sites offer listing services and standalone software that let you create your own fancy-looking eBay listings, no HTML coding required. We'll discuss this
approach in Chapter 3, "Using Auction Listing Services and Software."
Still more sites offer pre-designed auction templates into which you can insert your own auction information and photos. I've included dozens of these templates on this book's CD, and discuss this approach in Chapter 4, "Using Third-Party Auction Templates."
to an astonishing degree. To that end, the rest of the bookfrom Chapter 5 onis all about using HTML to create your own auction templates. It's a little work, but for many sellers, it's worth the effort.
Part II: Using Predesigned Auction Templates
2 Using Standard Text Formatting and eBay's Listing Designer
3 Using Auction Listing Services and Software
Chapter 2. Using Standard Text
Formatting and eBay's Listing Designer
When it comes to creating great-looking eBay auction listings, you can do it the hard way or you can do it the easy way. My motto is to try the easy way first; you never know, it might just be good enough. So that's what this chapter is aboutthe easy way to create formatted auction listings.Formatting a Normal Auction Listing with the
Text Editor
If you don't care about fancy background colors and graphics, you can perform a fair amount of text formatting for your item description using nothing more than eBay's standard text editor. As you can see in Figure 2.1, when you click the Sell link to
enter the sell your item process, the Describe Your Item page contains the familiar Description section. As you no doubt know (or have quickly figured out), this is a text box where you enter your item description. What's neat about the Description box is that it functions as a WYSIWYG (what you see is what you get) text editor, thanks to the formatting commands available just above the text box. All you have to do is enter your description, highlight the text you want to format, and then click the
appropriate formatting command.
Figure 2.1. eBay's standard text editor in the
Description section of the Describe Your Item
page.
Note
eBay is constantly updating its forms and tools to improve the user experience. With that in mind, it's possible that the text editor and other tools
discussed in this chapter might look different from what is presented here.
The result can be as visually interesting as you like, as you can see from the example in Figure 2.2. You can format the text's font, size, color, justification, and other attributes. Read on to learn more.
Figure 2.2. An item description formatted with
the commands available in the standard text
[View full size image]
Available Formatting Commands
Just what formatting commands are available in the standard text editor? Table 2.1 provides a complete list.
Table 2.1. Text Editor Formatting Commands
Formatting Command Description
Font Selects from four type families: Arial, Courier, Times, and Verdana
Size Selects from seven type sizes, from 8 pt. to 36 pt.
Color Changes the color of the selected text; available colors include Black, Blue, Red, Green, Brown, Gold, Purple, Pink, and Orange
Bold Displays the selected text in bold
Italic Displays the selected text in italics
Flush left Aligns the current paragraph to the left border
Center Centers the current paragraph on the page
Flush right Aligns the current paragraph to the right border
Bulleted list Displays the current paragraph as a bulleted list item
Numbered list Displays the current paragraph as a numbered list item
Decrease indent Moves the selected paragraph further to the left
Increase indent Moves the selected paragraph further to the right
You can use the various text formatting commands to create different formatting for different parts of your item description. For example, you can use a larger type face in bold to create a separate title, then a smaller type face (non-bold) for the main description. You can also highlight important words and phrases in bold or with a different color, or break out long lists of
features into a bulleted list.
Tip
The text editor also includes its own built-in spell checker. Just click the Check Spelling button to
Adding Inserts
eBay's text editor also includes some predesigned HTML code, in the form of inserts, for some of the most popular additional functions. To insert an insert, all you have to do is position your cursor within the text where you want the item to appear, and then select the insert from the pull-down menu.
Table 2.2 details the available inserts.
Table 2.2. Text Editor Inserts
Insert Example
Sellers Other Items
Add to favorites list
My Stores Logo
eBay stores logo
My Store newsletter
Creating Your Own Inserts
you create your own inserts, which you can then insert from the Inserts list in the text editor.
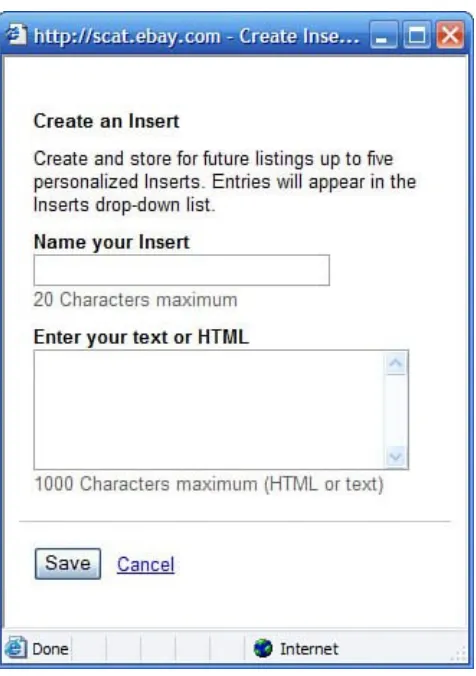
To create a new insert, follow these steps:
1. From the Description section of the Describe Your Item
page, pull down the Inserts list and select Create an Insert.
2. When the Create an Insert window opens, as shown in Figure 2.3, enter a name for your insert.
3. Enter the text or HTML for your insert into the appropriate text box.
4. Click the Save button.
Your newly created insert should now appear in the Inserts list, along with eBay's default inserts.
Tip
To create an insert for a graphic, use the HTML <img>
code, as explained in Chapter 5, "Learning How to Code with HTML"
Previewing Your Listing
When you're done formatting the text of your item description (and adding any desired inserts), you can preview how it will look on screen. Just click the Preview Description button, and a new window will open on your desktop, with the description section of your listing displayed, as shown in Figure 2.4.
Figure 2.4. Previewing your item description in a
separate window.
Enhancing Your Listing with Listing Designer
eBay's text editor lets you format your listing text, but doesn't let you add anything in the way of graphic interest. For that you need to use eBay's Listing Designer, also accessible from the Describe Your Item page. Listing Design lets you apply
predesigned templates, which it calls themes, to your item description. This feature isn't free; you pay 10 cents per listing to use Listing Designer.
Listing Designer also lets you customize the placement of the photos in your item listing. Normally, eBay sticks your photos below the listing; you don't have a choice in the matter. But when you use Listing Designer, you now can choose to put your photos at the top, bottom, left, or right of your item description. For many sellers, the customized photo placement alone is
worth the 10-cent price of using Listing Designer.
Choosing a Theme
As just discussed, Listing Designer lets you apply one of more than 200 different visual themes to your listing. While these themes aren't near as sophisticated or versatile as a full-featured listing template, they do add a little visual spice to your listings.
to format your item description text in the text editor. But by combining some simple text formatting with a colorful Listing Designer theme and custom photo layout, you can create
listings that stand out from the standard eBay text-only listings.
Selecting a theme is as easy as scrolling to the Listing Designer section (under the Description section, as shown in Figure 2.5) and checking the Enhance Description with a Theme and Layout option, pulling down the Theme list to select a category, and then selecting a specific theme within that category. A
thumbnail of the selected theme is displayed next to the pull-down list.
Figure 2.5. Selecting a Listing Designer theme.
[View full size image]
eBay organizes its Listing Designer themes into seven major categories:
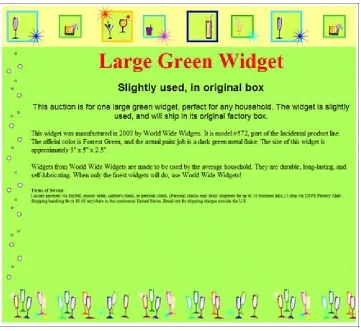
New, which features the latest themessuch as the Night Driving theme, shown in Figure 2.6.
[View full size image]
Special Events, which features themes for anniversaries and other celebrationssuch as the Celebration - Glasses theme, shown in Figure 2.7.
Figure 2.7. eBay's Celebration - Glasses
theme.
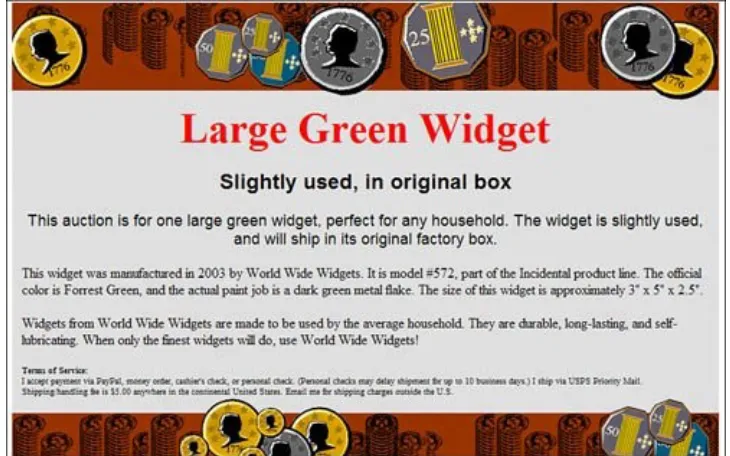
Category Specific, which features themes designed for specific product categoriessuch as the Coins - Red theme, shown in Figure 2.8.
Figure 2.8. eBay's Coin - Red theme.
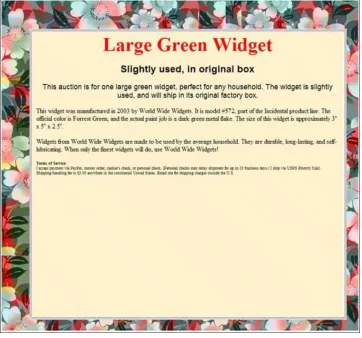
Patterns/Textiles, which features themes with patterned borders or backgroundssuch as the Elegant Floral theme, shown in Figure 2.9.
Figure 2.9. eBay's Elegant Floral theme.
Holiday/Seasonal, which features a variety of
holidaybased themessuch as the Christmas Tree theme, shown in Figure 2.10.
Figure 2.10. eBay's Christmas Tree theme.
eBay Stores, which features themes of interest to eBay Stores sellerssuch as the Stores Awning theme, shown in Figure 2.11.
Figure 2.11. eBay's Stores Awning theme.
Miscellaneous, which features themes that don't fit in any of the other categoriessuch as the Flags theme, shown in Figure 2.12.
Figure 2.12. eBay's Flags theme.
[View full size image]
Selecting a Picture Layout
Standard, which displays your photos in the default position underneath the item description, as shown in
Figure 2.13. With this option, multiple photos appear as one big photo and a series of smaller thumbnails; visitors have to click a thumbnail to view the full-size picture.
Figure 2.13. eBay's Standard photo layout.
[View full size image]
Photo on the left, which displays your photos on the left side of your listing, with the item description text to the right, as shown in Figure 2.14.
item description.
[View full size image]
Photo on the right, which displays your photos on the right side of your listing, with the item description text to the left, as shown in Figure 2.15.
Figure 2.15. Photos displayed on the right of
the item description.
Photo on the bottom, which displays your photos below the item description text, as shown in Figure 2.16. This option differs from the Standard layout in that all photos are displayed full size, stacked one on top of another.
Figure 2.16. Photos displayed below the item
description.
Photo on the top, which displays your first photo at the very top of the listing and the others below the description text, as shown in Figure 2.17.
[View full size image]
Previewing Your Listing
page. You have to click the Continue button at the bottom of the page to advance to the Review and Enhance Your Listing page. Scroll down to the Review Your Listing section, and you'll see your listing displayed within the short scroll box, as shown in Figure 2.18. This probably won't give you a good idea of how the listing will really look in a web browser, so click Preview in a Window to open a full-size preview of your listing in a new
browser window, as shown in Figure 2.19.
Figure 2.18. Your themed listing displayed in the
middle of the Review and Enhance Your Listing
page.
[View full size image]
Figure 2.19. The same listing, previewed full-size
in a separate window.
Using Listing Designer Themes in eBay Turbo
Lister
eBay's Listing Designer themes are also available in eBay's Turbo Lister program. Turbo Lister, if you're not aware, is a free bulk listing creation tool offered by eBay. It's a nice program that integrates well with the eBay site, as you might expect. And all the Listing Designer themes and picture layouts
available on the eBay site are also present in Turbo Lister
Note
Learn more about Turbo Lister in Chapter 3, "Using Auction Listing Services and Software."
To apply a theme within Turbo Lister, you have go to the listing you want to format and click the Change button in the
Description section. This opens the Enter Your Description
window, shown in Figure 2.20. Click the Use Designer option on the left side of the page, and then select a theme from the
Themes list and a photo layout from the Layout list. You can preview how the listing will look with the theme applied by selecting the Preview tab.
from within eBay's Turbo Lister program.
Use Other Programs to Create Fancy eBay
Listings
Like I noted at the start of this chapter, using standard text formatting and Listing Designer themes is the easy way to enhance the look of your auction listings. This approach is
limited, however, not only to a set number of themes but also in the sophistication of the designs.
That said, there are lots of other websites and software
programs you can use to create eBay auction listings, and some of these offer some pretty cool-looking listing designs. That's what we'll discuss in the next chapterso turn the page to learn more about these third-party listing creation services and
Chapter 3. Using Auction Listing
Services and Software
Practically every eBay seller starts out by using eBay's default sell your item form. As we discussed in the previous chapter, that form allows a good bit of listing customization, thanks to the Listing Designer feature, but it's certainly not the most robust way to create fancy-looking auction listings.
That's probably why so many third parties have entered the market for creating eBay auction listings, with a variety of listing creation services and software. Some of these
services/software are freestanding, dedicated only to the creation of auction listings; some are part of a more
comprehensive auction management package that also offers end-of-auction emails, checkout services, bulk feedback listing, and so on. Most of these sites and programs come with a fee, although a few are free to use. Almost all let you create listings that are somewhat more sophisticated than those you can
create with eBay's Listing Designer.
Using Auction Listing Services
An auction listing service is, quite simply, a website that lets you create eBay auction listings from within your web browser. You create the listings, apply some sort of predesigned template (or perform your own custom formatting), and then have the service upload the listing to the eBay auction site. Depending on the service, your listings may be free; you may be charged a per-listing fee; or you may pay a flat monthly subscription
charge. And, as part of the package offered by the site, you may have other auction management services available to you.
Note
Whatever fee you do or don't pay to the third-party site, you still have to pay eBay the standard
insertion fee for your listing.
That's it in a nutshellalthough the specific features offered will differ from site to site.
Why Pay for an Auction Listing Service?
If eBay lets you create basic auction listings for free (aside from the normal insertion fee, of course), why would you pay money to do the same thing at a different site?
That's a good question, with a few good answers.
want a standard text-based listing. If you include more than one photo, you have to pay extra. And if you want to use the fancy Listing Designer background themes, you pay an extra dime for that service. So listing creation on eBay isn't always free.
Second, there's the matter of variety and flexibility. As you learned in Chapter 2, "Using Standard Text Formatting and
eBay's Listing Designer," the themes that eBay offers aren't that spectacular, really. And there's only so much customization you can do; eBay's themes don't automatically create separate sections or formatting for different parts of your listing. So if you want a wider variety of better-looking predesigned
templates, you have to look outside of eBay.
Which is why all these listing-creation services exist.
Popular Auction Listing Services
There are a number of sites that offer auction management services, and almost all of them include fancy listing creation as part of those services. In addition, there are a handful of sites that offers standalone listing-creation services, without all the other auction management stuff. We'll look at the major ones next.
Tip
Ándale
Ándale (www.andale.com) is a site that offers various services for eBay sellers. Chief among these tools is the Ándale Lister bulk listing creation tool.
Ándale Lister lets you create good-looking listings, working from a catalog of more than 100 professionally created listing
templates. (Figure 3.1 shows a typical Ándale listing template.) You also get a built-in HTML editor, so you can customize the existing templates or create your own custom listings.
Figure 3.1. A listing created with Ándale Lister.
You can create your listings in bulk and then upload them
according to your designated timetable. You can even program a series of listings to launch on a regularly occurring scheduleor until your inventory runs out. Other listing features include a built-in spell checker, delayed launch scheduling, inline images (and an image hosting service), and pre-filled information for many item categories.
Note
Ándale also offers the Ándale Lister Pro software-based listing tool, discussed later in this chapter.
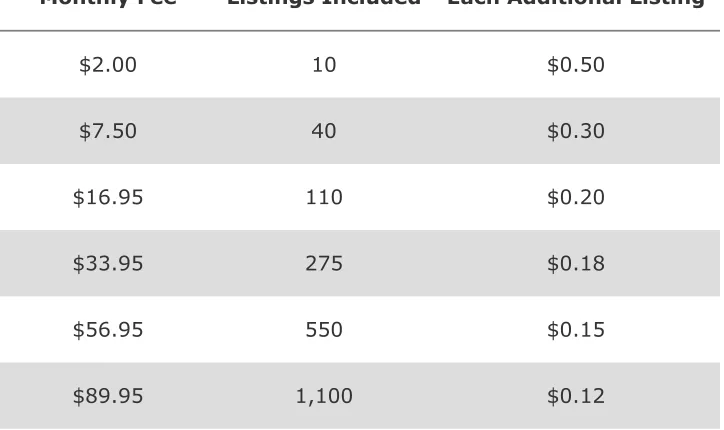
Like most of the other third-party listing creation tools, Ándale Lister isn't free; Table 3.1 details the tiered pricing schedule.
Table 3.1. Ándale Lister Fees
Monthly Fee Listings Included Each Additional Listing
$2.00 10 $0.50
$7.50 40 $0.30
$16.95 110 $0.20
$33.95 275 $0.18
$56.95 550 $0.15
$149.95 2,750 $0.10
$224.95 5,600 $0.08
Auction Hawk
Auction Hawk (www.auctionhawk.com) is a web-based auction listing/management service with quite affordable pricing. The site offers various tools in its main service, including built-in listing creation, image hosting, end-of-auction checkout with automated winning-bidder email, bulk feedback posting, and profit-and-loss reporting.
The site's primary listing-creation tool is the 1-Page Lister. As the name implies, it uses a single form-based page to create your eBay auction listings. More important, 1-Page Lister lets you use choose from over 2,000 pro-series templates (like the one shown in Figure 3.2), or use your own image backgrounds for your listings. You can also include up to 50 of your other listings in a scrolling cross-promotion gallery.
Figure 3.2. A listing template created with
Auction Hawk's 1-Page Lister.
Auction Hawk offers a five-level flat pricing scheme, as detailed in Table 3.2.
Table 3.2. Auction Hawk Fees
Level Monthly Fee Number of Listings Included
Basic $12.99 110
Power $21.99 250
Preferred $29.99 550
Professional $44.99 1,100
Unlimited $89.99 Unlimited
Auctiva
Auctiva (www.auctiva.com) offers a variety of different auction listing/management services, all of which are completely free of charge. Free is good, which explains Auctiva's newfound
popularity among eBay sellers.
marketing angle, in case you haven't noticed) lets you choose from hundreds of predesigned templates, such as the one in Figure 3.3. The templates are pretty basic, similar to what you get with eBay's Listing Designer, but they cost 10 cents less than eBay's templates. (They're free, in case you forgot.)
Figure 3.3. One of Auctiva's free predesigned
auction templates.
ChannelAdvisor (www.channeladvisor.com) offers a variety of auction and retail management toolsmost of which are targeted at larger online merchants. The service you want to look at is ChannelAdvisor Pro, which is actually HammerTap Manager in disguise. (We'll get to HammerTap next.) This service is a surprisingly easy-to-use collection of auction management tools, quite reasonably priced at a flat fee of just $29.95 per month.
With ChannelAdvisor Pro you can choose from a variety of predesigned templates or write your own HTML. You also get delayed scheduling, image hosting, and the other expected listing-creation features.
HammerTap
Next, we come to HammerTap (www.hammertap.com).
HammerTap sells various auction management software and services, all offered with a la carte pricing. The tool you're interested in is HammerTap Manager, the kissing cousin of
ChannelAdvisor Pro, which offers web-based listing creation. As noted in the ChannelAdvisor Pro discussion, HammerTap
Manager offers both predesigned templates and do-it-yourself HTML listing creation. Pricing is on a tiered schedule, as shown in Table 3.3.
Table 3.3. HammerTap Manager Fees
Level Monthly Fee Number of Listings Included
Standard $29.95 500
Gold $54.95 1,000
Platinum $99.95 2,000
inkFrog
inkFrog (www.inkfrog.com) is a cute name for some heavy-duty web-based auction management services. The one we're
interested in is the i-Lister, which lets you create your own
custom-built auction listings, based on a variety of predesigned templates. (Figure 3.4 shows a typical inkFrog auction
template.) You also get bulk listing, delayed auction launching, free image hosting, and the i-Showcase cross-promotion tool. Various pricing plans are offered, starting at $7.95 per month.
Figure 3.4. A listing template created with
inkFrog's i-Lister.
SpareDollar
SpareDollar (www.sparedollar.com) is a top choice of frugal eBay sellers. This popular site offers a complete package of auction management servicesincluding the sdLister bulk upload toolfor just $8.95 per month. No extra charges, just a flat
$8.95, no matter how many listings you create. Not a bad deal!
weeks in advance, and you even get the ability to relist unsold items in bulk. It's a pretty good dealespecially when you
consider the other tools (auction tracking, image management, and so on) you get as part of the package.
Figure 3.5. A listing template created with
SpareDollar's sdLister.
[View full size image]
Vendio (www.vendio.com) claims to be the largest third-party supplier of services to eBay sellers, used by tens of thousands of sellers each month. The company offers the Sales Manager service, which is a powerful set of listing creation and auction management tools. You can use Sales Manager not only to create new item listings, but also to manage all of your current and post-auction activity.
You can actually choose from two versions of Sales Manager. Sales Manager Merchandising Edition is designed for sellers who sell a lot of unique items; Sales Manager Inventory Edition is designed for sellers who sell multiple quantities of similar items. Both versions let you create listings based on predesigned
templates (and customized with your own HTML), such as the one in Figure 3.6.
Whichever version you choose, the pricing is the same, using a combination of monthly fees, per-item listing fees, and per-item final value fees. It's all a little complicated, especially when you consider that Vendio offers both variable rate and flat rate
plans. Table 3.4 details Vendio's current pricing.
Table 3.4. Vendio Sales Manager Fees
Plan Monthly Fee Listing
Fee
Final Value Fee
Pay as You Go Plan none ($2.95 monthly
minimum) $0.10 1%
Variable Rate Premium
Plan $12.95 $0.05 1%
Variable Rate Power
Plan $29.95 none 1.25%
Flat Rate Premium Plan $12.95 $0.20 none
Flat Rate Power Plan $39.95 $0.10 none
Annual Listing Plan $250 (yearly) $0.06 none
If you're interested in using Vendio primarily for its listing creation services, you probably want to sign up for one of the flat rate plans, which don't take a hunk out of your final sales price. Or, if you just want to check things out, perhaps the Pay as You Go Plan is the best way to go, as you don't have a hefty up-front monthly charge. I don't know; all these pricing
Using Auction Listing Software
All of the services we've discussed so far in this chapter are just thatservices, based on the company's website. To create an
auction listing, you use your web browser to access the website, log in, and then get to work.
But many sellers prefer to do their listing creation offline, at their own pace. For these sellers, a listing creation program is the preferred tool, like the ones we'll discuss next.
Why Use Listing Software Instead of a
Web-Based Service?
There are a few advantages to using a listing program instead of a web-based service. For one, using a software program lets you work offline, at your own pace; you can create your listings at any time of day or night, and upload them at your leisure.
Second, since you work offline, all your auction information is stored on your own computernot on somebody else's website. That makes it easier to access past information when you're not online, and to manage it as you see fit. (Many sellers like to create their own sales reports using Excel or Access, which isn't always doable with web-based management services.)
Popular Listing Creation Programs
If the software route sounds like the way you want to go, then here are the programs to check out. It's important to note that several of these listing creation programs are offered by eBay, which doesn't make them any better or any worse than the other programs; it only makes them "official," whatever that is worth.
Ándale Lister Pro
Earlier in this chapter we discussed the web-based Ándale Lister service. Ándale also offers a software-based listing-creation tool, called Ándale Lister Pro (www.andale.com), which provides the option of creating all your auction listings offline, at your leisure. The software is free to download, although Ándale still charges fees for all listings you upload.
Note
There's no need to repeat Ándale's fee structure here. Refer to Table 3.1 for all the details.