and the Cascades UI Framework
Learn
BlackBerry 10
App
Development
A Cascades-Driven Approach
®
•
•
•
•
•
•
•
•
•
For your convenience Apress has placed some of the front
matter material after the index. Please use the Bookmarks
v
Contents at a Glance
About the Author ...
xiii
About the Technical Reviewers ...
xv
Acknowledgments ...
xvii
Introduction ...
xix
Chapter 1: Getting Started
■
...
1
Chapter 2: QML and JavaScript
■
...
33
Chapter 3: C++, Qt, and Cascades
■
...
59
Chapter 4: Controls
■
...
99
Chapter 5: Application Structure
■
...
133
Chapter 6: ListView and DataModel
■
...
171
Chapter 7: HTTP Networking
■
...
219
Chapter 8: Personal Information Management APIs
■
...
251
Chapter 9: Sensors
■
...
281
Chapter 10: Invocation Framework
■
...
301
Appendix: Device File system
■
...
323
xix
Introduction
BlackBerry 10 is the latest incarnation of the mobile operating system developed by BlackBerry for its new line of smartphones. As you can imagine, mobile platforms have experienced exponential growth in the recent years and BlackBerry has invested tremendous efforts in order to build a rock solid operating system fuelling its future generations of devices. BlackBerry 10 is also amazingly powerful and includes tons of enhancements compared to its predecessors. First of all, the heart of BlackBerry 10 ticks with the QNX hard real-time microkernel, which is used in safety critical systems such as nuclear power plants, medical devices, and also increasingly in automotive systems.
BlackBerry 10 adds to rock-solid QNX a wealth of new APIs for accessing a mobile device’s sensors (such as its camera, accelerometer and gyroscope) and also includes the Cascades UI framework for building beautiful mobile applications. In essence, the new range of APIs propel BlackBerry 10 to the next level of mobile computing and give you the tools for developing truly innovative apps. The purpose of this book is to introduce you to the amazingly cool features of BlackBerry 10 and give you a solid foundation in Cascades application development. As I mentioned it in the previous paragraph, Cascades is first and foremost the new UI framework for building native BlackBerry 10 applications. Cascades is also based on QML, which is a powerful declarative language for designing UIs. Because QML is tightly integrated with JavaScript and C++, you have the choice between using JavaScript for the UI layer of your app and, if necessary, rely on C++ for the
performance critical aspects of the app. In essence, Cascades gives you an efficient way of creating native applications with beautiful UIs optimized for the BlackBerry 10 line of mobile devices. From a consumer perspective Cascades provides a very rich and visually enticing user experience based on beautiful controls and animations.
BlackBerry 10 is also a land of opportunity. As I write this introduction, new markets are opening up and new devices, more powerful with wider screens than my year-old Z10 companion, are rolling out. Secure platforms designed for enterprise users and, increasingly, cloud services users are still BlackBerry’s forte. As a developer you can tap into this largely unexploited world of opportunities by designing the next killer app. I hope this book will help you pave the way and that you will enjoy the same sense of fun and excitement I have using Cascades.
Should you want to share anything about the book with me, please feel free to reach me through my website (http://www.aludin.com). You will also find on the site some advanced material about BlackBerry 10 and Cascades programming that did not make the cut in the book’s current release. Finally I have also kept an up-to-date errata list on the book’s page. So if you feel at any point that the sample code ziggs when it should have zagged, make sure to check the list.
The eBook version of this book is free for all users under the license found on the copyright page of this book. You are therefore encouraged to share the ebook version with your friends, colleagues and BlackBerry developer enthousiasts. It can be downloaded for free from any major book reseller’s website, and from Apress using the following URL: www.apress.com/9781430261575 (you can also download from that location the code included with the book).
—Anwar Ludin, la Muse coworking center,
1
Chapter
1
Getting Started
This chapter will show you how to set up your BlackBerry 10 development environment and deploy your first application on the BlackBerry 10 simulator and on a physical device. You will also get a broad perspective of the Cascades programming model, as well as its most essential features. In setting up your environment, I will walk you through the following steps:
Getting your code signing keys and generating debug tokens.
Using the Momentics IDE to create your first Cascades project.
Building and deploying your application on a simulator and a physical device.
Cascades Programming Model
BlackBerry 10 is a major mobile operating system overhaul. It’s the third release built on top of the extremely reliable QNX operating system, which is used in critical applications ranging from medical devices to nuclear power plants. QNX is also POSIX compliant, meaning that if you’re familiar with a UNIX programming API, you will feel just at home with the operating system’s calls. Another big advantage of building BlackBerry 10 on top of a POSIX system is the availability of a myriad of open-source libraries that you can include in your own projects.
BPS is an API written in C, giving low-level access to the BlackBerry 10 device. It’s mostly used when you need to write high-performance applications such as games that require the most effective way of accessing the hardware. BPS is not the main subject of this book. I will nevertheless give you examples of how to use it, but I will mostly concentrate on the higher-level modules built on top of BPS.
Qt is a C++ framework providing an abstraction layer to the lower-level POSIX APIs. It also adds many classes and components essential to C++ programming. The following modules from the Qt framework have been ported to the BlackBerry 10 platform and can be used in your own applications:
QtCore: Provides the core framework elements for building C++ applications. In particular, QtCore defines the Qt object system, an event handling mechanism called signals and slots, memory management, and collection classes, to name a few.
QtNetwork: Provides APIs for building networked applications. In particular, for HTTP applications, it provides the QNetworkAccessManager class.
QtSql: Includes drivers and data access logic to relational databases.
QtXml: Includes SAX and DOM parsers for handling XML documents.
The Qt modules mostly provide non-GUI functionality for your application. To build rich native applications with an engaging UI, you need to rely on the Cascades layer of the BlackBerry 10 architecture. In fact, Cascades is much more than a GUI framework; it also includes the following nonexhaustive list of services and APIs:
User interface: Provides the core components for building rich native user interfaces using QML/JavaScript, C++, or a mix of all three technologies.
Application integration: APIs that integrate platform applications and functionality such as e-mail and calendar into your own apps.
Data management: High-level APIs abstracting data sources and data models. The supported data formats include SQL, XML, and JSON.
Communication: APIs for enabling your apps to communicate with other devices by using, for example, Bluetooth, Wi-Fi, and NFC.
Location: APIs for using maps and managing location services in your application.
Multimedia: APIs for accessing the camera, audio player, and video player in your apps.
Platform: Additional APIs for managing platform notifications and home screen functions.
When developing native applications, you will notice that there is some overlap between the functionality provided by Cascades and the underlying modules. At first this might seem confusing but you should keep in mind that Cascades often provides a richer and easier-to-use API. Therefore, as a good rule of thumb, always try to implement a functionality with the Cascades API first, and if it is not possible, use the underlying Qt or BPS modules. Networking is a good example where you will use the QtNetwork module essentially.
QML
When building user interfaces with Cascades, you can proceed in two distinct ways: you can either write imperative code in C++ or create your UI declaratively with the Qt Modeling Language (QML). Most examples in this book use the latter approach for the following reasons:
Thanks to the Cascades Builder tool, you get immediate feedback on the way
your UI will look in QML.
When it comes to designing UIs, writing C++ code can quickly become
unmanageable, especially if you consider many nested components. In contrast, QML keeps the code much more tractable.
Once you get the hang of QML, it is way faster to create a polished UI within a
few minutes than in C++.
Behind the scenes, you are still using C++ objects exposed to QML by
Cascades. QML simply makes your life easier during the entire application development life cycle by avoiding numerous compile-build-deploy cycles until you get the UI right.
QML is a much friendlier language than C++ for people with a programming
background in JavaScript. You will therefore have a greater chance of sharing your UI designs with other members of your team if they are written in QML.
Listing 1-1 shows the QML markup version.
Listing 1-1. main.qml
import bb.cascades 1.0 Page {
Container { TextField { id: texfield }
Slider{ id: slider fromValue: 0 toValue: 100
onImmediateValueChanged: {
texfield.text = Math.round(immediateValue) }
} } }
The equivalent C++ version of the code for creating the same UI is given in Listings 1-2 and 1-3.
Figure 1-2. Stacked TextField and Slider
Don’t worry if you have never programmed in C++, we will cover the basics in Chapter 3. As a matter of fact, you will also see in Chapter 2 that you can build relatively complex Cascades applications using
QML/JavaScript only, without ever writing a single line of C++ code.
Listing 1-2. applicationui.hpp
class ApplicationUI : public QObject {
Q_OBJECT public:
public slots:
void onImmediateValueChanged(float value);
};
Listing 1-3. applicationui.cpp
ApplicationUI::ApplicationUI(bb::cascades::Application *app) : QObject(app) { Page *page = new Page();
Container *contentContainer = new Container(); contentContainer->setLayout(StackLayout::create());
TextField* textfield = TextField::create();
Textfield->setObjectName("textfield"); Slider* slider = Slider::create();
slider->setFromValue(0); slider->setToValue(100);
contentContainer->add(textfield); contentContainer->add(slider);
QObject::connect(slider, SIGNAL(immediateValueChanged(float)), this, SLOT(onImmediateValueChanged (float)));
page->setContent(contentContainer); app->setScene(page);
}
void ApplicationUI::onImmediateValueChanged(float value) { value = round(value);
QString stringValue = QString::number(value);
Application* app = static_cast<Application*>(this->parent());
TextField* textField = app->scene()->findChild<TextField*>("textfield"); textField->setText(stringValue);
}
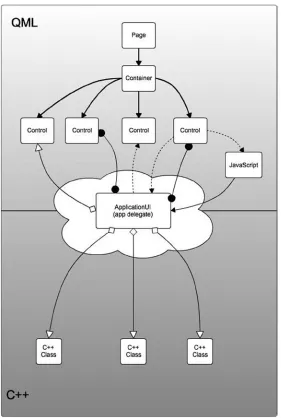
ApplicationUI is the “application delegate” in charge of creating the user interface and wiring together the application’s controls’ event handling. You have to provide this class and it is instantiated during the application bootstrap process.
As you can see, the declarative way of building the UI in QML is very concise compared to the imperative C++ approach. This is also because Cascades takes care of a lot of the plumbing work for you behind the scenes when you’re using QML.
Signals and Slots
or C++, which will be called in the corresponding Cascades predefined signal handler. Signals and slots are part of the QtCore module. The Cascades framework uses them in order to build a high-level event handling mechanism. This section will expand on the topic in order to give you a firm grip on the way signals and slots work. As noted previously, the most important property of signals is their ability to let you bind objects together without them knowing about each other.
Signals and Slots in QML
For a given predefined signal signal, Cascades also provides a corresponding predefined onSignal
handler (which is also called equivalently a slot). You can write JavaScript code in your QML document to tell Cascades what to do when the handler is triggered and how the control should respond to the signal. For example, in order to handle the slider’s position updates, Cascades defines a predefined
onImmediateValueChanged signal handler called when the slider emits the immediateValueChanged signal. In Listing 1-1, the predefined handler will execute the texfield.text = Math.round(immediateValue)
JavaScript code in order to update the textfield. You will also notice that the JavaScript code references an immediateValue parameter. Signals usually include extra parameters that provide additional
information about them. In QML, they are implicitly available to the JavaScript execution context and you can use them in order to retrieve further information about the change that just occurred.
You can refer to the Cascades API reference found at http://developer.blackberry.com/cascades/
reference/user_interface.html for a list of all predefined signals and corresponding slots organized
by GUI control. Look under the core controls section.
Signals and Slots in C++
Looking at Listing 1-2, you will notice that I’ve used the slots: annotation to declare an
onImmediateValueChanged(float value) slot in the application delegate class. In Listing 1-3, I’ve connected the slider’s onImmediateValueChanged(float value) to the application delegate’s
onImmediateValueChanged(float value) slot using the QObject::connect(source, SIGNAL(signal), destination, SLOT(slot)) method.
TheQ_OBJECT, signals:andslots:“annotations” are Qt extensions to the C++ language.
Signals and slots are implemented in Qt using the following constructs: A class must inherit from
QObject.
You must add the
Q_OBJECT macro at the beginning of the class definition. The
If you intend on extending the class, you must also repeat the Q_OBJECT macro in all of its subclasses.
Figure 1-3. Sensor system
You must declare the class signals using the
signals: annotation.
You must declare the class slots using the
slots: annotation.
You must define the class slots as regular member functions.
Finally, you must wire signals and slots using
QObject::connect().
As an example, let us consider the case of a temperature sensor. We would like to build a system where we can chart and log temperature readings over time. We would also want to decouple the system by separating the charting logic from the temperature logging. A very simplified design can be implemented using three classes (see Figure 1-3). The TempSensor class is responsible for the temperature readings through the setTemp(float newValue) function, which could be triggered by a hardware interrupt. The function would then update TempSensor’s internal state, and then emit a
tempChanged(float) signal. The TempChart and TempLogger classes would respectively handle the signal with a corresponding onTempChanged(float) slot.
Listing 1-4. TempSensor.hpp
#include <QObject>
class TempSensor : public QObject{ Q_OBJECT
public:
TempSensor(QObject* parent=0) : QObject(parent), m_value(0) {}; virtual ~TempSensor(){};
void setTemp(float newValue){ if(m_value == newValue) return; m_value = newValue;
emit(tempChanged(m_value); }
signals:
void tempChanged(float)
private:
float m_value; };
#include <QObject>
class TempChart : public QObject{ Q_OBJECT
public:
TempChart(QObject* parent=0) : QObject(parent){}; public slots:
void onTempChanged(float value){ // do charting
} };
#include <QObject>
class TempLogger : public QObject{ Q_OBJECT
public:
TempLogger(QObject* parent=0) : QObject(parent){};
public slots:
void onTempChanger(float value){ // do logging
Listing 1-5. main.cpp
QObject::connect(sensor, SIGNAL(tempChanged(float)), logger, SLOT(onTempChanged(float))); QObject::connect(sensor, SIGNAL(tempChanged(float)), chart, SLOT(onTempChanged(float)));
// do temperature readings here. }
Here are a few things to keep in mind when implementing signals and slots: Signals are triggered in your code using the emit
signalName() syntax
(see Listing 1-4).
Signals must always have a void return value. In other words, you can’t get a
return value from a signal once it has been emitted.
As illustrated in the previous example, one signal can be connected to many
slots. When the signal is emitted, the slots are called one after the other. The opposite is also true; many signals can be connected to the same slot.
You can also connect a signal to another signal. When the first signal is emitted,
the second one is also emitted.
Slots are normal member functions. You can call them directly if you wish. They
can also be virtual functions if you wish.
The signature of a signal must match the signature of the receiving slot.
A slot can also have a shorter signature than the signal (in this case the slot drops the extra arguments).
Meta-Object System
Qt extends C++ with a meta-object system in order to introduce runtime introspection features that would not be available with a statically compiled language such as C++. Behind the scenes, Qt uses the meta-object compiler (MOC) to generate the extra C++ plumbing code for the functions declared by the Q_OBJECT macro and for the class signals. Finally, the QObject::connect function uses the MOC-generated introspection functions to wire signals and slots together. When building Cascades applications, the MOC is called transparently by the build system.
Cascades Application Bootstrap Process
Listing 1-6. main.cpp
Q_DECL_EXPORT int main(int argc, char **argv) {
Application app(argc, argv);
// Create the Application UI object, this is where the main.qml file // is loaded and the application scene is set.
new ApplicationUI(&app);
// Enter the application main event loop. return Application::exec();
}
The first step in main is to create an instance of a bb::cascades::Application class, which provides the application’s run loop, and all the boilerplate functionality required by a Cascades application. At this point, you will have a “bare bones” Cascades app but the run loop has not kicked in yet. To further customize the application, the following properties of the bb::Cascades::Application
instance have to be specified:
Scene property: Specifies the instance of bb::cascades::AbstractPane to use as the scene for the application’s main window. A scene is basically a layout of controls which will be displayed in the application’s main window.
Cover property: Specifies the instance of bb::cascades::AbstractCover to be used when the application is in cover mode.
Menu property: An instance of a bb::cascades::Menu accessible by the user with a swipe from the top of the screen.
In practice, you will not update the bb::cascades::Application’s properties directly in the main
function but instead rely on an application delegate object, which will take care of loading or creating the main scene and wiring all the events using signals and slots. You’ve already seen an implementation of an application delegate in Listing 1-2 and Listing 1-3 given by the ApplicationUI
class. In Listing 1-3, we customized the application delegate in order to build the scene graph using C++. Listing 1-7 shows the default version generated by the Momentics IDE’s New BlackBerry Project wizard (more on installing your development environment later in the chapter).
Listing 1-7. applicationui.cpp
ApplicationUI::ApplicationUI(bb::cascades::Application *app) : QObject(app)
{
// Create scene document from main.qml asset, the parent is set // to ensure the document gets destroyed properly at shut down.
QmlDocument *qml = QmlDocument::create("asset:///main.qml").parent(this);
// Create root object for the UI
AbstractPane *root = qml->createRootObject<AbstractPane>();
// Set created root object as the application scene app->setScene(root);
}
I’ve removed the code related to localization in order to concentrate on the scene graph creation logic. Here an instance of a bb::cascades::QmlDocument is created by reading the main.qml QML file containing the declarative UI description. This is the same QML you will design using the Cascades Builder tool.
Finally, once the application delegate has been initialized, the application’s main event loop kicks in through a call to bb::cascades::Application::exec().
Parent-Child Ownership
If you take a close look at Listing 1-3, you will notice that I haven’t released the objects allocated with the new operator at any point in the code. This might seem as a memory leak but it’s not. Cascades widgets are organized in a parent-child relationship that also handles object ownership and memory management. In the case shown in Listing 1-3, the root parent of the entire object hierarchy is the
bb::cascades::Application app object. The memory associated with the child controls will be released when this object is deleted by the runtime. I will cover memory management in detail in Chapter 3, but for the moment you can safely assume that there are no memory leaks in Listing 1-3.
Native SDK Setup
To build Cascades applications, you need to set up the native SDK using the following steps:
1. Download and install the latest version of the Momentics IDE from
http://developer.blackberry.com/native/downloads (the page will also
provide you with a link to the latest BlackBerry 10 simulator). You can either download the simulator directly or let Momentics handle the download at a later stage when you configure a simulator target.
2. Request a BlackBerry ID from http://blackberryid.blackberry.com. You will need your BlackBerry ID to create a BlackBerry ID token, which is used in turn for generating debug tokens (debug tokens are deployed on a BlackBerry device during development and enable your device to run development code). Note that you don’t need a debug token for the simulator.
3. As soon as you have created your BlackBerry ID, go to
https://www.blackberry.com/SignedKeys in order to generate a BlackBerry
4. After having signed in, you will be redirected to another page for generating your BlackBerry ID token. Enter a password for the token, accept the license agreement, and click Get Token (see Figure 1-5).
5. The token will be generated and downloaded as a file called bbidtoken.csk. Depending on your development platform, you will have to put the file in one of the following locations:
a. Windows XP: C:\Documents and Settings\Application Data\Research in Motion\
b. Windows Vista, Windows 7, and Windows 8: C:\Users\AppData\Local\ Research in Motion\
c. Mac OS X: ~/Library/Research in Motion
Momentics IDE
To create Cascades applications, you will use the Momentics IDE, which essentially adds extra plug-ins and tools to a standard Eclipse distribution (if you’ve already used Eclipse in the past for Java or Android development, you will be right at home; otherwise, don’t worry—this section will guide you through the IDE). This section explains how a Cascades project is organized in Momentics and reviews the most important features of the IDE that you will be using frequently. First start by creating a new Cascades project using the following steps:
1. Launch the Momentics IDE and choose File ➤ New ➤ BlackBerry Project… This will start the New BlackBerry Project wizard shown in Figure 1-6.
2. Select Cascades as the project type and click Next.
3. Select Standard Empty Project from the templates page and click Next.
4. On the Basics Settings page, change your project’s name from the default CascadesProject to HelloCascades, and then click Next. Don’t change any of the other default settings.
5. Keep the default settings on the last wizard page API Level and click Finish.
6. If you’re not in the QML Editing perspective, a prompt will appear, asking you if you want to switch to it. Click Yes.
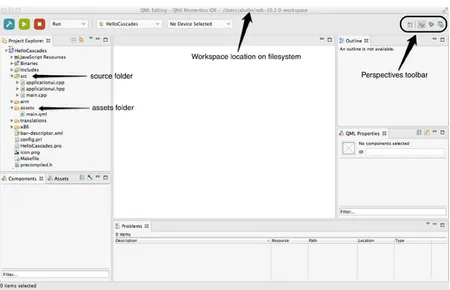
Workspace
Momentics stores your projects in a workspace, which is essentially a collection of projects located in the same directory on your file system. Once you’ve finished creating the HelloCascades project, your workspace should look similar to Figure 1-7.
Perspectives
A perspective is a task-oriented collection of views and editors. When designing Cascades
applications, you will mostly use the QML Editing, C/C++, and Debug perspectives. You can easily switch from one perspective to another using the perspectives toolbar or the Window ➤ Open Perspective navigation menu. Some views, such as the Project Explorer, will appear in multiple perspectives.
In the Project Explorer view, the src subfolder contains the following C++ source files:
main.cpp: Defines the application entry point main.
applicationui.hpp and application.cpp: You will find the wizard-generated application delegate declaration and definition.
You’ve already seen simplified versions of these files in the examples in Listing 1-7. For the moment, you can simply ignore them. The assets subfolder contains the main.qml defining your application’s UI. Let’s spice up the default version of the app generated by the Cascades wizard.
1. Create a new folder called images under the assets folder of your project (see Figure 1-5).
2. Copy the swissalpsday.png and swissalpsnight.png from the book’s resources in your project’s images folder.
The source code for this book is located in thehttps://github.com/aludin/BB10ApressGitHub repository and atwww.apress.com/9781430261575. You can either clone the repository or download a compressed Zip copy. As you read along, you can import the projects in turn in Momentics (in Momentics, select File ➤ Import Existing Projects into Workspace and select the root directory of a project located under theBB10Apressfolder).
Figure 1-8. Momentics IDE, QML perspective
3. Open the main.qml file by double-clicking it in Project Explorer. Make sure you’re in the QML editing perspective by switching to it using the perspectives toolbar located in the upper-right corner of the Momentics IDE. The QML editing or Cascades Builder perspective is organized around four important views (see Figure 1-8):
The Project Explorer shows you all the resources available in your project, including
source folders, asset folders, and targets.
The Components view located on the lower-left section of the screen displays core
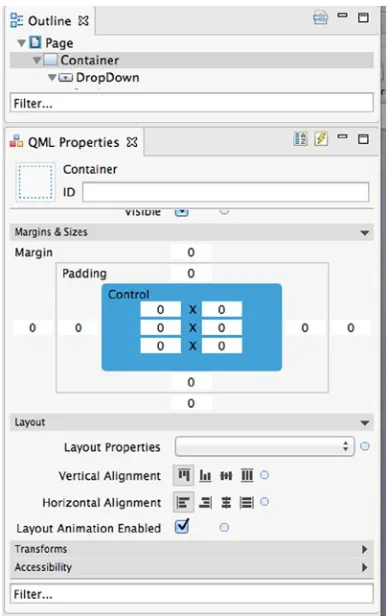
The QML Properties view is displayed on the right side of the screen. You can use
this view by selecting a QML element in the Source view.
The main design area is located in the middle of your screen. You can switch
between source only, design only, and source-design split modes.
4. In the Source view, remove the text: qsTr(Hello World) + Retranslate. onLocaleOrLanguageChanged property from the Label control.
5. Select the Label in the Source view by double-clicking it, and then update the QML Properties view by doing the following:
Add “helloCascades” in the id field.
Add “Hello Cascades” in the text field.
Scroll down until you reach the Horizontal Alignment property of the label and
change it to Center.
main.qml should now look like Listing 1-8.
Listing 1-8. main.qml textStyle.base: SystemDefaults.TextStyles.BigText
text: "Hello Cascades"
horizontalAlignment: HorizontalAlignment.Center }
} }
6. Drag a Container control from the Components view and drop it under the label’s closing brace in the Source view.
7. Double-click the second Container control: Change the id to imageContainer.
Change the Horizontal Alignment property to Center.
Change the Layout property to DockLayout.
9. Select the ImageView control:
Change the id property to “swissalpsday”.
Click the Image Source button and select the
swissalpsday.png file in the assets/
images folder.
10. Add another ImageView control under the previous one in the Source view. Change the id property to “swissalpsnight”.
Click the Image Source button and select the
swissalpsnight.png file in the assets/
images folder
Set the opacity property to 0.
11. Drag a Slider control from the Components view and drop it in the Source view after imageContainer’s closing brace. Change the slider Horizontal Alignment to Center.
12. In the Source view, add the following code in the body of the Slider control:
onImmediateValueChanged: {
swissalpsnight.opacity = immediateValue }
The final version of the QML markup should look like Listing 1-9. If not, try to repeat the previous steps until you reach the same result, or simply update the QML directly in the Source view.
Listing 1-9. main.qml textStyle.base: SystemDefaults.TextStyles.BigText
text: "Hello Cascades"
horizontalAlignment: HorizontalAlignment.Center }
Container {
id: imageContainer
horizontalAlignment: HorizontalAlignment.Center layout: DockLayout {
}
ImageView {
id: swissalpsday
}
horizontalAlignment: HorizontalAlignment.Center onImmediateValueChanged: {
Congratulations! You’ve just finished designing your first Cascades application!
Build Configurations
There are four build configurations to consider when creating Cascades application: Simulator debug
A build configuration defines a set of rules and settings for building your application for a given processor or target (for example, the “Simulator debug” configuration will build your project with debug symbols enabled for a Simulator target, whereas “Device release” will build a release version of your project for a physical device with an ARM processor). At any point, you can set the active build configuration, as explained in the following paragraph.
To build the project for the simulator, select HelloCascades in Project Explorer, and then
set Project ➤ Build Configurations ➤ Set Active ➤ Simulator-Debug from the Momentics main menu. Next, select Project ➤ Build Project. The build starts immediately and the build output is displayed in the Console View.
When the build finishes, a new folder called x86/o-g containing the build results will be created under your project’s root folder.
Targets
Before testing HelloCascades, you need to define a deployment target. On the BlackBerry Toolbar, select the Manage Devices… option located in the Active Device drop-down (this will display the Device Manager wizard; see Figure 1-10 and Figure 1-11).
Figure 1-9. BlackBerry Toolbar
Simulator
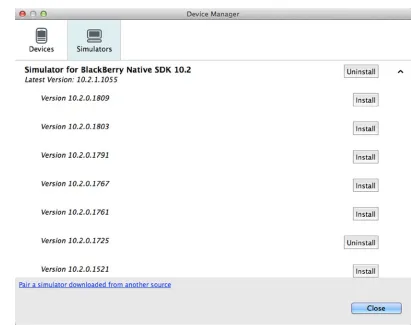
To configure a new simulator using the Device Manager wizard, follow these steps:
1. Click Install a New Simulator. Choose the most recent simulator from the list and install it (see Figure 1-12). (Note that if you are developing for a specific API level, you can select a different simulator. I will tell you more about API levels at the end of this Chapter.)
2. As soon as you have selected the simulator, the Device Manager wizard will start its download.
3. When the download has completed, the simulator will be launched and the final step will be to pair Momentics with the simulator (see Figure 1-13).
4. The simulator will now appear in the Device Manager’s list of simulators and you can connect to it (see Figure 1-11). (Note that you might need to restart Momentics for the new simulator to appear in the BlackBerry Toolbar’s Active Device list.)
You can now try to launch HelloCascades on the simulator using the green Debug button on the BlackBerry Toolbar (if you haven’t built the project previously, click the Hammer button; see Figure 1-9).
Device
Configuring a new physical device for testing purposes is accomplished by pairing the device with Momentics. You will also have to generate a debug token, which will be saved on the device by Momentics. Once again, the BlackBerry Toolbar streamlines the process:
1. Make sure to turn on Development Mode on your device using Settings ➤ Security and Privacy ➤ Development Mode.
2. Connect your device to your computer with the USB cable provided by BlackBerry.
3. Just like for the simulator, launch the Device Manager wizard from the BlackBerry Toolbar. This time, select the Devices tab and click Set Up New BlackBerry 10 Device (see Figure 1-14).
Figure 1-14. Set up new BlackBerry 10 device
5. If you have already generated your BlackBerry ID token as explained in the SDK configuration section, the wizard will skip the second step; otherwise, follow the wizard’s instructions.
6. On the next wizard page, select Create Debug Token and click Finish. You will finally be asked to provide the password used to create your BlackBerry ID token (see Figure 1-5) before a new debug token is deployed on your device (see Figure 1-16).
This time, you can try to launch HelloCascades on the device by selecting it as the Active Device on the BlackBerry Toolbar.
Launch Configurations
The purpose of this section is to explain what’s happening behind the scenes when you use the BlackBerry Toolbar, which essentially creates launch configurations for you. A launch configuration is purely an Eclipse concept and not at all specific to Momentics; it associates a build result with a target. You must create it in order to run your application on a simulator or a device. There are two kinds of launch configurations that you can create: the Run Configuration and the Debug Configuration. In this section, I will show you how to create a Debug Configuration for the Simulator target. (The steps for creating a Run Configuration are identical to a Debug Configuration. A Run Configuration will simply launch your application on the target, whereas a Debug Configuration will launch it under Momentics’ debugger control.)
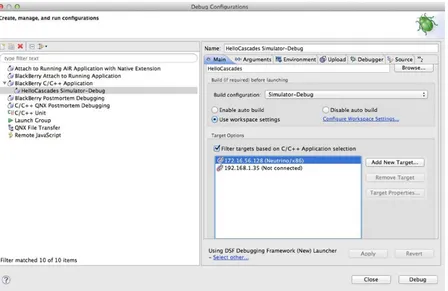
1. Select Run ➤ Debug Configurations… from the Momentics main menu to display the Debug Configurations Dialog (see Figure 1-17).
2. Select BlackBerry C/C++ Application from the list and press the New button in the upper-left corner of the dialog box. The settings for the new launch configuration will be displayed (see Figure 1-18).
3. Make sure that the build configuration is Simulator Debug and the selected target is Neutrino/x86, which corresponds to the simulator. Press Apply and then press Debug (note that the simulator name might be different, depending on how you have configured it).
4. HelloCascades will now be launched in debug mode on the simulator. The Momentics IDE will also switch from the QML Editing perspective to the Debug perspective, and the program execution will stop at the beginning of the main function (see Figure 1-19) .
5. Press the Resume button to continue the program execution. The Hello
Cascades application should now be running on the simulator (see Figure 1-20).
Figure 1-20. Hello Cascades on the simulator
6. Try moving the slider and notice how the scene changes from day to night.
To create a debug Launch configuration for the device, you basically need to repeat the same steps, with the following differences:
1. Set the active build configuration to Device-Debug.
2. Build the HelloCascades project.
3. Create a new launch configuration (see Figure 1-17 and Figure 1-18).
4. Give a name to your launch configuration (for example, HelloCascades Device-Debug).
5. Select the device target.
6. Press Debug.
API Levels
An API level is a set of APIs and libraries that your application builds against. It also corresponds to a version of the BlackBerry 10 OS. API levels are backward compatible. (Higher API levels include APIs from the previous releases, although some APIs could be deprecated. In other words, this is identical to the way Java manages its APIs.) If for some reason you need to compile against a specific API level, you can change the setting in Momentics using Momentics ➤ Preferences ➤ BlackBerry ➤
API Level.
QNX System Information Perspective
Before finishing this chapter, I want mention the Momentics QNX System Information perspective, which can be used for navigating your device’s or simulator’s filesystem (you can open the perspective by selecting Windows ➤ Open Perspective ➤ QNX System Information;
see Figure 1-21). As you develop Cascades applications, you will realize that the possibility to access your device will be extremely useful for retrieving logs from the target file system or for monitoring your application’s memory and CPU usage.
Figure 1-21. QNX System Information perspective
Summary
This chapter gave you a bird’s-eye view of the BlackBerry 10 platform and the Cascades
33
Chapter
2
QML and JavaScript
QML and JavaScript are the cornerstones of Cascades declarative user interface design. Both technologies, while amazingly easy to master, pack an enormous amount of punch when it comes to creating user interfaces quickly and effortlessly. QML, being a declarative language, lets you describe your user interface much like HTML would describe a web page. JavaScript then adds programmatic logic in event handlers, slots in Qt/Cascades parlance, and essentially ties your UI together with some behavior.
I’ve deliberately kept C++ out of the mix because I want to exclusively concentrate on QML and JavaScript for the moment, but you will see in Chapter 3 that C++ also transparently integrates with QML. As a good rule of thumb, you should always rely on C++ whenever you need to access core platform services or do some heavy lifting, such as computationally intensive tasks.
If you are a core JavaScript programmer and would like to quickly get a taste of Cascades programming, you can read this chapter, and then skip to Chapters 4 and 5 (this will provide you with the essential building blocks for creating Cascades applications using QML and JavaScript). At a later stage, you can return to Chapter 3 to understand what is happening behind the scenes in the C++ world.
Syntax Basics
You have already seen in Chapter 1 an example of a QML document. I did not go into the details of explaining the QML syntax and I informally presented concepts such as properties, signals, and slots (or signal handlers, if you prefer). It is now time to dig a bit deeper and give you a description of the various QML syntactical elements.
QML Documents
A QML document is the basic building block for creating Cascades UIs. The QML syntax resembles JSON, except that you don’t need to use quotes for defining attributes and that the QML language, combined with inline JavaScript, is much more expressive than JSON. Another big advantage of QML over other XML-based languages for designing UIs is that QML has been created from the ground up. The resulting language is very concise and expressive with advanced features, such as dynamic loading of components and transparent interoperability with C++ (you will see in Chapter 3 that you can very easily expose C++ objects to QML).
A QML document is a self-contained piece of QML source code that consists of the following: Import statements
A root object declaration (the root object can also in turn declare children and
JavaScript functions)
An example of a minimal main.qml document is given in Listing 2-1.
Listing 2-1. main.qml
import bb.cascades 1.0
Page {
}
As you saw in Chapter 1, the main.qml QML document is typically loaded during application start-up. The loading process is orchestrated behind the scenes by the QML declarative engine. When the engine encounters the import bb.cascades 1.0 statement, it will also search through its import paths for the bb.cascadesnamespace and load the Cascades core controls and types registered with that namespace. By the time it reaches the Page object declaration, the QML engine already knows about the Page type definition, properties and signals, and is in measure to validate the Page element within the document.
Import Statements
Import statements tell the declarative engine which libraries, resources, and component directories are used in a QML document. An import statement will then do any of the following:
Load a versioned module containing QML registered types. This is how you
import the Cascades core controls module in the global namespace (this is also how C++ types are exposed to QML through the qmlRegisterType method, as we will see in Chapter 3).
Specify a directory relative to your application’s assets directory, which contains
type definitions in QML documents. As a result, all the QML object types defined in the directory will be imported in the global namespace.
Load a JavaScript file containing functions that you want to use in your QML
document.
When using an import statement, you can further use a qualifier as a local namespace identifier. This is mostly used when importing a JavaScript file or when you want to make sure that there will be no clashes with types declared in the global namespace. Listing 2-2 shows a few examples:
Listing 2-2. imports
import bb.cascades 1.2
import "mycontrols"
import "mycontrols/core" as MyCoreControls import "parser.js" as Parser
The first line imports the versioned bb.cascades library (or module) in the global QML document namespace. The second line imports all the QML types defined in the mycontrols directory in the global QML namespace. The third example imports the QML types defined in the mycontrols/ core directory and binds them to the local MyCoreControls namespace. A type SomeType will then be accessible using MyCoreControls.SomeType. This is essentially a way of avoiding clashes when importing controls with the same name from different modules (for example, if you have defined your own Label control in mycontrols/core, then it will not clash with the Cascades control with the same name and yours will be accessible using MyCoreControls.Label).
Object Declarations
Listing 2-3. main.qml
The import bb.cascades 1.2 statement in Listing 2-3 tells the QML engine to import version 1.2 of the Cascades library, which is provided in BlackBerry API level 10.2. If you are targeting a different API level, the import statement should reflect the corresponding Cascades library version (for example, import bb.cascades 1.0 provided in BlackBerry API level 10.0).
The Page control represents a device’s screen. Its content property, the root control, is usually a cascades Container core control. A Container can in turn include child controls as well as other Containers by setting its controlsproperty (note that the property values are specified in brackets ([ ]), indicating that this is a QML list). As you will see later in this chapter, QML objects also have a predefined id property, which is useful when you want to reference them from JavaScript code. The page declaration in Listing 2-3 is a bit verbose and you can actually make it shorter by avoiding explicitly declaring default properties. A property can be marked as “default” in the QML object type
definition, and whenever you declare an object without assigning it to a property, the QML engine will try to assign it to the parent object’s default property (the default property for the Page control is
content and the default one for Container is controls). Listing 2-4 gives an updated version of main. qml using default properties.
Listing 2-4. main.qml with Default Properties
Button {
id: second text: "Not me!" }
} }
QML Basic Types
This section reviews some of the most important QML basic types that you will often use when writing Cascades applications.
string, int, bool, real, double: The “standard” types supported by most programming languages. A real is a number with a decimal point. A double is a number stored in double precision.
list: A list type contains a list of objects. In JavaScript, you can use the standard array notation to access the list elements. For example, myList[0]. You can also use the length property for iteration: for (int i=0; i < myList.length; i++ ) {...}.
enumeration: An enumeration type consists of a set of named values. For example, the LayoutOrientation enumeration, which dictates how controls are displayed on the screen, can take values such as LayoutOrientation. TopToBottom or LayoutOrientation.LeftToRight.
variant: A generic type that can contain any of the other basic types.
Creating a Custom Control
The best way to learn QML is by designing a custom type or control. This will give you the opportunity to see how the different QML syntactical elements fit together and will also give you some insight on how they are used by the Cascades framework.
If you’ve worked in a large corporation, chances are that you have already relied on an intranet for locating a person in your organization. This information is usually stored in LDAP directories and accessed by using a client application over an intranet. When you look up a person’s entry, you will usually be presented with his surname, first name, job title, employee number, and so forth. You will also be presented with the person’s picture so that you can easily recognize him when you attend one of those boring corporate meetings. Now let us imagine that your organization has decided to maintain this information using BlackBerry devices. You have been tasked to design a reusable custom control for displaying and updating a person’s entry. Let us start by defining a new QML type called PersonEntry.
1. Create a new standard empty Cascades project and call it CorpDir.
2. In the assets folder of your project, where main.qml is located, create a new QML file called PersonEntry.qml using the Container template (right-click the
assets folder, and then select New ➤ QML File).
Listing 2-5. PersonEntry.qml
import bb.cascades 1.0
Container{ id: root
}
4. PersonEntry is now a new, albeit minimal, custom type recognized by the QML declarative engine. Also, because PersonEntry’s root control is a Container, you can add it to a QML page. Go ahead and modify main.qml as shown in Listing 2-6.
Listing 2-6. main.qml
import bb.cascades 1.0
Page {
PersonEntry {
} }
Attributes
Let’s go over the attributes used in the example.
The id Attribute
As mentioned previously, object declarations can specify an id attribute that must start with a lowercase letter or an underscore. You will usually assign a value to the id attribute whenever you want to uniquely reference that object instance in your QML document.
Property Attributes
Let us now flesh out our PersonEntry type by adding some properties to it. We want to be able to add extra information such as a person’s surname, first name, login, e-mail, and so forth. We will also eventually have to implement business rules such as “a person’s login is the first letter of his first name concatenated to his surname with all letters in lowercase” and “a person’s e-mail is his login followed by the at symbol and the company’s domain name.”
In QML, this kind of information is provided by object properties.
A property is an attribute that can be assigned a static value or bound to a dynamic expression provided by some JavaScript code. Properties are used to expose to the “outside world” an object’s state by hiding its implementation at the same time. The syntax for defining properties is given by
property <propertyType> <propertyName>
Listing 2-7. PersonEntry.qml
import bb.cascades 1.0
Container{ id: root
property int employeeNumber property string surname property string firstname property string login property string email
}
You can in turn set the properties in main.qml as shown in Listing 2-8. Listing 2-8. main.qml
email:"[email protected]" }
}
The PersonEntry control is visually not very interesting at the moment. The most glaring problem is that it’s missing a screen representation. If you try to build the project and run it on the simulator, you will just get a blank screen (you will notice the same thing in the “Cascades builder” design view if you try to display main.qml). What we need to do is display the properties on the screen after they have been set. In order to achieve this, let’s use Cascades Labels (a Label is a core control with a displayable text property on the screen). Listing 2-9 gives an updated version of PersonEnty.qml
using Labels for displaying the object’s properties.
Listing 2-9. PersonEntry.qml
import bb.cascades 1.0
Container{ id: root
property int employeeNumber property string surname property string firstname property string login property string email
Label{
text: "MyCompany Employee Details"
textStyle.base: SystemDefaults.TextStyles.TitleText horizontalAlignment: HorizontalAlignment.Center }
Label{
text: "Employee number: " + employeeNumber; }
Label{
text: "Last name: "+surname; }
Label{
text: "First name:"+ firstname; }
Label{
text: "Login: "+ login; }
Label{
text: "Email: "+ email; }
}
You can now build the CorpDir project and run on it on the simulator (see Figure 2-1).
So far so good, but we still need to be able to set the person’s job title. This kind of information usually comes from a list of predefined values such as Software Engineer, Manager, Director, Consultant, Technician, and so forth. In order to achieve this, we can use a Cascades DropDown control. The control will be selectable so that if a person’s entry needs to be updated, a new job title can be selected from the list. See Listing 2-10 for the updated PersonEntry.qml control.
Listing 2-10. PersonEntry.qml
import bb.cascades 1.0
Container { id: root
property int employeeNumber property string surname property string firstname property string login property string email property string jobTitle
Label{
text: "Employee Details"
Option {
Listing 2-11 shows main.qml with the job property set.
Listing 2-11. main.qml
email:"[email protected]" jobTitle: "Software Engineer" }
}
At this point, we are still facing a couple of issues. For one thing, we need to be able to synch the
jobTitle property with the corresponding option value in the DropDown control. Also, instead of setting the e-mail and login properties, they should be generated using the business rules described at the start of this section. Whenever you need to add this kind of programmatic logic, you will have to rely on JavaScript.
JavaScript
JavaScript is not an object attribute per se, but is still tightly integrated and can be used in the following scenarios:
A JavaScript expression can be bound to QML object properties. The
expression will be reevaluated every time the property is accessed in order to ensure that its value stays up-to-date. Typically, the one-liners you have seen until now for setting a Label’s property are JavaScript expressions (for example,
their result is a value whose type can be assigned to the corresponding property. You can even include multiple expressions between open and close braces. Signal handlers can contain JavaScript code that is automatically evaluated
every time the corresponding QML object emits the corresponding signal. You can define custom JavaScript methods within a QML object (this can be
considered as an object attribute). You can import JavaScript files as
modules that you can use in your QML document.
And finally, you can wire a signal directly to a JavaScript function.
You have already encountered the first two methods of using JavaScript, and by time you finish this chapter, you will have seen all the different ways of incorporating JavaScript in your QML documents.
JavaScript Host Environment
The QML engine includes a JavaScript host environment, giving you the possibility of building extremely complex applications using JavaScript/QML only. There are some restrictions, however; for example, the environment does not provide the DOM API commonly available in browsers. If you think about it, this makes complete sense since a QML application is certainly not an HTML browser app and the DOM would be irrelevant. Also, the environment is quite different from server-side technologies such as Node.js. The runtime does, however, implement the ECMAScript language specification, so this effectively means that you have a complete JavaScript programming environment at your disposal. The host environment also provides a set of global objects and functions that you can use in your QML documents:
The
Qt object, which provides string utility functions for localization, date formatting functions, and object factories for dynamically instantiating Qt types in QML.
The
qsTr() family of functions for providing translations in QML. The
console object for generating logs and debug messages from QML (using console.log() and console.debug()).
And finally, the
XMLHttpRequest object. This basically opens the door to asynchronous HTTP requests directly from QML!
property string jobTitle
function getLogin(){
return root.firstname.charAt(0).toLowerCase() + root.surname.toLowerCase(); }
function getEmail(){
return root.firstname.toLowerCase() +"."+root.surname.toLowerCase()+"@mycompany.com"; }
onCreationCompleted: { switch (jobTitle) {
Label {
Listing 2-13 is the updated version of main.qml.
You will notice that login and email are no longer settable properties. Instead, the getLogin() and
getEmail() JavaScript functions are used in order to update the corresponding labels using the business rules for generating logins and e-mails respectively. Another interesting point is that in order to synchronize the jobFunction property with the DropDown control’s selected index, the
onCreationCompleted: signal handler is used (the body of the handler is simply a switch statement that sets the selected index). The QML engine automatically calls this handler after a QML object has been successfully constructed. This is the ideal place to set up additional validation or initialization logic (in the example given in Listing 2-13, “Jack of All Trades” is not a valid job title and the
selectedIndex will be set to 0, which corresponds to the “Unknown” job title).
Signal Attributes
In Chapter 1, you declared signals in C++ using the signals: annotation. Declaring your own signals in QML is just as simple and is given by the following syntax:
signal <signalName>[([<type> <parameter name>[, ...]])]
If your signal does not take any parameters, you can safely ignore the “()” brackets in the declaration.
Here are two examples:
signal clicked
signal salaryChanged(double newSalary)
There are also a couple of things that the QML engine provides you “for free:”
The QML engine generates a slot for every signal emitted by your controls. For
example, the onSalaryChanged slot will be generated for the salarayChanged
signal (you will see this in action in Listing 2-15).
Property change signals. The QML engine automatically generates these signals
for your custom control’s properties. They are emitted whenever a control’s property value is updated.
Property change signal handlers. For a given property
<Property>, they take the
form on<Property>Change. This is where you can define your own business logic when the property change signals are emitted.
Let’s add the salaryChanged signal to the PersonEntry control and the corresponding handler in
main.qml. The signal will be emitted with an updated salary whenever a person’s job title changes. The first step is to define the signal in the root QML object. You can then emit the signal using
root.salaryChanged() from the DropDown control’s onSelectedIndexChanged handler. The final version of the PersonEntry custom control also includes a new property for setting the person’s picture. (Note that I am using a property alias in this case. A property alias is a reference to an existing property. In other words, the picture property is a reference to the
Listing 2-14. PersonEntry.qml Final
import bb.cascades 1.0 Container {
id: root
property int employeeNumber property string surname property string firstname property string jobTitle
property alias picture: employeeImage.imageSource
signal salaryChanged(double newSalary)
function getLogin(){
return root.firstname.charAt(0).toLowerCase() + root.surname.toLowerCase(); }
function getEmail(){
return root.firstname.toLowerCase() +"."+root.surname.toLowerCase()+"@mycompany.com"; }
onCreationCompleted: { switch (jobTitle) {
horizontalAlignment: HorizontalAlignment.Center }
Label{
text: "Employee Details"
textStyle.base: SystemDefaults.TextStyles.TitleText horizontalAlignment: HorizontalAlignment.Center }
Label {
Option {
text: "Manager" }
Option {
text: "Director" }
Option {
text: "Technician" }
}
}
And Listing 2-15 gives the final version of main.qml. You will notice that now the root control is no longer a PersonEntry object but a Container. The reason for this is because we have also added a Label that will display a person’s updated salary whenever the salaryChanged signal is emitted.
Listing 2-15. main.qml Final
import bb.cascades 1.0
Page {
Container{ PersonEntry {
employeeNumber: 100 surname: "Smith" firstname: "John"
jobTitle: "Jack of All Trades" picture: "asset:///johnsmith.png"
onSalaryChanged: {
salaryLabel.text = "Salary: "+newSalary; }
} Label{
id: salaryLabel
} // Label } // Container } // Page
XMLHttpRequest Example
In this section, I want to show you how easily you can use the XMLHttpRequest object from QML. The sample code provided here is a quick and dirty REST client for the Weather Underground weather forecast service (www.wunderground.com/weather/api/d/docs). To call the REST service, you will need to register and obtain a free development key. Listing 2-16 shows you how to use the service to get a weather forecast for a given city. The application is quite basic at the moment and simply “dumps” the result of the query in a TextArea (see Figure 2-3; you will see in Chapter 7 how to enhance the app by building a full-fledged weather service client). The most important point to keep in mind is that the call to the weather service is completely asynchronous and will not block the UI thread. Listing 2-16. main.qml
import bb.cascades 1.0
Page { id: root
function getWeather(apikey, city, state) {
var getString = "http://api.wunderground.com/api/"+apikey+"/conditions/q/"; if("".valueOf() != state.valueOf()){
getString = getString+state; }
getString = getString + "/"+city+".json";
When the user touches the Get City! button, its onClicked slot calls the getWeather() JavaScript function defined at the Page level. The function in turn uses the standard XMLHttpRequest object to asynchronously call the weather service. An anonymous callback function is also provided in order to handle the HTTP response and update the TextArea (note that this the standard AJAX way of handling requests and responses).
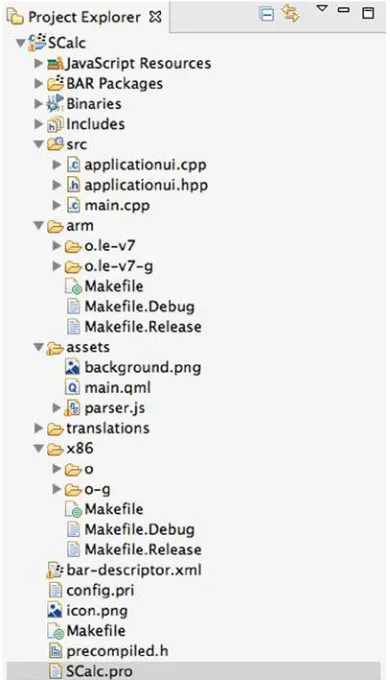
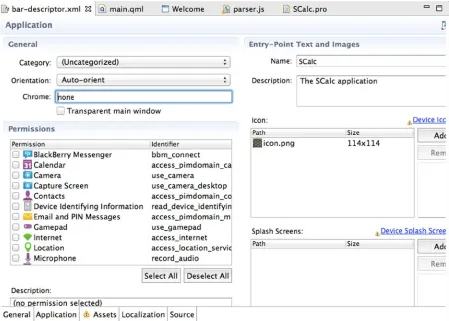
SCalc, the Small Calculator
Before wrapping up this chapter, I want to illustrate how QML and JavaScript can be used for developing a slightly more complex application than the ones shown up to this point. This will also give me the opportunity to explain your application’s project structure, something that I skimmed over in Chapter 1 (if you want to give the application a try right away, you can download it from BlackBerry World).
To import the SCalc project in Momentics, you can clone the https://github.com/aludin/BB10Apress
repository.
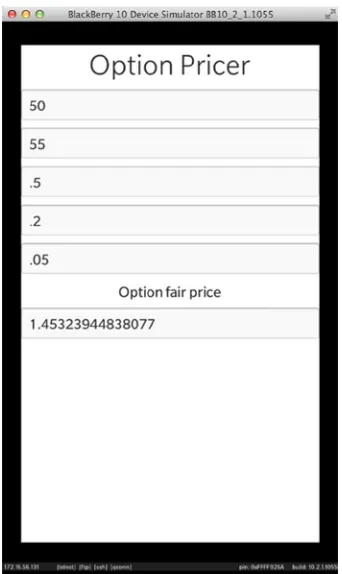
Figure 2-4. SCalc
SCalc is a simple calculator app written entirely in JavaScript and QML (see Figure 2-4). The application’s UI is built in QML and the application logic is handled in JavaScript using Matthew Crumley’s JavaScript expression engine (https://github.com/silentmatt/js-expression-eval). The engine is packaged as a single JavaScript file that I have dropped in the project’s assets folder (parser.js, located at the same level as main.qml).
You will notice that the containers have a layout property. A layout is an object that controls the way UI elements are displayed on the screen. In our case, we are using a StackLayout, which stacks controls horizontally or vertically. The root container does not define a layout and therefore Cascades will assign it a default StackLayout that stacks controls vertically. (In the child containers, the layout orientation has been set to horizontal, thus displaying the buttons in a row. I will tell you more about layout objects in Chapter 4.) Listing 2-17 is an outline of main.qml.
Listing 2-17. main.qml
import bb.cascades 1.2
import "parser.js" as JSParser Page {
id: calculatorView
// root containter goes here }
The second import statement imports the JavaScript expression engine as a module and
assigns it to the JSParser identifier (because the file is located in the same folder as main.qml, you don’t need to provide a path to the file). Now that the library has been imported, you will be able to use it in your QML document (the expression engine provides a Parser object that you can call using
JSParser.Parser.evaluate(expression, "")).
As mentioned previously, the root container contains a TextArea and six child Containers (see Listing 2-18).
Listing 2-18. root Container
The application logic is implemented by handling the clicked signal emitted by the Buttons and by updating the TextView with the current expression. For example, Listing 2-19 shows the implementation for the clicked signal when Button “7” is touched by the user.
Listing 2-19. Button “7”
Finally, the JavaScript expression library’s Parser.evaluate() method is called when the user touches the “=” button (the TextView is also updated with the result of the evaluation).
Listing 2-20. Button “=”