• Table of Contents • Index • Reviews
• Reader Reviews • Errata
PC Hardware in a Nutshell, 2nd Edition
By Barbara Fritchman Thompson, Robert Bruce Thompson
Publisher: O'Reilly Pub Date: June 2002
ISBN: 0-596-00353-6 Pages: 804
Slots: 1
Carefully researched and written, PC Hardware in a Nutshell, 2nd Edition is packed with useful and unbiased information, including how-to advice for specific components, ample reference material, and a comprehensive case study on building a PC. To the point yet complete, this book provides an enormous amount of timeless information intended for anyone who buys, builds, upgrades, or repairs PCs in a corporate, small business, or home setting.
• Table of Contents • Index • Reviews
• Reader Reviews • Errata
PC Hardware in a Nutshell, 2nd Edition
By Barbara Fritchman Thompson, Robert Bruce Thompson
Publisher: O'Reilly Pub Date: June 2002
ISBN: 0-596-00353-6 Pages: 804
Slots: 1
Copyright Dedication Foreword Preface Audience Organization Conventions
We'd Like to Hear from You Acknowledgments
Chapter 1. Fundamentals Section 1.1. PCs Defined
Section 1.2. PC Components and Technologies Section 1.3. System Resources
Section 1.4. Building or Buying a PC Section 1.5. Upgrading a PC Section 1.6. Smart Buying Practices Section 1.7. Things to Do with Old PCs
Chapter 2. Working on PCs
Section 2.1. Rules to Upgrade By Section 2.2. Tools
Section 2.3. General Procedures
Chapter 3. Motherboards
Section 3.1. Motherboard Characteristics Section 3.2. Choosing a Motherboard Section 3.3. Installing a Motherboard Section 3.4. Upgrading the System BIOS Section 3.5. Our Picks
Chapter 4. Processors
Section 4.1. Processor Design Section 4.2. Intel Processors
Section 4.5. Installing a Processor Section 4.6. Our Picks
Chapter 5. Memory
Section 5.1. Understanding Memory Section 5.2. Memory Access Methods Section 5.3. Memory Packaging
Section 5.4. How Much Memory Is Enough? Section 5.5. Memory Selection Guidelines Section 5.6. Installing Memory
Section 5.7. Troubleshooting Memory Installation and Operation Section 5.8. Our Picks
Chapter 6. Floppy Disk Drives
Section 6.1. Diskette Types and Formats Section 6.2. Drive Types
Section 6.3. FDD Interface and Cabling Section 6.4. Installing a Floppy Disk Drive Section 6.5. Working with FDDs
Section 6.6. Working with Obsolete Diskette Formats Section 6.7. Salvaging Diskette Data
Section 6.8. Our Picks
Chapter 7. High-Capacity Floppy Disk Drives Section 7.1. High-Capacity FDD Types
Section 7.2. Choosing a High-Capacity Floppy Disk Drive
Section 7.3. Using an ATAPI Zip or SuperDisk Drive as the Boot Device Section 7.4. Drive Letter Assignment Problems
Section 7.5. Our Picks
Chapter 8. Removable Hard Disk Drives
Section 8.1. Uses for Removable Hard Disk Drives Section 8.2. Cartridge-Based Removable Hard Disk Drives Section 8.3. Frame/Carrier-Based Removable Hard Disk Drives Section 8.4. Our Picks
Chapter 9. Tape Drives
Section 9.1. Choosing a Tape Drive
Section 9.2. Installing and Configuring a Tape Drive Section 9.3. Care and Feeding of a Tape Drive Section 9.4. Troubleshooting Tape Drive Problems Section 9.5. The Dirty Little Secret of Long Filenames Section 9.6. Developing a Backup Strategy
Section 9.7. Our Picks
Chapter 10. CD-ROM Drives
Section 10.1. Compact Disc Fundamentals Section 10.2. CD-ROM Drive Performance Section 10.3. Choosing a CD-ROM Drive
Section 10.4. Installing and Configuring a CD-ROM Drive Section 10.5. Cleaning a CD-ROM Drive
Chapter 11. CD-R and CD-RW Drives Section 11.1. CD Writers and Media Section 11.2. Writable CD Formats Section 11.3. CD Recording Methods Section 11.4. BURN-Proof Technology Section 11.5. Choosing a CD Writer Section 11.6. CD Writer Software
Section 11.7. Installing and Configuring a CD Writer Section 11.8. Updating CD Writer Firmware
Section 11.9. Media Issues Section 11.10. Burning CDs
Section 11.11. Special Problems and Applications Section 11.12. Writable CD Troubleshooting Section 11.13. Additional CD-R(W) Source Material Section 11.14. Our Picks
Chapter 12. DVD Drives Section 12.1. DVD-ROM
Section 12.2. DVD Writable and Rewritable
Section 12.3. Installing and Configuring a DVD Drive Section 12.4. Our Picks
Chapter 13. Hard Disk Interfaces Section 13.1. IDE
Section 13.2. SCSI
Section 13.3. ATA Versus SCSI Section 13.4. Our Picks
Chapter 14. Hard Disk Drives
Section 14.1. How Hard Disks Work Section 14.2. Choosing a Hard Disk Section 14.3. Installing an ATA Hard Disk Section 14.4. Installing a SCSI Hard Disk Section 14.5. Preparing a Hard Disk for Use Section 14.6. Our Picks
Chapter 15. Video Adapters
Section 15.1. Video Adapter Characteristics Section 15.2. Choosing a Video Adapter Section 15.3. Installing a Video Adapter
Section 15.4. Configuring Video Under Windows 98/Me/2000/XP Section 15.5. Configuring Video Under Windows NT 4
Section 15.6. Troubleshooting Video Adapter Problems Section 15.7. Our Picks
Chapter 16. Displays
Section 16.1. CRT Monitors Section 16.2. Flat-Panel Displays
Section 16.3. Installing and Configuring a Display Section 16.4. Troubleshooting Display Problems Section 16.5. Our Picks
Section 17.1. PC Audio Types
Section 17.2. MIDI Synthesis Methods Section 17.3. Downloadable Sounds Section 17.4. Sound Card Components Section 17.5. Sound Card Characteristics Section 17.6. Choosing a Sound Card Section 17.7. Installing a Sound Card
Section 17.8. Troubleshooting Sound Card Problems Section 17.9. MP3
Section 17.10. Our Picks
Chapter 18. Speakers and Headphones
Section 18.1. Speaker and Headphone Characteristics Section 18.2. Choosing Speakers and Headphones Section 18.3. Our Picks
Chapter 19. Keyboards
Section 19.1. Keyboard Switch Types Section 19.2. Keyboard Styles Section 19.3. Keyboard Interfaces Section 19.4. Choosing a Keyboard Section 19.5. Configuring a Keyboard Section 19.6. Cleaning a Keyboard
Section 19.7. Troubleshooting and Repairing Keyboards Section 19.8. Our Picks
Chapter 20. Mice and Trackballs Section 20.1. Mice Versus Trackballs Section 20.2. Mouse Characteristics Section 20.3. Choosing a Mouse
Section 20.4. Configuring a Mouse or Trackball Section 20.5. Cleaning a Mouse
Section 20.6. Troubleshooting a Mouse Section 20.7. Our Picks
Chapter 21. Game Controllers
Section 21.1. Game Controller Characteristics Section 21.2. Gameport Interface
Section 21.3. Choosing a Game Controller Section 21.4. Installing a Game Controller Section 21.5. Troubleshooting Game Controllers Section 21.6. Our Picks
Chapter 22. Serial Communications
Section 22.1. Serial Communications Overview Section 22.2. Serial Ports
Section 22.3. Serial Cables
Section 22.4. Installing and Configuring Serial Port Hardware Section 22.5. Troubleshooting Serial Port Problems
Section 22.6. Our Picks
Chapter 23. Parallel Communications
Section 23.2. Parallel Port Types
Section 23.3. Configuring Parallel Port Hardware Section 23.4. Parallel Connectors and Cables Section 23.5. Our Picks
Chapter 24. USB Communications Section 24.1. USB Characteristics
Section 24.2. USB Host Controller Interfaces Section 24.3. Configuring USB
Section 24.4. Troubleshooting USB Section 24.5. Our Picks
Chapter 25. Cases
Section 25.1. Case Characteristics Section 25.2. Choosing a Case Section 25.3. Our Picks
Chapter 26. Power Supplies
Section 26.1. Power Supply Characteristics Section 26.2. Volts, Amps, Watts, and Regulation Section 26.3. Power Connectors
Section 26.4. Choosing a Power Supply Section 26.5. Installing a Power Supply Section 26.6. Troubleshooting Power Supplies Section 26.7. Our Picks
Chapter 27. Backup Power Supplies
Section 27.1. What BPSes Protect Against Section 27.2. BPS Types
Section 27.3. BPS Characteristics Section 27.4. Choosing a BPS Section 27.5. Our Picks
Chapter 28. Building a PC
Section 28.1. Step 1: Prepare the Case
Section 28.2. Step 2: Configure the Motherboard Section 28.3. Step 3: Install the Processor Section 28.4. Step 4: Install the Memory
Section 28.5. Step 5: Prepare Drives for Installation Section 28.6. Step 6: Install the Floppy Disk Drive Section 28.7. Step 7: Install Other Drives
Section 28.8. Step 8: Install the Motherboard
Section 28.9. Step 9: Connect Cables to the Motherboard Section 28.10. Step 10: Install Expansion Cards
Section 28.11. Step 11: Perform the "Smoke Test" Section 28.12. Step 12: Install Software
Section 28.13. Step 13: Finishing Touches
Colophon Index
Copyright © 2002, 2000 O'Reilly & Associates, Inc. All rights reserved.
Printed in the United States of America.
Published by O'Reilly & Associates, Inc., 1005 Gravenstein Highway North, Sebastopol, CA 95472.
O'Reilly & Associates books may be purchased for educational, business, or sales promotional use. Online editions are also available for most titles (http://safari.oreilly.com). For more information contact our corporate/institutional sales department: 800-998-9938 or [email protected].
Nutshell Handbook, the Nutshell Handbook logo, and the O'Reilly logo are registered trademarks of O'Reilly & Associates, Inc. Many of the designations used by manufacturers and sellers to distinguish their products are claimed as trademarks. Where those designations appear in this book, and O'Reilly & Associates, Inc. was aware of a trademark claim, the designations have been printed in caps or initial caps. The association between the image of a scallop and the topic of PC hardware is a trademark of O'Reilly & Associates, Inc.
While every precaution has been taken in the preparation of this book, the publisher and the author assume no responsibility for errors or omissions, or for damages resulting from the use of the information contained herein.
Dedication
To my agent, David L. Rogelberg. No author could hope for a better colleague.
—Robert Bruce Thompson
To my parents, Richard Carl "Dutch" Fritchman and Sankie Callahan Fritchman, who gave me the opportunities and guidance to help me succeed.
—Barbara Fritchman Thompson
Foreword
My job is to persuade you to buy this book, or make you feel you've made the right choice if you've already bought it.
That's easy because there's not another book like this, and if you do much with computers you need a good reference work on hardware. Of course there are massively larger books on the subject, but that's just the point: most of the time you're not looking for a long essay on the subject, you need information, and reliable judgment, both of which Robert Bruce Thompson is highly—I am tempted to say uniquely—qualified to give.
I can say this with some authority. I've never actually met Robert Bruce Thompson face to face, but we've been friends for several years. Such is the way with the modern Internet. I first "met" him in the dark days after BYTE Magazine was suddenly and unexpectedly folded, and I
continued my column on my web site. (Shameless self-promotion: www.jerrypournelle.com.) One of the features of both the web site and the column was reader mail, and there soon appeared a corps of regulars, all experts in one or another field, all articulate, and all very generous with their time and effort. Robert Thompson stood out among these, and it was soon clear to me that he knew far more about computer hardware than I did. That was surprising: I've been in this business since 1978, and while no one can know everything, I thought I knew a good bit about nearly everything. I do, too, but Thompson knows more, both in depth and breadth, and that's astonishing.
He's pretty careful, too. Over the years I have found I agree with most of his conclusions, and when we disagree I have to rethink my position, because he's been right at least as often as I have been.
So. You have here a well-written book by someone who understands the subject. It's about computer hardware and nearly everyone needs a good opinionated reference work on that subject, provided the opinions are sound, which in Thompson's case they certainly are. It's published by O'Reilly, which means it's well edited by editors who resist the temptation to become unacknowledged collaborators. It's really the best book you'll find on this subject. And if that doesn't persuade you to buy this book, I doubt anything else I can say would.
—Jerry Pournelle Chaos Manor April 2002
Preface
PC Hardware in a Nutshell. An oxymoron, as it turns out. When Robert began work on the first edition of this book in late 1998, he planned to write a 300-page book in five months. Barbara joined the project early, at first as the researcher and later as the full co-author. After more than 18 months of working seven days a week, including last-minute rewrites to make everything as current as possible, we finally completed the first edition.
Robert decided to write the first edition because he couldn't find a good answer to what seemed to be a simple question. Robert, who has extensive PC experience, wanted to buy his first CD burner but didn't know much about them. He needed information about how to choose, install, configure, and use a CD burner. It would have been easy to check articles about CD burners in hardware-oriented magazines and enthusiast web sites, but Robert didn't trust them to provide accurate and unbiased information.
He next checked the shelf of PC hardware books he owns. What he found in those books was lots of interesting information, but a surprising dearth of useful information. For example, one very popular title devoted fewer than five of its 1500+ pages to CD-R and CD-RW, and most of those few pages described the history and low-level functioning of these devices. Advice on how to choose a CD burner? Advice on how to install it, configure it, use it, or troubleshoot it? Next to none. That same book devoted nearly 70 pages to a list of vendors—information easily accessible on the Web—so the shortage of information couldn't have been a result of page count constraints.
We were determined to write a book filled with useful information. You won't find tables of drive parameters for hundreds of obsolete disk drives, instructions on how to change the interleave by low-level formatting an XT hard drive, charts of keyboard scan codes, and so on. As interesting as those things might be, they fail the useful test. Pruning stuff that was merely interesting was painful, because we like to read interesting stuff as much as the next person. But we quickly found out why there's so much interesting information and so relatively little useful information in most PC hardware books. Interesting is quick and easy to write. Useful is slow and hard, because you actually have to do all the stuff.
We found numerous errors repeated nearly verbatim in more than one book—things that were clearly wrong, but that an author had simply repeated without verifying it rather than taking the time to check for himself. We're guilty of that at times, too. When we list the pinouts for a
gameport, for example, we get that information from published sources. But surprisingly often, we found that these sources disagreed, and so were forced to check for ourselves.
And, boy, did we expend an incredible amount of time and effort checking things for ourselves. Rather than simply repeating what others have said about CD burners, for example, we decided to find out for ourselves. Doing that required building four computers—two IDE and two SCSI, one each with Windows 98 and Windows NT—and testing each configuration with different drive models by burning numerous CDs with each. About ten 14-hour days and 400 CD blanks later, we finally had a handle on CD burners. All that work turned into just a few pages and some specific product recommendations. But all that work was necessary if we wanted to write something more than just a me-too book.
Our efforts were rewarded. The first edition of PC Hardware in a Nutshell sold well, and was widely acclaimed by readers and reviewers alike. For example, Barnes & Noble had this to say:
Given the success of the first edition, we considered doing just a quick update, but we decided that our readers deserved better. So we spent nearly a year building this second edition. Once again, we've done all the hard work so that you don't have to. We spent weeks on end doing detailed testing and comparisons of numerous products, the results of which often boil down to a couple of paragraphs of advice or a single product recommendation. We greatly expanded both the breadth of topics covered and the level of detail presented. This edition is, in every respect, twice the book that the first edition was.
We wouldn't have started this project unless we thought we could write the best PC hardware book available. We think this second edition of PC Hardware in a Nutshell meets that goal, and we hope you will think so too.
Audience
This book is intended for anyone who buys, builds, upgrades, or repairs PCs in a corporate, small-business, or home setting. If you want to buy a PC, this book tells you what to look for—and what to look out for. If you want to build a PC, this book explains, component by component, the key parts of a PC, describes the important characteristics of each, provides buying guidelines, recommends specific products (by brand name and model), and takes you step-by-step through building the PC. If you have an older PC, this book tells you what you need to know to upgrade it —if it makes sense to do so—as well as when it makes more sense simply to retire it to less demanding duties. Finally, if your PC breaks, this book tells you what you need to know to troubleshoot the problem and then choose and install replacement parts.
This book focuses on PC hardware running Windows 95/98/98SE/Me, Windows 2000/XP, and Windows NT 4, which together power the vast majority of PCs. We would also have liked to cover Linux, but we don't yet understand it well enough to write authoritatively about it. That will change. One of Robert's goals during early 2002 is to migrate his primary desktop system to Linux. By year-end 2002, we will be running Linux on many of our servers and desktops.
Organization
Each chapter of this book is devoted to one topic, and is self-supporting. The first two chapters provide an overview of PC hardware and standards, as well as detailed advice about buying, building, upgrading, and repairing PCs. They describe the tools and software you'll need, explain basic procedures like installing expansion cards, and detail the tips and tricks we've learned during 20 years of working on PCs. These chapters include:
Chapter 1 Chapter 2
The second group of chapters covers the core components of any PC—motherboards, processors, and memory. These chapters take the form used throughout the rest of the book, beginning with brief background information about the component, followed by an explanation of the important characteristics, guidelines on choosing among competing products, instructions for installing and configuring the component, troubleshooting information, if applicable, and a final "Our Picks" section, which tells you which products we recommend. This group includes the following chapters:
Chapter 3 Chapter 4 Chapter 5
The third group of chapters covers removable magnetic storage, including the pedestrian floppy disk drive, one of the few PC components that survives largely unchanged from the earliest days of PCs; "super-floppies" like the Iomega Zip and the Imation LS-120; removable hard disk drives like the Iomega Jaz and the Castlewood ORB; and tape drives, which despite the arrival of new technologies remain the best choice for backing up data. This group includes the following chapters:
Chapter 6 Chapter 7 Chapter 8 Chapter 9
The fourth group of chapters covers optical storage, an increasingly important component in modern PCs. We detail what you need to know to choose, install, configure, and use CD-ROM, CD-R, CD-RW, DVD-ROM, and writable DVD drives. This group includes the following chapters:
Chapter 10 Chapter 11 Chapter 12
The fifth group of chapters covers ATAPI ("IDE") hard disk drives, which are ubiquitous in modern PCs, as well as SCSI models, which provide better performance at correspondingly higher prices. We explain the important characteristics of hard drives, provide guidelines for purchasing a hard drive, and explain how to install, prepare, configure, and troubleshoot hard drives. This group includes the following chapters:
Chapter 13 Chapter 14
Chapter 15 Chapter 16 Chapter 17 Chapter 18
The seventh group of chapters covers input devices—keyboards, mice, and game controllers. We explain how they work, how to choose the best ones for your needs, and (as usual) how to install, configure, and troubleshoot them. This group includes the following chapters:
Chapter 19 Chapter 20 Chapter 21
The eighth group of chapters covers serial, parallel, and USB communications—the technologies that PCs use to connect with external peripherals and the outside world. We explain how each works, how to choose the best technology for your needs, and how to configure and troubleshoot communications. This group includes the following chapters:
Chapter 22 Chapter 23 Chapter 24
The ninth group of chapters covers three components—cases, PC power supplies, and backup power supplies—that receive little attention, but are important to system reliability and usability. We detail the important characteristics of each, and provide guidelines for choosing the best case and power supplies for your system. This group includes the following chapters:
Chapter 25 Chapter 26 Chapter 27
Finally, Chapter 28 puts it all together, illustrating how to turn a pile of components into a working PC.
Most chapters end with an Our Picks section. In the first edition of this book, we made specific recommendations in these sections. The problem with recommending specific makes and models in print, of course, is that PC hardware changes in Internet time. Products that were the hottest things on the market (or even preproduction engineering samples) when we started working with them had become mainstream when we went to press, and may even have been discontinued by the time the book reached the stores. So instead of focusing on ephemera in print, we instead concentrate here on important characteristics and guidelines, which don't change nearly as fast.
We recognize, though, that many people want specific advice by make and model—"Which motherboard/drive/monitor should I buy?" is one of the most common questions we get—so we've gone to some trouble to create and update pages on our web site that provide detailed
recommendations. We still provide general recommendations in the Our Picks sections, but you'll now find our specific recommendations—by brand name and model—on our web site, at:
http://www.hardwareguys.com/picks/picks.html
We base these recommendations on our own experience, not after using the product for a day or a week, but after extensive day-in-day-out use under realistic conditions. If we say we found a particular CD burner to be durable, that means that we used that CD burner extensively and burned a bunch of CDs with it. If we say a particular motherboard is stable, that means we used it in one or more of our own systems over a period of weeks or months and found that it didn't crash even when performing stressful tasks like running a full benchmark suite or compiling a Linux kernel. If we say a particular monitor is the best we've used, it's because we sat in front of it for many long hours while writing this book. And so on.
Conventions
This book uses the following typographical conventions:
italic
is used for filenames, directories, hostnames, domain names, URLs, and to emphasize new terms when they are first introduced.
constant width
is used to show the contents of files, command syntax, and the output from commands.
constant width italic
is used in examples to show variables for which a context-specific substitution should be made. (The variable filename, for example, would be replaced by some actual filename.)
[ option ]
When showing command syntax, we place optional parts of the command within brackets. For example, ls[-l] means that the -l option is not required.
This is an example of a tip or note. They suggest effective ways to accomplish common tasks, highlight important advice, or convey supplemental information that may not be important to all readers.
This is an example of a warning. Warnings highlight dangerous
procedures—those that may damage you, your hardware, or your data. Disregard warnings at your own peril.
We'd Like to Hear from You
Please address comments and questions concerning this book to the publisher:
O'Reilly & Associates, Inc. 1005 Gravenstein Highway North Sebastopol, CA 95472
(800) 998-9938 (in the United States or Canada) (707) 829-0515 (international or local)
(707) 829-0104 (fax)
There is a web page for this book, where we list errata, examples, or any additional information. You can access this page at:
http://www.oreilly.com/catalog/pchardnut2
To comment or ask technical questions about this book, send email to:
For more information about books, conferences, Resource Centers, and the O'Reilly Network, see the O'Reilly web site at:
http://www.oreilly.com
To contact one of us directly, send email to:
[email protected] [email protected]
We read all email we receive, but we cannot respond individually to requests for help in choosing hardware, resolving problems, and so on. But we do like to hear from readers.
We also have a web site for the book, which includes updated hardware recommendations, buying guides, and articles, as well as errata, archived older material, and so on:
http://www.hardwareguys.com
We also maintain a message board for the book, where you can read and post messages about PC hardware topics. You can read messages as a guest, but if you want to post messages you must register as a member of the message board. We keep registration information confidential, and you can choose to have your email address hidden on any messages you post.
http://forums.hardwareguys.com/
We each maintain a personal journal page, updated daily, which frequently includes references to new PC hardware we're working with, problems we've discovered, and other things we think are interesting. You can view these journal pages at:
Barbara: http://www.fritchman.com/diaries/thisweek.html Robert: http://www.ttgnet.com/thisweek.html
Acknowledgments
In addition to the O'Reilly production staff, who are listed individually in the Colophon, we want to thank our technical reviewers, Jon Barrett and Francisco García Maceda. These guys did yeoman duty in finding mistakes we made and in making numerous useful suggestions, all of which helped make this a better book.
We also want to thank our contacts at the hardware companies, who provided technical help, evaluation units, and other assistance. There are far too many to list individually, but they know who they are. We also want to thank the readers of our web sites and message boards, many of whom have taken the time to offer useful suggestions for improvements to the book. Thanks, folks. We couldn't have done it without you.
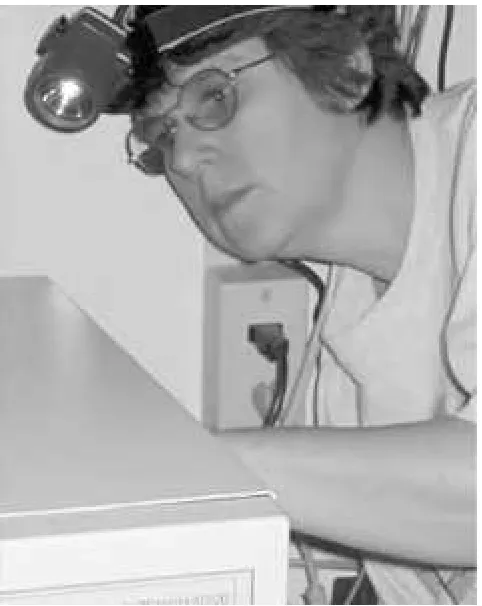
The photographs in this book were shot with Olympus digital cameras. We've used many digital cameras, and have developed a strong preference for Olympus models. Their experience as a premier maker of film cameras shows clearly in the construction quality, image quality,
functionality, and ease-of-use of Olympus digital cameras.
Finally, we want to thank our editor, Robert J. Denn, and our publisher, Tim O'Reilly, both of whom contributed numerous useful comments and suggestions.
Thank you for buying the second edition of PC Hardware in a Nutshell. We hope you enjoy reading it as much as we enjoyed writing it.
Chapter 1. Fundamentals
This chapter covers a mixed bag of important fundamental information about PCs, including how PCs are defined, an overview of PC components and technologies, a brief explanation of system resources, guidelines for building, buying, and upgrading PCs, smart buying practices, and suggestions as to what to do with old PCs.
1.1 PCs Defined
Who decides what is and what is not a PC? That question is not as trivial as it sounds, because there has never been (and probably will never be) an all-embracing de jure standard to define the PC. IBM created the de facto PC standard (and trademarked the name) when they shipped the first IBM Personal Computer in 1981. For more than five years, until their introduction of the ill-fated proprietary PS/2 line in 1987, IBM defined the PC standard. For a short time thereafter, some considered that Compaq defined the standard. But the days when any PC maker defined the PC standard are far in the past.
These days, Intel and Microsoft jointly define the de facto PC standard. In fact, a good working definition of a PC is a computer that uses an Intel or compatible processor and can run a Microsoft operating system. Any computer that meets both requirements—a so-called Wintel computer—is a PC. A computer that does not is not. Computers based on some Intel processors cannot run any Microsoft operating system, and thus are not PCs. Conversely, some computers with non-Intel processors can run Microsoft operating systems, but also do not qualify as PCs. For example, DEC Alpha minicomputers running Windows NT 4 are not PCs.
Two formal documents, described in the following sections, define the joint Intel/Microsoft
standards for systems and components you are likely to be working with. These standards are de facto in the sense that system and peripheral makers are not required to comply with them to manufacture and sell their products. They might as well be de jure standards, however, because compliance is required to achieve such nearly mandatory certifications as inclusion on the Windows NT/2000/XP Hardware Compatibility Lists.
1.1.1 PC 99 System Design Guide
PC 99 System Design Guide (PC 99) is a book-length document that defines required,
recommended, and optional (neither required nor recommended, but must meet the standard if included) characteristics for several classes of PCs, including Basic PC 99 (further subdivided into Consumer PC 99 and Office PC 99), Workstation PC 99, Entertainment PC 99, and Mobile PC 99.
PC 99 is the penultimate member of a series of documents, which began in 1990 with the first MPC standard, and continued with the PC 95, PC 97, and PC 98 revisions. PC 99 was formalized in mid-1998, took partial effect in July 1999 for systems to be delivered in Q4/99, came into full effect 1/1/00, and defined the standards for systems and components delivered through late 2001.
In some ways, PC 99 was unrealistically far ahead of its time: for example, in recommending Device Bay and 1394 as standard storage interfaces. In other ways it was far behind: for example, in requiring only a 300 MHz processor and 32 MB of RAM for some configurations. Some portions are skewed to Intel CPUs (e.g., an L2 cache requirement was cut from 512 KB to 256 KB when Intel shipped Coppermine Pentium III CPUs with 256 KB L2 cache—probably not a coincidence), while many others are skewed toward Microsoft operating systems. Neither of those is surprising in the document that defines the Wintel standard. All of that said, PC 99 was and remains an important document because it defined the direction of PC development as we entered the new millennium.
You can purchase PC 99 in book form (Microsoft Press, 1998). You can view or download PC991.0 in Acrobat format (http://developer.intel.com/design/desguide/) or PC99a—the final release of PC99, with minor updates and corrections—in compiled HTML help format
(http://www.microsoft.com/hwdev/platform/pcdesign/desguide/default.asp). The PC Design Guide home page (http://www.pcdesguide.org) also contains links to these documents in various
If you've ever crawled around under a desk trying to read the tiny icons on port connectors, you'll appreciate one very visible manifestation of PC 99 compliance—standard colors for port
connectors, listed in Table 1-1. Nearly all PCs and peripherals shipped since Q4/99 use these colors.
Table 1-1. PC 99 recommended connector color codes
Connector Color Connector Color
Analog VGA Blue PS/2-compatible keyboard Purple
Audio Line-in Light Blue PS/2-compatible mouse Green
Audio Line-out Lime Serial Teal/Turquoise
Digital monitor/flat panel White Speaker out/subwoofer Orange
IEEE 1394 Grey Right-to-left speaker Brown
Microphone Pink USB Black
MIDI/gameport Gold Video Out Yellow
Parallel Burgundy SCSI, LAN, telephone, etc. Not defined
1.1.2 PC 2001 System Design Guide
The PC 2001 System Design Guide (PC 2001) is, according to Intel and Microsoft, the final document in this series. In many respects, PC 2001 is more an addendum to PC 99 than a self-supporting document. Many PC 2001 specifications direct the reader to PC 99 and state only that the PC 2001 requirements are identical to those of PC 99, or are similar to those of PC 99 but with minor changes specified. The major differences between PC 99 and PC 2001 are:
PC 2001 eliminates the strong emphasis of PC 99 on market classifications—Basic PC, Consumer PC, Entertainment PC, and so on—although it does specify different
requirements for workstations and mobile PCs where appropriate.
PC 2001 no longer categorizes components and functionality as "recommended," instead specifying only those that are required. A component or function that is not required is not mentioned. Some requirements, identified as "if implemented," are conditional. If a manufacturer provides that component or feature, it must comply with the specified standard.
PC 2001 eliminates some former requirements because Microsoft and Intel deem them no longer important to the industry or "no longer relevant in defining the optimal user
experience with the Windows operating system," whatever that means.
PC 2001 defines requirements intended to support new and forthcoming technologies implemented in recent Microsoft operating systems, including Windows 2000, Windows Me, and Windows XP.
PC 2001 places a greatly increased emphasis on legacy-reduced and legacy-free systems. Some "legacy" items, such as ISA expansion slots and device dependence on MS-DOS, are forbidden entirely, while others are merely strongly discouraged.
PC 2001 emphasizes (although it does not mandate) features collectively called the Easy PC Initiative, which focuses on ease of setup, use, expansion, and maintenance.
You can download a copy of PC 2001 in Word, PDF, or Microsoft Compiled Help format from http://www.pcdesguide.org.
1.2 PC Components and Technologies
The following sections provide a quick overview of the components and technologies used in modern PCs.
1.2.1 Hardware Components
One of the great strengths of the PC architecture is that it is extensible, allowing a great variety of components to be added, and thereby permitting the PC to perform functions its designers may never have envisioned. However, most PCs include a more-or-less standard set of components, including the following.
Motherboard
The motherboard, described in Chapter 3, is the heart of a PC. It serves as "Command Central" to coordinate the activities of the system. Its type largely determines system capabilities. Motherboards include the following components:
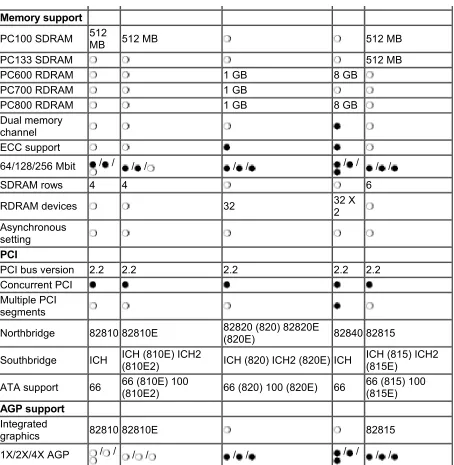
Chipset
The chipset provides the intelligence of the motherboard, and determines which processors, memory, and other components the motherboard can use. Most chipsets are divided physically and logically into two components. The Northbridge controls cache and main memory and manages the host bus and PCI expansion bus (the various buses used in PCs are described in Chapter 3). The Southbridge
manages the ISA bus, bridges the PCI and ISA buses, and incorporates a Super I/O controller, which provides serial and parallel ports, the IDE interface, and other I/O functions. Some recent chipsets, notably models from Intel, no longer use the old Northbridge/Southbridge terminology although the functionality and division of tasks are similar. Other recent chipsets put all functions on one physical chip.
CPU slot(s) and/or socket(s)
The type of CPU slot or socket determines which processors the motherboard can use. The most popular CPU connectors are Socket 370 (current Intel Pentium III and Celeron processors), Socket A (current AMD Athlon and Duron), Socket 478 (current Pentium 4), Socket 423 (old-style Pentium 4), Slot 1 (old-style Pentium II/III and Celeron), Slot A (older-style Athlon), and the nearly obsolete Socket 7 (Intel Pentium and AMD K6-* processors). Some motherboards have two or more CPU connectors, allowing them to support multiple processors. A few motherboards have both Slot 1 and Socket 370 connectors, allowing them to support either type of CPU (but not both at once).
There are three versions of Socket 370, which differ in pinouts and which processors they support. Early Socket 370/PPGA motherboards support only older Mendocino-core Celeron processors. Later Socket 370/FC-PGA motherboards support Coppermine-core Pentium III FC-PGA processors and Coppermine128-core Celeron FC-PGA processors. The most recent Socket 370 motherboards, which Intel refers to as "Universal" models, support any Socket 370 processor, including Tualatin-core Pentium III and Celeron processors.
VRMs supply clean, tightly regulated voltage to the CPU. Faster CPUs draw more current. Good VRMs are expensive, so some motherboard makers use the lowest-rated VRM suitable for the fastest CPU the motherboard is designed to support. Better VRMs allow a motherboard to accept faster future CPUs with only a BIOS upgrade.
Memory slots
The type and number of memory slots (along with chipset limitations) determine the type and amount of memory you can install in a PC. Most recent motherboards accept 168-pin SDRAM DIMMs or 168-pin or 184-pin Rambus RIMMs (or both). Many recent motherboards accept 184-pin DDR-SDRAM DIMMs. Older
motherboards accept 30-pin and/or 72-pin SIMMs.
Expansion bus slots
The type and number of expansion bus slots determine the type and number of expansion cards you can add to the system. Most recent motherboards include both PCI and ISA expansion slots, although the latest models may have only PCI slots.
Integrated functions
Modern motherboards often include embedded features, such as video and sound (and, less commonly, LAN and SCSI interfaces), that were formerly provided by add-on expansiadd-on cards. The upsides to embedded compadd-onents are reduced costs, better integration, and higher reliability. The downsides are that it may be difficult or impossible to upgrade embedded components, and that you have to pay for those embedded components whether you use them or not. Integrated motherboards are often ideally suited for casual use, but most readers of this book will avoid them for high-performance systems and build á la carte from discrete components.
Processor
The processor or CPU (described in Chapter 4) is the engine that drives the PC. The CPU you use determines how fast the system runs and what operating systems and other software can run on it. Most PCs use processors from Intel (Pentium II/III/4 or Celeron) or AMD (Athlon, Duron, or K6-2/III). Processors vary in speed (currently 700 MHz to 2.53 GHz), cost ($25 to $500+), physical connector (Socket 423, Socket 478, Socket 370, Socket A, Slot 1, Slot 2, Slot A, Socket 7, and so on), efficiency at performing various functions, and in other respects. Although processors get much attention, the truth is that performance differences between a $50 processor and a $250 processor are relatively minor, typically a factor of two.
Memory
A PC uses random access memory (RAM), also called simply memory, to store the programs and data with which it is currently working. RAM is available in many different types, speeds, and physical packages. The amount and type of RAM a system can use depends on its chipset, the type and number of RAM slots available, and other factors. The optimum amount of RAM depends on the operating system you run, how many and which programs you run simultaneously, and other considerations. Typical new PCs may have from 64 megabytes (MB)—marginally adequate for some environments—to 256 MB, which is sufficient for many people. Very few commercial desktop systems come standard with 512 MB or more, which is the amount now used by most "power users." Adding RAM is often a cost-effective upgrade for older systems, many of which have woefully inadequate RAM to run modern operating systems and programs. Memory is described in Chapter 5.
Floppy disk drive
The humble floppy disk drive (FDD) was formerly used for everything from booting the PC to storing data to running programs to making backups, but has now been largely relegated to such infrequent uses as making emergency boot diskettes, loading updated device drivers, running diagnostics programs, or "sneakernetting" documents to other systems. Many people don't use their FDDs from one month to the next. The FDD has been officially declared a "legacy" device, and many PCs manufactured after mid-2000 do not have one. All of that said, the FDD remains important to millions of PC users because it is the only read/write removable storage device present on most current PCs. Chapter 6 describes what you need to know about FDDs.
CD-ROM drive
CD-ROM drives began to appear on mainstream PCs in the early '90s, are now ubiquitous, and have remained generally unchanged except for improvements in speed and reliability. CD-ROM discs store 600+ MB of data in read-only form and, because they are both capacious and cheap to produce, are commonly used to distribute software and data. CD-ROM drives can also play CD-DA (audio) discs and multimedia discs, which makes them popular for listening to music and playing games. CD-ROM drives are detailed in Chapter 10. The chapters following that one cover other types of optical drives that are becoming common replacements for CD-ROM drives. Chapter 11 describes CD-R and CD-RW drives, which allow you to make your own CDs. Chapter 12 describes DVD-ROM drives— which are the follow-on to CD-ROM, and may be used to watch movies or access very large databases—and DVD recordable drives, which function much like CD writers but store about seven times as much data.
Hard disk drive
The hard disk drive (HDD) is the primary storage device on any PC. Unlike RAM, which retains data only while power remains applied, data written to an HDD remains stored there until you delete it. HDD space was formerly a scarce resource that users went to great lengths to conserve. Modern HDDs are so capacious (20 to 100+ GB) and so inexpensive (~$4/GB) that most people now regard disk space as essentially free. On the downside, modern HDDs can be difficult to install and configure, particularly in older systems, and their huge capacity makes some form of tape backup (Chapter 9) almost mandatory. Chapter 13 and Chapter 14 tell you everything you need to know about HDDs.
Video adapter
A video adapter, also called a graphics adapter, accepts video data from the computer and converts it into a form the monitor can display. In addition to image quality, the video adapter you use determines the sharpness, number of colors, and stability of the image your monitor displays. Most recent video adapters display text and simple graphics
adequately, but video adapters vary greatly in their suitability for use with graphics-intense software, including games. Video adapters are covered in Chapter 15.
Monitor
The monitor you use ultimately determines the quality of the video you see. Monitors are available in a wide variety of sizes, capabilities, features, and prices, and choosing the right one is not a trivial decision. Monitors are covered in Chapter 16.
Sound adapter and speakers
All PCs can produce basic warning sounds and audible prompts using their built-in
speakers, but for listening to audio CDs, playing games, watching DVDs with full surround sound, using the Internet to make free long-distance telephone calls, using
voice-recognition software, and other PC audio functions, you'll need a sound card (or embedded motherboard sound adapter) and speakers or headphones. Sound cards are covered in Chapter 17, and speakers in Chapter 18.
PCs use several types of devices to accept user input—keyboards for entering text; mice, trackballs, and other pointing devices for working in the Windows graphical environment; and game controllers for playing modern graphical computer games and simulations. These devices are covered in Chapter 19 through Chapter 21.
Communications ports
Communications ports allow a PC to connect to external peripherals such as printers, modems, and similar devices. Serial ports, which are obsolescent but still important for some applications, are covered in Chapter 25. Parallel ports, which are still commonly used to connect printers, are covered in Chapter 23. Universal Serial Bus (USB) ports, which are gradually replacing legacy serial and parallel ports, are covered in Chapter 24.
Case and power supply
The case (or chassis) is the outer shell that contains the PC and all internal peripheral devices. The power supply provides regulated power to all system components and cooling air flow to keep components from overheating. Cases are described in Chapter 25. Power supplies are covered in Chapter 26. Chapter 27 tells you what you need to know about protecting the power that runs your PC.
1.2.2 Software Components
Many people think of a PC as comprising solely physical hardware, but hardware is just a useless pile of silicon, metal, and plastic unless you have software to make it do something. Software is a set of detailed instructions that allows a computer to perform a task or group of tasks. Software is usually categorized as one of three types:
Applications programs
Applications programs are what most people think of when they hear the word software. These programs are designed to perform specific user-oriented tasks, such as creating a word processing document or spreadsheet, browsing the Web, reading and replying to email, managing a schedule, creating a presentation, or recovering a deleted file. Hundreds of thousands of applications programs are available, from comprehensive office suites like Microsoft Office, to vertical market packages like medical office billing software, to single-purpose utilities like WinZip. Whatever you might want a computer to do for you, you can probably locate applications software that will do it.
Operating system
An operating system is software that manages the PC itself, providing such basic functions as the ability to write and read data from a disk or to display images on the monitor. A PC can run any of dozens of operating systems, including DOS, Windows 95/98/98SE/Me (we use Windows 9X to refer to these collectively throughout the book, and Windows 98 inclusively if we are discussing all versions of Windows 9X other than Windows 95), Windows NT, Windows 2000, Windows XP, Linux and other Unix variants, NetWare, BeOS, and many others. The operating system you use determines which applications programs you can run, which peripherals you can use (not all operating systems support all peripherals), which technologies are available to you (e.g., NT does not support Plug-N-Play or USB), and how reliable the system is. The vast majority of PCs run Windows 95/98/Me/NT/2000/XP, at least for now, so those are the operating systems we focus on in this book. However, as we write this, Linux has begun to make serious inroads as a
desktop OS, so we expect that future editions of this book will focus increasing attention on Linux.
We said that the operating system determines which peripherals you can use. That's true, but only indirectly. Operating systems themselves natively recognize only the most basic, standardized system components—things like memory, the system clock, and so on. Device drivers are small programs that work at a very low level to integrate support for other devices into the operating system. Using device drivers allows an operating system to be extensible, which means that support for new devices can be added incrementally, without updating the operating system itself. For example, if you install a new video card, installing a device driver for that video card allows the operating system to recognize it and use its full capabilities. Most operating systems include "vanilla" device drivers that allow devices to be used at less than their full capabilities (e.g., the standard VGA driver in Windows) until an appropriate driver can be installed. Most operating systems also include specific device driver support for common devices, such as popular video cards and printers, but these drivers are often old, slow, and do not take full advantage of hardware capabilities. In general, you should download the most recent device driver from the hardware manufacturer when you install new hardware.
1.2.3 Firmware Components and the PC BIOS
Firmware is a special class of software, so called because it is more-or-less permanently stored on chips. Firmware is often referred to generically as a BIOS (Basic Input/Output System) because the only firmware contained in early PCs was the main system ROM-BIOS (Read-Only Memory BIOS). That's no longer true. Nearly every component in a modern PC contains its own firmware. Disk drives, SCSI host adapters, video cards, sound cards, keyboards, and most other devices contain firmware, and nowadays that firmware is seldom read-only.
Although few people do so, installing firmware updates is an important part of keeping a modern PC functioning at its best. For example,
firmware for most CD writers is frequently updated to add support for new types of blank media. The most important firmware to keep updated is the main system BIOS. Good motherboard makers frequently release
updated BIOS versions that add functionality, fix bugs, support faster processor speeds, and so on.
The two most important pieces of firmware in a PC are the chipset—which technically is intermediate between hardware and firmware—and the main system BIOS. The chipset is the heart of the PC. Its capabilities determine such fundamental issues as which processors the motherboard supports, how data is communicated between processor and memory, and so on. The BIOS manages the basic configuration information stored in non-volatile CMOS memory, such as the list of installed devices, and controls many of the low-level configuration parameters that determine how the PC functions. Although the chipset is not updatable, the BIOS is
updatable in all modern PCs.
BIOS updates sometimes correct bugs, but BIOS code is so stable and well debugged (it has to be) that the purpose of most BIOS updates is to add support for new technologies. For example, many pre-1998 BIOS versions did not support hard disk drives larger than 8.4 GB. Installing an updated BIOS with Extended Interrupt 13 support allows the system to recognize and use larger hard disks. Another common reason for BIOS updates is to add support for new CPU types. For example, many Pentium II motherboards did not support Celerons, which use a different L2 caching method. Similarly, a motherboard manufactured when the fastest Pentium III available was 600 MHz might have no settings to allow for faster Pentium IIIs. Installing an updated BIOS fixes problems like these. Systems with Flash BIOS (which is to say, all modern systems) can be updated simply by downloading the new BIOS and running a special installer program.
of booting. Read the detailed instructions supplied by the manufacturer before you attempt to update your BIOS, and if possible connect the PC to a UPS during the BIOS update. Some motherboards, notably recent Intel models, have a BIOS recovery function that allows for correcting a failed update simply by changing a jumper and running the update procedure again. Some motherboards have a dual BIOS, which means that if you damage one BIOS during an update, you can boot the system from the other and repair the corrupted BIOS. But many systems make no such provision, so be extremely careful when updating your system BIOS. If you fail to follow instructions exactly, or if you accidentally install the wrong BIOS update, or if the power fails during the update, the only solution may be to return the motherboard to the manufacturer for repair or replacement.
You configure BIOS options and chipset settings by running a special firmware program called CMOS Setup, which is usually invoked by pressing F1, F2, or Delete while the system is booting. Some systems allow the administrator to password-protect access to CMOS Setup, while others make CMOS Setup a "blind" option. For example, recent Intel motherboards by default display an Intel splash screen rather than the standard BIOS boot screen. To run CMOS Setup, press Esc when the splash screen appears to clear it, and then press F2 to enter BIOS Setup.CMOS Setup programs vary at the discretion of the motherboard or system maker in terms of what they allow you to access and change. Some Setup programs provide essentially complete access to all settings, while others allow changing only some settings, and some provide no access to chipset options at all. Figure 1-1 shows the main screen of a typical BIOS setup program.
Figure 1-1. The Main page of the PhoenixBIOS Setup Utility
There are so many different chipsets, BIOS versions, and Setup utilities that covering BIOS and chipset options in detail would require writing a separate book. Fortunately, someone already has. Phil Croucher's superb The BIOS Companion (http://www.electrocution.com/biosc.htm)
documents BIOS and chipset options in great detail, including some that even we don't understand. Every PC technician should own a copy of this book. Another very useful BIOS resource is Wim's BIOSPage (http://www.wimsbios.com/).
1.2.4 Technologies
ACPI
Advanced Configuration and Power Interface (ACPI) is the current standard for configuring system components under PnP, monitoring the health of the system, and managing power usage. It replaces Intel's Dynamic Power Management Architecture (DPMA) and Advanced Power Management (APM). All current PCs and motherboards include at least partial ACPI support. ACPI is one of those technologies that isn't quite "here" yet. When it works as it should, which is usually, it provides power management and other functions that many find useful. When it doesn't work properly, or when it conflicts with other technologies such as USB, it can cause very subtle, intermittent problems that can have you pulling out your hair. It can also cause very non-subtle problems, including systems that go into a coma rather than suspending, screens that refuse to unblank even though the system itself is running, and so on. In general, when we encounter a system that hangs or otherwise behaves strangely, our first suspects are the power supply or the memory. But ACPI conflicts are also high on the list.
AGP
Accelerated Graphics Port (AGP) is a dedicated video port connector, introduced in 1997 by Intel and now nearly ubiquitous. In theory, AGP improves video performance by removing it from the 33 MHz PCI bus and by allowing a video adapter to use main system memory. In practice, few applications saturate even a PCI video adapter, so the benefits of AGP are largely unrealized for now. AGP video cards do not fit PCI slots, and viceversa. AGP is fully supported only under Windows 98 and Windows 2000 or later. Note that many motherboards now use AGP 2.0-compliant 1.5V AGP slots that do not support legacy 3.3V AGP cards, so if you're upgrading a motherboard you may also have to upgrade your video adapter.
IAPC
Instantly Available PC (IAPC) is an Intel initiative that defines power-saving modes that retain the ability to respond to programmed or external triggers, such as LAN activity (Wake-on-LAN, WOL) or an inbound telephone call (Wake-on-Ring, WOR).
PnP
Plug-N-Play (PnP) is a joint Intel/Microsoft specification that allows computers and peripherals to configure themselves by negotiating for available system resources. Full implementation of PnP requires the chipset, BIOS, operating system, and devices all be PnP-compliant. Ideally, adding a device in a PnP environment requires only physically installing the device. PnP then configures everything automatically, loading the appropriate driver and assigning non-conflicting resources (IRQ, I/O port, DMA, and memory space) to the device. In practice, PnP sometimes does not work properly. PnP is partially supported by early releases of Windows 95, and fully supported by Windows 95 OSR2+, Windows 98, and Windows 2000 or later.
UDMA/100 and /133
Ultra DMA/100 (UDMA/100) and Ultra DMA/133 (UDMA/133) are recent standards that support IDE hard disk data transfer rates up to 133 MB/s, eight times that supported under earlier Programmed I/O (PIO) modes, four times that of UDMA/33, and twice that of
UDMA/66. DMA (Direct Memory Access) modes have low CPU utilization under heavy disk load (typically ~1.5%, versus 80% for PIO), and high-end UDMA drives approach low-end SCSI drives in raw performance. The fastest current ATA hard drives cannot saturate even a UDMA/66 interface, so the advantage of UDMA/100 and UDMA/133 over earlier UDMA standards is nil in practical terms for now. But we expect new-generation hard drives to ship in 2002 and 2003 that will be able to saturate UDMA/66, so UDMA/100 is worth having. UDMA/100 is supported by most current systems and motherboards, and by many current IDE drives. Most current motherboards do not support UDMA/133, although new motherboards shipping during 2002 will begin to incorporate it. UDMA can be used with all versions of Windows 95/98/Me and by Windows NT/2000/XP, although configuring it is nontrivial in some of those environments.
The Big Drive Interface Initiative
The ATA standard has used 28-bit addressing since its inception. When using standard 512-byte blocks, a 28-bit address limits maximum drive size to 128 GB. Until 2001, that was so large as to be no limit at all, but the exponential growth in hard drive sizes has now put them hard against that 128 GB limitation. In 2001, a consortium of storage industry companies, led by Maxtor, introduced the Big Drive Interface Initiative. This initiative replaces the old ATA interface with a new version that uses 48-bit addressing, which allows drive sizes up to 128 petabytes (PB), still using standard 512-byte sectors. The new
interface is compatible with older drives, and the newer drives are backward-compatible with older interfaces (although, of course, you are limited to using 128 GB of the drive's capacity if it is connected to an older interface). As this is written, no current
motherboard has an embedded 48-bit ATA interface, but we expect that motherboards with 48-bit ATA interfaces will begin shipping in 2002. During the transition, drives larger than 128 GB usually ship with a bundled 48-bit add-on ATA adapter. For more information about the Big Drive Interface Initiative, see http://www.maxtor.com/products/bigdrive/default.htm.
USB
Universal Serial Bus (USB) is a general-purpose communications interface for connecting peripherals to PCs. USB 1.1 supports speeds up to 12 Mb/s (1.5 MB/s). USB 2.0, finalized in February 2000, supports speeds 40 times faster—up to 480 Mb/s (60 MB/s). USB 2.0-compliant interfaces and peripherals began shipping in late 2001. USB is royalty-free and strongly backed by Intel, which makes it likely to prevail over the competing, more
expensive IEEE-1394 "Firewire" standard. USB will ultimately replace low-speed "legacy" serial, parallel, keyboard, mouse, and floppy interfaces, and may also become a standard or at least an alternative interface for mid-speed devices like video, network adapters, and optical drives. All current systems and motherboards include USB 1.1 ports, and an
increasing number of peripherals are available in USB form. USB 1.1 is fully supported only under Windows 98 and Windows 2000/XP. Microsoft added USB 2.0 support to Windows XP in January 2002, and we expect them to ship native USB 2.0 drivers by mid-2002.
An exhaustive list of these and other PC technology standards is available in the PC 2001 document and on the Web at http://www.pcdesguide.org/pc2001/Resources.htm.
1.2.5 The Strange Case of the AMR/CNR/ACR Slot
Nearly everything inside a PC is designed to be user-installable. The Audio Modem Riser (AMR), Communications and Networking Riser (CNR), and Advanced Communication Riser (ACR) slots are exceptions. Although their presence on many recent motherboards intrigues some upgraders, these slots were never intended as general-purpose expansion slots. All of them were designed to be used by OEM system builders, not by backyard mechanics. Here's what you need to know about AMR, CNR, and ACR slots:
Intel developed the AMR slot to provide an easy, standardized way to integrate modem and audio functions into finished systems at minimal cost, but OEM system builders ignored it in droves. Why? Mainly because the AMR slot took the place of a standard PCI slot, and most motherboard designers and system builders rightly preferred having an extra PCI slot to having an AMR slot of dubious utility. The AMR slot also had limited functionality and no support for Plug-N-Play. The result was that, although some motherboards included an AMR slot, very few AMR-compatible cards were ever developed, and those that were achieved only limited distribution. We've seen exactly one AMR card.
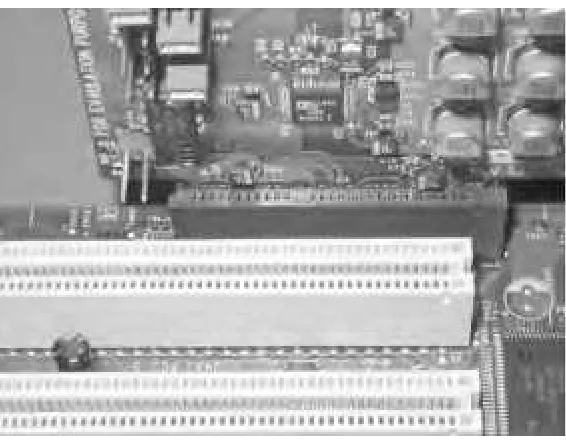
CNR slot
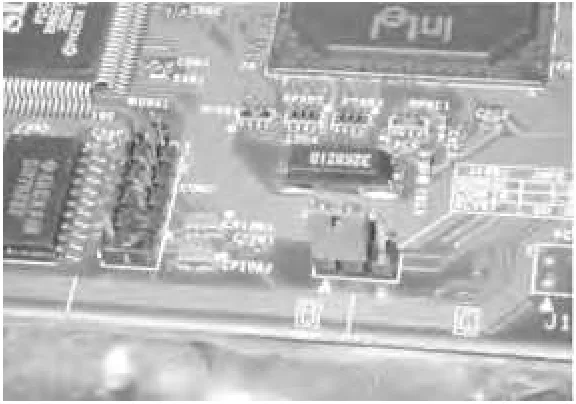
Intel's answer to the problems of AMR was to redesign the AMR slot. The CNR slot, shown in Figure 1-2, can coexist with a standard PCI slot, allowing either a CNR card or a
standard PCI card to use the slot position interchangeably. CNR also adds Plug-N-Play support and other features of interest to system designers. AMR and CNR are
incompatible, both at the physical and electrical level. Although we have seen a few CNR cards, mostly modems and sound adapters, CNR cards are not much easier to find than AMR cards. For more information about CNR, see
http://developer.intel.com/technology/cnr/qa.htm.
Figure 1-2. A CNR slot (top) with CNR card inserted
ACR slot
AMR and CNR are both Intel technologies. AMD, VIA, and the rest of the everyone-who-is-not-Intel camp came up with an alternative called the ACR slot, which is found on some Intel-free motherboards. The ACR slot is physically a standard PCI slot connector, which you can recognize because it's turned 90 degrees to the other PCI connectors on the motherboard. In theory, the ACR slot offers several advantages over the AMR/CNR slot, including its use of standard connectors and its additional flexibility because of the greater number of available pins. In practice, we've never seen or even heard of a card designed to fit that slot, so it is effectively a wasted connector.
Intel warns that the AMR and CNR interfaces are not rigidly defined, so it is quite possible that any given AMR or CNR card simply will not work in a particular AMR or CNR slot. If your motherboard has an AMR, CNR, or ACR slot, we suggest you pretend it's not there.
1.3 System Resources
PCs have four types of system resources—Interrupt Request lines, DMA channels, I/O ports, and memory ranges. Many system components and peripherals require one or more of these
resources, which raises the twin problems of resource availability and resource conflicts.
Resource availability is particularly important with regard to IRQs, which are in high demand, and of which only 16 exist. Resource conflicts can occur when two devices are assigned the same resource, in which case one or both devices may not function or may function unpredictably. Resource conflicts may occur even with plentiful resources, such as I/O ports, where many are available and only a few are in use.
A frequent cause of problems when building or upgrading PCs is a shortage of required resources or unintentional resource conflicts that occur when a new component is installed that was
inadvertently configured to use a resource already in use. Two technologies, PCI and Plug-N-Play, used in conjunction with recent versions of Microsoft operating systems (Windows 95 OSR2, Windows 98, and Windows 2000/XP) go a long way toward extending the availability of resources and preventing conflicts. Even in such an ideal environment, however, resource conflicts
sometimes occur, particularly if you are using older "legacy" hardware. The following sections describe what you need to know about PC resources and how to manage them.
1.3.1 Interrupt Request Line (IRQ)
When a component or peripheral, such as a network adapter or sound card, needs to get the CPU's attention, it does so by generating a signal on an Interrupt ReQuest Line (IRQ). Table 1-2 lists IRQs and the devices that typically use them.
Table 1-2. 8/16/32-bit ISA/PCI standard IRQ assignments
IRQ Bus type Typically used by
00 none Non-maskable Interrupt (NMI); system timer 01 none Keyboard port
02 none Programmable Interrupt Controller (PIC); cascade to IRQ 09 03 8/16-bit Communications Port 2 (COM2:)
04 8/16-bit Communications Port 1 (COM1:) 05 8/16-bit Sound card; Printer Port (LPT2:) 06 8/16-bit Floppy Disk Controller
07 8/16-bit Printer Port (LPT1:)
08 none System CMOS/real-time clock
09 8/16-bit Redirected from IRQ 02; network interface 10 16-bit Network interface; USB host controller 11 16-bit Video Adapter; SCSI host adapter 12 16-bit PS/2 mouse port
13 none Numeric Data Processor (math co-processor) 14 16-bit Primary IDE interface
15 16-bit Secondary IDE interface
If the processor receives two or more interrupts simultaneously, it processes them in order of priority. On 8-bit systems (PCs and XTs), the lower-numbered IRQ always takes priority. That is, IRQ 00 is the highest priority, and IRQ 07 is the lowest. 286 and higher systems use a second PIC to add a second set of eight IRQs, cascaded from IRQ 02. That changes IRQ priority from the simple numerical order used by 8-bit systems. On 16-bit and higher systems, IRQ 00 is still the highest priority, followed by IRQ 01 and 02. But because IRQ 02 is the cascade IRQ, the IRQs that it supports—IRQ 08 through IRQ 15—are next in priority. IRQ 03 follows IRQ 15 in priority, and then in numerical order through IRQ 07, the lowest priority. Whenever possible, assign "important" devices to higher-priority IRQs. For example, if you have a serial mouse and a modem, assign the modem to COM2: (IRQ3) and the mouse to COM1: (IRQ4). Because the modem is on the higher-priority IRQ, it is serviced first if the modem and the mouse generate interrupts simultaneously.
Juggling ISA IRQs
Only IRQs 03, 04, 05, 06, 07, 09, 10, 11, 12, 14, and 15 are available. Six of those— 03, 04, 06, 12, 14, and 15—are occupied by the serial ports, the floppy controller, the mouse, and the IDE interfaces on most ISA systems, leaving only 05, 07, 09, 10, and 11. If you require interrupt-based printing, you must allocate IRQ 07 to LPT1; if you have a sound card, it'll want IRQ 05; and so on. It's not surprising that many ISA systems have no free IRQs, and that allocating IRQs and resolving IRQ conflicts is a major issue for ISA systems.
If you find yourself out of IRQs on an ISA system, you may be able to reclaim one or more IRQs. Some cards and some systems allow using IRQ 02 successfully, and some do not. If one or both of the serial ports are unused, disable them in BIOS to reclaim IRQ 03 and/or IRQ 04. If you have two serial devices that are never used at the same time (e.g., your modem and your Palm Pilot sync cradle), you can use a switch box to connect both to the same serial port and disable the other serial port. If there is no printer connected to the system, disable the printer port in BIOS (or configure it to a mode that does not use an IRQ) to free up IRQ 07. If you have only one IDE drive in the system, disable the secondary IDE interface in BIOS to reclaim IRQ 15. If you have two IDE drives, one on each interface, consider putting both drives on the primary IDE interface and disabling the secondary IDE interface to reclaim IRQ 15. Note, however, that putting some very old CD-ROM drives on the same IDE channel as the hard disk can seriously degrade hard disk performance.
1.3.1.1 ISA Interrupts Versus PCI Interrupts
ISA and PCI handle interrupts very differently. ISA expansion cards are configured manually for IRQ, usually by setting a jumper, but sometimes by running a setup program. All ISA slots have all IRQ lines present, so it doesn't matter which card is placed in which slot. ISA cards use edge-sensitive interrupts, which means that an ISA device asserts a voltage on one of the interrupt lines to generate an interrupt. That in turn means that ISA devices cannot share interrupts, because when the processor senses voltage on a particular interrupt line it has no way to determine which of multiple devices might be asserting that interrupt. For ISA slots and devices, the rule is simple: two devices cannot share an IRQ if there is any possibility that those two devices may be used simultaneously. In practice, this means that you cannot assign the same IRQ to more than one ISA device.
AGP cards support only INT#1/A and INT#2/B, which they share with PCI Slot 1. If a PCI Slot 5 exists, it shares with Slot 4. In either case, with slots that share resources, avoid installing cards in both slots if both cards require the same shared resource. If you must use both slots, install only cards that can share an IRQ. If you encounter a conflict on a PCI system, simply moving cards to different slots often solves the problem.
Bridging circuitry within the chipset allows additional PCI or other buses to be cascaded from the primary PCI bus. For example, the PCI-to-ISA bridge present in most current chipsets allows cascading an ISA bus from the primary PCI bus. One function of the bridging circuitry is to convert PCI interrupts to ISA interrupts when a PCI device needs to get the processor's attention. PCI interrupts do not correspond directly to ISA IRQs, although an INT# can be mapped to an IRQ via the PC's interrupt handler if the card using that INT# requires an IRQ. Some configuration
firmware restricts mapping PCI interrupts to IRQ 09, 10, or 11 or Auto, while others allow mapping any INT# to any available IRQ.
In general, leave INT-IRQ mapping for all PCI slots set to Auto unless you have good reason to assign a specific IRQ. Sometimes a card with a dynamically mapped IRQ may work fine with some programs and not others. For example, many older games expect to find a sound card at IRQ 05. If you have a PCI/PnP sound card installed in PCI Slot 3, you can use INT-IRQ mapping to assign IRQ 05 to that slot and card, keeping the old games happy.
PCI expansion cards are normally assigned an IRQ dynamically, either by the BIOS or by Windows, depending on the version of Windows being used and the PCI/PnP configuration options in effect. On bridged PCI-ISA systems, ISA IRQs 00, 01, 02, 08, and 13 are reserved for critical system functions. IRQs 03 through 07, 09 through 12, 14, and 15 can each be
programmed using the CMOS Setup PCI/PnP configuration utility as being owned by either the PCI bus or the ISA bus, but not both. The terminology for this varies. Some utilities allow you to specify each IRQ as PCI/ISA PnP or Legacy ISA (or similar words). Others allow you to specify each IRQ as Level-Sensitive or Edge-Sensitive (or similar words). In either case, the effect is the same.
If you are installing a "legacy" card (i.e., a non-