Learning iPhone Programming
Alasdair Allan
Learning iPhone Programming by Alasdair Allan
Copyright © 2010 Alasdair Allan. All rights reserved. Printed in the United States of America.
Published by O’Reilly Media, Inc., 1005 Gravenstein Highway North, Sebastopol, CA 95472.
O’Reilly books may be purchased for educational, business, or sales promotional use. Online editions are also available for most titles (http://my.safaribooksonline.com). For more information, contact our corporate/institutional sales department: 800-998-9938 or [email protected].
Editor: Brian Jepson
Production Editor: Sarah Schneider Copyeditor: Audrey Doyle Proofreader: Kiel Van Horn
Indexer: Seth Maislin
Cover Designer: Karen Montgomery Interior Designer: David Futato Illustrator: Robert Romano
Printing History:
March 2010: First Edition.
O’Reilly and the O’Reilly logo are registered trademarks of O’Reilly Media, Inc. Learning iPhone Programming, the image of a lapwing, and related trade dress are trademarks of O’Reilly Media, Inc. Many of the designations used by manufacturers and sellers to distinguish their products are claimed as trademarks. Where those designations appear in this book, and O’Reilly Media, Inc. was aware of a trademark claim, the designations have been printed in caps or initial caps.
While every precaution has been taken in the preparation of this book, the publisher and author assume no responsibility for errors or omissions, or for damages resulting from the use of the information con-tained herein.
TM
This book uses RepKover™, a durable and flexible lay-flat binding.
ISBN: 978-0-596-80643-9
Table of Contents
Preface . . . xi
1. Why Go Native? . . . 1
The Pros and Cons 1
Why Write Native Applications? 2
The Release Cycle 3
Build It and They Will Come 4
2. Becoming a Developer . . . 5
Registering As an iPhone Developer 5
Enrolling in the iPhone Developer Program 7
The Apple Developer Connection 8
Installing the iPhone SDK 8
Preparing Your iPhone or iPod touch 11
Creating a Development Certificate 12
Getting the UDID of Your Development Device 14
Creating an App ID 15
Creating a Mobile Provisioning Profile 16
Making Your Device Available for Development 17
3. Your First iPhone App . . . 19
Objective-C Basics 19
Object-Oriented Programming 19
The Objective-C Object Model 21
The Basics of Objective-C Syntax 23
Creating a Project 23
Exploring the Project in Xcode 25
Our Project in Interface Builder 32
Adding Code 34
Connecting the Outlets in Interface Builder 36
Putting the Application on Your iPhone 37
4. Coding in Objective-C . . . 41
Declaring and Defining Classes 41
Declaring a Class with the Interface 41
Defining a Class with the Implementation 42
Object Typing 43
Calling Methods on nil 47
Memory Management 47
Creating Objects 47
The Autorelease Pool 48
The alloc, retain, copy, and release Cycle 48
The dealloc Method 50
Responding to Memory Warnings 50
Fundamental iPhone Design Patterns 50
The Model-View-Controller Pattern 51
Views and View Controllers 51
The Delegates and DataSource Pattern 52
Conclusion 53
5. Table-View-Based Applications . . . 55
Simplifying the Template Classes 55
Creating a Table View 58
Organizing and Navigating Your Source Code 61
Connecting the Outlets 62
Building a Model 65
Adding Images to Your Projects 71
Connecting the Controller to the Model 73
Mocking Up Functionality with Alert Windows 74
Adding Navigation Controls to the Application 75
Adding a City View 79
Edit Mode 85
Deleting a City Entry 89
Adding a City Entry 90
The “Add New City...” Interface 93
Capturing the City Data 100
6. Other View Controllers . . . 107
Utility Applications 107
Making the Battery Monitoring Application 108
Tab Bar Applications 119
Refactoring the Template 120
Adding Another Tab Bar Item 122
Finishing Up 124
Modal View Controllers 125
Modifying the City Guide Application 126
The Image Picker View Controller 133
Adding the Image Picker to the City Guide Application 133
7. Connecting to the Network . . . 145
Detecting Network Status 145
Apple’s Reachability Class 145
Embedding a Web Browser in Your App 150
A Simple Web View Controller 150
Displaying Static HTML Files 159
Getting Data Out of a UIWebView 160
Sending Email 161
Getting Data from the Internet 166
Synchronous Requests 166
Asynchronous Requests 167
Using Web Services 168
8. Handling Data . . . 191
Data Entry 191
UITextField and Its Delegate 191
UITextView and Its Delegate 193
Parsing XML 195
Parsing XML with libxml2 196
Parsing XML with NSXMLParser 197
Parsing JSON 199
The Twitter Search Service 201
The Twitter Trends Application 202
Regular Expressions 213
Introduction to Regular Expressions 213
Storing Data 217
Using Flat Files 217
Storing Information in an SQL Database 218
Core Data 224
9. Distributing Your Application . . . 225
Adding Missing Features 225
Adding an Icon 225
Adding a Launch Image 227
Changing the Display Name 231
Submitting to the App Store 241
The App Store Resource Center 244
Reasons for Rejection 244
10. Using Sensors . . . 249
Hardware Support 249
Determining Available Hardware Support 249
Setting Required Hardware Capabilities 251
Using the Camera 253
The Core Location Framework 254
Location-Dependent Weather 256
Using the Accelerometer 266
Writing an Accelerometer Application 268
Using the Digital Compass 272
Accessing the Proximity Sensor 274
Using Vibration 275
Using the Address Book 314
Interactive People Picking 315
Programmatic People Picking 319
13. Other Native Platforms . . . 321
PhoneGap 321
Download and Installation 322
Building a PhoneGap Project 323
MonoTouch 325
Download and Installation 325
Building a MonoTouch Project 327
14. Going Further . . . 335
Cocoa and Objective-C 335
The iPhone SDK 335
Web Applications 336
Core Data 336
Push Notifications 337
In-App Purchase 338
Core Animation 339
Game Kit 339
Writing Games 339
Look and Feel 340
Hardware Accessories 340
Index . . . 343
Preface
The arrival of the iPhone changed everything. Or, at the very least, it changed the direction of software development for mobile platforms, which is a pretty big thing. It spawned an entire generation of copycat devices and shook an entire multibillion-dollar industry to its knees. Despite this, it still fits in your pocket.
Who Should Read This Book?
This book gives a rapid introduction to programming for the iPhone and iPod touch for those with some programming experience. If you are developing on the Mac for the first time, drawn to the platform because of the iPhone, or alternatively you are an experienced Mac programmer making the transition to the iPhone, this book is for you.
What Should You Already Know?
The book assumes some knowledge of C, or at least passing knowledge of a C-derived language. Additionally, while I do give a crash course, some familiarity with object-oriented programming concepts would be helpful.
What Will You Learn?
This book will guide you through developing your first application for the iPhone, from opening Xcode for the first time to submitting your application to the App Store. You’ll learn about Objective-C and the core frameworks needed to develop for the iPhone by writing applications that use them, giving you a basic framework for building your own applications independently.
What’s in This Book?
Here’s a short summary of the chapters in this book and what you’ll find inside: Chapter 1, Why Go Native?
This chapter discusses the need for native applications and compares building native applications to building web applications.
Chapter 2, Becoming a Developer
This chapter walks you through the process of registering as an iPhone developer and setting up your work environment, from installing Xcode and the iPhone SDK to generating the developer certificates you’ll need to build your applications and deploy them onto your own iPhone or iPod touch.
Chapter 3, Your First iPhone App
This chapter allows you to get hands-on as quickly as possible and walks you through building your first Hello World application, including how to deploy and run the application on your iPhone or iPod touch.
Chapter 4, Coding in Objective-C
This chapter provides a crash course in the basics of the Objective-C language, and if you’re familiar with another C-derived language (and perhaps with object-oriented programming), it should be enough to get you up and running with Objective-C and the Cocoa Touch frameworks.
Chapter 5, Table-View-Based Applications
The UITableView and associated classes are perhaps the most commonly used classes when building user interfaces for iPhone or iPod touch applications. Due to the nature of the applications, these classes can be used to solve a large cross section of problems, and as a result they appear almost everywhere. In this chapter, we dive fairly deeply into the table view classes.
Chapter 6, Other View Controllers
After discussing the table view controller in detail, we discuss some of the other view controllers and classes that will become useful when building your applica-tions: simple two-screen views, single-screen tabbed views, modal view controllers, and a view controller for selecting video and images.
Chapter 7, Connecting to the Network
This chapter discusses connecting to the Internet, browsing the Web, sending email, and retrieving information.
Chapter 8, Handling Data
This chapter discusses how to handle data input, both from the application user and programmatically, and how to parse XML and JSON documents. The chapter also covers storing data in flat files and storing data with the SQLite database engine.
Chapter 9, Distributing Your Application
This chapter talks about how to add some final polish to your application and walks you through the process of building your application for distribution, either via ad hoc distribution or for the App Store.
Chapter 10, Using Sensors
This chapter discusses how to determine what hardware is available and illustrates how to deal with the major sensors on the iPhone and iPod touch: the accelerometer, magnetometer, camera, and GPS.
Chapter 11, Geolocation and Mapping
This chapter walks you through the process of building applications that make use of the Core Location and MapKit frameworks.
Chapter 12, Integrating Your Application
This chapter shows you some of the tricks to integrate your application with the iPhone’s software ecosystem, how to present user preferences with Settings Bun-dles, and how to use custom URL schemes to launch your application. It also discusses how to make use of the Media Player and Address Book.
Chapter 13, Other Native Platforms
This chapter deals with the PhoneGap and MonoTouch platforms for building native applications for the iPhone and iPod touch that can be sold on the App Store. The chapter then walks you through the installation process and building your first Hello World application for both platforms.
Chapter 14, Going Further
This chapter provides a collection of pointers to more advanced material on the topics we covered in the book, and material covering some of those topics that we didn’t manage to talk about in the book.
Conventions Used in This Book
The following typographical conventions are used in this book:
Italic
Indicates new terms, URLs, email addresses, filenames, and file extensions Constant width
Used for program listings, as well as within paragraphs to refer to program elements such as variable or function names, databases, data types, environment variables, statements, and keywords
Constant width bold
Shows commands or other text that should be typed literally by the user
Constant width italic
Shows text that should be replaced with user-supplied values or by values deter-mined by context
This icon signifies a tip, suggestion, or general note.
This icon signifies a warning or caution.
Using Code Examples
This book is here to help you get your job done. In general, you may use the code in this book in your programs and documentation. You do not need to contact us for permission unless you’re reproducing a significant portion of the code. For example, writing a program that uses several chunks of code from this book does not require permission. Selling or distributing a CD-ROM of examples from O’Reilly books does require permission. Answering a question by citing this book and quoting example code does not require permission. Incorporating a significant amount of example code from this book into your product’s documentation does require permission.
We appreciate, but do not require, attribution. An attribution usually includes the title, author, publisher, and ISBN. For example: “Learning iPhone Programming, by Alasdair Allan. Copyright 2010 Alasdair Allan, 978-0-596-80643-9.”
If you feel your use of code examples falls outside fair use or the permission given here, feel free to contact us at [email protected].
How to Contact Us
Please address comments and questions concerning this book to the publisher: O’Reilly Media, Inc.
1005 Gravenstein Highway North Sebastopol, CA 95472
800-998-9938 (in the United States or Canada) 707-829-0515 (international or local)
707-829-0104 (fax)
We have a web page for this book, where we list errata, examples, and any additional information. You can access this page at:
http://oreilly.com/catalog/9780596806439
Supplementary materials are also available at:
http://www.learningiphoneprogramming.com/
To comment or ask technical questions about this book, send email to:
For more information about our books, conferences, Resource Centers, and the O’Reilly Network, see our website at:
http://www.oreilly.com
Safari® Books Online
Safari Books Online is an on-demand digital library that lets you easily search over 7,500 technology and creative reference books and videos to find the answers you need quickly.
With a subscription, you can read any page and watch any video from our library online. Read books on your cell phone and mobile devices. Access new titles before they are available for print, and get exclusive access to manuscripts in development and post feedback for the authors. Copy and paste code samples, organize your favorites, down-load chapters, bookmark key sections, create notes, print out pages, and benefit from tons of other time-saving features.
O’Reilly Media has uploaded this book to the Safari Books Online service. To have full digital access to this book and others on similar topics from O’Reilly and other pub-lishers, sign up for free at http://my.safaribooksonline.com.
Acknowledgments
Books do not write themselves, but a book is also not the work of just a single person, despite what it may say on the front cover. I’d like to thank my editor, Brian Jepson. His hard work and constant prodding made the book better than it might otherwise have been. I’d also like to offer more than thanks to my long-suffering wife, Gemma Hobson. Without her support, encouragement, and willingness to make those small (and sometimes larger) sacrifices that an author’s spouse has to make, this book wouldn’t be in your hands today. Thank you. Finally to my son, Alex, who is as yet too young to do more than chew on the cover, daddy’s home. I can only hope for your sake that O’Reilly uses tasty paper.
CHAPTER 1
Why Go Native?
When the iPhone was introduced, there was no native SDK. Apple claimed that one wasn’t needed and that applications for the device should be built as web applications using JavaScript, CSS, and HTML. This didn’t go down well with the developer com-munity; they wanted direct access to the hardware and integration with Apple’s own applications.
Only a few months after the iPhone’s release, the open source community had accom-plished something that many thought impossible. Despite Apple locking the device down, developers had gained access, reverse-engineered the SDK, and gone on to build a free open source tool chain that allowed them to build native applications for the device. At one point, it was estimated that more than one-third of the iPhones on the market had been “jail broken” by their users, allowing them to run these unsanctioned third-party applications.
This open source development effort is ongoing today, and if you want to know more, I recommend iPhone Open Application Development, Second Edition by Jonathan Zdziarski (O’Reilly). However, the book you hold in your hands isn’t about the open source “hacker” SDK, because in March 2008 Apple publicly changed its mind and released the first version of the native SDK to a waiting developer community. Whether this release was in response to this effort, or perhaps because it was (the notoriously secretive) Apple’s plan all along, we’ll probably never know.
The Pros and Cons
When the native SDK was introduced, a number of people in the industry argued that it was actually a step backward for developers. They felt that web-based applications, especially once home screen icons for these applications arrived on the 1.1.3 firmware, were good enough. By writing code specifically for the iPhone in Objective-C, you were making it more difficult to port your applications, and porting a web application more or less consisted of simply restyling it using a new CSS template.
It seemed that the users of the applications disagreed. It’s arguable why this is the case, but it’s very hard to make native-looking web applications that can be reused across many different platforms, though it is possible. Just as applications on the Mac desktop that have been ported from Windows tend to stand out like a sore thumb by not quite working as the user expects, web applications, especially those that are intended to be used across different platforms, tend to do the same.
If you integrate your application into the iPhone ecosphere, make use of the possibilities that the phone offers, and optimize your user interface (UI) for the device, the user experience is much improved. It’s also really hard to write web applications that work well when you need to design for a smaller screen, implying as it does a simpler UI and less exposed functionality, without using native controls.
Why Write Native Applications?
The obvious reason to use the native SDK is to do things that you can’t do on the Web. The first generation of augmented reality applications is a case in point; these needed close integration with the iPhone’s onboard sensors (e.g., GPS, accelerometer, digital compass, and camera) and wouldn’t have been possible without that access. Although the iPhone’s Safari browser supports the new geolocation capabilities HTML 5 pro vides, this doesn’t alleviate the problem entirely. It’s doubtful that all platform-specific hardware is going to get the same sort of treatment, so it’s unlikely that you will see the arrival of augmented reality web applications.
If you are coming from a web development background, you may be interested in the cross-platform PhoneGap framework. This framework provides native wrapper classes and allows you to build native applica-tions in HTML/JavaScript on a range of mobile platforms. One of the platforms it targets is the iPhone. I talk about PhoneGap, and the other alternative native development platforms for the iPhone, in Chapter 13.
Sometimes it’s not about doing things that can’t be done; it’s about doing things faster, and doing client-side error handling. For instance, the Apple iTunes and App Store applications that are provided with the iPhone are actually web applications wrapped inside native applications. Just like the iTunes Store on the Mac, the main display you see is a web page, but the surrounding infrastructure is a native application. This means that while the application can’t do a lot without an Internet connection, it can at least start up.
But those are extreme examples. A lot of the applications in the App Store combine remote data and native interfaces. Without access to the network, some of the UI is generally disabled. However, native applications can be built to degrade gracefully when the device’s network connection disappears or if it was never present in the first
place. The user can still use the bits of the application that don’t need a network con-nection to work.
Sometimes it’s also about what an application doesn’t need. If it doesn’t need a network connection, the idea that your phone needs to be connected to the network to use it, sucking extra battery power in the process, is wasteful. Even when it is connected, the device isn’t always connected to a fast Internet connection. Anything you can do to minimize the amount of data you need to suck down the data connection will improve users’ interaction with your application. That means generating your UI locally, and populating it with data pulled from the Internet.
Network performance will affect the user’s perception of speed; rendering your UI while a web request is made to populate it allows your application to remain responsive to user interaction even while it’s waiting for the network. That can only be a good thing.
I haven’t even mentioned game development yet, and with Apple pitching the iPod touch as “the funnest iPod ever,” that’s important. You cannot develop the sorts of games now starting to appear on the App Store using web-based technologies. While this book covers the basics of how to program for the iPhone or iPod touch, if you want to delve deeply into game programming on the platform, I recommend iPhone Game Development by Paul Zirkle and Joe Hogue (O’Reilly).
The Release Cycle
Paul Graham, one of my favorite dispensers of wisdom, argues that the arrival of web-based software has changed not just the user experience, but the developer experience as well:
One of the most important changes in this new world is the way you do releases. In the desktop software business, doing a release is a huge trauma, in which the whole company sweats and strains to push out a single, giant piece of code. Obvious comparisons suggest themselves, both to the process and the resulting product.
—From “The Other Road Ahead” by Paul Graham He is exactly right. Working in the cloud, you rarely make a software release in the old sense of the word. Despite the benefits, I must admit I actually somewhat miss the “big push” where, usually with a great deal of trepidation, you roll out a new, improved version of a piece of software. However, one problem with writing native applications is that we’ve made a return to the release cycle.
With web-based software you can make incremental releases, fixing bugs when and if they occur. Native applications are far more like desktop software.
I cover the details of how to submit applications to the App Store in Chapter 10. How-ever, you should prepare yourself now for some amount of pain. The review process is notoriously opaque, and it can (and does) take time. Plus, each of your applications
must go through it, not just when you initially submit it to the store, but also for each new version you release. Typically, it can take up to 14 days from submitting your application for it to be approved (or rejected) by the review team, although it can take much longer. Based on my experience, although some of my applications have sailed through the submission process in only a couple of days, I have had applications in the review process for up to four months before receiving approval.
Build It and They Will Come
Of course, the big advantage, even with today’s crowded App Store, is exposure. If nobody can find your application, nobody can pay for it, and the Web is a big place. One big advantage a native application has over a web application is that it’s easier for potential users to find, and much easier to pay for when they find it. That is, if you can get people to pay for web applications at all. People don’t impulse-subscribe to a web service; they impulse-buy from the App Store.
However, don’t assume that if you build it, users will appear. Unless you’re really lucky and your application goes viral, you still need to market your application. The App Store may be a lot smaller than the Web, but it’s still a pretty big place.
Marketing your application is like marketing any product; you need to make use of the tools available and your contacts to get news of your software to your target market. Apple provides promotional codes for your application (although at the time of this writing, these work only on the U.S. App Store) that will give free downloads of your applications. Many developers reach out to high-profile blogs or the many application catalog sites and offer them review copies in hopes that they will publicize the appli-cation. If it’s well designed and useful, they might well be interested in reviewing it. Produce a screencast showing how your application works and how to use it. Also, applications with good support resources (such as forums and trouble-ticket systems) sell more copies. Applications with good design stand out in the store and sell more copies.
Good design often means that you do things “the Apple way.” Integrate your applica-tion well with the other applicaapplica-tions on the phone. Don’t reinvent the wheel: use the standard widgets and UI elements familiar to iPhone users.
CHAPTER 2
Becoming a Developer
Before you start writing code, you need to do some housekeeping. First, you’ll need to install Xcode, Apple’s development environment, as well as the iPhone SDK. Both of these are available directly from Apple, although you may already have Xcode on your Mac OS X install DVD. However, before you can install the iPhone SDK, you’ll have to register with Apple as a developer. If you enroll in one of the developer programs, you’ll also need to create, download, and install a number of certificates and profiles to allow you to deploy your applications onto your iPhone or iPod touch. Let’s get these housekeeping tasks out of the way now so that you can get to the interesting bit—the code—as quickly as you can.
Developing applications for the iPhone requires an Intel Mac running Mac OS X 10.5 (Leopard) or later.
Registering As an iPhone Developer
Before you can develop for the iPhone, you need to become a registered iPhone devel-oper so that you can download and install the iPhone SDK. This will give you access to the SDK and allow you to build and test your applications in iPhone Simulator. If you take it a step further and enroll in the iPhone Developer Standard or Enterprise Program (both of these have a yearly fee), you’ll be able to test applications on your own iPhone or iPod touch. We will discuss how to enroll in these programs in the next section.
If you choose the free account, you won’t be able to install your applications onto your own iPhone or iPod touch, nor will you be able to sell applications on Apple’s App Store (Standard Program) or distribute them to people within your own company (Enterprise Program). If you stick with a free account, you also won’t have access to prerelease versions of the iPhone SDK or the iPhone OS.
You can sign up at http://developer.apple.com/iphone/.
If you are an existing Apple Developer Connection (ADC) member, or if you have an iTunes or MobileMe account, you can use your existing Apple ID to register as an iPhone developer. However, if you intend to sell software commercially, you may want to create a new identity for use with the program to keep it separate from your existing Apple ID.
You’ll initially be asked to either choose an existing Apple ID or create a new one. If you create a new one, you’ll be asked for some details (e.g., email and physical ad-dresses); if you choose an existing Apple ID, you’ll still need to confirm some of these details, although they should be filled in with the most recent information Apple has. You’ll also be asked to provide a professional profile, indicating what sort of applica-tions you’ll be developing and whether you also develop for other mobile platforms. Finally, you’ll need to agree to the developer license. After you do, a verification code may be sent to the email address you registered with Apple, although this doesn’t hap-pen in all cases. However, if this haphap-pens to you, the final step of registering as an iPhone developer will be to verify your email address.
Apple Websites
You’ll use four main websites as part of the iPhone development process: The iPhone Dev Center
This site is where you can get access to the latest versions of the iPhone SDK, along with background technical information, API documentation, sample code, and instructional videos. You need to be a registered iPhone developer to access the site. The Developer Program Portal
This site is where you can generate and manage the certificates, provisioning pro-files, approved devices, and other housekeeping tasks necessary to test your ap-plications on the iPhone and iPod touch and prepare them for distribution. You’ll need to be both a registered iPhone developer and enrolled in one of the iPhone Developer Programs to access this site.
The App Store Resource Center
This site provides help and advice on how to distribute your application on the App Store, including preparing your app for submission, understanding the App Store approval process, and learning how to manage your apps on the App Store. You’ll need to be both a registered iPhone developer and enrolled in the iPhone Developer Standard Program to access this site.
iTunes Connect
This site provides you with the tools to manage your applications on the iTunes App Store and your contracts with Apple. You’ll need to be both a registered iPhone developer and enrolled in the iPhone Developer Standard Program to access this site.
Enrolling in the iPhone Developer Program
If you intend to sell your applications on the App Store, or you just want to be able to deploy them onto your own iPhone or iPod touch, you’ll also need to enroll in the iPhone Developer Program. If you’ve not already registered as an iPhone developer, you can do that during this process.
Your iPhone Developer Program membership lasts for 1 year and can be renewed starting 60 days before the expiration date of your existing membership. If you do not renew your membership, your ability to dis-tribute your applications will be curtailed. In addition, your developer and distribution certificates will be revoked. Finally, any applications you have on the iTunes App Store will be removed.
You have two options when enrolling in the iPhone Developer Program. Most people will want to register for the Standard Program, which costs $99 per year. This will allow you to create free—or, once you’ve filled out some paperwork, commercial— applications for the iPhone and iPod touch, and distribute them either via the App Store or via the ad hoc distribution channel where you provide both the application binary and a provisioning certificate to the end user.
Ad hoc distribution allows you to distribute your application directly to your users, bypassing the App Store. However, distribution is limited to just 100 devices during the course of your one-year membership and, at least for the end user, is more complicated than distributing your application via the App Store. It’s mainly intended for beta testing pro-grams, and it isn’t a substitute for publishing your application to the store. If you need to conduct large-scale rollouts to a specific group of users and you want to avoid the App Store, you should probably look at the Enterprise Program.
The more expensive Enterprise Program, at $299, is intended for companies with more than 500 employees that wish to create applications for in-house distribution. While this program allows you to distribute your applications inside your own company, it does not allow you to publish them for sale on the App Store. If you’re thinking about selling your applications to the public, you need the Standard Program.
An iPhone Developer University Program is also available, but this is designed specif-ically for higher education institutes looking to introduce iPhone development into their curricula. Unless you’re an academic at such an institute, it’s unlikely that this program will be applicable to you.
The Apple Developer Connection
As well as enrolling as a member of the iPhone Developer Program, you may also wish to register as a member of the Apple Developer Connection. Doing so is a good idea if you’re serious about developing with the Mac, and all but the free membership tiers will give you access to the Software Seeding Program, which provides prerelease copies of both the Mac OS X operating system and Apple’s developer tools. You can sign up for ADC at either http://developer.apple.com or https://connect.apple.com.
Three membership plans are available: a free online membership, the $500 Select membership, and the Premier membership that costs several thousand dollars (al-though it also includes a ticket to the Apple Worldwide Developers Conference).
Installing the iPhone SDK
Once you have registered as an iPhone developer, you can log in to the iPhone Dev Center and download the iPhone SDK.
At the time of this writing, Apple combined the iPhone SDK and Xcode into a single download. It is possible that in future releases you may need to install Xcode first, and then install the iPhone SDK from a sep-arate installer.
Newer prerelease beta versions of the SDK may be available to those enrolled in the iPhone Developer Program; however, the current stable version will be available even if you choose not to pay to enroll in the program.
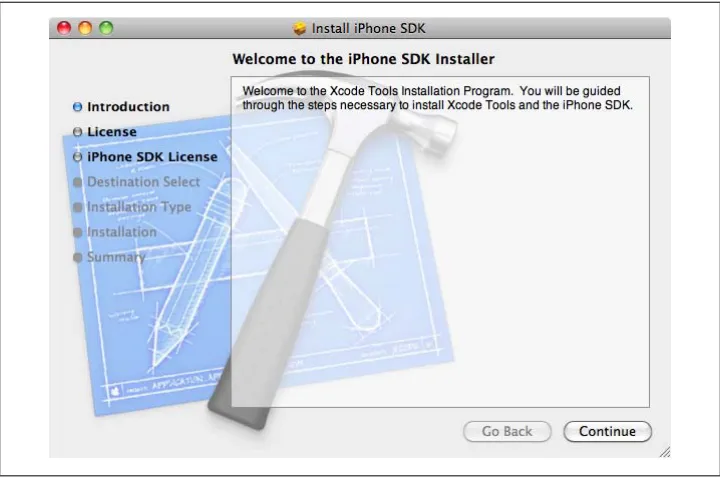
The combined download of the Xcode development tools and the iPhone SDK is around 2.5 GB in size. The combined bundle will be downloaded as a disk image file. After it downloads, the image should automatically mount; double-click on the iPhone SDK and Tools package file to install the SDK, as shown in Figure 2-1.
The installer will ask you to agree to the terms of the software license agreement before prompting you to install the software. You should install it in the suggested location, and the default installation options will include everything you need to develop appli-cations for the iPhone or iPod touch. However, you’ll need at least 5.9 GB of free space on your disk to install the Xcode developer tools and the iPhone SDK.
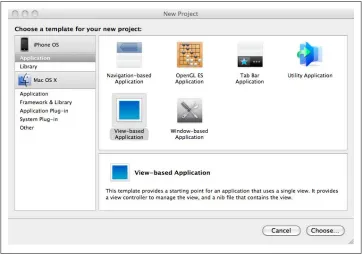
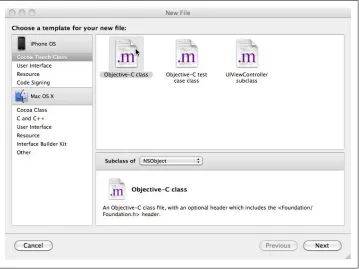
After installation, you can check that everything has gone OK by starting Xcode, which will have been installed in the /Developer/Application folder on your machine. Project templates should be available for the iPhone OS, as shown in Figure 2-2.
You now have everything you need to write applications and test them in the simulator.
If you want to test your code on an actual iPhone, you will need to enroll in either the Standard or Enterprise iPhone Developer Program. How-ever, the amount of time it takes to be accepted into the program varies, so after you enroll and have been accepted, you should bookmark this page and finish the steps in this chapter. You can use iPhone Simulator for the examples in this book while you wait to be accepted.
While the simulator is very good, it’s not perfect. Code runs much faster on the simu-lator than it does on the device. If you’re dealing with applications that have a com-plicated UI or consume a great deal of processor power, the difference in performance between the simulator and the device could become important. On several occasions I’ve had to go back and rewrite my code and refactor the way in which my UI functions; when I tested my application on the simulator it worked fine, but on real hardware it just ran too slowly. You can also allocate much more memory in the simulator than is available on the real hardware.
Additionally, some frameworks are available to you in the simulator—notably the NSPredicate and NSXMLDocument classes—that just don’t exist on the device. Code that uses these missing classes will compile and run on the simulator, but not on the device. As well as regularly building your application in iPhone Simulator, it’s therefore a good idea to do regular device builds. If you accidentally use one of these “missing” classes, it will show up as a link error at compile time for such a build. After all, you don’t want to get too far down the road of developing your application only to discover (hours, or
Figure 2-1. Installing the Xcode development tools and the iPhone SDK
worse yet, days later) that you’re using classes or frameworks that aren’t actually present on the device.
Both NSPredicate and NSXMLDocument are commonly used classes. For instance, NSXMLDocument is the class most people programming in Objective-C on the Mac (rather than the iPhone) would use to perform an XQuery on an XML document. The lack of NSXMLDocument is some-thing that most developers notice quite quickly.
While I’ve seen some complaints that the simulator can sometimes be slightly off on pixel alignment of UIKit elements, I’ve not yet come across this myself. However, when using lower-level graphics libraries, such as OpenGL ES, the renderer used on the iPhone and iPod touch is slightly different from the one used in the simulator, so when a scene is displayed on the simulator it may not be identical to the actual device at the pixel level.
Additionally, the simulator has some built-in limitations. For instance, if your appli-cation’s UI is designed to respond to touch events with more than two fingers, you can’t test it in the simulator.
Figure 2-2. The Xcode New Project window
While it doesn’t allow you to simulate gestures requiring many fingers, iPhone Simulator does allow you to test applications that require two-finger (multitouch) touch gestures. You can use Option-click (for pinch) or Option-Shift-click (for drag) while using the mouse to get two “fingers.”
Furthermore, you will not have access to the accelerometer, GPS, Bluetooth, or digital compass when running your application in the simulator. If your application relies on these hardware features, you have no choice but to test it on your device.
Preparing Your iPhone or iPod touch
Before you can install applications onto your iPhone or iPod touch, you must follow a number of steps, and you’ll need to do so in the order shown in Figure 2-3.
Figure 2-3. The workflow for creating certificates and mobile provisioning profiles
So, if you have enrolled in either the Standard or Enterprise iPhone Developer Program, now is the time to generate the appropriate certificates and provisioning profiles so that you will be able to deploy the test application from the next chapter onto your device.
Certificates and Provisioning Profiles
You must have a development certificate for Xcode to sign your application binaries. This certificate also identifies you as a developer. When you build your iPhone appli-cation, Xcode will look in your Mac OS X keychain for this certificate and the corre-sponding certificate from Apple, called the WWDR Intermediate certificate, which you’ll also need to download from the Developer Portal.
Provisioning profiles associate a development certificate, and hence a developer, with a hardware device and an iPhone application ID, which is a unique identifier for your application. To install an application that you’ve signed with your development certificate onto your iPhone or iPod touch, you need to install the associated provi-sioning profile onto your device.
Creating a Development Certificate
The first thing you need is a development certificate and Apple’s WWDR Intermediate certificate. To request a development certificate from the Developer Portal, you need to generate a certificate-signing request (CSR) using the Keychain Access application. You can find the Keychain Access application in the /Applications/Utilities folder. Launch the application and select Keychain Access→Preferences from the menu. Go to the Certificates Preferences pane to confirm that the Online Certificate Status Protocol (OCSP) and Certificate Revocation List (CRL) options are turned off, as shown in Figure 2-4.
Figure 2-4. The Certificates tab of the Keychain Access application’s Preferences pane
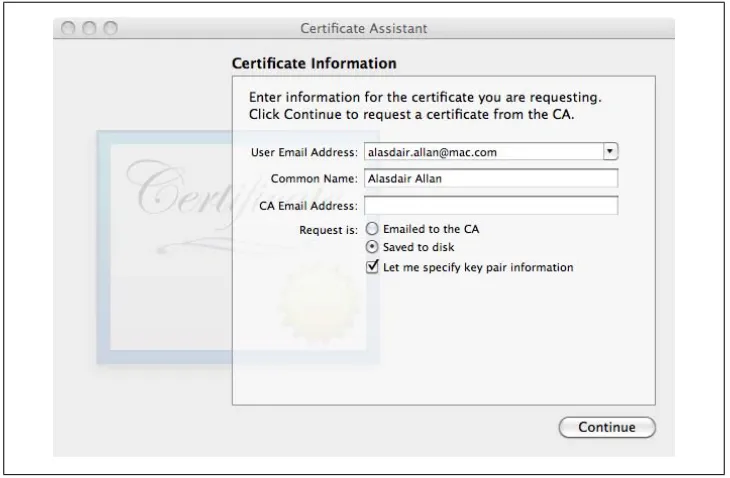
Next, select Certificate Assistant→Request a Certificate from a Certificate Authority from the Keychain Access menu, and enter the email address that you selected as your Apple ID during the sign-up process along with your name, as shown in Figure 2-5. Click the “Saved to disk” and the “Let me specify key pair information” radio buttons and then click Continue. You’ll be prompted for a filename for your certificate request. Accept the defaults (a key size of 2,048 bits using the RSA algorithm) and click Con-tinue. The application will proceed to generate a CSR file and save it to disk. The file will be saved to the location you specified when you were prompted to choose a file-name (the default is usually your desktop).
Next, log in to the iPhone Dev Center and click on the link to the iPhone Developer Program Portal. This will take you to the main portal used to manage certificates and devices associated with your developer program account.
Click the Certificates link, then go to the Development tab and click Request Certifi-cate. Follow the instructions to upload your CSR file to the portal.
If you joined the iPhone Developer Program as an individual, you now need to approve your own certificate request, again in the Development tab in the Certificates section of the portal (simply click Approve). If you are part of a development team, your nom-inated team admin must do this for you.
If you don’t see the Download option appear after you click Approve, click the Development tab link to refresh the page, and it should appear.
Once you do this, you need to download your personal certificate and the WWDR Intermediate certificate and install them in your Mac OS X keychain.
Still in the Development tab, click the Download button to download your personal certificate. Next, right-click on the link to the WWDR Intermediate certificate and save the linked file to disk.
Once both of these certificates have downloaded to your local machine, you need to install them in your Mac OS X keychain. Double-click on the certificate files to install them into your keychain. This will activate the Keychain Access application and ask you to confirm that you want to add the certificates to your Mac OS X keychain.
Figure 2-5. The Keychain Access.app Certificate Assistant
If you have more than one keychain, you need to make sure the certifi-cates are installed in the default keychain, normally called login. The default keychain is highlighted in bold in the list of keychains at the top left of the Keychain Access.app application. It’s normally best to keep the login keychain the default, but if this is not the case you can make it the default by selecting the File→Make Keychain “login” Default op-tion from the menu bar. If the certificates are not installed into the de-fault keychain, Xcode will be unable to find them, and hence will be unable to sign binaries with them. This means you will not be able to install your applications onto your iPhone or iPod touch.
You can check that the two certificates have been correctly installed in your keychain by clicking on the Certificates category in the Keychain Access application. You should see both your own developer certificate and Apple’s WWDR certificate in the login
keychain, as shown in Figure 2-6.
Figure 2-6. The Keychain Access application showing the newly installed certificates necessary for Xcode to sign your binaries and deploy them onto your iPhone
Getting the UDID of Your Development Device
Plug the iPhone or iPod touch you intend to use for development into your Mac. Open Xcode and select the Window→Organizer item from the menu bar. The Organizer window will open, showing the list of connected devices (see Figure 2-7).
You’ll need the unique device identifier (UDID) of your development device so that you can create a mobile provisioning profile for this device. Right-click or Ctrl-click on the 40-character string labeled Identifier (see Figure 2-7) and select Copy.
Return to the iPhone Developer Program Portal, click Devices, and select the Manage tab. Next, click Add Devices. Enter the device name in the appropriate box and the UDID in the box labeled Device ID, and click Submit. You have now registered your device.
Creating an App ID
To install your application onto your iPhone or iPod touch, you will need to create an App ID. This is a unique identifier that the iPhone uses to grant your application access to its section of the keychain, limiting the application’s access to usernames, passwords, and certificates used by other applications.
The App ID is also used as part of the mobile provisioning profile. The mobile provi-sioning profile is different from the certificate you generated earlier. Certificates stay in the keychain on your Mac and are used by Xcode to digitally sign the iPhone application binaries. The mobile provisioning profile you’re about to generate is tied to one or more devices and is transferred by Xcode onto your iPhone or iPod touch. This allows the applications you create to run on that device.
Go to the App IDs section of the iPhone Developer Program Portal, select the Manage tab, and click on New App ID. Enter a name for your App ID; this should be a human-readable name used to refer to this particular App ID. It’s entirely arbitrary what you use as the name for the App ID. Since this is your first App ID, for the Bundle Seed ID select Generate New.
Finally, enter a Bundle Identifier. This must be unique, and most developers use a reversed version of their domain name so that this is the case. For instance, my domain name is babilim.co.uk, so I entered uk.co.babilim.* as my Bundle Identifier.
Figure 2-7. The Xcode Organizer window
The asterisk (*) that appears at the end of my Bundle Identifier is the
wildcard symbol. Using a * in the Bundle Identifier means you will be able to use this App ID for multiple applications. If you did not use a wildcard here, you’d have to generate a new App ID for each of your applications, and a new provisioning profile for each of these applica-tions, before you could deploy your application onto your iPhone or iPod touch. Using a wildcard means you can generate a single mobile provisioning profile that will allow you to deploy multiple applications onto your developer device.
Technically, this means that all the applications created using this Bun-dle Identifier will share the same portion of the keychain on your iPhone. I discuss the implications of this later. Using a wildcard in the Bundle Identifier also means that the applications you create using this App ID, and the mobile provisioning profile(s) associated with it, will not be able to use the Apple Push Notification and in-app purchase services.
Click Submit. The portal will now generate a new 10-character Bundle Seed ID and prepend it to the Bundle Identifier you provided. This is your App ID.
You need to make a note of your Bundle Identifier as you’ll need to supply it to Xcode, as described near the end of Chapter 3, to allow you to deploy the application you are developing onto your iPhone or iPod touch.
Creating a Mobile Provisioning Profile
Now you’re ready to create a mobile provisioning profile. Go to the Provisioning section of the iPhone Developer Program Portal, select the Development tab, and click on New Profile.
Enter a profile name. While it’s more or less arbitrary what you put here, I recommend using “Developer Profile” somewhere in the name. You may be generating a number of provisioning profiles, including ones later on for distribution (both ad hoc and to the App Store), so it’s helpful to know that this profile is to be used for development. Check the relevant certificate box: if you’re an independent developer, you’ll have only one choice here, the certificate you generated earlier using the Keychain Access application.
Select the App ID you generated in the previous section, and then select the develop-ment device (or devices if you have more than one available) for which this profile will be valid. As I mentioned before, Xcode will transfer the provisioning profile onto your iPhone or iPod touch, and application binaries built by Xcode using a provisioning profile will run successfully only on devices for which this profile is valid. If you don’t select the correct device here, your code will not run on it. Don’t worry, though: you can add additional devices to the profile at any time, but you’ll need to regenerate a provisioning profile inside the Program Portal.
Click Submit to generate the new mobile provisioning profile that you’ll use during development. I discuss provisioning profiles needed for distributing your applications later in the book. The status will appear as pending; click the Development tab to reload it until it is no longer pending.
When the profile is ready, click Download and download the provisioning profile to your Mac. You can install it in a number of ways, but the easiest way is to drag the .mobileprovision file you downloaded onto the Xcode icon in the dock. This will install it in Xcode and make it available for development.
Making Your Device Available for Development
The final step before you can start coding is to make your device available for devel-opment. Return to Xcode and click Window→Organizer from the menu. Select your development device from the lefthand pane and click Use for Development. If Xcode doesn’t manage to correctly register your device, you may have to disconnect and re-connect your iPhone or iPod touch so that Xcode can find it correctly. If that fails to work, you should try turning your device off and then on again. Depending on the version of the SDK you installed and the version of the OS currently on your device, you may have to restore your device from the Organizer window inside Xcode. In the process, you’ll lose any data you have on it. If this is necessary, you can back up your data by syncing with iTunes as normal before restoring the OS using Xcode. After the restore, return to iTunes and restore your data.
If you can afford the extra cost, I recommend using a separate device for development than you use as your day-to-day iPod or phone. In the future, you may wish to install prerelease versions of the iPhone operating system onto your development device, and by definition, these are always unstable. If you’re relying on your iPhone to keep you in touch, you may not want to use it for development.
Once you’ve installed the profiles, you can verify that Xcode has correctly stored them by opening the Library folder in your home directory and looking in MobileDevice/ Provisioning Profiles. The next time you sync your development device with iTunes (and you should probably do that now), the mobile provisioning profile will be installed onto it.
You can verify that the profile has been installed by going to Settings→General→Profile on your iPhone and iPod touch and checking that the profile has been correctly installed and verified, as shown in Figure 2-8.
You can now confirm that everything has worked correctly by noting the status light next to your device in the Xcode Organizer window. If Xcode has managed to connect to the device, and it is correctly enabled for development, the status light next to the listing on the lefthand pane will be green. You’ll also see your mobile provisioning profile listed in the center box in the main pane, as shown in Figure 2-9.
Figure 2-8. The development provisioning profile installed on my iPod touch
Figure 2-9. The Xcode Organizer window showing my iPod touch ready for development with my development provisioning profile installed
Congratulations, you now have all the certificates and profiles in place to allow you to start running code on your iPhone or iPod touch.
CHAPTER 3
Your First iPhone App
In this chapter, you’ll build a small Hello World application and run it in iPhone Sim-ulator. If you’re enrolled in the iPhone Developer Program, you’ll even get to run the application on your iPhone or iPod touch. I’m going to take you through this step by step, just to give you an idea of how Xcode and Interface Builder work together.
Enrolling in the iPhone Developer Program is separate from registering as an iPhone developer. Enrollment ($99 or $299 per year, depending on which program you join) provides you with the software certificates and online provisioning tools needed to run your own apps on your own iPhone and submit them for approval to the App Store.
However, even if you don’t plan to enroll in a Developer Program, you will need to register so that you can download the iPhone SDK needed to create apps. See Chapter 2 for more information on registering and enrolling.
Objective-C Basics
I talk in detail about how Objective-C applications are normally structured in Chap-ter 4. However, in this chapter, although I do get into Objective-C’s sometimes quirky syntax, I’m going to give you a higher-level overview of the language to get you going quickly.
Object-Oriented Programming
If you’ve heard someone explain object orientation before, the distinction between the terms class and object may not be totally clear. However, there is a difference. A class is the blueprint for objects; each time you create an object, the class definition deter-mines its structure. An object is a collection of operations (methods) and information (data) that occupies space in memory and can be instructed to perform operations (invoke methods) on that information.
For those of you who are new to programming, the following list defines some of the terms you’ll come across frequently:
Objects and classes
A class consists primarily of two things: variables that can store data and methods that can perform operations. The methods are used to retrieve, set, and manipulate the variables. Objects—sometimes referred to as instances of a class—have specific values associated with these variables. For example, you might use Apple’s UIView Controller class to manage the view (i.e., UI) you present to the user of your ap-plication. You also might create an instance of that class named myViewControl ler to actually carry out the work of managing the view presented to the user. This would then be referred to as the myViewController object. An instance of a class should not be confused with its implementation, which is the realization of the class in code.
Subclasses
Classes can also inherit functionality from an existing class (the parent or base classes, commonly known as the superclass); classes that inherit functionality in this way are referred to as subclasses. This means you can invoke a method of the parent class on an object that is an instance of a subclass of the parent. Subclassing is normally done so that you can extend the functionality of that class with addi-tional methods or data. For example, when writing applications for the iPhone you commonly define a subclass of the UIViewController class to manage your views, instead of using the class directly. The subclass of the standard view controller inherits all of the properties of its parent class, but in addition it allows you to implement code to handle the specific view presented to the user, such as data entry and validation.
Instance and class variables
Both instance and class variables are defined as part of the class declaration. How-ever, every object (instance of the class) holds a separate copy of an instance vari-able. In other words, if a class defines a variable foo, the value of foo can be different for objects for the same class. Changing the value of an instance variable in one object will not affect the value of the same variable in all the other objects of that class. Conversely, only a single copy of a class variable exists. If you change the value of a class variable from one object, the value of that variable will change for all the objects of that class.
Accessor methods
Accessor methods, sometimes called getters and setters, are usually fairly simple methods used to get and set instance variables in a class. They are used to provide an abstraction layer between variables and the outside world so that the imple-mentation of the class can change without having to change any code outside of the class itself. In Objective-C, the compiler can generate these commonly used functions for you.
Class methods
Class methods (also known as static methods) are similar in nature to class varia-bles. These are methods that are associated directly with the class rather than the object instance; they therefore will not have access to object instance variables.
Events and messages
An event is a message generated by the user interacting with your application’s controls. For instance, if you tap the screen of your iPhone or iPod touch, this generates a UI event in your application that is passed via a message from the application to an object that has been delegated to deal with that specific type of event.
Protocols
A protocol definition declares methods that any class can implement. If your class declares that it abides by a particular protocol definition, you are announcing that you have implemented the minimum mandatory methods declared in the protocol definition, and may optionally have implemented some nonmandatory methods.
Delegate classes
A delegate class is a class that implements a protocol for handling events. Each delegate protocol specifies a number of methods that must be implemented, and additionally methods that may optionally be implemented. Declaring your class a delegate implies that it (at least) implements the mandatory methods. For instance, if your UI has a button, you can declare your class a delegate to handle events generated by the button.
Event loop
The main event loop is the principal control loop for your application. This loop is the process that receives and then passes external events, such as the user tapping the iPhone’s screen or changes in the device’s orientation, to the appropriate del-egate classes that you’ve included in your application.
Frameworks and libraries
A framework is a collection of related classes, protocols, and functions collected together within a cohesive architecture. When you make use of a framework many of the design decisions about how you as a developer will use the code it includes have been taken out of your hands. However, by using the standard frameworks, you inherit standard behavior. For example, when Apple introduced Copy & Paste to the iPhone with the release of version 3.0 of the firmware, it was enabled by default in most third-party applications because the developers made use of the standard UIKit framework to build those applications.
The Objective-C Object Model
For those of you coming from an object-oriented background, there are a number of differences between the Objective-C model of object orientation and the one imple-mented by Simula-derived languages such as C++, Java, and C#.
While its nonobject operations are identical to C, Objective-C derives its object syntax almost directly from the Smalltalk language. Its object model is based on sending mes-sages to object instances; in Objective-C you do not invoke a method, but instead send a message. What’s the difference? Invoking a method implies that you know something about that method. Sending a message leaves it up to the receiver of the message to figure out what to do with it.
This kind of loosely coupled chain of command means that Objective-C is much more dynamic at runtime than the Simula-derived languages, but it also means it might appear to be insubordinate.
That’s because in Simula-derived languages, you must know the type of an object before you can call a method on it. In Objective-C this is not the case. You simply send the object a message. The receiving object then attempts to interpret the message, but there is no guarantee of a response. If it doesn’t understand the message, it will ignore it and return nil. Among other things, this kind of model does away with the need to con-tinually cast objects between types to ensure that you are sending a message that will be understood.
Casting is the process whereby you represent one variable as a variable of another type. This is done both for primitive types (suppose you want to change a float to an integer as part of an integer arithmetic operation), as well as for objects. An object can be cast to another object type if it is a subclass of that type. In Objective-C, objects can be represented by the generic id type, and you can cast objects to this type without regard for their parent class.
The other main difference is in the way memory is managed. While languages such as Java use garbage collection to handle memory management, in Objective-C memory is managed using reference counting (the alloc-retain-release cycle, as discussed in Chap-ter 4).
Garbage Collection and Reference Counting
In the simplest case, memory management must provide a way to allocate a portion of memory and then free that memory when it is no longer needed. Garbage collection is a form of memory management that automatically attempts to free memory that is no longer in use. While garbage collection frees the developer from having to worry about manually managing memory, the point where memory is automatically freed can be unpredictable, and the garbage collection routines consume additional computing resources.
Reference counting is a form of garbage collection, which counts the number of refer-ences to an object (or portion of memory) and frees the associated memory when the number of references reaches zero. The main advantage of reference counting over “classic” garbage collection is that memory is freed as soon as it is no longer in use.
Although most programmers wouldn’t necessarily class it as such, reference counting is among the simplest garbage collection algorithms, as it frees the developer from having to manually manage memory at a low level.
Finally, the applications are almost invariably based on the Model-View-Controller (MVC) (design) pattern, which is pervasive in the Cocoa Touch and other frameworks that you’ll use to build iPhone applications. Rather than encouraging you to create subclasses, the MVC pattern makes use of delegate classes. A pattern is a reusable sol-ution to a commonly occurring problem; in object-oriented programming, patterns usually describe how the developer should model the application in terms of the classes that are used, and how the developer should structure the interactions and relationships between these classes.
For example, the root UIApplication class implements the behavior necessary for an application, but instead of forcing you to subclass the UIApplication class for your own application and add your own code to the subclass, it delivers notification messages of events to an assigned delegate class that implements the UIApplicationDelegate pro-tocol. The UIApplication class asks the delegate class to respond to events when they occur.
The Basics of Objective-C Syntax
I’ll dive a bit deeper into Objective-C as we go through the book, but to make it through this chapter all you really need to know is that while variable declarations look much the same as variable declarations do in other languages, method calls are surrounded by square brackets. So, for example, both of the following lines of code are method calls:
[anObject someMethod];
[anObject someMethod: anotherObject];
The someMethod message is sent to the anObject object.
The someMethod message is sent to the anObject object and passes anotherObject as an argument.
Despite the sometimes quirky syntax (including the square brackets and colon shown in the preceding code) that Objective-C has inherited from Smalltalk, the logic of what is going on should be clear, and we’ll discuss the syntax in much greater detail in the next chapter.
Creating a Project
Now let’s create our first application in Xcode. Launch Xcode by double-clicking its icon (it’s located in the /Developer/Applications folder on your hard drive). Click “Cre-ate a new Xcode project” in the Xcode welcome window, and then click Application under the iPhone OS section on the left side of the screen. Next, click the View-based
Application template and click Choose. When prompted, name your new project
HelloWorld. Make sure you don’t put a space between Hello and World, as this can sometimes confuse Xcode.
If you don’t see a welcome window when you start up Xcode, you can create a new project by choosing File→New Project.
Xcode will now open a project window. The left pane shows the classes and other files associated with the project, organized into groups. If you double-click on each group icon, the group will expand to show you the files it contains, as shown in Figure 3-1. The application template you choose determines how the groups are arranged, but you can move the files around and create your own groups if you prefer to organize things differently. The two main groups you’ll be working with are Classes, which contain all the classes that make up the application, and Resources, which contain other support-ing files, includsupport-ing the .xib files that the Interface Builder application uses to describe your application’s UI. By default, the project will open to the top level of the project hierarchy, and the top-right pane will show a list of all the files associated with the project. The bottom-right pane (blank at first) will show you the source code of which-ever file you have clicked on.
Figure 3-1. The initial project window opened by Xcode
Exploring the Project in Xcode
When you created the project, Xcode generated a number of files and, along with them, a lot of the boilerplate code you’d otherwise have to laboriously type in. In fact, the project that Xcode generates for you is a complete (if boring) iPhone application. You know those flashlight applications that have proliferated on the App Store? You’ve just written one....
If you click the Build and Run button in the Xcode toolbar (see Figure 3-1), Xcode will compile the application, deploy it in iPhone Simulator, and then run it. After the ap-plication opens, what you see in the simulator should look very similar to Figure 3-2, a simple, blank, gray view.
Figure 3-2. Our Xcode template compiled and running inside iPhone Simulator
Let’s look at the files Xcode has generated as part of the template and how it has divided them into separate groups in the Groups & Files pane of the interface:
Classes
The Classes group contains the classes and header files we’re most interested in and will be working with in this chapter. These are HelloWorldAppDelegate.h,
HelloWorldAppDelegate.m, HelloWorldViewController.h, and HelloWorldView-Controller.m. These are the classes that do most of the heavy lifting in our appli-cation, in particular managing the view (the UI) that the application’s user sees.
Other Sources
The Other Sources group contains just two files: the prefix header for the project,
HelloWorld_Prefix.pch, and main.m. The prefix header file is implicitly included by each of your source files when they’re built; if you need to include a header file in all of the classes in your project, you can add it here. However, it’s unlikely that you’ll need to do this, so you can safely ignore it for the time being. The main.m
file contains the main() routine; this is the place where your program begins. In this project, the main.m file handles some memory management duties (discussed in Chapter 4) and then calls the UIApplicationMain function, which is the main controller, responsible for handling the event loop. You’ll almost never have to change anything in the Other Sources group, as the boilerplate code the template generated should serve you fairly well.
Resources
The Resources group contains the .xib files Interface Builder uses to describe your application’s UI.
The HelloWorld-Info.plist (property list) file also plays a role in defining the UI. This property list is an XML file that describes basic information about your application for Xcode and the compiler. You’ll look inside the HelloWorld-Info.plist file later in the chapter when you deploy your application onto your iPhone or iPod touch.
Frameworks
The Frameworks group contains a list of external frameworks that your application links to. These frameworks provide the headers and libraries you need to write software for the iPhone OS.
Products
The Products group contains the application binary that is generated when you compile your application. At first the HelloWorld.app file is shown in red. Xcode knows this file should exist, but since you haven’t yet compiled the application, the file currently doesn’t exist.
If you open the Mac OS X Finder and navigate to where you saved the project, you’ll be able to see how the project files are organized on disk.