Pro Java 9 Games
Development
Leveraging the JavaFX APIs
—
Pro Java 9 Games
Development
Leveraging the JavaFX APIs
Wallace Jackson
This work is subject to copyright. All rights are reserved by the Publisher, whether the whole or part of the material is concerned, specifically the rights of translation, reprinting, reuse of illustrations, recitation,
broadcasting, reproduction on microfilms or in any other physical way, and transmission or information storage and retrieval, electronic adaptation, computer software, or by similar or dissimilar methodology now known or hereafter developed.
Trademarked names, logos, and images may appear in this book. Rather than use a trademark symbol with every occurrence of a trademarked name, logo, or image we use the names, logos, and images only in an editorial fashion and to the benefit of the trademark owner, with no intention of infringement of the trademark.
The use in this publication of trade names, trademarks, service marks, and similar terms, even if they are not identified as such, is not to be taken as an expression of opinion as to whether or not they are subject to proprietary rights.
While the advice and information in this book are believed to be true and accurate at the date of publication, neither the authors nor the editors nor the publisher can accept any legal responsibility for any errors or omissions that may be made. The publisher makes no warranty, express or implied, with respect to the material contained herein.
Distributed to the book trade worldwide by Springer Science+Business Media New York, 233 Spring Street, 6th Floor, New York, NY 10013. Phone 1-800-SPRINGER, fax (201) 348-4505, e-mail [email protected], or visit www.springeronline.com. Apress Media, LLC is a California LLC and the sole member (owner) is Springer Science + Business Media Finance Inc (SSBM Finance Inc). SSBM Finance Inc is a Delaware corporation.
For information on translations, please e-mail [email protected], or visit http://www.apress.com/ rights-permissions.
Apress titles may be purchased in bulk for academic, corporate, or promotional use. eBook versions and licenses are also available for most titles. For more information, reference our Print and eBook Bulk Sales web page at http://www.apress.com/bulk-sales.
Any source code or other supplementary material referenced by the author in this book is available to readers on GitHub via the book’s product page, located at www.apress.com/9781484209745. For more detailed information, please visit http://www.apress.com/source-code.
source community who is working diligently to make professional new media application
development software, operating systems, and content development tools, freely available for all
of us game application developers to utilize to achieve our iTV Set creative dreams and financial
goals. Last but certainly not least, I dedicate this book to my father William Parker Jackson,
Contents
About the Author ...xix
About the Technical Reviewer ...xxi
Acknowledgments ...xxiii
Introduction ...xxv
■
Chapter 1: The Different Faces of Java: Create a Java 9 Development
Workstation ... 1
Java Dichotomy: Versions Used in Various Platforms ... 2
Java Development Workstation: Required Hardware ... 3
Prepare a Workstation for Java 9 Game Development ... 4
Downloading and Installing the Oracle Java 9 JDK ... 6
Downloading and Installing the Oracle Java 8 JDK ... 9
Installing the Oracle NetBeans 9.0 (Development) IDE ... 12
Installing the Apache NetBeans 9 (Development) IDE ... 14
Installing New Media Content Production Software ... 17
Downloading and Installing InkScape for SVG Digital Illustration ... 17
Downloading and Installing GIMP for Digital Image Compositing ... 18
Downloading and Installing Audacity for Digital Audio Editing ... 19
Downloading and Installing DaVinci Resolve 14 for Digital Video ... 20
Downloading and Installing Blackmagic Fusion for Visual Effects ... 21
Download and Install Blender for 3D Modeling and Animation ... 22
Download and Install Terragen for 3D Terrain or World Creation ... 23
Other Open Source New Media Software Packages ... 25
Organizing Quick Launch Icons in Your Taskbar Area ... 28
Summary ... 28
■
Chapter 2: An Introduction to Content Creation: 2D New Media Asset
Fundamentals ... 29
Game Design Assets: New Media Content Concepts ... 30
Digital Imaging Concepts: Resolution, Color Depth, Alpha, Layers ... 31
Digital Image Resolution and Aspect Ratio: Defining Your Image Size and Shape ... 32
Digital Image Color Theory and Color Depth: Defining Precise Image Pixel Colors ... 32
Digital Image Compositing: Using Alpha Channels and Transparency with Layers ... 33
Representing Color and Alpha in Java Game Logic: Using Hexadecimal Notation ... 35
Digital Image Object Masking: Using Alpha Channels to Composite Game Sprites ... 36
Smoothing Digital Image Composites: Using Anti-aliasing to Smooth Image Edges ... 37
Digital Image Data Optimization: Using Compression, Indexed Color, and Dithering ... 38
Digital Video or Animation: Frames, Frame Rate, Loops, Direction ... 41
Digital Video Compression Concepts: Bit Rate, Data Streaming, SD, HD, and UHD ... 42
Digital Video Data Footprint Optimization: Important Settings for Video Codecs ... 43
Digital Audio Concepts: Amplitude, Frequency, Samples, Waves ... 45
Converting Analog Audio to Digital Audio Data: Sampling, Accuracy, and HD Audio ... 46
Digital Audio Asset Playback: Captive Audio Playback vs. Streaming Audio... 48
Digital Audio Assets in JavaFX: Digital Audio Codec and Data Format Support ... 49
Digital Audio Optimization: Start with CD Quality Audio and Work Backward ... 50
Summary ... 51
■
Chapter 3: Advanced 3D Content Rendering: 3D Asset Concepts and
Principles ... 53
Interactive 2D Assets: 2D Vector Content Concepts ... 54
Points on a Plane: 2D Vertices, Model Reference Origin, Pivot Point, Dummy Point ... 54
Connect the 2D Dots: Vector Lines and Spline Curves Connect Your 2D Vertices ... 55
Interactive 3D Assets: 3D Vector Content Concepts ... 57
The Foundation of 3D: The Geometry of the Mesh ... 57
Skinning Your 3D Model: 2D Texture Mapping Concepts ... 61
Animating Your 3D Model: Keyframes, Motion Curves, and IK ... 65
JavaFX 3D Support: Geometry, Animation, and Scene Packages ... 68
Summary ... 71
■
Chapter 4: An Introduction to Game Design: Game Design Concepts,
Genres, Engines, and Techniques ... 73
High-Level Concepts: Static vs. Dynamic Gaming ... 74
Game Optimization: Balancing Static Elements with the Dynamic ... 75
2D vs. 3D Rendering: Static vs. Dynamic Under the Hood ... 76
Game Components: 2D, 3D, Collision, Physics, and AI ... 77
2D Sprites: The Foundation of Arcade-Style Gaming ... 77
3D Models: The Foundation of the Role-Playing Style of Gaming ... 78
Collision Detection: The Foundation of Game Asset Interaction ... 78
Physics Simulation: The Foundation of Gameplay Realism ... 79
Artificial Intelligence: The Foundation of Your Gameplay Logic ... 79
Java Engines: Game, Physics, and Inverse Kinematic ... 80
Game Engines: JMonkey and the Lightweight Java Game Library ... 80
Physics and Collision Engines: Jbox2D, JBullet, Dyn4j, Jinngine... 81
Inverse Kinematics and Robot Engines: JRoboOp and JavaFX-IK ... 82
Game Genres: Puzzle, Board, Arcade, Shooter, or VR ... 83
Static Games: Strategy, Knowledge, Memory, and Board Games ... 83
Dynamic Games: Arcade, Shooter, Platform, and Action Games ... 84
Hybrid Games: An Opportunity to Leverage JavaFX Creatively ... 84
Summary ... 85
■
Chapter 5: A Java Primer: Introduction to Java Concepts and Principles ... 87
Writing Java Syntax: Comments and Code Delimiters ... 88
Java Classes: Java Structure to Modularize the Game ... 92
Nested Classes: Java Classes Living Inside of Other Classes ... 94
Inner Classes: Different Types of Nonstatic Nested Classes ... 95
Java Methods: Core Logic Function Java Constructs ... 96
Declaring Your Method: Modifier, Return Type, and Method Name ... 96
Overloading Your Methods: Providing Unique Parameter Lists ... 97
Constuctor Methods: Turning a Java Class into a Java Object ... 98
Java Variables and Constants: Values in Data Fields ... 100
Fixing Data Values in Memory: Defining a Data Constant in Java ... 102
Java Modifier Keywords: Access Control and More ... 103
Access Control Modifiers: Public, Protected, Package, or Private ... 103
Non Access Control Modifiers: Final, Static, and Abstract ... 105
Java Data Types: Defining Data Types in Applications ... 108
Primitive Data Types: Character, Numbers, and Boolean ... 108
Reference Data Types: Objects and Arrays ... 109
Java Operators: Manipulating Data in the Application... 109
Java Arithmetic Operators: Basic Mathematics ... 110
Java Relational Operators: Making Comparisons ... 111
Java Logical Operators: Processing Groups and Opposites ... 112
Java Assignment Operators: Assigning a Result to a Variable ... 113
Java Conditional Operator: Set One Value If True, Another If False ... 114
Java Conditional Control: Loops or Decision Making ... 114
Decision-Making Control Structures: Switch - Case and If - Else ... 114
Looping Control Structures: While, Do - While, and the For Loop ... 117
Java Objects: Virtualizing Reality Using OOP in Java ... 118
Coding the Object: Turning Your Object Design into Java Code ... 120
Extending a Java Object Structure: Java Inheritance ... 125
The Java Interface: Defining the Class Usage Pattern... 126
What’s New in Java 9: Modularity and Project Jigsaw ... 128
An Example of a Java 9 Module Hierarchy: JavaFX Modules ... 129
The Purpose of Java 9 Modules: Secure, Strong Encapsulation ... 131
Creating a Pro Java 9 Game Module: Using the Exports Keyword ... 131
Resource Encapsulation: Further Module Security Measures ... 132
Summary ... 132
■
Chapter 6: Setting Up Your Java 9 IDE: An Introduction to NetBeans 9 ... 135
New NetBeans 9 Features: Java 9 Module Integration ... 136
Java 9 Support: Modules, Ant, Java Shell, Multirelease ... 136
IDE User Experience: More Information and Intelligent Coding ... 137
Java Code Profiling: Completely Redesigned Java Profiling Suite ... 137
Primary Attributes of NetBeans 9: An Intelligent IDE ... 138
NetBeans 9 Is Intelligent: Put Your Code Editing in Hyperdrive ... 138
NetBeans 9 Is Extensible: Code Editing with Many Languages ... 140
NetBeans 9 Is Efficient: Organized Project Management Tools ... 140
NetBeans 9 Is UI Design Friendly: User Interface Design Tools ... 141
NetBeans 9 Is Not Bug Friendly: Squash Bugs with the Debugger ... 141
NetBeans 9 Is a Speed Freak: Optimize Your Code with a Profiler ... 141
Creating the Pro Java 9 Game Project: JavaFXGame ... 142
Compiling a Pro Java 9 Game Project in NetBeans 9 ... 147
Running Your Pro Java Game Project in NetBeans 9 ... 148
Summary ... 150
■
Chapter 7: Introduction to JavaFX 9: Overview of the JavaFX
New Media Engine ... 151
Overview of JavaFX: From SceneGraph Down to OS ... 152
The JavaFX Scene Package: 16 Java Scene Classes ... 154
JavaFX Scene Class: Defining Dimension and Background Color ... 155
JavaFX Scene Graph: Organizing Scenes by Using Parent Nodes ... 157
JavaFX Scene Content: Lights, Camera, Cursor, Action! ... 158
Scene Subpackages: Nine Scene-Related Packages ... 159
The javafx.graphics Module: 18 Multimedia Packages ... 162
JavaFX Animation for Games: Using javafx.animation Classes ... 163
JavaFX Screen and Window Control: Using javafx.stage Classes ... 168
Using the JavaFX Stage Object: Creating a Floating Windowless
Application ... 169
JavaFX Bounds and Dimensions: Using javafx.geometry Classes ... 179
JavaFX Input Control for Games: Using the javafx.event Classes ... 180
JavaFX UI Elements: Using the javafx.scene.control Classes ... 180
JavaFX Business Charting: Using the javafx.scene.chart Classes ... 181
JavaFX Media Control: Using the javafx.scene.media Classes ... 181
JavaFX Web Rendering: Using the javafx.scene.web Classes ... 181
Other JavaFX Packages: Print, FXML, Beans, and Swing ... 181
Summary ... 182
■
Chapter 8: JavaFX 9 Scene Graph Hierarchy: A Foundation for
Java 9 Game Design ... 185
Game Design Foundation: Primary Function Screens ... 186
Java Class Structure Design: Game Engine Support ... 187
JavaFX Scene Graph Design: Minimizing UI Nodes ... 188
JavaFX Design: Using VBox, Pos, Insets, and Group ... 189
JavaFX Pos Class: Generalized Positioning Using Constants ... 189
JavaFX Insets Class: Providing Padding Values for Your UI ... 190
JavaFX VBox Class: Using a Layout Container for Your Design ... 191
JavaFX Group Class: High-Level Scene Graph Node Grouping ... 193
Scene Graph Code: Optimize the JavaFXGame Class ... 194
JavaFX Object Declarations: Global Class Access for Methods ... 196
Scene Graph Design: Optimizing the BoardGame .start() Method ... 197
Add Scene Graph Nodes: addNodesToSceneGraph() ... 199
Adding New UI Scene Graph Nodes to createBoardGameNodes() ... 200
Interactivity: Creating the BoardGame Button UI Control ... 205
Testing Your BoardGame: Process the Scene Graph ... 208
Summary ... 210
■
Chapter 9: JavaFX 9 User Interface Design: The Front End for
Java 9 Game Design ... 211
UI Design Foundation: Finishing the Scene Graph... 212
JavaFX 9 UI Compositing: ImageView and TextFlow ... 213
JavaFX Image Class: Referencing Digital Imagery in Your Design ... 213
JavaFX ImageView Class: Display Digital Images in Your Design ... 214
JavaFX TextFlow Class: Use Text Objects (Content) in a Design ... 216
Coding the User Interface: A UI Compositing Pipeline ... 217
Instantiating the Compositing Layers: .createBoardGameNodes() ... 218
Adding UI Backplate to Scene Graph: addNodesToSceneGraph() ... 219
Asset Load Methods: loadImageAssets() and createTextAssets() ... 219
Creating SplashScreen Assets: Using 3D Assets in a 2D Pipeline ... 220
Adding Image Assets to Your Project: Using the \src\ Folder ... 221
A Method for Loading Image Assets: .loadImageAssets() ... 222
A Method for Creating Text Assets: .createTextAssets() ... 223
Using a Button.setMaxWidth() Method: Making Buttons Uniform ... 224
Using StackPane Background: Leverage All Compositing Layers ... 226
Using TextFlow: Setting Up Your Information Overlay Object ... 228
Using StackPane: Add More Digital Image Compositing Layers ... 231
Finishing Up Your UI Design Object Creation and Configuration ... 236
Summary ... 238
■
Chapter 10: User Interface Design Interactivity: Event Handling and
Imaging Effects... 239
Event Handling: Adding Interactivity to Your Games ... 239
Types of Controllers: What Types of Events Should We Handle? ... 240
Java and JavaFX Event Packages: java.util and javafx.event ... 240
Finishing Your UI Design: Coding the Event Handling ... 247
Special Effects: The javafx.scene.effects Package ... 254
Creating Special Effects: Add a createSpecialEffects() Method ... 255
Drop Shadows: Adding Drop Shadows to Your TextFlow Object ... 256
Color Adjust: Adjusting Hue, Saturation, Contrast, and Lightness ... 258
Summary ... 265
■
Chapter 11: 3D Scene Configuration: Using the PerspectiveCamera
and PointLight ... 267
Use a 3D Camera: Adding Perspective to 3D Games ... 267
JavaFX Camera Class: An Abstract Superclass Defining Camera ... 268
JavaFX PerspectiveCamera Class: Your 3D Perspective Camera... 268
JavaFX ParallelCamera Class: Your 2D Space Parallel Camera ... 270
Adding a PerspectiveCamera to Your Scene: Using .setCamera() ... 271
StackPane UI Testing: Making Sure Everything Else Still Works ... 277
Implementing the Start Game Button: Hiding Your UI ... 282
Using 3D Lighting: Adding Illumination to 3D Games ... 284
JavaFX LightBase Class: An Abstract Superclass Defining Light ... 284
JavaFX AmbientLight Class: Lighting Your 3D Scene Uniformly ... 285
JavaFX PointLight Class: Lighting Your 3D Scene Dramatically ... 286
Adding Light to the Game’s 3D Scene: Using PointLight Objects... 286
Summary ... 290
■
Chapter 12: 3D Model Design and Primitives: Using JavaFX 9
Shape3D Classes ... 291
JavaFX Shape3D Superclass: Primitive or MeshView ... 291
JavaFX Sphere: Creating Sphere Primitives for Your 3D Games ... 293
JavaFX Cylinder: Creating Cylinder or Disk Primitives for Games ... 294
JavaFX Box: Creating Boxes, Posts, and Planes for 3D Games ... 295
Using Primitives: Adding Primitives to Your JavaFXGame Class ... 295
Shape3D Draw Mode Property: Solid Geometry and Wireframe ... 303
JavaFX Mesh Superclass: Construct a TriangleMesh ... 309
JavaFX Mesh Superclass: Your Raw 3D Model Data Container ... 310
JavaFX MeshView Class: Format and Present Your 3D Mesh Data ... 310
JavaFX VertexFormat Class: Define Your 3D Vertex Data Format ... 311
JavaFX TriangleMesh Class: Create a 3D Polygonal Mesh Object ... 312
Summary ... 314
■
Chapter 13: 3D Model Shader Creation: Using the JavaFX 9
PhongMaterial Class... 315
JavaFX Material Superclass: i3D Shader Properties ... 315
JavaFX PhongMaterial: Phong Shading Algorithm and Attributes ... 316
Implementing PhongMaterial: Assigning Color and Power Values... 319
Using External Image Assets: Creating Texture Maps ... 325
Using External Third-Party Software: Creating Maps Using GIMP ... 325
Using Texture Maps in a PhongMaterial: Shader Special Effects ... 328
GameBoard Texturing: Creating a GameBoardSquare ... 334
Getting Ready to Create the GameBoard: Code Reconfiguration ... 334
Creating Your Game Board Square Diffuse Texture: Using GIMP ... 337
Summary ... 340
■
Chapter 14: 3D Model Hierarchy Creation: Using Primitives to Create a
Game Board ... 341
Primitive Creation Method: createGameBoardNodes() ... 341
Preparing to Position Gameboard SceneGraph Nodes ... 348
Coding a Phong Shader Creation Method: createMaterials() ... 350
Finishing Your GameBoard Construction: Quadrants 2 Through 4 ... 353
Changing Cameras: Using the ParallelCamera Class ... 365
Summary ... 368
■
Chapter 15: 3D Gameplay UI Creation: Using the Sphere Primitive to
Create a UI Node ... 369
Finish Your 3D Assets: Topic Quadrants and Spinner ... 369
Use Google to Resolve JavaFX Anomalies: Using StackOverflow ... 379
Creating a 3D User Interface Element: A 3D Spinner Randomizer ... 380
Enhancing the 3D Spinner Texture Map: Increasing Resolution ... 383
Summary ... 387
■
Chapter 16: 3D Game Animation Creation: Using the Animation
Transition Classes ... 389
Animating the 3D Assets: The Animation Superclass ... 389
Automated Object Animation: Transition Superclass ... 392
Animating 3D Object Rotation: Using the RotateTransition Class ... 393
A RotateTransition Example: Set Up Your RotateAnimation Asset... 394
Animating Node Movement: Using the TranslateTransition Class ... 402
TranslateTransition Example: Set Up Translate Animation Assets ... 404
Merging Animation Properties: Using a ParallelTransition Class ... 405
ParallelTransition Object: Merge rotSpinner and moveSpinnerOn ... 406
Summary ... 408
■
Chapter 17: i3D Game Square Selection: Using the PickResult Class with
3D Models ... 409
Select Your 3D Assets: The PickResult Class ... 409
The MouseEvent Class: Trapping Mouse Clicks on 3D Primitives ... 411
Implementing Spinner UI Functionality: Mouse Event Handling ... 413
Using java.util.Random: Generating a Random Spin ... 423
Random Quadrant Selection: Using Random with Conditional If() ... 424
Summary ... 433
■
Chapter 18: 3D Gameplay Design: Creating Your Game Content Using
GIMP and Java ... 435
Design Your Gameplay: Create Quadrant Definitions ... 435
Game Board Quadrant: Creating Game Quadrant Content (GIMP)... 436
Game Board Squares: Creating Game Squares Content in GIMP ... 446
■
Chapter 19: Game Content Engine: AI Logic with Random Content
Selection Methods ... 465
Coding a Random Spin Tracker: Remainder Operator ... 465
Implementing Spin Tracker Functionality: Create Empty Methods ... 466
Populating Quadrants After a Spin: OnFinished() Event Handling ... 470
Texture Map Management: Coding a resetTextureMaps() Method ... 482
Summary ... 486
■
Chapter 20: Coding Gameplay: Set Up Gameplay Methods and
Animated Camera View ... 487
Select Game Content: selectQSgameplay() Methods ... 487
Game Board Square Interaction: OnMouseClick() Event Handling ... 488
Camera Animation: Position Game Board After Select ... 507
Summary ... 511
■
Chapter 21: Questions and Answers: Finishing the Setup Methods
and Digital Audio ... 513
Finishing the Gameplay: Adding a qaLayout Branch ... 513
Adding Another Organization Layer: The createUInodes() Method ... 514
Implementing the New Q&A User Interface in Your JavaFXGame ... 524
Tweaking the Q&A Panel: Refining the createQAnodes() Settings ... 527
Adding Answer Button Content to setupQSgameplay() Methods ... 529
Digital Audio for Games: Using the AudioClip Class ... 531
Implementing AudioClip: Add Digital Audio Asset Sound Effects ... 532
Finding Free for Commercial Use Digital Audio: 99Sounds.org ... 534
Data Footprint Optimization: Use Audacity to Create Game Audio ... 535
Use toExternalForm() to Load a URI Reference as a String Object ... 539
Triggering Spinner Audio Playback in createSceneProcessing() ... 541
Camera Animation Audio: Matching Audio Length to Animation ... 542
■
Chapter 22: Scoring Engine: Creating the Score UI Layout and Scoring
the Content ... 545
SplashScreen Render Bug: Hide UI Panels on Startup ... 545
Scoreboard UI Design: A createScoreNodes() Method ... 548
Adding Your Score UI Container Design Elements: Text Objects ... 554
Scoring Engine: Logic to Calculate Score on Answer ... 561
Score UI Testing: Displaying Higher Integer Numbers ... 570
Completing the Gameplay: Add Answers and Score ... 572
Summary ... 573
■
Chapter 23: Completing the Gameplay Code and Player Proofing
Your Event Handling ... 575
Finishing Gameplay: Populating Gameplay Methods ... 576
Add Answer Options: Finishing the setupQSgameplay() Methods ... 576
Player-Proofing Code: Controlling Player Event Usage ... 583
Let’s Play Again Button: Resetting Player Event Handling ... 588
Camera Zoom Back Out: Another ParallelTransition ... 593
Finishing the Play Again Button: resetTextureMaps() ... 596
Quadrant-Level Protection: squareClick per Quadrant ... 598
Summary ... 602
■
Chapter 24: Optimizing Game Assets and Code, and Game Profiling Using
NetBeans ... 603
Optimizing Texture Maps: Converting to 8-Bit Color ... 603
Creating Indexed Color Textures: Changing Color Mode in GIMP ... 603
NetBeans 9 Profiler: Testing Memory and CPU Usage ... 611
Implementing Indexed-Color Imagery: Adding a Path ... 620
Java Game Code Optimization: Leverage Java Tricks ... 623
Future Expansion: Add Digital Video and 3D Models ... 625
Summary ... 625
About the Author
Wallace Jackson has been writing for leading multimedia publications about his work process for interactive new media content development since the advent of Multimedia Producer Magazine, nearly two decades ago, when he wrote about an advanced computer processor architecture for the issue centerfold (removable “mini-issue” insert) distributed at the SIGGRAPH trade show. Since then, Wallace has written across a significant number of popular publications about his work product in interactive 3D and new media advertising campaign design, including: 3D Artist Magazine, Desktop Publisher Journal, Cross Media Magazine, AV Video and Multimedia Producer Magazine, Digital Signage Magazine, and even Kiosk Magazine.
Wallace has authored more a dozen books for Apress including Beginning Java 8 Games Development, Android Apps for Absolute Beginners, Pro Android Graphics, Pro Android UI, Pro Android SmartWatch, Learn Android Design, VFX Fundamentals, Digital Audio Editing, Digital Image Compositing Fundamentals, HTML Quick Markup Reference, Digital Illustration Fundamentals, Digital Painting Fundamentals, Android Studio 3 New Media Fundamentals, Digital Video Editing Fundamentals, and many other titles.
He is currently the CEO of Mind Taffy Design the new media content production and digital campaign design and development agency, located in North Santa Barbara County, halfway between clientele in Silicon Valley to the north and in Hollywood, “The OC,” and San Diego, to the south. Mind Taffy will also produce Interactive 3D content for major brands around the world, from their content production studio on Point Concepcion Peninsula in the California Central Coast area. Mind Taffy Design has created open source technology (HTML5, Java, and Android) and digital new media content deliverables for more than a quarter century (starting in 1991) for a large number of the top branded manufacturers in the world, including Sony, Samsung, IBM, Epson, Nokia, TEAC, Sun, SGI, Dell, Compaq, ViewSonic, Western Digital, Mitsubishi, KDS USA, CTX International, NEC, Micron, KFC, Tyco Electronics, and ADI Systems.
About the Technical Reviewer
Acknowledgments
I would like to acknowledge all my fantastic Editors, and their support staff at Apress, who worked those long hours and toiled so very hard on this book, to make it the ultimate Pro Java 9 Games Development application production book title.
Steve Anglin, for his work as the Lead Editor on the book, and for recruiting me to write Java, HTML5 and Android programming titles at Apress covering the most popular open source application development platforms available anywhere today.
Matthew Moodie, for his work as the Development Editor on the book, and for his experience and guidance during the process of making this book one of the great Pro Java 9 Games Development titles currently available in the market.
Mark Powers, for his work as the Coordinating Editor on the book, and for his constant diligence in making sure I either hit my Java 9 chapter delivery deadlines or surpassed them.
Introduction
The Java 9 Programming Language is currently the most popular object-oriented programming (OOP) language in the world today. Java runs on consumer electronic devices from SmartWatches to UHD Smartphones, to Touchscreen Tablets, to eBook Readers, to Game Consoles, to SmartGlasses, to Ultra-High Definition (UHD) 4K Interactive Television Sets (or iTV Sets), with even more types of consumer electronics devices, such as those found in the automotive, home appliances, healthcare, digital signage, security, home automation market, VR AR and so on, increasingly adopting this open source Java 9 platform for usage to drive i3D new media experiences within their hardware devices.
Since there are literally billions of Java 9 compatible consumer electronics devices, owned by the billions of users all over the world, it stands to reason that developing popular Pro Java 9 Games for all of these people could be an extremely lucrative undertaking, given that you have the right game concepts, artwork, new media assets, game design, and optimization processes, of course.
Java 9 (and its multimedia engine, JavaFX 9) code can run on just about every operating system out there, including Windows 7, 8.1 and 10, Linux distributions such as Ubuntu LTS 18 or Fedora, 32-bit Android 1-4 and 64-bit Android 5-8, Open Solaris, Macintosh OS/X, iOS, Symbian, and the Raspberry Pi, it’s only a matter of time before any other popular OSes will add support for this popular open source programming language. Additionally, every popular Internet Browser has Java capability. Java provides the ultimate flexibility in installing software, as an application, or in the browser, as an applet. You can even drag a Java application right out of the browser, and have it install itself on a user’s desktop. Java 9 is truly remarkable technology all the way around.
There are a plethora of embedded and desktop hardware support levels currently for Java 9 and for JavaFX 9, including the full Java SE 9, Java SE 9 Embedded, Java ME (Micro Edition) 9 and Java ME 9 Embedded, as well as Java EE 9 for Enterprise Application Development.
Talk about being able to “code once, then deliver everywhere!” This is the pipe-dream of every programmer, and Oracle (Java) and Apache (NetBeans 9) is making it a reality with the powerful JavaFX 9 multimedia programming platform. This book will go a long way towards helping you to learn exactly how to go about developing Java 9 games, using the Java programming language in conjunction with the JavaFX 9 multimedia engine. These Java 9 game applications will be able to run across a plethora of Java-compatible consumer electronics devices. Developing Java 9 game applications which play i3D smoothly across all of these different types of consumer electronics devices requires a very specific work process, including game asset design, game code design, UI design, and data footprint optimization, all of which I’ll be covering during this Pro Java 9 book.
I designed this book to contain a comprehensive overview of optimal Java 9 games development work processes. Most professional Java 9 application development books only cover the language; however, if you really want to become that well known Java 9 game or IoT application developer that you seek to become, you will have to understand, as well as master, all of the areas of game design, including multimedia asset creation, user interface design, Java 9 Programming, JavaFX 9 class usage, and data footprint optimization, as well as memory and CPU usage optimization.
Once you’ve mastered these areas, hopefully, by the end of this book, you will be able to create the memorable user experience that will be required to create popular, best-selling Java 9 games. You can do it, I know you can!
Java 9 games are not only developed using a NetBeans 9 Integrated Development Environment (IDE) alone, but also in conjunction with the use of JavaFX 9 and several other different types of new media content development software packages (more than a dozen, at this point; all open source). For this reason, this book covers the installation and usage of a wide variety of other popular open source software packages, such as GIMP 2.9.7 and Audacity 2.1.3, for instance, in conjunction with developing Java 9 game applications using the NetBeans 9.0 IDE and the JavaFX 9 new media game engine, which brings the “wow factor” to the Java 9 programming language.
I am architecting this book in this fashion so that you can ascertain precisely how your usage of new media content development software will fit into the overall Pro Java 9 Game Development work process. A comprehensive approach will serve to set this unique book title distinctly apart from all of the other Java 9 game application development titles which are currently out on the market. The book startes out in Chapter One with downloading and installing the latest Java JDK as well as NetBeans 9 IDE, along with a dozen open source content development applications.
In Chapter Two you’ll learn about new media concepts for the 2D and i2D capabilities in JavaFX 9, and in Chapter Three you will learn about more advanced 3D new media concepts for the 3D and i3D capabilities in JavaFX 9. In Chapter Four we will cover game design concepts for JavaFX.
In Chapter Five, you’ll learn about the fundamentals of the Java 9 programming language, which you’ll be implementing to create a Java 9 game during the remainder of the book. In Chapter Six, you will learn about NetBeans 9, and create your first JavaFX 9 game application, and take a look at useful NetBeans 9 features, such as code completion and code profiling.
In Chapter Seven, you will learn all about the JavaFX 9 new media engine (JavaFX API), and how its impressive features can take your Pro Java 9 Game Development and place it in the stratosphere. Thus, the first third of this book is “foundational” material, which you will need to understand in order to be able to understand how NetBeans 9.0, Java 9, JavaFX 9.0, and the various new media genres and asset types supported by the JavaFX 9 game engine function together as a platform.
In Chapter Eight, you will learn all about the JavaFX 9 Scene Graph and how to use its hierarchy to begin to design the first i2D parts of the Java 9 Game, the top-level splashscreen and its user interface design. This is where we start into coding Java 9 and JavaFX 9 APIs more aggressively.
In Chapter Nine, you will learn about user interface design, including using digital image assets and text assets. Major JavaFX classes we will cover include the Image class, the ImageView class, and the TextFlow class. We will be looking at digital image compositing pipelines in the creation of the SplashScreen as well as game information overlays such as game play instructions, legal disclaimers, content production credits, and starting the game play to remove the SplashScreen.
In Chapter Ten we will learn about the JavaFX event processing engine, which will process all of the different types of action, key, mouse, and drag events that you are likely to utilize in your Java 9 game development work process in the future when you create your own custom pro Java 9 games. We will implement event handling in Java 9 during this chapter which will make the user interface and SplashScreen created in the previous chapter interactive.
3D scene infrastructure, which we’ll be creating during this chapter, as well as ParallelCamera, another Camera subclass which is better suited for 2D or 2.5D game development pipelines. We will also learn about the LightBase abstract superclass, and its two core lighting subclasses, AmbientLight and PointLight.
In Chapter Twelve you will learn about 3D modeling classes in the JavaFX API. You’ll be learning about the different JavaFX 9 3D model classes, which are contained in your javafx.scene.shape package. You will cover Sphere, which can be used to create a Sphere primitive, and which you have used already to test your 3D Scene setup in Chapter Eleven. We will also look at the other two primitive classes, Box and Cylinder, which can also be used to create your Plane and Disk primitives. These primitives are based on the Shape3D superclass, which we will be looking at first. We will also look at the more advanced TriangleMesh class, which allows you to build a polygon-based Mesh object, and finally, at the Mesh and MeshView class hierarchy, which will allow you to render your 3D Mesh objects.
During Chapter Thirteen you’ll be learning about the JavaFX 9 3D shader class hierarchy, which is contained in the javafx.scene.paint package. In Java 9 and Android 8 the Paint class applies pixel colors and attributes to the Canvas, and in this case, the surface of your JavaFX 9 i3D primitives. The paint package contains classes which are related to this “skinning,” or “texture mapping” 3D object shading objective. You will cover Material, a superclass which holds the top level shader definition, and the PhongMaterial class, which can be used to create a texture map, or “skin,” for the i3D primitives for your game which were covered in Chapter 12.
In Chapter Fourteen, you will create an advanced i3D object for your game using the JavaFX 9
SceneGraph hierarchy and JavaFX 3D primitives. During this chapter, you will be building your gameBoard Group branch of your SceneGraph, which is under the SceneGraph root, next to the SplashScreen (UI) branch, which we have already built in Chapter Nine. Under your gameBoard Group branch, we will segment your i3D game board into four quadrants, so the middle of the gameboard can have four larger 300x300 unit areas which we can use for gameplay. Each of the four game quadrants will have another 5 (of 20) perimeter game board squares as child objects.
In Chapter Fifteen, we’ll be using i3D primitives in JavaFX, to create i3D UI elements for your i3D Scene, and will work through some of the 3D face rendering anomalies which we saw in Chapter 14. The i3D UI element we’ll create will spin the gameboard, to select a quadrant topic for play.
In Chapter Sixteen, we’ll take a detailed look at the JavaFX 9 (abstract) Animation and Transition superclasses, and all of the powerful property transition subclasses, which you can implement as different types of Animation objects in your i3D boardgame. Animation adds professionalism to any game because motion, especially in a 3D game, adds a ton of realism to the user experience.
In Chapter Seventeen, we’ll take a close look at a public PickResult class and public MouseEvent class, and use these for our own game play design in a custom .createSceneProcessing() method which will be used to process i3D game elements (Box or Sphere objects) selection by the player (more event handling coding), so that our players can interact with their i3D game components.
During Chapter Eighteen, we will look at the work process for creating alternate texture maps, which will be changed during game play, by changing the Image object asset reference to add content to game board squares and quadrants, based on random spins and player mouse clicks (or screen touches). Although this particular chapter does not get into Java code too deeply, it is important to note that developing
professional Java 9 games involves digital image artisans, as well as digital audio engineers, 3D modelers, 3D texture artists, animators, 2D illustrators, and VFX artists, so we will need to cover some non-Java-specific topics as well during this book.
During Chapter Nineteen, an i3D game AI chapter, we will create two new int (integer) variables; spinDeg for spin degrees, and an accumulator (total) of the sum of the rotational degrees which have been spun by the players, and quadrantLanding, for holding the latest result of a simple yet powerful calculation which will always tell us what quadrant the latest spin landed on.
In Chapter Twenty-One, we will finish coding the .setupQSgameplay() methods, by adding the Q&A parts of the game play logic. We will also be looking at the JavaFX AudioClip class, which will allow us to add digital audio sound effects. This will further enhance the pro Java 9 game play experience using yet another new media component (digital audio) of the JavaFX 9 API.
During Chapter Twenty-Two, we’ll be implementing a single player game play and scoring engine, to get your game scoring user interface in place, because a lot of game players will want to play the game against the content, as a learning experience. That said, there will still be a lot of code to write for each Button UI element, that looks at if the answer is the correct answer, and if it is, will increments the “Right:” score, and if it is not, will increment the “Wrong:” score.
During Chapter Twenty-Three, we’ll finish populating the setupQSgameplay() methods with the text-based answer content that matches up with the questions. We’ll also finish the createQAprocessing() method, which holds the answer scoring code that updates the Score UI panel. The players will use these to select the correct answer revealing what the visual for that square represents and scoring their answer. Once we finish coding the bulk of the game play “answer display, selection, and scoring” infrastructure, and test each square to make sure it is working, we can create the “error-proofing” portion of the Java code, to finish up a professional game, which makes sure the players use it properly. This involves using Boolean variables (called “flags”) to hold “click” variables, where once a player clicks the spinner, game board square or answer Button element, the “elementClick” variable is set to “false” so your game player cannot click it again and “game” the game play code.
During Chapter Twenty-Four on Data and Memory Footprint Optimization, we will convert your digital image assets to use 8-bit (indexed) color, rather than the 24-bit truecolor depth, for your texture maps, and we’ll run the NetBeans Profiler to see how much memory and CPU processing your Java 9 code is using to run your game.
This book attempts to be the most comprehensive Pro Java 9 Games application development programming title on the market, by covering most, if not all, of the major Java 9 and JavaFX 9 classes that will need to be used to create i3D Java 9 Game Applications.
If you’re looking for the most comprehensive, up to date overview of the Java 9 programming language for games, including JavaFX 9.0 and NetBeans 9.0 IDE all seamlessly integrated with new media content development work processes, as well as a “soup to nuts” knowledge about how to optimally use these technologies in conjunction with the leading open source new media game content design and development tools, then this book will really be of significant interest to you.
The Different Faces of Java: Create
a Java 9 Development Workstation
Welcome to the Pro Java 9 Games Development book. In this first chapter, I’m going to discuss the various versions of Java which are still being used today to develop software applications for open source platforms such as Android, as well as for open source browsers based on WebKit, such as Google Chrome, Mozilla Firefox, Apple Safari, and Opera. After going over which versions of Java, spanning from JDK 1.6, also known as Java 6, through JDK 1.9, which was recently released as Java 9, will need to be used to develop for various versions of these popular platforms. We’ll also need to take a detailed look at how to create a professional Java 9 software development workstation for use during the rest of this book. This will include other software such as new media content production software packages which can be used with your Java software development packages to create games and IoT (Internet of Things) applications.
The core of your workstation will be either a Java 8 SDK or Software Development Kit which is also referred to as the JDK or Java Development Kit, or the new Java 9 JDK, which came out in 2017 and is more modular than Java 8, but which features the same classes and methods for creating games or IoT user experiences. This fact will allow us to safely focus on both Java 8, as well as Java 9, during the course of the book. This is because, for our purposes, these are fundamentally the same, allowing us to focus on the latest Java APIs, and not on what Java version you are using. In fact, since we are going to focus on Java’s multimedia APIs, commonly known as JavaFX, what you learn during this book can also be coded in Java 7 as well! Android recently upgraded to Java 7 and Java 8 compatibility (from Java 6).
We will also set you up with a NetBeans 9.0 IDE, or Integrated Development Environment, which will make coding Java 8 or 9 games so much easier. Expect to use NetBeans 9 once Java 9 comes out in Q4 of 2017, since NetBeans 9 IDE will have been upgraded significantly to accommodate the new modular nature of Java 9 and will allow you to mix functional modules, to create custom Java package collections
(API versions) for any type of application development.
After your Java JDK and NetBeans IDE are configured, we will get you setup with the latest open source new media content creation software packages, including professional software packages such as GIMP for digital imaging, InkScape for digital illustration, DaVinci Resolve for digital video editing or special effects, Audacity for digital audio editing, Fusion for special effects and 3D, Open Office 4 Suite for Business and Project management, Blender for 3D modeling, texturing, animation, rendering, particle systems, fluid dynamics or special effects, and Terragen 4 for virtual planets.
We will also be going over some hardware requirements and considerations for your new Java 9 content production workstation. Finally, note the Java code in this book will work just as well in a Java 8 IDE (or integrated development environment), so this book could just as easily be called the Pro Java 8 Games Development book!
Java Dichotomy: Versions Used in Various Platforms
There are a number of different versions of Java which are still widely used for development across a number of different popular platforms, including Java 6 for 32-bit Android (Versions 1.x, 2.x, 3.x and 4.x of Android are 32-bit), as well as Java 7 for early 64-bit Android versions (5.0, 5.1, and 6.0), Java 8 for recent Android Versions (7.0, 7.1.2, 8.0), and Java 9 for Windows 10 OS, Ubuntu Linux OS (and other Linux distributions), Macintosh OSX, and Open Solaris OS.
It is important to note that there are three primary versions of Java; Java ME or Micro Edition is optimized for embedded devices, Java SE or Standard Edition, which we’ll be covering, which is used on the “client side” as well as in mobile consumer electronics devices and in iTV sets, and Java EE, or Enterprise Edition, which could be thought of as a “server side” paradigm, as large corporate computing environments are generally server-based, and not “peer to peer” (pure client side, with client to client inter-communication possible, in addition to client-server interactions).
Java 6, released in December of 2006 (over a decade ago), is still widely used in conjunction with the Eclipse IDE to develop applications for all 32-bit versions of Android, from version 1.0 through version 4.4. This is because this is the Java version Google originally specified for use in developing 32-bit Android applications, when Android 1.0 was released in September of 2008. It is important to note that Google created a custom version of Java 6, using the Open Java Project, but this won’t effect the programming API, as the classes, methods, and interfaces still function the same way that they would if you were using Java 6 in the NetBeans IDE or the IntelliJ IDEA, instead of using the Eclipse IDE.
When Google upgraded Android to a 64-bit Linux Kernel, in Android 5.x, which uses the Android Studio IDEA based on IntelliJ, they upgraded to using Java 7, which also has a 64-bit version. Java 7 was released in July of 2011. So if you are developing Android 5-6 applications for advanced platforms, such as Android Wear, which is covered in my Pro Android Wearables (2015) title from Apress, or Android TV or Android Auto, covered in Android Apps for Absolute Beginners (2017) title from Apress, you will want to utilize Java 7. The JavaFX 8 engine found in JavaFX 8 and JavaFX 9, has been back-ported to Java 7 as well; however Java 7 was retired this year. Java 6, 7 and 8 are still used in Android.
Java 8 is the current version of Java SE, as of the writing of this book, and additionally, features the powerful JavaFX 8.0 multimedia engine, which has also been made compatible with Java 7, although JavaFX 8.0 APIs are not yet natively supported inside of the Android APIs. It is however, possible to develop JavaFX 8 or 9 applications that run on both Android OS and iOS platforms, making this book significantly more valueable to our readers! Java 8 is supported across all popular browsers, in Android 7, 7.1.2 and 8.0, and across all four of the popular OSes, including Windows 7, 8.1 and 10, in all Linux Distros, Macintosh OS/X, and Open Solaris from Oracle. Java 8 was released in March of 2014, and added a powerful new feature called Lambda Expressions, which we will be covering during the book, as this is a way to write more compact code, which is also often more multi-processor (and multi-thread) efficient.
Java 9 is the next major revision of Java. Java 9 was released September 22, 2017. The primary new feature in Java 9 that the Java language developers are reworking is making the Java 9 language API modular. This will allow Java 9 developers to “mix and match” features in “modules” (code libraries), and create their own custom, optimized versions of Java. These custom Java versions would work exactly the way that the developer will need it to for custom development environments or custom applications. As of the release of this book, NetBeans 9 is still in development.
9 version for all the popular OS platforms. If you are using the JavaFX multimedia/game engine, the latest JavaFX features exist across both the Java 8 and Java 9 APIs.
I wanted to point out to readers that they can optimize their game program logic to span several versions of Java, optimizing for Java 7 (Android 5 or 6) to Java 8 (Android 7, 8 and modern OSes) to the Java 9 version which came out on September 22, 2017 before the book release. This can also be done without any major code changes, because the core JavaFX game processing logic, other than using Lambda Expressions, exists across all of these Java revisions.
Java Development Workstation: Required Hardware
To get the best results from all of the professional open source software we will be installing during the course of this chapter, you will want to have a powerful 64-bit workstation, running a paid OS, such as Windows 10 or OSX, or a free OS, such as Ubuntu LTS 17. I use Windows 10 on several workstations, and Ubuntu LTS 17.10 on several workstations. You will also want a large display, preferably HD (1920 by 1080) or UHD (3840 by 2160). If you do the math, a UHD display is four HD displays in a single bezel, and UHD displays are now $300 to $500. I got one at a Thanksgiving sale for $250. The sizes I use for HD range from 32" to 43" and for UHD range from 44" to 55" yeilding a tight pixel density.
A computer workstation should feature (contain) at least 8 Gigabytes (8GB) of DDR3 system memory (16GB or 32GB of system memory would be even better). This memory should cycle at 1333, 1600, 1866, or 2133 megahertz clock speed. Cutting-edge systems often feature DDR4 system memory running at 2400 megahertz clock speed. DDR4 memory also comes in 16GB DIMMS, so that you can put 48GB, 64GB, or 128GB in your workstation motherboard. I’d do this for workstations running Fusion 9, DaVinci Resolve 14, Blender 2.8, JavaFX 9 or other i3D production software.
The faster your system memory runs, the faster your computer can process data, and the faster the CPU can get what it needs to process. That brings us to the “brain” or CPU/GPU for the workstation which does the processing. The same concept holds true; the more instructions a 64-bit CPU can process per second the more you’re going to get done in a shorter period of time, and the smoother your i3D applications are going to perform their given functions.
Almost all 64-bit workstations these days will feature a multi-core processor, often called a CPU, or Central Processing Unit. Popular CPUs include AMD Ryzen (QuadCore, HexaCore or OctaCore), 9590 (OctaCore or eight cores), or the more expensive Intel i7, which comes in QuadCore, HexaCore, OctaCore, and DecaCore versions. Like the AMD Ryzen, the Intel i7 features two threads per core, so these will look like 8, 12, 16 or 20 core processors to an operating system, which is why they’re more expensive than the AMD FX 9590 series of processors. I use AMD Ryzen or Intel i7 processors, depending on the application. For instance, Android Studio 3 is optimized for Intel hardware architecture, and doesn’t emulate Android Virtual Devices (AVD) fast enough on AMD FX CPU for smooth development and testing.
To store your data, you will also need a hard disk drive. Computers these days will usually come with a one terabyte (1TB) hard disk drive, and you can even get a workstation with a 2TB, 3TB, 4TB, 6TB, or an 8TB HDD. Opt for the 3GB or 4GB model if you are working on games (or 3D, film, special effects, or video assets) which feature UHD, or 4K, screen resolution. If you want your system to boot (start-up) rapidly, and load your software into memory rapidly, be sure to get an SSD (Solid State Drive) as your primary (C:\ for Windows, or, C:/ for Linux) drive assignment. These are more expensive than the traditional Terabyte Hard Disk Drives, but you only really need 64GB or 128GB to hold your OS and software. I have a 256GB SSD, and 512GB SSD and 768GB SSDs are also becoming much more affordable.
disk drive, as well as a 3D GPU from AMD (Radeon), or nVidia (GeForce), which will be used for real-time i3D rendering for both JavaFX 9 as well as Fusion, Blender, and DaVinci Resolve.
During the rest of this chapter, I am going to proceed as if you have just purchased one of these affordable 64-bit workstations, and we’re going to create a premiere Java 9 Games and IoT development workstation 100% from scratch! In case you already have an existing game development workstation, I’m going to include a short section that shows you how to remove outdated Java development software from Windows, so that we can all start from scratch.
Prepare a Workstation for Java 9 Game Development
Assuming that you already have a professional level workstation in place for new media content development and game development, you may need to remove an outdated JDK or IDE, to make sure that you have the latest software. The first thing that you will do in this section is make sure you have removed any of the outdated versions of Java, such as Java 6 or Java 7, and any outdated versions of NetBeans, such as NetBeans 6 or NetBeans 7. This involves uninstalling (removing, or completely deleting) outdated Java development software versions from the workstation. I had to do this on one of my QuadCore AMD workstations, to make room for the NetBeans 9.0 IDE for development of Java 9 and JavaFX 9 apps and games, so the screenshots in this section show a Windows 7 operating system. You’ll do this by using an OS Software Management Utility. On Windows this is the “Programs and Features” utility. This can be found under the Windows Control Panel, shown highlighted in blue in the middle column (seventh row) of Figure 1-1.
Figure 1-1. Use the Programs and Features utility icon to uninstall or change programs on your computer workstation
If you have a brand new workstation, you will not have to remove any previous software. There are similar software installation and removal utilities for Linux and Mac, if you happen to be using one of these OSes. Since most developers are using 64-bit versions of Windows 7, 8.1, or 10, we’ll only be using this 64-bit OS platform for this book.
It’s important to note that Java 9 now comes only in a 64-bit version, so you must have a 64-bit workstation, as I’ve specified in the previous section of this book (In fact, you cannot even buy a new 32-bit computer these days).
The way you customize Windows OS “chrome” (the windowing UI elements), as well as the desktop, and installed software packages is via the Windows Control Panel, and its set of more than 50 utility icons. One of these is the Programs and Features icon (in Windows versions 7 through 10), which can be seen selected in blue in Figure 1-1.
remove old versions. I do not recommend using outdated Vista or XP, as these are no longer supported by advanced Java 9 JDKs and IDEs.
Click this Programs and Features link, or double-click the icon, for previous versions of Windows, and launch the utility. Scroll down, and see if you have any older versions of the Java development tools (Java 5, Java 6, or Java 7) installed on your workstation. Note that if you have a brand new workstation, you should find there are no pre-installed versions of Java or NetBeans on the system. If you find them, return the system, as it may have been used previously.
As you can see in Figure 1-2, on my Windows 7 development workstation, I had an old version of Java 8u131 installed, taking up 442 Megabytes of hard disk drive space, and installed in 2017, on April 22nd. This was used to run the “Alpha” version of NetBeans 9, which runs on Java 8. To remove a piece of software, select it, by clicking on it (it will turn blue), and either click the Uninstall button, shown at the top of Figure 1-2, or you can alternately right-click on the (blue) software package (removal) selection, and select Uninstall from a context-sensitive menu that appears.
I left the tool-tip which says: “Uninstall” showing in the screen shot, so that you can see that if you “hover” your mouse over anything in the Programs and Features utility, it will tell you what that particular feature is used for.
Once you click on the Uninstall button, this utility will remove your older versions of Java 8. Remove the smaller version of Java 8 (non-JDK) first, and then remove the larger (full JDK) version, as the full JDK is required to remove the smaller JDK, as well as any old versions of NetBeans. You will need to have Java 8 installed if you want to remove NetBeans IDE, as NetBeans IDE is written in Java and requires a Java JDK to be installed in order to uninstall it.
Once you remove the full Java 8 JDK, there will only be (Alpha) versions of Java 9 (if you are me, writing this book, that is), as can be seen in Figure 1-3, labeled as Version 9.0.0.0. If you want to keep your older Java project files, make sure and back up your Java project files folder, if you haven’t done that already, that is. Make sure that you back up your workstation’s hard disk drive regularly, so that you do not lose any 3D, content production and coding work.
I removed any Alpha or Beta versions of Java 9 JDK software by again selecting it by clicking on it (it will turn blue), and either click the Uninstall button, seen at the top of Figure 1-3, or you can alternately right-click on the blue software package (removal) selection, and select Uninstall from a context-sensitive menu (opened by right-clicking).
Now that I have removed outdated versions of Java from my workstation, I will go and get the latest Java 9 Development Kit (JDK) versions from the Internet and install them on my Windows content development workstation.
Downloading and Installing the Oracle Java 9 JDK
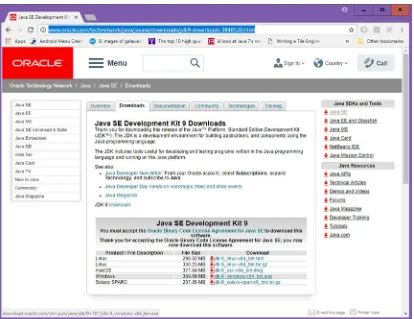
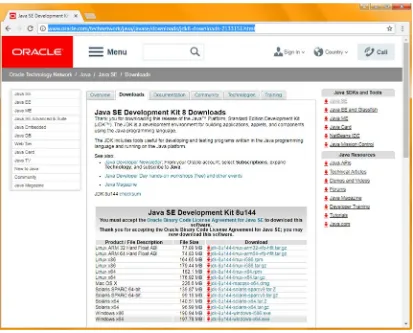
Now that outdated versions of Java have been removed from your workstation, you will need to go onto the Internet and to the Oracle website to get the latest Java 9 development JDK and IDE, since after all this is the Pro Java 9 Games Development book. I’ll show you how to do this using direct download URLs, and where they are are currently, at the time of writing this book. If these links have changed, simply use Google with the search term “Java 9 JDK Download.” The download is currently located at the Oracle Tech Network, as is shown at the top of the screen shot in Figure 1-4.
Before you can download the 360 Megabyte JDK9 installer file for Windows 64-bit, you will need to click the radio button next to an Accept License Agreement option, which can be found at the top-left of the download table.
Once you accept this license agreement, five OS-specific links will become activated for use, including Linux, Mac OS/X, Windows (7 through 10), and Solaris. Be sure to match the Java JDK software that you download to match your operating system. As you can see, there are now only 64-bit (or x64) versions available for use on 64-bit systems.
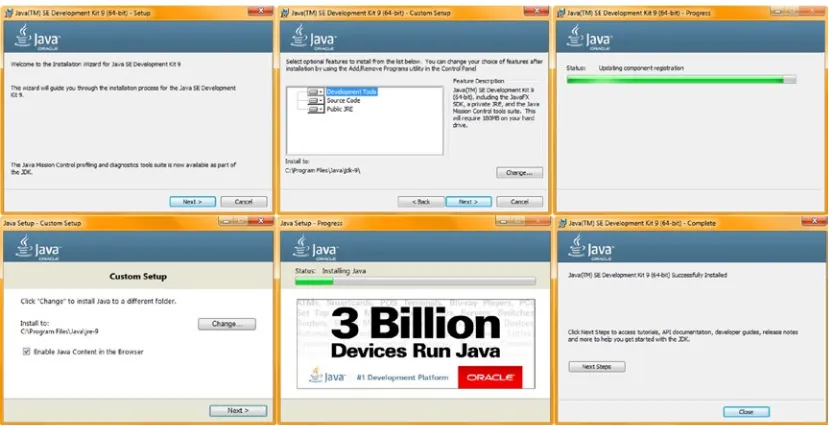
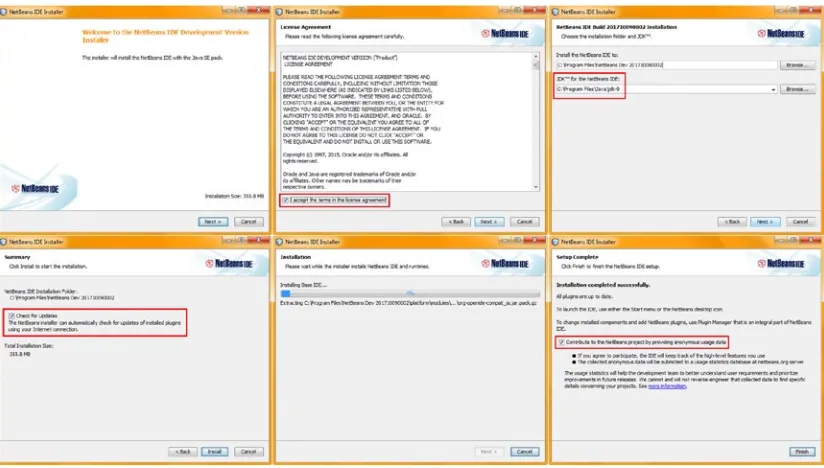
To launch a downloaded JDK9 installer, right-click on the file and use Run as Administrator to install it using Administrator priveledges (or as Superuser on Linux). Accept the default settings in the six dialogs, seen in Figure 1-5.
If you want to check and see if Java 9 installed on your system simply use the same Control Panel utility that you used in Figures 1-1 through 1-3. As you can see in Figure 1-6, the real version of Java 9.0 (not the alpha version) is now installed on my system, at 763 megabytes in size, and in my case, installed on 10/7/2017.
Figure 1-5. Install the Java 9 JDK on the workstation, accepting the default settings in the six Java 9 installation dialogs
Figure 1-6. Find the JDK-for the latest (currently 9.0.1) Java 9 version and make sure it is installed
Downloading and Installing the Oracle Java 8 JDK
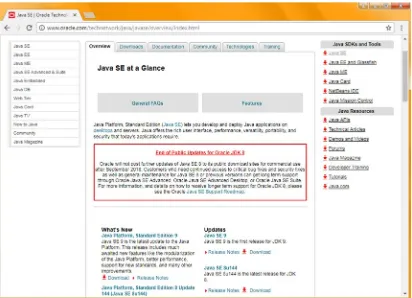
You may be wondering why we are downloading the latest version of Java 8 (currently update 152) right now, given that this is a Java 9 Games book. The reason is because although Java 9 JDK came out in September, the NetBeans 9 IDE version is still in beta (I wrote the book while it was still in alpha), meaning that NetBeans 9 (beta) still runs on top of Java 8, due to the complexity of modules in Java 9 (meaning the programmers are still modularizing NetBeans 9 so that it will be coded in Java 9). Once NetBeans 9 is released, it is likely that it will run directly on top of Java 9 JDK. There is a way to get to a webpage on the Oracle Tech Network that has links to both Java 8u144 and Java 9.0, located at the URL www.oracle.com/technetwork/java/javase/overview/ index.html as seen in Figure 1-7. The download links for both JDKs are located at the very bottom of the webpage, so just click the Download link for the Java SE 8 update 144 JDK (already upgraded to 8u152).
Figure 1-7. The Oracle Tech Network Java SE Overview webpage, which has links to Java 9 JDK as well as to Java 8u144
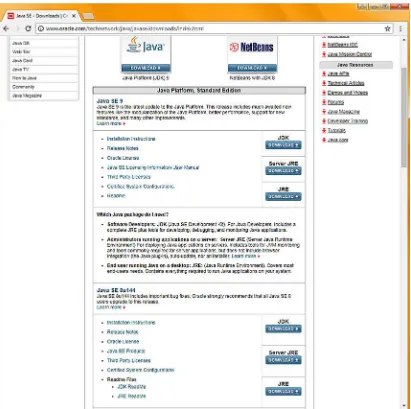
The Java SE downloads page seen in Figure 1-8, is the page the Download link on the previous page will take you. At the bottom of the page you will find the Java SE 8u144 section with three Download buttons in it. The first top button says JDK. This is the button you want to click to start a JDK 8u144 download. This will take you to the page for oracle.com/technetwork/java/javase/downloads/jdk8-downloads-2133151.html, which is shown in Figure 1-9.
Click an Accept the License radio button to enable all download links, and click the link for your OS version.
Notice that for Java 8 there are both 32-bit (i586) and 64-bit (x64) versions, as well as ARM CPU versions, which gives us over a dozen choices. Select the 64-bit version for your OS, to match what you installed for Java 9.0.
Now we can install the NetBeans 9.0 Integrated Development Environment, or IDE for short, which will use the Java 8 Run-Time Engine (JRE) that we just installed to run Java code which will create the NetBeans 9 IDE for you.
Since NetBeans 9 is transitioning from Oracle to Apache, there are actually two code repositories currently. I am going to first show you the one that I used while writing the book, which is hosted at Oracle, and second, I’ll show you the one hosted at Apache, which uses a beta repository called Jenkins, and also a link to GIT where you can build the NetBeans IDE from scratch if you so desire. There will also eventually be a “bundle” of Java 9 and NetBeans 9 as a single install. This is of course the easiest and most desireable, but does not exist currently, so I am covering the more advanced ways to build and install NetBeans 9.0 since it is not yet finished. This complicates installation currently, but there is nothing that I can do about this other than to give you all of this additional extra information, so that you can get NetBeans 9.0 up and running for Java 9 and JavaFX 9 development before the final NetBeans 9 on Java 9 bundle is released. This gives you a head start on everybody else as far as Pro Java 9 Games Development is concerned.
Installing the Oracle NetBeans 9.0 (Development) IDE
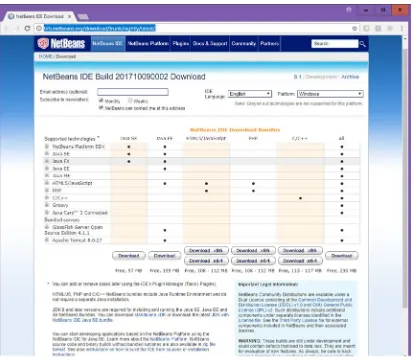
Since NetBeans 9 is still in development, I am going to show you how I got the NetBeans 9 release from Oracle, as well as in the next section how the general public will eventually get the NetBeans 9 IDE from Apache. In this way you will know all of the ways to download and install NetBeans 9. The Oracle repository (which will exist until the official transfer of the software to Apache) is located at bits.netbeans.org/download/trunk/nightly/latest/ and looks like the original NetBeans download page that you are all familiar with, shown in Figure 1-10. I would recommend using the simplest (smallest) Java SE version of the software, since it includes the three APIs (NetBeans, Java and JavaFX) which we are covering in this book. Click the first Download (Free, 97MB) button, and start the NetBeans download process.
Figure 1-10. The Oracle NetBeans 9.0 IDE download page located at bits.netbeans.org/download/trunk/ nightly/latest/
Click on the Next button to begin the default (full) installation, and you will get the NetBeans IDE 9 License Agreement dialog, shown in the top middle of Figure 1-11. Select the “I accept the terms in the license agreement” checkbox, shown circled in red, and click the Next button, to advance to the NetBeans IDE Build Installation dialog, shown on the right side of Figure 1-11. The third dialog specifies the install location in the Program Files directory, and also specifies the JDK to use for Java development. Notice that NetBeans 9 is smart enough to pick Java 9 over Java 8 (you have installed both, as you can have more than one Java version installed on any given workstation), and defines what version of Java you will be developing games for (this used to have to be set manually inside NetBeans). Leave these at their default setting, and click the Next button to advance to the Summary dialog, shown in the lower-left in Figure 1-11. Be sure to leave Check for Updates selected, so that NetBeans 9 will automatically update itself.
Once you click on the Install button, NetBeans will install the base IDE as can be seen in the bottom-middle dialog in Figure 11-1, showing you what it is doing via a progress bar and extracted files text underneath it. When the setup is complete, you will get a Setup Complete dialog, which will give you the checkbox option to “Contribute to the NetBeans project by providing anonymous usage data.” I chose to select this option, to help the NetBeans developers.
One final step, which you should do for all of the various game development and game asset
development software packages which we will be installing in this first chapter, is to test the installation by launching the software to make sure that it runs.
To confirm how NetBeans 9 is set up, use the Help ➤ About menu sequence, which is seen on the right hand side of Figure 1-12, showing your product version, Java JDK version being used, Java Runtime Environment (JRE) being used (JRE is part of the JDK install) to run NetBeans 9.0, Operating System being used, and the User directory location and Cache directory location. If you ever have a problem installing subsequent versions of this IDE, try deleting these two (that is, deleting the \dev folder), as they contain information from the previous NetBeans installation which may misdirect the next NetBeans installation.
Next, I’m going to show you how and where to go to install the Apache NetBeans product, as at some point in time, NetBeans 9.0 will be finished transferring over from Oracle to Apache (just as was done with Open Office). I’m not sure when this will happen, probably sometime in 2018, but I cannot wait that long to release this book, so I am simply going to show you all of the different ways that you can get NetBeans 9.0. Note that if you wanted to use 8.2, on top of Java 8, this is fine as well, as the JavaFX 8 (and JavaFX 9) classes (API) have not changed. This is because the focus for Java 9 (and NetBeans 9) was just to introduce modules into the workflow and get the IDE working, so JavaFX was left alone and the focus was on the other parts of Java (as you’ll see, JavaFX is the Java multimedia/game engine).
Installing the Apache NetBeans 9 (Development) IDE
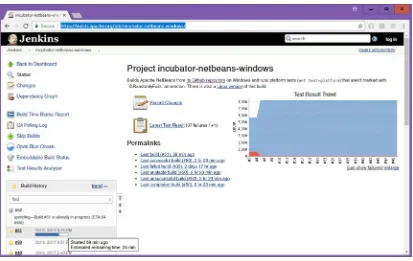
Next we are going to take a look at the Apache Jenkins and GIT Repository for NetBeans, which is where the software is going to “land” after the transfer currently underway is finished. The Apache Jenkins’ NetBeans site is located at https://builds.apache.org/job/incubator-netbeans-windows/ and is what is called an “incubator” site. An incubator is used to hatch eggs, so the inference here is that until a NetBeans 9 on Java 9 bundle is “hatched,” this is where you can get the NetBeans 9 IDE software while it is still under development. You can see what the Apache Jenkins website looks like at this time (there is a chance that this could change) in Figure 1-13. As you can see it has quite a few options.