UPDATE
04/16
KNOW-HOW HANDBOOK
UPDATE
04/16
KNOW-HOW HANDBOOK
UPDATE
04/16
KNOW-HOW HANDBOOK
UPDATE
04/16
KNOW-HOW HANDBOOK
5
5
5
M
a
ch
in
e M
a
in
te
n
a
n
UPDATE 04/16
KNOW-HOW HANDBOOK
UPDATE 04/16
KNOW-HOW HANDBOOK
5. MACHINE MAINTENANCE
5. MACHINE MAINTENANCE
D
I
S
P
L
A
Y
D
I
S
P
L
A
Y
Preventive maintenance encompasses planning and action necessary to identify and rectify deteriorating influences or conditions before they advance to the stage where the initiative is removed from preventive maintenance and placed in repair maintenance. Logic and experience clearly indicates that preventive maintenance, properly applied, reduces repair costs and increases production as a result of reduced downtime.
Please use the following handbook in order to keep all the machines in a good state and to avoid expensive breackdowns.
This button allows you to visualize/update the settings.During programming, it allows you to select a setting or confirm a value.
During programing, this button allows you to browse the setting codes where it increases in value. If pushed and then released, you can visualize the controlled section (LOC, SE2, ALL).
WELCOME
DISPLAY
SET
SET
Brief
During programming, this button allows you to browse the setting codes where it decreases in value.
If the button is continuously held for 3 seconds, manual-defrosting cycle shall begin.
This button turns the light on and off in the display cabinet.
UPDATE 04/16
KNOW-HOW HANDBOOK
UPDATE 04/16
KNOW-HOW HANDBOOK
5. MACHINE MAINTENANCE
5. MACHINE MAINTENANCE
D
I
S
P
L
A
Y
D
I
S
P
L
A
Y
VISUALIZATION OF THE CHOSEN MINIMUM TEMPERATURE
1
Push and release: you will see « LO » appear and the minimum temperature reached.
2
Push or wait 5 seconds to visualize the normal temperature.
1
Push and release: you will see « HI » appear and the maximum temperature reached.
2
Push or wait 5 seconds to visualize the normal temperature.
VISUALIZATION OF THE CHOSEN MAXIMUM TEMPERATURE
DELETING REGISTERED TEMPERATURES
2
Press on « SET » until « RST » flashes 3 times.
1
Visualize the maximum or minimal temperature by or
VISUALIZATION AND MODIFICATION OF A SETTING
2
Press or to update the value.
3
Press « SET » to save the new setting or wait 15 seconds to quit the program.
1
Press and immediately release SET to visualize the setting: the SET light will start to blink.
HOW TO MANUALLY START A DEFROSTING PROGRAM
2
Press « SET » to start the defrosting program.
1
Press on « DEF » for 3 seconds: « DF1 » will appear.
4
Press on « SET » to record the new value and move onto the following setting code.
MODIFICATION OF A SETTING’S VALUE
2
Select the required setting.
1
3
Access the program menu.
UPDATE 04/16
KNOW-HOW HANDBOOK
UPDATE 04/16
KNOW-HOW HANDBOOK
5. MACHINE MAINTENANCE
5. MACHINE MAINTENANCE
D
I
S
P
L
A
Y
D
I
S
P
L
A
Y
MAINTENANCE WHO FREQUENCY PRODUCTS
CLEANING GLASS SURFACES BOTH
INTERIOR & EXTERIOR
SHOP STAFF DAILY GLASS CLEANER,
PAPER TOWELS
CLEANING OTHER
EXTERIOR SURFACES SHOP STAFF DAILY
STAINLESS STEEL: GLASS CLEANER,
PAPER TOWELS WOOD: BLUE CLOTH,
WATER
CLEANING THE INTERIOR OF DISPLAY
CABINET
SHOP STAFF WEEKLY
DESINFECTENT ASODAL+, YELLOW
CLOTH, WATER
CLEANING THE
CONDENSER SKILLED OPERATOR MONTHLY
BRUSH/SMALL BRUSH, VACUUM
CLEANER
MAINTENANCE SCHEDULE
Cleaning the display
2
Remove the stainless steel pans, as well as the stainless steel support beams and the planks which are in the bottom of the display. Wash all of these elements with an antibacterial soap such as “ASODAL+” and leave it to work for 15 minutes.
3
Place these elements upright on kitchen roll and leave them to dry overnight.
1
After closing the shop and having stored the pans in the -13°C freezer, turn off the display.
Carry out a thorough clean of the display, once a week in winter, twice a week in summer and preferably at shop closure. The following morning, you should replace all parts in the display and clean any water stains which are still visible to the customer.
4
Pour very hot water and using a clean rag remove any traces of gelato from all the stainless steel parts of the display (make sure not to get any water on the fans or the probes).
5
Lift up the central element of the display and pick out, by hand, any pistachios or hazelnuts that may have got stuck and then wash this part down with hot water.
6
Spray with an antibacterial solution (ASODAL+), and scrub everywhere using a rag, then leave the product to work 15 minutes.
7
Wipe off all traces of water from the parts visible to customers.
8
UPDATE 04/16
KNOW-HOW HANDBOOK
UPDATE 04/16
KNOW-HOW HANDBOOK
5. MACHINE MAINTENANCE
5. MACHINE MAINTENANCE
R
E
F
R
I
G
E
R
A
T
E
D
C
A
B
I
N
E
T
S
R
E
F
R
I
G
E
R
A
T
E
D
C
A
B
I
N
E
T
S
2
Remove all dust and dirt on the fins of condenser fan using a brush or a paintbrush and a vacuum cleaner.
1
Turn the display off and disconnect it from the power supply. Remove the posterior metal grill.
The cleaning of the condenser must be carried out by an expert and qualified operator. The deposit of dust and dirt on the fins of the condenser fan reduces its efficiency and can cause damage, so it is essential that it be cleaned periodically as follows:
Do not clean the condenser with any hard or metal objects, as they could damage it.
REFRIGERATED CABINETS
2
Using a yellow cloth and the disinfectant ASODAL+, carefully clean the walls, shelves and seals of the fridge (action time fro the disinfectant is 15 minutes).
3
Rinse thoroughly with a wet yellow cloth. Then dry all internal parts of the fridge with paper towels. Note the date when cleaned on the technical data sheet.
1
Turn the fridge off and remove any products stored within. Leave the door open for 10 minutes.
MONTHLY CLEANING PROCEDURE CLEANING THE CONDENSER
• Clean the condenser, using the appropriate equipment, such as vacuum cleaners, or supple brushes (skilled operator).
• Check that the door seal is perfectly intact, and, if necessary, replace it. • Check that the electrical connections are not loose.
UPDATE 04/16
KNOW-HOW HANDBOOK
UPDATE 04/16
KNOW-HOW HANDBOOK
5. MACHINE MAINTENANCE
5. MACHINE MAINTENANCE
W
A daily cleaning (every night) of all removable parts as well as a thorough clean (a complete dismantling of the machine) every two weeks are essential.
During the day, if there is a time lapse of more than hour between the servings of chantilly cream, unscrew the decorative nozzle and rinse with water to remove all traces of chantilly that may have stayed inside so to avoid serving any chantilly cream that may have gone off.
CLEANING PROCEDURE ONCE EVERY 3 DAYS
You should note both the date when you make the whipped cream and the date when the machine is cleaned on the “Traceability of Whipped Cream” record sheet (see use by date: 3 days).
5
Unscrew the decorative nozzle, the plunger and the air regulator (top + base) and let them soak overnight in cold water with ASODAL+. Rinse thoroughly in cold water before putting them back on the machine.
2
Press on the cleaning button, which is found under the machine (the cold shall be cut off for 10 minutes once the green light starts to blink).
MANUAL BUTTON: press this button to start and stop the machine. Use when adding as a supplement of chantilly cream to drinks.
1
Before cleaning, pour any cream from the machine’s tub into another container and place it in the positive fridge (Best before date - 3 days) and then rinse the tub out.
3
Fill the machine tub with about 1,5 L of cold water to which add 35ml of ASODAL+ (=2 dessert spoons) and press the interval button (the machine will automatically run the water in 8 intervals).
Rinse with cold water, again by using the same button for sequential running of water.
4
WHIPPED CREAM MACHINE
CONTINUOUS BUTTON: One push and pump starts automatically and once pushed again the pump will stop (maximum duration of 3 minutes).
TEMPERATURE: red = too warm
green = ok
(blinks during cleaning)
yellow = too cold
PORTIONS:
first button = approx. 18 g, used for the supplement to crêpes and waffles
second button = approx. 30 g
third button = approx. 40 g, used for the supplement to gelato
fourth button = approx. 60 g,
6
UPDATE 04/16
KNOW-HOW HANDBOOK
UPDATE 04/16
KNOW-HOW HANDBOOK
5. MACHINE MAINTENANCE
5. MACHINE MAINTENANCE
W
A
F
F
L
E
M
A
C
H
I
N
E
W
A
F
F
L
E
M
A
C
H
I
N
E
WAFFLE MACHINE KRAMPOUZ
1
Plug in the waffle iron, open it and set the thermostat to 300°C. Leave it to heat for about 30 minutes. Then set the thermostat to 270°C and wait for about 5 minutes to allow the temperature to come down.
2
Using a brush, carefully apply a fine coat of frying oil to all the blocks and in the bottom of the grooves. Do not leave any excess oil in the bottom of the grooves (if necessary use a dry brush to ensure even application.)
3
Leave this first layer to cook through thoroughly for 10 minutes.
For a first seasoning
Before being used for the first time, the waffle iron must be seasoned. We recommend that you proceed as follows:
4
Then apply a second layer in the same way. Wait another 10 minutes then turn off the waffle iron.
1
Turn the iron on and set the temperature to 300°C.
2
Using a wire brush vigorously scrub the grills: the harder one will allow you to scrub clean the grills of the machine while the brush with the longer wires will help you clean the bottom of the grills.
3
Using a soft brush, get rid of any black dust.
Clean the machine once a week.
4
Make a cleaning batter: mix two large cups of water with one extra large cup of flour. Whisk together and then pour the whole batter over the surface of the grills and close the waffle iron.
5
After about 10 minutes, a “waffle” will have formed. Remove it and then using the wire brush, clean any leftover batter from the grills, finishing again with the soft brush.
6
Lower the temperature of the waffle iron to 200°C and once the temperature has lowered, lightly oil the grills with a silicone brush dipped in vegetable oil.
7
UPDATE 04/16
KNOW-HOW HANDBOOK
UPDATE 04/16
KNOW-HOW HANDBOOK
5. MACHINE MAINTENANCE
5. MACHINE MAINTENANCE
C
R
E
P
E
M
A
C
H
I
N
E
C
R
E
P
E
M
A
C
H
I
N
E
1
Plug the power supply cable - Switch on the appliance.
1
Before cleaning your
machine, unplug it and let the griddle cool down.
2
Heat the appliance in heated to 270°C. Your appliance reaches the required temperature when the orange indicator light goes out. Keep the appliance at this temperature for the duration of seasoning.
2
Using an abrasive stone vigorously scrub the griddle in circle.
3
Pour the equivalent of a tablespoon of cooking of frying oil into the centre of the griddle. Using a wiper pads ATG1 or ATG5 Krampouz spread this oil evenly, and then let it cook for 5 to 10 minutes so that the griddle becomes burnished and completely dry.
3
Using a wet sponge, get rid of any black dust.
4
Repeat previous operation eight times, decreasing the amount of oil used each time, but carefully respecting the 5 to 10 minutes cooking time for each layer of oil.
4
Using a wiper pads ATG1 or ATG5 Krampouz spread slightly some frying oil on the top of the griddle.
5
Register the date of cleaning in the form.
CREPE MACHINE KRAMPOUZ
LAVAZZA COFFEE MACHINE
For a first seasoning:
Clean the machine once a week:
Every day, we recommend to keep the overall cleanliness of the machine, empty the percolators of any capsules and clean all stainless steel parts (grid, etc.). Wipe with a cloth and purge the steam nozzle after each use. Ensure the cleanliness of the bar and the area fitness drinks (no spilled milk, splashes, etc.).
UPDATE 04/16
KNOW-HOW HANDBOOK
UPDATE 04/16
KNOW-HOW HANDBOOK
5. MACHINE MAINTENANCE
5. MACHINE MAINTENANCE
A
E
R
O
C
C
I
N
O
A
E
R
O
C
C
I
N
O
AEROCCINO
1
Remove the device from the base and detach the mixer.
2
During the day, rinse the cup and the coffee maker with water, at the end of the day fill it with antibacterial solution diluted with cold water (3%) and leave it all night long.
WARNING: never wash the Aeroccino in the dishwasher.
3
To avoid losing the two mixers, we advise you to clip one into the lid and the second in the milk jug.
Clean the machine every day:
HAMILTON BEACH FRAPPÈ
1
During the day, rinse the cup and the agitator with water.
2
At the end of the day fill the stainless steel cup with antibacterial solution diluted with cold water (3%) and soak the agitator in it during the night.
3
Two parts must be cleaned and desinfected every day : the stainless still cup guide that is removable and the upper part of the machine.
Clean the machine every day:
CHOCOLATE FOUTAIN
1
Turn the machine off and remove the bowl from the base (you will have to turn the central blade anti-clockwise slightly to do this). Throw any remaining chocolate away.
2
Remove the lid, the central blade and drip tray and dismantle the tap.
3
Wash the bowl and the
dismantled parts with hot water and liquid soap if necessary.
Clean the machine every day:
4
Once all traces of chocolate have been removed, soak all the parts in an antibacterial solution (ASODAL+ diluted with cold water (3%)).
5
Leave to soak for the appropriate time: if you are using ASODAL +, 5 minutes for antibacterial removal, 15 minutes for a bacterial and fungicide removal. Thoroughly rinse and dry.
6
UPDATE 04/16
KNOW-HOW HANDBOOK
UPDATE 04/16
KNOW-HOW HANDBOOK
5. MACHINE MAINTENANCE
5. MACHINE MAINTENANCE
G
R
A
N
I
T
E
M
A
C
H
I
N
E
G
R
A
N
I
T
E
M
A
C
H
I
N
E
GRANITE MACHINE
AUDIADIS MUSIC
1
Plug the Eternet cable coming from you ADSL router.
2
Plug the audio jack cable coming from your sound system.
3
Insert the big USB connector in the Belkin USB supply, than plug this one to the electricity. Music device starting instructions:
4
Insert the small USB connector in the Raspberry Pi. Wait 20’’ until music starts.
1
Empty the machine.
2
Remove the covers.
3
Disable the cold function. Maintenance
Clean the machine before each time you refill or at least every 3 days.
4
Fill the two bowls with water.
5
Empty the bowls by opening the taps. Move the left lever to the right to lock the valve(s) in an open position. Turn the machine off and unplug it.
6
Remove the cylinder nut.
7
Remove the lever cover by pressing on PUSH and pushing downwards.
8
Turn the plastic nut anti-clockwise and remove the tap.
9
Open the brackets and remove the bowls and horizontal blade.
10
Unscrew the nut to remove the vertical blade.
Submerge the dismantled pieces into a water and antibacterial solution.
11
Clean the stainless steel tub with an antibacterial solution for use with food contact like ASODAL+ (30ml of product diluted in a litre of water and leave to soak for 15 minutes).
12
13
UPDATE 04/16
KNOW-HOW HANDBOOK
UPDATE 04/16
KNOW-HOW HANDBOOK
5. MACHINE MAINTENANCE
5. MACHINE MAINTENANCE
A
I
R
A
N
D
B
A
L
A
N
C
E
A
I
R
A
N
D
B
A
L
A
N
C
E
AIR CONDITIONER
BALANCE
1
The most important maintenance task that will ensure the efficiency of your air conditioner is to routinely replace or clean its filters. Clogged, dirty filters block normal airflow and reduce a system's efficiency significantly. Replacing a dirty, clogged filter with a clean one can lower your air conditioner's energy consumption by 5% to 15%. Clean or replace your air conditioning system's filter or filters every month during the cooling season.
1
Before using the balance, be sure to recharge the battery for at least 8 hours.
4
Do not leave weight on the shelf for too long.
2
Check your evaporator coil every year and clean it as necessary.
2
Make sure also to recharge the battery if the balance has not been used for a substantial period (greater than one month). Fully charge the battery requires from 8 to 10 hours.
5
Maintain the balance away from the high temperatures and moisture, don’t submit to shocks or vibrations.
3
Occasionally pass a stiff wire through the unit's drain channels. Clogged drain channels prevent a unit from reducing humidity, and the resulting excess moisture may discolor walls or carpet.
3
Be sure to set up the board before turning on the balance.
6
Always make sure that the balance is used on a flat surface.
Maintenance
Moisture, dirt or dust are the principal causes of electrical breakdown.
Safe usage instruction
Maintenance
UPDATE 04/16
KNOW-HOW HANDBOOK
UPDATE 04/16
KNOW-HOW HANDBOOK
5. MACHINE MAINTENANCE
5. MACHINE MAINTENANCE
F
U
R
N
I
T
U
R
E
F
U
R
N
I
T
U
R
E
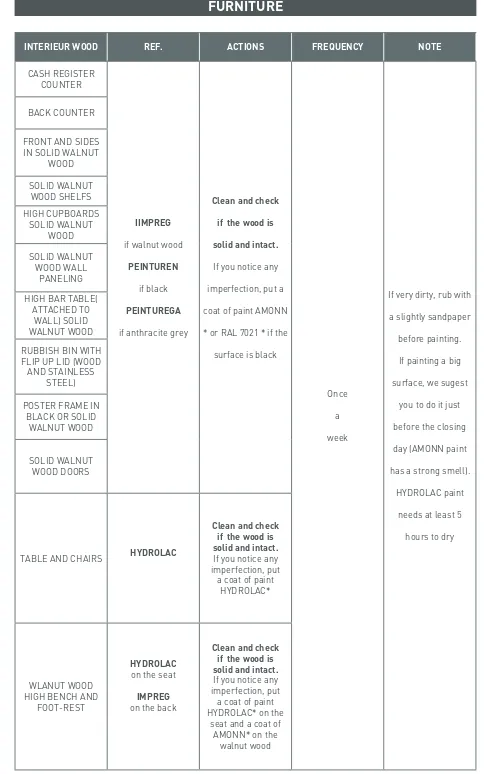
FURNITURE
INTERIEUR WOOD REF. ACTIONS FREQUENCY NOTE
CASH REGISTER COUNTER
IIMPREG
if walnut wood
PEINTUREN
if black
PEINTUREGA
if anthracite grey
Clean and check
if the wood is
solid and intact.
If you notice any
imperfection, put a
coat of paint AMONN
* or RAL 7021 * if the
surface is black
Once
a
week
If very dirty, rub with
a slightly sandpaper
before painting.
If painting a big
surface, we sugest
you to do it just
before the closing
day (AMONN paint
has a strong smell).
HYDROLAC paint
needs at least 5
hours to dry BACK COUNTER
FRONT AND SIDES IN SOLID WALNUT
WOOD
SOLID WALNUT WOOD SHELFS
HIGH CUPBOARDS SOLID WALNUT
WOOD
SOLID WALNUT WOOD WALL
PANELING
HIGH BAR TABLE( ATTACHED TO
WALL) SOLID WALNUT WOOD
RUBBISH BIN WITH FLIP UP LID (WOOD AND STAINLESS
STEEL)
POSTER FRAME IN BLACK OR SOLID
WALNUT WOOD
SOLID WALNUT WOOD DOORS
TABLE AND CHAIRS HYDROLAC
Clean and check if the wood is solid and intact.
If you notice any imperfection, put
a coat of paint HYDROLAC*
WLANUT WOOD HIGH BENCH AND
FOOT-REST
HYDROLAC
on the seat
IMPREG
on the back
Clean and check if the wood is solid and intact.
If you notice any imperfection, put
a coat of paint HYDROLAC* on the
seat and a coat of AMONN* on the
UPDATE 04/16
KNOW-HOW HANDBOOK
UPDATE 04/16
KNOW-HOW HANDBOOK
5. MACHINE MAINTENANCE
5. MACHINE MAINTENANCE
F
EXTERNAL WOOD REF. ACTIONS FREQUENCY NOTE
EASEL
PEINTUREN
if black
HYDROLAC
if walnut wood
Clean and check if the wood is solid and intact.
If you notice any imperfection, put 2
coats of paint RAL 7021* or 2 coats of paint HYDROLAC* if
natural wood Twice a month
If the shop is near the seaside, repaint it once a year, if not once every 2 years POSTER FRAME IN
BLACK OR SOLID WALNUT WOOD
EXTERIOR GLASS DOOR, BLACK, IN GLASS AND WOOD
5MM+5MM
FACADE
PEINTUREXT
Clean and check if the wood is
solid and intact.
If you notice any imperfection, put 2 coats of paint KEIM
PALETTE 9263* LIGHT BOX FOR LED
SIGN
ACCESORIES ACTIONS FREQUENCY NOTE
STAINLESS STEEL SINK Clean Once a day
MIXING FAUCET FOR THE TAP
Read the supplier maintenance notice
Read the supplier maintenance notice
UNDER COUNTER REFRIGERATOR –
POSITIVE COLD
Clean the tank inside the refrigerator and the door
seals and drawers
Once a month
Once a year, remove the grills and drawers and
thoroughly clean the inside and outside of the
refrigerator
COMPRESSOR Remove dust from
compressors Once a year
PLYWOOD PLATFORM WITH TILES 80X100CM IN NON-SLIP RUBBER
IMITATION SLATE
Clean Once a day
DOOR FRAME VERTICAL ANGLE PROTECTOR
Clean and check the paint is intact.
If you notice any imperfection, put a coat of
paint RAL 7021*
Once a week
REFRIGERATED DESSERT DISPLAY CASE, SOLID
WALNUT WOOD
Read the supplier maintenance notice
Read the supplier maintenance notice
SOFA COVERED IN SKY MATERIAL
Clean with a wet mop If spot, clean as soon as possible POUFFE COVERED IN SKY
MATERIAL
CHAIR COVERED IN SKY MATERIAL
UPDATE
04/16
KNOW-HOW HANDBOOK
UPDATE
04/16