Build exactly the skills you need.
Learn at the pace you want.
Microsoft
Access 2013
®®
Joyce Cox and Joan Lambert
Practice files plus ebookPUBLISHED BY Microsoft Press
A Division of Microsoft Corporation One Microsoft Way
Redmond, Washington 98052-6399
Copyright © 2013 by Joyce Cox and Joan Lambert
All rights reserved. No part of the contents of this book may be reproduced or transmitted in any form or by any means without the written permission of the publisher.
Library of Congress Control Number: 2013931601 ISBN: 978-0-7356-6908-6
Printed and bound in the United States of America. First Printing
Microsoft Press books are available through booksellers and distributors worldwide. If you need support related to this book, email Microsoft Press Book Support at [email protected]. Please tell us what you think of this book at http://www.microsoft.com/learning/booksurvey.
Microsoft and the trademarks listed at http://www.microsoft.com/about/legal/en/us/IntellectualProperty/ Trademarks/EN-US.aspx are trademarks of the Microsoft group of companies. All other marks are property of their respective owners.
The example companies, organizations, products, domain names, email addresses, logos, people, places, and
events depicted herein are fictitious. No association with any real company, organization, product, domain name,
email address, logo, person, place, or event is intended or should be inferred.
This book expresses the author’s views and opinions. The information contained in this book is provided without any express, statutory, or implied warranties. Neither the authors, Microsoft Corporation, nor its resellers, or distributors will be held liable for any damages caused or alleged to be caused either directly or indirectly by this book.
Acquisitions Editor: Rosemary Caperton
Editorial Production: Online Training Solutions, Inc.
Technical Reviewer: Rob Carr
Copyeditor: Jaime Odell
Indexer: Joyce Cox
Exploring reports . . . .43
Previewing and printing database objects. . . .46
Key points . . . .51
2
Create databases and simple tables
53
Creating databases from templates . . . .54Sidebar: Getting started with Access web apps . . . 61
Creating databases and tables manually . . . 64
Sidebar: Database design . . . 73
Manipulating table columns and rows . . . .74
Refining table structure. . . .77
Defining relationships between tables. . . .83
Key points . . . .89
3
Create simple forms
91
Creating forms by using the Form tool . . . .92Formatting forms . . . .98
Arranging the layout of forms . . . .107
Key points . . . .113
4
Display data
115
Sorting information in tables . . . .116Sidebar: How Access sorts . . . 120
Filtering information in tables . . . 121
Filtering information by using forms. . . 125
Sidebar: Wildcards . . . 129
Locating information that matches multiple criteria . . . 129
Sidebar: Saving filters as queries. . . 133
Contents v
5
Create simple reports
135
Creating reports by using a wizard . . . 136Modifying report design. . . .142
Previewing and printing reports . . . 150
Key points . . . 154
PART 2
Relational database techniques
6
Maintain data integrity
157
Specifying the type of data . . . 158Setting the field size . . . .163
Restricting the format of data . . . .165
Sidebar: Creating custom formats. . . 172
Validating the data. . . .173
Sidebar: Simple validation rules. . . 176
Allowing only values in lists . . . 183
Sidebar: Multicolumn lookup lists . . . 188
Allowing only values in other tables . . . 188
Sidebar: Multivalued fields. . . 194
Key points . . . .195
7
Create queries
197
Creating queries by using a wizard . . . 198Creating queries manually . . . 203
Summarizing data by using queries . . . 208
Calculating by using queries. . . 212
Updating records by using queries . . . .218
Deleting records by using queries. . . 222
8
Create custom forms
227
Modifying forms created by using a wizard . . . 228
Sidebar: Different types of forms . . . 230
Adding controls . . . .237
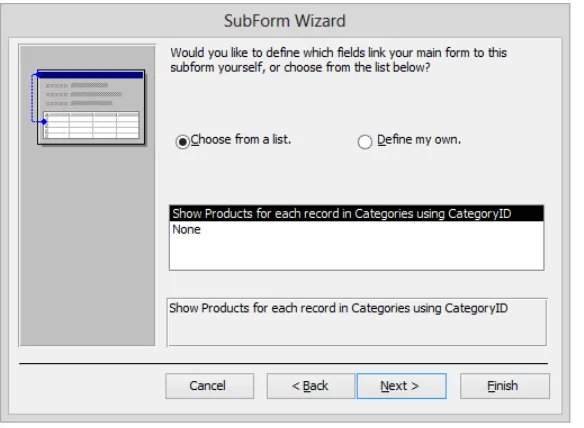
Displaying subforms . . . .245
Sidebar: Selecting fields for main forms and subforms. . . 245
Key points . . . .253
9
Create custom reports
255
Creating reports manually . . . .256Sidebar: Adding hyperlinks, charts, and buttons . . . 258
Modifying report content. . . .262
Sidebar: Layouts . . . 264
Adding subreports . . . .270
Key points . . . .276
PART 3
Database management and security
10
Import and export data
279
Importing information. . . 280Importing from other Access databases . . . 281
Importing from Excel worksheets . . . 282
Importing from text files. . . 282
Importing from other database programs . . . 283
Importing from Outlook folders . . . 283
Importing from SharePoint lists. . . 283
Importing from .html files . . . 285
Importing from .xml files . . . 286
Contents vii
11
Make databases user friendly
311
Designing navigation forms . . . .312Creating custom categories . . . .319
Controlling which features are available . . . .323
Key points . . . .327
12
Protect databases
329
Assigning passwords to databases . . . 330Contents ix
Index . . . 405
About the authors . . . 427
How to download your ebook . . . 431
Introduction xi
Introduction
Over the years, Microsoft has put a lot of effort into making Access not only one of the most powerful consumer database programs available, but also one of the easiest to learn
and use. Because Access is part of Microsoft Office 2013, you can use many of the tech -niques you use with Microsoft Word and Microsoft Excel. For example, you can use familiar commands, buttons, and keyboard shortcuts to open and edit the information in Access tables. And you can easily share information between Access and Word, Excel, or other
Office programs. Microsoft Access 2013 Step by Step offers a comprehensive look at the features of Access that most people will use most frequently.
Who this book is for
Microsoft Access 2013 Step by Step and other books in the Step by Step series are designed for beginning-level to intermediate-level computer users. If part of your job involves enter-ing data in or producenter-ing reports from a database designed by someone else, this book will help you understand the behind-the-scenes functionality of the database. If you are tasked with the maintenance of an existing database, you will learn important techniques for ensuring data integrity. Although we don’t cover the macro and VBA functionality that enables experienced developers to create full-featured database applications, we do touch on more advanced topics such as controlling access and preventing problems.
Examples shown in the book generally pertain to small and medium businesses but teach skills that can be used in organizations of any size. The databases you create and work with are desktop databases, designed to be used in Access 2013 on a local computer. Access 2013 has powerful new capabilities to enable more advanced users to create applications, called Access web apps, that are stored as SQL databases on a Microsoft SharePoint 2013 site and can be viewed and manipulated through a web browser. Because of the
behind-the-scenes requirements of these databases, we briefly describe them but don’t cover them
in depth.
Whether you are already comfortable working in Access and want to learn about new fea-tures in Access 2013 or are new to Access, this book provides invaluable hands-on
How this book is organized
This book is divided into three parts. Part 1 explains how to get data into a database, either directly by entering it into tables or indirectly by using forms; and how to get information out of a database, either by displaying it on the screen or by printing it in reports. Part 2 discusses ways to ensure that the data in related tables is accurate, how to use queries to extract data from related tables, and how to create forms and reports that use related tables. Part 3 covers more advanced Access techniques, including securing the database
and customizing the program to fit the way you work. With this three-part structure, read -ers who are new to the program can acquire basic skills and then build on them, whereas readers who are comfortable with Access 2013 basics can focus on material that is of the most interest to them.
Chapter 1 contains introductory information that will primarily be of interest to readers who are new to Access or are upgrading from Access 2003 or an earlier version. If you have worked with a more recent version of Access, you might want to skip directly to Chapter 2.
This book has been designed to lead you step by step through all the tasks a beginning-level or intermediate-beginning-level user is most likely to want to perform with Access 2013. If you start at the beginning and work your way through all the exercises, you will gain enough
proficiency to be able to create simple databases and work with more complex databases
created by experts. However, each chapter is self-contained, so you can jump in anywhere to acquire exactly the skills you need.
Download the practice files
Before you can complete the exercises in this book, you need to download the book’s
prac-tice files to your computer. These pracprac-tice files can be downloaded from the following page:
http://aka.ms/Access2013sbs/files
Introduction xiii
The following table lists the practice files for this book.
Chapter File
Chapter 1: Explore Microsoft Access 2013 GardenCompany01.accdb Chapter 2: Create databases and simple tables None
Chapter 3: Create simple forms GardenCompany03.accdb Logo.png
Chapter 4: Display data GardenCompany04.accdb Chapter 5: Create simple reports GardenCompany05.accdb Chapter 6: Maintain data integrity GardenCompany06.accdb Chapter 7: Create queries GardenCompany07.accdb Chapter 8: Create custom forms GardenCompany08.accdb
Hydrangeas.jpg
Chapter 9: Create custom reports GardenCompany09.accdb Chapter 10: Import and export data Customers.xlsx
Employees.txt
GardenCompany10.accdb ProductsAndSuppliers.accdb Shippers.xlsx
Chapter 11: Make databases user friendly GardenCompany11.accdb Icon.ico
Logo.png
Chapter 12: Protect databases GardenCompany12.accdb
Chapter 13: Work in Access more efficiently GardenCompany13.accdb
If you would like to be able to refer to the completed versions of practice files at a later time, save the modified practice files at the end of each exercise. If you might want to repeat the exercises, save the modified practice files with a different name or in a different
Your companion ebook
With the ebook edition of this book, you can do the following:
▪
Search the full text▪
Print▪
Copy and pasteTo download your ebook, please see the instruction page at the back of the book.
Get support and give feedback
The following sections provide information about getting help with this book and contact-ing us to provide feedback or report errors.
Errata
We’ve made every effort to ensure the accuracy of this book and its companion content. Any errors that have been reported since this book was published are listed on our
Microsoft Press site at oreilly.com, which you can find at:
http://aka.ms/Access2013sbs/errata
If you find an error that is not already listed, you can report it to us through the same page.
If you need additional support, email Microsoft Press Book Support at [email protected].
Introduction xv
We want to hear from you
At Microsoft Press, your satisfaction is our top priority, and your feedback our most valuable asset. Please tell us what you think of this book at:
http://www.microsoft.com/learning/booksurvey
The survey is short, and we read every one of your comments and ideas. Thanks in advance for your input!
Stay in touch
Simple database
techniques
1 Explore Microsoft Access 2013
3
2 Create databases and simple tables
53
3 Create simple forms
91
4 Display data
115
Chapter at a glance
Tables
Explore tables, page 28Queries
Explore queries, page 38Forms
Explore forms, page 331
3
Explore Microsoft
Access 2013
IN THIS CHAPTER, YOU WILL LEARN HOW TO
▪
Identify new features of Access 2013.▪
Work in the Access 2013 user interface.▪
Understand database concepts.▪
Explore tables, forms, queries, and reports.▪
Preview and print database objects.This chapter introduces Microsoft Access 2013 and is designed to serve different purposes for different readers, depending on prior knowledge of this program and other Microsoft
Office 2013 programs.
▪
If you are a beginning Access user, you might want to skip the lists of new features and start with “Working in the Access 2013 user interface.”▪
If you have used other Office 2007 or Office 2010 programs but have not worked withAccess before, you might want to skip down to “Understanding database concepts.”
▪
If you have upgraded to Access 2013 from Access 2003, you might want to read as far as the end of “Working in the Access 2013 user interface” and then skip to Chapter 2, “Create databases and simple tables.”▪
If you have upgraded to Access 2013 from Access 2007 or Access 2010, you might be interested in the new features that have been introduced in this version of the program, but you might not need to work through the exercises in the rest of this chapter.Throughout this book, you’ll be working with databases that contain information about the
employees, products, suppliers, and customers of a fictional company. As you complete the
In this chapter, you’ll get an overview of the new features in recent versions of Access to help you identify changes if you’re upgrading from a previous version. You’ll explore the program’s user interface, and the concepts and structure of data storage in Access. Then you’ll look at database objects such as tables, forms, queries, and reports, while learning about Access features and functionality that you’ll explore in more depth in later chapters. Finally, you’ll preview and print database objects.
PRACTICE FILES To complete the exercises in this chapter, you need the practice file
contained in the Chapter01 practice file folder. For more information, see “Download the practice files” in this book’s Introduction.
Identifying new features of Access 2013
Access 2013 builds on previous versions to provide powerful tools for all your database needs. If you’re upgrading to Access 2013 from a previous version, you’re probably most interested in the differences between the old and new versions and how they will affectyou, and you probably want to find out about them in the quickest possible way. The fol -lowing sections list new features you will want to be aware of, depending on the version of
Access you are upgrading from. Start with the first section and work down to your previous
version to get the complete picture.
If you are upgrading from Access 2010
If you have been using Access 2010, you might be wondering how Microsoft could have improved on what seemed like a pretty comprehensive set of features and tools. The new features introduced between Access 2010 and Access 2013 include the following:
Identifying new features of Access 2013 5
1
▪
Windows 8 functionality Access 2013, like all Office 2013 programs, is a full-featured Windows 8 application. When it is running on the Windows 8 operating system, it not only has the sleek new Windows 8 look but it also incorporates the latest touch tech-nologies designed for tablet and mobile devices.▪
Starting screen Access opens to a screen that provides easy access to new database templates, the databases you recently worked on, and locations where existing data-bases might be stored.▪
Cloud access When you connect your Office or Access installation to a Microsoftaccount (formerly known as a Windows Live account) or a Microsoft Office 365
account, you have the option of saving desktop databases “in the cloud” to a SharePoint document library or a Microsoft SkyDrive site, so that it is available when you are not at your desk.
If you are upgrading from Access 2007
In addition to the features listed in the previous section, if you’re upgrading from Access 2007, you’ll want to take note of the following features that were introduced in Access 2010:
▪
The Backstage view All the tools you need to work with your database files, as op -posed to their content, are accessible from one location. You display the Backstageview by clicking the File tab, which replaces the Microsoft Office Button at the left
end of the ribbon.
▪
Customizable ribbon Create your own tabs and groups to suit the way you work.▪
Unifying themes Add pizzazz to database objects such as forms and reports by applying a professional-looking theme from a gallery of options.▪
Web databases With Access 2010, companies with employees and clients in differ-ent geographic locations can make their databases accessible over the Internet in a web browser. (This technology is still available in Access 2013, but it has been super-seded by Access web apps. An Access 2010 web database cannot be converted to an Access web app.)▪
New database templates Creating common types of databases is easier when you start with a template. The database templates that come with Access are supple-mented by those made available by a community of database developers throughthe Office website.
▪
Application parts Add predefined database objects to an existing database. In ad -dition to various types of forms, several Quick Start parts are available. For example, adding the Contacts part adds one table and associated queries, forms, and reports.▪
Enhanced Layout view and layout controls It is easy to make design changes in Layout view while viewing the underlying data.▪
Enhanced Expression Builder The layout of the Expression Builder dialog box hasbeen refined to make building an expression more intuitive. In addition, a feature
called IntelliSense has been incorporated to display options based on what you enter and to provide syntax guidance.
▪
Improved conditional formatting You can use data bars to add at-a-glance insightinto the data in Number fields.
▪
Ability to export to PDF and XPS files When you want to make a report or other database object available to people but don’t want them to be able to manipulate it,export the object in either PDF or XPS format. You can optimize the file size for print -ing or publish-ing online.
If you are upgrading from Access 2003
In addition to the features listed in the previous sections, if you’re upgrading from Access 2003, you’ll want to take note of the following features that were introduced in Access 2007:
▪
The ribbon The user interface organizes the most common commands for any data-base object into tabs and groups so that the appropriate commands are immediately accessible for the current object.▪
Quick Access Toolbar Customize a portion of the toolbar to include commands you regularly use, regardless of which object is currently active.Identifying new features of Access 2013 7
1
▪
View Shortcuts toolbar This context-sensitive toolbar in the lower-right corner of the program window provides single-click switching among the supported views of the current database object.▪
Tabbed documents Open multiple database objects and switch between them quickly by clicking tabs on a tab bar.▪
Template library Quickly locate and download professionally designed templates for common database projects.▪
Improved sorting and filtering Easily sort all records in a table based on one ormore fields, or filter a table or form to display or hide records matching multiple
criteria.
▪
Layout view Redesign a form or report while viewing it.▪
Stacked and Tabular layouts Group controls in a form or report layout so that you can easily manipulate the entire group as one unit.▪
Automatic calendar The Date/Time data type includes an optional calendar control. Click the calendar, and select the date you want.▪
Rich Text Memo fields support most common formatting options, including fonts, color, and character formatting. The formatting is stored with the database.▪
Create tab Quickly create a new table, form, query, report, macro, SharePoint list, or other Access object.▪
Totals function Add a totals row to a query, and select from a list of formulas to automatically calculate aggregate values for forms and reports.▪
Field List Drag and drop fields from one or more related or unrelated tables onto your active table.▪
Attachment data type Attach photos and other files to a database record.▪
Embedded macros Macros embedded in a form or report offer a higher level of security in database applications.▪
Improved information sharing Easily import and export data between Access andother Office applications or .xml, .html, and .pdf files; create or link a database with
a SharePoint list; or publish your database to a SharePoint library and allow users to update and extract information.
▪
Improved report design Quickly create a professional-looking report, completewith logo, header, and footer; and use Report view, combined with filters, to browse
only selected records in the report.
▪
Group, Sort, and Total pane This feature makes it much easier to group and sort data in reports, and add totals from a drop-down list.▪
Enhanced security Adding password protection to a database causes Access to automatically encrypt the database when it closes, and decrypt it when it opens.Working in the Access 2013 user interface
The program we work with and depict in images throughout this book is a desktopinstalla-tion of Access 2013, installed from a DVD as part of the Office 2013 suite of programs. You might have installed Access 2013 as a freestanding program or as part of an Office 365 sub -scription that allows users to install the desktop programs from the Internet. Regardless of how you installed Access, the program has the same functionality and works the same way.
TIP Office 365 is a cloud-based solution that small, midsize, and enterprise businesses can use to provide a variety of products and services to their employees through a subscription licensing program.
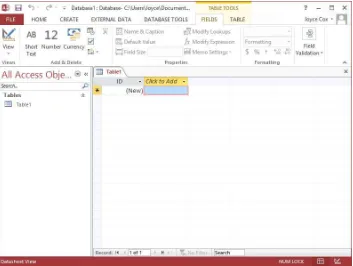
As with all programs in Office 2013, the most common way to start Access is from the Start screen (Windows 8) or the Start menu (Windows 7) displayed when you click at the left end of the Windows Taskbar. When you start Access without opening a database, the program’s starting screen appears. From this screen, you can create a new database or open an exist-ing one. Either way, the database is displayed in a program window that contains all the tools you need to create database objects and enter and manipulate data. The Access 2013
interface is designed to closely reflect the way people generally work with a database. If you are not familiar with this interface, which was first introduced with Access 2007, here is a
Working in the Access 2013 user interface 9
1
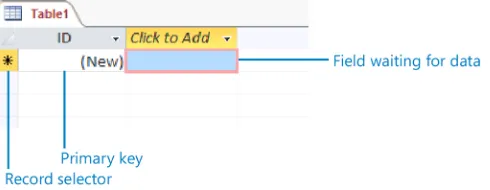
A new blank table displayed in the Access 2013 program window.
Identifying program window elements
The program window contains the following elements:
You can use the tools on the title bar to move and size the window, undo or redo changes, save the database, and get help with the program.
At the left end of the title bar is the program icon, which you click to display com-mands to restore, move, size, minimize, maximize, and close the program window.
To the right of the Access icon is the Quick Access Toolbar. By default, the Quick Access Toolbar displays the Save, Undo, and Redo buttons, but you can customize it to display any command you want.
TIP You might find that you work more efficiently if you organize the commands you use frequently on the Quick Access Toolbar and then display it below the ribbon, directly above the workspace. For information, see “Manipulating the Quick Access
Toolbar” in Chapter 13, “Work in Access more efficiently.”
At the right end of the title bar are four buttons: a Help button that opens the Access
Help window, in which you can use standard techniques to find information; and the
familiar Minimize, Maximize/Restore Down, and Close buttons.
SEE ALSO For information about the Access Help system, see the sidebar “Getting help with Access 2013” later in this chapter.
▪
Ribbon Below the title bar, all the commands for working with an Access databaseare represented as buttons in this central location so that you can work efficiently
with the program.
Working in the Access 2013 user interface 11
1
TIP If your ribbon appears as a row of tabs across the top of the workspace, click the Home tab to temporarily display that tab’s buttons so that you can follow along. We tell you how to control the display of the ribbon in a minute. Don’t be alarmed if your ribbon looks different from those shown in our screens. You might have installed programs that add their own tabs to the ribbon, or your screen settings might be different. For more information, see “Working with the ribbon” later in this topic.
Across the top of the ribbon is a set of tabs. Clicking a tab displays its associated set of commands.
Commands related to managing Access and Access databases (rather than their content) are gathered together in the Backstage view, which you display by clicking the colored File tab located at the left end of the ribbon. Commands available in the Backstage view are organized on pages, which you display by clicking the page tabs in the colored left pane. You redisplay the database and the ribbon by clicking the Back arrow located above the page tabs.
The Backstage view, where you can manage files and customize the program.
Commands related to working with database content are represented as buttons on the remaining tabs of the ribbon. When an object is selected in a database, one or more tool tabs might appear at the right end of the ribbon to make commands related
TIP Some older commands no longer appear as buttons on the ribbon but are still available in the program. You can make these commands available by adding them to the Quick Access Toolbar. For more information, see “Manipulating the Quick Access
Toolbar” in Chapter 13, “Work in Access more efficiently.”
On each tab, buttons representing commands are organized into named groups. You can point to any button to display a ScreenTip with the command name and its key-board shortcut (if it has one).
SEE ALSO For information about controlling the display and content of ScreenTips, see
“Changing default program options” in Chapter 13, “Work in Access more efficiently.”
Some buttons include an integrated or separate arrow. If a button and its arrow are
integrated, clicking the button displays options for refining the action of the button.
If the button and its arrow are separate, clicking the button carries out the default action indicated by the button’s current icon. You can change the default action by clicking the arrow and then clicking the action you want.
Related but less common commands are not represented as buttons in a group. Instead, they’re available in a dialog box or pane, which you display by clicking the dialog box launcher located in the lower-right corner of the group.
To the right of the ribbon group names is the Collapse The Ribbon button. Clicking this button hides the groups of commands but leaves the tab names visible. You can then click any tab name to temporarily display its commands. Clicking anywhere other than the ribbon hides the commands again. When the full ribbon is temporar-ily visible, you can click the Pin The Ribbon button (the pushpin) to the right of the group names to make the display permanent.
KEYBOARD SHORTCUT Press Ctrl+F1 to minimize or expand the ribbon. For a list of keyboard shortcuts, see “Keyboard shortcuts” at the end of this book.
▪
Navigation pane On the left side of the program window, the Navigation pane displays lists of database objects. By default, it displays all the objects in thedata-base by type of object, but you can filter the list by clicking the pane’s title bar and
Working in the Access 2013 user interface 13
1
Navigation pane is in your way, you can click the Shutter Bar Open/Close button in its upper-right corner to minimize it. To redisplay the Navigation pane, click the Shutter Bar Open/Close button again. You can drag the right border of the pane to the left or right to make it wider or narrower.
KEYBOARD SHORTCUT Press F11 to display or hide the Navigation pane.
▪
Status bar Across the bottom of the program window, this bar displays information about the current database and provides access to certain program functions. At the right end of the bar is the View Shortcuts toolbar, which provides convenient buttons for switching the view of the active database object.This status bar tells you the current view and the status of the keyboard.
The goal of all these user interface features is to make working in a database as intuitive as possible. Commands for tasks you perform often are readily available, and even those you
might use infrequently are easy to find.
Working with the ribbon
As with all Office 2013 programs, the Access ribbon is dynamic, meaning that as its width
changes, its buttons adapt to the available space. As a result, a button might be large or small, it might or might not have a label, or it might even be an entry in a list.
The width of the ribbon depends on the following three factors:
▪
Program window width Maximizing the program window provides the most space for the ribbon.▪
Screen resolution Screen resolution is the size of your screen display expressed as pixels wide × pixels high. The greater the screen resolution, the greater the amountof information that will fit on one screen. Your screen resolution options are depen -dent on your graphics adapter and monitor. Common screen resolutions range from
800 × 600 to 2560 × 1600. The greater the number of pixels wide (the first number),
To change your screen resolution:
1 Open the Screen Resolution control panel item by using one of the following methods:
▪
Right-click the Windows desktop, and then click Screen Resolution.▪
Click a blank area at the top of the Windows 8 Start screen, and enter screen resolution. Then in the Search pane, click Settings, and in theSettings results, click Adjust screen resolution.
▪
In Control Panel, open the Display control panel item, and then click Adjust Resolution. (If Control Panel is set to Category view, click Adjust screen resolution in the Appearance and Personalization category.)2 On the Screen Resolution page, click the Resolution arrow, click or drag to select the screen resolution you want, and then click Apply or OK.
Working in the Access 2013 user interface 15
1
▪
The magnification of your screen display If you change the screen magnification setting in Windows, text and user interface elements are larger and therefore morelegible, but fewer elements fit on the screen. You can set the magnification from 100
to 500 percent.
You can change the screen magnification from the Display control panel item, which
you can open from Control Panel or by using one of the following methods:
▪
Right-click the Windows desktop, click Personalize, and then in the lower-left corner of the Personalization page, click Display.▪
Enter display at the top of the Windows 8 Start screen, click Settings, and then click Display in the Settings results.To change the screen magnification to 125 or 150 percent, click that option on the
Display page.
To select another magnification, click the Custom Sizing Options link and then, in the Custom Sizing Options dialog box, click the magnification you want in the drop-down list or drag the ruler to change the magnification even more.
You can set the magnification as high as 500 percent by dragging the ruler in the Custom Sizing Options dialog box.
After you click OK in the Custom Sizing Options dialog box, the custom magnification
is shown on the Display page along with any warnings about possible problems with
Working in the Access 2013 user interface 17
1
Adapting exercise steps
The screen shots shown in this book were captured at a screen resolution of 1024 x
768, at 100-percent magnification. If your settings are different, the ribbon on your
screen might not look the same as the one shown in this book. As a result, exercise instructions that involve the ribbon might require a little adaptation.
Our instructions use this format:
▪
On the Home tab, in the Sort & Filter group, click the Ascending button. If the command is in a list, our instructions use this format:▪
On the Home tab, in the Records group, click the More button and then, in the list, click Hide Fields.If differences between your display settings and ours cause a button to appear differ-ently on your screen than it does in this book, you can easily adapt the steps to locate
the command. First click the specified tab, and then locate the specified group. If a
group has been collapsed into a group list or under a group button, click the list or button to display the group’s commands. If you can’t immediately identify the button you want, point to likely candidates to display their names in ScreenTips.
In this book, we provide instructions based on the traditional keyboard and mouse input methods. If you’re using Access on a touch-enabled device, you might be giving
In this exercise, you’ll start Access and explore the Backstage view and ribbon.
SET UP
You need the GardenCompany01 database located in the Chapter01 practice file folder to complete this exercise, but don’t open it yet. Just follow the steps.1
From the Start screen (Windows 8) or the Start menu (Windows 7), start Access 2013.2
On the Access starting page, at the bottom of the left pane, click Open Other Filesto display the Open page of the Backstage view.
TIP From the Backstage view, you manage your Access database files, but you don’t
work with the content of databases. For example, you can create a database, but not a database object. We’ll talk about the tasks you can perform in the Backstage view in other chapters of this book.
3
In the left pane of the Open page, click Computer, and in the right pane, click theBrowse button. Then in the Open dialog box, navigate to the Chapter01 practice
file folder, and double-click GardenCompany01 to open the database.
4
If a security warning appears, click Enable Content in the security warning bar.TIP Be sure to read the sidebar “Enabling macros and other active content” later in this chapter to learn about Access security options.
Let’s save the database so that you can explore it without fear of overwriting the
original practice file.
5
Click the File tab to display the Backstage view, and click Save As. Then with Save Database As selected in the left pane of the Save As page and Access DatabaseWorking in the Access 2013 user interface 19
1
6
In the Save As dialog box, save the database with a different name, such as MyGardenCompany01.TIP In this book, we assume you will save files in the practice file folders, but you
can save them wherever you want. When we refer to the practice file folders in the
instructions, simply substitute the save location you chose.
7
Click Enable Content in the security warning bar.On the left, the Navigation pane displays a list of all the objects in this database.
Spanning the top of the window, the ribbon includes five tabs: File, Home, Create,
External Data, and Database Tools. Because no database object is currently open, the Home tab is active by default, but none of its buttons are available.
TIP Databases created in Access 2013 use the file storage format introduced with
Access 2007, and their files have the .accdb extension. You can open database files
created in earlier versions of Access (which have an .mdb extension) in Access 2013. You can then either work with and save them in the old format or work with and save them in the new format. If you convert them, you can no longer open them in ver-sions prior to Access 2007. For more information about the ACCDB format, search for
accdb in Access Help.
8
In the Navigation pane title bar, click All Access Objects, and then in the Filter By Group area of the menu, click Tables to list only the tables in the Navigation pane.Buttons representing commands related to working with database content are organized on the Home tab in six groups: Views, Clipboard, Sort & Filter, Records, Find, and Text Formatting.
TIP By default, Access 2013 displays database objects on tabbed pages. If you want, you can display each object in a separate window instead. In the Access Options dia-log box, display the Current Database page, and then in the Application Options area, below Document Window Options, click Overlapping Windows. The window of each object has its own set of Minimize, Restore Down/Maximize, and Close buttons. You can move object windows by dragging their title bars, you can size them by dragging their frames, and you can arrange them by clicking the Switch Windows button in the Window group and selecting an option. (This group is added to the Home tab when you select Overlapping Windows in the Access Options dialog box.)
10
On the Home tab, click the Text Formatting dialog box launcher to open theWorking in the Access 2013 user interface 21
1
From the Datasheet Formatting dialog box, you can access settings not available as buttons in the Text Formatting group, such as Gridline Color and Border And Line Styles.
11
Close the Datasheet Formatting dialog box.12
Click the Create tab.Buttons representing commands related to creating database objects are organized on the Create tab in six groups: Templates, Tables, Queries, Forms, Reports, and Macros & Code.
13
Double-click the Create tab.14
Click the External Data tab to temporarily display the full ribbon, which drops down over the table.Buttons representing commands related to moving information between a database and other sources are organized on the External Data tab in three groups: Import & Link, Export, and Web Linked Lists.
15
Click anywhere in the open table, and notice that the ribbon disappears again.16
Double-click the Database Tools tab to permanently display the ribbon and activate that tab.Buttons representing commands related to managing, analyzing, and ensuring data reliability are organized on the Database Tools tab in six groups: Tools, Macro, Relationships, Analyze, Move Data, and Add-Ins.
Before we finish this exercise, let’s close first the active database object and then the database. (If you want to close the database and exit Access, click the Close button in the upper-right corner of the program window.)
17
At the right end of the bar where the page tab for the Categories table is displayed, click the Close button to close the table without closing the database.18
Display the Backstage view, and then click Close to close the database without exiting Access.TIP If you don’t close the active database before opening another one, Access prompts you to save your changes and closes the active database for you. You cannot have two data bases open simultaneously in a single instance of Access. If you want to have two data bases open at the same time, you must start a new instance of Access.
+
CLEAN UP
Retain your version of the GardenCompany01 database for use in laterWorking in the Access 2013 user interface 23
1
Getting help with Access 2013
Whenever you have a question about Access 2013 that is not answered by this book, your next recourse is the Access Help system. This system is a combination of tools
and information available from the Office website for reference when you are online, and basic information stored on your computer for reference when you are offline.
Online references can include articles, videos, and training tools.
To open the Access Help window and search for information:
1 Near the right end of the title bar, click the Microsoft Access Help button to open the Access Help window.
KEYBOARD SHORTCUT Press F1 to display the Access Help window.
TIP To switch between online and offline reference content, click the arrow to
the right of Access Help and then click Access Help From Office.com or Access
Help From Your Computer. You can print the information shown in the Help win-dow by clicking the Print button on the toolbar. You can change the font size of the topic by clicking the Use Large Text button on the toolbar to the left of the Search Help box.
2 In the search box, enter your search term, and then click the Search button (the magnifying glass) to display a list of related topics.
3 In the results list, click the topic you’re interested in to display its information.
4 Jump to related information by clicking any hyperlink identified by blue text.
TIP When section links appear at the beginning of an article, you can click a link to move directly to that section of the article. You can click the Top Of Page link at the end of an article to return to the beginning.
5 When you finish exploring, close the Access Help window by clicking the Close
Understanding database concepts
Simple databases store information in only one table. These simple databases are often called flat file databases, or just flat databases. More complex database programs, such as Access, store information in multiple related tables, thereby creating what are referred to as
relational databases. If the information in a relational database is organized correctly, you can treat these multiple tables as a single storage area and pull information electronically from different tables in whatever order meets your needs.
Tables are one of the types of database objects you work with in Access. Other types include forms, queries, reports, macros, and modules. Of these object types, only tables are used to store information. The others are used to enter, manage, manipulate, analyze, retrieve, or display the information stored in tables—in other words, to make the information as acces-sible and therefore as useful as posacces-sible.
In its most basic form, a database is the electronic equivalent of an organized list of infor-mation. Typically, this information has a common subject or purpose, such as the list of em-ployees shown in the following table.
ID First name Last name Title Hire date
1 Karen Berg Owner May 1, 2008
2 Kim Akers Head Buyer June 1, 2008 3 Tom O’Neill Assistant November 2, 2008 4 Naoki Sato Sales Manager August 14, 2009 5 Molly Dempsey Gardener October 17, 2009 6 Nancy Anderson Sales Rep May 1, 2010 7 Michael Entin Sales Rep April 1, 2011
8 Kari Furse Buyer May 3, 2011
Understanding database concepts 25
1
This list is arranged in a table of columns and rows.
▪
Each column represents a field—a specific type of information about an employee:last name, first name, hire date, and so on.
▪
Each row represents a record—all the information about a specific employee. If a database did nothing more than store information in a table, it would be no more use-ful than a paper list. But because the database stores information in an electronic format, you can manipulate the information in powerful ways to extend its usefulness.For example, suppose you want to find someone’s phone number. You can look up this
information in a phone book, because its information is organized for this purpose.
How-ever, if you want to find the phone number of your grandmother’s neighbor, a printed
phone book won’t do you much good, because it isn’t organized in a way that makes that
information easy to find.
Storing the information published in a phone book in a database, has the following advantages:
▪
It takes up far less space.▪
It costs less to reproduce and distribute.Enabling macros and other active content
Some databases contain macros and other active content that can run code on your computer. In most cases, the code is there to perform a database-related task, but hackers can also use macros to spread a virus to your computer. When you open a database that is not stored in a trusted location or signed by a trusted publisher, Access displays a security warning below the ribbon.
While the security warning is displayed, the active content in the database is disabled.
You can enable macros and other active content in three ways:
▪
By enabling the macros for use in the current database session.▪
By adding the database publisher to the list of trusted publishers. This option is available only if the publisher’s digital signature is attached to the database. Access will then automatically enable macro content in any database that is also signed by that publisher.▪
By making the location of the database a trusted location, or moving the data-base to a trusted location. Access automatically enables macro content in any database saved in that location.To enable macros for the current database session only:
▪
In the security warning bar, click Enable Content.To add the publisher of a digitally signed database to the Trusted Publishers list:
1 In the security warning bar, click Some active content has been disabled.
Understanding database concepts 27
1
3 In the Microsoft Office Security Options dialog box, click Trust all documents from this publisher, and then click OK.
To add the location of a database to the Trusted Locations list:
1 Display the Backstage view, and then click Options.
2 In the left pane of the Access Options dialog box, click Trust Center, and then click
Trust Center Settings.
3 In the left pane of the Trust Center dialog box, click Trusted Locations.
4 On the Trusted Locations page, click Add new location.
5 In the Microsoft Office Trusted Location dialog box, click Browse.
6 In the Browse dialog box, navigate to the folder containing the current database, and then click OK.
7 In the Microsoft Office Trusted Location dialog box, select the Subfolders of this location are also trusted check box if appropriate, and then click OK in each of the open dialog boxes.
If you prefer, you can change the way Access handles macros in all databases:
1 Display the Trust Center, and then in the left pane, click Macro Settings.
2 Select the option for the way you want Access to handle macros:
▪
Disable all macros without notification If a database contains macros, Access disables them and doesn’t display the security warning to give you the option of enabling them.▪
Disable all macros with notification Access disables all macros and displays the security warning.▪
Disable all macros except digitally signed macros Access automatically enables digitally signed macros.▪
Enable all macros Access enables all macros (not recommended).3 Click OK to close the Trust Center, and then click OK to close the Access Options
Exploring tables
Tables are the core database objects. Their purpose is to store information. The purpose of every other database object is to interact in some manner with one or more tables. An Access database can contain thousands of tables, and the number of records each table can contain is limited more by the storage space available than by anything else.
Every Access object has two or more views. For tables, the two most common views are Datasheet view, in which you can display and modify the table’s data, and Design view, in which you can display and modify the table’s structure. To open a table in Datasheet view, either double-click its name in the Navigation pane, or right-click its name and then click Open. To open a table in Design view, right-click its name and then click Design View. When a table is open in Datasheet view, clicking the View button in the Views group on the Home tab switches to Design view; when it is open in Design view, clicking the button switches to Datasheet view. You can also switch the view by clicking one of the buttons on the View Shortcuts toolbar in the lower-right corner of the program window.
Datasheet view displays the table’s data in columns (fields) and rows (records). The first row contains column headings (field names).
Exploring tables 29
1
If two tables have one or more field names in common, you can embed the datasheet from one table in another. By using an embedded datasheet, called a subdatasheet, you can dis-play the information in more than one table at the same time. For example, you might want to embed an Orders datasheet in a Customers table so that the orders each customer has placed are visible in the context of the customer record.
In this exercise, you’ll open existing database tables and explore the table structure in two views.
SET UP
You need the GardenCompany01 database you worked with in the preced-ing exercise to complete this exercise. (For practice purposes, you might have saved this database with a different name.) Open the database, ensure that tables are listed in the Navigation pane, and then follow the steps.1
In the Navigation pane, double-click Products to open the Products table inDatasheet view.
2
At the right end of the Navigation pane title bar, click the Shutter Bar Close buttonto display more of the table’s fields.
Each row in this table contains information about a product and each column contains one field from each record. The record navigation bar shows that the selected record is 1 of 189.
TIP To make the graphics in this book readable, from now on we will often work in a program window that is smaller than full screen with the Navigation pane closed.
More fields and records might be visible in your tables than those shown in our
Let’s adjust the width of a couple of columns to accommodate their longest entries.
3
In the row of field names at the top of the table, point to the right border of theProduct Name column, and when the pointer changes to a double-headed arrow, double-click the border.
4
Double-click the right border of the Category column to adjust that field’s width.Notice that the products Magic Lily and Autumn Crocus are assigned to the Bulbs
category.
TIP You can also resize a table column by pointing to the border and dragging it to the left or right.
Now let’s open a second table.
5
In the Navigation pane, click the Shutter Bar Open button, and then double-clickCategories to open the Categories table on a new tabbed page in Datasheet view. Notice that the Products table is still open and available if you need it.
TIP From now on, open the Navigation pane whenever you need to work with a dif-ferent object, but feel free to close it if you want to display more of the data.
6
In the Categories table, at the left end of the record for the Bulbs category, click theExpand button (the plus sign) to display a subdatasheet containing all the records from the Products table that are assigned to the Bulbs category.
Exploring tables 31
1
TIP Displaying a subdatasheet is only possible if a relationship has been established
between two tables. For information about relationships, see “Defining relationships
between tables” in Chapter 2, “Create databases and simple tables.”
7
To the left of the record for the Bulbs category, click the Collapse button (the minus sign) to hide the subdatasheet.8
Click the Close button at the right end of the page tab bar (not the Close button in the upper-right corner of the program window) to close the Categories table.9
Close the Products table, and when Access asks whether you want to save your changes to this table, click Yes.TIP In steps 3 and 4, you changed the look of the table by changing the widths of columns. If you want those changes to be in effect the next time you open the table, you must save them.
Next let’s use a table containing order-fulfillment information to practice moving among records.
10
In the Navigation pane, double-click the Orders table.The record navigation bar at the bottom of the window indicates that this table contains 87 records, and that the active record is number 1 of 87.
KEYBOARD SHORTCUT Press the Up Arrow or Down Arrow key to move the selection one record at a time. Press the Page Up or Page Down key to move one screen at a
time. Press Ctrl+Home or Ctrl+End to move the selection to the first or last field in
the table.
12
Click the record navigation bar, select the current record number, enter 40, and then press the Enter key to move the selection directly to record 40 of 87.Finally, let’s view the structure of the open table.
13
On the View Shortcuts toolbar, click the Design View button to display the Orderstable structure in Design view. Notice that the Design tool tab now appears on the ribbon.
Datasheet view displays the data stored in the table, whereas Design view displays the underlying table structure.
SEE ALSO For information about table structure, see “Refining table structure” in
Chapter 2, “Create databases and simple tables.”
+
CLEAN UP
Close the Orders table. Keep the GardenCompany01 database open for useExploring forms 33
1
Exploring forms
Access tables are dense lists of raw information. Working directly with tables in a database you have created might be quite simple for you, but it might be overwhelming for people who don’t know much about databases in general or about this database in particular. To make it easier to enter, display, and print information, you can design forms.
A form acts as a friendly interface for a table. Through a form, you can display and edit the records of the underlying table, or create new records. Most forms provide an interface to only one table. However, by embedding subforms within a main form, you can use one
form to interact with multiple tables that are related through one or more common fields.
Forms are essentially collections of controls that either accept information or display infor-mation. You can create forms by using a wizard, or you can create them from scratch by manually selecting and placing the controls. Access provides the types of controls that are standard in Windows dialog boxes, such as labels, text boxes, option buttons, and check boxes. With a little ingenuity, you can create forms that look and work much like the dialog boxes in all Windows programs.
As with tables, you can display forms in several views. The following are the three most common views:
▪
Form In this view, you can display and enter data.▪
Layout In this view, you can work with the elements of the form to refine its appear -ance and functionality while also displaying the data from the underlying table.▪
Design In this view, you have more precise control over the appearance, placement, and functionality of form elements, but you cannot display the underlying data.In this exercise, you’ll explore forms, subforms, and the available form controls.
SET UP
You need the GardenCompany01 database you worked with in the preceding exercise to complete this exercise. If necessary, open the database, and then follow the steps.1
In the Navigation pane, click the title bar to display the category list, and then in theFilter By Group area, click Forms to display all the forms that have been saved as part of this database.
2
In the Navigation pane, double-click Products to open the Products form on a tabbed page.This form is the interface for the Products table.
Exploring forms 35
1
This is an example of a list box control.
Now let’s open a form that includes a main form and a subform.
4
In the Navigation pane, double-click Categories to open that form on its own tabbed page. Notice that the main form displays information from the Categoriestable, and the subform, which looks like a datasheet, displays information from the
Products table for the current record.
5
On the main form’s record navigation bar, click the Next Record button a few times to display the next few records. Notice that the subform changes with each click to display the products in each category.Next let’s display a form containing customer information in various views.
6
In the Navigation pane, double-click Customers to open that form in Form view.The purpose of this form is to edit or create customer records.
7
On the Home tab, in the Views group, click the View button, which switches betweenForm view and Layout view. Notice that three tool tabs (Design, Arrange, and Format) appear on the ribbon.
Exploring forms 37
1
In Design view, you can add controls to a form, rearrange controls, format the controls and the form itself, and add pictures and lines to help identify the form and its sections.
9
Switch between Form view, Layout view, and Design view, noticing the similarities and differences.Finally, let’s take a look at the controls available for designing forms.
10
On the Design tool tab, in the Controls group, do one of the following, depending on the size of your program window:▪
In the lower-right corner of the Controls gallery, click the More button.▪
Click the Controls button.You can use these controls to assemble custom forms for your database.
SEE ALSO For information about form controls, see “Adding controls” in Chapter 8, “Create custom forms.”
11
Click away from the gallery to close it.12
Close all the open database objects by right-clicking the tab of the Customers form and then clicking Close All.+
CLEAN UP
Keep the GardenCompany01 database open for use in later exercises.Exploring queries
You can locate specific information stored in a table, or in multiple tables, by creating
a query that specifies the criteria you want to match. Queries can be quite simple—for example, you might want a list of all products in a specific category that cost less than
$10.00. They can also be quite complex—for example, you might want to locate all
out-of-state customers who have purchased gloves within the last three months. For the first example, you might be able to sort and filter the data in the Products table fairly quickly to come up with a list. For the second example, sorting and filtering would be very tedious.
It would be far simpler to create a query that extracts all records in the Customers table whose billing addresses are not in your state and whose customer IDs map to records that appear in the Orders table within the last three months and whose item IDs map to records
Exploring queries 39
1
You can create queries by using a Query wizard, and you can also create them from scratch. The most common type is the select query, which extracts matching records from one or
more tables. Less common are queries that perform specific types of actions.
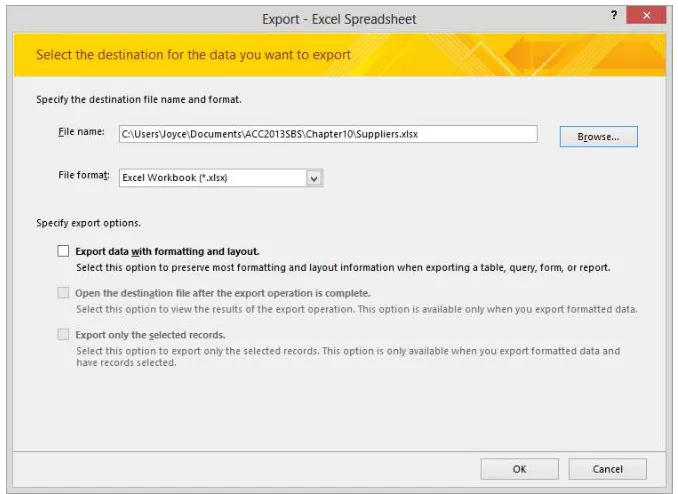
Processing a query, commonly referred to as running a query or querying the database, displays a datasheet containing only the records that match your search criteria. You can use the query results as the basis for further analysis, create other database objects (such as reports) from the results, or export the results in another format, such as an Excel spreadsheet.
If you create a query that you are likely to want to run more than once, you can save it. It then becomes part of the database and appears in the list when you display the Queries group in the Navigation pane. To run the query at any time, you simply double-click it in the Navigation pane. Each time you run the query, Access evaluates the records in the
spec-ified table or tables and displays in Datasheet view the current subset of records that match the criteria defined in the query.
To set up a query, you work in Design view. Switching to this view displays the Query Designer, which has two components:
▪
The top pane displays boxes listing the fields of the tables the query is designed towork with. Each box represents one table. In a query that works with more than one table, lines between the boxes indicate that before the query was created,
relation-ships were established between the tables based on common fields. The relationrelation-ships
enable the query to draw information from the tables.
SEE ALSO For more information about relationships, see “Defining relationships
between tables” in Chapter 2, “Create databases and simple tables.”
▪
The bottom pane displays the design grid, where the query’s search criteria arede-fined. Each column of the grid refers to one field from one of the tables in the top pane. Each row defines a different aspect of the query.
Don’t worry if this all sounds a bit complicated at the moment. When you approach queries logically, they soon begin to make perfect sense.
In this exercise, you’ll explore two existing queries.
SET UP
You need the GardenCompany01 database you worked with in the preceding exercise to complete this exercise. If necessary, open the database, and then follow the steps.1
In the Navigation pane, display the Queries group, which includes all the queries that have been saved as part of this database.2
In the Navigation pane, right-click the Delete Discontinued Products query, and then click Object Properties to display the properties of the query, including a description of its purpose.The icon at the top of the General tab indicates that this is a select query.
3
In the Delete Discontinued Products Properties dialog box, click Cancel. Let’s run a query.Exploring queries 41
1
The record navigation bar indicates that 171 records meet the criteria of the Products By Category query.
The Products table contains 189 records. To find out why 18 of the records are miss -ing in the query results, let’s look at this query in Design view.
5
On the View Shortcuts toolbar, click the Design View button to display the query in the Query Designer.The two boxes in the top pane of the Query Designer list the fields in the Categories
and Products tables. The line between the boxes indicates a relationship based on
their common CategoryID field. The design grid in the bottom pane defines a query
that matches information from both tables. Because <> Yes (not equal to Yes) is
en-tered in the Criteria row for the Discontinued field, this query finds all the records that don’t have a value of Yes in that field (in other words, all the records that have
not been discontinued) and displays them by category.
As an experiment, let’s make a small change to the query design.
6
In the Criteria row of the Discontinued field, replace <> with =. Then on the Designtool tab, in the Results group, click the Run button to find all the records that have
been discontinued.
The 18 discontinued products account for the difference between the number of records in the Products table and the number of records displayed by the original query.
TIP You can also run a query by switching to Datasheet view.