PHP Application Development with
NetBeans Beginner's Guide
Boost your PHP development skills with this step-by-step
practical guide
Beginner's Guide
Copyright © 2012 Packt Publishing
All rights reserved. No part of this book may be reproduced, stored in a retrieval system, or transmitted in any form or by any means, without the prior written permission of the publisher, except in the case of brief quotations embedded in critical articles or reviews. Every effort has been made in the preparation of this book to ensure the accuracy of the information presented. However, the information contained in this book is sold without warranty, either express or implied. Neither the author, nor Packt Publishing, and its dealers and distributors will be held liable for any damages caused or alleged to be caused directly or indirectly by this book.
Packt Publishing has endeavored to provide trademark information about all of the
companies and products mentioned in this book by the appropriate use of capitals. However, Packt Publishing cannot guarantee the accuracy of this information.
First published: August 2012
Production Reference: 1210812
Published by Packt Publishing Ltd. Livery Place
35 Livery Street
Birmingham B3 2PB, UK. ISBN 978-1-84951-580-1
www.packtpub.com
About the Author
M A Hossain Tonu
graduated in Computer Science and Engineering from Dhaka University of Engineering and Technology (DUET) in Bangladesh. He has been a passionate developer over the past six years, has worked for leading software companies in the country, such as Somewherein and Improsys, and has developed a series of web applications, services, and solutions for foreign clients as part of the offshore software development and outsourcing team. He is an agile software craftsman, who loves to code, keep himself updated with cutting-edge technologies, and play with PHP, Zend Framework, Ruby-on-Rails, JavaScript, and more. He loves to moderate the local PHP community—phpXperts—and conducts seminars and workshops at different tech premises.You can reach Tonu at [email protected], and his tech blog is available at http://mahtonu.wordpress.com.
It takes many people to create a book like this, and I'd like to thank some people for their contributions to this work.
First of all, I would like to thank my wife Shamima Rahman Jhumur for her tremendous patience when I was unavailable to her. I appreciate my family, friends, and well-wishers, who continuously tolerate my computer madness.
To the people at Packt, I am much obliged: Kartikey Pandey, the man who started the process; Dayan Hyames, for guiding me throughout; Alka Nayak, the kind soul accepting my delays; and Lubna Shaikh, for being such a great help.
I'd also like to thank those who provided prepublication feedback, such as Ondřej Nešpor, Tomáš Myšík and Nurul Ferdous.
About the Reviewers
Tomáš Myšík
is a Java Software Developer working on NetBeans, on its PHP support. He used to be a Java Enterprise, and PHP developer working on modern websites. In his leisure time, he likes sports (especially football and ice-hockey), reading books, and of course, learning all new things related to software development.Deepak Patil
is a Software Architect, Mobile Web Enthusiast, and Instructor of Standards-Based Mobile Web Development.His initial responsibilities included the architecture, design, development, implementation, and support of web applications, especially into the LAMP stack.
He has eight years of experience in the Internet industry, and specializes in LAMP technologies and open source. He has experience in all areas of application development processes, including database design, user interface, e-commerce, security, web services, optimization, and scalability.
He is the Tech Lead at @netCore Solutions; is an Open Source Entrepreneur, and loves all things social, mobile, cricket, and soccer; and is a proud Indian.
of Westminster, UK. He was first introduced to NetBeans IDE during his placement at a London-based Internet Service Provider. In his placement role, he realized the power of NetBeans IDE to develop Real Estate Management Software, which is used by the top estate agencies in London.
After graduating, Azizur secured employment with the University of Manchester as a Web Application Developer. Throughout his six years of employment with the University, he successfully used NetBeans IDE to develop a variety of internal applications. Some of his most challenging projects have been to develop secure, reliable, scalable, and robust, client-facing web applications using PHP Zend Framework and MySQL database. In late 2011, he decided to pursue new pastures, and currently works for a world-class, broadcasting company in the UK, developing innovative web applications used by millions of users across the globe, where NetBeans IDE still firmly remains the tool of choice.
A firm believer in philanthropy, he spends his spare time supporting philanthropic causes, using his knowledge and expertise of open source technologies, and has helped international, non-profit organizations, such as Mercy Mission World; he is currently leading the development team at ProductiveMuslim.com. He uses NetBeans IDE to develop web applications, custom WordPress themes, and plugins to support his work.
His keen interest in open source software makes him a regular attendee at the Manchester WordPress User Group and wider PHP and open source community events.
I would like to thank everyone who helped in tech reviewing this book. You know who you are; you have been absolutely amazing in supporting me when I needed it most. Thank you for all your help.
Anthony Reid
is a Software Developer, who currently works within the Information Systems Department of a London insurance brokerage firm. Anthony has over 20 years of programming experience. His career started in the pre-Windows era, developing database systems in DataEase, Paradox, FoxPro, and Visual Basic.University of Engineering and Technology (KUET), and his M.Sc. degree in Computer Science and Engineering from United International University, Dhaka. He is also a co-founder of CyberXpress.Net Inc, based in Bangladesh.
He has a wide breadth of technical skills and Internet knowledge, and has experience across the spectrum of online development in the service of building and improving online properties for multiple clients. He enjoys creating site architecture and infrastructure, backend development using open source toolsets (PHP, MySQL, Apache, Linux, and others, such as LAMP), and frontend development with CSS and HTML/XHTML.
I want to thank my loving wife, Maria Akter, for her great support.
Mushfiq-E Mahabub
is a Software Engineer, driven by passion.He has been writing production-level code for the last three years using open source technologies, such as LAMP, Python/Django, YII, Zend, MySQL, and MongoDB. Currently, he is working as a Platform Engineer for a new start-up.
After acquiring his BSc Engineering degree in Computer Science, he participated in the development of open source software based on Python.
He has been conducting different workshops and seminars on open source software since 2009 for university students.
www.PacktPub.com
Support files, eBooks, discount offers and more
You might want to visit www.PacktPub.com for support files and downloads related to your book.
Did you know that Packt offers eBook versions of every book published, with PDF and ePub files available? You can upgrade to the eBook version at www.PacktPub.com and as a print book customer, you are entitled to a discount on the eBook copy. Get in touch with us at [email protected] for more details.
At www.PacktPub.com, you can also read a collection of free technical articles, sign up for a range of free newsletters and receive exclusive discounts and offers on Packt books and eBooks.
http://PacktLib.PacktPub.com
Do you need instant solutions to your IT questions? PacktLib is Packt's online digital book library. Here, you can access, read and search across Packt's entire library of books.
Why Subscribe?
Fully searchable across every book published by Packt Copy and paste, print and bookmark content
On demand and accessible via web browser
Free Access for Packt account holders
Table of Contents
Preface 1
Chapter 1: Setting up your Development Environment
7
Why NetBeans for PHP application development? 8
Recommended system requirements 9
Downloading the NetBeans IDE 10
Time for action – downloading the NetBeans IDE 10
Installing NetBeans 12
Time for action – installing NetBeans step by step 13
Setting up your development environment in Windows 18
Time for action – installing XAMPP in Windows 18
Setting up your development environment in the Ubuntu desktop 21
Time for action – installing LAMP on the Ubuntu desktop 21
Setting up your development environment in Mac OS X 25
Time for action – installing MAMP in Mac OS X 26
Creating a NetBeans PHP project 30
Time for action – creating a NetBeans PHP project 31
Summary 36
Chapter 2: Boosting Your Coding Productivity with the PHP Editor
37
Familiarizing yourself with the base IDE features 38
Exploring the editor for PHP 45
Exploring more with the editor 53
Using rename refactoring and instant rename 53
Using code completion 56
Using the code generator 63
Chapter 3: Building a Facebook-like Status Poster using NetBeans
67
Planning the project 67
Understanding JSON – JavaScript Object Notation 69 Introducing jQuery – the definitive JavaScript library 70 Understanding AJAX – asynchronous JavaScript and XML 71
Introducing jQuery.ajax() 71
Introducing PHP Data Objects (PDO) 72
Creating the NetBeans PHP project 72
Creating the status stream display list 73
Setting up the database server 73
Time for action – connecting with MySQL database server 73
Creating the database and table 74
Time for action – creating MySQL database and table 75
Inserting sample rows into the table 78
Adding sample user image files 79
Creating the StatusPoster PHP class 79
Time for action – creating a class, adding a constructor, and creating methods 80
Firing the user interface for displaying the status list 85
Time for action – adding CSS support to the document 85
Time for action – adding jQuery support and custom JS library 89
Time for action – showing the status list 92
Hatching out the status poster using PHP-AJAX 96
Time for action – adding the status input box to the interface 97
Adding new status post template to index.php 99
Creating the AJAX status poster 99
Time for action – creating status poster using JQuery AJAX 100
Working with StatusPoster.php again 103
Adding AJAX responder code to index.php 104
Testing the usability of the status poster 105
Summary 108
Chapter 4: Debugging and Testing using NetBeans
109
Debugging – the ancient art of programming 109
Debugging PHP source code with XDebug 110
Configuring XDebug 110
Time for action – installing XDebug on Windows 111
Enabling XDebug on Ubuntu 113
Time for action – installing XDebug on Ubuntu 113
Debugging the PHP source with NetBeans 115
The debugger windows 116
Basic debugging workflow 117
Time for action – running a debugging session 117
Adding Watches 122
Time for action – adding the expression to watch 122
Testing with PHPUnit 125
Configuring PHPUnit 125
Time for action – installing PHPUnit via PEAR 125
Creating and running PHPUnit tests 129
Time for action – testing with PHPUnit 129
Dealing with code coverage with PHPUnit 132
Time for action – using code coverage 132
Testing using the Selenium framework 135
Time for action – running tests with Selenium 136
Summary 139
Chapter 5: Using Code Documentation
141
Writing great documentation 141
PHPDoc – commenting standard for PHP 142
Example of a DocBlock 142
Acquainting with PHPDoc tags 143
Data type tags 144
Legal tags 144
Versioning tags 144
Other tags 145
Documenting the source code 145
Documenting the functions and methods 145
Time for action – documenting a PHP function or method 146
Documenting classes 149
Time for action – documenting the PHP class and class variables 149
Documenting TODO tasks 153
Time for action – using @todo tags 153
Documenting the API 155
Configuring ApiGen 155
Time for action – installing ApiGen and configuring it with NetBeans 156
Generating API documentation 157
Time for action – generating documentation using ApiGen 158
Summary 163
Git – the fast and distributed version control system 169
Understanding Git, the NetBeans way 170
Initializing a Git repository 170
Time for action – initializing a Git repository 170
Cloning a Git repository 172
Time for action – cloning a Git repository from GitHub via the SSH protocol 173
Staging files to a Git repository 177
Time for action – staging files to a Git repository 177
Viewing changes in the source editor 180
Git window 180
Committing changes to the repository 181
Time for action – committing changes to the local repository 181
Comparing file revisions 182
Time for action – using diff from the IDE 182
Reverting the local changes of the repository 183
Time for action – reverting changes of the working tree 184
Working with remote repositories 186
Fetching source code updates 186
Time for action – fetching source code updates 186
Pulling updates from the remote repository 187
Time for action – pulling updates from the remote repository 187
Pushing source code changes to a remote repository 188
Time for action – pushing source code changes 189
Working with branches 190
Creating a branch 191
Time for action – creating a branch 191
Checking out a branch 192
Time for action – checking out a branch 192
Switching to a branch 194
Checking out files 195
Merging 195
Time for action – merging into current branch 196
Deleting a branch 197
Good practices and workflow 198
Summary 199
Chapter 7: Building User Registration, Login, and Logout
201
Planning the project 202
Understanding the application architecture 202
Reviewing OOP issues 205
Namespace 206
The API 207
Designing the database 207
Creating the data access layer 208
Creating the BaseDao abstract class 208
Time for action – creating the BaseDao class 208
Creating the User DAO class 210
Time for action – creating the User Dao class 211
Creating the Service layer 216
Creating the ValidatorService class 216
Time for action – creating the ValidatorService class 216
Creating the UserService class 223
Time for action – creating the UserService class 224
Building the application 233
Time for action – creating the user application 233
Creating the user interface 237
Time for action – creating the user interface 237
Summary 247
Appendix A: Introducing Symfony2 Support in NetBeans 7.2
249
Downloading and integrating the latest Symfony Standard Edition 249
Time for action – integrating Symfony2 with NetBeans 249
Creating a new Symfony2 project 250
Time for action – creating a Symfony2 project using NetBeans 250
Running Symfony2 console commands inside NetBeans 254
Creating a bundle 254
Time for action – creating a bundle using the Symfony2 console command 255
Appendix B: NetBeans Keyboard Shortcuts
259
File menu 259
Edit menu 259
View menu 260
Navigate menu 261
Source menu 262
Refactor menu 263
Run menu 263
Debug menu 263
Window menu 264
Code folding 266
Searching for text 267
Setting tabs 267
Appendix C: Pop Quiz Answers
269
Chapter 2, Boosting your Coding Productivity with the PHP Editor 269 Chapter 3, Building a Facebook-like Status Poster using NetBeans 270
Chapter 4, Debugging and Testing using NetBeans 271
Chapter 5, Using Code Documentation 272
Chapter 6, Understanding Git, the NetBeans way 272
Preface
Productivity is an important factor for a software developer. A good development
environment or surrounding tools with the essence of a particular programming flavor can boost up our coding productivity and yield a quality and optimized software product. In order to maintain a fast-paced development, developers seek the environment with which they feel at home. Such an Integrated Development Environment (IDE) can really accelerate code implementation and be the magic wand to your project development.
A good IDE is more like a Swiss army knife with crafted features. It consists of:
A source editor
A compiler/an interpreter A debugger
Database management support Version Control System
Tools for Object-Oriented Programming, such as Class Browser and Object Inspector IDE, like NetBeans, comes with greater flexibility, with such features where the developer can feel at home. Moreover, NetBeans is absolutely free of charge and is provided by the open source community. Simply put, the IDE for PHP will facilitate your productivity from development to production, in every respect.
What this book covers
Chapter 1, SettingUpYourDevelopmentEnvironment, guides you through the process of
NetBeans installation and sets up the PHP development environment step by step. By the end of this chapter, you will have your development environment ready on your operating system.
Chapter 2, BoostingYourCodingProductivitywithPHPEditor, shows how you can write
faster code using the NetBeans PHP Editor. You will be introduced to killer features of the IDE, such as code completion, code templates, rename refactoring, and code generation. At the end of this chapter, you will have a full, hands-on knowledge of the editor's smart features and increased coding productivity.
Chapter 3, BuildingaFacebook-likeStatusPosterusingNetBeans, jumps directly to a
real-life, PHP application development that will be used to display Facebook/Twitter-like, posted status streams. By the end of this chapter, you will be able to develop simple PHP applications with the NetBeans IDE.
Chapter 4, DebuggingandTestingusingNetBeans, will explain how to debug and test a PHP application using the IDE. Topics covered in the chapter include configuring XDebug, debugging the PHP source code, testing with PHPUnit and Selenium, and code coverage.
Chapter 5, UsingCodeDocumentation, guides the developer through the process of creating source and project documentation. You will become familiar with PHPDoc standard tags and their use, to document the source code with the help of the editor. Also, you will use an external document generator for the project API.
Chapter 6, UnderstandingGit,theNetBeansWay, will show you how to use Git, a free and open source-distributed version control system. Using the IDE, you will be working on Git operations, such as initializing or cloning a repository, staging files, committing changes, reverting modifications, and remote repository operations such as fetching, pulling, and pushing, while working with branches. By the end of this chapter, you will be able to be part of a development team using the NetBeans collaborative development feature.
Chapter 7, BuildingUserRegistration,Login,andLogout, deals with a professional PHP application. You will design and develop a PHP application where users can register themselves, and after the registration they can log in to the application, view, and update their own profile, and more.
Appendix A, Introducing Symfony2 Support in NetBeans 7.2, will discover the Symfony2 PHP framework support by NetBeans. This introduces Symfony2's project creation, runs Symfony2 commands, and introduces bundle creation from NetBeans.
What you need for this book
In Chapter 1, Setting up your Development Environment the Recommended system
requirements section, explains the system requirements, and the sections beginning with
Setting up your development environment explains the PHP development environment for specific operating systems. In summary, you should have the following:
NetBeans IDE
Latest package of Apache, MySQL, and PHP
Who this book is for
The book is aimed at beginning level PHP developers who wish to develop PHP applications while taking advantage of the NetBeans functionality to ease their software development efforts and utilize the powerful features of the IDE. Familiarity with NetBeans is not assumed. However, a little familiarity with PHP development is expected.
Conventions
In this book, you will find several headings appearing frequently.
To give clear instructions on how to complete a procedure or task, we use:
Time for action – heading
1.
Action 12.
Action 23.
Action 3Instructions often need some extra explanation so that they make sense, so they are followed with:
What just happened?
This heading explains the working of tasks or instructions that you have just completed. You will also find some other learning aids in the book, including:
Have a go hero – heading
These set practical challenges and give you ideas for experimenting with what you have learned.
You will also find a number of styles of text that distinguish between different kinds of information. Here are some examples of these styles, and an explanation of their meaning. Code words in text are shown as follows: "Set the installation folder using the file browser."
A block of code is set as follows:
<?php
echo "Hello World"; ?>
When we wish to draw your attention to a particular part of a code block, the relevant lines or items are set in bold:
<head>
<meta http-equiv="Content-Type" content="text/html; charset=UTF-8">
<title>Status updater</title>
<link href="<?=BASE_URL?>styles/styles.css" media="screen" rel="stylesheet" type="text/css" />
<script src="http://ajax.googleapis.com/ajax/ libs/jquery/1.7/jquery.min.js">
</script>
<script src="<?=BASE_URL?>js/status.js"></script> </head>
Any command-line input or output is written as follows:
sudo apt-get install lamp-server^
Warnings or important notes appear in a box like this.
Tips and tricks appear like this.
Reader feedback
Feedback from our readers is always welcome. Let us know what you think about this book—what you liked or may have disliked. Reader feedback is important for us to develop titles that you really get the most out of.
To send us general feedback, simply send an e-mail to [email protected], and mention the book title via the subject of your message.
If there is a book that you need and would like to see us publish, please send us a note in the SUGGEST A TITLE form on www.packtpub.com or e-mail [email protected]. If there is a topic that you have expertise in and you are interested in either writing or contributing to a book, see our author guide on www.packtpub.com/authors.
Customer support
Now that you are the proud owner of a Packt book, we have a number of things to help you to get the most from your purchase.
Downloading the example code
Errata
Although we have taken every care to ensure the accuracy of our content, mistakes do happen. If you find a mistake in one of our books—maybe a mistake in the text or the code—we would be grateful if you would report this to us. By doing so, you can save other readers from frustration and help us improve subsequent versions of this book. If you find any errata, please report them by visiting http://www.packtpub.com/support, selecting your book, clicking on the erratasubmissionform link, and entering the details
of your errata. Once your errata are verified, your submission will be accepted and the errata will be uploaded on our website, or added to any list of existing errata, under the Errata section of that title. Any existing errata can be viewed by selecting your title from http://www.packtpub.com/support.
Piracy
Piracy of copyright material on the Internet is an ongoing problem across all media. At Packt, we take the protection of our copyright and licenses very seriously. If you come across any illegal copies of our works, in any form, on the Internet, please provide us with the location address or website name immediately so that we can pursue a remedy.
Please contact us at [email protected] with a link to the suspected pirated material.
We appreciate your help in protecting our authors, and our ability to bring you valuable content.
Questions
1
Setting up your Development
Environment
NetBeans is a free and open source IntegratedDevelopmentEnvironment
(IDE), which complies with multiple programming languages. For a long time
it has been the editor of choice to major developer communities. Along with the growing market demand, NetBeans has integrated the PHP development features since NetBeans 6.5 (November 2008), and these days, it has become one of the most popular IDEs for the PHP community.
In this chapter we will discuss:
Why NetBeans for PHP application development? Downloading the NetBeans IDE
Step-by-step NetBeans installation
Setting up your PHP development environment Creating a NetBeans project
Why NetBeans for PHP application development?
NetBeans IDE facilitates our daily PHP application development activities with the following:
Creatingandmanagingprojects: The IDE for PHP enables us to create PHP projects, and helps to grow the project. It can perform project-related settings and operations; that is, creating documentation for the project, testing the project, and so on.
Editingfeaturesforthesourcecode: The code editor comes with an exciting collection of source-editing capabilities within the PHP project scope. It empowers faster code writing with the following features:
Syntaxhighlightingenables highlighting PHP syntax in project files. Codefoldingenables the folding and unfolding of selected classes and
method codes within the current file.
Navigation helps to explore classes and methods in the current PHP file. Codetemplates help in using predefined code snippets.
Codecompletionshows the code's auto completion list.
Parameterhints give information about the formal parameters of a method
where the method is called.
Smartindent provides auto formatting while code pressing. Formattingprovides auto code formatting in the current file.
Bracketcompletion adds/removes paired quotes, parentheses, and braces
during code writing.
Markoccurrences marks all the occurrences of a code string within the
opened project files.
Errordetectionshows the PHP parsing error immediately after typing is
finished.
Pairmatchinghighlights matched pair of quotes, braces, parentheses, and
so on.
Semantichighlighting identifies the keywords, method names, call, unused
variables, and so on.
Instantrename renames all occurrences of a variable within its scope. Spellchecker shows spelling mistakes and corrections.
Codedocumentation helps with an automatic documentation structure.
Deploying theproject: Provides synchronization within the PHP project content, with remote server content.
Databaseandservices: Provides support for database management and web services.
SCMtools: Provides source code management tools, such as Git, Subversion, CVS, and Mercurial, built-in for source code versioning, tracking changes, and so on. RunningPHPscripts: Enables the parsing of PHP scripts, and yields output within
the IDE without going to the browser.
Debuggingthesourcecode: You can inspect local variables, set watches, set breakpoints, and evaluate the code, live. You can also perform command-line debugging, and check the PHP output in the IDE without going to the browser, which provides competence for remote debugging.
Supporting PHP frameworks: It also offers the support for popular PHP frameworks, such as the Zend Framework and Symfony.
Comparison of integrated development environments for PHP can be found at http://en.wikipedia.org/ wiki/Comparison_of_integrated_development_ environments#PHP.
Recommended system requirements
Before we proceed with downloading the latest version, let's have a look into the recommended system requirements of various platforms for installing and running the NetBeans IDE:
Microsoft Windows XP Professional SP3/Vista SP1/Windows 7 Professional:
Processor: 2.6 GHz Intel Pentium IV or equivalent Memory: 2 GB
Ubuntu 12.04:
Processor: 2.6 GHz Intel Pentium IV or equivalent Memory: 2 GB
Diskspace: 850 MB of free disk space
Macintosh OS X 10.7 Intel:
Processor: Dual-Core Intel (32 or 64-bit) Memory: 2 GB
Diskspace: 850 MB of free disk space
Downloading the NetBeans IDE
NetBeans can be your daily IDE for development that will assist you in increasing your coding productivity. It is a free-of-cost, open source IDE, which can be downloadable for different technologies, including Java, C/C++, PHP, and so on, and platforms such as Windows, Linux, Mac OS X, or even OS-independent bundles. Moreover, you may download the IDE only for PHP technology, or for all technologies in an installer package.
Again, if you are already using the IDE for the development of Java, C/C++, and so on, then you may skip this download, and the installation section, and jump directly to the section named AddingPHPasaplugintoanalreadyexistingNetBeansinstallation.
Time for action – downloading the NetBeans IDE
Go through the following steps to download the NetBeans IDE:
Next, we are going to download the PHP bundle, as shown in the screenshot above..
As you can see, your download starts automatically; Firefox users should see a window to save the file, which will appear as follows:
3.
Save the file onto your disk space.What just happened?
We just downloaded the installation file for the NetBeans PHP bundle. The PHP bundle provides tools for PHP 5.x development, and Zend and Symfony framework support. If you click on the All download option, you'll have the installation file for all mentioned technologies and during installation you will be able to choose exactly what tools and runtimes to install. So, now we are ready launch the installation wizard.
Installing NetBeans
Installing NetBeans is pretty much easier with the installation wizard, which guides the user with the required steps or configurations. Those who are already using NetBeans for other technologies, such as Java or C/C++, can skip this section and jump directly to the section named AddingPHPasaplugintoanalreadyexistingNetBeansinstallation.
Time for action – installing NetBeans step by step
In this section, we will install the NetBeans IDE step by step, for Windows OS—that is, Windows 7. In order to install the software, you need to run the installer and proceed with the followings steps:
2.
By clicking on the Next button, you will be asked to accept the license agreement:Note that JRE is the Java software for your computer, or the Java Runtime Environment, which is also referred to as the JavaVirtualMachine (JVM). JRE will be installed as well.
4.
Set the installation folder using the file browser, and click on the Next button. The next screenshot shows the total installation size:6.
After everything is installed correctly, you will see the finish wizard, as shown in the following screenshot:7.
You may check or uncheck the ContributetotheNetBeansprojectbyprovidinganonymoususagedata checkbox, as per your wish to participate or not. Note that
it will send project-specific usage data to netbeans.org, so read the on-screen instructions carefully before checking it. Complete the installation by clicking on the
8.
Finally, the running IDE looks similar to the following screenshot:What just happened?
Now that we have the IDE up and running, we can go on to explore setting up the development environment with various operating systems.
In the next section, we will configure our PHP development environment on various
operating systems. We will use the latest Apache-MySQL-PHP package installer, that is LAMP, XAMPP, and MAMP, for corresponding operating systems.
Adding PHP as a plugin to an already existing NetBeans installation
If you want to add functionality to your NetBeans IDE configuration, use the NetBeans Plugin Manager. For example, assume that you have already been running the NetBeans IDE for the Java or C/C++ pack. You then decide that you want to try out the PHP functionality. To do this, go to the NetBeans Plugin Manager from the IDE (choose Tools|Plugins), and add the
Multiple installation support
Multiple installations of NetBeans IDE 5.x, 6.x, and 7.x can coexist with the latest version on the same system. You do not have to uninstall the earlier versions in order to install or run the latest one.
If you have an earlier installation of the NetBeans IDE, you can choose whether or not to import the user settings from the existing user directory when you run the latest IDE for the first time.
Have a go hero – adding or removing features from NetBeans
So, you have NetBeans up and running on your computer. Now, add more features or remove unnecessary features, to or from your installed NetBeans, and check the newly added feature(s) inside the IDE. You may try the plugin manager to do this.
Setting up your development environment in Windows
Instead of installing and configuring Apache, MySQL, and PHP individually, we will use the XAMPP package to have all of them installed and configured automatically. We will download and install the latest XAMPP package (v. 1.7.7), which includes the following:
Apache 2.2.21 MySQL 5.5.16 PHP 5.3.8
phpMyAdmin 3.4.5 FileZilla FTP Server 0.9.39
Time for action – installing XAMPP in Windows
The following steps will download and install the XAMPP package:
1.
We will download the installer for the latest XAMPP package from: http://www.apachefriends.org/en/xampp-windows.html.2.
After completing the download, run the .exe file to proceed with the installation. More installation details can be found at:http://www.apachefriends.org/en/xampp-windows.html.
4.
After completing the installation process successfully, you will be able to proceed with further steps. Open the XAMPP control panel from your operating system'sStart|Programs|XAMPP.
Svc checkboxes indicate that the module was installed as a Windows service, and
hence will start with the Windows startup, or you can check them to be running as a service. If you ever need to restart your Apache web server, use the Stop/Start
button besides Status of Apache.
6.
From the left, click phpinfo() to check the PHP release and the installed components that you have configured:What just happened?
We have successfully installed and run the XAMPP package on our system. We have the XAMPP control panel in order to control the installed services and we also have a web interface to manage MySQL databases.
Have a go hero – securing your XAMPP installation
XAMPP is not meant for production use, but only for developers in a development environment. XAMPP is configured to be as open as possible, and it allows the web developers to fetch anything they want. For development environments, this is great. But, in a production environment, it could be fatal. So, you need to secure your XAMPP installation with the help of the Amatterofsecurity section, at
http://www.apachefriends.org/en/xampp-windows.html.
To display errors in the development environment, update the loaded
php.ini file to set display_errors = On, and do the reverse display_errors = Off for the production environment.
Setting up your development environment in the Ubuntu
desktop
Linux, Apache, MySQL, and PHP (LAMP) are some of the most common web hosting
platforms. So, it's a perfect environment for you to build and test your website code. In this section, we will have our own LAMP set up, configured, and running easily into our Ubuntu 12.04 desktop.
Time for action – installing LAMP on the Ubuntu desktop
Follow the steps listed here in order to install the LAMP package in Ubuntu:
1.
Instead of installing each item separately, we will go with installing the LAMP server in a package in Ubuntu, which is fairly simple, along with a single terminal command:sudo apt-get install lamp-server^
sudo, used to invoke the current user with the power of a super user and a caret (^) symbol, is placed after the package name to indicate that tasks are being performed together.
2.
This command will cause the LAMP package to start installing immediately along with the latest PHP5, Apache 2, MySQL and PHP5-MySQL software. By default, Apache 2 and MySQL install as a service, and your document root will be at /var/ www/, and an index.html file will be at /var/www/.3.
Both Apache and MySQL should be running. However, if required, you may start Apache by using the servicestart command as follows:sudo service apache2 start
You can stop Apache by using the following command:
sudo service apache2 stop
4.
Now, let's check the LAMP installation. Point your browser to http://localhost/, and you will see the default, Apache 2 landing page, as shown in the following screenshot:This means that your Apache 2 web server is running. You can still check these service statuses as follows:
sudo service apache2 status
The previous command will give you the following output:
5.
Again, to check the MySQL status, simply run the following command:sudo service mysql status
The following output will be displayed:
mysql start/running. Process #
6.
To check the PHP installation, simply create a file named test.php in /var/www/, with the following line:<?php phpinfo(); ?>
You can create a new file from the terminal by using
touchtest.php or using gedit application, then
editing the file, and saving it.
7.
Now, point your browser to http://localhost/test.php, and you will see the installed PHP and the component's configuration details:8.
Though we can maintain our databases using NetBeans, we still need to maintain the MySQL database functionalities using a web-based interface. To do this, we may use phpMyAdmin.sudo apt-get install phpmyadmin
phpMyAdmin will be installed with this command, and during the installation, you will receive a blue window asking which server you want to use—apache2 or lighttpd. Choose apache2, and click on OK to continue with the installation. Note that during the installation, you may be asked to configure phpMyAdmin for database-config, passwords, and so on.
10.
If you receive a 404 error at http://localhost/phpmyadmin/, then you need to manually set up phpMyAdmin under Apache, by modifying /etc/apache2/ apache2.conf using gedit (the official text editor for the GNOME desktop):sudo gedit /etc/apache2/apache2.conf
11.
gedit will open the file in a graphical mode, and will add the following line inside apache2.conf at the bottom:Include /etc/phpmyadmin/apache.conf
12.
Now, restart the Apache server to make the changes effective:sudo service apache2 restart
Refresh your browser, and you will now have the same phpMyAdmin login screen as shown in the previous screenshot.
What just happened?
The PHP development environment in the Ubuntu desktop has been set up successfully. The installation of the LAMP server was really a charm with a single command. We learned how to stop or restart services such as Apache and MySQL, along with checking their status. Also, we have optionally installed phpMyAdmin for managing databases via the web interface. Note that phpMyAdmin is not meant for production use, but only for developers, in a development environment.
Have a go hero – displaying errors
As we have crafted our environment for development, PHP error messages will be very helpful for us to resolve them. By default, PHP error messages are turned off in your LAMP installation. You can enable the error messages displaying from the loaded php.ini file (see phpinfo) by modifying the line that contains display_errors. Note that any changes to php.ini requires the Apache 2 server to restart.
Time for action – installing MAMP in Mac OS X
Follow the steps below to download and install MAMP in your Mac OS X:
1.
Download the latest MAMP release from http://www.mamp.info/en/; download MAMP by clicking on the Downloadnow button under MAMP packagedownloader:3.
Extract the downloaded file, and run the .dmg file. After accepting the "terms of use", you will see a screen similar to the following:5.
Now, let's check our MAMP installation. Point your browser to http://localhost/MAMP/, and you will see the default MAMP landing page, as shown in the following screenshot:6.
From /Applications/MAMP/, double-click on MAMP.app to run the Apache, MySQL, PHP, and MAMP control panel. The MAMP control panel shows the server status, and lets you start/stop servers, as shown in the following screenshot:7.
Switch to PHP version 5.3 from the MAMP control panel at Preferences… | PHP Tab (it requires a server restart).What just happened?
We have successfully downloaded and installed MAMP for our Mac OS X development environment. Also, we have tested the installation, and found that it is up and running perfectly. The MAMP landing page comes with a tabbed interface, with phpinfo, phpMyAdmin, SQLiteManager, and so on. You have the following program and libraries installed with your MAMP bundle:
Apache 2.0.63 MySQL 5.1.44 PHP 5.2.13 and 5.3.2 APC 3.1.3
Freetype 2.3.9
YAZ 4.0.1 and PHP/YAZ 1.0.14
So far, we have installed the latest NetBeans IDE, and set up our platform-precise development environment with up-to-date Apache, MySQL, and PHP. Now, our recently completed development environment is well-crafted enough to start building projects. We will head for PHP project creation and maintenance with the help of IDE. Such a synergetic approach between the developer and the IDE can really improve productivity.
Have a go hero – securing your MAMP installation
As we have learned, MAMP is not meant for production use, but only for developers in a development environment. Secure your MAMP installation with the help of the MAMP forum at http://forum.mamp.info/viewtopic.php?t=365. You may need to set the MySQL password, phpMyAdmin password, secure the MAMP landing page, and so on.
Creating a NetBeans PHP project
Time for action – creating a NetBeans PHP project
Finally, we are going to create a NetBeans PHP project to have the PHP content organized, and get more control over the created project.
In order to create a NetBeans PHP project, follow the steps below:
1.
In order to start the project creation, go to File|NewProject from the IDE menu bar.2.
From this window, choose PHP for the project category, and select PHPApplication that is selected by default, which means we are going to create a PHP project from scratch. If you already have source PHP code, then go for PHPApplicationwithExistingSources, and you will have to browse to your existing sources to set your
3.
Click on the Next button, which will take you to the following screen, as shown below:4.
Define the project name and IDE, which automatically suggests the source folder for the given name. However, we can explicitly define the source folder path by browsing the folder path. Also, choose the appropriate PHPVersion, according towhich the project will behave at the IDE, and select DefaultEncoding. We will go for the selected items, by default, to have the latest PHP version behavior, and UTF-8 as DefaultEncoding.
6.
So, we name our project as chapter1, and click on Next, as shown in the following screenshot:8.
Finally, click on Finish to complete the project wizard, and NetBeans will open the PHP project. It should look similar to the following screenshot:An index page, index.php, is created inside the project source automatically.
9.
To test the project, we will put some code between PHP tags. So, let's put a simple echo as follows:<?php
10.
Save the file and point your browser to a project URL, http://localhost/ chapter1/. The page should give an output similar to the following screenshot:So, we can see that our PHP project is performing fine.
11.
To add more files and classes into our project, you may right-click on the project name, which will show the Project menu:What just happened?
Creating a new PHP project in NetBeans has worked like a charm. While creating it, we have observed that we can easily set several configurations of a project with the help of the step-by-step project creation wizard. Also, we have seen that after the creation of a new project, the IDE supports new PHP files, classes, interfaces, and so on from the project context menu. Note that, from the project context menu, you can manage the project operations, such as running and versioning tasks. To change the settings of an existing project, position the cursor on the project node, and choose Properties from the pop-up menu.
So, from now on, these will be our steps to create a new PHP project in NetBeans.
Have a go hero – creating a project from existing sources
If you already have some foundation source code for a PHP project, you can bring those source files under NetBeans, to have more control over the project. Create a new project from existing sources by selecting File|NewProject.
Summary
We have practiced setting up the development environment for a particular operating system. We have the IDE, web server, database server, scripting language, and database management web interface installed and running successfully.
Specifically, we covered:
NetBeans IDE installation
PHP development environment setup on various platforms Creating a PHP project in NetBeans IDE
2
Boosting Your Coding Productivity
with the PHP Editor
In this chapter, we shall discuss how to increase our coding productivity using the editor, and how to get the most out of the NetBeans Editor.
We shall focus on the following:
The base IDE features The editor for PHP
Rename refactoring and instant rename Code completion
Familiarizing yourself with the base IDE features
As an IDE, NetBeans supports a wide range of features to boost your daily PHP development. It includes the editor, debugger, profiler, version control, and other collaborative features. The base IDE provides the following interesting features:
Quicksearch: NetBeans provides you with a searching facility throughout the IDE, such as search within files, types, symbols, menu actions, options, help and open projects, Press Ctrl+I to focus on the search box. In the search results list, you will
find the typed search term highlighted among the resultant items:
Pluginmanager: From Tools|Plugins, you will have the plugin manager from where
Projectmanager: From Window|Projects or by pressing Ctrl+1, you can fix the Project
Manager pane of the IDE to perform operations on each of the available projects. Project operations, such as run, debug, test, generate documentation, check local history, set configuration, and set project properties can all be done at the project manager window:
Filemanager: From Window|Files or by pressing Ctrl+2, you can fix the File
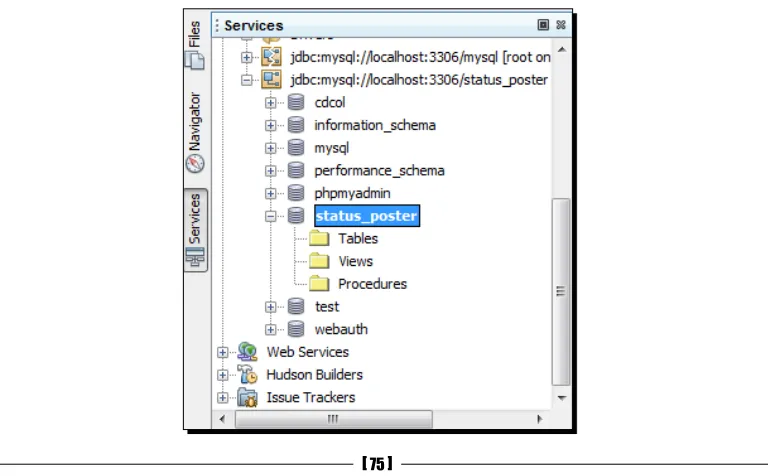
Servicesmanager: From Window|Services or by pressing Ctrl+5, you can fix the ServicesManager pane of the IDE to use the pre-registered SoftwareasaService
(SaaS) web-service components. Drag the item from the Services tab, drop the item
in the resource class, and you will have the necessary code generated to access the service. Also, the Services pane gives you access to all your connected databases:
Taskmanager: From Window|Tasks or by pressing Ctrl+6, you can fix the Tasks
Navigate: From the Navigate menu, the IDE provides navigation to a file, type, symbol, line, bookmark, and so on. Such features are used for a quick jump over the desired location in the project, or outside of it:
Press Alt+Shift+O to open Gotofile, Ctrl+O to open
Gototype, Ctrl+B to open Gotodeclaration, Ctrl+G to
open Gotoline, and so on.
Templatesandsampleapplications: You can start a similar new project with the given sample applications in the IDE. To do this, start a new project by pressing Ctrl+Shift+N
and choose Samples | PHP from ProjectCategories. Also, you may use templates,
such as the templates of PHP files, and web pages from Tools|Templates:
Customizableworkspaceandwindows: The entire IDE workspace is fully
You can manage windows in your workspace easily; double-click on an editor tab to expand it. Ctrl+Tab shows the opened file's list, and pressing it again will cause it to switch between the editor tabs. Ctrl+Pageup/Down switches among the opened files. Press Ctrl+W to close the current file window.
Multiplemonitors: You can undock any editor tab and drag it outside the IDE, so that it can act like an independent window, and you can easily move it to a second screen. Also, you can reverse the procedure to dock it back again in the previous screen. Note that all of the shortcuts will remain the same in the second screen; for example, drag out the Files tab and click anywhere else in the IDE, and then press
CTRL+2 to regain focus on the files window.
Local history: Local history is similar to a classic versioning system in which it stores multiple versions of files. However, the storage is only local to your NetBeans installation. Local history enables you to examine the content within files and folders on time, lets you diff them, and most importantly, lets you roll back your sources to some previous state, or revert already deleted files or folders.
Pop quiz – familiarizing yourself with basic IDE features
1. Which is not an IDE feature?a. Source code editor b. Debugger
c. Plugin manager d. Source code optimizer
2. Under which menu can all the IDE windows be enabled or focused? a. File menu
b. Tools menu c. Navigate menu d. Windows menu
3. Which is the correct command to open the GotoaFile window?
a. CTRL+F b. CTRL+SHIFT+O c. ALT+SHIFT+O d. CTRL+G
4. Why is the keyboard shortcut CTRL+SHIFT+N used?
a. To open a new template file b. To open a new PHP file c. To open a new PHP project d. To open the Project window
5. What is the keyboard shortcut to fix the Filemanager pane? a. CTRL+1
Exploring the editor for PHP
In this section, we will learn how to get the most out of the editor for PHP in NetBeans. The editor provides very handy code-authoring features, and we shall learn those important features by testing them in our editor. Once we are familiar with the following features, we will rule the editor. All you have to do is just practice the commands mentioned for the following features. Here we go:
Syntaxhighlighting: This editor enables the highlighting of syntax elements, such as PHP keywords, variables, constants, HTML tags, and input form attributes. In the editor, the current line is marked with a light blue background, and the line where any error occurred is displayed with a red underline, as shown in the following screenshot:
GoToDeclaration: The GoToDeclaration feature provides an instant jump to the
line where a variable or method has been declared from its occurrence:
In order to use this feature, place the cursor on a desired variable or method, and press Ctrl+B, or click on the context menu that appeared on the right-hand side of the screen, choose Navigate|
GotoDeclaration to have your cursor placed at the start of the line where it was declared. Pressing Ctrl+left-click will also direct you to the declaration, along with all the occurrences that are highlighted.
From Window|Navigating|Navigator or by pressing Ctrl+7, you can focus on the code navigator pane. The listed items are iconized according to relevant item properties.
Click on the "–" or "+" button from the left side of the screen to fold and unfold code blocks.
Smartindent: The editor provides an automatic indentation before the code, while typing and hitting on new lines:
Type an if or for statement line, and press Enter to see the next line indented.
Select the code block you want to format. Right-clickon the context menu, choose Format, or press Alt+Shift+F. To format the entire code file, choose Source|Format, or press Ctrl+A and Alt+Shift+F.
Bracketcompletion: The consecutive second character of the paired characters item such as single quotes (''), double quotes (""), braces (()), and brackets ([]) are automatically added with the first character type, and the paired consecutive character is removed with the first one deleted again. Also, the pair of curly brackets ({}) is completed when the first character is typed, and Enter is pressed. A pair of braces, curly braces, and brackets are highlighted with the yellow color when any of the characters from matching pairs are pointed at with the cursor, as follows:
In the previous auto-suggestion list, you may traverse using the Up/Down arrow keys. You can hit Enter to insert the desired function name with the placeholders, to insert the parameters within the brackets:
Definingavariabletypeincomments: You can define a variable and its type in comments, in the format /* @var $variable type */. The var tag will be in bold font, if the comment was written correctly:
Type vdoc, and press Tab to use the code template for the variable documentation. A comment will be generated, which defines a variable. Once the variable name is selected, change it, and press Tab again, to change the type:
The code template automatically generates a variable name and type in the context of a comment position; that is, if you use the template just before the variable was used, then it will suggest that variable name and type.
Errormessages: The editor parses your PHP code while typing, marks the syntax errors with a red underline, places a red error bullet in the left margin, and a red error scroll position in the right margin.
You can see the error details in a tool tip, by hovering over the erroneous line or by clicking on the red error bullet on the left side of the screen. Press Alt+Enter to show error hints.
Pop quiz – exploring the editor for PHP
1. Which functionality is not an editor feature?a. Source code formatting b. Code auto completion c. Syntax highlighting d. Debugging
2. How do you format a code block?
a. Select the code block by right-clicking on the context menu, and choose Format
b. Select the code block and press ALT+SHIFT+F
c. Select the code block and choose Source|Format
d. All of the above
3. What is the syntax-searching keyboard command? a. CTRL+W
b. CTRL+F
c. CTRL+ALT+F
d. CTRL+SHIFT+S
4. How to go to the declaration of a method?
a. Place the cursor on the method and press CTRL+B
b. Right-click on the method name, and choose Navigate|GotoDeclaration
from the context menu
c. Press CTRL+left-click on the method name
Exploring more with the editor
We have learned about the editor and practiced the shortcuts given as tips. In the next two sections, we will learn to use the rename refactoring, code completion, and code generator features of the editor, which are really helpful to boost coding.
In the next section, we will discuss and practice the following important editor features:
Rename refactoring and instant rename Code completion
Code generators
Using rename refactoring and instant rename
You can rename an element, such as a class name, across all files in a project. This feature enables you to preview the possible changes in every location for that desired rename, and you can exclude individual occurrences from being renamed.
A change in even one instance of that name will rename all other instances in the file simultaneously:
To use rename refactoring, select the element to rename, then right-click, and select
Refactor|Rename. A dialog box opens for you to rename the element, as shown in
In this screenshot, provide a new name for the element and click on Preview. The refactoring
window opens with all the instances of the element listed within the project:
From this screenshot, you can exclude the instances and apply DoRefactoring to the selected instances.
See the Appendix for NetBeans IDE keyboard shortcuts.
Pop quiz – using rename refactoring and instant rename
1. How do you refactor a variable name throughout the project?a. Select the variable, then right-click and select Refactor|Rename
b. Place the cursor on the variable name, and press CTRL+SHIFT+R
c. Select the variable, and select Source|Rename
d. None of the above
2. Which is the shortcut on a variable for instant rename?
a. SHIFT+ALT+R
b. CTRL+R
c. CTRL+ALT+R
Using code completion
The code completion feature enables us to complete the desired syntax, methods, or code with some minimal keystrokes, or just with a keyboard command.
Following are the code completion features provided by the editor:
Snippets: This automatically generates code snippets for various elements.
Select Tools|Pallete|PHPCodeClips, and PalleteManager will open. Drag the
relevant item icon from PalleteContent, and drop it to the relevant position in your
code. A dialog box will appear for specifying the parameters of the corresponding code item. Fill in the parameters, and have the code generated in that place.
Context-sensitiveproposals: The editor provides context-sensitive proposals for any number of starting symbols for:
A PHP keyword, including if, else, elseif, while, switch, function
and so on.
A PHP built-in function.
Type the starting characters of a keyword or a function name, and press Ctrl+Space bar. A drop-down list will show all the applicable proposals for that context. Each proposal is supplied with a description and parameter hints:
To generate a list of PHP keywords, which is applicable in the current context, press
To obtain a hint on a variable, type the dollar ($) symbol. A list of currently-available local and global variables will be displayed:
You can see that the abbreviation is replaced with the corresponding PHP keyword, and the code template for that keyword has been provided by the editor, as per the following screenshot:
To view the list of code templates with their associated abbreviations, Select Tools
|Options|Editor|CodeTemplates. You can add/remove or edit your PHP code
Note that coding methods change over time. So, it is recommended to have a look into your templates every few months, and update them to comply with any new changes.
Codecompletioninconstructors: After the new keyword, code completion is displayed along with the list of constructors and parameters for all the classes available in the current project:
Along with being selected, all the database connections registered with the IDE will be displayed as follows:
After selecting the database connection, the SQL code completion feature offers all the tables associated with that connection:
Also, the list of columns (if any) will be displayed from that table. SQL code completion also works with table aliases.
PHP5.3namespaces: Code completion supports PHP 5.3 namespaces.
Overriddenandimplementedmethods: Code completion between class members offers to override or implement methods.
Press Ctrl+Space bar wherever you wish to use code completion. See the Appendix for NetBeans IDE keyboard shortcuts.
Pop quiz – using code completion
1. Why is the code completion feature used? a. To refactor a variable
b. To write a new PHP class
2. Which PHP language feature does the code completion feature not support? a. Namespace
b. Class declaration c. Override methods d. None of the above
3. What is the shortcut to enable the context-sensitive proposal? a. Ctrl+Shift+Space
b. Ctrl+Space c. Ctrl+S
d. Ctrl+Alt+Space
Using the code generator
The editor provides context-sensitive code generators, so as to generate a database
connection, constructors, getters or setters, and so on. A specific code generator will appear in the context of cursor location. For example, inside a class, it will display for generating constructors, getters, setters, and so on.
We will discuss the following code generators:
Constructors: Inside a PHP class (but not inside any method's body), you can open the constructor generator by pressing Alt+Insert. Select GenerateConstructor, and a
dialog box similar to the following screenshot will appear:
The window comes with a list of available fields that you can initialize in the constructor. Field names are used as parameters of the constructor. You can decide not to select any fields; an empty constructor will be generated in such a case.