11
g
Release 1 (11.1.1)
E14309-08Copyright © 1991, 2011, Oracle and/or its affiliates. All rights reserved.
Primary Author: Debapriya Datta
Contributing Author: Michael Teger
Contributor: Sid Choudhury
This software and related documentation are provided under a license agreement containing restrictions on use and disclosure and are protected by intellectual property laws. Except as expressly permitted in your license agreement or allowed by law, you may not use, copy, reproduce, translate, broadcast, modify, license, transmit, distribute, exhibit, perform, publish, or display any part, in any form, or by any means. Reverse engineering, disassembly, or decompilation of this software, unless required by law for interoperability, is prohibited.
The information contained herein is subject to change without notice and is not warranted to be error-free. If you find any errors, please report them to us in writing.
If this is software or related documentation that is delivered to the U.S. Government or anyone licensing it on behalf of the U.S. Government, the following notice is applicable:
U.S. GOVERNMENT RIGHTS Programs, software, databases, and related documentation and technical data delivered to U.S. Government customers are "commercial computer software" or "commercial technical data" pursuant to the applicable Federal Acquisition Regulation and agency-specific supplemental regulations. As such, the use, duplication, disclosure, modification, and adaptation shall be subject to the restrictions and license terms set forth in the applicable Government contract, and, to the extent applicable by the terms of the Government contract, the additional rights set forth in FAR 52.227-19, Commercial Computer Software License (December 2007). Oracle America, Inc., 500 Oracle Parkway, Redwood City, CA 94065.
This software or hardware is developed for general use in a variety of information management applications. It is not developed or intended for use in any inherently dangerous applications, including applications that may create a risk of personal injury. If you use this software or hardware in dangerous applications, then you shall be responsible to take all appropriate fail-safe, backup, redundancy, and other measures to ensure its safe use. Oracle Corporation and its affiliates disclaim any liability for any damages caused by use of this software or hardware in dangerous applications.
Oracle and Java are registered trademarks of Oracle and/or its affiliates. Other names may be trademarks of their respective owners.
Intel and Intel Xeon are trademarks or registered trademarks of Intel Corporation. All SPARC trademarks are used under license and are trademarks or registered trademarks of SPARC International, Inc. AMD, Opteron, the AMD logo, and the AMD Opteron logo are trademarks or registered trademarks of Advanced Micro Devices. UNIX is a registered trademark of The Open Group.
List of Examples List of Figures List of Tables
Preface
... xxxiiiAudience... xxxiii
Documentation Accessibility ... xxxiii
Related Documents ... xxxiii
Conventions ... xxxiv
Part I
Concepts
1
Design Console Overview
1.5.4 Working with a Set of Query Results ... 1-16 1.5.5 Optimizing Query Performance ... 1-16 1.5.6 Exceeding the Limit for a Result Set ... 1-17 1.6 Forms Accessible from the Design Console ... 1-17 1.6.1 User Management... 1-18 1.6.2 Resource Management... 1-19 1.6.3 Process Management... 1-19 1.6.4 Administration ... 1-20 1.6.5 Development Tools... 1-20 1.6.5.1 Business Rule Definition... 1-20
2
Developing Adapters
2.12 Working with Responses ... 2-35 2.12.1 To Create a Response ... 2-36 2.12.2 To Modify a Response... 2-36 2.12.3 To Delete a Response... 2-37 2.13 Scheduling Rule Generators and Entity Adapters... 2-37 2.13.1 Scheduling Rule Generators and Entity Adapters... 2-38
3
Using Adapters
4.2 Mapping Oracle Identity Manager Attributes... 4-4 4.3 Sending Event Callbacks... 4-6 4.4 Configuring the Callback Service ... 4-8 4.4.1 Understanding CallbackConfiguration.xml ... 4-8 4.4.2 Importing CallbackConfiguration.xml ... 4-12 4.5 Troubleshooting the Callback Service... 4-13
5
Developing Rules
5.1 Overview of Business Rule Definition... 5-1 5.2 Event Handler Manager Form ... 5-1 5.3 Data Object Manager Form ... 5-4 5.3.1 Tabs of the Data Object Manager Form... 5-5 5.3.1.1 Attach Handlers Tab ... 5-5 5.3.1.1.1 Assigning an Event Handler or Adapter to a Data Object ... 5-6 5.3.1.1.2 Organizing the Execution Schedule of Event Handlers or Adapters ... 5-6 5.3.1.1.3 Removing an Event Handler or Adapter from a Data Object ... 5-6 5.3.1.2 Map Adapters Tab... 5-7 5.4 Reconciliation Rules Form ... 5-7 5.4.1 Defining a Reconciliation Rule ... 5-8 5.4.2 Adding a Rule Element... 5-9 5.4.3 Nesting a Rule Within a Rule... 5-11 5.4.4 Deleting a Rule Element or Rule ... 5-11
6
Developing Scheduled Tasks
6.1 Overview of Task Creation... 6-1 6.1.1 Steps in Task Creation... 6-1 6.1.2 Example of Scheduled Task ... 6-2 6.2 Define the Metadata for the Scheduled Task... 6-2 6.3 Configure the Scheduled Task XML File... 6-2 6.4 Develop the Scheduled Task Class... 6-3 6.5 Configure the Plug-in XML File... 6-4 6.6 Create the Directory Structure for the Scheduled Task... 6-5
7
Developing Plug-ins
7.4.1 Registering and Unregistering Plug-ins By Using APIs ... 7-6 7.4.2 Registering and Unregistering Plug-ins By Using the Plugin Registration Utility.... 7-7 7.5 About Mapped Values ... 7-8 7.5.1 Accessing Mapped Values... 7-9 7.6 Plug-in Points ... 7-9
8
Developing Event Handlers for Extending User Management Operations
8.1 An Overview of User Management Operations... 8-1 8.2 Extending User Management Operations with Event Handlers ... 8-2 8.2.1 Understanding Elements in Event Handlers XML Files... 8-2 8.2.2 Writing Custom Event Handlers... 8-4 8.2.2.1 Implementing Custom Event Handlers ... 8-4 8.2.2.2 Creating Plug-ins for Custom Event Handlers ... 8-7 8.2.2.3 Defining Custom Events... 8-8 8.3 Troubleshooting an Event Handler... 8-9
9
Configuring LDAP Container Rules
10
Understanding Context
10.1 Child Context... 10-1 10.2 Context Types... 10-2
Part II
Application-Specific Connectors
11
Developing Resource Objects
11.9.3.2.2 Usage Tab ... 11-57 11.9.3.3 Rule Designer Table ... 11-57 11.9.4 Resource Objects Form... 11-58 11.9.4.1 Creating a Resource Object ... 11-60 11.9.4.2 Tabs on the Resource Objects Form ... 11-61 11.9.4.2.1 Depends On Tab ... 11-62 11.9.4.2.2 Object Authorizers Tab... 11-62 11.9.4.2.3 Process Determination Rules Tab ... 11-63 11.9.4.2.4 Event Handlers/Adapters Tab... 11-64 11.9.4.2.5 Resource Audit Objectives ... 11-64 11.9.4.2.6 Status Definition Tab ... 11-65 11.9.4.2.7 Administrators Tab ... 11-67 11.9.4.2.8 Password Policies Rule Tab ... 11-68 11.9.4.2.9 User-Defined Fields Tab... 11-69 11.9.4.2.10 Process Tab ... 11-69 11.9.4.2.11 Object Reconciliation Tab... 11-70 11.9.4.3 Multiple Trusted Source Reconciliation... 11-73 11.9.4.3.1 Multiple Trusted Source Reconciliation Using MTS-Compatible Connectors...
11-74
11.9.4.3.2 Multiple Trusted Source Reconciliation Using Connectors That Are Not MTS-Compatible 11-76
11.9.5 Service Account Management ... 11-81
12
Developing Provisioning Processes
Lookup.USR_PROCESS_TRIGGERS Fields 12-18
12.3.3.2 Integration Tab... 12-20 12.3.3.2.1 Assigning an Adapter or Event Handler to a Process Task ... 12-20 12.3.3.2.2 Mapping Adapter Variables ... 12-21 12.3.3.2.3 Removing an Adapter or Event Handler from a Process Task ... 12-22 12.3.3.3 Task Dependency Tab... 12-22 12.3.3.3.1 Assigning a Preceding Task to a Process Task... 12-22 12.3.3.3.2 Removing a Preceding Task from a Process Task ... 12-22 12.3.3.3.3 Assigning a Dependent Task to a Process Task... 12-23 12.3.3.3.4 Removing a Dependent Task from a Process Task ... 12-23 12.3.3.4 Responses Tab... 12-23 12.3.3.4.1 Adding a Response to a Process Task ... 12-23 12.3.3.4.2 Removing a Response from a Process Task... 12-24 12.3.3.4.3 Assigning a Generated Task to a Process Task ... 12-24 12.3.3.4.4 Removing a Generated Task From a Process Task... 12-25 12.3.3.5 Undo/Recovery Tab ... 12-25 12.3.3.5.1 Assigning an Undo Task to a Process Task ... 12-25 12.3.3.5.2 Removing an Undo Task From a Process Task... 12-26 12.3.3.5.3 Assigning a Recovery Task to a Process Task... 12-26 12.3.3.5.4 Removing a Recovery Task from a Process Task ... 12-26 12.3.3.6 Notification Tab ... 12-26 12.3.3.6.1 Assigning an E-Mail Notification to a Process Task ... 12-27 12.3.3.6.2 Removing an E-mail Notification from a Process Task ... 12-27 12.3.3.7 Task to Object Status Mapping Tab ... 12-28 12.3.3.7.1 Mapping a Process Task Status to a Provisioning Status ... 12-28 12.3.3.7.2 Unmapping a Process Task Status From a Provisioning Status... 12-29 12.3.3.8 Assignment Tab of the Editing Task Window ... 12-29 12.3.3.8.1 Adding a Rule to a Process Task... 12-30 12.3.3.8.2 Removing a Rule from a Process Task ... 12-31
13
Developing Process Forms
13.1.2.5 Administrators Tab ... 13-15 13.1.2.5.1 Assigning Privileges to a User Group for a Record of a User-Created Form...
13-16
13.1.2.5.2 Removing User Group Privileges for a Record of a User-Created Form. 13-16 13.1.2.6 Usage Tab ... 13-17 13.1.2.7 Pre-Populate Tab ... 13-17 13.1.2.8 Default Columns Tab ... 13-17 13.1.2.9 User Defined Fields Tab ... 13-17 13.1.3 Creating an Additional Version of a Form ... 13-18 13.2 Error Message Definition Form ... 13-18 13.2.1 Creating an Error Message ... 13-19
14
Customizing Reconciliation Operations
14.1 Developing Reconciliation Scheduled Tasks ... 14-1 14.2 Understanding Reconciliation APIs... 14-2 14.3 Postprocessing for Trusted Reconciliation... 14-3 14.4 Troubleshooting Reconciliation ... 14-3 14.4.1 Troubleshooting General Reconciliation Issues ... 14-3 14.4.2 Troubleshooting Trusted Source Reconciliation ... 14-4 14.4.3 Troubleshooting Target Resource Reconciliation ... 14-7 14.4.4 Troubleshooting Database-Related Reconciliation Issues ... 14-9
15
Developing Lookup Definitions, UDFs, and Remote Manager
15.1 Overview... 15-1 15.2 Lookup Definition Form ... 15-1 15.2.1 Creating a Lookup Definition ... 15-3 15.2.2 Lookup Code Information Tab ... 15-3 15.2.2.1 Creating and Modifying a Lookup Value... 15-4 15.2.2.2 Deleting a Lookup Value... 15-4 15.2.3 Configuring Challenge Questions for the User... 15-5 15.3 User Defined Field Definition Form... 15-5 15.3.1 Selecting the Target Form for a User-Defined Field ... 15-6 15.3.2 Tabs on the User Defined Field Definition Form ... 15-6 15.3.2.1 User Defined Columns Tab... 15-6 15.3.2.2 Properties Tab ... 15-10 15.3.2.3 Administrators Tab ... 15-11 15.4 Remote Manager Form... 15-11
Part III
Identity Connector Framework
16.2.4 The ConnectorInfo Interface ... 16-4 16.2.5 The APIConfiguration Interface ... 16-4 16.2.6 The ConfigurationProperties Interface... 16-4 16.2.7 The ConnectorFacadeFactory Class ... 16-5 16.2.8 The ConnectorFacade Interface ... 16-5 16.3 Introducing the ICF SPI... 16-5 16.3.1 Implementing the Required Interfaces ... 16-5 16.3.1.1 org.identityconnectors.framework.spi.Connector... 16-6 16.3.1.1.1 Implementing the init Method ... 16-7 16.3.1.1.2 Implementing the dispose Method... 16-7 16.3.1.1.3 Implementing the getConfiguration Method... 16-8 16.3.1.2 org.identityconnectors.framework.spi.Configuration ... 16-8 16.3.1.2.1 The validate() Method ... 16-9 16.3.1.2.2 The setConnectorMessages() Method ... 16-9 16.3.1.2.3 The getConnectorMessages() Method... 16-10 16.3.2 Implementing the Feature-based Interfaces ... 16-10 16.3.2.1 org.identityconnectors.framework.spi.PoolableConnector... 16-10 16.3.2.2 org.identityconnectors.framework.spi.AttributeNormalizer ... 16-11 16.3.3 Implementing the Operation Interfaces ... 16-12 16.3.3.1 Implementing the SchemaOp Interface... 16-13 16.3.3.2 Implementing the CreateOp Interface... 16-13 16.3.3.3 Implementing the DeleteOp Interface ... 16-14 16.3.3.4 Implementing the SearchOp Interface... 16-15 16.3.3.4.1 Implementing the createFilterTranslator Method ... 16-15 16.3.3.4.2 Implementing the executeQuery Method... 16-16 16.3.3.5 Implementing the UpdateOp Interface ... 16-17 16.3.4 Common Classes... 16-18 16.4 Extending an Identity Connector Bundle... 16-19 16.5 Using an Identity Connector Server... 16-20 16.5.1 Using the Java Connector Server... 16-22 16.5.1.1 Installing and Configuring a Java Connector Server ... 16-22 16.5.1.2 Running the Java Connector Server on Microsoft Windows ... 16-23 16.5.1.3 Running the Java Connector Server on Solaris and Linux ... 16-24 16.5.1.4 Installing an Identity Connector in a Java Connector Server ... 16-25 16.5.1.5 Using SSL to Communicate with a Connector Server... 16-25 16.5.2 Using the Microsoft .NET Framework Connector Server... 16-25 16.5.2.1 Installing the .NET Connector Server... 16-26 16.5.2.2 Configuring the .NET Connector Server... 16-26 16.5.2.3 Configuring Trace Settings... 16-27 16.5.2.4 Running the .NET Connector Server ... 16-27 16.5.2.5 Installing Multiple Connectors on a .NET Connector Server ... 16-27
17
Developing Identity Connectors
17.2.2 Creating Basic Identity Connector Metadata... 17-19 17.2.2.1 Creating the IT Resource Type Definition ... 17-19 17.2.2.2 Creating the Resource Object... 17-20 17.2.2.3 Creating Lookups ... 17-21 17.2.2.3.1 Creating the Main Configuration Lookup... 17-21 17.2.2.3.2 Creating Object Type Configuration Lookup ... 17-22 17.2.3 Creating Provisioning Metadata ... 17-23 17.2.3.1 Creating a Process Form ... 17-24 17.2.3.2 Creating Adapters ... 17-26 17.2.3.3 Creating A Process Definition ... 17-27 17.2.3.4 Creating a Provisioning Attribute Mapping Lookup... 17-30 17.2.3.4.1 Field Flags Used in the Provisioning Attributes Map... 17-31 17.2.4 Creating Reconciliation Metadata ... 17-32 17.2.4.1 Creating a Reconciliation Schedule Task ... 17-32 17.2.4.1.1 Defining the Schedule Task ... 17-32 17.2.4.1.2 Creating a Scheduled Task... 17-33 17.2.4.2 Creating a Reconciliation Profile... 17-34 17.2.4.3 Setting a Reconciliation Action Rule... 17-35 17.2.4.4 Creating Reconciliation Mapping ... 17-36 17.2.4.4.1 Field Flags Used in the Reconciliation Attributes Map ... 17-37 17.2.4.5 Defining a Reconciliation Matching Rule ... 17-37 17.3 Provisioning a Flat File Account... 17-38
Part IV
Generic Technology Connectors
18
Understanding Generic Technology Connectors
18.4 Connector Objects Created by the Generic Technology Connector Framework... 18-9 18.4.1 Both Reconciliation and Provisioning Are Selected ... 18-9 18.4.2 Only Reconciliation Is Selected... 18-11 18.4.3 Only Provisioning Is Selected ... 18-11 18.5 Roadmap for Information on Generic Technology Connectors in This Guide... 18-11
19
Predefined Providers for Generic Technology Connectors
19.1 Shared Drive Reconciliation Transport Provider ... 19-1 19.2 CSV Reconciliation Format Provider ... 19-7 19.3 SPML Provisioning Format Provider... 19-7 19.3.1 Run-Time Parameters... 19-9 19.3.2 Design Parameters... 19-9 19.3.3 Nonmandatory Parameters... 19-11 19.3.4 Parameters with Predetermined Values... 19-11 19.4 Web Services Provisioning Transport Provider ... 19-12 19.4.1 Configuring SSL Communication Between Oracle Identity Manager and the Target
System Web Service 19-12
19.5 Transformation Providers... 19-15 19.5.1 Concatenation Transformation Provider ... 19-15 19.5.2 Translation Transformation Provider... 19-16 19.5.2.1 Configuring Account Status Reconciliation ... 19-18 19.6 Validation Providers... 19-21
20
Creating Custom Providers for Generic Technology Connectors
22.2 Configuration Issues for Generic Technology Connectors ... 22-7 22.2.1 Names of Generic Technology Connectors and Connector Objects ... 22-7 22.2.2 Step 3: Modify Connector Configuration Page ... 22-8 22.2.3 Errors During Connector Creation... 22-11 22.2.4 Errors During Reconciliation ... 22-11 22.2.5 Errors During Provisioning ... 22-13
Part V
Requests and Approval Processes
23
Configuring Requests
23.1 Step 1: Creating a Request Dataset for the Resources ... 23-1 23.1.1 Elements and Properties ... 23-3 23.1.1.1 The request-data-set Element ... 23-3 23.1.1.2 The DataSetValidator Element ... 23-4 23.1.1.3 The AttributeReference Element ... 23-5 23.1.1.3.1 The PrePopulationAdapter Element ... 23-9 23.1.1.3.2 The lookupValues Element ... 23-10 23.1.1.3.3 The lookupQuery Element... 23-11 23.1.1.4 The Attribute Element ... 23-12 23.1.2 Sample Request Dataset... 23-12 23.1.3 Child Data ... 23-15 23.1.4 Common Request Dataset ... 23-20 23.1.5 Configuring Localized Values for Request Datasets ... 23-20 23.1.5.1 Localization for Request Dataset Attributes... 23-20 23.1.5.2 Localization of Column Names in LookupQuery for Dataset Attributes... 23-23 23.2 Step 2: Uploading Request Datasets into MDS... 23-24 23.3 Step 3: Creating SOA Composites Required for Approval... 23-24 23.4 Step 4: Registering the SOA Composites in Oracle Identity Manager... 23-24 23.5 Step 5: Defining Request Approvals ... 23-25 23.5.1 Approval Workflows ... 23-25 23.5.2 Approval Levels... 23-26 23.5.2.1 Template-Level Approval ... 23-27 23.5.2.2 Request-Level Approval... 23-27 23.5.2.3 Operation-Level Approval... 23-28 23.5.3 Creating Approval Policies ... 23-29 23.6 Step 6: Creating Request Templates... 23-30 23.7 Extending Request Management Operations ... 23-30 23.7.1 Running Custom Code Based on Request Status Change... 23-30 23.7.2 Validating Request Data ... 23-31 23.7.3 Prepopulation of an Attribute Value During Request Creation ... 23-31
24
Understanding Approval Process Development in Oracle SOA Suite
24.3 Developing an Approval Process for Oracle Identity Manager... 24-4 24.4 Monitoring Oracle Identity Manager SOA Composites... 24-5 24.5 Enabling Oracle Identity Manager to Connect to SOA ... 24-5
25
Developing SOA Composites
25.1 Creating New SOA Composites ... 25-2 25.1.1 Creating a New SOA Composite... 25-2 25.1.2 Deploying a SOA Composite in Oracle SOA Server ... 25-3 25.1.3 Prerequisites for Communication to Oracle Identity Manager Through SSL Mode ...
25-4
25.1.4 Registering a SOA Composite with Oracle Identity Manager ... 25-4 25.2 Modifying Existing SOA Composites ... 25-5 25.2.1 Modifying a SOA Project in JDeveloper... 25-6 25.2.2 Disabling a SOA Composite on Oracle Identity Manager... 25-6 25.2.3 Deploying a SOA Composite in Oracle SOA Server ... 25-7 25.2.4 Enabling a SOA Composite with Oracle Identity Manager ... 25-7
26
Using Oracle Identity Manager APIs in SOA Composites
26.1 Software Prerequisites... 26-1 26.2 Configuring the SOA Composite By Using JDeveloper... 26-1 26.2.1 Setting an Application Server Connection in JDeveloper... 26-2 26.2.2 Setting Up the SOA Composite in JDeveloper ... 26-2 26.2.3 Updating the SOA Composite ... 26-3 26.2.4 Deploying the SOA Composite ... 26-6 26.2.5 Testing the Setup ... 26-7
Part VI
Segregation of Duties
27
Using Segregation of Duties (SoD)
27.8.1 Modifying the Approval Workflow for SoD ... 27-13 27.8.2 Modifying the Provisioning Workflow for SoD... 27-30 27.9 Marking Fields as Entitlements ... 27-34 27.9.1 Marking Request Dataset Attributes That Hold Entitlement Data ... 27-34 27.9.2 Marking Child Process Form Tables That Hold Entitlement Data ... 27-34 27.10 Custom Combination of Target Systems and SoD Engines... 27-35 27.10.1 Using a Custom Target System... 27-35 27.10.1.1 Addressing Prerequisites ... 27-35 27.10.1.2 Creating the Transformation Layer ... 27-36 27.10.1.3 Deploying the Transformation Layer ... 27-36 27.10.1.4 Modifying the Registration XML File... 27-36 27.10.1.5 Registering the New Target System... 27-38 27.10.1.5.1 Running the Registration Script and Providing Registration Information...
27-38
27.10.1.5.2 Recording the Names of the System Types ... 27-41 27.10.2 Adding Custom SoD Engine... 27-42 27.10.2.1 Addressing Prerequisites ... 27-43 27.10.2.2 Creating an IT Resource to Hold Information about the SoD Engine ... 27-43 27.10.2.3 Implementing the Service Components for the Provider... 27-44 27.10.2.4 Deploying the Service Components ... 27-44 27.10.2.5 Modifying the Registration XML File for the New SoD Engine... 27-44 27.10.2.6 Registering the New SIL Provider ... 27-46 27.11 Performing Role SoD Check with Oracle Identity Analytics ... 27-46 27.11.1 Enabling Role SoD Check ... 27-47 27.11.2 Using Role SoD Check ... 27-47 27.11.2.1 SoD Check When A User Requests a Role... 27-47 27.11.2.2 SoD Check When A User Revokes a Role... 27-48 27.11.2.3 SoD Check When an Administrator Requests To Assign Roles ... 27-49 27.11.2.4 SoD Check When an Administrator Requests To Revoke Roles ... 27-51 27.11.2.5 SoD Check for Assigning/Revoking Roles with Callback Policy Request ... 27-52 27.12 Using SoD in Provisioning Workflow ... 27-52 27.12.1 Direct Provisioning... 27-52 27.12.2 Updating Entitlements... 27-53 27.12.3 Request Provisioning ... 27-54 27.12.4 Creating a Request to Modify Provisioned Resource... 27-54 27.12.5 Request Provisioning With the DefaultSODApproval Workflow ... 27-55 27.12.6 Request Provisioning with Approver-Only Field and With the DefaultSODApproval
Workflow 27-56
27.12.7 Requesting for Self... 27-56 27.12.8 Provisioning Based on Access Policies ... 27-56 27.12.9 Updating Entitlements By Using Provisioning Based on Access Policies... 27-57 27.13 Enabling Logging for SoD-Related Events... 27-57 27.14 Troubleshooting SoD Check... 27-57
28.1 Branding Customization... 28-1 28.1.1 Login Page ... 28-2 28.1.2 Identity Administration ... 28-4 28.1.3 Unauthenticated Self-Service ... 28-6 28.1.4 Authenticated Self Service... 28-7 28.1.5 Advanced Administration... 28-9 28.2 Style Sheet Modifications... 28-10 28.2.1 Introduction to the Style Sheets... 28-10 28.2.2 Creating Custom Skins and Overriding Style Sheets... 28-11 28.2.3 Style Sheets in Transitional UI ... 28-12 28.2.3.1 Files to Modify ... 28-12 28.2.3.2 Customizing the Appearance of the Transitional UI ... 28-12 28.3 Renaming Button Labels... 28-12 28.3.1 Identity Administration ... 28-12 28.3.2 Other Consoles ... 28-13 28.3.3 Transitional UI Pop-ups... 28-14 28.3.3.1 Files to Modify ... 28-15 28.3.3.2 Customizing Descriptive Text and Labels ... 28-15 28.4 Working with Menus and Tabs ... 28-15 28.4.1 Oracle Identity Administration ... 28-16 28.4.2 Other Consoles ... 28-17 28.5 Disabling Features ... 28-18 28.5.1 Disabling Access to Features Through the Authorization Policies ... 28-18 28.5.2 Other Administration Features... 28-19 28.5.3 Other Consoles ... 28-19 28.6 Adding or Deleting Columns in Console Tables ... 28-19 28.6.1 Identity Administration ... 28-19 28.6.2 Transitional UI ... 28-30 28.6.2.1 Customizing Search Drop-Down Item... 28-31 28.6.2.2 Customizing Number of Search Drop-Down Items and Search Results ... 28-31 28.7 Data Customization ... 28-32 28.7.1 Advanced Administration... 28-32 28.7.2 Unauthenticated Self Service ... 28-32 28.7.3 Authenticated Self Service... 28-32 28.8 Injecting Custom URLs ... 28-32 28.8.1 Custom URLs for the Identity Administration ... 28-32 28.8.2 Custom URLs for Other Consoles ... 28-33 28.9 Changing Popup Properties ... 28-33 28.10 Customizing the Workflow Designer ... 28-34
30.3 Design Console Actions ... 30-16
Part VIII
APIs and Web Services
31
Using APIs
31.1 Accessing Oracle Identity Manager Services ... 31-1 31.1.1 Using OIMClient... 31-1 31.1.2 Using the tcUtilityFactory ... 31-2 31.2 Oracle Identity Manager Services... 31-2 31.2.1 Services Introduced in Oracle Identity Manager 11g Release 1 (11.1.1) ... 31-3 31.2.2 Legacy Services or Utilities... 31-3 31.3 Commonly Used Services... 31-3 31.3.1 Mapping Between Legacy and New Services ... 31-4 31.4 Developing Clients for Oracle Identity Manager... 31-4 31.4.1 Prerequisites for Developing Clients ... 31-4 31.4.2 Setup and Configuration ... 31-4 31.5 Working With Legacy Oracle Identity Manager APIs ... 31-5 31.5.1 Using a Result Set Object ... 31-5 31.5.2 Handling Oracle Identity Manager Exceptions... 31-6 31.5.3 Cleaning Up... 31-6 31.6 Code Sample ... 31-6
32
Using SPML Services
32.1 Introduction ... 32-1 32.1.1 About SPML Interactions ... 32-1 32.1.2 Integration Interface ... 32-2 32.2 Create Identity (SPML Core Service: addRequest) ... 32-2 32.3 Modify Users, Roles, Change Attributes and Role Memberships (SPML Core Service:
modifyRequest) 32-3
32.4 Delete an Identity or Role (SPML Core Service: deleteRequest)... 32-4 32.5 Check Request Status (SPML Core Service: statusRequest) ... 32-4 32.6 List Available Targets (SPML Core Service: listTargets)... 32-5 32.7 Disable a User (SPML Suspend Service: suspendRequest) ... 32-5 32.8 Enable a User (SPML Suspend Service: resumeRequest) ... 32-6 32.9 Check if User is Active (SPML Suspend Service: activeRequest) ... 32-6 32.10 Validate a Username (SPML Username Service: validateUsername) ... 32-7 32.11 Obtain a Username (SPML Username: suggestUsername) ... 32-7 32.12 Securing SPML Web Services... 32-8 32.12.1 About Web Services Security ... 32-8 32.12.2 A Request Example ... 32-8 32.12.3 Applying Policies... 32-9 32.13 Operations Not Supported ... 32-9
33.1 Setting up the Environment for MDS Utilities ... 33-1 33.2 Structure of Properties File ... 33-3 33.3 User Modifiable Metadata Files... 33-4 33.4 Example of MDS Utility Usage ... 33-5
34
Using the Bulk Load Utility
35
Upload JAR and Resource Bundle Utilities
35.1 Upload JAR Utility... 35-2 35.2 Download JAR Utility ... 35-3 35.3 Delete JAR Utility... 35-3 35.4 Upload Resource Bundle Utility... 35-4 35.5 Download Resource Bundle Utility ... 35-4 35.6 Delete Resource Bundle Utility... 35-4
Part X
Reporting
36
Configuring Reports
36.1 What is Oracle Identity Manager Reports? ... 36-1 36.2 What is Oracle BI Publisher? ... 36-2 36.3 Supported Products ... 36-2 36.4 Licensing ... 36-2 36.5 Deploying Oracle Identity Manager Reports... 36-3 36.5.1 Upgrading to 11g Release 1 (11.1.1) ... 36-3 36.5.2 Installing 11g Release 1 (11.1.1)... 36-4 36.5.2.1 Describing the Oracle Identity Manager Reports Directories... 36-4 36.5.2.2 Acquiring and Installing Oracle BI Publisher ... 36-5 36.5.2.3 Installing Oracle Identity Manager Reports ... 36-6 36.5.2.3.1 Installing Oracle Identity Manager Reports from the Web site... 36-6 36.5.2.3.2 Installing Oracle Identity Manager Reports from Oracle Identity Manager
Installation 36-6
36.6 Configuring Oracle Identity Manager Reports ... 36-7 36.6.1 Configuring Oracle Identity Manager Reports for Oracle Identity Manager... 36-7 36.6.2 Configuring a Secondary Data Source for BPEL-Based Oracle Identity Manager
Reports 36-9
36.7 Generating Oracle Identity Manager Reports ... 36-10 36.7.1 Generating Sample Reports Against the Sample Data Source... 36-10 36.7.2 Generating Reports Against the Production JDBC Data Source ... 36-10 36.7.3 Generating Reports Against the BPEL-Based JDBC Data Source... 36-11
37
Developing Entitlements
37.6.1 Entitlement Access List ... 37-9 37.6.2 Entitlement Access List History ... 37-9 37.6.3 User Resource Entitlement ... 37-9 37.6.4 User Resource Entitlement History... 37-9
Part XI
Appendixes
A
Scheduled Task Configuration File
A.1 Structure of the Scheduler XML File ... A-1 A.2 The scheduledTasks Element ... A-2 A.3 The task Element ... A-2 A.4 The name Element ... A-2 A.5 The class Element... A-3 A.6 The description Element ... A-3 A.7 The retry Element... A-4 A.8 The parameters Element ... A-4 A.9 The string-param Element ... A-4 A.10 The number-param Element ... A-5 A.11 The boolean-param Element ... A-6
B
SPML Attributes and LDAP Mappings, and Oracle Identity Manager Attributes
B.1 Identity PSO Attributes... B-1 B.1.1 Custom Identity Attributes ... B-4 B.2 Role PSO Attributes... B-4 B.2.1 Custom Role Attributes ... B-5 B.3 Preference Attributes... B-5 B.4 Special Character Restrictions in Oracle Identity Manager Attributes ... B-10 B.4.1 Characters Available in All Attributes ... B-10 B.4.2 Special Characters in the Password Field ... B-10 B.4.3 Usage of Single Quotation Mark ... B-10 B.4.4 Usage of Semicolon ... B-11 B.4.5 Unsupported Special Characters ... B-11 B.5 Operation Data ... B-11 B.5.1 Passing Operation Data ... B-11 B.5.2 Passing Reference Data ... B-12
C
SPML Examples
C.10 SPML Example – Add User with Role Assignment... C-9 C.11 SPML Example - Assign Role Membership ... C-11 C.12 SPML Example – Revoke Role Membership... C-12 C.13 SPML Example - Add Role ... C-12 C.14 SPML Example - Add Role with Parent ... C-13 C.15 SPML Example - Modify Role... C-14 C.16 SPML Example - Add Parent to a Role ... C-15 C.17 SPML Example - Role Grant... C-15 C.18 SPML Example - Delete Role... C-16 C.19 SPML Example - Status Request ... C-17
D
Metadata Column Codes
D.1 Extracting the Metadata Column Code ... D-1 D.2 Mapping Information for the Metadata Column Code... D-2
11–35 Edit Rule Element Window... 11-56 11–36 Usage Tab of the Rule Designer Form ... 11-57 11–37 Rule Designer Table... 11-58 11–38 The Resource Objects Form ... 11-65 11–39 Trusted Source Reconciliation by User Type... 11-79 11–40 Trusted Source Reconciliation for Specific OIM User Attributes ... 11-81 12–1 Email Definition Form... 12-2 12–2 Process Definition Form... 12-6 12–3 Tasks Tab of the Process Definition Form ... 12-9 12–4 Reconciliation Field Mappings Tab of the Process Definition Form ... 12-10 12–5 Handler Selection Dialog Box ... 12-21 13–1 Form Designer Form... 13-2 13–2 Object Permissions Tab of the Form Designer Form ... 13-10 13–3 Properties Tab of the Form Designer Form... 13-11 13–4 Add Property Dialog Box ... 13-12 13–5 Add Property Dialog Box - Filled ... 13-13 13–6 Add Property Dialog Box ... 13-13 13–7 Edit Property Dialog Box ... 13-15 13–8 Administrators Tab of the Form Designer Form... 13-16 13–9 Error Message Definition Form ... 13-19 14–1 Invalid Action Rule... 14-8 14–2 Valid Action Rule... 14-8 15–1 Lookup Definition Form ... 15-2 15–2 User Defined Columns Tab of the User Defined Field Definition Form ... 15-7 15–3 User Defined Fields Dialog Box... 15-7 15–4 User Defined Fields Dialog Box - Filled ... 15-9 15–5 Properties Tab of the User Defined Field Definition Form... 15-10 15–6 Administrators Tab of the User Defined Field Definition Form... 15-11 15–7 Remote Manager Form... 15-11 16–1 Identity Connector Framework Deployment ... 16-2 16–2 Compatibility Between the ICF and Connector Bundles ... 16-2 16–3 ICF Connectors and Connector Server ... 16-21 17–1 IT Resource Type Definition in Design Console ... 17-20 17–2 Resource Objects in Design Console ... 17-21 17–3 Lookup Definition in Design Console ... 17-22 17–4 Second Lookup Definition in Design Console... 17-23 17–5 Form Designer in Design Console... 17-24 17–6 Properties of Form Designer in Design Console ... 17-25 17–7 Adapter Factory Variable List in Design Console... 17-26 17–8 Adapter Factory in Design Console ... 17-27 17–9 Process Definition in Design Console ... 17-28 17–10 Editing Task Screen in Design Console ... 17-28 17–11 Integration Tab in Design Console ... 17-29 17–12 Configure Responses in Design Console... 17-30 17–13 Task to Object Status Mapping ... 17-30 17–14 Schedule Task Screen in Advanced Console ... 17-34 17–15 Object Reconciliation in Design Console... 17-35 17–16 Reconciliation Action Rules in Design Console ... 17-36 17–17 Reconciliation Field Mapping in Design Console ... 17-37 17–18 Adding Reconciliation Matching Rule... 17-38 18–1 Functional Architecture of a Generic Technology Connector ... 18-3 19–1 Communication Between the SPML Provisioning Format Provider and the Target System..
20–1 Value Objects Used During Provider Operations... 20-9 20–2 Logging Modules Specific to the Supported Provider Types ... 20-10 20–3 Elements of the Provider XML File ... 20-11 21–1 Sample Entries for the Step 1: Provide Basic Information Page... 21-5 21–2 Sample Entries for the Step 2: Specify Parameter Values Page... 21-12 21–3 Display of Data Sets and Fields Under Various Input Conditions... 21-20 21–4 Lookup Properties ... 21-25 21–5 Methods of ResourceConnection... 21-40 21–6 ITResource Parameters... 21-40 21–7 Methods of the GenericPool Interface... 21-42 22–1 Common Errors Encountered During Reconciliation ... 22-12 22–2 Common Errors Encountered During Provisioning... 22-13 23–1 Default Request Datasets Shipped with Oracle Identity Manager... 23-2 23–2 Request Datasets for Resource Entity ... 23-4 23–3 Request Types and Associated keys ... 23-28 24–1 Predefined Workflow Composites ... 24-3 25–1 Location of Default SOA Composites ... 25-6 27–1 Variables to Assign ... 27-23 27–2 Troubleshooting SoD Check... 27-58 28–1 Files to Modify For Customizing Tables in Identity Administration... 28-22 28–2 Properties that Determine the Number of Menus on a Search Page... 28-31 30–1 Rule Elements to Create Oracle Identity Manager Rules... 30-1 30–2 Variables to Create Templates ... 30-8 30–3 Properties Associated with Data Types for Creating Oracle Identity Manager Forms...
30-10
The Oracle Fusion Middleware Developer's Guide for Oracle Identity Manager describes how to develop and customize various components and features of Oracle Identity Manager.
Audience
This guide is intended for developers who use Oracle Identity Manager development tools to customize the product according to the requirements of an organization. The customization involves using APIs, configuring request datasets and approval workflows, developing connectors by using Generic Technology Connector or Adapter Factory, and customizing the user interface.
Documentation Accessibility
For information about Oracle's commitment to accessibility, visit the Oracle Accessibility Program website at
http://www.oracle.com/pls/topic/lookup?ctx=acc&id=docacc.
Access to Oracle Support
Oracle customers have access to electronic support through My Oracle Support. For information, visit
http://www.oracle.com/pls/topic/lookup?ctx=acc&id=info or visit http://www.oracle.com/pls/topic/lookup?ctx=acc&id=trs if you are hearing impaired.
Related Documents
For more information, refer to the following documents:
■ Oracle Fusion Middleware Administrator's Guide for Oracle Identity Manager ■ Oracle Fusion Middleware User's Guide for Oracle Identity Manager
■ Oracle Fusion Middleware Developer's Guide for Oracle Adaptive Access Manager ■ Oracle Fusion Middleware Administrator's Guide for Oracle Identity Navigator ■ Oracle Fusion Middleware Administrator's Guide for Authorization Policy Manager
Conventions
The following text conventions are used in this document:
Convention Meaning
boldface Boldface type indicates graphical user interface elements associated with an action, or terms defined in text or the glossary.
italic Italic type indicates book titles, emphasis, or placeholder variables for which you supply particular values.
Part I
Part I
Concepts
This part familiarizes you with tools and features for Oracle Identity Manager developers, and provides some simple examples to illustrate the concepts.
It contains the following chapters:
■ Chapter 1, "Design Console Overview" ■ Chapter 2, "Developing Adapters" ■ Chapter 3, "Using Adapters"
■ Chapter 16, "Understanding the Identity Connector Framework" ■ Chapter 4, "Using the Callback Service"
■ Chapter 5, "Developing Rules"
■ Chapter 6, "Developing Scheduled Tasks" ■ Chapter 7, "Developing Plug-ins"
■ Chapter 8, "Developing Event Handlers for Extending User Management
Operations"
1
1
Design Console Overview
You can use the Design Console to configure system settings that control the systemwide behavior of Oracle Identity Manager and affect its users. The Design Console allows you to perform user management, resource management, process management, and other administration and development tasks.
This chapter contains an overview of the Oracle Identity Manager Design Console and describes the basic operations of the console. It is recommended that you review this information before proceeding to subsequent chapters that describe in-depth Design Console features.
This chapter contains the following sections:
■ Starting the Design Console
■ Navigating Around the Design Console ■ Special Field and Form Types
■ Assignment Windows ■ Search Operations
■ Forms Accessible from the Design Console
1.1 Starting the Design Console
To start the Design Console:1. Double-click the Oracle Identity Manager client icon on the desktop.
The Login window is displayed.
2. Enter your user ID and password.
3. Click Login.
The Design Console main screen is displayed.
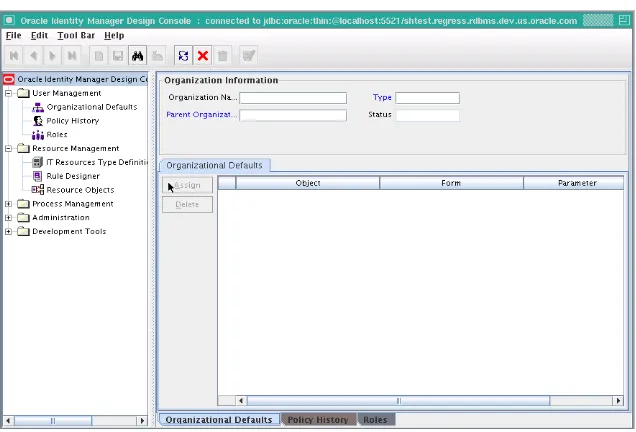
Figure 1–1 Design Console Main Screen
The Design Console main screen consists of these regions:
■ Design Console Menu Bar ■ Design Console Toolbar ■ Design Console Explorer ■ Design Console Workspace
1.2.1 Design Console Menu Bar
The menu bar is displayed at the top of the main screen. It contains menus that enable you to perform all operations in the Design Console user interface.
The Design Console menu bar provides the following menus:
■ File Menu ■ Edit Menu ■ Toolbar Menu ■ Help Menu
You can use keyboard shortcuts to use the menu items for performing various operations in the Design Console. See "Keyboard Shortcuts in the Design Console" on page 1-3 for information about keyboard shortcuts available in the Design Console.
1.2.1.1 File Menu
The File menu provides the following options:
Menu Item Action
Print Prints the active form
Login Logs out of the Design Console, and log in again
1.2.1.2 Edit Menu
The Edit menu provides the following options:
1.2.1.3 Toolbar Menu
The Toolbar menu operations are described in the following table.
1.2.1.4 Help Menu
The Help menu provides you with access to the Design Console version number and copyright information. These are displayed when you select About from the Help menu.
1.2.1.5 Keyboard Shortcuts in the Design Console
The Design Console provides the following keyboard shortcuts to help you perform functions quickly and provide you with easy access to menu commands.
Menu Item Action
Cut Deletes selected text from editable fields and copies it to the system Clipboard
Copy Copies the selected text to the system Clipboard
Paste Pastes text from the system Clipboard to the selected field
Clear Clears the selected text
Menu Item Action
New Clears the contents of the active form
Save Changes Saves all changes made to the active form
Query Runs a query on the active form
Notes Displays any notes that are attached to the active form
Refresh Refreshes the record of the active form
Close Closes the active form
Delete Deletes the current record
Next Displays the next record when you query more than one record
Previous Displays the previous record when you query more than one record
First Displays the first record when you query more than one record
Last Displays the last record when you query more than one record
Close All Closes all open forms and clears the Design Console Workspace
1.2.2 Design Console Toolbar
The toolbar consists of a series of buttons below the menu bar. These buttons provide single-click access to frequently used actions. The toolbar buttons apply to the active form.
Figure 1–2 shows the Design Console Toolbar.
Toolbar menu Alt+T Activates the Toolbar menu
Help menu Alt+H Activates the Help menu
Print Ctrl+P Prints the active form
Cut Ctrl+X Deletes selected text from editable fields, and
copies it to the system Clipboard
Copy Ctrl+C Copies the selected text to the system
Clipboard
Paste Ctrl+V Pastes text from the system Clipboard to the
selected field
Clear Ctrl+Delete Clears the selected text
New Ctrl+N Clears the active form
Save Changes Ctrl+S Saves all changes made to the active form
Query Ctrl+Q Runs a query on the active form
Notes Ctrl+Shift+N Displays notes that are attached to the active form
Refresh Ctrl+R Refreshes the active form
Close Ctrl+W Closes the active form
Delete Ctrl+D Deletes the current record
Next Number pad
+ (plus)
Displays the next record, when you have queried more than one record
Previous Number pad -
(minus)
Displays the previous record, when you have queried more than one record
First Ctrl+F Display the first record, when you have
queried more than one record
Last Ctrl+L Displays the last record, when you have
queried more than one record
Prepopulate Ctrl+U Populates designated fields of a customized form with data
Help F1 Opens context-sensitive Help for the active
form
Explorer F3 Selects the Design Console icon, which is
displayed at the top of the Design Console Explorer
Lookup F4 Displays the Lookup window for the selected
lookup field
Menu F10 Activates the File menu
Shortcut Name
Keystroke
Figure 1–2 Design Console Toolbar
When you hold the mouse over a toolbar button for a few seconds, a tool tip that describes the button is displayed.
The following table describes the toolbar buttons:
1.2.3 Design Console Explorer
The Design Console Explorer contains a list of icons that represent forms that you have permission to access.
Figure 1–3 shows the Design Console Explorer. You can customize the Explorer. Depending on the permissions assigned to you, you can see different icons in the Explorer. If you want to access a form icon that you do not have permissions for, contact your system administrator.
Button Action
First Displays the first record when you have queried more than one record.
Previous Displays the previous record when you have queried more than one record.
Next Displays the next record when you have queried more than one record.
Last Displays the last record when you have queried more than one record.
New Clears the active form.
Save Saves all changes made to the active form.
Query Runs a query on the active form.
Notes Displays any notes that are attached to the active form.
Refresh Refreshes the active form.
Close Closes the active form.
Delete Deletes the current record.
Prepopulate Populates designated fields with data. These fields are user defined, and have prepopulate adapters attached to them.
Figure 1–3 Design Console Explorer
1.2.3.1 Starting a Form
To start a form:
1. Expand the folder that contains the required form.
2. Double-click the form that you want to open.
The corresponding form is displayed in the Design Console Workspace.
1.2.3.2 Refreshing the List of Forms
To refresh the list of forms:
1. Right-click the Oracle Identity Manager logo at the top of the Oracle Identity Manager Explorer window. A menu is displayed.
2. Click Refresh Explorer.
The Design Console refreshes the Explorer with all forms that you can access, including any forms that a system administrator recently gave you permission to access.
1.2.4 Design Console Workspace
The Design Console Workspace is the region of the main screen that displays forms that you access using the Explorer.
Figure 1–4 shows the Workspace. Tip:
■ If the system administrator changes your permissions, you must
refresh the Explorer window.
■ You can adjust the size of the Design Console Explorer by moving
Figure 1–4 Design Console Workspace
If you access multiple forms, the Design Console places the active form on top and layers the remaining forms on tabs along the bottom of the main screen. To switch between forms, click the desired form's tab.
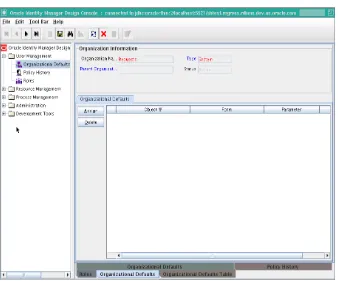
The Design Console can display each form in two views: a form view and a table view.
1.2.4.1 The Form View
The form view provides detailed information about a single record. The form view is displayed when you initially access a form by using the Explorer, for example, before you perform a query.
1.2.4.2 The Table View
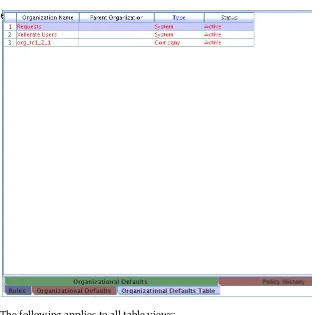
The table view lists general information about multiple records of a form. When you submit a query that produces more than one result, the Design Console displays a table that contains the records that match the criteria in the query.
For example, a query of the Organizations form can return several records. Both the form and table view tabs of the Organizations form can be displayed. Figure 1–5
Figure 1–5 Table View
The following applies to all table views:
■ To select a record in a table view, click it.
■ The data associated with a record is displayed in cells.
Cells are also referred to as fields.
■ Forms contain column headings, which are boxes with labels above each column.
Column headings display the name of the column. If a column contains a Lookup dialog box, which provides acceptable values for some field or attribute, then the column heading is displayed in blue.
■ The Design Console forms contain row headings, which are boxes with numeric
labels at the beginning of each row.
To view a detailed form view of a record, double-click its row header. To display a record in the form view, select the record in the table view. Then, click the
applicable form tab at the bottom of the Workspace.
■ If a query returns more records than can be displayed in the Workspace, a vertical
scroll bar is displayed along the right edge of the table view.
Click the up or down arrows in the vertical scroll bar to scroll through the records of the table.
■ If the table view contains more columns than can be displayed in the Workspace,
then a horizontal scroll bar is displayed along the bottom edge of the table view.
Click the left or right arrows in the horizontal scroll bar to display additional columns not initially visible in the Workspace.
To edit the information in a particular field, click it and make the desired changes.
■ Fields whose column headings are displayed in blue have Lookup dialog boxes.
You can double-click these fields to access their Lookup dialog boxes, and select the desired value. When you edit the value in any field, the row header for the corresponding record changes to black. This indicates that the data in that field has changed and must be saved.
■ To select consecutive records, press the Shift key and use the mouse to select
records.
■ To select nonconsecutive record rows, press the Ctrl key and use the mouse to
select records.
■ To export a record, right-click the row heading.
To select more than one record, press the Shift key before clicking the row heading.
A dialog box is displayed.
■ Select Copy to Clipboard to copy the selected records to the Clipboard.
You can paste copied records into a Microsoft Excel worksheet or a Microsoft Word document.
■ To save the records as a tab-delimited file, select Copy to File.
■ You can control the order in which the records in a table view are displayed by
using the sort feature.
To change the sort order of displayed records, click the heading of the column by which you want the records to be sorted. A triangle is displayed beside the column heading text. This indicates the direction, ascending or descending order, in which the records were sorted.
1.3 Special Field and Form Types
The actions of the basic features of the Design Console are standard for all forms. This section describes the standard actions of the Design Console and the field and window types in the Design Console main screen.
1.3.1 Data Fields
Data fields are display areas in forms that present information related to a specific record. For example, First Name can be a data field on the Users form.
The label of a field can be displayed in black or blue.
■ A black label indicates that this field is a standard field.
You can query, create, modify, or delete information in a standard field.
■ A blue label indicates that the data in this field is derived from a predefined list of
values supplied by using a Lookup or a Date & Time window.
■ If the field value is displayed in red, the data in this field is supplied by Oracle
Identity Manager.
These values are read-only. This prevents you from overwriting critical information.
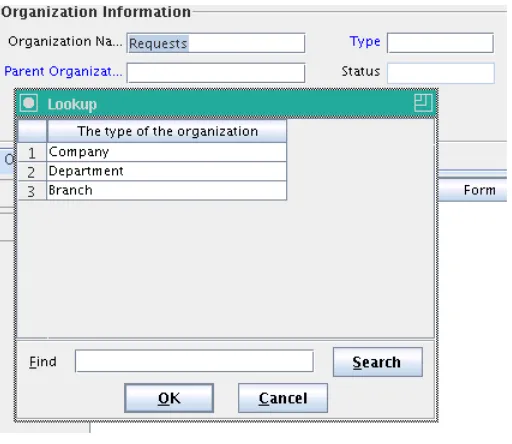
1.3.2 Lookup Fields
A lookup field enables you to search for a value. Lookup fields are displayed in blue. The following procedure describes how to use lookup fields.
To use lookup fields:
1. Double click the lookup field. The Lookup dialog box is displayed.
2. In the Lookup dialog box, to select a value, click the field, and then click OK.
Alternatively, you can select the field and press F4.
Click Cancel to close the Lookup window without selecting anything.
Figure 1–6 shows the Lookup dialog box.
Figure 1–6 Lookup Dialog Box
3. If the Lookup dialog box contains a long list of values, enter the first few characters of the value in the Find box, followed by an asterisk (*), and click Search. Alternatively, you can scroll through the list of values to locate it.
The Lookup dialog box displays the results that match your search.
1.3.3 Date and Time Fields
The Date & Time window enables you to select a month, year, day, and time. This window is displayed when you double-click a field that is equipped with a an option to open this window. The Date & Time fields have labels in blue.
To select a date and time:
1. Double-click the field in which you want to enter a date and time.
The Date & Time window is displayed, as shown in Figure 1–7:
Figure 1–7 The Date & Time Window
2. From the menu, select the month.
3. From the Date scroll box, select the year.
4. Click the date on the calendar.
5. From the Time box, select the time.
6. Click OK to save your changes.
The Date & Time window closes. The field that you double-clicked in Step 1 now displays the date and time you selected.
Click Cancel to exit without saving.
1.3.4 List
Lists have predefined values. When you click a list, its values are displayed. If the list contains more values that can be displayed at one time, then a vertical scroll bar is displayed to the right of the list. In Figure 1–8, the Employee Type field is a list:
Figure 1–8 The List Field
When you select a value, the list is replaced by a field in which the selected value is displayed.
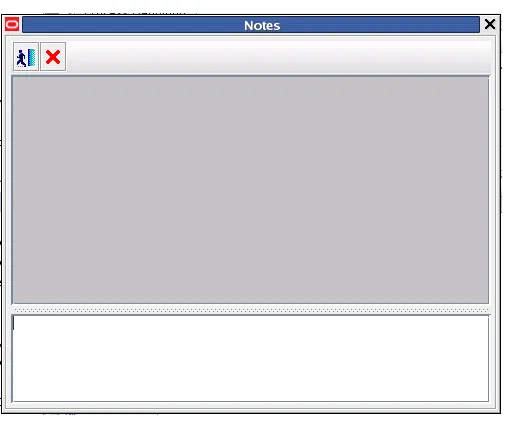
To use the Notes window:
1. Select the required record.
2. Click Notes.
The Notes window is displayed, as shown in Figure 1–9:
Figure 1–9 The Notes Window
3. Enter information in the text area of the Notes window.
4. Click the icon that represents a man to store your information in the Notes window.
Or, click Close to close the Notes window without saving.
5. From the Toolbar, click Save.
The information you entered into the Notes window is saved.
1.3.6 Tabs on Forms
Most forms in the Design Console contain multiple tabs. The tabs are usually in the bottom of the form. The tabs display additional information about a record, for example, the users who are employed at an organization, as shown in Figure 1–10.
Figure 1–10 Design Console - Tab on Forms
Each tab has its own tables and function buttons. Usually, the buttons on a tab are grayed out until the information in the upper portion of the form is saved. The table displayed in the tab enables you to view and edit the records associated with that tab item.
To modify information in a row of a tab's table, either double-click the field that contains the information you want to edit, or double-click the associated row heading.
1.4 Assignment Windows
The User Form Assignment windows enable you to select and assign entities to a record. The Assignment window is displayed when you click the Assign button.
Figure 1–11 User Form Assignment Window
The left pane lists items that you can assign to the record, for example, Organization. The right pane lists the items that have already been assigned to the record. Although the values available for selection in the left and right panes are unique to what is being assigned or unassigned, the buttons and general use of this dialog box are consistent throughout the application.
The following are methods for working with this window:
■ To select multiple unconsecutive items, hold down the Ctrl key while selecting
items with the mouse.
For example, you can select the User Group, the IT Resource Type Definition object, and the Form Information object, but not the Process Definition object.
■ To select multiple items that are listed consecutively, hold down the Shift key and
select the first and last items with the mouse.
■ To assign one or more items, select the item and click the right arrow.
■ To unassign one or more items, select them, and click the left arrow.
When you are done, click OK. If you click Cancel, all assignment changes are discarded.
1.5 Search Operations
This section describes the search operation that you can perform in the Design Console. It contains the following sections:
■ Starting a Search
■ Constructing a Search Filter ■ Results of a Search
1.5.1 Starting a Search
The Design Console enables you to perform searches (queries) for records in the database. Every form in the Design Console provides a search function. The search function is also available in lookup fields.
To conduct a search on a blank form or after entering a search filter, click the binoculars icon on the toolbar.
After you enter the search criteria in the query fields, click the binoculars symbol or press Ctrl+Q.
1.5.2 Constructing a Search Filter
You can filter the search results in a form field. Filtering limits the results that are returned to only the records that match the criteria you entered. If you leave all form fields blank before conducting the search, all records in the table are returned.
You can use a wildcard character in a search. The asterisk (*) wildcard character represents unspecified portions of the search criteria. You can use a wildcard character at the beginning, middle, or end of the value that you enter in a field. For example, if you enter B* in the Location field of a Design Console form and execute a search, you retrieve all records with locations that begin with the letter B (for example, Burbank, Boston, Bristol, and so on). If the asterisk is placed in the middle of a search value, as in B*on, you retrieve all records that begin with B and end with ON (for example, Brighton, Boston, and so on). If you place the asterisk at the beginning of the search value, as in *A, you retrieve all records that end in A (for example, Philadelphia, Tampa, and so on).
In Figure 1–12, a query is performed on the Organizational Defaults form and the Organization Name field is used to filter the search criteria. The filter Xell* ensures that only organizations with names that begin with Xell are retrieved.
■ No records are returned. No records in the database match your search criteria for
this form. Either the record that you are searching for no longer exists in the database, or you must modify your search criteria.
■ One record is returned. One record in the database matches your search criteria.
The Form view displays that record.
■ More than one record is returned. Multiple records in the database match your
search criteria. A Table view is displayed, listing all records that meet your search criteria. The first record is displayed in the Form view, as shown in Figure 1–13.
Figure 1–13 Multiple Records Returned
1.5.4 Working with a Set of Query Results
If multiple records in the database match your search criteria, you can view details about each record. Several buttons can assist you when viewing these records in the Form view. These directional buttons, referred to as VCR buttons, are located in the toolbar. The following table describes the VCR buttons:
1.5.5 Optimizing Query Performance
A query that returns a large result set can require significant time to run and can affect your computer's performance. To optimize performance, use the following search techniques:
■ Define the scope of a search strategy as precisely as possible.
Enter the most specific information that you can when constructing your query. For example, if the first name of a contact is JOHN and the last name is JACKSON, enter both pieces of information, rather than searching only for contacts with the last name JACKSON.
■ Use the asterisk (*) wildcard character where possible.
Buttons Description
Click this button to display the first record in the result set in the Form view.
Click this button to display the preceding record according to the display sequence in the Table view. The record is displayed in the result set in the Form view.
Click this button to display the next record (according to the display sequence in the Table view) in the result set in the Form view.
If you place the asterisk in front of an alphabetic character (for example, *A), fewer records are returned as compared to when you leave a field blank.
1.5.6 Exceeding the Limit for a Result Set
If you have both read and write access to all forms and records in the Design Console (that is, if you are a system administrator), you can set the maximum number of records that are displayed in the result set for a search. If the number of records retrieved for a search exceeds this value, the Design Console displays the Query size exceeded dialog box, as shown in Figure 1–14.
Figure 1–14 Query Size Exceeded Dialog Box
You are prompted to enter a specific range or subset of the result set to be viewed. In
Figure 1–14, the maximum result set of 100 has been exceeded. Only records 1 through 100 will be displayed.
1.6 Forms Accessible from the Design Console
The left side of the Design Console main screen is the Design Console Explorer. The Explorer consists of a list of icons that represent forms that you have permissions to access. These icons are grouped under folders based on functionality and are displayed to the users according to the access rights that you assign to them.
Figure 1–15 The Design Console Main Screen
The forms in the various folders in the Design Console Explorer are described in the following sections:
■ User Management ■ Resource Management ■ Process Management ■ Administration ■ Development Tools ■ Business Rule Definition
1.6.1 User Management
The User Management folder provides tools to create and manage information about organizations, users, and roles. This folder contains the following forms:
■ Organizational Defaults: This form is used to specify the default values that the
organization users should have for certain resources. The organization hierarchy is considered while getting the values specified on the organization defaults by traversing from the bottom of the hierarchy to the top.
■ Policy History: This form is used to view resources that are allowed and
disallowed for users through policies.
■ Roles: This form is used to specify which Design Console forms are available for
1.6.2 Resource Management
The Resource Management folder provides you tools for managing Oracle Identity Manager resources. This folder contains the following forms:
■ IT Resources Type Definition: This form is used to create resource types that are
displayed as lookup values on the IT Resources form.
IT resource types store the set of fields that are used to specify connectivity and other configuration of a particular target type. For example, the AD Server IT resource type indicates what fields must be specified for conneting to Microsoft Active Directory. This can include the host, port, username, password, and root context. This is essentially a list of parameters. From this type, you can create an IT resource instance by specfying concrete values for all the parameters. While provisioning an Active Directory account, one of the fields on the process form is of type AD Server, and the value of this field is the IT resource instance that points to the actual target where the account is created.
■ Rule Designer: This form is used to create rules that can be applied to password
policy selection, auto-group membership, provisioning process selection, task assignment, and prepopulating adapters.
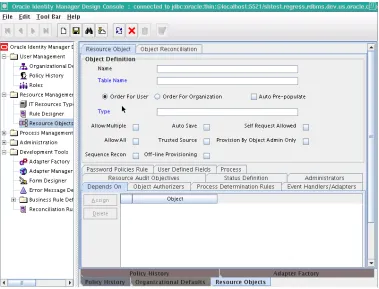
■ Resource Objects: This form is used to create and manage resource objects. These
objects represent resources that you want to make available to users and organizations.
Resource objects specify account types in Oracle Identity Manager. Resource objects encapsulate the following:
– The type of the entity that the resource objects are representing in the target, for example AD User and AD Group.
– The provisioning mechanism. This is not a configuration specific to resource objects but a provisioning process definition. However, the process definition itself is tied to the resource object.
– Flags related to permissioning that determines who is the resource allowed for, if the user can get more than one instances of this resource, and who can provision the resource.
– Object administrator and object authorizer configuration.
– Reconciliation fields, action rules and other reconciliation related flags.
– Resource dependency.
– Status flags for a resource, which determines the states that a resource can go through.
– Resource audit objectives used in attestation.
Examples of resource objects are AD User, SAP User, and LDAP Account.
1.6.3 Process Management
The Process Management folder provides you tools for creating and managing Oracle See Also: Chapter 11, "Developing Resource Objects" for more
■ Process Definition: This form is used to create and manage approval and
provisioning processes. It also lets you start the Workflow Definition Renderer that displays your workflow definition in a graphical presentation.
1.6.4 Administration
The Design Console Administration folder provides you tools for managing Oracle Identity Manager administrative features. This folder contains the following forms:
■ Lookup Definition: This form is used to create and manage lookup definitions. A
lookup definition represents a lookup field and the values you can access from that lookup field.
■ User Defined Field Definition: This form is used to create and manage
user-defined fields. A user-defined field enables you to store additional information, such as user, request, and resource information.
■ Remote Manager: This form is used to display information about the servers that
Oracle Identity Manager uses to communicate with third-party programs. These servers are known as remote managers.
■ Password Policies: This form is used to set password restrictions for the users and
view the rules and resource objects that are associated with a password policy.
1.6.5 Development Tools
The Design Console provides a suite of development tools that enable system administrators or developers to customize Oracle Identity Manager. This folder contains the following forms:
■ Adapter Factory: This form is used to create and manage the code that enables
Oracle Identity Manager to communicate with any IT Resource by connecting to that resource's API. This code is known as an adapter.
■ Adapter Manager: This form is used to compile multiple adapters simultaneously.
■ Form Designer: This form is used to create process and resource object forms that
do not come packaged with Oracle Identity Manager.
■ Error Message Definition: This form is used to create error messages that can be
used for reporting when certain problems occur while using Oracle Identity Manager. This form also enables a system administrator or developer to define the error messages that users can access when they create error handler tasks by using the Adapter Factory form.
■ Reconciliation Rules: This form is used to create and manage reconciliation rules
in Oracle Identity Manager.
1.6.5.1 Business Rule Definition
The Development Tools folder consists of the Business Rules Definition subfolder. The Business Rule Definition folder provides system administrators and developers with tools to manage the event handlers and data objects of Oracle Identity Manager. This folder contains the following forms:
See Also: Chapter 12, "Developing Provisioning Processes" for more information about the forms in the Process Management folder
■ Event Handler Manager: This form is used to create and manage the event
handlers that are used with Oracle Identity Manager.
■ Data Object Manager: This form is used to define a data object, assign event
handlers and adapters to it, and map any adapter variables associated with it.