Oracle® Fusion Middleware
Administrator's Guide for Kofax Capture Export Connector to
Oracle UCM
11g Release 1 (11.1.1)
E15965-01
Oracle Fusion Middleware Administrator's Guide for Kofax Capture Export Connector to Oracle UCM, 11g
Release 1 (11.1.1)
E15965-01
Copyright © 2009, 2010, Oracle and/or its affiliates. All rights reserved.
Primary Author: Deanna Burke
Contributor: Sean Cearley, Alec Han, Jack Mu, Johnnie Randhawa
This software and related documentation are provided under a license agreement containing restrictions on use and disclosure and are protected by intellectual property laws. Except as expressly permitted in your license agreement or allowed by law, you may not use, copy, reproduce, translate, broadcast, modify, license, transmit, distribute, exhibit, perform, publish, or display any part, in any form, or by any means. Reverse engineering, disassembly, or decompilation of this software, unless required by law for interoperability, is prohibited.
The information contained herein is subject to change without notice and is not warranted to be error-free. If you find any errors, please report them to us in writing.
If this software or related documentation is delivered to the U.S. Government or anyone licensing it on behalf of the U.S. Government, the following notice is applicable:
U.S. GOVERNMENT RIGHTS Programs, software, databases, and related documentation and technical data delivered to U.S. Government customers are "commercial computer software" or "commercial technical data" pursuant to the applicable Federal Acquisition Regulation and agency-specific supplemental regulations. As such, the use, duplication, disclosure, modification, and adaptation shall be subject to the restrictions and license terms set forth in the applicable Government contract, and, to the extent applicable by the terms of the Government contract, the additional rights set forth in FAR 52.227-19, Commercial Computer Software License (December 2007). Oracle USA, Inc., 500 Oracle Parkway, Redwood City, CA 94065.
This software is developed for general use in a variety of information management applications. It is not developed or intended for use in any inherently dangerous applications, including applications which may create a risk of personal injury. If you use this software in dangerous applications, then you shall be responsible to take all appropriate fail-safe, backup, redundancy, and other measures to ensure the safe use of this software. Oracle Corporation and its affiliates disclaim any liability for any damages caused by use of this software in dangerous applications.
Oracle is a registered trademark of Oracle Corporation and/or its affiliates. Other names may be trademarks of their respective owners.
iii
Contents
Preface
... viiAudience... vii
Documentation Accessibility ... vii
Related Documents ... viii
Conventions ... viii
1
Introduction
1.1 Product Overview... 1-1 1.2 Software Requirements ... 1-1 1.2.1 Compatibility with Oracle Content Server ... 1-1 1.2.2 Compatibility with Kofax Capture... 1-1 1.2.3 Compatibility with Adobe Acrobat Capture ... 1-2
2
Installation
2.1 Installation Summary ... 2-1 2.2 Pre-Installation Tasks and Considerations... 2-1 2.3 Installing Kofax Capture Export Connector ... 2-2 2.3.1 Instructions for an Update Installation... 2-2 2.3.1.1 Delete Existing Release Script... 2-2 2.3.1.2 Delete Existing Batch Class ... 2-3 2.3.1.3 Remove the Kofax Capture Export Connector... 2-3 2.3.2 Instructions for a New Installation ... 2-4 2.4 Configuring Kofax Capture... 2-5 2.4.1 Configuring Kofax Capture Client Systems ... 2-5 2.4.2 Configuring Kofax Capture Client to Use Kofax Capture Export Connector ... 2-5 2.4.2.1 Installing the Release Script ... 2-6 2.4.2.2 Importing Batch Classes ... 2-6 2.4.2.3 Assigning Release Script to Batch Classes ... 2-6 2.4.2.4 Publishing Batch Classes ... 2-7 2.4.3 Configuring Kofax Capture Export Connector in a Non-Default Directory ... 2-7
3
Using Kofax Capture with Kofax Capture Export Connector - Oracle UCM
3.1.3 Setting Up Field Types... 3-3 3.1.4 Document Classes... 3-4 3.1.5 Setting Up Document Class Index Fields... 3-4 3.1.6 Mapped Index Fields... 3-5 3.1.6.1 ScannedDocsForOracleUCM ... 3-5 3.1.6.2 ScannedDocsForOracleUCMParam... 3-5 3.1.7 Form Types ... 3-7 3.2 Customizing the Release Script ... 3-7 3.2.1 Accessing the Setup Dialogs ... 3-8 3.2.2 Using the Index Storage Tab ... 3-8 3.2.3 Setting Index Values... 3-9 3.2.4 Using the Document Storage Tab... 3-9 3.2.5 Using the Image Format Tab... 3-9 3.2.6 Specifying PDF Settings... 3-10 3.2.7 Setting File Type of Released Images... 3-10 3.2.8 Selecting Multipage TIFF Output File Types... 3-10 3.2.9 Selecting TIFF, JPG, or PCX Output File Types... 3-10 3.2.10 Selecting Adobe Acrobat Capture PDF Output File Types ... 3-11 3.2.11 Specifying Adobe Acrobat Capture PDF Settings ... 3-11 3.2.12 Using the Server Tab ... 3-12 3.2.13 Setting URL, User Name, and Password... 3-12 3.2.14 Setting Primary/Alternate File Formats ... 3-12 3.2.15 Setting Workflow Status ... 3-12 3.2.16 Setting Options for Adobe Acrobat Capture PDF Files With Errors ... 3-13 3.2.17 Accessing CHECKIN Parameters Editor... 3-14 3.3 Mapping Kofax Index Fields to CHECKIN Parameters... 3-14 3.3.1 Setting Up Mappings for Required Parameters ... 3-15 3.3.2 Setting Up Mappings for Optional Parameters... 3-15 3.3.3 Setting Up Date and Time Parameters ... 3-16 3.3.4 Debugging Using LIDebug Parameter ... 3-17 3.4 Verifying Kofax Capture Installation... 3-17 3.4.1 Create a Batch... 3-17 3.4.2 Process Batch: Scan Queue ... 3-17 3.4.3 Process Batch: Validation Queue... 3-18 3.4.4 Process Batch: Release Queue ... 3-18
B
Using Adobe Acrobat Capture
v B.1.2 Creating a Workflow ... B-2 B.1.3 Creating a TIFF Workflow... B-2 B.1.4 Creating a JPG Workflow ... B-3 B.2 Checking In Adobe Acrobat Capture PDF Files... B-4 B.2.1 Setting Up the Computer Running Adobe Acrobat Capture... B-4 B.2.2 Setting Up the Primary/Alternate File Formats ... B-5 B.2.3 Setting Up the Image Files Release Directory... B-5
C
Setting Global Options
C.1 About Global Options ... C-1 C.2 Salvaging PDF Documents ... C-1 C.3 Limiting the Error Check of the Adobe Acrobat Capture Log... C-3
vii
Preface
The Kofax Capture Export Connector component provides a link between Kofax Capture and Oracle Content Server. The integration is a custom release script that runs in Kofax Capture. The script takes the scanned images and index data processed in Kofax Capture and produces TIFF files that are checked directly into Oracle Content Server. Optionally, you can use Adobe Acrobat Capture to convert the TIFF files to PDF files.
Audience
This installation and user guide is intended for system administrators who need to install the Kofax Capture component. System administrators will also use this guide to configure Kofax index fields, Oracle Content Server check-in parameters, and output file settings. Instructions for using Adobe Acrobat Capture and setting global options are also provided. This guide assumes that the product has been installed correctly and that you are familiar with Oracle products in general the overall architecture of Oracle Content Server.
Documentation Accessibility
Our goal is to make Oracle products, services, and supporting documentation accessible to all users, including users that are disabled. To that end, our
documentation includes features that make information available to users of assistive technology. This documentation is available in HTML format, and contains markup to facilitate access by the disabled community. Accessibility standards will continue to evolve over time, and Oracle is actively engaged with other market-leading
technology vendors to address technical obstacles so that our documentation can be accessible to all of our customers. For more information, visit the Oracle Accessibility Program Web site at http://www.oracle.com/accessibility/.
Accessibility of Code Examples in Documentation
Screen readers may not always correctly read the code examples in this document. The conventions for writing code require that closing braces should appear on an
otherwise empty line; however, some screen readers may not always read a line of text that consists solely of a bracket or brace.
Accessibility of Links to External Web Sites in Documentation
This documentation may contain links to Web sites of other companies or
Access to Oracle Support
Oracle customers have access to electronic support through My Oracle Support. For information, visit http://www.oracle.com/support/contact.html or visit
http://www.oracle.com/accessibility/support.html if you are hearing impaired.
Related Documents
For more information, refer to the administrator guides included in the Oracle Content Server documentation set and the documentation provided with the Kofax Capture product, as necessary.
Conventions
The following text conventions are used in this document:
Convention Meaning
boldface Boldface type indicates graphical user interface elements associated with an action, or terms defined in text or the glossary.
italic Italic type indicates book titles, emphasis, or placeholder variables for which you supply particular values.
1
Introduction 1-1
1
Introduction
This section provides an introduction to the information in this guide. It covers the following topics:
■ "Product Overview" on page 1-1 ■ "Software Requirements" on page 1-1
1.1 Product Overview
This installation and user guide is intended for system administrators who need to install the Kofax Capture component. System administrators will also use this guide to configure Kofax index fields, Oracle Content Server check-in parameters, and output file settings. Instructions for using Adobe Acrobat Capture and setting global options are also provided. This guide assumes that the product has been installed correctly and that you are familiar with Oracle products in general the overall architecture of Oracle Content Server.
1.2 Software Requirements
The information is subject to change as the product technology evolves and as
hardware, operating systems, and third-party software programs are created, updated, or otherwise modified.
This section covers the following topics:
■ "Compatibility with Oracle Content Server" on page 1-1 ■ "Compatibility with Kofax Capture" on page 1-1
■ "Compatibility with Adobe Acrobat Capture" on page 1-2
1.2.1 Compatibility with Oracle Content Server
The Kofax Capture 11gR1 component is compatible with Oracle Content Server 11gR1.
1.2.2 Compatibility with Kofax Capture
Software Requirements
1.2.3 Compatibility with Adobe Acrobat Capture
2
Installation 2-1 2
Installation
This section covers the following topics:
■ "Installation Summary" on page 2-1
■ "Pre-Installation Tasks and Considerations" on page 2-1 ■ "Installing Kofax Capture Export Connector" on page 2-2 ■ "Configuring Kofax Capture" on page 2-5
2.1 Installation Summary
The basic installation procedure consists of the following tasks:
■ Installing Oracle Content Server. For installation information, refer to your Oracle
Oracle Content Server installation documentation.
■ Installing Kofax Capture as a standalone or server version. (The server version
requires at least one client system.) For installation information, refer to your Kofax Capture documentation.
■ Installing the Kofax Capture Export Connector component on the Kofax Capture
standalone or server system. For more information, see "Installing Kofax Capture Export Connector" on page 2-2.
■ (Optional) Installing and configuring Adobe Acrobat Capture. For installation and
configuration information, refer to your Adobe Acrobat Capture documentation.
■ Configuring Kofax Capture Export Connector for use with Kofax Capture (and
optionally, with Acrobat Capture). For configuration and user information, see
Chapter 3, "Using Kofax Capture with Kofax Capture Export Connector - Oracle UCM".
2.2 Pre-Installation Tasks and Considerations
Complete the following checklist before continuing:
■ Specify a user and password to use to check all scanned documents into Oracle
Content Server, taking into account the following scenarios:
– User has maximum access.
Installing Kofax Capture Export Connector
– User has minimal access.
If scanned documents will be checked into a limited area of Oracle Content Server, then ensure that the user has Write access to the necessary security groups.
– User must adjust Author content information field.
If you want the person performing the scan to adjust the Author content information field to reflect the author of the document, then ensure that the user has Admin access to the necessary security groups.
■ Record the user name and password. You will enter these names during the new
installation procedure. See "Instructions for a New Installation" on page 2-4.
■ Identify the server host name (or IP address) of the Oracle Content Server instance.
The server name can be found on the Configuration Information page of the instance. You will enter this name during the new installation procedure. See
"Instructions for a New Installation" on page 2-4.
■ If you are installing Kofax Capture Export Connector for use with a proxied
instance of Oracle Content Server, identify the relative web root from the
Configuration Information page of the proxied instance. For example, cs (without forward slashes). You will enter this name, if necessary, during the new
installation procedure. See "Instructions for a New Installation" on page 2-4.
2.3 Installing Kofax Capture Export Connector
This section includes step-by-step instructions for installing Kofax Capture Export Connector. The procedures for new and update installs are not the same. Please follow the install procedure that corresponds to your current configuration. This section covers the following topics:
■ "Instructions for an Update Installation" on page 2-2 ■ "Instructions for a New Installation" on page 2-4
2.3.1 Instructions for an Update Installation
If you are upgrading from a previous version of the Kofax Capture Export Connector (or Ascent Capture, if an older version), you must perform these tasks before installing the new version:
■ "Delete Existing Release Script" on page 2-2 ■ "Delete Existing Batch Class" on page 2-3
■ "Remove the Kofax Capture Export Connector" on page 2-3
2.3.1.1 Delete Existing Release Script
In this procedure you unassign document classes and then delete the previous release script.
1. On the Windows taskbar, click the Start button, then select Programs, then select
Kofax Captureversion (or Ascent Captureversion for older versions of Kofax), then select Administration.
The Kofax Capture Administration dialog is displayed.
Installing Kofax Capture Export Connector
Installation 2-3
The Release Scripts dialog is displayed.
3. In the Assigned Release Scripts column, highlight the old Release Script name.
4. Click Remove.
A validation dialog is displayed.
5. Click Yes.
This disassociates the document class with the old release script.
6. Click Close.
7. Perform steps 2 through 6 for each document class.
8. Select Tools, then Release Script Manager. The Release Script Manager dialog is displayed.
9. Highlight the old release script, and click Remove.
10. Click Close.
2.3.1.2 Delete Existing Batch Class
Use this procedure to remove the existing batch class.
1. In the Batch tab, right-click the existing batch class, and select Delete. A confirmation dialog is displayed.
2. Click Yes to delete the batch class.
3. Exit Kofax Capture.
2.3.1.3 Remove the Kofax Capture Export Connector
Use this procedure to remove the Kofax Capture Export Connector:
1. On the Windows taskbar, click the Start button, then select Settings, then select
Control Panel, then select Add/Remove Programs.
2. Select Kofax Capture Export Connector.
3. Click Change/Remove.
You are asked whether to completely remove the application.
4. Click OK.
Kofax Capture Export Connector files are removed, and a Maintenance Complete dialog is displayed.
5. Click Finish.
6. Close the Windows Add/Remove Programs dialog.
You may now proceed to"Instructions for a New Installation" on page 2-4.
Installing Kofax Capture Export Connector
2.3.2 Instructions for a New Installation
Use this procedure to install Kofax Capture Export Connector:
1. Close all other Windows programs.
2. From Windows Explorer, navigate to the Kofax Capture Export Connector executable, and run setup.exe.
The Welcome dialog is displayed.
3. Click Next.
The License Agreement dialog is displayed.
4. Read through the agreement, and click Yes.
The Set Kofax Capture Export Connector - Oracle UCM Parameter dialog is displayed.
5. Enter the username and password from "Pre-Installation Tasks and Considerations" on page 2-1, and click Next.
The Scanned Files Directory dialog is displayed.
6. Accept the default, and click Next. This is the directory in which your scanned files will be temporarily stored.
The Enter Text dialog is displayed.
7. Enter the server host name from "Pre-Installation Tasks and Considerations" on page 2-1, and click Next.
The Setup Type dialog is displayed.
8. Select the version of your Oracle Content Server and click Next. The Setup Type dialog is displayed.
9. Select the type of Oracle Content Server (master or proxy) and click Next.
■ If you select a master instance, the Enter Text dialog is displayed. Skip step 10
and continue at step 11.
■ If you select a proxy instance, continue at step 10.
10. For a proxy server, select from the list of proxied instances, and click Next.
The Enter Text dialog is displayed.
11. Enter a web root, and click Next. The Enter Text dialog is displayed.
12. Enter any changes to the URL, and click Next.
It is necessary to specify changes only in rare instances. (For example, if you are using a different cgi name or a web filter.) If you are unsure about whether you need to make a change, verify this information in your web server by examining the properties of your web site. The InstallShield Wizard Complete dialog is displayed.
Note: If a list of proxied instances is not displayed, enter the Relative Web Root of the proxy server from "Pre-Installation Tasks and
Configuring Kofax Capture
Installation 2-5 13. Click Finish.
2.4 Configuring Kofax Capture
Use the following procedures to configure Kofax Capture for use with Kofax Capture Export Connector:
■ If Kofax Capture Export Connector is installed on a Kofax Capture client system,
copy files from the client system to the server system.
■ Configure the Kofax Capture client system to use Kofax Capture Export
Connector.
■ If Kofax Capture Export Connector was not installed in the default directory,
configure the image folder path in Kofax Capture. This section covers the following topics:
■ "Configuring Kofax Capture Client Systems" on page 2-5
■ "Configuring Kofax Capture Client to Use Kofax Capture Export Connector" on
page 2-5
■ "Configuring Kofax Capture Export Connector in a Non-Default Directory" on
page 2-7
2.4.1 Configuring Kofax Capture Client Systems
If you are installing Kofax Capture Export Connector on a Kofax Capture client system, certain Legacy files from the first Kofax Capture client system must be copied to the Kofax Capture server system.
To configure your client Kofax Capture Export Connector instance:
1. From the client system, copy the StellentRel directory, located in <Kofax install Dir>\Bin\.
2. Paste this directory to the server system \Ascent directory. For example,
\\servername\shared directory name\Ascent\Bin\.
2.4.2 Configuring Kofax Capture Client to Use Kofax Capture Export Connector
Configuring Kofax Capture to use Kofax Capture Export Connector involves the following tasks:■ "Installing the Release Script" on page 2-6 ■ "Importing Batch Classes" on page 2-6
■ "Assigning Release Script to Batch Classes" on page 2-6 ■ "Publishing Batch Classes" on page 2-7
Configuring Kofax Capture
2.4.2.1 Installing the Release Script
1. On the Windows taskbar, click the Start button, then select Programs, then select
Kofax Capture (or Ascent Capture version for older systems), then select
Administration.
The Administration dialog is displayed.
2. Select Tools then Release Script Manager. The Release Script Manager dialog is displayed.
3. Click Add.
The Open dialog is displayed.
4. From the StellentRel directory, select StellentRel.inf, and click Open. The Add Release Scripts dialog is displayed.
5. Select Kofax Capture Export Connector, and click Install. A dialog is displayed, specifying that registration is complete.
6. Click OK.
7. Click Close to close the Add Release Scripts dialog.
8. Click Close to close the Release Script Manager dialog.
2.4.2.2 Importing Batch Classes
After installing the release script, perform the following steps from the Kofax Capture Administration dialog.
1. Select File, then Import. The Open dialog is displayed.
2. Select OracleUCMBatch.cab, and click Open. Unpacking is performed.
3. Click OK.
The Import dialog is displayed, with ScansForOracleUCM and
ScansForOracleUCMParameters listed as Available Batch Classes.
4. Click Add All.
5. In Transfer Mode box, select Replace duplicates with items imported.
6. Click Import.
The files are imported.
7. Click OK to close the Import/Export dialog.
ScansForOracleUCM and ScansForOracleUCMParameters are now displayed in the Batch tab on the Kofax Capture Administration dialog.
2.4.2.3 Assigning Release Script to Batch Classes
After importing the batches, perform the following steps from the Kofax Capture Administration dialog.
1. Expand the ScansForOracleUCM batch class, right-click
ScannedDocsForOracleUCM document class, and select Release Scripts.
Configuring Kofax Capture
Installation 2-7 2. Select Kofax Capture Export Connector - Oracle UCMversion.
The Kofax Capture Export Connector - Oracle UCM Release Setup dialog is displayed.
3. Click Add >>. Select the scripts.
4. Click OK.
5. Click Close to exit the Release Scripts dialog.
6. Expand the ScansForOracleUCMParameters batch class, right-click
ScannedDocsForOracleUCMParam document class, and select Release Scripts.
The Release Scripts dialog is displayed.
7. Select Kofax Capture Export Connector - Oracle UCMversion.
The Kofax Capture Export Connector - Oracle UCM Release Setup dialog is displayed.
8. Click Add >>. Select the scripts.
9. Click OK.
10. Click Close to exit the Release Scripts dialog.
2.4.2.4 Publishing Batch Classes
After adding the release script to batches, perform the following steps from the Kofax Capture Administration dialog.
1. Select File then Publish.
2. Click Select All.
3. Click Publish.
Validation and publishing should occur without warnings or errors.
4. Click Close.
The icons for the batch classes ScansForOracleUCM and
ScansForOracleUCMParameters in the Batch tab on the Kofax Capture Administration dialog now display with check marks.
2.4.3 Configuring Kofax Capture Export Connector in a Non-Default Directory
Complete these steps only if you did not install Kofax Capture Export Connector into the default directory.
1. On the Windows taskbar, click the Start button, then select Programs, then Kofax Captureversion, then Administration.
The Kofax Capture Administration dialog is displayed.
2. In the Batch tab, highlight ScansforOracleUCM, and right-click Properties.
3. Adjust the path for the image folder to be your Ascent\Images directory.
4. In the Batch tab, highlight ScansforOracleUCMParameters, and right-click
Properties.
Configuring Kofax Capture
3
Using Kofax Capture with Kofax Capture Export Connector - Oracle UCM 3-1
3
Using Kofax Capture with Kofax Capture
Export Connector - Oracle UCM
This section covers the following topics:
■ "Working with Kofax Capture Batch Classes" on page 3-1 ■ "Customizing the Release Script" on page 3-7
■ "Mapping Kofax Index Fields to CHECKIN Parameters" on page 3-14 ■ "Verifying Kofax Capture Installation" on page 3-17
3.1 Working with Kofax Capture Batch Classes
After you have completed the installation and configuration tasks, your Kofax Capture workstation has two published batch classes: ScannedDocsForOracleUCM and
ScannedDocsForSOracleUCMParam.
Both batch classes (shown in the figure below) are set up to support the standard required Oracle Content Server check-in parameters. In addition, the batch class
ScansForOracleUCMParameters illustrates how a batch class can be configured for optional Oracle Content Server parameters, such as Release Date, Expiration Date, and so forth.
Like all Kofax Capture batch classes, these Oracle Content Server batch classes are constructed using field types, index fields, form types, and document classes, which are described in the following sections.
Working with Kofax Capture Batch Classes
This section covers the following topics:
■ "Folders" on page 3-2 ■ "Field Types" on page 3-3
■ "Setting Up Field Types" on page 3-3 ■ "Document Classes" on page 3-4
■ "Setting Up Document Class Index Fields" on page 3-4 ■ "Mapped Index Fields" on page 3-5
■ "Form Types" on page 3-7
3.1.1 Folders
Folder classes define the properties of folders for a batch class. Batches are a collection of pages, documents, and folders that are organized into a hierarchy that you define. As with other elements of a batch class, you can create, edit, and delete folder classes. In addition to organizing your documents within Kofax Capture, the real advantage to using folders comes after the documents have been released from Kofax Capture. If you ensure that the folder hierarchy in Kofax Capture matches (as closely as possible) the hierarchy used by your document management software, you can more easily import those documents into your third-party software.
Folders are created and filled with documents as the documents are processed through the Kofax Capture workflow. You can create folders manually (with batch editing), or you can allow them to be created automatically in accordance with rules you define. Likewise, you can place documents into folders manually or automatically.
Working with Kofax Capture Batch Classes
Using Kofax Capture with Kofax Capture Export Connector - Oracle UCM 3-3
3.1.2 Field Types
Installing and configuring the Kofax Capture release script sets up specific Kofax Capture field types, which are shown in the figure below. These field types are in turn used to define index fields in the sample document classes:
ScannedDocsForOracleUCM and ScannedDocsForOracleUCMParam. When defining new index fields, you may use these field types, or create additional field types as needed. See "Setting Up Field Types" on page 3-3.
3.1.3 Setting Up Field Types
To set up field types:1. From Kofax Capture, open the Administration dialog, then select the Field Type tree view tab.
2. Right-click anywhere within the tab and select New Field Type. The Create Field Type dialog is displayed.
3. Click New.
4. Enter values in the fields provided.
■ On the General tab, Name and Data type are required; Description and
Dictionary are optional. For Data type, Kofax Capture supports 11 ODBC-compliant types.
■ On the Values tab, you have the option of entering known values for the field
type and specifying settings for Force match and Case sensitive.
5. Click OK when complete.
Working with Kofax Capture Batch Classes
3.1.4 Document Classes
Installing and configuring the Kofax Capture release script as described in Section 2.3, "Installing Kofax Capture Export Connector," and Section 2.4, "Configuring Kofax Capture," sets up the following sample Kofax Capture document classes:
■ ScansForOracleUCM
■ ScansForOracleUCMParameters
Each document class that is used with Kofax Capture includes the following:
■ Index fields
■ Attributes for the index fields ■ At least one form type
3.1.5 Setting Up Document Class Index Fields
Use the following procedure to set up document class index fields.
1. From Kofax Capture, open the Administration dialog, then select the Document tree view tab.
2. Right-click a document class and select Properties.
The Document Class Properties dialog is displayed. For examples of the dialogs for ScannedDocsForOracleUCM and ScannedDocsForOracleUCMParam, see
"ScannedDocsForOracleUCM" on page 3-5 and
"ScannedDocsForOracleUCMParam" on page 3-5.
3. Click New.
4. Enter the following information:
■ Name
Enter a descriptive name.
■ Field Type
Select the appropriate field type from the drop-down list.
■ Default
If desired, enter a default value to populate the index field.
Tech Tip: If the corresponding Oracle Content Server metadata field is required, entering a default value is recommended. Check-in will fail if a required metadata field does not contain a value.
Working with Kofax Capture Batch Classes
Using Kofax Capture with Kofax Capture Export Connector - Oracle UCM 3-5
■ Required
Select True if the field must contain a value during validation.
Tech Tip: If the corresponding Oracle Content Server metadata field is required, set this field to True.
■ Verify
Set to False.
■ Hidden
Set to False.
■ Sticky
Set to False.
■ Total
Set to False.
5. When you are done adding the index field, click Apply to continue or OK to exit.
3.1.6 Mapped Index Fields
This section covers the following topics:
■ "ScannedDocsForOracleUCM" on page 3-5 ■ "ScannedDocsForOracleUCMParam" on page 3-5
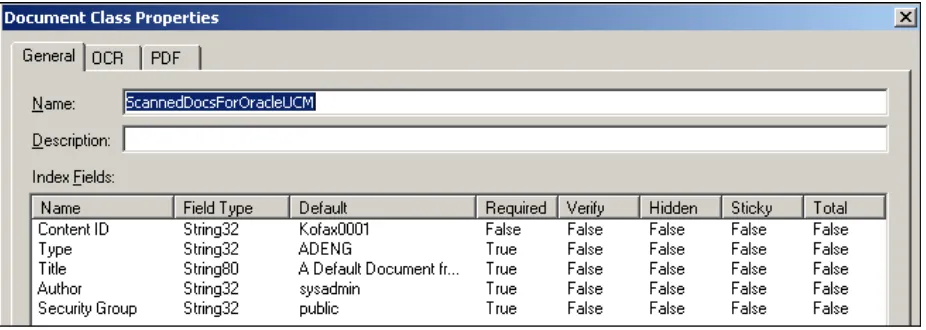
3.1.6.1 ScannedDocsForOracleUCM
The ScannedDocsForOracleUCM document class includes "core" index fields that are mapped to Oracle Content Server standard required CHECKIN parameters.
Figure 3–1 Mapped Index Fields for ScannedDocsForOracleUCM Document Class
3.1.6.2 ScannedDocsForOracleUCMParam
Working with Kofax Capture Batch Classes
Figure 3–2 Mapped Index Fields for ScannedDocsForOracleUCMParam Document Class
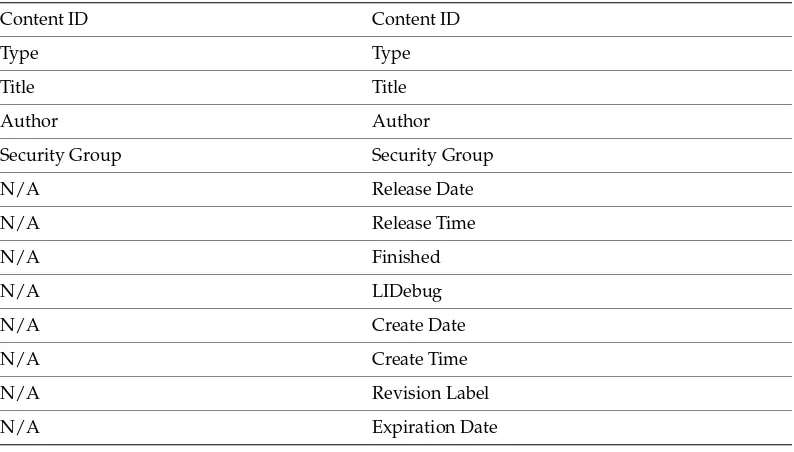
Each of the Oracle Content Server document classes is configured with the index fields listed in the table below. The index fields that are defined for both document classes (Content ID, Type, Title, Author, and Security Group) are mapped to Oracle Content Server parameters that are required for successful check-in of documents to Oracle Content Server.
The additional index fields defined for ScannedDocsForOracleUCMParam are provided in the document class for illustration purposes only. They are examples of index fields that might hypothetically be mapped to Oracle Content Server parameters using the CHECKIN Parameters Editor.
ScannedDocsForOracleUCM Index Fields ScannedDocsForOracleUCMParam Index Fields
Content ID Content ID
Type Type
Title Title
Author Author Security Group Security Group N/A Release Date N/A Release Time
N/A Finished
N/A LIDebug
Customizing the Release Script
Using Kofax Capture with Kofax Capture Export Connector - Oracle UCM 3-7
3.1.7 Form Types
Installing and configuring the Kofax Capture release script as described in chapters 1 and 2 sets up the two sample document classes with the form types shown in the figure below.
The form types (SimpleForm and SimpleFormParameters) are provided for the Oracle Content Server document classes because at least one form type must be defined for a document class. Since a form type defines a unique form, you will set up your own form types to meet the needs of your specific application.
3.2 Customizing the Release Script
This section covers the following topics:
■ "Accessing the Setup Dialogs" on page 3-8 ■ "Using the Index Storage Tab" on page 3-8 ■ "Setting Index Values" on page 3-9
■ "Using the Document Storage Tab" on page 3-9 ■ "Using the Image Format Tab" on page 3-9 ■ "Specifying PDF Settings" on page 3-10
■ "Setting File Type of Released Images" on page 3-10 ■ "Selecting Multipage TIFF Output File Types" on page 3-10 ■ "Selecting TIFF, JPG, or PCX Output File Types" on page 3-10
■ "Selecting Adobe Acrobat Capture PDF Output File Types" on page 3-11 ■ "Specifying Adobe Acrobat Capture PDF Settings" on page 3-11
■ "Using the Server Tab" on page 3-12
■ "Setting URL, User Name, and Password" on page 3-12 ■ "Setting Primary/Alternate File Formats" on page 3-12
N/A Expiration Time N/A Do Security Check
Note: For more information about form types, view the Kofax Capture online help.
Customizing the Release Script
■ "Setting Workflow Status" on page 3-12
■ "Setting Options for Adobe Acrobat Capture PDF Files With Errors" on page 3-13 ■ "Accessing CHECKIN Parameters Editor" on page 3-14
3.2.1 Accessing the Setup Dialogs
Use the following procedure to access the setup dialogs for the Kofax Capture release script.
1. From Kofax Capture, open the Administration dialog, then select the Document tree view tab.
2. Expand a Oracle Content Server batch class, right-click its document class, and select Release Scripts.
The Release Script dialog is displayed.
3. In the list of Assigned Release Scripts, highlight Kofax Capture Export Connector - Oracle UCMversion, and click Setup.
The Text Release Setup dialog is displayed. This dialog has the following tabs :
■ Index Storage Tab
Used for index value settings.
■ Document Storage Tab
Used for release directory and Acrobat Capture settings.
■ Image Format Tab
Used for releases images as file type settings.
■ Server Tab
Used for Oracle Content Server settings.
3.2.2 Using the Index Storage Tab
Use the Index Storage tab to set index values for the batch class. The Kofax Capture release script establishes assignments for the required information field items found in an initial Oracle Content Server installation. The values assigned to the index fields are supplied from the Validation module during Kofax Capture batch processing.
Note: You must add index fields to a document class before they are available to assign as index values in a customized release script. See
"Setting Up Document Class Index Fields" on page 3-4. By default, all index fields currently defined for the selected document class will be in the list of index values.
Customizing the Release Script
Using Kofax Capture with Kofax Capture Export Connector - Oracle UCM 3-9
3.2.3 Setting Index Values
To set up index values:
1. Add the desired Index Field to document class properties. See "Setting Up Document Class Index Fields" on page 3-4 or "Mapped Index Fields" on page 3-5.
2. Navigate to the Index Storage tab of the Oracle Content Server Release Setup dialog.
3. Click Add.
A blank index value is added to the end of the list of existing index values.
4. Click the context menu button to the right of the blank index value.
5. From the Index Fields menu option, select an index field.
6. Click Apply to continue or OK to exit the dialog.
3.2.4 Using the Document Storage Tab
Use the Document Storage tab to view or change the directory paths for released files and to set how Kofax Capture monitors the Acrobat Capture PDF conversion process.
3.2.5 Using the Image Format Tab
Use the Image Format tab to set the format (file type) of released images.
Note: When selecting index values, do not choose Kofax Capture Values or Text Constant.
Note: If you want an index value to map to a Oracle Content Server optional check-in parameter, you must use the CHECKIN Parameter Editor to create the mapping. However, the following standard check-in parameters do not need to be mapped, because they are assigned automatically:
■ Content ID ■ Type ■ Title ■ Author
■ Security Group
■ Account (if enabled in Oracle Content Server)
Note: For more detailed information about this tab, see "Document Storage Tab" on page A-3.
Customizing the Release Script
3.2.6 Specifying PDF Settings
Use the Settings button to open the Adobe Acrobat Capture Settings dialog box where you can specify PDF settings.
3.2.7 Setting File Type of Released Images
Kofax Capture supports releasing scanned images in a number of output file formats. The following image files are supported when using Kofax Capture:
■ JPG - JPG Compression
■ Multipage TIFF - CCITT Group 3 ■ Multipage TIFF - CCITT Group 3/2D ■ Multipage TIFF - CCITT Group 4 ■ Multipage TIFF - JPEG Compression ■ Multipage TIFF - Uncompressed ■ PCX - PackBytes
■ Adobe Acrobat Capture PDF (from JPEG)
■ Adobe Acrobat Capture PDF (from Multipage TIFF) ■ Adobe Acrobat Capture PDF (from PCX)
■ Adobe Acrobat Capture PDF (from Single Page TIFF) ■ TIFF - CCITT Group 3
■ TIFF - CCITT Group 3/2D ■ TIFF - CCITT Group 4 ■ TIFF - JPEG Compression ■ TIFF - Uncompressed
3.2.8 Selecting Multipage TIFF Output File Types
Select a Multipage TIFF output file type when you have more than one TIFF image in a batch, and you would like to have all of those images bundled together and checked into the Oracle Content Server as one content item.
1. Navigate to the Image Format tab on the Oracle Content Server Release Setup dialog.
2. In the Release Images As Image file type drop-down list, click a Multipage TIFF Output File Type.
3.2.9 Selecting TIFF, JPG, or PCX Output File Types
Select a TIFF, JPG or PCX output file type if you want to check a file in one of those formats into Oracle Content Server as both the primary (native) and alternate (web viewable) file.
Customizing the Release Script
Using Kofax Capture with Kofax Capture Export Connector - Oracle UCM 3-11
When you select TIFF, JPG or PCX, the first graphic in each batch is checked into Oracle Content Server. Because of this, you may want to use Multipage TIFF (see
"Selecting Multipage TIFF Output File Types" on page 3-10) if you have more than one graphic in a batch. Alternatively, you could ensure that each batch contains only one graphic.
1. Navigate to the Image Format tab on the Oracle Content Server Release Setup dialog.
2. In the Release Images As Image file type drop-down list, click a TIFF, JPG or PCX Output File Type.
3.2.10 Selecting Adobe Acrobat Capture PDF Output File Types
Select Adobe Acrobat Capture PDF as the output file type if you want to check a PDF file into Oracle Content Server as the primary (native) or alternate (web viewable) file.
1. Navigate to the Image Format tab on the Oracle Content Server Release Setup dialog.
2. In the Release Images As Image file type drop-down list, click Adobe Acrobat
PDF (from Multipage TIFF).
The Settings button becomes available.
3.2.11 Specifying Adobe Acrobat Capture PDF Settings
When you choose to release images as Adobe Acrobat Capture PDF (from Multipage TIFF), you then use Settings button to specify Adobe Acrobat Capture workgroup hub, watched folder, workflow, and other settings.
1. On the Image Format tab of the Oracle Content Server Release Setup dialog, click
Settings.
2. Select the location of the Adobe Acrobat Capture workgroup hub:
a. Click the browse button next to the Workgroup Hub field.
b. Navigate to the location of the Hub directory. For example:
mapped drive/Program Files/Adobe/Adobe Acrobat Capture 3.0/Hub
c. Click OK.
Upon selection of a workgroup hub, the Dictionaries and Workflows drop-down lists will be populated with available options.
3. Select the location of the Adobe Acrobat Capture Watched Folder:
a. Click the browse button next to the Watched Folder field.
Note: Selecting Adobe Acrobat Capture PDF as the output file type requires the use of Adobe Acrobat Capture. Before continuing with the following procedure, read through and complete "Configuring Adobe Acrobat Capture" on page B-1.
Note: The Adobe Acrobat Capture PDF (from Multipage TIFF)
Customizing the Release Script
b. Navigate to the location of the Watch directory. For example:
mapped drive/Program Files/Adobe/Adobe Acrobat Capture 3.0/Watch
c. Click OK.
4. Select Formatted Text & Graphics from Page Content drop-down list.
5. If desired, select options for Language, PDF Document Settings, and Dictionaries.
6. Select StellentScans from Workflows drop-down list.
7. If desired, select options for Suspect Regions and Advanced Settings.
8. Click OK.
3.2.12 Using the Server Tab
The Server tab on the Oracle Content Server Release Setup dialog is used to specify settings for Oracle Content Server URL, user name, and password; to select options for workflow and primary/alternate file check in formats; and to access the CHECKIN parameters editor.
3.2.13 Setting URL, User Name, and Password
These settings were made during installation of Kofax Capture and may be changed using the fields provided on the Server tab if necessary.
3.2.14 Setting Primary/Alternate File Formats
Kofax Capture lets you control how your released files (as specified on the Document Storage Tab) are checked into Oracle Content Server.
There are two drop-down menus available-one for the primary file and one for the alternate file. Within each menu, you can choose: Image, Kofax PDF, Adobe Acrobat Capture PDF, or OCR full text. The Alternate file menu also includes a [None] option in case you do not want to check in an alternate file.
You can use the menus to, for example, select Image at the primary (native) file and Adobe Acrobat Capture PDF as the alternate (web-viewable) file.
3.2.15 Setting Workflow Status
The Kofax Capture release script enables you to initiate an existing workflow in Oracle Content Server when an item is released from Kofax Capture.
Note: Oracle Content Server will not allow two files with the same file extension (such as .pdf) to be both the primary and alternate file.
Note: For information on using Adobe Acrobat Capture and checking in Adobe Acrobat Capture PDFs, see Appendix B, "Using Adobe Acrobat Capture".
Customizing the Release Script
Using Kofax Capture with Kofax Capture Export Connector - Oracle UCM 3-13 1. Navigate to the Server tab on the Oracle Content Server Release Setup dialog.
2. Set the workflows status using the Allow Workflows check box.
■ Select the check box to enable initiation of workflows when content items are
released from Kofax and checked into Oracle Content Server.
■ Clear the check box to disable initiation of workflows when content items are
released from Kofax and checked into Oracle Content Server.
■ If the Allow Workflows check box is not selected, the revision will be checked
in unconditionally.
■ If the Allow Workflows check box is selected, the content item identified by
the user (on the Validation dialog) must be checked out of Oracle Content Server before Kofax Capture initiates check in. If the content item is not checked out, the check in will fail with an error message.
3.2.16 Setting Options for Adobe Acrobat Capture PDF Files With Errors
When an Adobe Acrobat Capture PDF file contains an error, you can stop it from being checked into Oracle Content Server so you can review it.
With the "Check In Adobe Acrobat Capture PDF with Errors" option, you can allow the check in of a PDF generated by Adobe Acrobat Capture that has any errors in the Adobe Acrobat Capture finished document log. In addition, you can choose to keep the PDF file, so it remains in the release directory where you can review it.
To set PDF error options:
1. Navigate to the Server tab on the Oracle Content Server Release Setup dialog.
2. Choose the PDF error checking option:
■ Leave the Check In Adobe Acrobat Capture PDF with Errors option
unchecked to ensure that all PDF files containing errors are not checked into Oracle Content Server.
■ Check the Check In Adobe Acrobat Capture PDF with Errors option to check
all PDF files into Oracle Content Server, even if they contain errors.
3. Determine if the files with errors remain or are deleted:
■ To keep the PDF files with errors in the release directory, select the Keep primary and alternate files in the release directory when the check in fails
option, which is selected by default.
■ To delete PDF files with errors from the release directory, clear the Keep primary and alternate files in the release directory when the check in fails
option.
Note: An active workflow must exist in Oracle Content Server before an item released from Kofax Capture can enter it.
Mapping Kofax Index Fields to CHECKIN Parameters
You may also want to use the Salvage PDF documents option, described
Appendix C, "Setting Global Options".
3.2.17 Accessing CHECKIN Parameters Editor
When you want to map Kofax Capture index fields to Oracle Content Server CHECKIN parameters, you use the CHECKIN Parameters Editor, which is accessed using the following procedure.
1. Navigate to the Server tab on the Oracle Content Server Release Setup dialog.
2. Click the CHECKIN Service Parameters button. The CHECKIN Parameters Editor dialog is displayed.
3.3 Mapping Kofax Index Fields to CHECKIN Parameters
When a Kofax Capture release script is used to check documents into Oracle Content Server, one of two Oracle Content Server IdcCommand services is used:
■ The CHECKIN_ARCHIVE service is used if the Allow Workflows check box is
selected on the Server tab of the Oracle Content Server Release Setup dialog . See
"Setting Workflow Status" on page 3-12.
■ The CHECKIN_UNIVERSAL service is used if the Allow Workflows check box is
not selected on the Server tab of the Oracle Content Server Release Setup dialog. See "Setting Workflow Status" on page 3-12.
Each CHECKIN service specifies certain required parameters to successfully execute the content item check-in process. Other parameters may be specified but are not required.
Note: For information on how to create mappings, see "Mapping Kofax Index Fields to CHECKIN Parameters" on page 3-14.
Mapping Kofax Index Fields to CHECKIN Parameters
Using Kofax Capture with Kofax Capture Export Connector - Oracle UCM 3-15
This section covers the following topics:
■ "Setting Up Mappings for Required Parameters" on page 3-15 ■ "Setting Up Mappings for Optional Parameters" on page 3-15 ■ "Setting Up Date and Time Parameters" on page 3-16
■ "Debugging Using LIDebug Parameter" on page 3-17
3.3.1 Setting Up Mappings for Required Parameters
When using Kofax Capture, it is necessary for Kofax Capture to have, at a minimum, index fields that correspond to the content information (metadata) fields that Oracle Content Server requires for content item check in. The following list of index fields must exist in the Kofax document class or the batch class.
■ Content ID (unless auto-generation of Content IDs is enabled in Oracle Content
Server)
■ Type ■ Title ■ Author
■ Security Group
■ Account (if security accounts are enabled)
3.3.2 Setting Up Mappings for Optional Parameters
If you want to specify other check-in parameters, for example, release date, expiration date, and so forth, use the following procedure.
1. Set up index fields for the desired parameters. See "Setting Up Document Class Index Fields" on page 3-4.
2. Set up index values for the Kofax Capture release script. See "Setting Index Values"
on page 3-9.
3. Open the CHECKIN Parameters Editor. See "Accessing CHECKIN Parameters Editor" on page 3-14.
4. On the CHECKIN Parameters Editor dialog, click Add. The Parameter Detail dialog is displayed.
Note: Index fields must be named exactly as they are shown in the list above, so that the release script can recognize them as required fields and correctly format them for Oracle Content Server.
Note: You should have a solid understanding of Oracle Content Server CHECKIN services and parameters before proceeding to set up mappings. Invalid parameters will cause a batch to fail during
Mapping Kofax Index Fields to CHECKIN Parameters
5. From the User Interface Name drop-down list, select the desired index field.
6. In the Oracle Content Server Parameter field, enter the name of the parameter.
7. Click OK.
The mapping will be displayed in the CHECKIN Parameters Editor list.
8. Add, edit, or delete mappings as desired.
9. When you are finished, click Save to exit and save your changes, or click Cancel to exit without saving your changes.
10. Click Yes to confirm the action.
11. Click OK to exit the Oracle Content Server Release Setup dialog.
12. Click Close to exit the Release Scripts dialog.
13. Publish the batch class so that your changes are in effect when you next use the batch class to import or scan documents.
3.3.3 Setting Up Date and Time Parameters
Oracle Content Server date fields include both the date and the time in one field. Kofax Capture uses separate fields for date and time. Use the following procedure to
concatenate date and time into a single check-in parameter.
1. Set up an index field for the date field (for example, Release Date). Be sure to use the Date field type when defining the index field.
2. Set up an index field for the time field (for example, Release Time). Be sure to use the Time field type when defining the index field.
3. Use the CHECKIN Parameters Editor to map the date index field to the desired Oracle Content Server check-in parameter. For example, map Release Date to dInDate.
4. Use the CHECKIN Parameters Editor to map the time index field to the same Oracle Content Server check-in parameter. For example, map Release Time to dInDate.
Verifying Kofax Capture Installation
Using Kofax Capture with Kofax Capture Export Connector - Oracle UCM 3-17
3.3.4 Debugging Using LIDebug Parameter
If a mapping LIDebug:LIDebug is created, and if the value is set to TRUE during the validation step, the .hda data that is passed from Kofax Capture to Oracle Content Server will be displayed when the release script is run. This allows the user to verify that the correct data and parameters are being passed to the Oracle Content Server.
3.4 Verifying Kofax Capture Installation
Perform the following tasks to verify that Kofax Capture is installed and configured correctly.
■ "Create a Batch" on page 3-17
■ "Process Batch: Scan Queue" on page 3-17 ■ "Process Batch: Validation Queue" on page 3-18 ■ "Process Batch: Release Queue" on page 3-18
3.4.1 Create a Batch
To create a batch:
1. On the Windows taskbar, click the Start button, then select Programs, then Kofax Capture, then Batch Manager.
2. Select File then New Batch.
3. In Batch class drop-down list, select ScansForOracleUCM.
4. Click Save.
5. Click Close.
The new batch is displayed in the Batch Manager main dialog. The batch should be at the "Scan" queue and should show a "Ready" status.
3.4.2 Process Batch: Scan Queue
After creating the batch, perform the following steps from the Kofax Capture Batch Manager main dialog.
1. Select File then Process Batch. The Scan module is displayed.
2. Select Software Import from the drop-down list.
3. Select Scan then Start.
The Import dialog is displayed.
4. Select a sample TIFF file, and click Open. A TIFF image is added to the batch contents.
5. Select Batch then Close.
6. Click Yes to confirm the action.
Verifying Kofax Capture Installation
In the Batch Manager main dialog, the batch should be at the Validation queue and should show a "Ready" status.
3.4.3 Process Batch: Validation Queue
After running the scan queue, perform the following steps from the Kofax Capture Batch Manager dialog.
1. Select File then Process Batch. The Validation module is displayed.
2. Enter the required Oracle Content Server Field Info values. Specify a Content ID if necessary, based on this information:
■ Use the default batch with the default Content ID: The content will be
checked in with a unique suffix added to the Content ID Kofax0001.
■ Do not specify a Content ID (you can remove the default Content ID by
changing the batch or by deleting the Content ID in the validation step): If Oracle Content Server is configured to automatically assign a Content ID, the content is checked in with this automatic ID. If Oracle Content Server is not configured to assign a Content ID, an error message is displayed during the release process.
■ Specify a Content ID: The content is checked into Oracle Content Server with
the specified Content ID and without a unique suffix added. If a content item with the same Content ID is already checked in, the new document is checked in as a new revision of the existing content item.
3. Select Batch then Close.
4. If prompted, click Yes to save data before closing document.
In the Batch Manager main dialog, the batch should be at the Release queue and should show a Ready status.
3.4.4 Process Batch: Release Queue
After running the validation queue, perform the following steps from the Kofax Capture Batch Manager dialog.
1. Select File then Process Batch.
If the release queue runs without error, the TIFF image is checked into Oracle Content Server.
If the release queue results in errors, check the error messages.
A
User Interface A-1
A
User Interface
This section provides information about the user interface screens and covers the following topics:
■ "Text Release Setup Page" on page A-1 ■ "Index Storage Tab" on page A-2 ■ "Document Storage Tab" on page A-3 ■ "Image Format Tab" on page A-4
■ "Adobe Acrobat Capture Settings" on page A-4 ■ "Server Tab" on page A-8
A.1 Text Release Setup Page
Use this page to access the setup dialogs for the Kofax Capture release script.
Element Description
Batch class The name of this batch class. A batch class describes how the documents in a batch will be processed. A batch class contains one or more document classes, which in turn contain one or more form types. This allows you to have different kinds of documents and forms within one batch.
Document class The name of this document class. A document class is a definition of a particular type of document, such as an order form or medical form. Document classes provide a convenient mechanism for associating the same group of index fields and processing settings with multiple form types. You can define a document class, and then add one or more form types to it. Then, you can associate a set of index fields and processing settings with the document class. The same set of fields and settings will be shared across all the form types defined for the document class.
Index Storage Tab
A.2 Index Storage Tab
Use the Index Storage tab to set index values for the batch class. The Kofax Capture release script establishes assignments for the required information field items found in an initial Oracle Content Server installation. The values assigned to the index fields are supplied from the Validation module during Kofax Capture batch processing.
Index Storage tab
Displays the "Index Storage Tab" on page A-2.
Document Storage tab
Displays the "Document Storage Tab" on page A-3.
Image Format tab
Displays the "Image Format Tab" on page A-4.
Server tab Displays the "Server Tab" on page A-8. OK button Saves the current settings.
Cancel button Closes the page without saving the current settings. Apply button Applies and saves the current settings.
Help button Opens the applicable context-sensitive help screen.
Note: You must add index fields to a document class before they are available to assign as index values in a customized release script. By default, all index fields currently defined for the selected document class will be in the list of index values.
Element Description
Sequence number
Use the sequence position to establish the priority for the specified index values.
Document Storage Tab
User Interface A-3
A.3 Document Storage Tab
Use the Document Storage tab to view or change the directory paths for released files and to set how Kofax Capture monitors the Acrobat Capture PDF conversion process.
Index Value The Content Server metadata parameters used for index values associated with the new file checkin.
Add button Opens a dialog to add a new metadata parameter as an index value. Delete button Removes a selected index value from the list.
Delete All button
Removes all of the listed index values.
Up / Down buttons
Used to adjust the specific placement order of the selected entry in the index values list. The position of each entry in the list is relevant to its priority for batch processing. The higher an entry is positioned in the list, the higher its priority is in the processing. Each click on the up or down arrow moves the selected entry up or down one position in the list.
Element Description
Release image files
Select this check box if you want to release your image files.
Release directory
Enter the path to the folder to which you want to release the files. If desired, you can use the Browse button.
Note: The path to the Image Files release directory must not exceed 122 characters.
Image Format Tab
A.4 Image Format Tab
Use the Image Format tab to set the format (file type) of released images.
A.5 Adobe Acrobat Capture Settings
Use the Settings button to open the Adobe Acrobat Capture Settings dialog box where you can specify PDF settings.
Skip first page of each document
Select this check box if you do not want the first page of your documents released. For example, you might want to check this option if you are using separator sheets to separate the documents in your batches and do not want to release the separator sheets.
Note: If you are not using separator sheets, checking this option will cause the first page of each document to be skipped (not released).
Release OCR full text files
Select this check box if your want to release your OCR full text files.
Release directory
Enter the path to the folder to which you want to release the files. If desired, you can use the Browse button.
Note: The path to the OCR full text files release directory must not exceed 122 characters.
Release Kofax PDF files
Select this check box to release Kofax PDF files.
Release directory
Enter the path to the folder to which you want to release the files. If desired, you can use the Browse button.
Note: The path to the Kofax PDF files release directory must not exceed 122 characters.
Element Description
Image file type Provides a list of file types to use to check documents into Content Server. Settings Displays the "Adobe Acrobat Capture Settings" on page A-4.
Adobe Acrobat Capture Settings
User Interface A-5 Element Description
Workgroup Hub Select the location of your Adobe Acrobat Capture workgroup hub by using the Browse button. The workgroup hub is a folder on a drive accessible to all stations off the workgroup. Each workstation in the group needs read and write access to the hub folder to operate. The workgroup hub property is required by Adobe Acrobat Capture. Upon selection of a workgroup hub, the Dictionaries and Workflow's properties will be populated with default values.
Adobe Acrobat Capture Settings
Page Content Select the desired output format for your PDF images. You can choose from the following:
■ Formatted Text & Graphics: Each page of a Formatted Text & Graphics
file, also known as PDF Normal, is made up of a combination of text and bitmap images. It is the default page content. It contains text that is scalable and can be indexed, searched, and copied to the clipboard. The documents preserve page formatting and graphic images.
■ Searchable Image - Exact: Searchable Image (Exact) page content shares
the same features with PDF Normal, but also includes complete bitmaps for each page of the original document. Select this format when you need to keep the original scanned image of a document for legal or archival purposes but want the document to be searchable.
■ Searchable Image - Compact: Searchable Image (Compact) is a more
compressed version of Searchable Image (Exact) in which text regions that contain no color are stored as monochrome rather than full-color images and can be indexed, searched, and copied to the clipboard.
■ Image Only: Image Only page content stores the entire content of each
page as one large bitmap. Searches against the contents of these types of files are not available. However, processing PDF files of this type are tremendously faster as the PDF engine does not perform character or font recognition on the images. Note that the Adobe Acrobat Capture 3.0 Personal Edition does not decrement the Adobe hardware key for Image Only page content.
Note: The "Formatted Text & Graphics," "Searchable Image (Compact)," and "Searchable Image (Exact)" formats use the Adobe Acrobat Capture OCR engine to perform OCR on the text. You can control the behavior of the engine for words or characters that cannot be recognized by selecting "Suspect Regions" options, as described below.
Language Select the desired language. The default is English (U.S.). Changing the language from English (U.S.) changes the character set, the primary spelling dictionary, and (with some languages) the recognition engine.
PDF Document Information
Enter or select the desired PDF document information. When viewing the PDF file, your selections will show up as "Document Info." You can enter text, select an index field, batch field, or an Kofax Capture Value for Title, Subject, Author, or Keywords.
Dictionaries Select the desired dictionary for OCR processing. You can accept the default Adobe Acrobat Capture dictionary or select a predefined custom dictionary to process your documents. Note that the default dictionary is automatically populated after a workgroup hub has been selected.
Workflows Select the desired workflow for Adobe Acrobat Capture processing. You can accept the default Adobe Acrobat Capture workflow or select a different workflow. Workflow's are automatically populated after a workgroup hub has been selected. Note that your workflow must have a designated watched folder. Adobe Acrobat Capture lets you create your own workflow or use one of the predefined workflow's.
Suspect Regions Select the desired behavior for how suspect regions should be handled. A suspect region is one that the Adobe Acrobat Capture engine cannot recognize with a confidence level greater than or equal to your selected OCR confidence threshold.