Learn Microsoft
®
Visual Basic
®
2012
Published with the authorization of Microsoft Corporation by: O’Reilly Media, Inc.
1005 Gravenstein Highway North Sebastopol, California 95472
Copyright © 2012 by Michael Halvorson
All rights reserved. No part of the contents of this book may be reproduced or transmitted in any form or by any means without the written permission of the publisher.
ISBN: 978-0-7356-7298-7
1 2 3 4 5 6 7 8 9 LSI 7 6 5 4 3 2
Printed and bound in the United States of America.
Microsoft Press books are available through booksellers and distributors worldwide. If you need support related to this book, email Microsoft Press Book Support at [email protected]. Please tell us what you think of this book at http://www.microsoft.com/learning/booksurvey.
Microsoft and the trademarks listed at http://www.microsoft.com/about/legal/en/us/IntellectualProperty/ Trademarks/EN-US.aspx are trademarks of the Microsoft group of companies. All other marks are property of their respective owners.
The example companies, organizations, products, domain names, email addresses, logos, people, places, and events depicted herein are fictitious. No association with any real company, organization, product, domain name, email address, logo, person, place, or event is intended or should be inferred.
This book expresses the author’s views and opinions. The information contained in this book is provided without any express, statutory, or implied warranties. Neither the authors, O’Reilly Media, Inc., Microsoft Corporation, nor its resellers, or distributors will be held liable for any damages caused or alleged to be caused either directly or indirectly by this book.
Acquisitions and Developmental Editor: Russell Jones
Contents at a Glance
Introduction xiii
Chapter 1 Getting to Know Visual Basic 2012 1
Chapter 2 Creating Your First Windows 8 application 35
Chapter 3 Using Controls 65
Chapter 4 Designing Windows 8 applications with Blend
for Visual Studio 97
Chapter 5 Working with XaML 125
Chapter 6 Visual Basic Language elements 149
Chapter 7 Controlling application Design, Layout, and
program Flow 177
Chapter 8 Using the .Net Framework 209
Chapter 9 Debugging applications 235
Chapter 10 Managing Data with arrays and LINQ 253
Chapter 11 Design Focus: Five Great Features for a Windows 8
application 281
Chapter 12 Future Development Opportunities and the
Windows Store 315
vii
Contents
Introduction . . . xiii
Chapter 1 Getting to Know Visual Basic 2012
1
Development Opportunities for Visual Basic Programmers . . . 2New Development Platforms . . . 3
Obtaining, Installing, and Starting Visual Studio Express 2012 for Windows 8 . . . 4
Downloading the Product . . . 5
Installing Visual Studio Express 2012 for Windows 8. . . 5
Starting Visual Studio Express 2012 . . . 6
The Visual Studio Development Environment . . . 7
The Visual Studio Tools . . . .10
The Designer Window . . . .12
Running a Visual Basic Program . . . 16
The Properties Window . . . .18
Moving and Resizing the Programming Tools . . . .22
Moving and Resizing Tool Windows . . . 24
Docking Tool Windows . . . .25
Hiding Tool Windows . . . .27
Switching Among Open Files and Tools Using the IDE Navigator . . . 28
Opening a Web Browser Within Visual Studio . . . .29
Customizing IDE Settings to Match This Book’s Exercises . . . .30
Checking Project and Compiler Settings . . . .30
Exiting Visual Studio . . . .33
Summary. . . .33
What do you think of this book? We want to hear from you! Microsoft is interested in hearing your feedback so we can continually improve our books and learning resources for you. to participate in a brief online survey, please visit:
Chapter 2 Creating Your First Windows 8 Application
35
Web List: Your First Visual Basic Program . . . .36
Creating the User Interface . . . .37
Setting the Properties . . . .46
Writing the Visual Basic Code . . . 51
A Look at the Visual Basic Code-Behind File . . . 55
Running Visual Basic Applications . . . .56
Sample Projects on Disk . . . .58
Building an Executable File and Deploying . . . 59
Summary. . . .63
Chapter 3 Using Controls
65
Using the Ellipse and TextBlock Controls . . . .66Using the CheckBox and RadioButton Controls . . . 74
Using the MediaElement Control to Add Music and Video . . . .86
Thinking about Media Files . . . .86
Summary. . . .95
Chapter 4 Designing Windows 8 Applications with Blend
for Visual Studio
97
Blend for Visual Studio . . . .98Why Blend Is Useful for Visual Studio Developers . . . .98
Starting Blend . . . .99
Design Tools in the Blend IDE . . . .102
Using XAML Controls in Blend . . . .103
Creating a Storyboard to Add Basic Animation Effects . . . .108
Writing Event Handlers in Visual Studio . . . .115
Using the OnNavigatedTo Event . . . .121
Contents ix
Chapter 5 Working with XAML
125
Understanding XAML Basics . . . .126
What Is XAML? . . . .126
XAML Is Related to XML and HTML . . . .127
XAML Elements . . . .127
Examining XAML Project Files . . . .129
Creating XAML Objects . . . .135
Summary. . . .146
Chapter 6 Visual Basic Language Elements
149
Understanding Visual Basic Program Statements . . . .150Using Variables to Store Information . . . .150
Setting Aside Space for Variables: The Dim Statement . . . .151
Using Variables in an Event Handler . . . .152
Using a Variable to Store and Process Input . . . .156
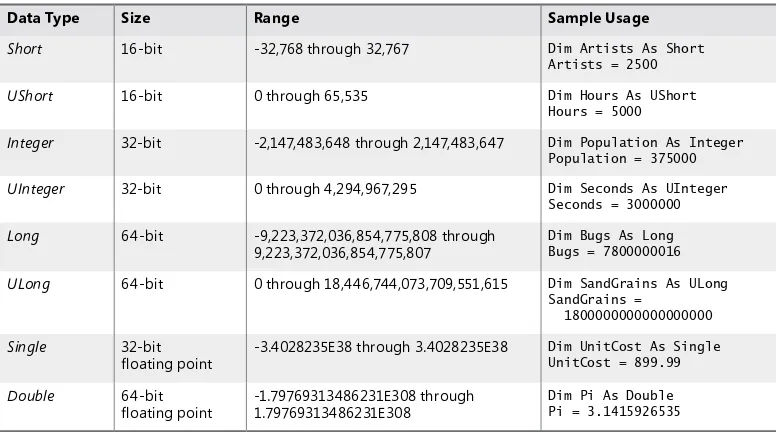
Working with Data Types . . . .160
Constants: Variables That Don’t Change . . . .167
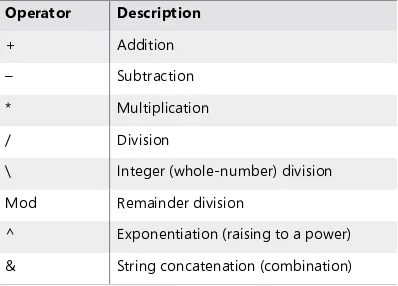
Working with Visual Basic Operators . . . .170
Basic Math: The +, –, *, and / Operators. . . .170
Advanced Operators: \, Mod, ^, and & . . . .172
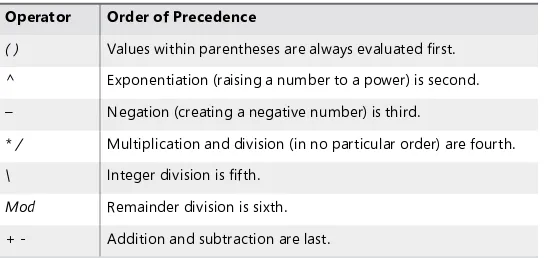
Establishing Order of Precedence . . . 174
Using Parentheses in a Formula . . . .175
Summary. . . .175
Chapter 7 Controlling Application Design, Layout, and
Program Flow
177
Creating a Tile-Based Layout for Windows Store Apps . . . .178Designing Pages for User Input . . . .179
Evaluating Specific Conditions Using If...Then...Else Statements . . . .189
Controlling Program Flow Using For...Next and
For Each...Next Loops . . . .194
For...Next Loops . . . .195
For Each...Next Loops . . . .197
Writing an Exception Handler to Manage Error Conditions . . . .202
Summary. . . .207
Chapter 8 Using the .NET Framework
209
Programming Resourcefully: Using Class Libraries in the .NET Framework . . . .210Object-Oriented Terminology . . . .211
Using the Object Browser . . . .212
Using Methods in System.String . . . .216
Using Methods in System.Math . . . .223
Working with Random Numbers . . . .225
Using Code Snippets to Insert Ready-Made Code . . . .227
Summary. . . .233
Chapter 9 Debugging Applications
235
Finding and Correcting Errors . . . .236Three Types of Errors . . . .236
Identifying Logic Errors . . . .237
Debugging 101: Using Debugging Mode . . . .238
Tracking Variables by Using a Watch Window . . . .244
Visualizers: Debugging Tools That Display Data . . . .247
Using the Immediate Window . . . .248
Removing Breakpoints . . . .250
Contents xi
Chapter 10 Managing Data with Arrays and LINQ
253
Using Arrays to Store Data . . . .254
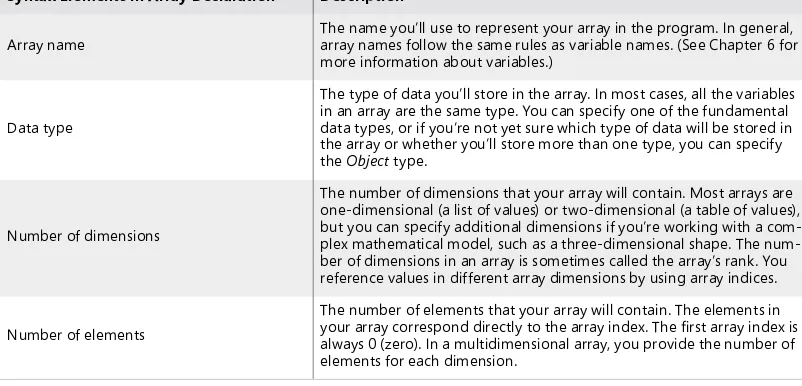
Declaring Arrays . . . .254
Declaring a Fixed-Size Array . . . .255
Using an Array . . . .256
Assigning Initial Values to an Array. . . .258
Using Methods in the Array Class . . . .263
Introducing LINQ . . . .267
Understanding LINQ Syntax . . . .267
Working with XML Documents . . . .275
Using XML Documents in a Visual Basic Project . . . .277
Summary. . . .280
Chapter 11 Design Focus: Five Great Features for a
Windows 8 Application
281
Creating a Tile for Your App on the Windows Start Page . . . .282Creating a Splash Screen for Your App . . . .294
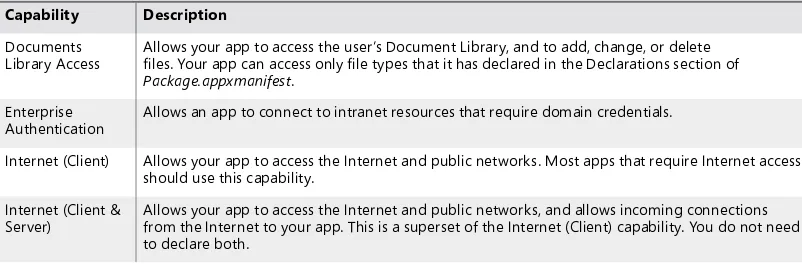
Settings Permissions and Capabilities for Your Windows 8 App . . . .299
Using a Project Template to Showcase Application Content . . . .302
Optimizing Your App for Touch Input and Gestures . . . .309
Touch Input is Built In . . . .310
The Tap . . . .310
The Slide . . . .311
Zooming and Resizing . . . .311
Designing for Touch . . . .313
Summary. . . .313
What do you think of this book? We want to hear from you! Microsoft is interested in hearing your feedback so we can continually improve our books and learning resources for you. to participate in a brief online survey, please visit:
Chapter 12 Future Development Opportunities and the
Windows Store
315
Preparing for the Windows Store . . . .315
Exploring the Store’s Features . . . .316
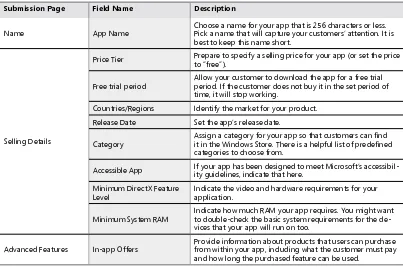
Pricing and Sales . . . .317
Getting Ready for Certification and Deployment . . . .318
Store Requirements Checklist . . . .319
Future Opportunities and Programming Resources . . . .321
Web Sites for Visual Basic and Windows 8 . . . .321
Video on the Web . . . .322
Books About Visual Basic and Visual Studio . . . .323
Summary. . . .325
xiii
Introduction
M
icrosoft Windows 8 is a powerful and visually compelling operating system designed to dramatically enhance consumer productivity and offer access to a wide range of web-based products and services. A rich user experience is at the heart of Windows 8, where the new look and feel of Windows 8 applications provide rapid access to music, photos, contacts, and user settings in the Internet “cloud”, and the Windows Store provides immediate access to exciting consumer applications. Windows 8 has been designed to operate on a broad spectrum of devices, from touch-enabled tablets, to laptops, to traditional desktop computers. As customers immerse themselves in hundreds of vibrant Windows 8 applications, they are given the freedom to focus on the task at hand, rather than the commands or features of the operating system.From the perspective of the software developer, Windows 8 presents amazing opportunities; it’s fast, secure, and robust, and will be installed on millions of computers worldwide, including the Microsoft Surface tablets. Windows 8 applications are exciting and easy to use, and they offer customers an interface that is content-rich and runs equally well on touch-based devices or desktop PCs. Most significantly, the Windows Store allows developers to sell their Windows 8 applications directly to the global mar-ketplace, providing new sources of revenue and streamlining installation procedures.
One of the coolest features of this book, of course, is that every programming tool that it teaches and describes is free! Microsoft is offering complementary access to the Express edition of Visual Studio because it hopes that you will enjoy learning how to program with it, and that you will one day become a professional Visual Basic program-mer who will build and sell great Windows applications. All you need is Windows 8 installed on a compatible computer with an Internet connection, and the desire to write Visual Basic programs.
In fact, the outlook for professional Visual Basic programmers has never been brighter. You just need to Start Here!
Who Should Read This Book
This is a hands-on programming tutorial for readers who enjoy learning to do new things by actually doing them. Start Here! Learn Microsoft Visual Basic 2012 assumes no prior knowledge of Visual Studio or Visual Basic, and it focuses entirely on introductory programming concepts and procedures. You will be surprised at how much you can ac-complish as a beginning programmer with Visual Studio, and you will be building your own projects in no time. I assume only that you are an intelligent student, hobbyist, or IT professional who is interested in learning how to program, and that you have no prior experience with Visual Basic or the Visual Studio software suite.
This book’s content will provide you with concrete Visual Basic coding techniques as well as a broad overview of programming strategies. In addition, you will learn about the capabilities of the Windows 8 operating system, and the specific design guidelines that Microsoft recommends for Windows 8 applications, an exciting new way of creat-ing software. The Windows 8 user interface design principles are sleek and empower-ing, and they encourage developers to put information-rich, web-aware applications at the center of the computing experience. Windows 8 applications present new ways of collaborating with others, as well as exciting opportunities for working with new input devices, such as built-in cameras, touchpads, accelerometers, gyros, compasses, GPS controls, and ambient light sensors.
Introduction xv
assumptions
This book is designed to teach readers with no programming experience how to use the Visual Basic programming language. As part of that process, readers will also learn how to use the Visual Studio 2012 Express software, which they can download for free. Chapter 1, “Getting to Know Visual Basic 2012,” shows you how to download and install Visual Studio 2012 Express on your system.
The book assumes that you have purchased and are running the Windows 8 operat-ing system, and that you want to learn how to create applications for Windows 8. These applications are simply programs that run under Windows 8, follow basic guidelines about how the user interface works, and are (or should be) designed to take advantage of the numerous resources and connections available on the web. Windows 8 applica-tions are deeply interactive, and are designed to be downloaded by customers from the Windows Store.
To make the most of your programming practice, you will need to know a little about how to perform common tasks in Windows 8, how to work with information on the web, how to customize the Start page and user interface, and how to adjust basic system settings. If you also have Windows 8 installed on a tablet or touchpad device, all the better, because a fundamental design emphasis of Windows 8 is to make touch and gestures a natural way to manipulate content. You can build your applications on a laptop or desktop running Visual Studio 2012 and Windows 8, and then test them on your tablet or touchpad.
Who Should Not Read This Book
You’re going to be disappointed with this book if you’re an advanced programmer and interested in learning Visual Basic as a second language. The examples in this book are relatively basic, and the explanations are kept simple. You may also be disappointed if you already have significant Visual Basic programming experience, and just want to know the new features of Visual Studio 2012. However, if you have not programmed before, or if it has been some time since you wrote programs, you will probably appre-ciate the thorough introduction to Visual Studio 2012 and the coverage of the funda-mentals of writing Windows 8 programs with Visual Basic, tasks that involve a number of tools and methods that may be unfamiliar.
Developers who have a lot of experience will feel that I’m exploring the obvious— but what is obvious to experienced programmers often isn’t obvious at all to someone who is just learning to write code. If programming is a new concept for you, this is the place to start.
Organization of This Book
Start Here! Learn Microsoft Visual Basic 2012 uses a hands-on approach to learning, in which readers actually build Windows 8 applications from scratch, one step at a time. Each chapter introduces a new tool or technique, and the book has been designed to be read sequentially, so that what you learn in one chapter is carried forward to the next. Although the core of this book involves teaching Visual Basic coding techniques, you will also learn how to use the interesting tools and features in the Visual Studio IDE, including the Toolbox, the Code Editor, XAML controls, Solution Explorer, and the debugger. You will also learn how to use Blend for Visual Studio 2012, a separate design application distributed with Visual Studio.
Collectively, the twelve chapters in this book offer you a complete introductory pro-gramming course that you can complete at your own pace. You might try to finish one or two chapters a day for a few days, and then take some time off to practice building applications on your own before moving on. Reading about new techniques, trying out what you have learned, and then pushing a bit further on your own is the best way to acquire many new skills, including how to program.
Introduction xvii
■ Chapter 1: Getting to Know Visual Basic 2012 What types of applications
can Visual Basic programmers actually create, and how should they go about doing it? This introductory chapter answers these fundamental questions, and then introduces the Visual Studio IDE, an electronic workshop where Visual Basic applications are built from the ground up. You’ll learn how to download the Visual Studio Express 2012 for Windows 8 software, how to start it, and how to get going with the Visual Studio programming tools.
■ Chapter 2: Creating Your First Windows 8 application In this chapter you
learn how to build your first Windows 8 application, a web browser that allows you to explore web sites and record the locations that you have visited. You’ll learn more about the programming tools in Visual Studio, and you’ll learn what it means to test an application and prepare it for distribution to others.
■ Chapter 3: Using Controls The controls that you use to receive input, display
output, and help the user navigate your application represent a fundamental element of the user interface. In this chapter, you’ll learn how to create several useful XAML controls, including Ellipse, TextBlock, CheckBox, RadioButton, and MediaElement.
■ Chapter 4: Designing Windows 8 applications with Blend for Visual
Studio Your Visual Studio 2012 Express software installation includes a sepa-rate program called Blend for Visual Studio, which provides easy-to-use design tools for creating the user interface of a Windows 8 application. You’ll use Blend in this chapter to construct a user interface that displays digital photographs and uses storyboards and animation effects. You’ll also learn how to switch from Blend to Visual Studio, where you can write Visual Basic program code.
■ Chapter 5: Working with XaML Windows 8 applications use the XAML
markup language to define how the user interface appears on the screen, and how it presents information to the user. This chapter explores in detail the struc-ture of XAML markup, and explains how you can customize a program’s look and feel by working with XAML markup in the Visual Studio Code Editor.
■ Chapter 6: Visual Basic Language elements Visual Basic is an advanced
■ Chapter 7: Controlling application Design, Layout, and program
Flow Windows 8 applications should feature compelling content and pages prepared for rich user interaction. This chapter digs deeper into Windows 8 design principles by focusing on tile-based layout and user input with the Image and ListBox controls. To help you control execution and program flow, you’ll learn how to write effective decision structures, loops, and exception handlers in your applications.
■ Chapter 8: Using the .Net Framework As you write more sophisticated
programs, you’ll need to manipulate graphics, display text files, perform calcula-tions, process strings, and retrieve information from the web. These capabilities and much more are supplied to you via the .NET Framework, an underlying programming interface that is part of the Windows operating system. This chap-ter explains how to learn more about .NET Framework classes using the Visual Studio Object Browser, how to use Framework methods to process strings and calculate formulas, and how to save development time by inserting ready-made Code Snippets into your project.
■ Chapter 9: Debugging applications The complex nature of Window
pro-gramming means that you’ll run into syntax errors and other logic problems from time to time as you build your applications. This chapter introduces the programming tools in the Visual Studio IDE that help you locate and correct programming mistakes, and how to anticipate operating errors that your users may encounter in the future.
■ Chapter 10: Managing Data with arrays and LINQ Because there is so
Introduction xix
■ Chapter 11: Design Focus: Five Great Features for a Windows 8
application This chapter returns to the user interface of Windows 8 applica-tions, and offers additional instruction about how programs can be designed so that they comply with Microsoft’s design guidelines for Windows 8 applications. You’ll learn how to create a tile for your app on the Windows Start page, how to create a splash screen for your project, how to control application permissions and capabilities, how to use ready-made project templates, and how to add support for touch input and gestures.
■ Chapter 12: Future Development Opportunities and the Windows
Store This last chapter provides a summary of the Visual Basic programming techniques that you have learned, and presents future development opportuni-ties for those interested in careers in Visual Studio programming. The chapter also presents a detailed look at the final testing and packaging of applications, including a discussion of the Windows Store, an exciting new distribution point for Windows 8 applications. Also included in this chapter are web resources and books that you can use to continue your learning.
Free eBook Reference
When you purchase this title, you also get the companion reference, Start Here!™ Fundamentals of Microsoft® .NET Programming, for free. To obtain your copy, please see the instruction page at the back of this book.
The Fundamentals book contains information that applies to any programming lan-guage, plus some specific material for beginning .NET developers.
As you read through this book, you’ll find references to the Fundamentals book that look like this:
For more information, see <topic> in the accompanying Start Here! Fundamentals of Microsoft .NET Programming book.
Conventions and Features in This Book
This book presents information using conventions designed to make the information readable and easy to follow:
■ Step-by-step instructions help you create Visual Basic applications. Each set of
instructions is listed in a separate section and describes precisely what you’ll accomplish by following the steps that it contains.
■ Screen illustrations show you exactly what is happening as you complete
the step-by-step instructions. I have used the default colors and settings for Windows 8 to create these illustrations, and configured my screen resolution at a low setting to make the illustrations as readable as possible.
■ Boxed elements with labels such as “Note” provide additional information or
alternative methods for completing a step successfully. Make sure that you pay special attention to warnings because they contain helpful information for avoiding problems and errors.
■ Text that you type (apart from code blocks) appears in bold.
■ A plus sign (+) between two key names means that you must press those keys at
the same time. For example, “Press Alt+Tab” means that you hold down the Alt key while you press the Tab key.
■ A vertical bar between two or more menu items (such as File | Close), means that
you should select the first menu or menu item, then the next, and so on.
System Requirements
You will need the following hardware and software to work through the examples in this book:
■ The Windows 8 operating system. Depending on your Windows configuration,
you might require Local Administrator rights to install or configure Visual Studio 2012 Express.
■ An Internet connection to download Visual Studio, try out the Windows Store,
and download this book’s sample files.
■ Visual Studio 2012 Express for Windows 8 (see Chapter 1 for installation
instructions).
Introduction xxi
■ 1 GB RAM (32-bit) or 2 GB RAM (64-bit).
■ 16 GB available hard disk space (32-bit) or 20 GB (64-bit) for Windows 8.
■ 4 GB of available hard disk space for Visual Studio 2012 Express.
■ DirectX 9 graphics device with WDDM 1.0 or higher driver.
■ 1024 ✕ 768 minimum screen resolution.
■ If you want to use touch for user input, you’ll need a multitouch-capable laptop,
tablet, or display. Windows 8 supports at least five simultaneous touch points, although not all tablets or displays do. A multitouch-capable device is optional for the exercises in this book, although one is useful if you want to understand what such devices are capable of as a software developer. Typically a program-mer will develop software on a desktop or laptop computer, and then test multi-touch functionality on a multimulti-touch-capable device.
Code Samples
Most of the chapters in this book include exercises that let you interactively try out new material learned in the main text. All sample projects, in both their pre-exercise and post-exercise formats, can be downloaded from the following page:
http://go.microsoft.com/FWLink/?Linkid=271576
Follow the instructions to download the 9780735672987-files.zip file.
Installing the Code Samples
Follow these steps to install the code samples on your computer so that you can use them with the exercises in this book:
1. Unzip the 9780735672987-files.zip file that you downloaded from the book’s website. (Name a specific directory along with directions to create it, if necessary.)
Using the Code Samples
The code samples .zip file for this book creates a folder named “Start Here! Program-ming in Visual Basic” that contains 11 subfolders—one for each of the chapters in the book (except the last chapter). To find the examples associated with a particular chapter, open the appropriate chapter folder. You’ll find the examples for that chapter in separate subfolders. The subfolder names have the same names as the examples in the book. For example, you’ll find an example called ”Web List“ in the My Documents\ Start Here! Programming in Visual Basic\Chapter 02 folder on your hard drive. If your system is configured to display file extensions of the Visual Basic project files, look for .sln as the file extension. Depending on how your system is configured, you may see a “Documents” folder rather than a “My Documents” folder.
Acknowledgments
The planning for this book began well before the release of Windows 8 and the first Visual Studio 2012 test releases. In early conversations with Microsoft Press and O’Reilly Media, we all realized that Windows 8 and Visual Studio 2012 presented truly revolu-tionary opportunities for Visual Basic programmers. The question was: how could we prepare the right learning materials for new and existing software developers so that they could get up-to-speed quickly and begin exciting Windows applications as soon as possible?
The solution we came up with was to create two original books with information about the Visual Studio software release—the book that you are holding now, my Start Here! Learn Microsoft Visual Basic 2012, and a second book designed for more experi-enced developers, my Microsoft Visual Basic 2012 Step by Step. These two books work together to provide a comprehensive course on Windows 8 programming with Visual Basic 2012.
Introduction xxiii At Microsoft Press, I would like to thank Devon Musgrave for his early enthusiasm for
the books, and for connecting me to team members in the Visual Studio product group. At O’Reilly Media, I would like to thank first and foremost Russell Jones, for our many conversations about Visual Basic programming, and our hope that these books will pro-vide a complete path for new and experienced programmers to unlock the secrets of Visual Basic 2012. Tim Patrick, a talented author and Visual Basic developer in his own right, provided a thorough review of the Start Here! manuscript, and answered many practical questions about Visual Studio for me. Within the editorial group, I would like to thank Holly Bauer, for scheduling the editorial review and answering questions about content; and Damon Larson, for his skillful copy editing and managing the style issues that arose. Also within O’Reilly Media, I would like to thank Kristin Borg and Rebecca Demarest, and at Zyg Group, I'd like to thank Linda Weidemann, Kim Burton-Weisman, and Kevin Broccoli for their important editorial, technical, and artistic contributions.
I am also most grateful to the Microsoft Visual Studio 2012 development team for providing me with the beta and release candidate software to work with. In addition, I would like to thank the Microsoft Windows 8 team for their support, and offer my spe-cial thanks to the many MSDN forum contributors who asked and answered questions about Visual Basic and Windows 8 programming.
As always, I offer my deepest gratitude and affection to my family for their continued support of my writing projects and various academic pursuits. In particular, Henry Halvorson created impressive electronic music, electronic artwork, and a video file for Chapters 3, 7, and 11. I am so thankful for your efforts, son.
Errata & Book Support
We’ve made every effort to ensure the accuracy of this book and its companion con-tent. Any errors that have been reported since this book was published are listed on our Microsoft Press site at oreilly.com:
http://go.microsoft.com/FWLink/?Linkid=271575
If you find an error that is not already listed, you can report it to us through the same page. If you need additional support, email Microsoft Press Book Support at [email protected].
We Want to Hear from You
At Microsoft Press, your satisfaction is our top priority, and your feedback our most valuable asset. Please tell us what you think of this book at:
http://www.microsoft.com/learning/booksurvey
The survey is short, and we read every one of your comments and ideas. Thanks in advance for your input!
Stay in Touch
Let’s keep the conversation going! We’re on Twitter: http://twitter.com/MicrosoftPress.
1
C H A P T E R 1
Getting to Know Visual Basic 2012
after completing this chapter, you’ll be able to
■ Describe various development opportunities for Visual Basic programmers.
■ Download and install Visual Studio Express 2012 for Windows 8.
■ Start Visual Studio Express and explore the Visual Studio IDE.
■ Open and run a Visual Basic program.
■ Use Visual Studio programming tools and windows.
■ Customize the Visual Studio IDE.
■ Save changes and exit Visual Studio.
thIS Chapter INtrODUCeS YOU to Microsoft Visual Basic programming and gives you the skills you need to get up and running with the Microsoft Visual Studio Express 2012 for Windows 8 In-tegrated Development Environment (IDE). The Visual Studio IDE is the application you use to build and run Visual Basic programs. The Visual Studio IDE is a busy place with numerous menu options, buttons, tool windows, code editors, and output windows. However, you’ll discover that any general experience you may have had with Windows applications will help you a lot as you learn how to use the IDE, and you’ll find that some of the tools and features are more important than others. The important thing to remember, faced with the IDE’s extensive capabilities, is that you don’t need to learn everything at once.
Development Opportunities for Visual Basic Programmers
Visual Basic is an object-oriented computer programming language that has roots in earlier develop-ment tools such as BASIC and QuickBASIC—that is, logical and practical (though somewhat quirky) programming languages from the 1960s, ‘70s, and ‘80s.
In 1991, Microsoft released Visual Basic 1.0, which innovatively combined a sophisticated Visual Basic language compiler with an IDE that allowed developers to build Windows applications by visu-ally arranging controls on a Windows form and then customizing the controls with property settings and Visual Basic code. Over the past two decades, Visual Basic has grown into an extremely power-ful development tool, capable of creating fast and efficient Windows applications that can run on a variety of hardware platforms.
The term Visual Basic has come to have two meanings over the past 10 years or so. In the narrower sense, Visual Basic is the name of a programming language with specific syntax rules and logical pro-cedures that must be followed when a developer creates code to control some aspect of an applica-tion’s functionality. However, Visual Basic is also used in a more comprehensive product-related sense to describe the collection of tools and techniques that developers use to a build Windows applica-tions with a particular software suite. In the past, developers could purchase a stand-alone version of Visual Basic, such as Microsoft Visual Basic .NET 2003 Professional Edition, but these days Visual Basic is sold only as a component within the Visual Studio software suite, which also includes Microsoft Visual C#, Microsoft Visual C++, Microsoft Visual Web Developer, and other development tools.
More Info For more information about object-oriented computing, see Chapter 10, “Object-Oriented Programming,” in the free companion volume, Start Here! Fundamentals of .NET Programming (Microsoft Press, 2011).
The Visual Studio 2012 development suite is distributed in several different product configurations, including Test Professional, Ultimate, Premium, Professional, Express for Windows 8, and Express for Web. Express for Windows 8 and Express for Web are currently the free editions that you can use to test-drive the software. (Express for Windows 8 is the product that you will be using in this book.) The full retail versions of Visual Studio 2012 have different prices and feature sets, with Test Professional being the most comprehensive (and expensive) development package. The Visual Studio web site (http://www.microsoft.com/visualstudio) explains the differences between all these versions.
You have purchased this book because you want to learn how to program in Visual Basic. This is an excellent choice; there are over 3 million Visual Basic programmers in the world developing innovative solutions, blogging on the web, and shopping for add-ons and training materials.
CHAPTER 1 Getting to Know Visual Basic 2012 3 that developers know more than one programming language, in addition to specific skills related to database or web development.
Microsoft has tried to satisfy a wide range of programming audiences by bundling many different software development technologies into Visual Studio, including Visual Basic, Visual C#, Visual Web Developer, and JavaScript. Visual Studio also contains some core tools that all developers use, no mat-ter which programming language they choose. These include the various toolbox controls, the Project and Properties windows, the code editors, the debugger, the Blend Designer, various management tools, and the .NET Framework—a library of coded solutions designed to be used by applications that run on the Windows operating system.
New Development platforms
So, what can you actually do with Visual Basic and Visual Studio?
In the early 2000s, Visual Basic programmers were concerned primarily with creating Windows ap-plications that helped businesses manage data effectively. Visual Basic’s ability to graphically display information and provide access to it with powerful user interface controls gained many supporters for the product. Over the past decade, the leading Visual Basic applications have been database front-ends, inventory management systems, web applications and utilities, purchasing tools, CAD programs, scientific applications, and games.
In the 2010s, however, the explosion of Internet connectivity and online commerce has dramati-cally changed the landscape for software developers. In the past, most Windows applications ran on a server or a desktop PC. Today, laptops, tablet devices, and smartphones are everywhere, and often the same person owns all three device types. Consumers need to move applications and information seamlessly across devices, and software developers need the tools that will allow them to create applications that work on multiple platforms, or can at least be ported easily from one device to the next.
The Visual Studio 2012 product team took the challenge of coding for diverse platforms seriously, and they have created a software suite that allows developers to leverage their existing work while also allowing developers to create a variety of different application types. The following list highlights the major development platforms and opportunities for Visual Basic programmers (some of which are supported only by the full retail versions of Visual Studio 2012):
■ Windows 8 Visual Basic developers can create Windows 8 applications and traditional desk-top applications for a wide range of Windows 8 devices, including Microsoft Surface tablets, and sell them on the Microsoft Store.
■ Windows Phone Using Visual Studio and the Windows Phone software development kit (SDK), Visual Basic programmers can create applications that run on Windows Phone and take advantage of its unique features.
■ Web development Developers can use Visual Basic, HTML5, CSS3, or JavaScript to create applications that will run on the web and look great in a variety of browsers. A technology known as ASP.NET allows Visual Basic programmers to build web sites, web applications, and web services quickly without knowing all the details about how the information will be stored on the web.
■ Device drivers and console applications Visual Basic programmers can write applications that work primarily with the internal components of the operating system or run in command-line mode (the MS-DOS shell).
■ Office applications Visual Basic programmers can build macros and other tools that enhance the functionality of Microsoft Office applications, such as Excel, Word, Access, and PowerPoint.
■ Xbox 360 Visual Basic programmers can write games for the Xbox using Visual Studio and Microsoft XNA Game Studio.
■ Windows Azure applications for web servers and the cloud Visual Basic is powerful enough to write applications that will be used on sophisticated web servers, distributed data centers, and a version of Windows designed for cloud computing known as Windows Azure.
This is an amazing list of application types! Although this list might seem daunting at first, the good news is that the fundamental Visual Basic programming skills that you will explore here remain the same from platform to platform, and there are numerous tools and techniques that help you to port work easily between them. This book provides a solid introduction to many of the core skills that you will use; you can then learn specific programming techniques related to any particular platform when you are ready.
Obtaining, Installing, and Starting Visual Studio Express 2012
for Windows 8
CHAPTER 1 Getting to Know Visual Basic 2012 5 Note This book requires that you are running Windows 8 and that you have a
ver-sion of Visual Studio 2012 installed on your system. Although you can download Visual Studio Express 2012 for Windows 8 for free, you will also need a valid, installed version of Windows 8 to create the applications.
Downloading the product
Microsoft produces a number of Express products that you can download from http://www.microsoft .com/express/Downloads/, but for the purposes of this book you need to download only this one:
■ Visual Studio Express 2012 for Windows 8 This product provides the Visual Studio IDE and tools that allow you to create Visual Basic, Visual C#, Visual C++, or JavaScript applications for Windows 8. You also have to have Windows 8 installed on your computer—Windows 8 does not come with Visual Studio Express 2012.
You must have an Internet connection to install the product. The setup files for Visual Studio Ex-press 2012 can either be installed either directly from the web or downloaded to your hard drive and then opened and installed later.
Installing Visual Studio express 2012 for Windows 8
To download Visual Studio Express 2012 for Windows 8, complete the following steps:1. Open a web browser (Internet Explorer or other) and go to the following web site:
http://www.microsoft.com/express/Downloads.
2. Click Visual Studio 2012 to see a list of the Express products available for Visual Studio 2012.
Note You must have Window 8 installed on your computer before you install Visual Studio Express 2012 for Windows 8.
3. Click Express for Windows 8, and follow the instructions to download and install Visual Studio Express 2012 for Windows 8.
Starting Visual Studio express 2012
To start Visual Studio Express and begin working with the Visual Studio IDE, complete the following steps.
Start Visual Studio express 2012
1. On the Windows Start screen, click VS Express for Windows 8.
If this is the first time you are starting Visual Studio, the program will take a few moments to configure the environment. You may be prompted to get a developer license for Windows 8, which typically requires that you create a Windows Live account or enter existing account information. During the beta testing for Visual Studio 2012, developer licenses were free and valid for about a month before they needed to be renewed. You will likely encounter a similar registration scenario.
2. If you are prompted to identify your programming preferences, select Visual Basic Develop-ment Settings.
When Visual Studio starts, you see the IDE on the screen with its many menus, tools, and component windows. (These windows are sometimes called tool windows.) You also should see a Start page containing a set of tabs with links, learning resources, news, and project options. The Start page is a comprehensive source of information about your project, as well as resources within the Visual Basic development community.
The screen shown following offers a typical Visual Studio setup. I captured the screen at a resolution of 1024✕768, which may be smaller than you are using on your computer, but I wanted you to see the content as clearly as possible. (Larger resolutions are often great to work with on screens that support them, but they don’t reproduce well in books.)
CHAPTER 1 Getting to Know Visual Basic 2012 7 After starting Visual Studio, you’re ready to explore the Visual Studio IDE.
Note The following section describes how to open and run a Visual Basic program in the
IDE. If you haven’t downloaded this book’s sample files yet, you should do so now, because you’ll be asked to open a specific program on your hard disk. (For sample code installation
instructions, see the “Code Samples” section in the Introduction.) Return to this point after you have installed the code samples.
The Visual Studio Development Environment
In the Visual Studio IDE, you can open a new or existing Visual Studio project, or you can explore the many online resources available to you for Visual Basic programming.
Open a Visual Basic project
1. On the Start page, on the left side of the screen, click the Open Project link.
You’ll see the Open Project dialog box shown in the following illustration. (You can also display this dialog box by clicking the Open Project command on the File menu or by press-ing Ctrl+Shift+O.) Even if you haven’t used Visual Studio before, the Open Project dialog box will seem straightforward because it resembles the familiar Open dialog box in many other Windows applications.
tip In the Open Project dialog box, you see a number of storage locations along the left side of the window. The Projects folder under Microsoft Visual Studio Express 2012 for Windows 8 is particularly useful. By default, Visual Studio saves your pro-gramming projects in this Projects folder, giving each project its own subfolder. However, this book uses a different folder to organize your programming course-work, as you’ll discover following. Additional locations such as Favorites and Libraries are also made available to you through this dialog box, depending on how your
CHAPTER 1 Getting to Know Visual Basic 2012 9 2. Browse to the My Documents\Start Here! Programming in VB 2012 folder on your hard disk.
This folder is the default location for the book’s extensive sample file collection, and you’ll find the files there if you followed the instructions in “Code Samples” in the Introduction. If you didn’t copy the sample files, close this dialog box and copy them now.
3. Open the Chapter 01\World Capitals folder, and then double-click the WorldCapitals solution file. (If your system shows file name extensions, this file will end with .sln.)
Visual Studio loads the WorldCapitals page, properties, and program code for the solution. Solution Explorer, a tool window on the right side of the screen, lists some of the files in the solution.
Visual Studio provides a special option named Always Show Solution to control several options related to solutions within the IDE. The option’s check box is located on the Projects And Solutions | General tab of the Options dialog box, which you open by clicking the Options command on the Tools menu. If the check box is selected (the default position), a subfolder is created for each new solution, placing the project and its files in a separate folder beneath the solution. Also, if you keep the default selection for Always Show Solution, a few options related to solutions appear in the IDE, such as commands on the File menu and a solution entry in Solution Explorer. If you like the ideas of creating separate folders for solutions and seeing solution-related commands and settings, I suggest that you keep the default (selected) option for this check box. You’ll learn more about these options at the end of the chapter.
projects and Solutions
In Visual Studio, programs under development are typically called projects or solutions be-cause they contain many individual components, not just one file. Visual Basic 2012 programs include a project file (.vbproj), a solution file (.sln), one or more markup files (.xaml), and several supporting files organized into various subfolders.
The Visual Studio Tools
At this point, you should take a few moments to study the Visual Studio IDE and identify some of the programming tools and windows that you’ll be using as you complete this book. If you’ve written Visual Basic programs before, you’ll recognize many (but perhaps not all) of the programming tools. Collectively, these features are the components that you use to construct, organize, and test your Visual Basic programs. A few of the programming tools also help you learn more about the resources on your system, including the larger world of databases and web site connections available to you. There are also several powerful help tools.
The menu bar provides access to most of the commands that control the development environ-ment. Menus and commands work as they do in all Windows-based programs, and you can access them by using the keyboard or the mouse. Located below the menu bar is the Standard toolbar, a col-lection of buttons that serve as shortcuts for executing commands and controlling the Visual Studio IDE. My assumption is that you’ve used Word, Excel, or some other Windows application enough to know quite a bit about toolbars, and how to use familiar toolbar commands, such as Open, Save, Cut, and Paste. But you’ll probably be impressed with the number and range of toolbars provided by Visual Studio for programming tasks. In this book, you’ll learn to use several toolbars; you can see the full list of toolbars at any time by right-clicking any toolbar in the IDE.
Along the bottom of the screen you may see the Windows taskbar. You can use the taskbar to switch between various Visual Studio components and to activate other Windows-based programs. You might also see taskbar icons for Windows Internet Explorer, antivirus utilities, and other programs installed on your system. In most of my screen shots, I’ll hide the taskbar to show more of the IDE.
The following illustration shows some of the tools and windows in the Visual Studio IDE. Don’t worry that this illustration looks different from your current development environment view. You’ll learn more about these elements (and how you adjust your views) as you work through the chapter.
CHAPTER 1 Getting to Know Visual Basic 2012 11 If a tool isn’t visible and you want to see it, click the View menu and then select the tool. Because the View menu has expanded steadily over the years, Microsoft has moved some of the less frequent-ly used View tools to a submenu called Other Windows. Check there if you don’t see what you need.
The reason I said your IDE view probably doesn’t match the preceding image is because the exact size and shape of the tools and windows in the IDE depend on how your particular development envi-ronment has been configured. With Visual Studio, you can align and attach, or dock, windows to make visible only the elements that you want see. You can also partially conceal tools as tabbed documents along the edge of the development environment and then switch back and forth between documents quickly. For example, if you click the Toolbox label on the left side of the screen, the Toolbox panel will fly out, ready for use. If you click another tool or window in the IDE, the Toolbox panel will return to its concealed position.
The purpose of all this tool complexity is to add many new and useful features to the IDE while providing clever mechanisms for managing the clutter. These mechanisms include features such as docking, autohiding, floating, and a few other window states that I’ll describe later. Visual Studio 2012 also hides rarely used IDE features until you begin to use them, which has also helped to clean up the IDE workspace.
If you’re just starting out with Visual Studio, the best way to deal with feature overload is to hide the tools that you don’t plan to use often to make room for the important ones. The crucial tools for beginning Visual Basic programming—the ones you’ll start using right away in this book—are the Designer window, the Properties window, Solution Explorer, and the Toolbox. You won’t use the Document Outline, Server Explorer, Class View, Object Browser, Device, or Debug windows until later in the book, so feel free to hide them by clicking the Close button on the title bar of any windows that you don’t want to see.
In the following exercises, you’ll start experimenting with the crucial tools in the Visual Studio IDE. You’ll also learn how to display a web browser within Visual Studio and more about hiding the tools that you won’t use for a while.
the Designer Window
If you completed the previous exercise (“Open a Visual Basic project”), the World Capitals project is loaded in the Visual Studio development environment. However, the user interface, or page, for the project might not yet be visible in Visual Studio. (More sophisticated projects might contain several pages, but this first example program needs only one.) To make the page of the World Capitals proj-ect visible in the IDE, you display it by using Solution Explorer.
Note If you don’t currently have the World Capitals project loaded, go back to and com-plete the exercise in this chapter titled “Open a Visual Basic project.”
Display the Designer window
1. Locate the Solution Explorer window near the upper-right corner of the Visual Studio devel-opment environment. If you don’t see Solution Explorer (if it is hidden as a tab in a location that you cannot see or isn’t currently visible), click the View menu and then select Solution Explorer to display it.
CHAPTER 1 Getting to Know Visual Basic 2012 13 When the World Capitals project is loaded, Solution Explorer looks like this:
Like most basic Windows 8 applications, this Visual Basic solution contains an App.xaml file that holds global project settings and resources; an Assets folder that contains any splash screen and logo files for the project; a Common folder, which contains common classes and XAML styles that simplify your development tasks; a deployment package manifest, containing build and distribution settings for your file; and one or more user interface windows, or pages, which you can identify because they have the extension .xaml.
2. Click the expansion arrow to the left of the MainPage.xaml file in the Solution Explorer window.
With the MainPage.xaml file expanded, Solution Explorer looks like this:
You can open MainPage.xaml in Design view so that you can examine and modify the user interface with graphical design tools, or you can open the file in the Code Editor, where you can modify the user interface with XAML, a special user interface definition language de-signed for Windows applications and other computer programs.
Below the MainPage.xaml file, you will see a second file, named MainPage.xaml.vb. This file is also associated with the user interface of the World Capitals project. MainPage.xaml.vb is called a code-behind file because it contains a listing of the Visual Basic program code con-nected to the user interface defined by MainPage.xaml. As you learn how to program in Visual Basic, you’ll become very adept at customizing this file.
Solution Explorer is the gateway to working with the various files in your project—it is an essential tool. When you double-click a file in Solution Explorer, it opens the file in an appro-priate editor, if direct editing of the file is allowed.
3. Double-click the MainPage.xaml file in Solution Explorer to display the project’s user interface in the Designer window, if it is not already visible. Use the vertical scroll bar if necessary to adjust your view of the user interface.
The World Capitals page is displayed in the Designer, as shown here:
Notice that a tab with the file name MainPage.xaml is visible near the top of the Designer win-dow, along with additional tab names. You can click a tab at any time to display the contents of the various files, even if the windows become covered.
CHAPTER 1 Getting to Know Visual Basic 2012 15 markup for the user interface and use the window’s scroll bars to view any part of the markup that is not currently visible.
4. Double-click the XAML tab to display the XAML markup for the page in the Code Editor, and scroll to the top of the window to see the entire document.
You’ll see the following:
The XAML contents of MainPage.xaml appear in the Code Editor, and it is this structured information that controls how Visual Studio and Windows will display the application’s user interface and graphics. If you know some HTML, this should look somewhat familiar. XAML contains markup—instructions whose primary purpose is to tell a program how to display things on the screen. The XAML markup shown here is displayed between <Page and </Page> tags, and is further indented to make the information readable. The first seven lines below <Page define the resources used to create the user interface. Below these lines, the section between <Grid and </Grid> defines the objects in the user interface. This XAML content defines one button, two text boxes, and one text block. If you look at the screen illustration of the Designer again, you can see how these elements appear visually. You can even see specific property settings for the objects being assigned through individual property names (like
HorizontalAlignment) and values (like Left).
Visual Studio programmers often want to see both panes of information side by side as they work on a program. In fact, if you’ve built an HTML application in the past for the web, this whole concept might seem a little familiar, as a number of web design tools also display page layout at the top of the screen, while showing HTML code at the bottom.
tip There are some handy buttons along the bottom of the Designer window and
Code Editor that allow you significant control over the split-screen behavior of these
elements. At the bottom left of the Designer window are XAML and Design tabs, as well as a handy Document Outline button, which opens a separate window to dis-play the objects within the user interface organized by type. At the bottom right of the Designer window are Vertical Split, Horizontal Split, and Expand Pane/Collapse Pane buttons, which control how the Designer window and Code Editor are arranged. Expand Pane/Collapse Pane is especially useful; it is a toggle that allows you to view the windows one at a time or side by side.
5. Click the Design tab to display the project’s main page in the Designer window again.
6. Click the Expand Pane button to display the XAML markup that renders the page in a window below the Designer window.
Now you’ll try running this simple program within Visual Studio.
running a Visual Basic program
World Capitals is a simple Visual Basic program designed to familiarize you with the programming tools in Visual Studio. The page you see now has been customized with four objects (one button, a text block, and two text boxes), and I’ve added one line of program code to a code-behind file to make the program ask a simple question and display the appropriate answer. You’ll learn more about creating objects like these and adding Visual Basic code to a code-behind file in Chapter 2, “Creating Your First Windows 8 Application.” For now, try running the program in the Visual Studio IDE.
run the World Capitals program
1. Click the Start button (the right-facing arrow next to the words Local Machine) on the Stan-dard toolbar to run the World Capitals program in Visual Studio.
tip You can also press F5 or click the Start Debugging command on the Debug menu to run a program in the Visual Studio IDE.
CHAPTER 1 Getting to Know Visual Basic 2012 17 the IDE. (This is known as running the program on a local machine, as opposed to running on a remote computer somewhere on the web or in a software simulator of some kind.)
While the program is running, an icon for the program appears on the Windows taskbar. After a moment, you will see the World Capitals user interface running as any application would under Windows 8. The program looks just like the preview version did within the Visual Studio Designer:
World Capitals now asks you a question: What is the capital of Peru?
2. Click the Answer button to reveal the solution to the question, and the program should dis-play the answer (Lima) below the question.
When you move the mouse cursor to the top edge of the screen, it changes to a hand, which provides some visual feedback as you drag the title bar to the bottom of the screen to ter-minate the program. After the application closes, you can press the Windows key or click the Visual Studio program icon on the desktop to activate the IDE again.
The World Capitals application may continue to run for a moment or two as the Visual Studio IDE catches up with the terminate-program request that you just issued. (For example, you may see the phrase Running in the Visual Studio title bar, which indicates that a program in the IDE is still executing.) You can force an immediate stop to any running application in the Visual Studio IDE by clicking the Stop Debugging button on the toolbar.
After the program has stopped running, you will notice a few changes in the IDE. For example, you will likely see an Output window at the bottom of the IDE with information about how the assemblies in the application were compiled and executed. This is the expected behavior within Visual Studio after a program has been compiled and run. The Output window provides a fairly detailed listing of what happened during compilation, a process that involves several stages and the loading of a number of files and resources called libraries. This record of the process is especially valuable when the compilation fails due to an unforeseen programming mistake or error. (Something that you will certainly experience, though not yet!)
4. After you’ve reviewed the content of the Output window, click its Close button to hide it.
I won’t emphasize the Output window much in the early chapters of this book, but if you encounter an inadvertent error as you write your own programs, you’ll find this tool useful. Most of the time, though, you’ll can simply close the window to allow more room for examin-ing your code.
It’s time to learn about another useful development tool.
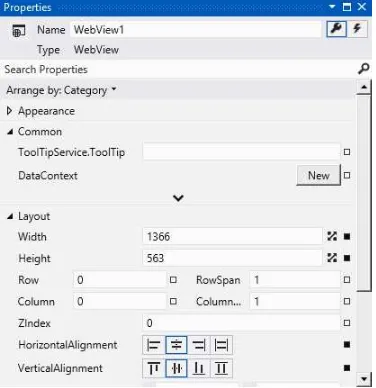
The Properties Window
CHAPTER 1 Getting to Know Visual Basic 2012 19 The Properties window contains a list of the properties for the object that is currently selected in the Designer window. For example, if a button object is selected in the Designer, the properties for the button object will be visible in the Properties window. The first property listed at the top of the Properties window is the Name property, and you will use this property to name your objects if you plan to customize them using Visual Basic code. (By default, new XAML objects are unnamed.) Although there are a lot of properties for each object on a page, Visual Studio assigns default values for most of them, and you can quickly find the properties that you want to set by arranging them us-ing the Arrange By drop-down box at the top of the Properties window.
You can change property settings from the Properties window while you are working on a page, you can change a property setting by editing the XAML markup for a page, and you can add Visual Basic code to a page’s code-behind file to instruct Windows to change one or more property settings while a program is running.
As you’ll learn later, you can also customize the event handlers for objects on a page by using the Event Handlers button (which looks like a lightning bolt) near the top of the Properties window. Event handlers are custom Visual Basic routines that run when the user interacts with the objects on a page by clicking, tapping, dragging, and other actions.
To get some practice setting properties, you’ll edit the text in a button object, and you’ll change the font weight and style of a text block object to bold and italic, respectively.
Change properties
1. Click the Answer button on the page that is currently loaded in the Designer window.
To work with an object on a page, you must first select the object. When you select an object, resize handles appear around it, and the property settings for the object are displayed in the Properties window. You’ll also see numbers indicating the distance (in pixels) to the top and left edges of the window.
2. Press Alt+Enter to display the Properties window, if it is not currently visible.
You’ll see a window similar to this one:
The Properties window lists all the property settings for the selected button object, named btnAnswer. Property names are listed in nested groups, and the default view displays the properties alphabetically by category. (Brush is first, Appearance is second, Common is third, and so on.) When you expand the property groups, the property names are generally listed on the left side, and the property settings are listed on the right. Some property settings, like Brush, are made by selecting color values with a design tool, so there are a variety of ways to set properties—not just entering text via the keyboard.
3. In the Common property group (containing the most typical properties for a button object), see that the Content property is set to “Answer.”
“Answer” is the text that currently appears on the page’s main button, and you can change it to whatever you would like using the Properties window. Add an exclamation point now to the current value to add a little more emphasis to the button.
4. Click after “Answer” in the Content text box, type an exclamation mark (!), and then press Enter.
The Content property setting is changed to “Answer!” in three places: within the Proper-ties window, on the page in the Designer window, and within the XAML markup in the Code Editor.
CHAPTER 1 Getting to Know Visual Basic 2012 21 Now you’ll change the font style of the text block object to bold and italic. The text block object currently contains the text “World Capitals.”
5. Click the “World Capitals” text block object on the page. A text block object is an excellent way to display descriptive text on a page.
6. In the Properties window, click the Text property group (not the Text property in the Common group that is currently visible).
7. Click the Bold button to change the font weight to bold.
8. Click the Italic button to change the font style to italic.
Visual Studio records your changes and adjusts the property settings accordingly. Your screen should look like this:
thinking about properties
In Visual Basic, each user interface element in a program (including the page itself) has a set of definable properties. You can set properties at design time by using the Properties window, or by editing properties in the XAML markup for the page that defines one part the program’s user interface. Properties can also be set or referenced in Visual Basic code to make changes to program elements while the application runs. (User interface elements that receive input often use properties to receive information into the program.) At first, you might find properties a difficult concept to grasp. Viewing them in terms of something from everyday life can help.
Consider this bicycle analogy: a bicycle is an object you use to ride from one place to anoth-er. Because a bicycle is a physical object, it has several inherent characteristics. It has a brand name, a color, gears, brakes, and wheels, and it’s built in a particular style. (It might be a road bike, a mountain bike, or a tandem bike.) In Visual Basic terminology, these characteristics are properties of the bicycle object. Most of the bicycle’s properties were defined when the bicycle was built. But others (tires, travel speed, and options such as reflectors and mirrors) are proper-ties that change while the bicycle is used. The bike might even have intangible (that is, invisible) properties, such as manufacture date, current owner, value, or rental status. And to add a little more complexity, a company or shop might own one bicycle or (the more likely scenario) an entire fleet of bicycles, all with different properties. As you work with Visual Basic, you’ll set the properties of a variety of objects, and you’ll organize them in very useful ways. Working with properties is a fundamental task in object-oriented programming.
Moving and Resizing the Programming Tools
With numerous programming tools to contend with on the screen, the Visual Studio IDE can become a pretty busy place. To give you complete control over the shape and size of the elements in the de-velopment environment, Visual Studio lets you move, resize, dock, and autohide most of the interface elements that you use to build programs.
To move one of the tool windows in Visual Studio, simply click its title bar and drag the window to a new location. If you position the window somewhere in the middle of the IDE and let go, it will float over the surface of Visual Studio, unattached to other tool windows. If you drag a window along the edge of another window, it attaches to that window, or docks itself. Dockable windows are advanta-geous because they always remain visible. (They don’t become hidden behind other windows.) If you want to see more of a docked window, simply drag one of its borders to view more content.