800 East 96th Street, Indianapolis, Indiana, 46240 USA
Jesse Feiler
Sams
Teach Yourself
24
in
Hours
Core Data for
Mac
®
and iOS
All rights reserved. No part of this book shall be reproduced, stored in a retrieval system, or transmitted by any means, electronic, mechanical, photocopying, recording, or otherwise, without written permission from the publisher. No patent liability is assumed with respect to the use of the information contained herein. Although every precaution has been taken in the preparation of this book, the publisher and author assume no responsibility for errors or omissions. Nor is any liability assumed for damages resulting from the use of the information contained herein. ISBN-13: 978-0-672-33619-5
ISBN-10: 0-672-33619-7
Library of Congress Cataloging-in-Publication data is on file. Printed in the United States of America
First Printing: June 2012
Trademarks
All terms mentioned in this book that are known to be trademarks or service marks have been appropriately capitalized. Sams Publishing cannot attest to the accuracy of this information. Use of a term in this book should not be regarded as affecting the validity of any trademark or service mark.
Warning and Disclaimer
Every effort has been made to make this book as complete and as accurate as possible, but no warranty or fitness is implied. The information provided is on an “as is” basis. The author and the publisher shall have neither liability nor responsibility to any person or entity with respect to any loss or damages arising from the information contained in this book.
Bulk Sales
Sams Publishing offers excellent discounts on this book when ordered in quantity for bulk purchases or special sales. For more information, please contact
U.S. Corporate and Government Sales 1-800-382-3419
For sales outside of the U.S., please contact
Contents at a Glance
Introduction. . . .1
Part I: Getting Started with Core Data
HOUR 1: Introducing Xcode 4. . . .72: Creating a Simple App. . . .49
3: Understanding the Basic Code Structure. . . .63
Part II: Using Core Data
HOUR 4: Getting the Big Core Data Picture. . . .855: Working with Data Models. . . .101
6: Working with the Core Data Model Editor. . . .117
7: What Managed Objects Can Do. . . .133
8: Controllers: Integrating the Data Model with Your Code. . . .143
9: Fetching Data. . . .153
10:
Working with Predicates and Sorting. . . .171Part III: Developing the Core Data Interface
HOUR 11: Finding Your Way Around the Interface Builder Editor: The Graphics Story. . . .18912: Finding Your Way Around the Interface Builder Editor: The Code Story. . . .209
13: Control-Dragging Your Way to Code. . . .223
14: Working with Storyboards and Swapping Views. . . .239
Part IV: Building the Core Data Code
HOUR 15: Saving Data with a Navigation Interface. . . .25716: Using Split Views on iPad. . . .279
17: Structuring Apps for Core Data, Documents, and Shoeboxes. . . .289
Part V: Managing Data and Interfaces
HOUR 19: UsingUITableViewon iOS. . . .337
20: UsingNSTableViewon Mac OS. . . .363
21: Rearranging Table Rows on iOS. . . .375
22: Managing Validation. . . .393
23: Interacting with Users. . . .409
24: Migrating Data Models. . . .423
Appendix
A What’s Old in Core Data, Cocoa, Xcode, and Objective-C. . . .441Table of Contents
Introduction
1
Who Should Read This Book . . . .1
Some Points to Keep in Mind . . . .2
How This Book Is Organized. . . .3
Part I: Getting Started with Core Data
HOUR 1:Introducing Xcode 4
7
Getting to Know Xcode . . . .8Goodbye “Hello, World” . . . .8
Hello, App Development for Mac OS X and iOS. . . .11
Getting Started with Xcode. . . .13
Using the Navigator . . . .15
Using Editors . . . .25
Working with Assistant . . . .29
Getting Help in an Editor Window. . . .31
Using Utilities—Inspectors . . . .31
Using Utilities—Libraries . . . .35
Using the Text Editor. . . .40
Using the Organizer Window . . . .45
Summary . . . .47
Workshop . . . .48
Activities. . . .48
HOUR 2:
Creating a Simple App
49
Starting to Build an App . . . .49Building the Project. . . .52
Exploring the App. . . .58
Summary . . . .60
Workshop . . . .60
HOUR 3:
Understanding the Basic Code Structure
63
Working with the Code . . . .63
Looking at Object-Oriented Programming in the Context of Objective-C . . . .66
Using Declared Properties. . . .68
Messaging in Objective-C. . . .73
Using Protocols and Delegates. . . .75
Using the Model/View/Controller Concepts. . . .81
Importing and Using Declarations in Files . . . .82
Summary . . . .83
Workshop . . . .84
Activities. . . .84
Part II: Using Core Data
HOUR 4:Getting the Big Core Data Picture
85
Starting Out with Core Data. . . .85Examining Core Data at Runtime: The Core Data Stack . . . .90
Working with Fetched Results. . . .96
Summary . . . .99
Workshop . . . .99
Activities. . . .99
HOUR 5:
Working with Data Models
101
Making the Abstract Concrete. . . .101Working with Entities. . . .103
Adding Attributes to Entities. . . .105
Linking Entities with Relationships. . . .107
Keeping Track of Your Data in Files and Documents. . . .108
Summary. . . .116
Workshop . . . .116
HOUR 6:
Working with the Core Data Model Editor
117
Moving the Data Model from Paper to Xcode and
the Core Data Model Editor . . . .117
Adding Entities to the Data Model. . . .119
Choosing the Editor Style . . . .125
Adding Relationships to a Data Model. . . .126
Summary . . . .132
Workshop . . . .132
Activities. . . .132
HOUR 7:
What Managed Objects Can Do
133
Using Managed Objects. . . .133Deciding Whether to Override NSManagedObject. . . .134
OverridingNSManagedObject. . . .136
Implementing Transformation in an NSManagedObjectSubclass . . . .140
Summary. . . .142
Workshop . . . .142
Activities. . . .142
HOUR 8:
Controllers: Integrating the Data Model with Your Code
143
Looking Inside Model/View/Controller . . . .143Integrating Views and Data on Mac OS . . . .147
Integrating Views and Data on iOS . . . .151
Summary. . . .152
Workshop . . . .152
Activities. . . .152
HOUR 9:
Fetching Data
153
Choosing the Core Data Architecture. . . .153Exploring the Core Data Fetching Process. . . .154
Using Managed Object Contexts . . . .158
Creating and Using a Fetch Request. . . .159
Stopping the Action to Add New Data . . . .161
Optimizing Interfaces for Core Data. . . .162 vii
Summary. . . .168
Workshop . . . .168
Activities. . . .169
HOUR 10:
Working with Predicates and Sorting
171
Understanding Predicates. . . .171Constructing Predicates . . . .177
Creating a Fetch Request and Predicate with Xcode . . . .178
Sorting Data. . . .185
Summary. . . .187
Workshop . . . .187
Activities. . . .187
Part III: Developing the Core Data Interface
HOUR 11:Finding Your Way Around the Interface Builder Editor:
The Graphics Story
189
Starting to Work with the Interface Builder Editor in Xcode . . . .189Working with the Canvas. . . .197
Summary. . . .206
Workshop . . . .206
Activities. . . .207
HOUR 12:
Finding Your Way Around the Interface Builder Editor:
The Code Story
209
Using the Connections Inspector . . . .209UsingIBOutletsfor Data Elements. . . .215
Summary. . . .222
Workshop . . . .222
Activities. . . .222
HOUR 13:
Control-Dragging Your Way to Code
223
Repurposing the Master-Detail Application Template . . . .223Workshop . . . .237
Activities. . . .238
HOUR 14:
Working with Storyboards and Swapping Views
239
Creating a Project with a Storyboard . . . .239Swapping Views on iOS Devices. . . .241
Swapping Detail Views (the Old Way). . . .244
Understanding the Storyboard Concept. . . .246
Looking at the Estimator Storyboard and Code . . . .248
Creating a Storyboard. . . .251
Summary. . . .254
Workshop . . . .255
Activities. . . .255
Part IV: Building the Core Data Code
HOUR 15:Saving Data with a Navigation Interface
257
Using a Navigation Interface to Edit and Save Data. . . .257Starting from the Master-Detail Template. . . .263
Using the Debugger to Watch the Action. . . .267
Adding a Managed Object . . . .272
Moving and Saving Data. . . .273
Cleaning Up the Interface . . . .275
Summary. . . .277
Workshop . . . .278
Activities. . . .278
HOUR 16:
Using Split Views on iPad
279
Moving to the iPad . . . .279Implementing the Second Interface . . . .281
Changing the Data Update and Saving Code . . . .284
Summary. . . .287
Workshop . . . .287
Activities. . . .288 ix
HOUR 17:
Structuring Apps for Core Data, Documents, and Shoeboxes
289
Looking at Apps from the Core Data Point of View:
The Role of Documents . . . .289
Exploring App Structure for Documents, Mac OS, and iOS. . . .292
Moving Data Models. . . .311
Moving a Data Model from One Project to Another . . . .312
Summary. . . .315
Workshop . . . .316
Activities. . . .316
HOUR 18:
Validating Data
317
Using Validation Rules in the Data Model. . . .317Setting Up Rules in Your Data Model . . . .320
Entering Data into the Interface and Moving It to the Data Model (and Vice Versa) . . . .327
Creating Subclasses of NSManagedObjectfor Your Entities. . . .331
Summary. . . .335
Workshop . . . .336
Activities. . . .336
Part V: Managing Data and Interfaces
HOUR 19:Using
UITableViewon iOS
337
Working with Table Views and iOS, Mac OS, and Core Data . . . .337Comparing Interfaces: Settings on iOS and System Preferences on Mac OS. . . .339
UsingUITableViewWithout Core Data . . . .344
UsingUITableViewwith Core Data. . . .357
Summary. . . .360
Workshop . . . .361
Activities. . . .361
Summary. . . .373
Workshop . . . .374
Activities. . . .374
HOUR 21:
Rearranging Table Rows on iOS
375
Handling the Ordering of Table Rows. . . .375Allowing a Table Row to Be Moved . . . .380
Doing the Move . . . .382
Summary. . . .391
Workshop . . . .392
Activities. . . .392
HOUR 22:
Managing Validation
393
Validation for Free. . . .393Validation on Mac OS . . . .394
Programming Validation for iOS or Mac OS . . . .402
Summary. . . .407
Workshop . . . .407
Activities. . . .408
HOUR 23:
Interacting with Users
409
Choosing an Editing Interface. . . .409Communicating with Users. . . .413
Using Sheets and Modal Windows on Mac OS. . . .419
Summary. . . .422
Workshop . . . .422
Activities. . . .422
HOUR 24:
Migrating Data Models
423
Introducing the Core Data Migration Continuum. . . .423Managing Data Model Migration . . . .424
Working with Data Model Versions . . . .426
Using Automatic Lightweight Migration. . . .432
Looking at a Mapping Model Overview . . . .434 xi
Summary. . . .438
Workshop . . . .438
Activities. . . .439
APPENDIX A:
What’s Old in Core Data, Cocoa, Xcode, and Objective-C
441
Declared Properties . . . .441Required and Optional Methods in Protocols. . . .442
Storyboards in Interface Builder. . . .442
Ordered Relationships . . . .442
About the Author
Jesse Feileris a developer, web designer, trainer, and author. He has been an Apple devel-oper since 1985 and has worked with mobile devices starting with Apple’s Newton and con-tinuing with the iOS products such as the iPhone, iPod touch, and iPad. Feiler’s database expertise includes mainframe databases such as DMS II (on Burroughs), DB2 (on IBM), and Oracle (on various platforms), as well as personal computer databases from dBase to the first versions of FileMaker. His database clients have included Federal Reserve Bank of New York; Young & Rubicam (advertising); and many small and nonprofit organizations, pri-marily in publishing, production, and management.
Feiler’s books include the following:
.
Sams Teach Yourself Objective-C in 24 Hours (Sams/Pearson).
Data-Driven iOS Apps for iPad and iPhone with FileMaker Pro, Bento by FileMaker, and FileMaker Go(Sams/Pearson).
FileMaker 12 in Depth(Sams/Pearson).
Using FileMaker Bento(Sams/Pearson).
iWork for Dummies(Wiley).
Sams Teach Yourself Drupal in 24 Hours(Sams/Pearson).
Get Rich with Apps! Your Guide to Reaching More Customers and Making Money NOW (McGraw-Hill).
Database-Driven Web Sites(Harcourt).
How to Do Everything with Web 2.0 Mashups(McGraw-Hill).
The Bento Book(Sams/Pearson)He is the author of MinutesMachine, the meeting management software for iPad—get more details at champlainarts.com.
A native of Washington, D.C., Feiler has lived in New York City and currently lives in Plattsburgh, NY. He can be reached at northcountryconsulting.com.
Acknowledgments
Thanks go most of all to the people at Apple, along with the developers and users who have helped to build the platform and imagine possibilities together to make the world better.
At Pearson, Loretta Yates, Executive Editor, has taken a concept and moved it from an idea through the adventures along the way to printed books and eBooks in a variety of formats. She is always a pleasure to work with.
Mandie Frank, Project Editor, has done a terrific job of keeping things on track with a complex book full of code snippets, figures, and cross references in addition to the text. Technical Editor Robert McGovern caught numerous technical typos and added comments and perspectives that have clarified and enhanced the book.
We Want to Hear from You!
As the reader of this book, youare our most important critic and commentator. We value your opinion and want to know what we’re doing right, what we could do better, what areas you’d like to see us publish in, and any other words of wisdom you’re willing to pass our way.
As an Editor-in-Chief for Sams Publishing, I welcome your comments. You can email or write me directly to let me know what you did or didn’t like about this book—as well as what we can do to make our books better.
Please note that I cannot help you with technical problems related to the topic of this book. We do have a User Services group, however, where I will forward specific technical questions related to the book.
When you write, please be sure to include this book’s title and author as well as your name, email address, and phone number. I will carefully review your comments and share them with the author and editors who worked on the book.
Email: [email protected]
Mail: Greg Wiegand Editor-in-Chief Sams Publishing 800 East 96th Street Indianapolis, IN 46240 USA
Reader Services
Visit our website and register this book at amspublishing.com/register for convenient access to any updates, downloads, or errata that might be available for this book.
Who Should Read This Book
1Introduction
Organizing things is an important human activity. Whether it is a child organizing toys in some way (by size, color, favorites, and so forth) or an adult piecing together a thousand-piece jigsaw puzzle, the desire to “make order out of chaos” (as one inveterate puzzler put it) reflects a sense that somehow if we try hard enough or just have enough information, we can find or create an understandable view of the world. Or at least an understandable view of the left overs in the refrigerator or the photos in an album.
Core Data is a powerful tool that you can use with the Cocoa and Cocoa Touch frameworks on iOS and Mac OS to help you make order out of the chaos of the hun-dreds, thousands, and even billions of data elements that you now can store on your computer or mobile device.
Who Should Read This Book
This book is geared toward developers who need to understand Core Data and its capabilities. It’s also aimed at developers who aren’t certain they need the combina-tion of Core Data and Cocoa. It places the technologies in perspective so that you can see where you and your project fit in. Part of that is simply analytical, but for everyone, the hands-on examples provide background as well as the beginnings of applications (apps) that you can create with these two technologies.
If you are new to databases or SQL, you will find a basic introduction here. If you are familiar with them, you will find a refresher as well as details on how the con-cepts you know already map to Core Data terminology.
Likewise, if you are new to development on Mac OS, iOS, or Cocoa and Cocoa Touch, you will find a fairly detailed introduction. If you are already familiar with them, you will see how some of the basic concepts have been expanded and rearranged to work with Core Data.
Some Points to Keep in Mind
Not everyone starts from the same place in learning about Core Data (or, indeed, any technology). Learning and developing with new technologies is rarely a linear process. It is important to remember that you are not the first person to try to learn these fairly complex interlocking technologies. This book and the code that you experiment with try to lead you toward the moment when it all clicks together. If you do not understand something the first time through, give it a rest, and come back to it another time. For some people, alternating between the graphical design of the interface, the logical design of the code processes, and the organizational structure of the database can actually make things seem to move faster.
Here are some additional points to consider.
Acronyms
In many books, it is a convention to provide the full name of an acronym on its first use—for example, HyperText Markup Language (HTML). It is time to recognize that with wikipedia.org, dictionaries built into ebooks and computers, and so many other tools, it is now safe to bring a number of acronyms in from the cold and use them without elaboration. Acronyms specific to the topic of this book are, indeed, explained on their first use in any chapter.
There is one term that does merit its own little section. In this book, as in much usage today, SQL is treated as a name and not as an acronym. If you look it up on Wikipedia, you will see the evolution of the term and its pronunciation.
Development Platforms
How This Book Is Organized
3Assumptions
Certain things are assumed in this book. (You might want to refer to this section as you read.) They are as follows:
. Cocoa, as used in this book, refers to the Cocoa framework on Mac OS and, unless otherwise specified, also to the Cocoa Touch framework on iOS.
. iPhonerefers to iPhone and iPod touch unless otherwise noted.
Formatting
In addition to the text of this book, you will find code samples illustrating various points. When a word is used in a sentence as computer code (such as NSTableView), it appears like this. Code snippets appear set off from the surrounding text.
Sometimes they appear as a few lines of code; longer excerpts are identified with listing numbers so they can be cross-referenced.
Downloading the Sample Files
Sample files can be downloaded from the author’s website at northcountryconsulting. com or from the publisher’s site at www.informit.com/9780672335778.
How This Book Is Organized
There are five parts to this book. You can focus on whichever one addresses an immediate problem, or you can get a good overview by reading the book straight through. Like all of the Teach Yourself books, as much as possible, each chapter (or hour) is made to stand on its own so that you can jump around to learn in your own way. Cross-references throughout the book help you find related material.
Part I, “Getting Started with Core Data”
This part introduces the basic issues of the book and shows you principles and tech-niques that apply to all of the products discussed:
. Chapter 2, “Creating a Simple App”—This hour walks you through the process of creating an app from one of the built-in Xcode templates. It’s very little work for a basic app that runs.
. Chapter 3, “Understanding the Basic Code Structure”—This hour introduces design patterns used in Objective-C as well as some of the features (such as delegates and protocols) that distinguish it from other object-oriented pro-gramming languages.
Part II, “Using Core Data”
Here you will find the basics of Core Data and its development tools in Xcode:
. Chapter 4, “Getting the Big Core Data Picture”—Here you’ll find an overview of Core Data and a high-level introduction to its main components.
. Chapter 5, “Working with Data Models”—Data models have been around since the beginning of databases (and, in fact, since long before, if you want to include data models such as the classifications of plants and ani-mals). This hour lets you learn the language of Core Data.
. Chapter 6, “Working with the Core Data Model Editor”—In this hour, you will learn how to build your data model graphically with Xcode’s table and grid styles.
. Chapter 7, “What Managed Objects Can Do”—In this hour, you’ll discover the functionality of managed objects and what you can do to take advan-tage of it and to expand it.
. Chapter 8, “Controllers: Integrating the Data Model with Your Code”—The key point of this book is to show you how to link your database and data model to interface elements and your code. This hour provides the basics for Mac OS and for Cocoa.
. Chapter 9, “Fetching Data”—Just as the SQL SELECTstatement is the heart of data retrieval for SQL databases, fetching data is the heart of data retrieval for Core Data. Here you’ll learn the techniques and terminology.
How This Book Is Organized
5Part III, “Developing the Core Data Interface”
Now that you understand the basics of Core Data, you can use it to drive the com-mands, controls, and interfaces of your apps:. Chapter 11, “Finding Your Way Around Interface Builder: The Graphics Story”—The Interface Builder editor in Xcode 4 (a separate program until now) provides powerful tools and a compact workspace to help you develop your interface and app functionality.
. Chapter 12, “Finding Your Way Around Interface Builder: The Code Story”—This hour shows you the graphical tools to link the code to the interface.
. Chapter 13, “Control-Dragging Your Way to Code”—A special aspect of linking your interface to your code is using the tools in Xcode 4 to actually write the interface code for you.
. Chapter 14, “Working with Storyboards and Swapping Views”—One of the major advances in Xcode 4, storyboards not only create and manage the views and controllers that make up your interface, but also let you manage the sequences in which they are presented (segues). You will find that storyboards can replace a good deal of code that you would otherwise have to write for each view you display.
Part IV, “Building the Core Data Code”
Yet another aspect of the connections between Core Data, your code, and your inter-face consists of the data source protocol and table views. This part explains them:
. Chapter 15, “Saving Data with a Navigation Interface”—Originally designed for iPhone, navigation interfaces are an efficient use of screen space for organized data. This hour shows you how to use them.
. Chapter 16, “Using Split Views on iPad”—Split views on iPad provide a larger-screen approach to data presentation than navigation interfaces. As you see in this hour, you can combine navigation interfaces with a split view on iPad. Data sources provide your Core Data data to the table view. This hour shows how that happens and moves on to how you can work with tables and their rows and sections. You’ll also see how to format cells in various ways.
. Chapter 17, “Structuring Apps for Core Data, Documents, and
Shoeboxes”—This hour goes into detail about how and where your data can actually be stored.
Part V, “Managing Data and Interfaces”
. Chapter 19, “Using UITableView on iOS”—Table views let you manage and present data easily. The UITableViewstructure on iOS is designed for seamless integration with Core Data.
. Chapter 20, “Using NSTableView on Mac OS”—NSTableViewon Mac OS is revised in Lion. The older versions of table views still work, but as you see in this hour, some of the new features of UITableViewhave been back-ported to Mac OS.
. Chapter 21, “Rearranging Table Rows on iOS”—The ability to rearrange table rows by dragging them on the screen is one of the best features of iOS. It is remarkably simple once you know the table view basics.
. Chapter 22, “Managing Validation”—This hour shows you how to build on the validation rules from Hour 18 to actually implement them and let users know when there are problems.
. Chapter 23, “Interacting with Users”—On both iOS and Mac OS, it is important to let users know when they are able to modify data and when it is only being displayed.
. Chapter 24, “Migrating Data Models”—You can have Core Data automati-cally migrate your data model to a new version. This hour shows you how to do that, as well as how to use model metadata and alternative types of data stores.
Appendixes
. Appendix A, “What’s Old in Core Data, Cocoa, Xcode, and Objective-C”— There are some legacy features in the sample code you’ll find on developer. apple.com and in apps you might be working with. This appendix helps you understand what you’re looking at and how to modernize it.
NOTE
Due to the complexity of the topics discussed, some figures in this book are very detailed and are intended only to provide a high-level view of concepts. Those figures are representational and not intended to be read in detail. If you prefer to view these figures on your computer, you can download them at
7
HOUR 1
Introducing Xcode 4
What You’ll Learn in This Hour:
.
Understanding the new development paradigms
.
Exploring the Xcode workspace window
.
Defining projects and workspaces
.
Debugging with breakpoints
.
Caring for your source code with repositories and versions
The Origins of Xcode 4
Xcode 4 has its roots in Project Builder and Interface Builder, the two development tools created for NeXTSTEP. The NeXTSTEP operating system ran on the NeXT com-puter, which was manufactured by NeXT, the company Steve Jobs founded when he left Apple in 1985. The hardware side of the business was not successful, and NeXTSTEP morphed into OPENSTEP, which ran on Sun’s Solaris operating system, and later on Windows. After Apple purchased NeXT in 1996, the software became Rhapsody and, later, Mac OS X. A branch of the software became the iPhone oper-ating system which, after the introduction of iPad, became iOS.
Getting to Know Xcode
Everything you do in the development of Mac and iOS apps is done in the context of Xcode. First demonstrated at Apple’s Worldwide Developers Conference in June 2010, it was released in several preview versions until the final release in the spring of 2011. Xcode 4 is not just a revision to the interface of Xcode 3; it is a rethinking of the way in which developers work on their apps.
This hour helps you understand this new way of working and why it is so relevant to apps written for Mac and iOS in today’s world. Not only will you find out how to use Xcode 4, but you will see why it is structured the way it is and how you can best take advantage of its new features.
As you use Xcode 4, try to use the new features and new ways of working so that you understand what the people at Apple think a productive development process can look like today. And bear in mind one important point about Apple’s developer tools: for many years, these tools have been testing and proving grounds for new ideas about interface design. What you see in Xcode 4 includes some novel
approaches to interface design that you may consider using for your own apps both on Mac and iOS.
. One of the most important features of Xcode is its simulator: software that lets you test iOS apps on your Mac. You’ll find out more about the simula-tor in Part II of this book, “Using Core Data.”
Goodbye “Hello, World”
For many people, their first program was something along the lines of the well-known Hello World program shown in Listing 1.1. It is from the classic The C Programming Languageby Brian Kernighan and Dennis Ritchie (1978).
LISTING 1.1
Hello, World
main( ) {
printf(“hello, world”); }
Goodbye “Hello, World”
9Today’s programming is based on several commonly used paradigms. Two of the most important have to do with how programs function—declarative and impera-tive paradigms. A third, object-oriented programming, has to do with the structure of programs.
Working with Imperative and Declarative
Programming Paradigms
Today’s apps are much more complex than just printing or displaying a line of text. How do you get from Hello, World to an app such as iTunes? Even an app that appears to be text-based such as Pages in the iWork suite is a far cry from Hello, World. And when you consider that Mac OS X and iOS are basically just very large apps, it is hard to see how they evolved from Hello, World.
When Hello, World first was written, the programming world was already moving away from this linear do this/do that paradigm (called imperativeor proceduralprogramming) to a new paradigm called declarativeprogramming, in which the mechanics of howsomething is done are less important than whatis done.
Procedural programming is used in the code you write; most of that is Objective-C when you are writing for Mac OS X and iOS. For most people, writing procedural code “feels” like programming. (In addition to its procedural programming con-cepts, Objective-C uses object-oriented programming, hence its name.)
Languages that are declarative (that is, focusing on what is done) are particularly common on the Web. Most people consider Cascading Style Sheets (CSS), regular expressions, and the basics of SQL (SELECT statements, for example) to be examples of declarative languages. Markup languages in general—including HTML itself—are declarative rather than procedural because they describe what the end result should look like. For many people, designing databases and web pages doesn’t “feel” like programming (and many people do not think that it is).
NOTE
In at least one case—the creation of interface views—you can choose between procedural and declarative styles. In those cases, this book will point out some of the differences that affect your finished app.
If you are starting building apps for Mac OS X or iOS that use Core Data, you will use descriptive editors for the Core Data side of things just as you do with many SQL-based development environments, and you will use procedural editors for the text-based code that you write to manipulate the interface and the database.
Working with Object-Oriented Programming
Object-oriented programming is now so pervasive that for many people, it is the only kind of programming they do. Instead of the simple and relatively unstructured code shown in Listing 1.1, objectsare created that encapsulate data and functionali-ty. These objects interact with one another to get the work of the program done.When people first started using object-oriented programming techniques, some critics pointed out that it took much more code and programming time to use object-oriented techniques and languages than to use traditional techniques and languages. The idea of writing a program with the three lines shown in Listing 1.1 is unthinkable in the object-oriented programming world.
However, the arguments made by proponents of object-oriented programming and borne out by decades of experience are that
. Object-oriented programming is easier to maintain and modify over time in part because of its inherent structures.
. It might take many more lines to write a very simple program using object-oriented programming techniques, but as the complexity of the program increases, the incremental effort to build each new feature can be signifi-cantly less than with traditional techniques.
When you put these points together, you can see that there is a significant difference between simple and complex programs no matter whether you are using object-oriented programming or traditional programming. The benefits of object-object-oriented programming really only appear in complex programs, whereas the limitations of traditional programming methods do not appear in short programs.
Hello, App Development for Mac OS X and iOS
11simplified example, you might wind up thinking that these tools are overly complex. That is true in one sense: Using these tools to write something very simple is overkill. But not using tools like this to write complex software is frequently self-defeating.
As you begin to work with Xcode, Core Data, Mac OS X, and iOS, you will find your-self at the helm of a sophisticated and powerful development environment. In this book, you will see how to start small and build up to very complex apps. In the ini-tial hours, because the examples are small, you may be tempted to worry about the complexity, but just remember that the complexity will pay off as the examples become more complex.
. With that overview, you might be interested in the Tutorial “Using Xcode to Write ‘Hello, World’” in Hour 1 of Apple’s Xcode Quick Start Guide. It is 20 pages long and demonstrates precisely these points.
TIP
If you have not done so already, register as a developer with Apple at developer. apple.com. A variety of developer programs are available, but the most common are the Mac OS X developer program ($99/year), the iOS developer program ($99/year), and the Safari developer program (free). All these programs are built on your registration as a developer with Apple, which is free.
Without even registering, you have access to libraries of documentation. All Apple documentation referred to in this book is available through developer.apple.com. Any documentation that is not available through developer.apple.com will be identified. You can visit http://developer.apple.com/programs/which-program/ to compare the various developer programs and to choose the one that makes sense for you.
Hello, App Development for Mac OS X
and iOS
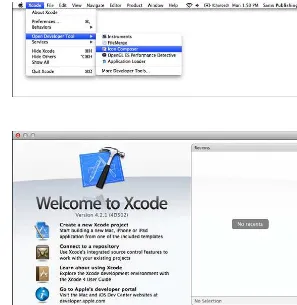
To get started, register and sign up for a developer program so you can download Xcode from developer.apple.com. If you are not certain that you want to register as a developer, you can purchase Xcode alone from the Mac App store. It is currently free. Starting with Xcode 4.3.1, it is an app just like any other you download from the App Store. It comes with a variety of tools as shown in Figure 1.1. (Prior to Xcode 4.3.1, it and the tools were installed in a special Developer folder.)
FIGURE 1.1
Xcode comes with a variety of developer apps.
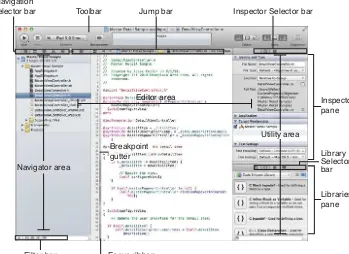
FIGURE 1.2
Launch Xcode.
TIP
If you have run Xcode before, preferences might have changed and you may see a different welcome screen—or none at all.
As you can see in Figure 1.2, from this point you can create a new project, get help, and generally get started with Xcode.
. At this point, you can get started using Xcode by creating a simple app as described in Hour 2, “Creating a Simple App,” p. 49.
Getting Started with Xcode
13Getting Started with Xcode
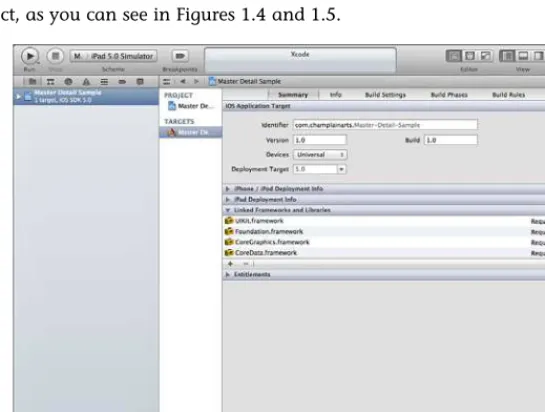
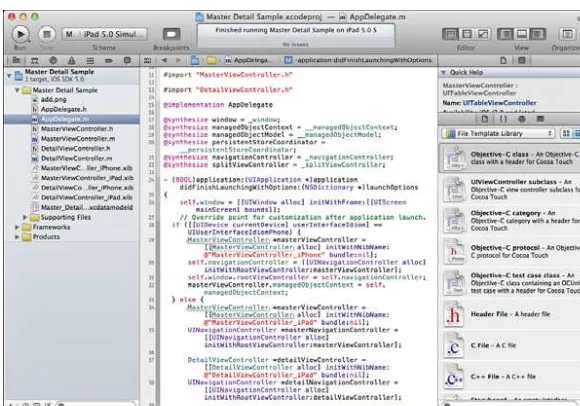
Whether you are creating a new Xcode project or reopening an old one, you see the Xcode workspace window shown in Figure 1.3. Note that depending on your project and your Xcode preferences, the details of the window (not to mention the code) will very likely be different.
full-screen implementations of existing apps such as Preview, iCal, iPhoto, and Mail, which Apple did as long ago as fall of 2010.
But how would full-screen apps work with data that is not visual the way that pho-tos, calendars, and the documents shown in Preview are? The answer was under developers’ eyes right at the first preview: They just had to download a beta version of Xcode 4.
The window is a combination of panes and panes-within-panes that can be shown or hidden as well as resized. At first glance, Figure 1.3 can be daunting. But when you look at it a second time, you will see that it is actually fairly simple. It uses and reuses three components. Each component exhibits the same behavior wherever it appears. In addition, you can show or hide almost all the components, rearrange them, and resize them.
These are the main components of the workspace window:
. Areas—There are three areas shown in Figure 1.3. At the left is the naviga-tor area, at the right is the utility area, and hidden at the bottom is the debug area. Each of these can be shown or hidden by using the three View buttons at the upper right of the workspace window. The editor area, in the center of the workspace window, is always visible.
. Bars—At the top of the navigator, editor, and debug areas, you will find a bar you can use to select different views for the area. The bar above the editor area is the jump bar, but the others are the navigator selector bar and the debug bar.
. Panes—The utility area is divided into two panes, each of which can be resized. The combined height of the utility area remains constant within the window size, so if you enlarge the height of the library pane, you auto-matically reduce the height of the inspector pane. Selector bars appear at the top of the panes in the utility area.
There are three lesser components in the workspace window:
. Filter bar—At the bottom of the navigator area, this lets you filter the lists in the navigator to include or exclude certain types of items, such as class symbols, files with unsaved changes, and so forth.
. Breakpoint gutter—This appears in the editor area and lets you insert and delete breakpoints for debugging.
Using the Navigator
15TIP
The best way to explore the workspace window is to open or create a project and then explore the menu bar. This hour can only provide a high-level summary of the workspace window.
There you have it: The workspace window is a compact and powerful environment to let you manage your development process. The same interface elements are used over and over, which means you do not have to learn a multitude of interfaces and functions. This is the result of the consolidation of Project Builder and Interface Builder along with a great deal of hard work and imagination.
Xcode is designed to be customizable with all kinds of preferences; these, together with the basic interface components, allow you to work the way you want to work on the projects you want to work on. (An iPhone app? A Mac OS app? And if you work for Apple, Mac OS X itself?) For these reasons, there is no sequential way to start working with Xcode. The sections that follow highlight some of the main components: Feel free to skip around.
NOTE
This overview of Xcode walks through the workspace window. There is an Xcode menu bar, as you would expect in a Mac app, but menus today are not nearly so important as they were many years ago. If this book had been written 10 years ago, it is quite likely that the overview would have walked you through each menu and each command in that menu. Now, however, we are in a world of direct manipu-lation where buttons, commands, and hot items are located throughout the interface—they are placed where you want to use them. This means that that lengthy mouse trip up to the menubar is often not necessary because the interface element that does what you want to have done is right on the window itself. (Hmmm, just like on an iOS device.) The menu commands are more often than ever available with keyboard equivalents. For many people, the menubar and its commands serve largely as a place to go to find the keyboard equivalent for a command. For these reasons, you will find the menu commands scattered through this hour; they are dealt with in the interface elements they affect.
Using the Navigator
TIP
If the navigator is not visible, the menu command will automatically open it.
If you want to hide the navigator, use the leftmost View button or the View > Navigators > Hide Navigator command (–0).
The next sections explain the navigators, their keyboard equivalents, and what they do.
Project
–1
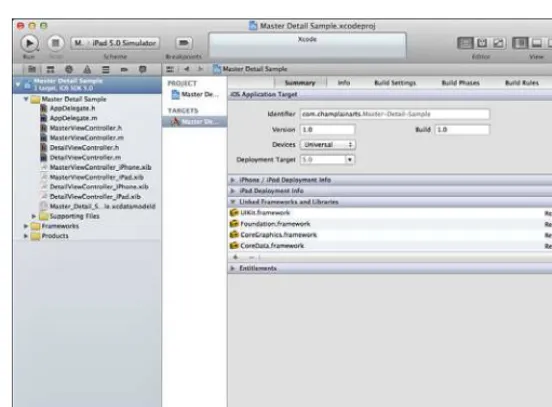
Figure 1.4 shows the project navigator. When you have first created a new project, it will very likely look like this. At the top of the navigator is a single item with a dis-closure triangle to its left.
Click the disclosure triangle, and the single project item opens revealing its files and groups, as you see in Figure 1.5.
NOTE
Groups are shown with folder icons, but they are not file system folders. The groups into which you organize your project’s files are a construct within Xcode. The files can be anywhere you want.
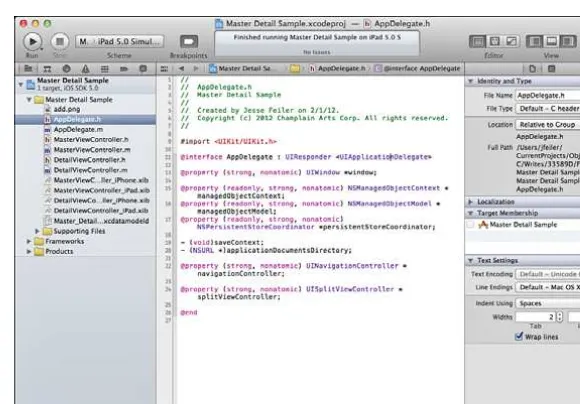
Figure 1.5 also demonstrates another feature of Xcode: the parts of the workspace window know about one another. When you click the project icon at the top of the navigator, the editor area of the workspace window shows information about the project, as you can see in Figures 1.4 and 1.5.
FIGURE 1.4
Using the Navigator
17FIGURE 1.5
You can expand groups in the project navigator.
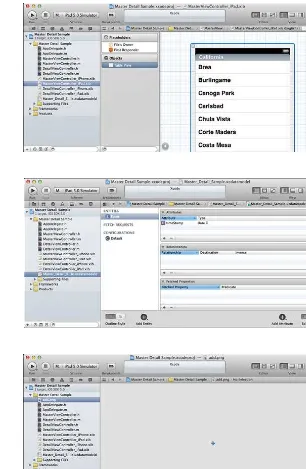
Click one of the files in the project, and it appears in the editor area shown in Figure 1.6.
FIGURE 1.6
Click a file to edit it.
Clicking a file opens it in the editor area no matter what kind of file it is. Figure 1.7 shows an interface file (a nibfile) in the editor area. Note that new projects for iOS have the option to use storyboards instead of nib files; for older projects and on Mac OS, nibs remain the standards.
. Learn more about storyboards in Hour 14, “Working with Storyboards and Swapping Views.”
Figure 1.8 shows a Core Data data model file in the editor area.
FIGURE 1.7
Edit a nib file in Xcode.
FIGURE 1.8
Edit your data model in Xcode.
FIGURE 1.9
Using the Navigator
19In other words, no matter what kind of file it is, select it in the project navigator and edit it in the editor (for the file types that Xcode supports).
You have seen how to use the navigator to explore your project and its files, but how do you manage the files themselves? When you create a project, as you will see in Hour 2, the files are automatically created for you. In your own projects, you might need to add files to it. Control-click in the project navigator to bring up the shortcut menu shown in Figure 1.10. For many people, right-clicking the mouse will have the same effect. You can add the new file anywhere you want and move it to the right position in the navigator just by dragging it. If you control- or right-click in a group, the file will be added to that group and you might not have to move it.
FIGURE 1.10
Use the short-cut menu to add files to the project.
Once you have selected a file to add, the sheet shown in Figure 1.11 opens.
FIGURE 1.11
The most important part of this dialog other than the filename is the Destination checkbox. This determines whether the project will use the file that may be some-where else on your disk or network or whether it will copy it into your project. Normally, you do want to copy the file into the project so that you can then move the entire project folder to another computer if necessary.
TIP
Sometimes, a filename will appear in red. This indicates that it is part of the proj-ect but that it is missing. For example, before you have built your projproj-ect, the file named <MyProjectName>.app appears in red. After you have successfully built your project, the name appears in black.
The filter bar at the bottom of the project navigator lets you filter by filename (or part thereof). The + in the bottom-left lets you add a new file with a template (it is not the same as the add file to project command shown in the shortcut menu in Figure 1.10). Three symbols to the right of the + limit your navigation. From left, here are their effects:
. Show only recently edited files
. Show only files with source-control status such as modified
. Show only files with unsaved changes
Symbol
–2
The symbol navigator, shown in Figure 1.12, shows you the symbols in your project: the classes (indicated with C), methods (M), and properties (P). Interface Builder actions (A) and outlets (O) manage the interactions between your code and your interface.
FIGURE 1.12
Using the Navigator
21Properties are identified by P unless they are Interface Builder outlets—a special kind of property. The synthesizedirective that is the companion to a propertydirective is flagged with a V (for variable).
. You will find out more about the property and synthesize directives in Hour 3, “Understanding the Basic Code Structure,” p. 63.
At the bottom of the symbol navigator, you can filter the display. Use the search box to type text to search for in symbol names. To the left of the filter bar, symbols let you choose what to display and hide. From left, the following effects are available:
. Show only class symbols—that is, no globals
. Show only symbols defined in the project
. Show only containers such as classes and categories; do not show members
Search
–3
The search navigator packs a lot of searching into a small space. You can use it by simply typing a search term into the box; Xcode will search for it through the proj-ect. The list of results (if any) is shown in the search navigator. You will see the rele-vant filename, a symbol such as the ones shown previously in Figure 1.12, and the beginning of the line of code. The search term is highlighted in yellow in each line. Sometimes this means that you do not see the beginning of the line, but never fear—a click on the line will display it in the editor area, or you can hover the pointer over it to see a tooltip with the full text.
You can switch between searching and replacing text at the upper-left, as shown in Figure 1.13. In addition, at the bottom of the search navigator, the filter bar lets you search within the results. In Figure 1.13, for example, the find was executed on “detail.” (You can see this because “detail” is highlighted in all of the search results.) The filter bar is used to filter on “item.” If you look at the search results, you will see that “detail” is always found, but each of those results also contains “item,” which is not highlighted because it was not part of the original search. You can duplicate these results for yourself. Conduct a search without a filter, and then add a filter. You’ll see that the number of results is reduced.
FIGURE 1.13
Specify a search.
The search navigator searches throughout the project. The Edit menu has traditional single-file Find commands, as shown in Figure 1.15.
FIGURE 1.14
Show or hide Find Options shortcuts.
FIGURE 1.15
Using the Navigator
23Issue
–4
The issue navigator lets you view the issues with your project. In the old days, these used to be called compile errors, but with Xcode, you will have many fewer compile errors. Do not get your hopes up, though. That is because Xcode has a powerful parser that checks your code as you type. It is as lively as a spell-checker, but it looks for syntax errors as well as ordinary misspellings. This means that compile errors now show up much earlier—just as you are typing them in many cases. The issue navigator lets you see them. You can display them by file (the traditional way of showing compile errors), but you can also display them by type so that like errors are grouped together. Sometimes that can make fixing the errors faster, particularly if you are consistently mistyping a variable name.
Figure 1.16 shows the issue navigator. In addition, note that, in the breakpoint gut-ter at the left of the editor area, symbols show up as soon as you have made the offending keystroke. (An extra shas just been added to synthesize—synthessize.)
Debug
–5
Debug shows you the calling sequence for each of your app’s threads (in the simplest case, there is only one). For example, Figure 1.17 shows the app stopped in DetailViewController viewWillAppear. That was called from UISplitViewController viewWillAppear, and so on back to the bottom of the calling sequence—main, which starts the program running.
FIGURE 1.16
Breakpoint
–6
Breakpoints let you stop program execution at specific lines of code. You place a breakpoint in the breakpoint gutter to the left of the editor area and, when the pro-gram is about to execute that line of code, it stops. You can then inspect the vari-ables in the debug area. In Figure 1.17, a breakpoint was set in the editor area at [super viewWillAppear:animated]. The program stopped just before executing that line of code. The calling sequence is visible in the debug navigator. In the editor area, you see the breakpoint, and, to its right, a small green arrow that points to the line of code about to be executed. If you have several breakpoints, you need to know which one has just stopped the app.
Beneath the editor area, the debug area shows you information about the break-point. On the left is a view of the variables at this moment. On the right are console messages. Buttons at the upper-right of the debug area let you choose which—or both—views to display. In the view of variables, you can expand and collapse con-tainers as you examine exactly what data is where.
TIP
Breakpoints can be useful even if they do not trip. When you cannot figure out why a line of code does not work properly, set a breakpoint on it to examine the data. If the breakpoint is not tripped, work backwards to see where the app goes off the rails. Command-click on a breakpoint to edit it. For example, you can stop only after the nth pass through the breakpoint and only if a certain data condition is true. You can add actions to the breakpoint such as a sound; a log message; a FIGURE 1.17
Using Editors
25To remove a breakpoint, drag it out of the breakpoint gutter. You can also use the breakpoint navigator to list the breakpoints. Clicking one will take you to the line of code. You can drag breakpoints out of the breakpoint navigator to remove them if you prefer not to drag them out of the breakpoint gutter.
TIP
Note that there is a global breakpoint control in the toolbar. Use it to turn all points on or off. This is helpful in debugging when you are done with the break-points but might want to turn the breakpoint back on the next time a bug appears.
Log
–7
Finally, the log navigator keeps track of what you’ve been doing with this app. Figure 1.18 shows the log navigator. The events are in reverse chronological order (latest first). As always in the navigator, a filter bar lets you filter the entries so you can easily find builds or other specific types of entries; you can also use the control at the bottom-left to see the most recent log entries. Clicking a log entry shows you the console results for that compile, build, or other action.
Using Editors
The center of the workspace window is reserved for editing your project and its files. As you have seen, different editors are automatically opened for the different types of files in your project.
FIGURE 1.18
. This section focuses on text editors; other editors are discussed in Hour 6, “Working with the Core Data Model Editor,” p. 117, and Hour 11, “Finding Your Way Around Interface Builder: The Graphics Story,” p. 189.
Using Editing Modes
Three editing modes are available in Xcode:
. Standard—This displays a single file in the edit area.
. Assistant—This displays two or more related files in the edit area.
. Version—If you are using source control, you can compare a file with its previous version or versions.
. Refer to “Working with Assistant” on p. 29 of this hour for details about the Assistant mode.
You select the editing mode with the trio of buttons marked Editor at the right of the top of the Xcode window, as shown in Figure 1.19. You can also use View, Editor to choose among them.
FIGURE 1.19
Using Editors
27Using the Jump Bar
Thejump bar appears at the top of the editor area no matter what mode you are in. As you can see in Figure 1.20, the jump bar above the editor area shows the path to the file you are working on relative to the project and lets you quickly navigate to a file, method, property, or class in the file. If you have several files open (as is often the case in Assistant and Version editor panes), each has its own jump bar.
You can use it to quickly navigate to a file or to a method, property, or class in the open file.
Thus, at the left, you see the icon for the project (Master Detail Sample); within that, you see a group (Master Detail Sample—shown with a Finder folder icon), and with-in that, the filename is shown (Hour1_AppDelegate.m). The next level down is a list of the methods, properties, and classes in that file.
TIP
It is important to note that this is the logical structure of the project, files, and groups. If you move the project to another folder, drive, or computer, this structure will remain the same.
Organizing Your File’s Pop-Up Menu List
In addition to the names of the methods, properties, and classes, titles appear in the pop-up list. You put titles into the file using a pragmadirective:
#pragma mark – headingName
FIGURE 1.20
There actually are three variations on this directive:
. The example shown provides a bold-faced heading with a dividing line above it, as shown in Figure 1.20.
. If you omit the hyphen, the dividing line is not shown and you only have the name.
. If you omit the name but use the hyphen, you have an unnamed divid-ing line.
You can use the bold-faced heading with a dividing line for major sections of your code; then use dividing lines without headings to further divide each major section.
Using headers forces you to keep your file organized because related methods, prop-erties, and classes are physically co-located in the file.
TIP
Be aware that the code that is commented out will not appear in the pop-up menu list.
Using Xcode’s Organization Tools
Xcode keeps track of the relationships among your files. At the left of the jump bar, the related items menu lets you quickly jump to related files. You can see the related items menu in Figure 1.21.
Related items menu
FIGURE 1.21
Working with Assistant
29At the top of the menu, submenus show you unsaved files and recent files. Submenus show you these types of related files when you are looking at source code. Other types of files, such as nib files and Core Data model editor files, have different submenus:
. Counterparts—This means the .h files for .m files, and vice versa.
. Superclasses—There is always a superclass (except for NSObject). This list is organized in order so that the last item at the bottom is always NSObject.
. Subclasses—If any.
. Siblings—These are classes that share the same immediate superclass.
. Categories—This is an Objective-C construct that allows you to add meth-ods to an existing class.
. Protocols—This Objective-C features lets you declare a set of methods that can be implemented by several classes in their own ways and with their own data structures. Protocols provide functionality similar to multiple inheritance in some other object-oriented languages.
. Both categories and protocols are discussed in Hour 3, p. 63.
. Includes—These are the files that are included in the file you are looking at.
. Included By—From an included file, you can return easily to this file; you can also see the other files in your project that may include this file.
With these various navigational tools available and updated by Xcode, you might want to use the adjacent forward and back arrows. They function just as forward and back arrows do in a browser. This means that you can use the related items menu to explore the rest of your project and get back to where you started from with just a few mouse clicks.
Working with Assistant
Experiment with the various layouts. Most people switch back and forth among them, depending on the size of their display and the files that they are working with. Sometimes, you are dealing with short lines of code that look good side-by-side, but in other cases, you have large chunks of code that need the width of your computer display.
Once you are using an assistant, you might be able to open additional panes in the assistant. Figure 1.23 shows two panes displayed, one above the other. When you have several panes in the assistant window, each has its own jump bar.
Also, note that small widget at the right of a jump bar let you close that pane or add another pane.
FIGURE 1.22
Control the lay-out of assistant panes.
FIGURE 1.23
Using Utilities—Inspectors
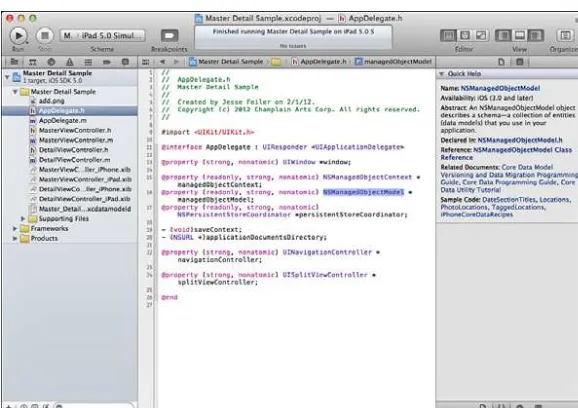
31Getting Help in an Editor Window
You can option-click on a word in an editor window to bring up help and documen-tation, as shown in Figure 1.24.
FIGURE 1.24
Use option-click to get more information about code syntax.
Where possible, there will be two links to the documentation—the filename is a link, as is the file icon with .h in the upper-right of the window. The book in the upper-right opens the reference in the Organizer window, which is described later in this hour.
. Find out more about help and documentation in the “Using the Organizer Window” section on p. 45 of this hour.
Using Utilities—Inspectors
At the right of the workspace window is the utility area. This consists of two panes stacked one above the other. You can drag the divider between them to change their sizes, but they always fill the utility pane.
In Figure 1.25, you see the file inspector as it appears when a file is selected in the project navigator; if a line of text within a file is selected in the text editor, the dis-play may look the same.
FIGURE 1.25
Use the file inspector.
At the left of the top of the inspector, the small icon lets you view the information about the file you have selected. Information about the filename and file type is available. Each section of the file inspector has its own heading; you can expand or collapse each one.
These settings are self-explanatory, but one of them needs careful attention if you want to avoid problems. The location of each file can be set to one of six settings:
. Absolute Path
. Relative to Group
. Relative to Project
. Relative to Build Products
. Relative to Developer Directory
. Relative to SDK
Using Utilities—Inspectors
33Relative to Group can be a good structure for a multiperson project where compo-nents are being developed by different people at different times. Each person can structure a group without worrying about how they will be arranged together. The remaining choices are useful in specific cases that typically are involved with large projects or special conditions.
TIP
Of course, by using a source code repository, you can handle the issues of sharing and version control easily.
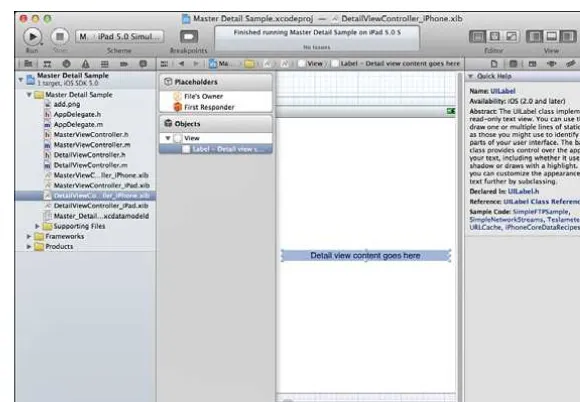
To the immediate right of the file inspector button is a Quick Help button. If an ele-ment in the editor is selected and help is available, it will be displayed as shown in Figure 1.26.
FIGURE 1.26
Quick Help is available wherever possible in the inspector pane.
In Figure 1.27, an Interface Builder document is open. The file inspector is still the left-most button at the top of the window, and its data is much the same.
For example, in Figure 1.28, you see the Identity inspector in action. It identifies a selected object in the interface.
FIGURE 1.27
Inspectors change depend-ing on what is selected in the editor.
FIGURE 1.28
Use the Identity inspector.
Using Utilities—Libraries
35Using Utilities—Libraries
The bottom pane of the utility area is for libraries. These are collections of items that you can add to your apps just by dragging them to the appropriate place in an editor.
. More information on libraries is included in Hour 11, p. 189.
The selector bar at the top of the library pane lets you choose from four libraries:
. File templates—[ctrl][option][command]1
. Code snippets—[ctrl][option][command]2
. Objects—[ctrl][option][command]3
. Media—[ctrl][option][command]4
You can also use the View, Utilities submenu to select the library you are interested in. If the Utilities submenu is hidden, use the View menu or the rightmost of the three View buttons at the upper-right of the workspace window to show it.
TIP
Alternatively, if the utility area is hidden, choosing View, Utilities, File Template Library or any of the other commands in the View, Utilities menu will show utilities and select the appropriate library with one command (or one keyboard shortcut).
Figure 1.29 shows the general components of the library pane. At the top of the library pane, a pop-up menu lets you navigate to sections within that library. To its right, buttons let you display the contents of that library as icons or in a list. The icon view can make finding images or objects such as graphic elements very fast; for other items such as code snippets, the list view is better.
At the bottom of the library pane, a search field lets you filter the library shown above it.
When you select an item in the library, a description appears floating over the edi-tor area, as shown in Figure 1.30. This description is generally somewhat lengthier than the summary in the library list.
File Templates Library
FIGURE 1.29
Use the library pane to take advantage of existing code, objects, and media.
You select the appropriate file template from the file template library and drag it into the project navigator, as shown in Figure 1.31.
TIP FIGURE 1.30
FIGURE 1.31
Use a file template.
Using Utilities—Libraries
37You can also use file templates by choosing File, New, New File, as shown in Figure 1.32. The templates in this interface are shown grouped by their SDK and area of func-tionality. However, as you can see in Figure 1.32, by comparing the descriptions of NSManagedObjectsubclass in the library and in the sheet, they are the same. The menu command gives you the organization by SDK and area, while the library pro-vides you with the ability to search with the filter at the bottom of the pane. The choice is yours.
FIGURE 1.32
▼
Code Snippet Library
Code snippets can only be dragged into text editing files. They provide common examples and templates. The pop-up menu lets you choose from iOS, Mac OS X, and your own snippets (which you can add).
If you select a code snippet, its code appears as shown in Figure 1.33. Sometimes, if you have just forgotten a small piece of syntax, this refresher is enough and you do not have to worry about actually dragging the snippet into your file. Other times, the snippet gets you started with your own programming.
Try It Yourself
Add Your Own Code to the Code Snippet Library
Add your own snippets to the library to save time or to enforce standards on your-self or your colleagues in a multiperson project. (A particularly useful snippet would be the copyright notice you place at the beginning of each file if you want to protect your work.) Here’s how:
1. Show the User section of the Code Snippet library. If necessary, show utili-ties and choose User from the pop-up menu at the top of the library pane.
2. Select the code you want to make into a snippet.
3. Drag the code into the Users pane of the code snippet library. It will appear FIGURE 1.33
Using Utilities—Libraries
394. Provide a title and summary. Also, check that the code is complete (check the first and last characters in case of sloppy mousing).
5. Provide the other information (optional). The more information you pro-vide, the more useful your snippet will be. In particular, specifying the lan-guage as shown in Figure 1.35 will remove it from the code snippet library for files that cannot use it. And, of course, a title other than My Code Snippet will increase the usability of the code.
FIGURE 1.34
Drag the code into the library.
FIGURE 1.35
6. Click Done, and your snippet is added to the library.
To change the snippet’s name, summary, or other data, select it and then click the Edit button, as shown previously in Figure 1.33. Click Done to save the changes.
Object Library
The Object library contains objects you use in building interfaces. This includes visi-ble interface elements, such as views and buttons, as well as objects that work behind the scenes, such as view controllers.
. See Hour 11, p. 189, and Hour 12, “Finding Your Way Around Interface Builder: The Code Story,” p. 209, for more details on developing your app’s interface.
Media Library
The Media library brings together media files (icons, sounds, and images) from your workspace or from the system. Particularly when you have large projects, this helps you keep things organized. It also means that in creating your file groups, you can organize them functionally rather than putting all media files in one group and all code files in another.
Using the Text Editor
The text editor in Xcode is similar to many text editors that you have probably used already. Two areas deserve your attention even if you are used to using text editors:
. Editing preferences—Xcode provides extensive preferences for displaying and auto-completing code. Even if you have used other text editors, take a quick look at these preferences so that you can find out what’s new in Xcode and, if you are used to another text editor, how to customize colors and behaviors to what you are used to.
Using the Text Editor
41such error is demonstrated in this line of code that almost every developer has typed more than once:
if ( x = 3 ) {...
That is a replacement statement, not a logical comparison. Fix-It would most likely suggest the following:
If ( x == 3 ) {...
Setting Editing Preferences
As in most Mac apps, preferences are set from the application menu (that is, the Xcode menu in this case). Tabs at the top let you set different collections of prefer-ences, and, as in the case of text editing, further tabs let you set more details such as the editing and indentation preferences.
Figure 1.36 shows the editing preferences. Most are familiar to users of other code text editors, but two may be new to you. The code folding ribbon appears to the right of the gutter and the left of the main text editing area. It lets you collapse blocks of code so you can focus on other areas. If the code folding ribbon is shown, you have a further option—to focus on code as you hover the pointer over it.
FIGURE 1.36
Figure 1.37 shows this behavior in action. Note the folded code in shouldAutorotateToInterfaceOrientation.
Many people have this option on at all times. As you move the mouse over code, you will quickly spot unmatched brackets or quotation marks because the highlight-ed block of code will be illogical.
Syntax-aware indenting can be set, as shown in Figure 1.38. Just as with the high-lighting of code in the code ribbon, this can provide an early warning of unbal-anced punctuation.
FIGURE 1.37
Highlight blocks of code by hovering over them.
FIGURE 1.38