Quick Installation Guide
Wireless-N Extender 300Mbps AC Passthrough MODEL NO: PWN3702P Version 1.20 (English / Indonesian)BEFORE GETTING STARTED
This document is designed to aid you to get started with the device. If you experience problems following these guides or need further information pertaining to the device, please visit our website at www.prolink2u.com. All specifications are subject to the manufacturer’s configuration at the time of shipping and may change without prior notice, written or otherwise.
1. Package Contents
EN 1
1 2
Items:
One (1) unit of PROLiNK® PWN3702P One (1) piece of Quick Installation Guide (QIG)
1 2
Note:
1. The illustrations in this document may appear different from your model.
2. If any of above item is not packed in your package when open, please consult your reseller immediately.
Quick Installation Guide Wireless-N Extender 300Mbps AC Passthrough MODEL NO: PWN3702P Version 1.10 (English / Indonesian)
BEFORE GETTING STARTED
This document is designed to aid you to get started with the device. If you experience problems following these guides or need further information pertaining to the device, please visit our website at www.prolink2u.com. All specifications are subject to the manufacturer’s configuration at the time of shipping and may change without prior notice, written or otherwise.
2. Overview
EN 2
Back View
Front View Left View Right View
5
Reset 4
Note:
The illustration in this document may appear different from your model. 1 2 3 4 5 AC Passthrough Socket
WPS : Press 1 second to trigger WPS function LED Indicators:
Power : On - Power On Off - Power Off WLAN : On - Wireless turn On
Off - Wireless turn Off WPS : On - WPS feature turn On
Off - WPS feature turn Off Blinking - WPS triggering Signal Strength : 1 LED On : Low Signal
2 LEDs On : Medium Signal 3 LEDs On : Good Signal 4 LEDs On : Excellent Signal
Reset : Press 1 - 5 seconds to reboot extender.
Press > 5 seconds to reset to factory default and reboot. AC Power Input
Caution : If the device is used wrongly, this may lead to personal injury and result in property damage Instructions Included : Read installation guide carefully to
avoid misuse of the device
Caution:
• The socket outlet of this device can only be connected with information technology equipment (I.T.E.).
• Connected equipment should not cause any hazard to the environment, personnel, other equipment and property when left unattended.
• The socket outlet on equipment forbids to insert to other equipment of wall plug (Direct Plug-in) or Power bar.
• The socket outlet only can insert power cord, The direction of power cord is drooping naturally, Power Cord length needs < 2M.
• The socket-outlet shall be installed near the equipment and shall be easily accessible • Maximum load: 12A.
2 WPS 1
3. Hardware Installation
EN 3
Router WiFi Range WiFi Extender Range
Laptop
Cable / DSL Modem Router
PWN3702P
4. Connecting to the Root AP
EN 4 Step 1. Plug the PWN3702P into the electrical socket and power on the electrical socket. The Power
LED on PWN3702P will illuminate. Wait until the WLAN and WPS LEDs light up.
Step 2. Press the Wi-Fi Protected Setup (WPS) button on your wireless router or root AP. Step 3. Press the WPS button of PWN3702P for 1 second until the WPS LED starts to blink.
Note 1. The Signal Strength LEDs will illuminate to show the link quality once connected to the root AP.
Note 2. Both buttons must be pressed within 2 minutes.
Method 1 : With WPS button
LOCATION 1 LOCATION 2
2
Minutes 2 seconds Within 2 Minutes 1 second WPS WPS WPS Wireless Router PWN3702P4. Connecting to the Root AP
EN 5 Step 1. Connect your computer to PWN3702P via wireless.
The wireless network (SSID) shall appear as “PROLiNK_xxxxxx”.
Note: The Wi-Fi Key or password can be found on the label pasted on PWN3702P.
Step 2. Open web browser and type http://192.168.123.253 in the browser’s address box. This
is the default IP address for PWN3702P.
The default user name is “admin” and password is “password”.
Step 3. Click on Quick Setup Wizard -> Start
Click <Next>, the extender will scan and find the available wireless network.
4. Connecting to the Root AP
EN 6
Select the wireless network or root AP that you want to connect to, and click on <Next>.
Key in the wireless password of the wireless router or root AP, and click on <Next> to proceed.
4. Connecting to the Root AP
EN 7
Check and confirm if the information are correct.
Click <Finish> and the PWN3702P will attempt to connect to the root AP.
Note: The Signal Strength LEDs will illuminate to show the link quality once connected to the root AP.
Important:
Please obtain the wireless password from the owner of the wireless router or root AP.
The extender will not able to connect to the wireless router or root AP if the password is incorrect.
Wireless Password History
1. 2. 3. 4. 5.ID 1
1. Isi kemasan
1 2
Catatan:
1. Ilustrasi didalam dokumen ini mungkin akan berbeda dari model perangkat yang Anda miliki.
2. Jika terdapat item diatas yang tidak ditemukan pada isi kemasan, silahkan untuk menhubungi dealer Anda secepatnya. Items:
1 Satu (1) unit PROLiNK® PWN3702P 2 Satu (1) buah Lembar Panduan Installasi
1 2
Indonesian
Quick Installation Guide Wireless-N Extender 300Mbps AC Passthrough MODEL NO: PWN3702P Version 1.10 (English / Indonesian)
BEFORE GETTING STARTED
This document is designed to aid you to get started with the device. If you experience problems following these guides or need further information pertaining to the device, please visit our website at www.prolink2u.com. All specifications are subject to the manufacturer’s configuration at the time of shipping and may change without prior notice, written or otherwise.
2. Penjelasa
ID 2 Catatan:
Ilustrasi didalam dokumen ini mungkin akan berbeda dari model perangkat yang Anda miliki.
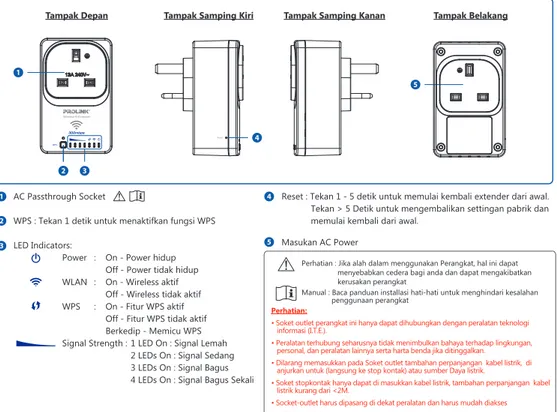
Tampak Belakang
Tampak Depan Tampak Samping Kiri Tampak Samping Kanan
2 WPS 1 2 3 Reset 4 1 2 3 4 5 AC Passthrough Socket
WPS : Tekan 1 detik untuk menaktifkan fungsi WPS LED Indicators:
Power : On - Power hidup Off - Power tidak hidup WLAN : On - Wireless aktif
Off - Wireless tidak aktif WPS : On - Fitur WPS aktif
Off - Fitur WPS tidak aktif Berkedip - Memicu WPS Signal Strength : 1 LED On : Signal Lemah
2 LEDs On : Signal Sedang 3 LEDs On : Signal Bagus 4 LEDs On : Signal Bagus Sekali
Reset : Tekan 1 - 5 detik untuk memulai kembali extender dari awal. Tekan > 5 Detik untuk mengembalikan settingan pabrik dan memulai kembali dari awal.
Masukan AC Power
Perhatian : Jika alah dalam menggunakan Perangkat, hal ini dapat menyebabkan cedera bagi anda dan dapat mengakibatkan kerusakan perangkat
Manual : Baca panduan installasi hati-hati untuk menghindari kesalahan penggunaan perangkat
Perhatian:
• Soket outlet perangkat ini hanya dapat dihubungkan dengan peralatan teknologi informasi (I.T.E.).
• Peralatan terhubung seharusnya tidak menimbulkan bahaya terhadap lingkungan, personal, dan peralatan lainnya serta harta benda jika ditinggalkan. • Dilarang memasukkan pada Soket outlet tambahan perpanjangan kabel listrik, di anjurkan untuk (langsung ke stop kontak) atau sumber Daya listrik.
• Soket stopkontak hanya dapat di masukkan kabel listrik, tambahan perpanjangan kabel listrik kurang dari <2M.
• Socket-outlet harus dipasang di dekat peralatan dan harus mudah diakses • Maksimum beban: 12A.
3. Instalasi Perangkat Keras
ID 3
Jangkauan Wifi Router Jangkauan WiFi Extender
Laptop
Cable / DSL Modem Router
PWN3702P
Smartphone Tablet
WPS
4. Bagaimana Cara Koneksi ke AP?
ID 4 Langkah 1. Pasang PWN3702P ke soket listrik dan hidupkan soket listrik. Lampu Power LED
menyala PWN3702P. Tunggu sampai indicator LED WLAN dan WPS LEDs menyala.
Langkah 2. Tekan tombol on Proteksi Wi-Fi Protected Setup (WPS) pada router nirkabel atau AP. Langkah 3. Tekan tombol WPS dari PWN3702P selama 1 detik sampai indicator LED WPS LED
berkedip, kemudian lepaskan tombol.
Catatan 1. Indikator LED kekuatan Signal akan menerangi untuk menunjukkan kualitas Jaringan pada saat terhubung ke AP.
Catatan 2. Kedua tombol harus di tekan dalam 2 menit.
Metode 1 : Dengan tombol WPS
LOKASI 1 LOKASI 2
2
Menit 2 detik Dalam 2 Menit 1 detik WPS WPS Wireless Router PWN3702P4. Bagaimana Cara Koneksi ke AP?
ID 5 Langkah 1. Hubungkan computer anda ke PWN3702P melalui jaringan nirkabel.
Nama Jaringan nirkabel (SSID) akan muncul sebagai “PROLiNK_xxxxxx”.
Catatan: Kunci Wi-Fi atau sandi dapat ditemukan pada label PWN3702P.
Langkah 2. Buka web browser dan ketikkan http://192.168.123.253 Pada kolom alamat browser.
Nomor ini adalah alamat IP address PWN3702P.
Nama asal adalah “admin” dan password adalah “password”.
langkah 3. Klik pada Quick Setup Wizard -> Start
Klik pada <Next>, Extender akan melakukan pencarian dan akan menemukan jaringan nirkabel yang ada.ID
Metode 2 : Dengan Konfigurasi melalui Web
4. Bagaimana Cara Koneksi ke AP?
ID 6
Pilih jaringan nirkabel atau AP yang akan anda hubungkan, dan klik pada <Next>.
Sandi Kunci pada jaringan nirkabel dari router nirkabel atau AP, dan klik pada <Next> untuk menjalankannya.
4. Bagaimana Cara Koneksi ke AP?
ID 7
Periksa dan pastikan apakah informasi sudah benar.
Klik <Finish> dan PWN3702P akan melakukan koneksi ke AP.
Catatan: Signal LED Strength akan menerangi untuk menunjukkan kualitas jaringan pada saat terhubung dengan AP.
Penting:
Silakan mendapatkan sandi nirkabel dari pemilik router nirkabel atau AP. Extender tidak akan dapat terhubung ke router atau AP nirkabel jika router nirkabel atau AP menggunakan kata sandi yang salah.
Catatan Sejarah Sandi Nirkabel
1. 2. 3. 4. 5.KETENTUAN GARANSI
Kami mengucapkan terima kasih atas kepercayaan Anda memilih produk kami dan selaku distributor di Indonesia, kami memberikan garansi produk selama1 (satu) tahun.
1. Garansi Hanya Berlaku Jika :
a. Diisi dengan jelas, lengkap dan benar.
b. Jika telah dikirimkan dan diterima oleh PT. Prolink Intidata Nusantara. c. Memperlihatkan kartu garansi asli dan nota pembelian pada saat klaim service. 2. Garansi Tidak Berlaku Apabila :
a. Kerusakan yang disebabkan oleh, kelalaian pemakai, bencana alam, kebakaran, tegangan listrik yang terlalu tinggi / rendah, terkena cairan.
b. Kerusakan yang diakibatkan karena transportasi / pengiriman, pemasangan / pengoperasian yang tidak sesuai dengan buku petunjuk, penyambungan dengan alat lain.
c. Barang yang diservice tidak sesuai dengan kartu garansi. d. Serial number rusak / robek / tidak ada.
3. Ruang Lingkup Garansi :
a. Garansi hanya mencakup bagian-bagian / komponen perangkat keras dari konfigurasi standar yang terdapat pada spesifikasi produk sesuai dengan faktur.
b. Khusus netbook garansi baterai hanya berlaku selama 6 bulan sejak tgl. pembelian.
* Biaya pengiriman ditanggung pembeli
Tel / Fax : Email :
PT. Prolink Intidata Nusantara Pelanggan Barang ————: Produk Nama ———: Name Model : S/N : Alamat ————: Address Tgl. Pembelian —————— : Purchase Date Dealer : ——— Toko : Kota : ——— City : Cap Toko
Kota: Kode Pos:
Tel / Fax : Email :
PT. Prolink Intidata Nusantara Pelanggan Barang ————: Produk Nama ———: Name Model : S/N : Alamat ————: Address Tgl. Pembelian —————— : Purchase Date Dealer : ——— Toko : Kota : ——— City : Cap Toko
Kota: Kode Pos:
Kepada Yth.
Customer Service
PT. PROLINK INTIDATA NUSANTARA
Jl. Cideng Barat No.79
Jakarta Pusat 10150 - Indonesia
KARTU GARANSI
Tempelkan perangko disini. Hanya untuk pengeposan
di Indonesia
Worldwide Customer Care Centers
INDONESIA Office
PT PROLiNK INTIDATA NUSANTARA
Walk-In : Jl. Cideng Barat No. 79, Jakarta Pusat 10150, Indonesia.
Telephone : +62 21 3483 1777
Email Support : [email protected]
MALAYSIA Office FIDA SYSTEMS (M) SDN BHD
Walk-In : 29 Jalan USJ 1/31, 47600 Subang Jaya, Selangor Darul Ehsan, Malaysia.
Telephone : +60 3 8024 9151
Email Support : [email protected]
SINGAPORE Office FIDA INTERNATIONAL (S) PTE LTD
Walk-In : Block 16 Kallang Place #06-02, Kallang Basin Industrial Estate, Singapore 339156.
Telephone : +65 6357 0668
Email Support : [email protected]
Technical Support Hotline
INDONESIA : +62 21 3483 1717
MALAYSIA : +60 3 8023 9151
SINGAPORE : +65 6357 0666
Note: Closed on Saturdays, Sundays and local/regional Public Holidays.
PROLiNK® is a trademark of FIDA INTERNATIONAL (S) PTE LTD and is manufactured under its authority. All other brands, products, services, logos and company names mentioned herein are trademarks of their respective owners. All specifications, designs and contents are subject to changes without prior notice. © Copyright 2013. PROLiNK® all rights reserved.