BAB 4
IMPLEMENTASI DAN EVALUASI
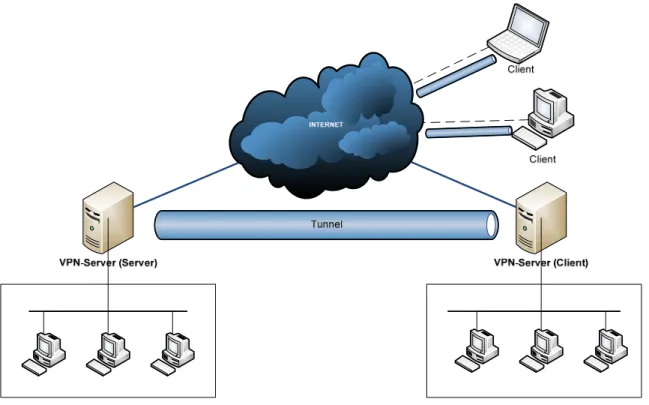
4.1 Perancangan Jaringan VPN
Perancangan VPN pada PT Eresha Education Indonesia menggunakan software
OpenVPN, dengan metode client-server dimana cabang samali sebagai server dan
cabang semanggi sebagai client. Berikut adalah skema sederhana jaringan VPN yang
telah dirancang :
Dengan rancangan jaringan seperti diatas, memungkinkan menambah jumlah
client sehingga dosen atau karyawan yang bertugas di luar daerah dapat mengakses data
yang berada pada jaringan kantor.
4.2 Hardware dan Software yang digunakan
4.2.1 Jaringan Internal Perusahaan
Hardware
Jumlah
Router SMC 3616PC 16 port 1
Unit
Dlink DES-1024D 24 port 2
Unit
3Com 3C16471 24 port 1
Unit
Prolink PSW-808 8 port 1
Unit
Dlink DES 1008D 8 port 4
Unit
Allied Telesis FSW 708 8 port 1
Unit
LinkSys WRT54GL
6 Unit
TABEL 4.1 Hardware yang Digunakan Eresha Samali
Hardware
Jumlah
Cisco catalyst 2600
1 Unit
LinkSys WRT54GL
2 Unit
Switch 3Com 16 port 4
Unit
TABEL 4.2 Hardware yang Digunakan Eresha Semanggi
4.2.2 Virtual Private Network
Berikut adalah hardware dan software yang digunakan dalam simulasi
VPN menggunakan OpenVPN pada PT. Eresha Education Indonesia:
• Komputer server
Hardware:
Processor
AMD Athlon 64 3000+ (1.8 Ghz)
Motherboard
DFI nF4 Ultra-D
Hardisk
80 Gb
NIC
2 x Dlink DFE-528TX 10/100 Mbps
Optical Drive
Pioneer DVD-RW
TABEL 4.3 Hardware yang Digunakan Oleh Server Dalam VPN
Software:
-
Operating System Linux Fedora Core 11
-
OpenVPN v2.1
-
VSFTPD
-
MUNIN
• Komputer client
Hardware:
Processor
INTEL DualCore 3.0 Ghz
Motherboard
Asus P5V-VMDH
Memory
1 Gb PC-5300
Hardisk
160 Gb
NIC
2 x Dlink DFE-528TX 10/100 Mbps
Optical Drive
LG DVD-RW
TABEL 4.4 Hardware yang Digunakan Oleh Client Dalam VPN
Software:
-
Operating System Windows XP SP2
-
OpenVPN 2.1.1
-
WinSCP
-
Putty
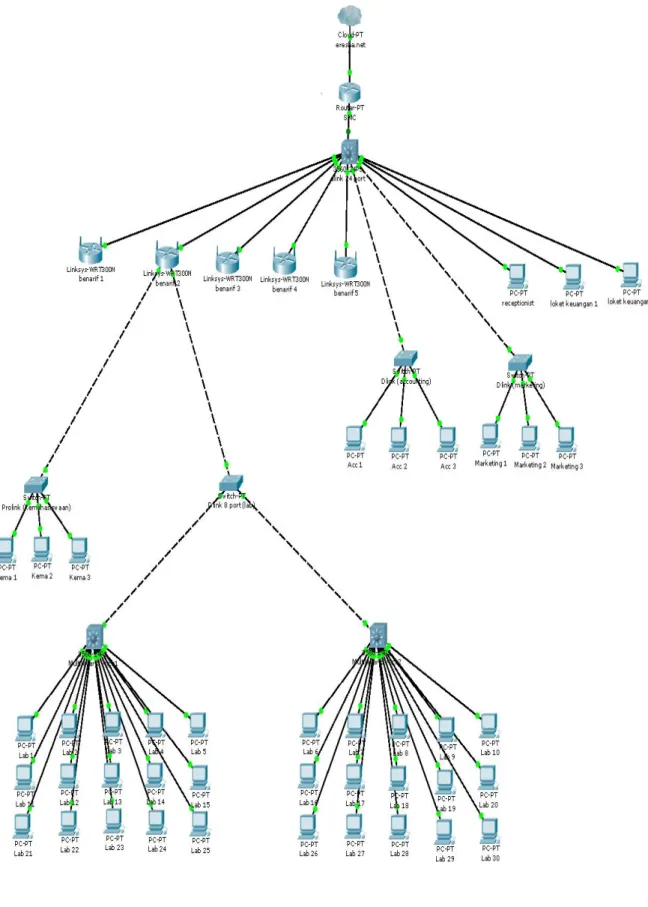
4.3 Perbaikan Jaringan Internal Eresha Samali
Gambar 4.2 Jaringan Internal Samali Sebelum Diperbaiki
Berikut adalah langkah-langkah yang dilakukan untuk memperbaiki jaringan
Eresha Samali:
1. Langkah pertama adalah menghubungkan langsung “Benarif 2” yang
sebelumnya terhubung dengan D-Link 4 port ke D-Link 24 port agar
pembagian bandwith lebih merata.
2. Access Point “Benarif 1” yang sebelumnya terhubung dengan Router SMC
dipindahkan ke D-Link 24 port. Karena apabila “Benarif 1” tersambung ke
Router SMC akan terjadi pembagian bandwith yang tidak merata antar Access
Point lainnya.
3. Access Point “Benarif 2” yang sebelumnya terhubung dengan switch
dipindahkan ke D-Link 24 port karena switch tersebut akan hilangkan untuk
memperpendek jalur koneksi data. Apabila switch tersebut masih digunakan
dapat membuat jalur koneksi data yang berasal dari eresha.net menjadi
panjang dan tidak efisien. Data yang berasal dari eresha.net akan langsung
disambungkan ke Router SMC.
4. Lalu langkah berikutnya adalah membenahi “Benarif 3” sampai “Benarif 5”.
Sebelumnya “Benarif 3” tersambung dengan “Benarif 4”, lalu “Benarif 4”
tersambung dengan “Benarif 5”, jaringan tersebut menjadi tidak efektif karena
terjadi pembagian bandwith yang tidak merata dan koneksi yang terjadi akan
panjang maka jaringan tersebut diubah menjadi setiap Benarif langsung
terhubung dengan D-Link 24 port. Gambar jaringan sebelum :
Gambar 4.4 Susunan Access Point Setelah Diperbaiki
5. Setelah dianalisa D-Link 4 port ternyata tidak berguna, maka tidak akan
digunakkan lagi. Sehingga Router SMC langsung terhubung dengan internet.
Pada halaman selanjutnya menampilkan jaringan Eresha Samali yang telah
diperbaiki.
4.4 Instalasi OpenVPN
Pada
dasarnya
software OpenVPN bersifat open source, untuk memperoleh
software tersebut dapat mengunduh langsung dari web resmi OpenVPN secara gratis.
Tetapi sebelum proses instalasi, sistem operasi yang digunakan baik pada Windows XP
atau pada Linux Fedora Core 11 harus mendukung beberapa persyaratan berikut:
1. Sistem harus mendukung driver Universal TUN/TAP
Kernel terbaru dari versi 2.4 dihampir semua distribusi modern Linux sudah
mendukung untuk perangkat TUN/TAP. Untuk proses Enabling Linux Kernel
Support for TUN/TAP Devices bisa didapatkan di:
http://vtun.sourceforce.net/tun/
.
2. Terdapat Library OpenSSL pada sistem yang digunakan
Pada umunya semua aplikasi pada sistem operasi modern mendukung kebutuhan
ini. Dalam proses penyusunan OpenVPN dari source program, pengembangan
SSL mungkin diperlukan. Web resmi dari OpenSSL adalah:
http://www.openssl.org
3. Harus menginstall Library LZO (Lempel-Ziv-Oberhumer) Compression
LZO adalah library kompresi real-time yang digunakan oleh openVPN untuk
mengkompres/memampatkan data sebelum proses pengiriman. Paket dapat
didapat pada:
http://openvpn.net/download.html
. Website dari LZO adalah:
http://www.oberhummer.com/opensource/lzo
Untuk memperoleh software GUI OpenVPN pada sistem operasi Windows XP
tersedia di alamat
http://openvpn.se/
Sistem operasi Linux Fedora Core 11 juga menyediakan program bantuan
installasi seperti YUM (Yellowdog Updater Modified) yang berbasis command line dan
dijalankan melalui terminal.
4.4.1 Instalasi OpenVPN pada Linux Fedora Core 11 Sebagai Server
1. Untuk menjalankan proses instalasi OpenVPN dengan menggunakan YUM,
terlebih dahulu harus log in sebagai administrator (root) :
2.
Jalankan YUM dengan format “yum install openvpn –y”, -y
mengasumsikan bahwa semua pertanyaan akan dijawab “yes”.
3. Proses instalasi OpenVPN :
Loaded plugins: refresh-packagekit
Error: Cannot retrieve repository metadata (repomd.xml) for repository: fedora. Please verify its path and try again [root@localhost ~]# yum install openvpn -y
Loaded plugins: refresh-packagekit
fedora/metalink | 11 kB 00:01 http://mirror.unej.ac.id/fedora/releases/11/Everything/i386/ os/repodata/repomd.xml: [Errno 4] IOError: <urlopen error [Errno -2] Name or service not known>
Trying other mirror.
fedora | 3.8 kB 00:00 fedora/primary_d | 8.4 MB 03:43 updat | 9.2 kB 00:02 http://repo.ugm.ac.id/fedora/updates/11/i386/repodata/repomd .xml: [Errno 4] IOError: <urlopen error [Errno -2] Name or service not known>
Trying other mirror.
updates | 4.4 kB 00:00 updates/primary_db | 4.8 MB 02:10 Setting up Install Process
Resolving Dependencies
--> Running transaction check
---> Package openvpn.i586 0:2.1-0.32.rc15.fc11 set to be updated
--> Processing Dependency: liblzo2.so.2 for package: openvpn --> Running transaction check
---> Package lzo.i586 0:2.03-2.fc11 set to be updated [eresha-samali@localhost ~]$ su
Password:
--> Finished Dependency Resolution Dependencies Resolved
============================================================ Package Arch Version Repository Size
============================================================ Installing:
openvpn i586 2.1-0.32.rc15.fc11 fedora 368 k Installing for dependencies:
lzo i586 2.03-2.fc11 fedora 68 k Transaction Summary
============================================================ Install 2 Package(s)
Update 0 Package(s) Remove 0 Package(s) Total download size: 436 k
Downloading Packages:
http://ftp.cuhk.edu.hk/pub/linux/fedora/releases/11/Everythi ng/i386/os/Packages/lzo-2.03-2.fc11.i586.rpm: [Errno 4] IOError: <urlopen error [Errno -2] Name or service not known>
Trying other mirror.
http://free.nchc.org.tw/fedora/linux/releases/11/Everything/ i386/os/Packages/lzo-2.03-2.fc11.i586.rpm: [Errno 4]
IOError: <urlopen error [Errno -2] Name or service not known>
Trying other mirror.
(1/2): lzo-2.03-2.fc11.i586.rpm | 68 kB 00:07 (2/2): openvpn-2.1-0.32.rc15.fc11.i586.rpm | 368 kB 00:42 --- Total 5.2 kB/s | 436 kB 01:24 warning: rpmts_HdrFromFdno: Header V3 RSA/SHA256 signature: NOKEY, key ID d22e77f2
fedora/gpgkey | 1.6 kB 00:00 Importing GPG key 0xD22E77F2 "Fedora (11)
<[email protected]>" from /etc/pki/rpm-gpg/RPM-GPG-KEY-fedora-i386
Running rpm_check_debug Running Transaction Test Finished Transaction Test Transaction Test Succeeded Running Transaction
Installing : lzo 1/2 Installing : openvpn 2/2 Installed: openvpn.i586 0:2.1-0.32.rc15.fc11 Dependency Installed: lzo.i586 0:2.03-2.fc11 Complete!
Pada tahap ini OpenVPN telah berhasil diinstal kedalam sistem. Untuk mengetahui
file-file OpenVPN yang terinstal pada sistem operasi Fedora Core 11,
menggunakan perintah “rpm -ql openvpn”.
[root@localhost ~]# rpm –ql openvpn /etc/openvpn /etc/rc.d/init.d/openvpn /usr/lib/openvpn /usr/lib/openvpn/plugin /usr/lib/openvpn/plugin/lib /usr/lib/openvpn/plugin/lib/openvpn-auth-pam.so /usr/lib/openvpn/plugin/lib/openvpn-down-root.so /usr/sbin/openvpn /usr/share/doc/openvpn-2.1 /usr/share/doc/openvpn-2.1/AUTHORS /usr/share/doc/openvpn-2.1/COPYING /usr/share/doc/openvpn-2.1/COPYRIGHT.GPL /usr/share/doc/openvpn-2.1/INSTALL /usr/share/doc/openvpn-2.1/PORTS /usr/share/doc/openvpn-2.1/README /usr/share/doc/openvpn-2.1/auth-pam.txt /usr/share/doc/openvpn-2.1/contrib /usr/share/doc/openvpn-2.1/contrib/README /usr/share/doc/openvpn-2.1/contrib/multilevel-init.patch /usr/share/doc/openvpn-2.1/contrib/openvpn-fwmarkroute-1.00 /usr/share/doc/openvpn-2.1/contrib/openvpn-fwmarkroute-1.00/README /usr/share/doc/openvpn-2.1/contrib/openvpn-fwmarkroute-1.00/fwmarkroute.down /usr/share/doc/openvpn-2.1/contrib/openvpn-fwmarkroute-1.00/fwmarkroute.up /usr/share/doc/openvpn-2.1/contrib/pull-resolv-conf /usr/share/doc/openvpn-2.1/contrib/pull-resolv-conf/client.down /usr/share/doc/openvpn-2.1/contrib/pull-resolv-conf/client.up /usr/share/doc/openvpn-2.1/down-root.txt /usr/share/doc/openvpn-2.1/sample-config-files /usr/share/doc/openvpn-2.1/sample-config-files/README /usr/share/doc/openvpn-2.1/sample-config-files/client.conf /usr/share/doc/openvpn-2.1/sample-config-files/firewall.sh /usr/share/doc/openvpn-2.1/sample-config-files/home.up /usr/share/doc/openvpn-2.1/sample-config-files/loopback-client /usr/share/doc/openvpn-2.1/sample-config-files/loopback-server
/usr/share/doc/openvpn-2.1/sample-config-files/office.up /usr/share/doc/openvpn-2.1/sample-config-files/openvpn-shutdown.sh /usr/share/doc/openvpn-2.1/sample-config-files/openvpn-startup.sh /usr/share/doc/openvpn-2.1/sample-config-files/roadwarrior-client.conf /usr/share/doc/openvpn-2.1/sample-config-files/roadwarrior-server.conf /usr/share/doc/openvpn-2.1/sample-config-files/server.conf /usr/share/doc/openvpn-2.1/sample-config-files/static-home.conf /usr/share/doc/openvpn-2.1/sample-config-files/static-office.conf /usr/share/doc/openvpn-2.1/sample-config-files/tls-home.conf /usr/share/doc/openvpn-2.1/sample-config-files/tls-office.conf /usr/share/doc/openvpn-2.1/sample-config-files/xinetd-client-config /usr/share/doc/openvpn-2.1/sample-config-files/xinetd-server-config /usr/share/doc/openvpn-2.1/sample-keys /usr/share/doc/openvpn-2.1/sample-keys/README /usr/share/doc/openvpn-2.1/sample-keys/ca.crt /usr/share/doc/openvpn-2.1/sample-keys/ca.key /usr/share/doc/openvpn-2.1/sample-keys/client.crt /usr/share/doc/openvpn-2.1/sample-keys/client.key /usr/share/doc/openvpn-2.1/sample-keys/dh1024.pem /usr/share/doc/openvpn-2.1/sample-keys/pass.crt /usr/share/doc/openvpn-2.1/sample-keys/pass.key /usr/share/doc/openvpn-2.1/sample-keys/pkcs12.p12 /usr/share/doc/openvpn-2.1/sample-keys/server.crt /usr/share/doc/openvpn-2.1/sample-keys/server.key /usr/share/doc/openvpn-2.1/sample-scripts /usr/share/doc/openvpn-2.1/sample-scripts/auth-pam.pl /usr/share/doc/openvpn-2.1/sample-scripts/bridge-start /usr/share/doc/openvpn-2.1/sample-scripts/bridge-stop /usr/share/doc/openvpn-2.1/sample-scripts/openvpn.init /usr/share/doc/openvpn-2.1/sample-scripts/openvpn.init.orig /usr/share/doc/openvpn-2.1/sample-scripts/ucn.pl /usr/share/doc/openvpn-2.1/sample-scripts/verify-cn /usr/share/man/man8/openvpn.8.gz /usr/share/openvpn /usr/share/openvpn/easy-rsa /usr/share/openvpn/easy-rsa/1.0 /usr/share/openvpn/easy-rsa/1.0/README /usr/share/openvpn/easy-rsa/1.0/build-ca /usr/share/openvpn/easy-rsa/1.0/build-dh /usr/share/openvpn/easy-rsa/1.0/build-inter /usr/share/openvpn/easy-rsa/1.0/build-key /usr/share/openvpn/easy-rsa/1.0/build-key-pass
/usr/share/openvpn/easy-rsa/1.0/build-key-pkcs12 /usr/share/openvpn/easy-rsa/1.0/build-key-server /usr/share/openvpn/easy-rsa/1.0/build-req /usr/share/openvpn/easy-rsa/1.0/build-req-pass /usr/share/openvpn/easy-rsa/1.0/clean-all /usr/share/openvpn/easy-rsa/1.0/list-crl /usr/share/openvpn/easy-rsa/1.0/make-crl /usr/share/openvpn/easy-rsa/1.0/openssl.cnf /usr/share/openvpn/easy-rsa/1.0/revoke-crt /usr/share/openvpn/easy-rsa/1.0/revoke-full /usr/share/openvpn/easy-rsa/1.0/sign-req /usr/share/openvpn/easy-rsa/1.0/vars /usr/share/openvpn/easy-rsa/2.0 /usr/share/openvpn/easy-rsa/2.0/Makefile /usr/share/openvpn/easy-rsa/2.0/README /usr/share/openvpn/easy-rsa/2.0/build-ca /usr/share/openvpn/easy-rsa/2.0/build-dh /usr/share/openvpn/easy-rsa/2.0/build-inter /usr/share/openvpn/easy-rsa/2.0/build-key /usr/share/openvpn/easy-rsa/2.0/build-key-pass /usr/share/openvpn/easy-rsa/2.0/build-key-pkcs12 /usr/share/openvpn/easy-rsa/2.0/build-key-server /usr/share/openvpn/easy-rsa/2.0/build-req /usr/share/openvpn/easy-rsa/2.0/build-req-pass /usr/share/openvpn/easy-rsa/2.0/clean-all /usr/share/openvpn/easy-rsa/2.0/inherit-inter /usr/share/openvpn/easy-rsa/2.0/list-crl /usr/share/openvpn/easy-rsa/2.0/openssl-0.9.6.cnf /usr/share/openvpn/easy-rsa/2.0/openssl.cnf /usr/share/openvpn/easy-rsa/2.0/pkitool /usr/share/openvpn/easy-rsa/2.0/revoke-full /usr/share/openvpn/easy-rsa/2.0/sign-req /usr/share/openvpn/easy-rsa/2.0/vars /usr/share/openvpn/easy-rsa/2.0/whichopensslcnf /var/run/openvpn
Tabel berikut menampilkan file dan direktori penting yang akan digunakan:
Lokasi dan File yang Ada
Fungsi/etc/openvpn /etc/init.d/openvpn /usr/sbin/openvpn /usr/share/doc/openvpn /usr/share/man/man8/openvpn.8.gz /usr/share/doc/openvpn/examples/sample-config-files /usr/share/doc/openvpn/examples/sample-keys /usr/share/doc/openvpn/examples/easy-rsa /usr/share/openvpn/verify-cn /usr/lib/openvpn/plugin/lib/openvpn-auth-pam.so /usr/lib/openvpn/plugin/lib/openvpn-down-root.so
Berisi konfigurasi file
Start/Stop script untuk services Binary file
File dokumentasi Halaman pentunjuk
File yang berisi contoh konfigurasi VPN
Contoh keys dan certificate
Kumpulan script yang digunakan untuk proses otentikasi
Fungsi verify-cn
Library untuk PAM-Authentication dan mode chroot
4.4.2 Instalasi OpenVPN pada Windows XP Sebagai Client
Setelah melakukan instalasi pada Linux, langkah selanjutnya adalah
melakukan instalasi OpenVPN pada Windows XP. Berikut adalah
langkah-langkah yang dilakukan :
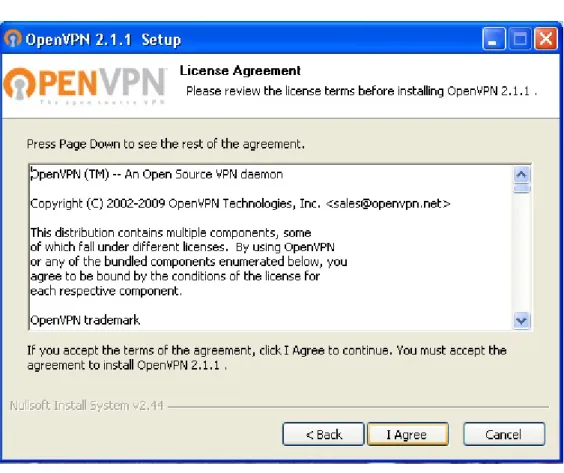
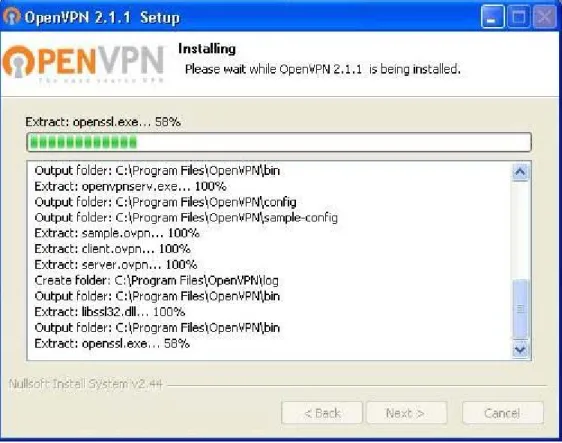
1. Langkah pertama adalah buka folder OpenVPN, lalu pilih “openvpn-2.1.1
gui-1.0.3-install.exe” lalu keluar jendela sebagai berikut. Pilih tombol next untuk
melajutkan instalasi.
2. Lalu keluar halaman License Agreement pilih tombol Next untuk melanjutkan
instalasi.
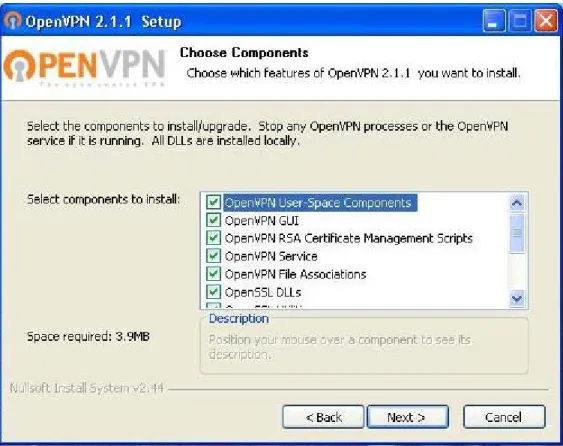
3. Langkah berikutnya adalah pemilihan komponen untuk instalasi, tidak perlu
diubah, lalu pilih tombol Next untuk melanjutkan.
4. Lalu pemilihan lokasi instalasi OpenVPN, pilih tombol Next untuk
melanjutkan.
5. Setelah memilih tombol Next, lalu proses instalasi dilakukan.
6. Setelah proses instalasi selesai, lalu pilih tombol Next untuk melanjutkan
instalasi.
7. Instalasi telah selesai dilakukan, tekan tombol finish untuk mengakhiri.
4.5 Konfigurasi OpenVPN
4.5.1 Pembuatan Key dan Sertifikat
Paket OpenVPN pada Linux Fedora Core 11 telah menyertakan beberapa
tool yang memudahkan pembuatan key dan sertifikat. Key dan sertifikat yang
dibutuhkan adalah sertifikat CA, sertifikat server, dh-key dan sertifikat client. Tool
untuk membuat key dan sertifikat tersebut (berupa script) berada dalam direktori
/usr/share/doc/openvpn/easy-rsa/2.0.
4.5.1.1 Menyiapkan Variabel dalam vars
Pindah ke direktori /usr/share/doc/openvpn/easy-rsa/2.0
[root@localhost ~]# cd /usr/share/openvpn/easy-rsa/2.0/ [root@localhost 2.0]# vi vars
Ubah file vars sesuai dengan kebutuhan.
export KEY_COUNTRY="ID" export KEY_PROVINCE="JKT"
export KEY_CITY="JakartaSelatan" export KEY_ORG="Eresha"
export KEY_EMAIL="[email protected]"
Lalu export variable vars.
[root@localhost 2.0]# . ./vars
NOTE: If you run ./clean-all, I will be doing a rm -rf on /usr/share/openvpn/easy-rsa/2.0/keys
[root@localhost 2.0]# ./clean-all [root@localhost 2.0]#
Di dalam direktori /usr/share/doc/openvpn/easy-rsa/2.0 terdapat script
clean-all yang berguna untuk menghapus semua keys dan konfigurasi sebelumnya
yang berada dalam direktori keys.
4.5.1.2 Membuat key Diffie-Hellman
Jalankan perintah “build-dh” untuk membuat key Diffie-Hellman.
Hasil operasi ini terdapat pada file dh1024.pem. Pembuatan key
Diffie-Hellman digunakan untuk menjalankan algoritma Diffie-Diffie-Hellman, yaitu
suatu mekanisme yang memungkinkan client dan server saling bertukar key
dengan aman.
[root@localhost 2.0]# ./build-dh
Generating DH parameters, 1024 bit long safe prime, generator 2
This is going to take a long time
...+...+... ...+...+... ...+...+... ...+.+... ...+... ...+...+... ... ...+...+...+... ...+...+...+... ...+... ...+...+.+... ... .+... ...+...+.... ...+....+...++*++*++* [root@localhost 2.0]#
4.5.1.3 Membuat Certificate Autority (CA)
Jalankan perintah “build-ca”. Akan ada beberapa yang harus dijawab.
Bila di dalam tanda kurung siku ( [ ] ) telah terdapat jawaban yang tepat
sesuai dengan konfigurasi dalam vars diatas lanjutkan dengan menekan
enter. Bila tidak, masukkan isi yang sesuai dengan kebutuhan.
[root@localhost 2.0]# ./build-ca Generating a 1024 bit RSA private key ...++++++
...++++++ writing new private key to 'ca.key'
---
You are about to be asked to enter information that will be incorporated
into your certificate request.
What you are about to enter is what is called a Distinguished Name or a DN.
There are quite a few fields but you can leave some blank For some fields there will be a default value,
If you enter '.', the field will be left blank. ---
Country Name (2 letter code) [ID]:
State or Province Name (full name) [JKT]: Locality Name (eg, city) [JakartaSelatan]: Organization Name (eg, company) [Eresha]:
Organizational Unit Name (eg, section) []:PT.EreshaEducation Common Name (eg, your name or your server's hostname)
[Eresha CA]: Name []:
Email Address [[email protected]]: [root@localhost 2.0]#
Hasilnya akan disimpan pada direktori keys dengan nama ca.crt dan ca.key.
4.5.1.4 Membuat key Server
Jalankan perintah “build-key-server”. Ada beberapa pertanyaan yang
harus di jawab. Bila didalam kurung siku ( [ ] ) terdapat jawaban yang tepat
lanjutkan dengan menekan enter. Selanjutnya terdapat pertanyaan untuk
memasukkan sebuah password. Masukkan sebuah password, dan ingatlah
secara otomatis men-sign sertifikat tersebut dengan menggunakan CA yang
telah dibuat.
Country [root@localhost 2.0]# ./build-key-server server Generating a 1024 bit RSA private key
...++++++
...++++++ writing new private key to 'Server.key' ---
You are about to be asked to enter information that will be incorporated
into your certificate request.
What you are about to enter is what is called a Distinguished Name or a DN.
There are quite a few fields but you can leave some blank For some fields there will be a default value,
If you enter '.', the field will be left blank. ---
Country Name (2 letter code) [ID]:
State or Province Name (full name) [JKT]: Locality Name (eg, city) [JakartaSelatan]: Organization Name (eg, company) [Eresha]:
Organizational Unit Name (eg, section) []: Common Name (eg, your name or your server's hostname) [server]:
Name []:
Email Address [[email protected]]:
Please enter the following 'extra' attributes to be sent with your certificate request A challenge password []:
An optional company name []:
Using configuration from /usr/share/openvpn/easy-rsa/2.0/openssl.cnf
Check that the request matches the signature Signature ok
The Subject's Distinguished Name is as follows countryName :PRINTABLE:'ID' stateOrProvinceName :PRINTABLE:'JKT' localityName :PRINTABLE:'JakartaSelatan' organizationName :PRINTABLE:'Eresha' commonName :PRINTABLE:'server' emailAddress :IA5STRING:'[email protected]' Certificate is to be certified until Dec 27 05:49:35 2019 GMT(3650 days)
Sign the certificate? [y/n]:y
1 out of 1 certificate requests certified, commit? [y/n]y Write out database with 1 new entries
Data Base Updated [root@localhost 2.0]#
Proses diatas menghasilkan file server.crt, server.csr dan server.key pada
direktori keys.
4.5.1.5 Membuat key Client
Proses pembuatan sertifikat dilanjutkan dengan pembuatan key client.
Proses ini diulang sebanyak jumlah client yang akan dibuat. Bila terdapat 20
client, maka tentu saja proses ini harus dilakukan sebanyak 20 kali.
[root@localhost 2.0]# ./build-key client1 Generating a 1024 bit RSA private key ...++++++
...++++++
writing new private key to 'client1.key' ---
You are about to be asked to enter information that will be incorporated
into your certificate request.
What you are about to enter is what is called a Distinguished Name or a DN.
There are quite a few fields but you can leave some blank For some fields there will be a default value,
If you enter '.', the field will be left blank. ---
Country Name (2 letter code) [ID]:
State or Province Name (full name) [JKT]: Locality Name (eg, city) [JakartaSelatan]: Organization Name (eg, company) [Eresha]: Organizational Unit Name (eg, section) []:
Common Name (eg, your name or your server's hostname) [client1]:
Name []:
Email Address [[email protected]]:
Please enter the following 'extra' attributes to be sent with your certificate request A challenge password []:
An optional company name []:
Using configuration from /usr/share/openvpn/easy-rsa/2.0/openssl.cnf
Check that the request matches the signature Signature ok
The Subject's Distinguished Name is as follows countryName :PRINTABLE:'ID' stateOrProvinceName :PRINTABLE:'JKT' localityName :PRINTABLE:'JakartaSelatan' organizationName :PRINTABLE:'Eresha' commonName :PRINTABLE:'client1' emailAddress :IA5STRING:'[email protected]'
Certificate is to be certified until Dec 27 05:50:16 2019 GMT (3650 days)
Sign the certificate? [y/n]:y
1 out of 1 certificate requests certified, commit? [y/n]y Write out database with 1 new entries
Data Base Updated
Proses diatas menghasilkan file client.crt, client.csr dan client.key pada
direktori keys.
4.5.2 Konfigurasi Server
Konfigurasi server OpenVPN terdapat pada server.conf di dalam
direktori /etc/share/doc/openvpn-2.1/sample-config-files. Copy file server.conf
ke dalam direktori /etc/openvpn/. Kemudian pindahkan folder keys yang sudah
dibuat di dalam direktori /etc/share/openvpn/2.0/ ke dalam direktori
/etc/openvpn/
[root@localhost ~]# cp /usr/share/doc/openvpn-2.1/sample-config-files/server.conf /etc/openvpn/
[root@localhost ~]# cp –r /etc/share/openvpn/2.0/keys/ /etc/keys/
Kemudian pindah ke direktori /etc/openvpn/ lalu edit file server.conf sesuai
dengan kebutuhan.
[root@localhost ~]# cd /etc/openvpn/ [root@localhost openvpn]# vi server.conf
port 1194 Proto tcp dev tun
ca keys/ca.crt
key keys/server.key dh keys/dh1024.pem server 10.8.0.0 255.255.255.0 ifconfig-pool-persist ippt.txt client-to-client keepalive 10 120 comp-lzo user nobody group nobody persist-key persist-tun status openvpn-status.log verb 3
Jalankan OpenVPN sebagai server dengan perintah “openvpn --config
server.conf”.
[root@localhost openvpn]# openvpn --config server.conf
Tue Dec 29 15:09:18 2009 OpenVPN 2.1_rc15 i586-redhat-linux-gnu [SSL] [LZO2] [EPOLL] built on Feb 26 2009
Tue Dec 29 15:09:18 2009 NOTE: OpenVPN 2.1 requires '--script-security 2' or higher to call user-defined scripts or
executables
Tue Dec 29 15:09:18 2009 Diffie-Hellman initialized with 1024 bit key
Tue Dec 29 15:09:18 2009 TLS-Auth MTU parms [ L:1542 D:138 EF:38 EB:0 ET:0 EL:0 ]
Tue Dec 29 15:09:18 2009 TUN/TAP device tun0 opened
Tue Dec 29 15:09:18 2009 TUN/TAP TX queue length set to 100 Tue Dec 29 15:09:18 2009 /sbin/ip link set dev tun0 up mtu 1500 Tue Dec 29 15:09:18 2009 /sbin/ip addr add dev tun0 local
10.8.0.1 peer 10.8.0.2
Tue Dec 29 15:09:18 2009 /sbin/ip route add 10.8.0.0/24 via 10.8.0.2
Tue Dec 29 15:09:18 2009 Data Channel MTU parms [ L:1542 D:1450 EF:42 EB:135 ET:0 EL:0 AF:3/1 ]
Tue Dec 29 15:09:18 2009 GID set to nobody Tue Dec 29 15:09:18 2009 UID set to nobody
Tue Dec 29 15:09:18 2009 Socket Buffers: R=[111616->131072] S=[111616->131072]
Tue Dec 29 15:09:18 2009 UDPv4 link local (bound): [undef]:1194 Tue Dec 29 15:09:18 2009 UDPv4 link remote: [undef]
Tue Dec 29 15:09:18 2009 MULTI: multi_init called, r=256 v=256 Tue Dec 29 15:09:18 2009 IFCONFIG POOL: base=10.8.0.4 size=62 Tue Dec 29 15:09:18 2009 IFCONFIG POOL LIST
Tue Dec 29 15:09:18 2009 client1,10.8.0.6 Tue Dec 29 15:09:18 2009 client2,10.8.0.10
4.5.2.1 Konfigurasi Firewall
Secara
default, firewall pada Linux Fedora Core 11 memblokir
tunnel yang akan digunakan untuk OpenVPN karena tidak didefinisikan
sebelumnya. Untuk dapat membuka blok tersebut, maka harus ditambahkan
aturan-aturan pada iptables.
[root@localhost ~]# iptables -I INPUT -i tun+ -j ACCEPT [root@localhost ~]# iptables -I INPUT -i tap+ -j ACCEPT [root@localhost ~]# iptables -I FORWARD -i tap+ -j ACCEPT [root@localhost ~]# iptables -I FORWARD -i tun+ -j ACCEPT [root@localhost ~]# iptables -I INPUT -i eth0 -j ACCEPT [root@localhost ~]# iptables -I FORWARD -i eth0 -j ACCEPT
Setelah melakukan konfigurasi tersebut diatas, maka firewall akan
membuka blok pada tunnel yang digunakan oleh OpenVPN dan jaringan
VPN sudah dapat melakukan koneksi.
4.5.3 Konfigurasi Client
Untuk menghubungkan client ke server, ada beberapa data yang harus di
pindahkan terlebih dahulu. Data-data tersebut adalah sebagai berikut :
• client1.crt
berisi sertifikat public OpenVPN yang digunakan pada client dalam
melakukan hubungan dengan server.
• client1.key
berisi sertifikat yang digunakan pada client untuk melakukan suatu enkripsi
data yang diperoleh dari server.
• ca.crt
merupakan sertifikat CA yang digunakan untuk verifikasi suatu sertifikat yang
diperoleh dari server dalam proses penyambungan yang sedang berlangsung.
Data-data tersebut merupakan sertifikat-sertifikat yang sebelumnya di telah dibuat
di server, lalu admin mengirim data-data tersebut ke masing-masing client agar
bisa saling terhubung antara client dan server.
Sama seperti server, client juga memiliki konfigurasi yang disimpan di direktori
C:\Program Files\OpenVPN\sample-config. Copy client.ovpn lalu pindahkan
kedalam direktori C:\Program Files\OpenVPN\config. Berikut adalah konfigurasi
yang dimiliki oleh client :
Client dev tun proto udp remote skripsi.dnslias.com 1194 resolv-retry infinite nobind persist-key persist-tun ca keys/ca.crt cert keys/client1.crt key keys/client1.key comp-lzo verb 3
Jalankan OpenVPN sebagai client, klik kanan pada gambar OpenVPN GUI yang
terdapat pada taskbar windows, lalu tekan connect.
Gambar 4.13 OpenVPN GUI Pada Windows
Setelah menekan connect maka OpenVPN akan mulai menjalankan koneksi sesuai
dengan konfigurasi yang telah ditetapkan sebelumnya.
Tue Dec 29 15:09:18 2009 NOTE: --user option is not implemented on Windows
Tue Dec 29 15:09:18 2009 NOTE: --group option is not implemented on Windows
Tue Dec 29 15:09:18 2009 OpenVPN 2.1.1 i686-pc-mingw32 [SSL] [LZO2] [PKCS11] built on Dec 11 2009
Tue Dec 29 15:09:18 2009 WARNING: No server certificate verification method has been enabled. See
http://openvpn.net/howto.html#mitm for more info.
Tue Dec 29 15:09:18 2009 NOTE: OpenVPN 2.1 requires '--script-security 2' or higher to call user-defined scripts or executables Tue Dec 29 15:09:18 2009 LZO compression initialized
Tue Dec 29 15:09:18 2009 Control Channel MTU parms [ L:1542 D:138 EF:38 EB:0 ET:0 EL:0 ]
Tue Dec 29 15:09:18 2009 Data Channel MTU parms [ L:1542 D:1450 EF:42 EB:135 ET:0 EL:0 AF:3/1 ]
Tue Dec 29 15:09:18 2009 Local Options hash (VER=V4): '41690919' Tue Dec 29 15:09:18 2009 Expected Remote Options hash (VER=V4): '530fdded'
Tue Dec 29 15:09:18 2009 Socket Buffers: R=[8192->8192] S=[8192->8192]
Tue Dec 29 15:09:18 2009 UDPv4 link local: [undef]
Tue Dec 29 15:09:18 2009 UDPv4 link remote: 192.168.2.4:1194 Tue Dec 29 15:09:18 2009 TLS: Initial packet from
192.168.2.4:1194, sid=5ff52512 348a70c7
Tue Dec 29 15:09:18 2009 VERIFY OK: depth=1,
/C=ID/ST=JKT/L=JakartaSelatan/O=Eresha/CN=Eresha_CA/emailAddress= [email protected]
Tue Dec 29 15:09:18 2009 VERIFY OK: depth=0,
Tue Dec 29 15:09:19 2009 Data Channel Encrypt: Cipher 'BF-CBC' initialized with 128 bit key
Tue Dec 29 15:09:19 2009 Data Channel Encrypt: Using 160 bit message hash 'SHA1' for HMAC authentication
Tue Dec 29 15:09:19 2009 Data Channel Decrypt: Cipher 'BF-CBC' initialized with 128 bit key
Tue Dec 29 15:09:19 2009 Data Channel Decrypt: Using 160 bit message hash 'SHA1' for HMAC authentication
Tue Dec 29 15:09:19 2009 Control Channel: TLSv1, cipher TLSv1/SSLv3 DHE-RSA-AES256-SHA, 1024 bit RSA
Tue Dec 29 15:09:19 2009 [server] Peer Connection Initiated with 192.168.2.4:1194
Tue Dec 29 15:09:21 2009 SENT CONTROL [server]: 'PUSH_REQUEST' (status=1)
Tue Dec 29 15:09:21 2009 PUSH: Received control message: 'PUSH_REPLY,route 10.8.0.0 255.255.255.0,topology net30,ping 10,ping-restart 120,ifconfig 10.8.0.6 10.8.0.5'
Tue Dec 29 15:09:21 2009 OPTIONS IMPORT: timers and/or timeouts modified
Tue Dec 29 15:09:21 2009 OPTIONS IMPORT: --ifconfig/up options modified
Tue Dec 29 15:09:21 2009 OPTIONS IMPORT: route options modified Tue Dec 29 15:09:21 2009 ROUTE default_gateway=192.168.2.1
Tue Dec 29 15:09:21 2009 TAP-WIN32 device [Local Area Connection 10] opened: \\.\Global\{1E0BFA36-05DE-4846-AB70-19C6C005A25A}.tap Tue Dec 29 15:09:21 2009 TAP-Win32 Driver Version 9.6
Tue Dec 29 15:09:21 2009 TAP-Win32 MTU=1500
Tue Dec 29 15:09:21 2009 Notified TAP-Win32 driver to set a DHCP IP/netmask of 10.8.0.6/255.255.255.252 on interface {1E0BFA36-05DE-4846-AB70-19C6C005A25A} [DHCP-serv: 10.8.0.5, lease-time: 31536000]
Tue Dec 29 15:09:21 2009 Successful ARP Flush on interface [327682] {1E0BFA36-05DE-4846-AB70-19C6C005A25A}
Tue Dec 29 15:09:25 2009 TEST ROUTES: 1/1 succeeded len=1 ret=1 a=0 u/d=up
Tue Dec 29 15:09:25 2009 C:\WINDOWS\system32\route.exe ADD 10.8.0.0 MASK 255.255.255.0 10.8.0.5
Tue Dec 29 15:09:25 2009 Route addition via IPAPI succeeded [adaptive]
Tue Dec 29 15:09:25 2009 Initialization Sequence Completed
Jika sudah muncul tulisan “Initialization Sequence Completed”, maka konfigurasi client
yang dibuat sudah benar dan client telah terhubung dengan server.
Gambar 4.14 Client Sudah Terhubung Pada Server VPN
4.6 Evaluasi
4.6.1 Uji Konektivitas Jaringan
Uji konektivitas dilakukan pada dua sisi, yaitu server dan client. Pada
server yang bersistem operasi Linux Fedora Core 11 menggunakan perintah
“ifconfig” untuk melihat statistik dari seluruh network device yang aktif, perintah
“route –n” untuk mendapatkan data numerik dari routing table sistem dan perintah
“ping” digunakan untuk menganalisa komunikasi antar komputer dalam sebuah
jaringan melalui protokol TCP/IP. Pada client yang bersistem operasi Windows
XP menggunakan perintah ipconfig untuk melihat statistik dari seluruh network
device yang aktif , perintah print route untuk mendapatkan data numerik, dan
perintah ping digunakan untuk mengecek komunikasi antar komputer dalam
sebuah jaringan melalui protokol TCP/IP .
Langkah pertama adalah pengecekan sistem alamat jaringan pada server
dengan menggunakan perintah ifconfig :
[root@localhost ~]#ifconfig
eth0 Link encap:Ethernet HWaddr 00:40:F4:D1:79:48 inet addr:192.168.2.4 Bcast:192.168.2.255 Mask:255.255.255.0
inet6 addr: fe80::240:f4ff:fed1:7948/64 Scope:Link UP BROADCAST RUNNING MULTICAST MTU:1500 Metric:1
RX packets:176885 errors:0 dropped:0 overruns:0 frame:0
carrier:0
collisions:0 txqueuelen:1000
RX bytes:159633596 (152.2 MiB) TX bytes:37218698 (35.4 MiB)
Interrupt:18 Base address:0xc000
eth1 Link encap:Ethernet HWaddr 00:1E:58:36:2D:CB UP BROADCAST MULTICAST MTU:1500 Metric:1
RX packets:0 errors:0 dropped:0 overruns:0 frame:0 TX packets:0 errors:0 dropped:0 overruns:0 carrier:0 collisions:0 txqueuelen:1000
RX bytes:0 (0.0 b) TX bytes:0 (0.0 b) Interrupt:19 Base address:0xc000
eth2 Link encap:Ethernet HWaddr 00:01:29:F6:8B:6F UP BROADCAST MULTICAST MTU:1500 Metric:1
RX packets:0 errors:0 dropped:0 overruns:0 frame:0 TX packets:0 errors:0 dropped:0 overruns:0 carrier:0 collisions:0 txqueuelen:1000
RX bytes:0 (0.0 b) TX bytes:0 (0.0 b) Interrupt:23 Base address:0xe000
Hasilnya memperilhatkan alamat IP jaringan (192.168.2.4) dan menunjukkan
sistem jaringan berjalan dengan baik. Selanjutnya jalankan perintahh “route –n”
untuk menampilkan routing table dari sistem jaringan server yang ada.
[root@localhost ~]#route –n
Destination Gateway Genmask Flags Metric Ref Use Iface 192.168.2.0 0.0.0.0 255.255.255.0 U 1 0 0 eth0 0.0.0.0 192.168.2.1 0.0.0.0 UG 0 0 0 eth0
Dapat dilihat dalam table diatas yang menghasilkan informasi mengenai
destination, gateway, netmask dan interface.
Baris ketiga menunjukkan semua traffic yang menuju jaringan 192.168.2.0
dikirim langsung menuju network interface eth0.
Baris keempat menujukkan semua traffic ke tujuan manapun akan dikirim
melalui default gateway 192.168.2.1 melalui interface eth0.
Dari hasil diatas telah terbukti tidak terjadi masalah pada sisi server. Lalu
jalankan perintah “ping” untuk mencoba apakah default gateway diatas
tersambung pada jaringan.
[root@localhost ~]#ping 192.168.2.1
PING 192.168.2.1 (192.168.2.1) 56(84) bytes of data. 64 bytes from 192.168.2.1: icmp_seq=1 ttl=64 time=1.80 ms 64 bytes from 192.168.2.1: icmp_seq=2 ttl=64 time=1.21 ms 64 bytes from 192.168.2.1: icmp_seq=3 ttl=64 time=1.19 ms 64 bytes from 192.168.2.1: icmp_seq=4 ttl=64 time=1.22 ms 64 bytes from 192.168.2.1: icmp_seq=5 ttl=64 time=1.21 ms 64 bytes from 192.168.2.1: icmp_seq=6 ttl=64 time=1.27 ms --- 192.168.2.1 ping statistics ---
6 packets transmitted, 6 received, 0% packet loss, time 5794ms rtt min/avg/max/mdev = 1.195/1.320/1.802/0.219 ms
Hasil ping membuktikan default gateway merespon jaringan keluar. Hasil
tersebut membuktikan bahwa jaringan server sudah berjalan dengan benar dan
tidak bermasalah. Kemudian uji konektivitas yang sama juga dilakukan pada sisi
client.
Gambar 4.16 Route Print Pada Sisi Client
Gambar 4.17 Ping Pada Sisi Client
Hasil diatas menunjukkan bahwa konfigurasi jaringan pada client sudah
berjalan dengan benar dan tidak bermasalah.
4.6.2 Analisa interface, Routing dan Koneksi Pada VPN
Setelah jaringan VPN terhubung, uji konektivitas pada server dan client sama
seperti sebelumnya hanya saja kali ini hasilnya lebih kompleks.
[root@localhost ~]# ifconfig
eth0 Link encap:Ethernet HWaddr 00:40:F4:D1:79:48 inet addr:192.168.2.4 Bcast:192.168.2.255 Mask:255.255.255.0
inet6 addr: fe80::240:f4ff:fed1:7948/64 Scope:Link UP BROADCAST RUNNING MULTICAST MTU:1500 Metric:1 RX packets:178820 errors:0 dropped:0 overruns:0 frame:0 TX packets:144828 errors:0 dropped:0 overruns:0 carrier:0 collisions:0 txqueuelen:1000
RX bytes:159843279 (152.4 MiB) TX bytes:37543172 (35.8 MiB) Interrupt:18 Base address:0xc000
eth1 Link encap:Ethernet HWaddr 00:1E:58:36:2D:CB UP BROADCAST MULTICAST MTU:1500 Metric:1
RX packets:0 errors:0 dropped:0 overruns:0 frame:0 TX packets:0 errors:0 dropped:0 overruns:0 carrier:0 collisions:0 txqueuelen:1000
RX bytes:0 (0.0 b) TX bytes:0 (0.0 b) Interrupt:19 Base address:0xc000
eth2 Link encap:Ethernet HWaddr 00:01:29:F6:8B:6F UP BROADCAST MULTICAST MTU:1500 Metric:1
RX packets:0 errors:0 dropped:0 overruns:0 frame:0 TX packets:0 errors:0 dropped:0 overruns:0 carrier:0 collisions:0 txqueuelen:1000
RX bytes:0 (0.0 b) TX bytes:0 (0.0 b) Interrupt:23 Base address:0xe000
lo Link encap:Local Loopback
inet addr:127.0.0.1 Mask:255.0.0.0 inet6 addr: ::1/128 Scope:Host
UP LOOPBACK RUNNING MTU:16436 Metric:1
RX packets:62844 errors:0 dropped:0 overruns:0 frame:0 TX packets:62844 errors:0 dropped:0 overruns:0 carrier:0 collisions:0 txqueuelen:0
RX bytes:8601235 (8.2 MiB) TX bytes:8601235 (8.2 MiB)
tun0 Link encap:UNSPEC HWaddr 00-00-00-00-00-00-00-00-00-00-00-00-00-00-00-00
inet addr:10.8.0.1 P-t-P:10.8.0.2 Mask:255.255.255.255 UP POINTOPOINT RUNNING NOARP MULTICAST MTU:1500 Metric:1 RX packets:87335 errors:0 dropped:0 overruns:0 frame:0 TX packets:55447 errors:0 dropped:0 overruns:0 carrier:0 collisions:0 txqueuelen:100
RX bytes:98535290 (93.9 MiB) TX bytes:13208992 (12.5 MiB)
Dari hasil diatas, disimpulkan bahwa server mempunyai tiga network interface
card eth0 dengan IP 192.168.2.4, eth1 dan eth2. Ditambah dengan tunnel dari
[root@localhost ~]# route –n Kernel IP routing table
Destination Gateway Genmask Flags Metric Ref Use Iface 10.8.0.2 0.0.0.0 255.255.255.255 UH 0 0 0 tun0 192.168.2.0 0.0.0.0 255.255.255.0 U 1 0 0 eth0 10.8.0.0 10.8.0.2 255.255.255.0 UG 0 0 0 tun0 0.0.0.0 192.168.2.1 0.0.0.0 UG 0 0 0 eth0
Hasil diatas adalah routing table setelah VPN dijalankan. Dapat dilihat adanya
tambahan dua informasi baru pada interface tun0. 10.8.0.2 dan 10.8.0.0
menunjukkan environtment dari VPN. Berdasarkan ifconfig dapat diketahui ip
tunnel computer server adalah 10.8.0.1
Kemudian jalankan perintah ping untuk mengetahui koneksi tunnel antara
client dan server. Sebelumnya untuk mengetahui IP tunnel client yang terhubung
dengan server, dapat dilihat dalam file openvpn-status.log yang terdapat pada
direktori /etc/openvpn.
[root@localhost ~]# cat /etc/openvpn/openvpn-status.log OpenVPN CLIENT LIST
Updated,Wed Dec 30 18:25:09 2009
Common Name,Real Address,Bytes Received,Bytes Sent,Connected Since
client2,116.68.163.2:53869,143041,234356,Wed Dec 30 16:32:28 2009 client1,116.68.163.2:51478,8733,9569,Wed Dec 30 18:16:49 2009 ROUTING TABLE
Virtual Address,Common Name,Real Address,Last Ref
10.8.0.10,client2,116.68.163.2:53869,Wed Dec 30 18:24:33 2009 10.8.0.6,client1,116.68.163.2:51478,Wed Dec 30 18:18:53 2009 GLOBAL STATS
Max bcast/mcast queue length,1 END
Setelah itu ping IP tunnel client dari sisi server untuk mengetahui apakah
koneksi server-client telah berjalan.
[root@localhost ~]# ping –c 6 10.8.0.6
PING 10.8.0.6 (10.8.0.6) 56(84) bytes of data.
64 bytes from 10.8.0.6: icmp_seq=1 ttl=128 time=64.9 ms 64 bytes from 10.8.0.6: icmp_seq=2 ttl=128 time=64.8 ms 64 bytes from 10.8.0.6: icmp_seq=3 ttl=128 time=55.1 ms 64 bytes from 10.8.0.6: icmp_seq=4 ttl=128 time=67.6 ms
IP tunnel client
64 bytes from 10.8.0.6: icmp_seq=5 ttl=128 time=52.5 ms 64 bytes from 10.8.0.6: icmp_seq=6 ttl=128 time=56.4 ms --- 10.8.0.6 ping statistics ---
6 packets transmitted, 6 received, 0% packet loss, time 5555ms rtt min/avg/max/mdev = 52.509/60.258/67.625/5.748 ms
[root@localhost ~]# ping –c 6 10.8.0.10
PING 10.8.0.10 (10.8.0.10) 56(84) bytes of data.
64 bytes from 10.8.0.10: icmp_seq=1 ttl=128 time=100 ms 64 bytes from 10.8.0.10: icmp_seq=2 ttl=128 time=48.6 ms 64 bytes from 10.8.0.10: icmp_seq=3 ttl=128 time=49.7 ms 64 bytes from 10.8.0.10: icmp_seq=4 ttl=128 time=51.3 ms 64 bytes from 10.8.0.10: icmp_seq=5 ttl=128 time=63.7 ms 64 bytes from 10.8.0.10: icmp_seq=6 ttl=128 time=48.5 ms --- 10.8.0.10 ping statistics ---
6 packets transmitted, 6 received, 0% packet loss, time 5056ms rtt min/avg/max/mdev = 48.575/60.403/100.340/18.611 ms
Selanjutnya ping IP server dari sisi client untuk mengetahui apakah koneksi
client-server telah berjalan.
4.7 File Transfer
Dalam jaringan komputer proses transfer file salah satunya dapat ditangani
melalui protocol FTP (File Transfer Protocol). Oleh sebab itu, diperlukan FTP Server
yang berfungsi untuk melayani permintaan koneksi client melalui protokol FTP. Vsftpd
(Very Secure File Transfer Protocol Daemon) adalah salah satu aplikasi untuk
menjalankan FTP Server. Selain aplikasi tersebut cukup ringan dan mudah untuk
dikonfigurasi, performa dan keamanannya cukup baik. Vsftpd juga memungkinkan
untuk anonymous user dan non-anonymous user untuk login bersamaan.
Setelah
FTP
Server dijalankan pada sisi server VPN, client dapat melakukan
download file memakai browser. Percobaan berikut menunjukan bahwa client akan
mendownload salah satu file yang berada pada komputer server menggunakan Mozilla
Firefox sebagai browser.
Gambar 4.20 Direktori Server
4.8 Monitoring Jaringan
Salah satu tool monitoring jaringan yang tersedia dalam sistem operasi Linux
adalah munin. Munin berisi proses analisa traffic yang terdiri dari data server yang
dikorelasikan berdasarkan sumber dari sistem Linux ataupun pada Windows. Gambar
dibawah adalah interface munin dari sisi client pada network internet card eth0 di
server.
Gambar 4.22 Monitoring Jaringan Menggunakan Munin
Monitoring jaringan dilakukan menggunakan Munin karena software tersebut
bukan hanya dapat melihat traffic jaringan tetapi juga dapat melihat penggunaan
memory, penggunaan CPU, jumlah proses yang berjalan, dan sebagainya. Fitur yang
ada disediakan oleh Munin lebih beragam dibandingkan dengan software monitoring
serupa, seperti MRTG (Multi Router Traffic Grapher).
4.9 Keamanan Jaringan
Secara garis besar tujuan utama dari keamaanan jaringan komputer dibagi
menjadi tiga bagian yang saling berkaitan satu sama lain, yaitu Confidentiality, integrity,
availability.
4.9.1 Confidentiality
Confidentiality berarti menjaga sedemikian rupa kerahasiaan informasi
yang dikirimkan melalui jaringan komputer sehingga tidak dapat diketahui oleh
pihak yang tidak berhak mengetahui informasi tersebut. Dalam OpenVPN, untuk
menjaga data agar bisa memenuhi target confidentiality adalah dengan cara
menekripsi paket data tersebut. Untuk menganalisa paket data yang keluar melalui
jaringan VPN maka diperlukan software Wireshark Network Analyzer .
Media Transmisi
Security Data Modifikasi Data Keterangan
Jalur Public (Internet) Minim Security, hanya pada aplikasi tertentu menyediakan full-security Tidak dienkripsi Besar peluang untuk memodifikasi data yang lalu lalang, karena data tidak dienkripsi. Capturing data menggunakan software Wireshark Virtual Private Network Full-security Dienkripsi Memperkecil peluang untuk memodifikasi data yang lalu lalang, karena data di enkripsi terlebih dahulu.
Analisa data yang pertama dilakukan dengan software MSN Messenger
untuk berkomunikasi mengunakan jaringan internet bebas tanpa melalui jaringan
VPN.
Gambar 4.23 Chat Menggunakan MSN Messenger
Gambar 4.24 Capturing Data Menggunakan Wireshark
Wireshark menyediakan fitur follow TCP Stream untuk merangkum data yang
berhasil didapat.
Hasil diatas menyimpulkan bahwa komunikasi yang dilakukan
menggunakan MSN Messenger melalui jaringan internet bebas tidak aman, karena
dapat dengan mudah di baca oleh pihak yang tidak berhak atas data tersebut.
Analisa data kedua dilakukan dengan software Yahoo! Messenger untuk
berkomunikasi mengunakan jaringan internet bebas tanpa melalui jaringan VPN.
Gambar 4.26 Chat Menggunakan Yahoo! Messenger
Gambar 4.27 Capturing Data Menggunakan Wireshark
Dengan menggunakan follow TCP Stream data dapat lebih mudah terbaca.
Ternyata berkomunikasi menggunakan Yahoo! Messenger dan MSN Messenger
tidak aman, karena isi dari data yang lalu lalang dalam jaringan internet dapat
dengan mudah ditangkap oleh Wireshark.
Analisa data berikutnya dengan mengunakan Software p300 untuk
berkomunikasi melalui jaringan VPN.
Gambar 4.29 Tampilan Software p300
Compaq-eki adalah nama hosts yang berada pada jaringan VPN. Kemudian
dilakukan proses pertukaran data melalui fitur chat.
Gambar 4.30 Chat Menggunakan p300
Di bawah ini adalah kumpulan data yang berhasil ditangkap oleh Wireshark.
Dengan menggunakan fitur Follow UDP Stream data dapat lebih mudah terbaca.
Gambar 4.32 Follow UDP Stream Di Wireshark
Dapat dilihat bahwa data yang berhasil ditangkap oleh Wireshark adalah data yang
telah dienkripsi, sehingga data tidak mudah untuk dibaca/diedit oleh pihak yang
tidak bertanggung jawab.
4.9.2 Integrity
Dalam aspek ini menekankan bahwa informasi yang diterima oleh pihak
penerima harus sama dengan informasi yang telah dikirim oleh pihak pengirim.
Informasi tidak boleh diubah tanpa seijin pemilik informasi, artinya informasi
yang dikirimin tidak akan mengalami perubahan yang mungkin dilakukan oleh
pihak yang tidak bertanggung jawab. Seandainya informasi mengalami perubahan
dalam proses pengiriman, pihak penerima harus mengetahui perubahan tersebut.
Untuk mencapai tujuan tersebut OpenVPN mengunakan enkripsi untuk memecah
informasi agar tidak mudah dibaca/dimodifikasi pihak yang tidak berhak atas
informasi tersebut.
4.9.3 Availability
Aspek ini berhubungan dengan ketersediaan informasi ketika dibutuhkan.
Karena OpenVPN mengunakan media internet, jadi ketersediaan informasi akan
selalu terjaga apabila jaringan internet berjalan dengan baik. Ketika diperlukan
untuk mengakses jaringan internal kantor untuk untuk memperoleh informasi,
informasi akan selalu tersedia.
4.10 Kompresi Jaringan
TABEL 4.7 Kompresi Pada VPN
Keterangan:
File A : linux dictionary.pdf
File B : BAB 1 2 3skripsi 2009.docx
File C : Jason Mraz ft. Colbie Caillat - Lucky.mp3
File D : Facebook - Videos Posted by Emir Ferdian Vichary- Grand Father Funeral @
TMP Kalibata.mp4
File Jenis Ukuran (asli)
Received Data Pemakaian Jaringan Kompresi (%) Sebelum Sesudah File A PDF 8,624,356 5,389,312 12,407,808 7,018,496 19 File B Ms. Office 1,868,926 13,687,808 15,099,904 1,412,096 24 File C File Musik 5,279,851 15,186,944 19,580,928 4,393,984 17 File D Video 5,229,559 22,769,664 27,155,456 4,385,792 16