JUMP START
COFFEESCRIPT
Jump Start CoffeeScript
by Earle Castledine
Copyright©2012 SitePoint Pty. Ltd.
Expert Reviewer: Craig Sharkie Product Manager: Simon Mackie
English Editor: Kelly Steele Technical Editor: Diana MacDonald
Cover Designer: Alex Walker Assistant Technical Editor: Ben Axnick
Indexer: Glenda Browne
Notice of Rights
All rights reserved. No part of this book may be reproduced, stored in a retrieval system or transmitted in any form or by any means, without the prior written permission of the publisher, except in the case of brief quotations embodied in critical articles or reviews.
Notice of Liability
The author and publisher have made every effort to ensure the accuracy of the information herein. However, the information contained in this book is sold without warranty, either express or implied. Neither the authors and SitePoint Pty. Ltd., nor its dealers or distributors will be held liable for any damages to be caused either directly or indirectly by the instructions contained in this book, or by the software or hardware products described herein.
Trademark Notice
Rather than indicating every occurrence of a trademarked name as such, this book uses the names only in an editorial fashion and to the benefit of the trademark owner with no intention of infringement of the trademark.
Published by SitePoint Pty. Ltd.
48 Cambridge Street Collingwood VIC Australia 3066 Web: www.sitepoint.com Email: business@sitepoint.com
ISBN 978-0-9872478-2-7 (print)
Dedication
To Amelia: If I could write, I’d write a book for you.
About the Author
Sporting a Masters in Information Technology and a lifetime of experience on the Web of Hard Knocks, Earle Castledine (aka Mr Speaker) holds an interest in everything computery. Raised in the wild by various 8-bit home computers, he settled in the Internet during the mid-nineties and has been living and working there ever since.
A senior systems analyst and JavaScript flâneur, he is equally happy in the muddy pits of .NET code, the dense foliage of mobile apps and games, and the fluffy clouds of client-side interaction development.
As co-creator of client-side opus http://www.turntubelist.com/, as well as many web-based experiments, Earle recognizes the Internet not as a lubricant for social change, but as a vehicle for unleashing frivolous ECMAScript gadgets and interesting time-wasting technologies.
About the Expert Reviewer
Craig was once happy to call himself a developer, speaker, author, and advocate. Since then, he’s added JS meet founder and JSConf organizer to the list—and expert reviewer. Should you add husband and father, and you’d be getting closer to working out why he’s often un-reasonably happy. In 2000, he was asked by short-sighted bosses where he wanted to be in five years’ time, and twelve years on he’s still doing the same thing—working with languages he loves in a community that expands on possibilities as fast as it creates them.
About SitePoint
SitePoint specializes in publishing fun, practical, and easy-to-understand content for web professionals. Visit http://www.sitepoint.com/ to access our blogs, books, newsletters, articles, and community forums. You’ll find a stack of information on JavaScript, PHP, Ruby, Mobile, design, and more.
About Jump Start
Preface
. . . ix
Who Should Read This Book . . . ix
Conventions Used . . . ix
Code Samples . . . ix
Tips, Notes, and Warnings . . . xi
Supplementary Materials . . . xi
Challenge Yourself . . . xii
Friends of SitePoint . . . xii
Chapter 1
Getting Started
. . . 1
HTML5 Game Jam Challenge . . . 2
The Basics . . . 3
Missing Cruft . . . 6
Whitespace . . . 6
Comments . . . 7
Types, Variables, and Scope . . . 7
Functions . . . 8
Starting the Game Project . . . 10
Installing: an Overview . . . 10
Client-side Compilation on the Fly . . . 11
Installing CoffeeScript Properly . . . 13
Choosing Our Tech . . . 16
Document Object Model . . . 17
Canvas . . . 18
Further Options . . . 19
Drawing Something: Using Canvas . . . 20
Chapter 2
CoffeeScript Fundamentals
. . . 23
More of the Basics . . . 24
Setting Up Our Project . . . 24
alert
versus
console.log. . . 25
Returning to JavaScript . . . 27
Strings . . . 27
Conditionals and Operators . . . 28
Loops and Ranges . . . 31
Objects and Arrays . . . 33
Introducing Professor Digman-Rünner . . . 35
The Canvas API . . . 36
Context and Soaking up Nulls . . . 37
Drawing Primitives . . . 40
Draw an Image . . . 42
Processing a Sprite Sheet . . . 43
Random Map . . . 44
Ready to Rumble . . . 46
Chapter 3
Features to Boost Your Game
. . . 47
Team Meeting . . . 47
Functions Revisited . . . 48
Default Argument Values . . . 49
Function Gotchas . . . 51
List Comprehensions . . . 53
Creating a Level . . . 55
Building Larger Projects . . . 58
Removing the Safety Wrapper . . . 59
Compiling a List of Files . . . 60
Getting Serious with Cake . . . 61
Dispatching with Switch . . . 63
Adding the Professor . . . 64
And There Was Light! . . . 66
Chapter 4
Game Loop and Classes
. . . 67
The Game Loop . . . 67
Improving Our Loop . . . 68
Looping with
RequestAnimationFrame. . . 70
Classes . . . 71
Constructor and Auto Properties . . . 73
Class Inheritance . . . 74
Game Classes . . . 77
The Level Class . . . 77
The Block Class . . . 80
Loading Levels . . . 82
Driving a Level . . . 85
Kicking It All Off . . . 86
Adding New Blocks . . . 88
Stay Classy . . . 90
Chapter 5
Bringing a Game to Life
. . . 91
Block Collision Detection . . . 91
Destructured Assignment 1: Arrays . . . 95
Splats . . . 99
Gravity . . . 100
Ladders . . . 103
Collecting . . . 107
Testing Class Types . . . 107
Collision . . . 110
Destructured Assignment 2: Objects . . . 113
Adding the AI Rules into the Code . . . 115
Power to the Professor . . . 117
Digging Holes . . . 117
Building Blocks . . . 119
Set for Life . . . 120
Chapter 6
CoffeeScript and HTML5 FX
. . . 121
HTML-ifying things . . . 121
Using jQuery . . . 122
CSS Effects . . . 125
Canvas Scrolling . . . 127
Audio and Sound Effects . . . 128
Animation . . . 130
Walk Animation . . . 131
Falling Animation . . . 132
Screens and Dialogs . . . 133
Particles . . . 141
Game Over . . . 144
Chapter 7
Epilogue
. . . 145
And on the Seventh Day ... . . 145
CoffeeScript is “a little language that compiles into JavaScript.”1It aims to smooth over some of JavaScript’s rougher edges while highlighting and augmenting the impressive flexibility at the core of the JavaScript language. It’s clean, concise, and maintainable, and makes writing client-side code really,reallyfun.
Jump Start CoffeeScriptis a book about CoffeeScript. Its goal is to help you become productive with CoffeeScript as quickly as possible. From the first line in the book, you’ll be writing code that shows just how easy it is to take the plunge into this delightfully addictive world.
Along the way, we’ll make a game. Not just the outer husk of a boring space-based shoot ’em up, but a complete, extensible HTML5 game with tile maps, particle effects, AI, and (of course) ninjas. You’ll see how CoffeeScript’s succinctness and elegance is the perfect partner for effectively prototyping and refining your ideas.
That’s it. By the end of this book, you’ll know how to make HTML5 games, and proficiently code (and think) in CoffeeScript, as well as have a deeper understanding of the power and beauty of JavaScript itself.
Who Should Read This Book
If you have some knowledge of web programming concepts and want to streamline writing JavaScript, this book is for you.
Conventions Used
You’ll notice that we’ve used certain typographic and layout styles throughout this book to signify different types of information. Look out for the following items.
Code Samples
<h1>A Perfect Summer's Day</h1>
<p>It was a lovely day for a walk in the park. The birds were singing and the kids were all back at school.</p>
If the code is to be found in the book’s code archive, the name of the file will appear at the top of the program listing, like this:
example.css
.footer {
background-color: #CCC; border-top: 1px solid #333; }
If only part of the file is displayed, this is indicated by the wordexcerpt:
example.css (excerpt)
border-top: 1px solid #333;
If additional code is to be inserted into an existing example, the new code will be displayed in bold:
function animate() {
new_variable = "Hello";
}
Also, where existing code is required for context, rather than repeat all the code, a
⋮ will be displayed:
function animate() { ⋮
return new_variable;
}
URL.open("http://jspro.com/raw-javascript/how-to-create-custom-even ➥ts-in-javascript/");
Tips, Notes, and Warnings
Hey, You!
Tips will give you helpful little pointers.
Ahem, Excuse Me …
Notes are useful asides that are related—but not critical—to the topic at hand. Think of them as extra tidbits of information.
Make Sure You Always …
… pay attention to these important points.
Watch Out!
Warnings will highlight any gotchas that are likely to trip you up along the way.
Supplementary Materials
http://www.sitepoint.com/books/coffeescript1/
The book’s website, containing links, updates, resources, and more.
http://www.sitepoint.com/books/coffeescript1/code.php
The downloadable code archive for this book.
http://www.sitepoint.com/forums/forumdisplay.php?15-JavaScript-amp-jQuery
SitePoint’s JavaScript forum, for help on any tricky CoffeeScript problems.
books@sitepoint.com
Challenge Yourself
Once you’ve mastered CoffeeScript, test yourself with our online quiz. With questions based on the book’s content, only true CoffeeScript champions can achieve a perfect score. Head on over to http://quizpoint.com/#categories/COFFEESCRIPT.
Friends of SitePoint
Chapter
1
Getting Started
CoffeeScript is a programming language that looks like this:
hello = (name) ->
alert "Hello, #{name}!" hello "World"
Here, we’re defining and then calling a function,hello, which accepts a single parameter,name, and is displayed in an annoying fashion on the screen (viaalert). If you’re a coder, you’ve probably identified a few interesting elements in this piece of code. Indeed, one of this book’s goals is to thoroughly explore the syntactic and pragmatic choices that make CoffeeScript an interesting programming language.
Why write a language that’s simply a copy of another language? Because the primary purpose of CoffeeScript is to be a simpler version of JavaScript. CoffeeScript aims to highlight and streamline the fantastically powerful parts of its progenitor while concealing and repairing its rough spots. It aims to be more expressive, yet more succinct. It aims to be fun.
How? Without going into details (and never mind if some of the following sounds like gibberish), CoffeeScript provides us with a bunch of features that we currently lack: nicer syntax, function binding (to help with scoping issues), multiline strings, splats (for neatly handling variable parameter lengths), lambda functions with im-plicit returns, list comprehensions, destructuring, ranges, simple classes with inher-itance, string interpolation, a funky existential operator ... and so much more.
A side effect of learning CoffeeScript is that you will improve at JavaScript. If you’re here because you hate JavaScript and never want to see another line of it, I have bad news: CoffeeScript is not an attempt to kill JavaScript (unlike some newer transpiled languages—I’m looking at you, Dart), but to co-exist and ultimately help improve JavaScript itself. That’s how good it is!
HTML5 Game Jam Challenge
It’s 9.00 a.m. on Monday morning. You’re sitting in a coffee shop, eagerly awaiting the arrival of your fellow team members to commence your entry in the “7-day HTML5 Game Jam-a-Thon Challenge (TM),” as advertised in Figure 1.1. The rules are simple: You have seven days to create an HTML5 video game from scratch.
Figure 1.1. Game Jam-a-Thon
in a language that you have no experience in. We’d better take a few minutes to learn some of the basics before they arrive …
The Basics
First up, how can we run some code? It turns out that the options available for ex-ecuting CoffeeScript are legion. As we only have a few minutes to get up to speed, we’ll choose the simplest:
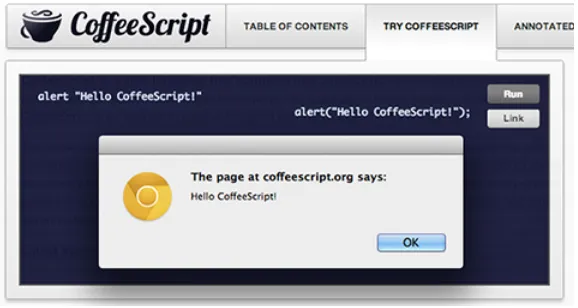
■ Head to the CoffeeScript website [http://www.coffeescript.org].
■ Select theTry CoffeeScripttab.
■ Activate theRunbutton, as shown in Figure 1.2.
Figure 1.2. Hello CoffeeScript
Ebbs and Flows
The Internet ebbs and flows like the tides, and by the time you read this text, the “click-to-run” functionality may have moved, morphed, or disappeared from the CoffeeScript website. If that’s the case, don’t fear: we’re covering more options in the section called “Starting the Game Project”.
Let’s remove the default CoffeeScript code and add some of our own. We’ll create a small function to reverse a string. There’s no need to fully understand it yet (try to figure it out, though!), but if you’re typing along at home, you might want to indent using spaces because hittingtabwill change the focused area:
# Simple string reversal function reverse = (sentence) ->
sentence .split("") .reverse() .join("")
# Now use our new reversing powers! text = "rats live on"
backwards = reverse text alert "#{text} #{backwards}"
Running this will reward you with a popup containing the forward and reversed text.
Running Directly in the Browser
How is our code—which isn’t JavaScript—running directly in the browser like this? Perhaps you’d guess it’s sending it off to the server for compilation? Nope. The trick is,CoffeeScript is written in CoffeeScript. And, as you know, CoffeeScript outputs to JavaScript. Therefore, the CoffeeScript compiler can be included in a web page and compiled on the fly.
Let’s contrast that block of code with how we’d write it using plain JavaScript:
var text, backwards;
// Simple string reversal function function reverse(sentence) { return sentence
.split("") .reverse() .join(""); }
text = "rats live on"; backwards = reverse(text); alert(text + " " + backwards);
You’ll probably notice that the CoffeeScript and JavaScript versions are fairly sim-ilar. That’s not surprising in this case because we’re using only a few of CoffeeScript’s fancy features, and the guts of the algorithm (the split/reverse/join manipulation) is simply using JavaScript’s native methods. The truth is—especially when you’re beginning—you can mostly get away with writing CoffeeScript just like JavaScript. So it’s easy to begin writing code and add in the cool tricks as you learn them.
Here’s some more simple CoffeeScript and its corresponding JavaScript output. Nothing will happen when you run this (becausecollidedis nevertrue); it’s merely to highlight more differences. If you’re just starting out with CoffeeScript, comparing the before and after code isinvaluablefor learning how it works:
lives = 3
collided = false
# ...after some game logic... if collided
lives = lives - 1
alert "Game Over" if lives is 0
Once compiled, this will spit out the following:
var collided, lives; lives = 3;
collided = false; if (collided) { lives = lives - 1; if (lives === 0) { alert("Game Over"); }
JavaScript under the Hood
This is the actual JavaScript that the CoffeeScript transpiles itself into. It may not be exactly how you’d write your own JavaScript, but it is functionally equivalent.
In CoffeeScript, we don’t use avardeclaration; it’s done for us, and we’re using some kind of weird inverted syntax to testif lives is 0. Even in these two brief snippets, there are a bunch of small and important differences between the languages. I’m warning you now: if you’re a long-time JavaScripter, some of them might rub you the wrong way at first, so hang tight …
Missing Cruft
CoffeeScript does away with a bundle of the boilerplate elements of JavaScript code: semicolons and curly braces are gone, there are novarkeywords for variable definitions, parentheses are often omitted when calling functions, and function and return statements are nowhere to be seen.
This is a considered attempt on CoffeeScript’s part to remove as much as possible that’s not directly related to the problem you’re trying to solve. For those of us who have spent our whole lives with the function/return construct, it seems a minor point; like people who swear they don’t even notice advertisements anymore, we’re sure that the cruft has no effect on us. But just as with advertising, the cruft is still there, doing its best to be confused with content—making it harder to parse (visually), and easier for bugs to stay hidden.
A pleasant side effect of this cruft removal is that CoffeeScript programs are notice-ably shorter than their JavaScript counterparts.
Whitespace
Superficially, JavaScript looks a lot like C or Java—that’s why we have curly braces to delimit code blocks. CoffeeScript decided to go the Ruby/Python route and use
Historically, programmers will fervently fight for or against “spaces or braces” in the same way they’d argue “tabs versus spaces.” CoffeeScript avoids some of the problems of significant whitespace by virtue of its transpiled nature; for example, people dislike that whitespace is unable to be minimized, unlike curly-brace pro-gramming languages. However, as our output is JavaScript, it’s this output that will be the target of our minimization efforts.
Comments
Comments aren’t executed:
# Commencing a line with a # indicates a comment
What’s more, they’re excluded from the JavaScript output:
So, this is a case where CoffeeScript is, in fact, more verbose than JavaScript! If you want a multiline comment block, you use the triple hashes:
###
Everything you put here will be ignored. Unlike single-line comments - these show up in the output. ###
This will produce the following:
/*
Everything you put here will be ignored. Unlike single-line comments - these show up in the output. */
Multiline comments are included in the compiled output; this makes them useful for adding block headers to each file, for example.
Types, Variables, and Scope
handled automatically. So, if you had the following variable declarations in JavaS-cript:
var result = [], count = 0, $el;
… the equivalent in CoffeeScript would be simply:
result = [] count = 0
We wouldn’t define$elbecause we’re yet to use it! When you define a variable in CoffeeScript, thevardeclaration is pushed up to the closest scope that the variable is in (similar to Ruby’s local scope). This avoids the common pitfall in JavaScript of accidentally creating global variables—though it does mean you need to take care to avoid reusing variable names when you nest functions, because the inner variable will just be a reference to the outer variable.
CoffeeScript also helps out with some of the other fun parts of JavaScript scope, which we’ll delve into later.
Functions
Functions are one of the most powerful aspects of JavaScript. They are first-class citizens of the language, because you can pass a function as a parameter or return a function as the result from another function. You can compose them—just as you can in other functional programming languages, such as Lisp. In fact, as JavaScript’s resident guru, Douglas Crockford, once said, JavaScript has more in common with functional languages like Lisp or Scheme than with C or Java.1
You might not be sold on functional programming (coughjust yetcough), but it’s a paradigm that is very powerful and a lot of fun. As an example, part of jQuery’s success is due to the joy of being able to chain a bunch of functions together to manipulate and process lists of DOM nodes. Each step of the jQuery chain returns a new list, and the lists can be filtered or transformed as needed.
1
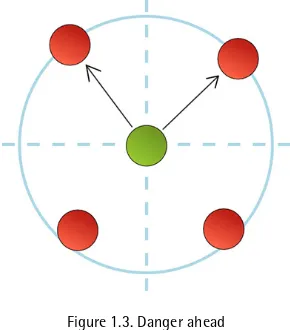
If you utilize a functional style—or do a lot of asynchronous work—you would have noticed an issue with JavaScript: a large chunk of your code consists of thefunction
andreturnkeywords. Consider the following JavaScript snippet that takes an array of angles in degrees, converts them to radians, and then returns only values that appear in the first two quadrants (the “top half” of the circle), as seen in Figure 1.3.
Figure 1.3. Danger ahead
We might do this in a game to fetch directions to enemies in our field of view:
[45, 135, 225, 315].map(function(degrees) { return degrees * (Math.PI / 180);
}).filter(function(radians) {
return radians % (2 * Math.PI) < Math.PI; });
First we usemapto convert degrees to radians, thenfilterto only keep the values we’re interested in. Here’s the same code in CoffeeScript (please note that there are more idiomatic ways to do mapping and filtering in CoffeeScript, but this is just to highlight the difference between function declarations):
[45, 135, 225, 315].map (degrees) -> degrees * (Math.PI / 180)
.filter (radians) ->
radians % (2 * Math.PI) < Math.PI
our problem. In this case, it does it by replacing thefunctionkeyword with the symbol->, and by havingimplicit returns.
The CoffeeScript compiler tries to make sure that all statements in the language can be used as expressions, so nearly everything will have a return value. The last ex-pression inside a function will give the value that’s returned. Consider:
square = (x) -> x * x
Short Syntax
This short function syntax is out-and-out a good idea; so good that it’s been accep-ted into the next version of JavaScript. I’m trusting that by the time you read this book, it will be part of the standard and already implemented in your browser—and this whole section will seem obvious to you. If that’s the case, just remember: you have CoffeeScript to thank for it!
Starting the Game Project
Hmmm, this is a bad sign. It’s the kick-off meeting on day one and your team is already half an hour late. After ordering another cup of coffee,2you decide you might as well start on the game. The first step is to create the base project and set up your environment for development.
Installing: an Overview
As we mentioned right at the beginning, CoffeeScript sits in a bit of a weird space for a language. For most programming languages, “installing” means downloading a package from the author’s website and running it. But CoffeeScript is a bit different: the core compiler is available as a command line tool that can be run in any Java-Script environment, and at the present time this means running under Node.js.
Node.js is a popular platform for running JavaScript applications. It’s often used as a web server for serving apps that use JavaScript as both the client- and server-side language. However, CoffeeScript uses it for running its command line tool that compiles our sources. We need to install both Node.js and then thecoffeetool.
2
Client-side Compilation on the Fly
“My teammates will be hereany minute, and you expect me to install and configure the whole internet in ten seconds? There must be another way … ,” you grumble to yourself. Well, there is another way. But you have topromiseafter you have tried it and written some code to read the next section on installing things properly.
On the CoffeeScript.org website, we were running code and executing it live. This worked because CoffeeScript is written in CoffeeScript, so the compiler itself can be output as plain-old JavaScript. You can download a special version of this JavaScript that, when included in your web page, automatically compiles any Cof-feeScript code snippets on the page. Magic!
Not for General Consumption
This technique of finding and compiling pieces of CoffeeScript in the page is a novel and interesting idea, but it’s inefficient. Every page view requires the com-piler to be loaded unnecessarily (it should be cached after the first view), and every chunk of code must be recompiled—which, depending on the complexity and size of the code, can be very slow. It’s a useful tool for testing, but if you’re serving pages to the grand public, you should be using precompiled JavaScript.
The first step is to grab the compiler. The official source repository for the entire project is on Jeremy Ashkenas’s (the creator of CoffeeScript—commit that name to memory!) GitHub repository at https://github.com/jashkenas/coffee-script. At the moment, we’re only interested in the JavaScript file for the browser. This lives in theextras/directory of the repository, or you can grab it from the direct link via the website at http://coffeescript.org/extras/coffee-script.js.
Save the file to your project—wherever you’d normally put your third-party scripts (I'm putting it in the/vendordirectory)—and include it in the page:
chapter01/01jsandcs/index.html (excerpt)
<script src="vendor/coffee-script.js"></script>
prevents the browser from trying to execute it as regular JavaScript, and gives the CoffeeScript library a way to find all the code it needs to compile:
<script type="text/coffeescript"> alert "Look ma! no braces!" </script>
These snippets can be sprinkled anywhere in the code, though you should probably follow good practices and place your scripts at the bottom of the page. Here’s a full example, including both our favorite languages together:
chapter01/01jsandcs/index.html
<!DOCTYPE html> <html>
<head>
<meta charset="utf-8">
<title>HTML5 Game Jam Entry</title> </head>
<body>
<h1>Ready to RUMBLE!</h1>
<script src="vendor/coffee-script.js" type="text/javascript"></script> <!-- Run some JavaScript --> <script type="text/javascript"> alert("JavaScript is here."); </script>
<!-- Run some CoffeeScript --> <script type="text/coffeescript"> alert "CoffeeScript is here, too!" </script>
</body> </html>
CoffeeScript running directly in the browser … weird! If you didn’t get the alert dialog, double-check the path to the library, and be sure you set the scripttype
Installing CoffeeScript Properly
It’s time to get serious. Our real goal setup is to create an environment that lets us run thecoffeeutility, which is a command-line tool for turning CoffeeScript files into JavaScript files that we then include in our web pages like any ordinary resource.
No Installation Required
Some web frameworks such as Ruby on Rails3and the Play! framework4support CoffeeScript by default. If you’re using such a framework, none of this installation is necessary; just place your.coffeefiles in the correct place and the framework will compile them for you. If CoffeeScript is not supported by your framework of choice, write the creators a persuasive email today!
Installing Node.js
First up, you’ll need the latest stable version of the Node.js platform. Handy installers are available for Windows and Mac from the download page at
http://nodejs.org/download/. If you’re in a Unix environment, you can also grab the sources from the download page or install via your distro’s package manager.5
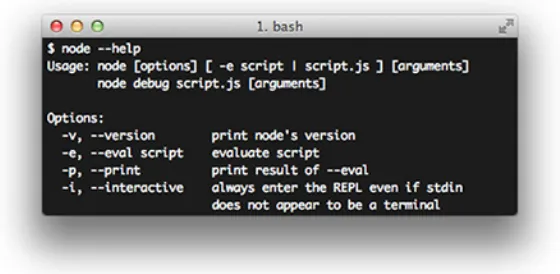
Once the install is complete, you should be able to run Node.js from your terminal vianode, as shown in Figure 1.4. If the install completed correctly but the node command was not found, be sure to restart your shell session, and check that the Node path exists in your shell environment path.
3
http://www.rubyonrails.org
4
Figure 1.4. Running Node.js from your terminal
Installing Coffee
The next step is to installcoffee. The easiest way to do this is via npm, Node’s package manager for installing modules. This is installed when you install Node, so it should already be available to you. Try it out with the following command (if you’re still on the Node command line, you’ll need to exit by pressingCtrl-d):
npm --version
We want to usenpmto grab thecoffee-scriptmodule6(note the hyphen). To actu-ally install the module, usenpm’sinstallcommand:
npm install -g coffee-script
Global versus Local
On the official Node.js blog, sparing use of global installs is recommended.7The guideline is to use a global install if the package needs to be accessed on the command line, as in our case.
This will fetch the module and make it available via Node.js. You can make sure everything has gone to plan by opening up a new console session and asking for some help on our new module:
6
https://npmjs.org/package/coffee-script
7
coffee --help
This should show output in the vein of Figure 1.5.
Figure 1.5. Outputting CoffeeScript help
Coffee Options
That’s it for installing—our system is now fully operational. The last step is to figure out how to integratecoffeeinto our workflow. By default, thecoffeeutility will run.coffeefiles. To test it out, create a blank document in your text editor and save it asfriday.coffee; then add the following:
chapter01/02isitfriday/script.coffee (excerpt)
day = new Date().getDay()
isFriday = if day == 5 then "YES!" else "no." console.log "Is it Friday? #{isFriday}"
Finally, a tool to tell us if it’s Friday or not! Again, don’t worry too much about the syntax for now, but the final line is used to log to the screen output (because an alert is only for the browser). To run it, type the following at your prompt (making sure you are in the same directory as the file):
The output, of course, will depend on the day you run it! Now we know how to make command line tools, but that’s no good for an HTML5 game—we need JavaScript files. First, modify theconsole.logto be an alert (we’ll look more at
console.login the section called “alertversusconsole.log” in Chapter 2):
chapter01/02isitfriday/script.coffee (excerpt)
alert "Is it Friday? #{isFriday}"
Now it’s time to compile the CoffeeScript code using the--compile(or-c) flag:
coffee -c script.coffee
This generates a JavaScript file of the same name in the same directory, but with the.jsextension. Open up this file now and have a look at whatcoffeehas done. It’s plain ol’ JavaScript, which we can link to in a website as usual:
chapter01/02isitfriday/index.html (excerpt)
<!DOCTYPE html> <html>
<head>
<title>Is it Friday?</title> </head>
<body>
<script src="script.js" type="text/javascript"></script> </body>
</html>
Thecoffeetool has a stack of features that we’ll use as we go along. At the moment, you’ll notice that every time you make a change in your.coffeesource file, you need to rerun thecoffeecommand. We’ll look at how to bypass this, and create an effi-cient coding workflow in Chapter 2.
Choosing Our Tech
Document Object Model
We have a few options when it comes to rendering HTML5 games. The oldest and most widely supported is to use positioned DOM elements, such asdivs or DOM images. Elements will be dynamically added and removed from the container with their appropriate animation frame or tile image. During the render phase of our game loop, we update thestyleproperties of elements that have changed. For ex-ample, we might update a player’s DOM element (el) in response to a player model:
el.style.left = player.x el.style.top = player.y
There are a few advantages of using the DOM. Being inherent to a web page, it’s the most “web” of all our options; like any regular DOM element, you can easily attach mouse event handlers—likemouseoverormousedown—to individual elements of your game (you have to calculate this manually otherwise). You can also right-click on your player and see debug information with your regular debugging tools.
The DOM is supported absolutely everywhere on the Web (albeit with the familiar cross-browser problems that you have to deal with in web development). There’s also a lot of work being done by the browser vendors on hardware acceleration of the DOM, so rendering games can be as fast as—or faster than—a canvas equivalent.
The disadvantages are that the browser can quickly slow down if your game contains a lot of entities that are onscreen at the same time. Anytime a node in a web page is changed, the browser is forced to perform a reflow, updating and repainting everything. This is generally the slowest operation the browser performs. There are ways to minimize this issue (using document fragments that are replaced in bulk)—but if you’re trying to make Raiden IV,8you’re going to notice slowdowns.
Canvas
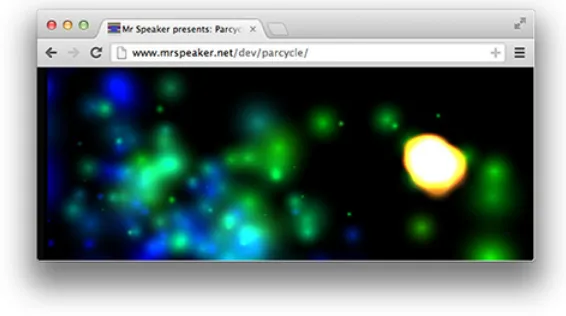
To circumvent this limitation, HTML5 has given us thecanvaselement. This is a block-level element that consumes a rectangular space in your web page, like an image—except it’s a visual that we can alter with JavaScript! The Canvas API has many cool features: drawing and compositing shapes and paths, manipulating and transforming images, filling with gradients, and setting individual pixels. You can see some of them in action in Figure 1.6.
Figure 1.6. A particle effect system running completely in canvas
Support for canvas is growing, and the browser implementations are constantly improving (which means canvas animations will run faster). The API is quite simple, but lets us do an impressive number of graphical operations—certainly enough for turning out some fantastic-looking games.
Further Options
Although many HTML games use either DOM or canvas for rendering, there are a few more options available to us. SVG (Scalable Vector Graphics) is widely suppor-ted, is fantastic for drawing and manipulating vector graphics, and lets you easily add event handlers to nodes. It’s less commonly used for games at the moment, but if you want your graphics to scale to different devices easily, it’s worth a look!
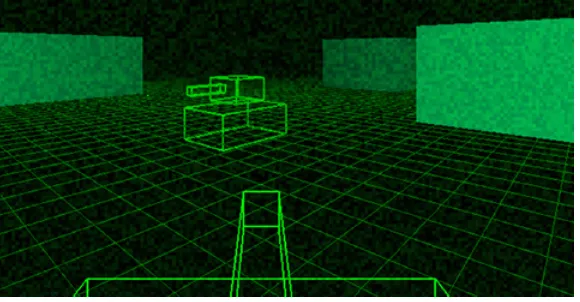
And if two dimensions are just not enough, WebGL is the new kid in town. It brings the raw power of OpenGL to the browser, opening the door for very advanced 3D games. Learning OpenGL is a whole world of pain, however, so we’re not even going to consider it at the moment. If we were, it would definitely be via the awesome three.js library,9which simplifies building 3D games significantly, as shown by the graphics in Figure 1.7.
Figure 1.7. Three.js 3D tank game
When generating games, it’s good practice to separate the game logic from the ren-dering code; then, at runtime, you can choose which render to use. So if the browser has no support for canvas, you can render to the DOM or use SVG. If you want to be extremely crazy, you could even create a version that renders to the 16×16 pixel browser favicon like the classic “Defender of the Favicon”!10
9
Drawing Something: Using Canvas
Alas, we only have seven days to create this game, so we’re going to keep develop-ment simple (yet powerful!) and use the Canvas API for rendering our game. The ultimate goal will be to import our graphics as sprite sheets for making animations and so forth. But first of all, it’s time to push some pixels on the screen. Plop a
canvaselement into your web page using a unique ID:
chapter01/03disco/index.html (excerpt)
<canvas id="game"></canvas>
Now we need to grab a reference to its drawing context via CoffeeScript:
chapter01/03disco/script.coffee (excerpt)
ctx = document
.getElementById("game") .getContext("2d") ctx.fillStyle = "#000"
ctx.fillRect 0, 0, ctx.canvas.width, ctx.canvas.height
Compile Your File
If you’re compiling this code withcoffee, it needs to be in a separate file, com-piled, then included in the web page. Seechapter01/03disco/for the full code.
There you go, a black rectangle. Any canvas drawing operations need to be done against a context that we fetch by calling thegetContext("2d")method on the
canvasDOM element. When we implement this for our actual game, we’ll have to add in a check that the user’s browser actually does support thecanvaselement; for now, we’ll let it slide.
Once you have a canvas context, we can use all of its API methods to draw awesome visuals on the screen. So far, we’ve only set thefillStyle(this can be a named color, or a hex, RGB(A), or HSL(A) value; note, however, support for CSS3 color notation varies across browsers) and filled a solid rectangle to the screen (starting at coordinate 0, 0 from the top-left corner and using the canvas’swidthandheight
So we have an object on the screen, but it’s hardly exciting. Let’s jump ahead a little in our CoffeeScript studies for the purpose of spicing it up a bit. Underneath the
fillRectcommand, add in the following code:
chapter01/03disco/script.coffee (excerpt)
noise = ->
for x in [0..20] for y in [0..10]
color = Math.floor(Math.random() * 360) ctx.fillStyle = "hsl(#{color}, 60%, 50%)" ctx.fillRect x * 15, y * 15, 14, 14 setInterval noise, 100
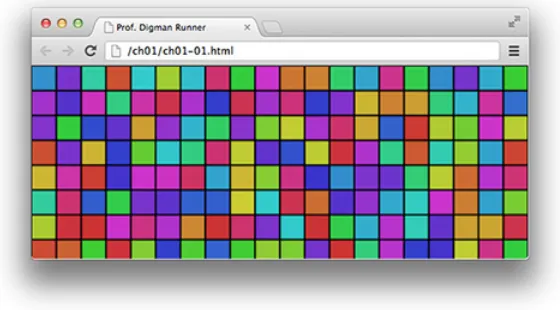
This will produce the image shown in Figure 1.8.
Figure 1.8. 1970s disco squares
Form, movement, color … it’s seventies disco time! Movement is indicated in the last line: thesetIntervalcall. This is a standard JavaScript method that executes a given function repeatedly at a given interval time (in our code, that’s every 100 milliseconds). We ask it to call ournoisefunction.
that the li’l rectangles snap to (we’ll dissect them fully in the section called “Loops and Ranges” in Chapter 2).
Finally, the meat of the routine: drawing hundreds of little squares. First, we choose a random color hue; then fill a 14×14 pixel rectangle at every grid position. The grid position is determined by multiplying thexandycoordinates by 15. Because the grid is 15 pixels, and we only draw rectangles 14 pixels squared, there is a one-pixel black line separating them. This is just the background showing through.
HSL Colors
Choosing some nice-looking random colors with a very small amount of code can be tough. The trick we’ve used here is to take advantage ofcanvas’s support or HSL (Hue/Saturation/Lightness) colors. HSL is an alternative to the RGB and hex (#00000-style) color definitions. In HSL, the first value represents the hue in a range: 0 (and 360) is red, 120 is green, and 240 is blue. Other numbers are hues in between them. The second parameter is the saturation, and the last is the lightness. These parameters are defined as percentages.
To generate our assortment of colors with HSL, we just select a random shade between 0 and 360, turn the saturation and lightness down a bit, and voilà—nice random colors!
We’re on Our Way
“Oooh, what’s that?” asks your pixel artist over your shoulder. They’re an hour and a half late, but finally the team has sheepishly wandered into the café. It comprises a pixel artist, a web designer, and a story writer/ideas person—plus you, the coder.
“Where have you folk been?” you ask. They look at you blankly. You give them a rundown of your progress so far, and how the game will be written in CoffeeScript using canvas. You point at the colorful squares flashing on your screen and they nod with vague comprehension. You explain that the game will be a 2D platformer with retro-style graphics and some nice effects—unless they have any other ideas? They stare blankly again.
Chapter
2
CoffeeScript Fundamentals
It’s Day 2 of the inaugural “7-day HTML5 Game Jam-a-Thon Challenge (TM),” and the situation has gone from bad to worse. After last night’s team kick-off party, everyone else decided to go out on the town for “one more.” It’s now 11.00 a.m. and still no sign of any team members. Your questions about graphic concepts and plot suggestions remain unanswered in your outbox, and you’re bored with waiting.
Lacking real direction on where the game is headed, we might have to set our own goals for the day. First up, we need to learn enough CoffeeScript to be able to code
anything. There may be a cleaner and more efficient way to code our solutions, but we want to be able to solve any problem that comes our way. If we’re successful, we can feel more comfortable about finishing our game in time (and we can convince our manager to let us use CoffeeScript for the mega-corporate client project they just won).
More of the Basics
Like any language, it’s going to take us a while before we become proficient. It’s impossible to master everything right away, but we have a tight schedule, so we need to be productive, fast! Because we’re looking at the very basics, we’ll have to first work through some examples that aren’tdirectlyrelated to the creation of our game. But never fear, we’ll only spend a short time in boring-example land before delving into the exciting world of our game.
Setting Up Our Project
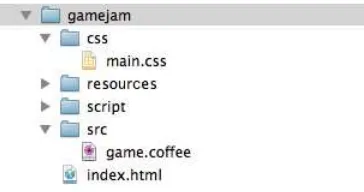
Our initial project tree will look like Figure 2.1. The details are sketchy, and you probably have your own idea of where everything should go, but it’ll do for a base.
Figure 2.1. Planning our project tree
As you can see, it’s just a basic web structure. The most important parts are thesrc
andscriptsfolders. Thesrcfolder will hold all our.coffeefiles for the entire game. These are compiled directly into thescriptfolder, from where they can be imported into ourindex.htmlpage.
Let’s open up our editor, and add a message to thegame.coffeefile:
chapter02/src/game.coffee
alert "Game loaded!"
Another indispensable feature iscoffee’s ability to watch a directory for changes. This means anytime you make a change in a source file, the code is compiled and deployed instantly. The command we’ll be using to join and watch our game files looks like this (and assumes it is being run from thesrc/directory):
coffee -j ../script/main.js -w -c game.coffee
This will populate thescriptfolder with themain.jsfile. Now we can include this in our web page:
chapter02/index.html
<!DOCTYPE html> <html>
<head>
<meta charset=UTF-8>
<link rel="stylesheet" href="css/main.css"> </head>
<body>
<div id="container">
<canvas id="game" width="580" height="480"></canvas> </div>
<script src="script/main.js" type="text/javascript"></script> </body>
</html>
Loading the page should give us the console message, and changing the.coffeefile and refreshing the page should update it. Note that the page includes a reference to a CSS file to improve the game’s appearance by automatically tiling the back-ground image. If you wish to use it, the file is available atchapter02/css/main.css. With that said, we’re now ready to code!
alert
versus
console.log
Before we move on, let’s look at our alternatives to testing viaalert. So far, we’ve beenalerting things to see some output. It’s a tried-and-true method of debugging code, but we have some better choices at our disposal these days. Modern versions of Chrome and Firefox—along with IE9—contain aconsoletool for this purpose so that our debugging avoids blocking the main browser thread as it does with the
out what your browser offers1)—but generally they’ll support at least a couple of standard methods:
console.log "No more alerts!"
console.error "In case something goes wrong."
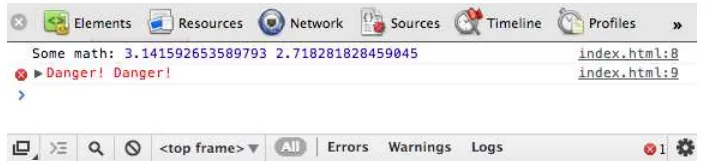
These will appear in the console window, which can be opened from a keyboard shortcut or via the application menus. You can also specify any number of arguments to log; just pass them as a comma-separated list:
console.log "Some math:", Math.PI, Math.E console.error "Danger! Danger! "
A sample of the console output as viewed in the Chrome Developer Tools is shown in Figure 2.2.
Figure 2.2. The Chrome Developer Tools console
Debugging with CoffeeScript can sometimes be more difficult than you’d expect, as the errors that are displayed are based on thefinal compiled code, rather than your source code. This means that line numbers will fail to match up, and is one reason for having some familiarity with the JavaScript that’s spat out.
There is new technology slowly filtering into browsers called “source maps” that will help map source code to the compiled output for debugging purposes; however, until there’s widespread support, we’ll have to make do with reading JavaScript and making good use ofconsole.log!
1
Returning to JavaScript
Learning a new language can sometimes be a frustrating experience. You know ex-actlyhow to perform a task in one language, but have no idea how to do it in the new one. CoffeeScript gives you a fallback if you really need it, a way to embed pieces of JavaScript directly in your CoffeeScript source. Any text wrapped in backticks or grave accents [`] will simply be passed straight through to the JavaScript output. For example, this is CoffeeScript:
greeter = `function(name) { console.log("Hello, " + name); }`
The JavaScript output generated from it is as follows:
var greeter;
greeter = function(name) { console.log("Hello, " + name); };
Notice that anything inside the backticks is handed on exactly as typed, but everything around it is compiled as usual. It’s to be hoped that you wouldn’t resort to this feature too often, but it’s nice to know it’s there.
Strings
A lot of today’s web development involves string manipulation, and currently JavaScript has some clunky string handling. Much of the clunk is due to be repaired in the ECMAScript 6 specification, but until then, CoffeeScript is here to smooth over the rough patches.
The first feature CoffeeScript adds is multiline strings. To use this feature, simply utilize your enter key:
To use quotes in the string itself, you’ll have to escape them with a backslash. When compiled, the multiline string will simply be concatenated into a one-liner. If that’s not what you’re after, and you want to keep your formatting (or you just want to avoid the hassle of escaping away your double quotes), you can use the block string feature employing triple double quotes:
haiku = """
I mean, we're looking
Down on Wayne's basement. Only That's not Wayne's basement """
The final and coolest string bonus on offer with CoffeeScript isstring interpolation. Many of the examples we’ve seen have already demonstrated this concept; it’s the ability to easily embed values in the middle of double-quoted strings (including the multiline and block strings), without laborious string concatenation:
name = "Steak Styles" score = 8675308
display = "Player #{name} has #{score++} points"
A token is formed by wrapping an expression with#{and}. These tokens are re-placed in the compiled output in a manner that resembles how you’d probably do it in plain old JavaScript:
var display = "Player " + name + " has " + (score++) + " points";
That’s a lot of pluses and quotes. It’s a minor pain to both read and write, especially when building complicated expressions. CoffeeScript’s string interpolation takes that pain away.
Conditionals and Operators
Our language wouldn’t be “Turing complete”2without some conditional branching. Naturally, it’s straightforward, but there are a few extras in CoffeeScript to make our code more concise, readable, and fun:
2
if lives == 0
alert "Game Over!" running = false else
frameCount += 1
Like function calls, the parentheses are missing, and we have to indent to start a new code block. However, if it’s just a simple one-liner, you can join the statements with the then keyword, or put the expression first (this inverted or post-fix form comes up a lot in CoffeeScript). The following two lines compile to exactly the same JavaScript:
if lives == 0 then alert "Game Over"
alert "Game Over" if lives == 0
Oftentimes, you’ll simply be usingifstatements to test a condition before assigning a value to a variable. CoffeeScript lacks the ternary construct (which in C-like lan-guages allows you to do statements such asdanger = (distance < 0) ? "HIGH" : "LOW"); rather, it uses the sameifstructure as above:
danger = if distance < 10 then "HIGH" else "LOW"
And if theelseclause is unnecessary, there’s even a nicer construct for conditional assignments:
danger = "HIGH" if distance < 10
Operator Aliases
To guarantee equality on these types, you can use JavaScript’s triple equals operator [===] rather than the regular double equals [==]. This is a good idea that helps avoid nasty logic bugs, so naturally CoffeeScript bakes this right in, compiling==into===
and!=into!==, and you don’t have to worry about it.
But there’s more: a whole slew of JavaScript operators are aliased for your comfort too, though instead of symbols, they’re aliased to their English-language equivalents. For example, JavaScript’snot(!),and(&&), andor(||) operators are aliased tonot,
and, andor! Consider the following:
drawGlow() if (running and energy > 10) or poweredUp
Not everyone is going to be thrilled with this literate style, though some will love it. The reasoning behind these operators is to help write code that you (and other people working with your code) can easily read. If you were born and raised with pipes and ampersands, you might think changing to prose is a useless feature, but give it a go.
If you find yourself liking it, here are a few more to add to the mix:isandisntare aliases for==and!=(which, as we said, is an alias for the triple equals versions);
onandyesare the equivalent oftrue; andoffandnoare both the same asfalse. Finally, the inverse ofifis aliased tounless, letting us write code such as:
power = on unless lives is 0
This will compile down to:
var power;
if (lives !== 0) { power = true; }
Loops and Ranges
We’ve already used a fewforloops in the examples and by the time we’ve finished the game, we’ll be almost sick of them. Tile-based games are rooted in a 2D grid, therefore you spend a lot of time inside nested loops: the outside loop to iterate over therowsof the grid, and the inside loop for thecolumns. However, for most other work such as web development, we won’t use loops as much as we do in game development; this is because we process our lists using comprehensions, a concise notation for specifying operations over a list, which we’ll look at fully in the section called “List Comprehensions” in Chapter 3.
The loops we’ve used so far have been defined using ranges, where our loop iterates over the values inside the range. Just like theifstatement, we can either write an indented code block, or use the inverse form for simple expressions:
console.log "GO!" for [1..3]
This will give us three"GO!"s on the console. You have the option to break out of aforloop or continue on to the next iteration withbreakandcontinue—exactly the same as in JavaScript. In many cases, we’ll want to have access to the current index the loop is in. To do this, we assign the current value to a variable:
console.log "...and a #{ x }" for x in [1..4]
These kinds of range loops will be compiled into regularforloops, albeit with a hidden temporary variable: this is to allow anything we throw at CoffeeScript to be handled generically:
var x, _i;
for (x = _i = 1; _i <= 4; x = ++_i) { console.log("...and a " + x); }
Inclusive versus Exclusive Ranges
[0...4]; this gives us the numbers 0 to 3, more like theforloops you might be used to!
Ranges do not have to be ascending. If you want a descending range, simply put the larger number as the first argument, and the smaller as the second. And if you need a different size step between loops, you can specify it with thebykeyword after the range, remembering to use the correct sign:
for x in [99..1] by -2
console.log "#{x} bottles of beer on the wall"
If our logic to execute is a short one-liner, we can use the post-fix form in the same way we did for our conditionals:
console.log x for x in [1..10]
Butforis not the only way to move in a circle: CoffeeScript also provides a low-levelwhileloop. Like our operator alias, we also have a “while not” version:until. These can be used as traditionalwhileloops, or in post-fix form for prose-like readability:
animatePlayer() while alive fall() until yPosition is 0
The final looping loop isloop; use it if you want to loop forever. Well, nothing lasts
forever: it’s just awhile(true){}that can be broken withbreak:
loop
killBaddie()
break if baddieCount is 0
Comprehensive Collectivism
Objects and Arrays
Okay, we can control our program flow, but what about data structures? We have
Arrays for lists, andObjects for key/value dictionaries; what more do we need? Arrays are defined by wrapping your comma-separated list in square brackets:
blocks = ["dirt", "stone", "coal", "iron ore"] console.log blocks.length # 4
Each array element can be of any type (including other arrays), and whitespace is ignored; the compiled version will be concatenated into one long line. If you include line breaks, the trailing comma on each line is optional. This is useful when you’re defining lists that will be processed one-dimensionally, but are better represented visually in two dimensions (quite common for games):
levelMap1 = [ 1,1,1,1,1 1,0,0,0,1 1,0,1,0,1 1,0,0,0,1 1,1,1,1,1 ]
Naturally, all theArray’s built-in properties and methods are available:push, pop, reverse, join, concat... it’s all there. Additionally, CoffeeScript provides some helpers for slicing, dicing, and processing arrays, the most notable being able to use them directly inforloops:
register block for block in ["dirt", "stone", "coal"]
Thefor … inconstruct will call theregisterfunction on each string in our array, as did the range loops above. One difference is that for our regular arrays, we might also want to know the current index the loop is in. We do this by supplying an extra variable, separated by a comma:
topPlayers = ["Max", "Lily", "Brian", "Tracy"] for player, i in topPlayers
Now, on to objects! At their base, objects are a collection of key/value pairs. They’re a fundamental method of encapsulation in CoffeeScript, allowing us to group related functionality together in a single location. Objects are structured by indentation, though braces are optional—but particularly useful when you only need a small object that can be defined on a single line:
player = x: 10 y: 25 stats:
score: 1337 update: (speed) -> @x += speed @stats.score += 5
Theplayerobject contains a bunch of key/value pairs:x, andyas numbers,stats
as a nested object, andupdateas a function. The outside world can interact with the object directly via its name:
player.update 2.5
Inside theupdatefunction, you’ll notice the variable names commence with an@, which is an alias forthis., a keyword used to indicate the current scope. Scope is a hairy issue in JavaScript, so we’ll talk about this some more later; for now, you can see that prefixing an identifier with the@symbol means we’re referring to the identifier in the current scope. In our example, theupdatefunction will compile as:
this.x += speed; this.stats.score += 5;
This will update the player properties accordingly.
Reserved Words as Keys
We can iterate over an object in a similar way that we did forArrays, but this time using thefor … ofconstruct:
for own key, value of player console.log "#{key}: #{value}"
You can choose any identifier for thekeyandvaluevariables. Notice theown
keyword in there? This is optional, and used to counter another fun gotcha from JavaScript: looping over the keys of an object that were defined directly, rather than being inherited (for each key, it tests the object’shasOwnProperty(key)function under the covers).
Introducing Professor Digman-Rünner
It’s well into the afternoon, with minimal movement from the team. One email from the pixel artist says she refuses to draw anything until there’s a theme, and there’s a strange tweet from the story writer saying he had the most amazing idea for the game last night, but he struggles to recall it now. Fed up, you crack open your image editor, set the pencil tool to one pixel, and draw like you’ve never drawn before (which is true), as evident in Figure 2.3.
Figure 2.3. Creating our game characters
Okay, that’s extremely retro, but it’s something. Looks like we have a guy in a lab coat wearing safety goggles, and a ninja ...
Re-search Institute for ReRe-search,” he’s finally proven the existence of the elusive particle and is ready to announce it to the scientific community.
Alas, there is trouble afoot. His archenemy and nemesis, Stealthy HawkMan, has a lucrative book-publishing deal in the works for his personal memoirs, the majority of which is just him making fun of the Professor’s study of Pig’s Boffin. If the Pro-fessor were to release his findings to the public, his archenemy’s book deal would fall through, forcing Stealthy HawkMan to continue in the teaching position he despises. Using his international HawkMan family connections, Stealthy organizes a team of Japanese ninjas (frozen in time since the Meiji Restoration of 1868) to steal the Professor’s particle research.
Luckily, the ninjas are relatively unfamiliar with the Standard Model of particle physics. This provides the Professor with an opportunity to reclaim his work using his two superpowers (which he’s been secretly developing over the years). His primary superpower of running will be handy to escape the ninjas, while his sec-ondary power will enable him to dig traps in the laboratory floor that will ensnare unsuspecting ninjas. It’s all up to Professor Digman-Rünner. Good luck.
The Canvas API
Clearly, we’re going to require some graphics for our game. And for that, we’ll have to step out of the laboratory in order to become familiar with the HTML5 Canvas API. We don’t need tomasterit (indeed, for our immediate purposes we just want to place our professor and some ninjas on the screen), but it’s a fairly simple API, and we’ll use more of it when it comes time to add flourishes.
CoffeeScript and the Canvas API
How are CoffeeScript and the Canvas API related? If you’re just starting out with web development, it’s easy to be confused about the separate parts. The Canvas DOM element was introduced as part of HTML5. To draw on the canvas, you use various drawing and manipulation methods via its API, which you access in the browser via JavaScript. And as we know, if we can target it with JavaScript, we can also target it with CoffeeScript!
include a bunch of helpful properties and methods that we’ll access often. For now, we’ll just set up a blankinitfunction as an entrance point:
chapter02/src/gfx.coffee (excerpt)
gfx = init: ->
We’ll add this to our list of files thatcoffeeis watching too:
coffee -j ../script/main.js -w -c gfx.coffee game.coffee
Check the compiledmain.jsfile and make sure you can see a reference to ourgfx
object.
Context and Soaking up Nulls
To draw shapes and graphics on the screen, any and all drawing operations must be done on a canvas’scontext. Usually, you’ll grab this context when your applic-ation initializes and either keep a reference to it, or pass it around your functions that need it. To obtain the reference, ask for it from the canvas DOM element in your web page usinggetContext:
chapter02/src/gfx.coffee (excerpt)
init: ->
canvasDOM = document.getElementById "game" @ctx = canvasDOM.getContext "2d"
This will give you a 2D context to draw in (store it in thegfxobject asctx), assuming there’s adocumentelement, thedocumentcontains a<canvas id="game"></canvas>
tag,andthe user’s browser actually supports the Canvas API.
But what if any of these assumptions are incorrect? If either of the first two assump-tions is incorrect, the next line will fail; if the last is incorrect, any use ofctxwill fail. In all cases, the user will be left wondering what the heck is going on.
chapter02/src/gfx.coffee (excerpt)
init: ->
canvasDOM = document.getElementById "game"
@ctx = canvasDOM.getContext "2d" if canvasDOM != null return @ctx == null
This works, and stops our code from crashing if something is amiss. However, CoffeeScript provides us with a way to do it that’s more concise, and without requir-ing the declaration of intermediate temporary variables:
chapter02/src/gfx.coffee (excerpt)
init: ->
canvas = document.querySelector "#game" @ctx = canvas?.getContext? "2d"
@ctx?
We use the?operator on a variable to “soak up nulls.” If the value is null, the code keeps running, and we can handle any errors afterwards. The?operator can also be used to assign default values. For example, to select and assign the DOM element only if thecanvaselement was yet to be assigned already, we could do this:
canvas = canvas ? document.querySelector "#game"
Though, in this situation, it seems redundant to have to assigncanvasto itself like this, so we can use the shortcut version instead:
canvas ?= document.querySelector "#game"
What if document is missing?
In reality, if there is nodocumentor thedocument.getElementByIdfails, you have bigger problems—something has gone seriously wrong. For a regular project, this is unnecessary; just checking the context, which some browsers won’t support, should be sufficient.
chapter02/src/game.coffee (excerpt)
game = init: ->
if not gfx.init()
alert "Could not set up game canvas!" return # abort the game
# Start the game running game.init()
With the initialization out of the way, we can start to find out more about our game canvas. Thecontextcontains a field calledcanvas, which in turn contains its own
widthandheightfields. However, since we already have a reference tocanvas, we can access thewidthandheightfields directly. We’ll be using these often, so let’s expand ourgfxobject and attach some shortcuts:
chapter02/src/gfx.coffee (excerpt)
init: ->
canvas = document.querySelector "#game" @ctx = canvas?.getContext? "2d"
return false if not @ctx @w = canvas.width
@h = canvas.height true
Now that we’re reasonably sure we have a place to draw, let’s start with a clean slate by clearing our canvas using theclearRectmethod:
chapter02/src/gfx.coffee (excerpt)
gfx.ctx.clearRect 0, 0, gfx.w, gfx.h
Actually, while we’re at it, let’s make that a helper method that we can add directly to ourgfxobject:
chapter02/src/gfx.coffee (excerpt)
clear: -> @ctx.clearRect 0, 0, @w, @h
chapter02/src/game.coffee (excerpt)
init: ->
if not gfx.init()
alert "Could not set up game canvas!" return # abort the game
# Ready to play! gfx.clear()
TheclearRectmethod removes any content from the rectangle specified by the argumentsx1,y1,x2, andy2. In our example, we’ve emptied everything by clearing from the point0, 0(top left) to the point atwidthandheightof the canvas (bottom right). In a game, this method is often called before each frame to erase the last frame’s content. This is a bit unnecessary if you’re going to fill theentirescreen anyway; for example, if you’re drawing a tiled map. However, be aware that trans-parent images can still cause issues. When in doubt, it’s best to clear each frame and then optimize as your performance needs dictate.
Drawing Primitives
To draw shapes on the screen, we need to define the style properties of ourcontext
and then call the method that draws it. Generally, shapes can be either stroked (drawn as an outline) or filled (colored in), and the styles must be defined separately for either. While we won’t be using this code in the upcoming sections, feel free to experiment by appending it to the end of yourgame.coffeefile. (Make sure to delete it or comment it out when you’re done experimenting.) Here’s an example of filling and then stroking a rectangle:
chapter02/src/game.coffee (excerpt)
c = gfx.ctx
Context Is Important
Youalwaysneed a context to draw in, and for our game that context is always going to begfx.ctx. Because we sometimes need to perform a lot of operations on the context, we’ll often aliasgfx.ctxtoc, just to keep the code shorter.
And that’s all there is to it if your end goal is to make an orange rectangle with a dark-gray border!
ThefillRectandstrokeRectmethods both accept four parameters: thexandy
coordinates of the top-left corner of the rectangle, and the width and height of the rectangle. Although our rectangle looks like a single item, it actually requires two separate drawing operations; we just happen to use the same parameter values for each.
For our game, we’ll certainly have to draw some text. Just like the rectangle, we specify some styles, then fill or stroke the text:
chapter02/src/game.coffee (excerpt)
c.fillStyle = "#202020" c.font = "14pt monospace"
c.fillText "Professor Digman-Rünner", 30, 55
Aaaand … Figure 2.4 reveals our title screen! ThefillTextmethod takes a string to draw, and an (x, y) coordinate from which to start drawing.
Figure 2.4. Basic title screen
is very consistent and these basics scale well. Head over to the spec and find out more!4
Draw an Image
We have no intention of creating our graphics out of squares and circles—that’s too much work. We want our pixel artist to hand us a bunch of amazing graphics and we’ll render them instead. Though, with our pixel artist still missing in action, we have our blocky professor and ninjas to tide us over.
Our game is going to be tile-based: which means the background will be a grid composed of a handful of tiles rather than one great big image. We’ll create all our levels out of these tiles. We’ve chosen (rather randomly) 24×24 pixel tiles. Historic-ally, the size of tiles has been constrained to powers of two to fit in the smallest number of machine bytes; however, we have no limitations on the desktop, so you can choose whatever you like. 24×24 and 32×32 are still very common for pixel-art games, though.
We’ve created some tiles—the ground block and a ladder—as well as some character images. On-screen character images in 2D video games are calledsprites. When we push all our art together in a fixed-size grid, as we have done, we call it asprite sheet. In our game, we draw the correct subsection of the sprite sheet to the screen for each tile and character. It’s a very handy way to keep all our assets together, as well as reduce our game’s loading time.
To put our image on canvas, we need an image source to draw. You might be hoping to simply reference our PNG file by providing the URL as a string, but, unfortunately, canvas doesn’t work that way. The source must be either a DOM image or another canvas object. This means we have to take care of loading the image manually and making sure it has loaded before we try to draw it.
The most common approach to resource loading is to dynamically create an image, and hook into itsloadevent. If you have a bunch of images to load, you’ll have to be a bit cleverer, or consider using a dedicated resource loader. In this case, we’ll just save our image to ourgfxobject and provide a callback that runs when our image is loaded:
4
chapter02/src/gfx.coffee (excerpt)
load: (onload) ->
@sprites = new Image()
@sprites.src = "resources/sprites.png" @sprites.onload = -> onload()
When we callload, we provide a function once our image is ready. This will be where we start running the game and perform other initialization work; for now, let’s just start drawing directly inside the callback. Underneath our context check, add the following call:
chapter02/src/game.coffee (excerpt)
init: -> ⋮
gfx.load -> c = gfx.ctx
c.drawImage gfx.sprites, 10, 20
ThedrawImagefunction takes the image we want to draw, and anxandyscreen position. Our example draws the s